Still Life 2
Paloma (A Few Minutes Earlier)
Note: It’s funny because, even though we just
got a New Objective, we cannot check it during the sequence that follows, when
it really counts. If you are curious to know, however, and as you can
later check for yourself, the objective was to "Remove the chains to
escape."
The Countdown clock is running, but don’t worry. As usual, we have more
than enough time to beat the clock. Here is the situation. Paloma
is bound to the chair by a chain around her waist, and the chain apparently has
a lock on it. The Key to that lock is on the small table (on your
left) that was shown in the cutscene we just saw. If you try to go and
pick up that Key now, however, Paloma will approach it only to tell you that
she can’t reach the Key because her hands are tied. You must therefore first
free her hands by using the Circular Saw on your right. But Watch
Out for the Wood Chips on the floor around the left part of the Saw
Table. If Paloma moves into that rubble, she will not be able to go
directly towards the Saw. You would have to bring her down and then try
to go to the Saw again, losing some time in this struggle. Here is the
quickest way to get through this rather short sequence.
Move Paloma towards the right in a straight line, stopping just under
the Saw; and then, move her up towards the Saw in a straight line again.
[See the path marked by the Red Line in the picture below.]
Don’t click on the white icon that appears on the Saw because that means
you are still too far away from the Saw to use it. Click on the gear
icon when it appears on the Saw. A cutscene will follow.
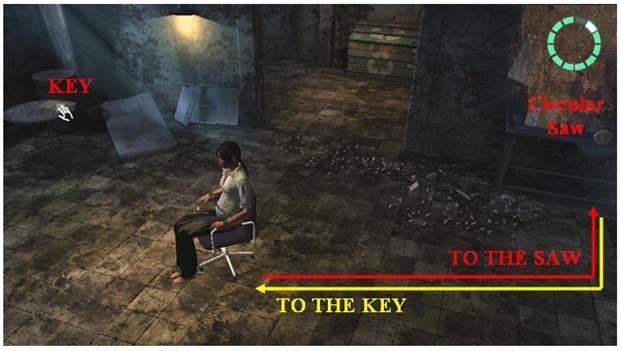
Click on the white icon on the Box left of the Saw, to hear
Paloma’s comment. Go back down on the screen in a straight line,
and then to your left, also in a straight line. [See the path marked
by the Yellow Line in the above picture.] You don’t have to
actually reach the Table on your left to pick up the Key. Click on
the hand icon on the Key as soon as you see it, and Paloma will do the
rest. A cutscene will follow, switching the story back to Victoria’s
point-of-view. [But note: you will not see any caption (like the one I
have used below) when the story changes the point-of-view this time.]
Killer’s House (Victoria:
2008)
The Countdown Clock is running but, again, don’t worry. We have more than
enough time to beat the clock. Check out your New Objective. We
really need to open that Blue Door in the Upstairs Corridor now. The
cutscene has already put you in a close up on the Computer Table. So just
click on the Keyboard, and proceed as follows.
·
Cameras System.
·
Group 4 Cameras. A cutscene will
follow. Victoria will read the Reference Number for the Upstairs Blue
Door (from the reflection of the wall plate on to the Tank below that
plate): D090746. The cutscene brought you out of the
computer system. So click on the Keyboard, and continue as follows.
·
Access Control.
·
Upper Door (locked). Note that the computer gives
you a choice of two passwords that begin with the above Reference Number
but end with two additional characters: one with "B2" and the other
with "C7." If you try each choice, one by one, you will find
that the correct Reference Number = D090746B2. So, click on this choice.
A cutscene will follow, switching
the story back to Paloma’s point-of-view.
Paloma (A Few Minutes Earlier)
The Countdown Clock is running but, once again, don’t worry. We have more
than enough time to beat the clock. Check out your New Objective.
Click on the Door to hear Paloma’s comment. Click on the Pipes
against the wall, right of the Door, to hear another comment. Click in
the lower-left corner of your screen to approach the large Blue Cupboard
by the door with the Red Bulb above it. Open the Cupboard. Click on
the Jacket hanging in the middle of the Cupboard, to hear Paloma’s
comment. Pick up the METALLIC SHELF above that Jacket.
Step out of the close up on the Cupboard. You don’t need to even go back
to the Door on your right that we are trying to barricade. Bring
out the METALIC SHELF from your inventory, and just click on the tool
icon on that Door.
The clock will stop. A dialog will follow. You will then get a
short cutscene. Check out your New Objective. Feel free to go
around the room and click on anything that has an icon on it. More
importantly, however, go to and close up on the Computer Table.
You can try to use the Computer, if you like. Just click on the Processor
to turn the Computer on; and then, click on the Keyboard. But Paloma
doesn’t know the password, of course.
Click on the Telephone, to hear Paloma’s comment. Pick up the
Telephone. A dialog will follow. You will then get a cutscene,
switching the story back to Victoria’s point-of-view. [But note again:
you will not see a caption (like the one I have given below), when the story
switches the point-of-view this time.]
Killer’s House (Victoria:
2008)
Check out your New Objective. We have to find Hawker and Paloma.
You should be already in a close up on the Computer. So click on the
Keyboard; go to Cameras System; and check out all the camera groups, one
by one, to see Karson’s body outside the Computer Room, the disarray by the
Blue Door at the Workshop, but no sign of Hawker or Paloma.
Close the Computer, and step out of the close up on it. Go to the
Upstairs Corridor, and click on the white icon now on the stairs leading
to the Blue Door; but Victoria will decline to go through the flames coming out
of the pipes on either side of that Corridor.
Go back downstairs. Use the Hatch in the Eastern part of the Shelter to
go out into the Backyard. Go towards the Back Porch. You will be
stopped by a call from Hawker, but the line is cut off. Feel free to call
him back, but there is no answer.
Proceed towards the Back Porch. Feel free to click on the white
icons on the three objects (the Archery Target and the two Grates) that you had
placed on the ground in front of the Back Porch Stairs, to learn that those
mines have been disarmed.
Go inside the house through the Back door, step out in the Main Hallway, and go
through the Cellar Door. Go left on the landing to enter the Workshop.
The Workshop
Move further down in the room, to learn about the Strange Odor. Go
to the other end of this Dumpster Area, to see the blue hand icon
on the floor under the Window. Collect the clue by using the ELECTRONIC
NOSE; and then, analyze it.
Enter the Workshop Area on your left. Go to the Circular Saw
Table, on your right. Pick up the SOLDERING IRON from the left
of that Table. Use the WRENCH on the tool icon on the
Furnace on your right, to loosen the wheel. Pick up the FURNACE WHEEL.
Go to the Blue door on your right. Click on the white icon on the Electronic
Lock on the wall left of that door, to get a close up of the Lock and hear
Victoria’s comment. [Note that the Keypad on the lock is
missing.] Step out of the close up, and go through the Blue Door to
arrive in the Upstairs Corridor.
The Valve
Go down the stairs. Close up on the Red-&-Black-Striped Valve Box
on the wall on your right. Attach the FURNACE WHEEL to the
Box. Click on the gear icon on that Wheel, to turn off the flames
coming from the pipes on either side of the Corridor.
Step out of the close up on the Valve, and return to the Workshop. But we
are done here, for now. So step out of the Workshop, go through the Blue
Door, to arrive at the landing where Karson’s Body still lies slumped on
the floor outside the Computer Room.
Karson’s Body: Discovery
Close up on Karson’s Body. [You will have to click twice on the
magnifying-glass icon before you will get the close up.] Victoria will
comment. Pick up the Red ELECTRONIC KEY from the floor on your
left. Click on the Gun at the bottom of the screen, to hear
another comment and receive a New Objective.
Click on the blue icon on the Bullet in the wall on your left, to
hear yet another comment. Use the SAMPLING TONGS from your Kit to
collect the clue. Analyze the clue by running the Chemical Analysis and
then, the Database Analysis.
As you finish the above analyses, note the Message in Green at the bottom
of the screen, to learn that two Ballistic Profiles of Bullets have been
saved, and that you can compare them by using a new Database Analysis. So
run another Database Analysis on the clue you just analyzed, to hear Victoria’s
comment and receive another New Objective.
Call Hawker.
Note: If you have difficulty scrolling down to
Hawker’s number in the cell phone, step out of the close up on Karson. As
I have noticed, if you step out of this close up at this point, sometimes
Victoria will get a call from Hawker automatically. The conversation
proceeds, however, as if she had called him after all.
Exhaust the conversation, but Beware! The conversation ends as
soon as you bring up the topic of the "Gun Bullet." So
save that topic for last, if you would also like to discuss the other
topics. [At the end of the conversation, you will get another New
Objective notification. But, if you check your objectives, you will find
that there is really no "new" objective.]
Step out of the close up on Karson, if you haven’t done so already, and go into
the Computer Room.
The Computer Room
Go to the Computer Table, and close up on it. Click on the Telephone,
to learn that the line is jammed again. Click on the Keyboard and then,
on User: Truth. But the password has been changed again,
and we don’t know the new one yet.
Step out of the close up on the Computer Table. Click on the Piece of
Paper in the Printer, in the lower-right corner of your screen, and
Victoria will read the message written on that paper: "The Truth is
behind the Mask."
Go and open the large Blue Cupboard by the door with the red bulb above
it. Click on the Mask, right of the Jacket, and Victoria will tell
us that the word "Betrayal" is written on the back of that
Mask.
Go back to the Computer Table, and close up on it. Click on the
Keyboard. Click on User: Truth. When the Computer
asks for a password, click on BETRAYAL. A cutscene and
then, a phone conversation will follow. Exhaust the conversation. A
cutscene and a comment will follow. You will also get a New Objective.
Note: If you check, you will find that the
Door with the Red Bulb above it is locked. You can unlock it by using
Karson’s Red ELECTRONIC KEY on the Electronic Lock left of that
door. Feel free to go through that door and check out all the rooms in
that part of the Basement. But, if you have already explored that area
earlier when I suggested doing so in this walkthrough, you will not find
anything new there. I suppose we got the Red Key at this time to give us
a chance to check out that area, if we had not already done so. Then
again, maybe this was an opportunity to retrieve something that we might have
previously put in the Storage down in the Cell.
We need to go to the Shelter. The Hatch in the Backyard is closed, and
cannot be opened from the Computer in the Computer Room. We must
therefore go to the Workshop, and use the Blue Door there to get into the
Shelter. So go to the Workshop. A cutscene will be followed by a
dialog that will be followed by yet another cutscene that will take you back to
2005.
Chicago (Victoria: 2005)
Victoria comments. Check out your New Objective. The Countdown
Clock is running, but don’t worry. We have a little less time than we
usually do, but it will be more than enough if you proceed as follows.
Click on the white icon on your right, to learn that you cannot go in
that direction. Close up on the Wash Basin on your left.
Click on the tool icon, to hear Victoria’s comment. Use the KILLER’S
CAPE on the tool icon, to get a WET CAPE.
Click at the bottom-center of the screen to approach the stairs. Pick up
the HOOK from the floor at the bottom of the screen. Pick up the CHAIN
from the floor on your left.
We need to get the gray Pole leaning against the left of the Orange
Drum on your left. Click on the hand icon on the Pole to try
to pick it up, but the flames are in the way. So put the WET CAPE
on the Orange Drum, to subdue the flames. Pick up the POLE.
Go to the right of the Wash Basin. Try to get as far as you can in the
corner of the room left of the Bench. If you go far enough,
you will get an aerial view of the Beam and the Window overlooking that
Bench.
Click on the white icon on the Beam on your left, to hear
Victoria’s comment. Click on the Window on your right, to hear
another comment. Use the POLE to open that Window, and hear
Victoria’s comment.
Combine the HOOK with the CHAIN, and use the resulting GRAPPLE
on the Beam on your left. A cutscene will follow, taking you back to
2008.
Killer’s House (Victoria:
2008)
Check out your New Objectives. The Countdown Clock is running, but don’t
worry. We have plenty of time to beat that clock.
Click at the Bottom-Center of the screen to approach the Orange Still in
that corner of the room. Click on the white icon on the Keypad
on that Still, to learn that it is the Fuse Box controlling the release
of the toxic fumes. Pick up the KEYPAD BOX.
We have stopped the release of the fumes, but we still need to ventilate the
room to get rid of the fumes already released. So click on the Lever
on the wall, right of the Still, to see the two Windows open above that
Lever. [Note: You will have to wait a little while for the gear
icon to appear on that Lever.]
Go to the Storage Area (right of the Furnace), on your left. Click
on the Lever on the wall right of the Furnace, to see the two Windows
open above that Lever also. The Countdown Clock will stop.
Step out of the Storage Area. Close up on the orange Gas Cylinder
left of the Furnace. Click on the gear icon on the Cylinder
Valve, to turn off the flames in the entryway on your left.
Step out of the close up on the Cylinder. Go to the Blue Door on your
right. Click on that Door, to learn that it is locked again. Click
on the top-center of the Tank right of the Blue Door. Victoria
will read the Reference Number for the Blue Door: D090746,
reminding us of the first time we had seen it. [But recall that we had to
add B2 at the end of this Number when we unlocked the Blue Door
at that time.]
Click on the Electronic Lock left of the Blue Door, to get a close up of
that Lock and hear Victoria’s comment. Put the KEYPAD BOX in the
Lock, to get a close up of the Keypad itself. Click in the complete
Reference Number on that Keypad: DO90746B2; and then, click on OK, to hear the Door unlock.
Step out of the close up on the Lock. Go through the Blue Door, and down
to the Control Room.
The Control Room
Close up on the Computer Table. Click on the Keyboard. We have to
try to find Hawker and/or Paloma. So click on Cameras System.
Feel free to check all the Camera Groups, one by one; but you will get results
only when you click on Group C Cameras. A cutscene and a comment
will follow.
We need to go to the Kitchen. But we still cannot use the Hatch in the
Eastern part of the Shelter to get out into the Backyard and go into the house
that way. Feel free to try it! Click on Access Control, to
see that both the East and West Hatch openings are
"unavailable." In other words, we cannot open those Hatches
from the computer. Feel free to try to open those Hatches manually, of
course. Just go to the Hatch in this room, close up on the Switch left of
the Ladder, and click on the gear icon. But the Switch won’t
work. Go to the Hatch in the Eastern part of the Shelter, and try the
Switch left of the Ladder under that Hatch, to learn that it doesn’t work
either. In short, you need to use the Upstairs Corridor to go back into
the House.
We need to make some room in our inventory. So use the Storage Cabinet
in the Side Corridor of the Eastern part of the Shelter to put away your FIRST-AID
KIT. Use the door right of the Storage Cabinet to return to the
Western Part of the Shelter. Go to the Upstairs Corridor, through the
Workshop, and up to the Main Hallway on the First Floor. Click on the
Target icon on the Kitchen door to enter that room.
The Kitchen
A cutscene and a comment will follow. Approach the Kitchen Sink on
your left. Click on the Counter right of the Sink, to hear
Victoria’s comment. Pick up the DETONATOR, to get another pick-up
icon in the same spot. Pick up the C-4 BARS.
We are done in the Kitchen. Feel free to go out into the Backyard to see
if you can now use the Hatch there, since Hawker seems to have fled in that
direction. But you will find that the Hatch is still closed. So use
the Blue Door in the Workshop again to return to the Western part of the
Shelter. Go down to the Corridor on the First Floor in that section of
the Shelter.
Downstairs Corridor
Click on the Blue Door, right of the Control Room door, to hear a new
comment. Note that a tool icon has appeared on the door after the
comment. Close up on the Electronic Lock left of the door, to hear
Victoria’s comment and see a tool icon now on that lock as well.
Feel free to try the Red or the Green Electronic Key from your
inventory, but neither will work on that lock. So step out of the close
up on the lock, and proceed as follows.
Combine the DETONATOR with the C-4 BARS, to make a BOMB WITH
C-4. Use this Bomb on the Blue Door. Victoria will put it down
against the door. Combine the SOLDERING IRON and the ELECTRIC
EXTENSION CORD, and attach this combination to the Bomb you just put in
front of the door.
Go to the Electrical Outlet in the wall left of the Control Room
door. Click on the end of the Electrical Cord lying under that
outlet, to plug it into the outlet. A cutscene follows. Go back to
where the Blue Door once stood, and enter what I will call the "Glass
Room."
The Glass Room
A cutscene and a dialog will follow. Check out your New Objective.
You can click on the Talk icon on the Glass Partition on your left, but
Paloma can’t hear you because the glass is sound-proof. The only way to
talk to Paloma is by clicking on the Intercom on your right. But
there is nothing further to discuss with her.
Don’t try to go through the Gray Rusty Door right of the
Intercom, just yet. We need to assess the situation on the other side
before we go there. So close up on the Computer Table right of
that Door. Click on the Monitor ("Console"), to hear
Victoria’s comment. Attach the COMPUTER KEYBOARD from your
inventory to that Console. Click on the Keyboard to connect with
the cameras system.
Note that the names of, and the areas covered by, the Camera Groups on
this computer are identical to those you found on the Control Room computer,
except for an additional Camera Group on this computer: Group E Cameras.
Click on this Camera Group, to get a cutscene and a comment.
Click on the white icon on the Red-&-Gray Object in the
lower-right corner of your screen, to hear Victoria’s comment. Pick up
the ELECTRONIC TRACKING DEVICE.
Click on the Keyboard, and check out Group E Cameras again to get a more
detailed view of the room on the other side of the Gray Rusty Door on your
left.
Step out of the close up on the Computer Table. Feel free to check out
the Cupboard (the Storage) on your right, but we don’t need to put away
anything just yet.
Click on the Target icon on the Gray Rusty Door left of the Computer Table, to
enter what I will call the Warehouse (because of all the Tanks that seem to be
stored there).
Warehouse: The Confrontation
The following sequence is actually quite easy. It is also not
timed! The only catch you have to watch out for is that every time you
approach the aisle in the middle of the room, the camera will automatically
turn you around to face the front of the room, where Hawker is lying in
wait. You don’t want to go there, at least not through the middle
aisle. So remember to turn right or left to get back on track. The
following diagram gives an overview of what you need to do. Step-by-step
instructions follow the diagram.
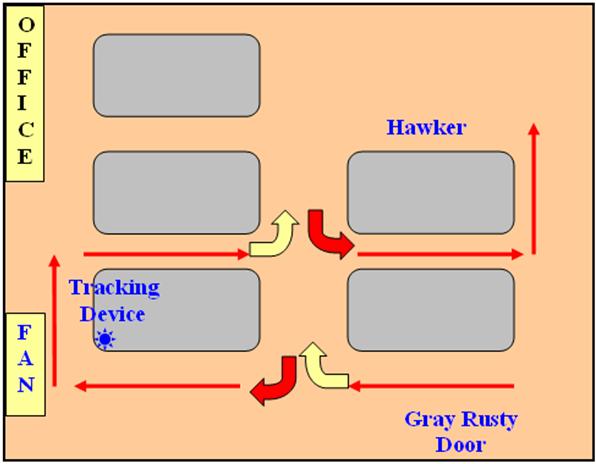
Note: In the above diagram, the
Straight RED Arrows show the direction you must take. The Curved YELLOW
Arrows show the direction in which the camera turns you around when you reach
the aisle in the middle of the room. The Curved RED Arrows show
that you must turn LEFT or RIGHT to get back on track.
Step-by-Step
Instructions
- Click on the Target icon to step towards the large Fan
against the wall in front of you. - A cutscene follows, turning you around to face the front of the
room. So turn LEFT, to face the Fan again. - Click on the Target icon to reach the Fan.
- A cutscene focuses you on the Fan itself. Click on the Switch
on the wall left of the Fan, to turn up the Fan speed and hear Victoria’s
comment. - Click on the Target icon to go right, around that corner.
- Apply the ELECTRONIC TRACKING DEVICE to the tool icon
on the Tank in the lower- right corner of your screen. - Click on the Target icon to step forward, past the Fan.
- Turn RIGHT.
- Click on the Target icon to reach the aisle in the middle of the
room. - A cutscene follows, turning you around to face the front of the
room again. So turn RIGHT to get back to your original
direction. - Click on the Target icon to cross the aisle in the middle of the
room. - Click on the Target icon to approach Hawker from the right side of
the room.
* * * * * * * * * * * *
A cutscene follows. Victoria will comment.
Check out your New Objective.
Pick up the DAMAGED PDA from your left,
to hear Victoria’s comment. Pick up Hawker’s Loaded Gun from his
right hand, to hear another comment. Close up on Hawker’s Body, to
hear yet another comment. Pick up the Blue HAWKER’S ELECTRONIC KEY
from the floor, just right of Hawker’s body.
Step out of the close up on Hawker. We need to make some room in our
inventory. So click on the footprint icon on the middle aisle, in
the center of the screen, to approach the Gray Rusty Door you had used to enter
this room. Go through that door to return to the Glass Room. Use
the Storage Cupboard on your right to put away the Green and Red Electronic
Keys, the WRENCH, and the POCKET KNIFE.
Go back into the Warehouse. Click on the footprint icon right of
Victoria to return to Hawker’s Body. Click on the footprint icon
on your right, to enter what I call the Office.
The Office
Pick up the CONNECTING CABLE and HAWKER’S PICK GUN from the Desk
in front of you.
Close up on the Bulletin Board
on the wall above the Desk. Click on the Gray Sheet of Paper on
your left, to get a New Document notification. You will automatically get
a close up of the contents of this Document, and hear Victoria’s comment.
[If you would like to refer to this Document later, it has been stored as the
"Check-list drawn up by Hawker" in the Documents folder of
your cell phone.]
Step out of the close up on the Document. Click on the Photograph
in the lower-left portion of the Bulletin Board, to hear Victoria’s comment.
Step out of the close up on the Bulletin Board. Click on the Center
Drawer of the Desk, to learn that it is locked. You can’t use
Hawker’s pick gun because, even though we are never actually told, it is not
functional just now. So use your own Pick Gun to open the Drawer and get
a close up of its contents. Pick up the METAL CUTTER from your
right. Click on the Torn Photograph of Victoria on your left, to
hear Victoria’s comment.
Step out of the close up on the Drawer. Click at the bottom of your
screen to approach the Bed on the other side of this room. Open
the Black Tool Box under the Bed. Pick up the ELECTRIC WIRE
COIL, COPPER STRIP, SET OF ALLIGATOR CLIPS, and ISOLATED
CUTTING PLIERS. [Note: You might have to rearrange the
items in your inventory to fit all of the above items.] Step out of the
close up on the Tool Box.
* * * * * * * * * * * *
We are done in this room. So
go back out in the Warehouse. Click on the footprint icon at the
bottom of the screen, to find yourself in front of the Blue Door left of the
Fan. As you might guess, Paloma is on the other side of this door.
But we are not ready to go in just yet. So use the Rusty Gray Door on
your left to return to the computer side of the Glass Room. Step
out into the Corridor, and enter the Control Room on your left.
Control Room: The
Damaged PDA
Close up on the Processor Table on your left. Click on the Processor
on your right, to hear Victoria’s comment. Combine the DAMAGED PDA
and the CONNECTING CABLE, and attach the resulting combination to the
Processor. Victoria will comment.
Step out of the close up on the Processor Table. Refer to the Document
"Check-list drawn up by Hawker" in the Documents folder of
your cell phone. Note the Heading at the top of the page: "Checklist
Nemesis." Close up on the Computer Table, click on the
Keyboard, and proceed as follows.
- PDA Data. The computer will ask for a password.
- NEMESIS. Access is granted!
- Nemesis File. [Note the alpha-numeric code under the word "Nemesis"
at the top of the page: A: A64571. This code will come in handy later.]
Read the rest of the Document.
Close the computer, and step out of the close up on the Computer Table.
* * * * * * * * * * * *
We are now ready to help
Paloma. So step out of the Control Room, and go through the Glass Room
back into the Warehouse.
Approach the Blue Door on
your left. Click on the white icon on the door, to learn that it
is locked (of course). Unlock the door using the Blue HAWKER’S
ELECTRONIC KEY on the Electronic Lock left of the door.
Note: I would suggest that you SAVE your
game before going through this Blue door, for reasons explained in the
Yellow Textbox below.
Go through the Blue Door to arrive
at Paloma‘s side of the Glass Room.
Glass Room: Saving Paloma
A cutscene and a dialog will follow. Paloma will comment, and the
Countdown clock begins to run. But don’t worry. You have more than
enough time to beat the clock if you have collected all the items from the
Office that I indicated in this walkthrough.
Note: There are actually two solutions to this puzzle, as
described below. If you saved your game before entering this room, as I
suggested, you can use that Save to check out each of the following solutions.
Solution 1
- Click in the lower-left corner
of your screen to go to the black Countdown Clock behind
Paloma. Click on that Clock, to hear Victoria’s comment.
- Click on the magnifying-glass
icon on Paloma‘s right side, to get a close up of the four Shackles
binding her wrists and ankles.
- Click on the tool icon
on one of these Shackles, to hear Victoria’s comment.
- Open the Inventory Menu.
[Remember: The Timer STOPS when you are in this Menu. So
don’t worry about how long it takes to do the following work in the
Inventory.]
- Combine the ISOLATED CUTTING
PLIERS with the ELECTRIC WIRE COIL, to make a PIECE OF
ELECTRIC WIRE.
- REPEAT this procedure 3 more
times to make a total of 4 such Pieces of Electric
Wire, thus using up the entire Coil.
Note: You will have sufficient room in your
inventory for these 4 pieces if you had stored the items I suggested, in the
Glass Room’s Storage cabinet. But don’t worry even if you didn’t.
Just "combine" each new Piece of Wire that you make with the one you
made before. In fact, you will not be really "combining," but
only adding the new one to the one(s) before, thus collecting all
those Wires in a single Inventory space (as indicated by the changing numbers
in the upper-left corner of the Inventory space).
- Combine a PIECE OF ELECTRIC
WIRE with the SET OF ALLIGATOR CLIPS, to make an ELECTRIC
WIRE WITH PLIERS.
- REPEAT this procedure 3 more times to make a total of 4 such Electric Wires with
Pliers, thus using up your entire Set of Alligator Clips.
- Step out of the Inventory
Menu.
- Attach, one by one, each ELECTRIC
WIRE WITH PLIERS to one of the four Shackles binding Paloma’s
wrists and ankles.
- Unlock these four Shackles, one
by one, by using either your Pick Gun OR Hawker’s Pick Gun (after
you have fixed it by combining it with the COPPER STRIP).
* * * * * * * * * * * *
Solution 2
- Click in the lower-left corner
of your screen to go to the black Countdown Clock behind
Paloma. Click on that Clock, to hear Victoria’s comment.
- Click at the bottom-center of
your screen to approach the Metal Box on the floor, against the
wall left of the wall with the black Countdown Clock.
- Close up on that Metal Box,
to hear Victoria’s comment.
- Step out of the close up on the
Box, and click on the Target icon now on that Box. A cutscene
will follow, taking you back into a close up on the Metal Box.
- Click on the Electric Dimmer
on your left, to hear Victoria’s comment.
- Click on the Metal Cover
on your right, to learn about the Foam Insulation in it.
- Use the METAL CUTTER on
the Cover, to cut out the Insulation inside.
- Pick up the FOAM INSULATION.
- Bring the FOAM INSULATION
out of your Inventory, and attach it to the Electric Dimmer on your
left. Victoria will comment.
- Step out of the close up on the
Dimmer, and click on the magnifying-glass icon on Paloma‘s left
side, to get a close up of the four Shackles binding her wrists and
ankles.
- Click on the tool icon
on one of those Shackles, to hear Victoria’s comment.
- Unlock the four Shackles,
one by one, using either your Pick Gun OR Hawker’s Pick Gun (after
you have fixed it by combining it with the COPPER STRIP).
* * * * * * * * * * * *
A cutscene, a dialog, and then another cutscene will follow. The
Countdown Clock has begun to run again. At this point, you might be
inclined to agree with Paloma: "Oh, my God, will this never end?"
Don’t worry. This is the last puzzle; and, as usual, you have plenty of
time to beat that clock. What’s more, you also get an Auto-save this
time!
Check out your New Objective. We must find and defuse a bomb. Click
at the bottom-center of the screen, to approach the Electric Box on the
wall left of the Blue Door. Open this Box, to hear Victoria’s
comment. Pick up HAWKER’S KEYPAD BOX.
Step out of the close up on the Electric Box. Go to the Warehouse through
the Blue Door on your right.
Warehouse: Defusing the Bomb
You might be wondering about the
three Metal Cabinets you saw earlier, against the wall on your right in the
front part of the room where Hawker’s body lay on the floor. Don’t waste
your time on them. The bomb is in the Metal Cabinet right here, to
the right of the Blue Door that you just used to return to the Warehouse.
Click on the gear icon on this Metal Cabinet, to learn that the
Cabinet is locked. Click on the tool icon on the Lock Outlet
on the right side of the Cabinet, to hear Victoria’s comment. Put HAWKER’S
KEYPAD BOX in that Outlet, to get a close up of the Keypad.
Recall the alpha-numeric code we noted earlier from the Nemesis File of
the PDA Data we read on the Computer in the Control Room: A64571. Punch this code into the
Keypad; and then, click on OK. A cutscene will follow, as you hear the
door unlock.
Step out of the close up on the
Keypad. Open the Cabinet, to hear Victoria’s comment. Click on the white
icon on each of the following objects, one by one, to hear Victoria’s comment
about that object.
- The large Battery Unit,
at the top of the Cabinet.
- The two tanks filled with Red
& Yellow Fluids, in the middle of the Cabinet.
- The big Brown Tank, at
the bottom of the Cabinet.
Next, click on the Gray Metal Box
between the two tanks filled with Red & Yellow Fluids. Victoria will
comment, the cover will open, and you will get a close up of the panel inside.
- Click on the three Green
Lights in the top-center of the panel, to learn that we have to be careful
not to let them go red. [Actually, it is okay if one or two
of them do go red. You just have to be careful not to let all three
of them go red.]
- Click on the three Yellow
Lights in the bottom-right of the panel, to learn that we need to turn
all of them OFF. Finally,
- Click on the Meter in
the bottom-left of the panel, to hear Victoria’s comment about the 24
Milliamps.
Note: Don’t worry if you are confused by this
comment. The Developers could certainly have come up with something
better. Just know that the object of this puzzle is to cut up the Blue
Wires so that their numbers, as marked on the panel, will add up to 24.
So,
- Use the ISOLATED CUTTING
PLIERS to cut the Blue Wires numbered 7
and 16 in the left column, and 01
in the right column. (See Picture below.)
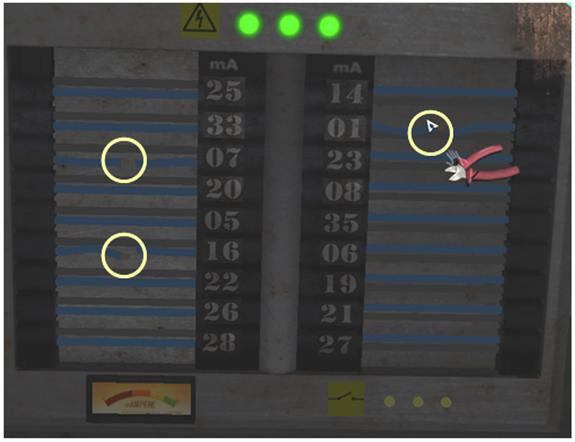
As soon as you cut the last Blue Wire, Paloma will comment and the final
cutscene will follow. So,
Just sit
back and enjoy the ending!
* * * * * * * * * * * *
View this guide raw, exactly as the archive holds it