Still Life 2
Jackman (Victoria: 2008)
After the dialog between Victoria and Garris, three messages will flash in the
upper-left corner of the screen notifying you about a New Document, an unread
message on your phone, and a New Objective. Be sure to check out
especially the document ("The Killer’s Case File") and the
text message (from Claire).
Click on Garris to talk to him again.
Address the topic at the top first, and then the one below it. At the end
of the second topic, the CSIA ("Crime Scene Investigation &
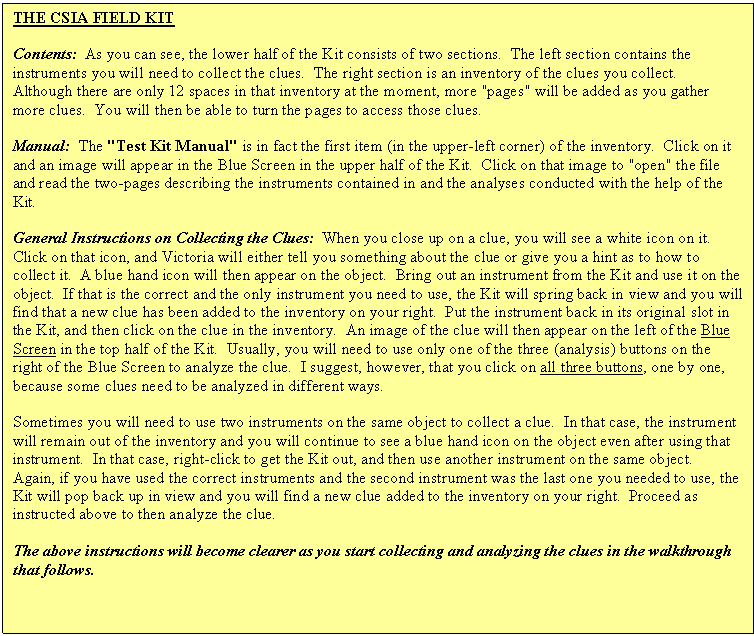
Analysis") Field Kit will automatically pop up in view. See the
Game Manual (in the game DVD) for details about this Kit. The following
text box gives a general description of the contents of the Kit and how to use
it.
Feel free
to talk to Garris again to see what he is doing as you go about your own
work. Click on the papers on the bed to learn about them. Close up
on the side table on the right of the bed, and click on the answering machine
to hear the first message. Victoria will comment, and a phone icon will
appear on the answering machine. Click on that phone icon, and the image
of the CSIA Kit along with the notification "New Document! Data is
ready for transfer to CSIA Kit" will appear in the top-left corner of
the screen. Right-click to bring up the inventory. The CSIA Kit
will be in the center. Note that two phones have appeared on the
screen. The phone in the lower-right portion of the screen is your actual
phone. You can click on that phone to call, or to check messages,
documents, objects, etc. The phone in the upper-left portion of the
screen appears only for the purpose of transferring data to the Kit. Note
the brown outline around it right now. This outline appears only when
there is data to be transferred to the Kit, like the first message that we just
recorded from the answering machine. Click on this phone now to transfer
that message. The clue will appear in your Kit’s inventory area.
Click on that clue, and an image will appear up in the Kit’s Blue Screen.
You can click on the clue on the Blue Screen to hear the message again.
More importantly, however, click on the top "Computer Analysis"
button on the right of the Blue Screen to analyze the clue. The results
of the analysis will also appear on the Kit’s Blue Screen. The figure
"100%" on the image on left shows that you have received all the
information you can get out of this clue. As I mentioned earlier in the
text-box, however, it is a good idea to get in the habit of using, one by one, all
three buttons on the right of the Blue Screen, just to make sure you have
completely analyzed each clue you collect.
The first message on the answering machine was the clue that we needed.
After finishing the analysis on that clue, however, feel free to click on the
answering machine again to hear the second message there as well. Then,
step out of this close up and into the one on the ground to the right of the
bed to hear Victoria’s comment about the BROWN FOOTPRINT (see picture
below) there. Use the 3D SCANNER on the footprint to collect the
clue, and then analyze it. (See the text-box labeled "The CSIA Field
Kit.")
Step out of this close up and into the one on the left side of the bed to hear
Victoria’s comment about the REMOTE CONTROL (see picture above) that
fell under the bed. Use the FINGERPRINT POWDER, and then the 3D
SCANNER, on the remote control to collect the clue; and then, analyze
it. Click on the safe in the top-left, to find that it is empty.
Step out of this close up and click on the lower-left corner of the screen to
go towards the bathroom. Instead of going inside the bathroom, however,
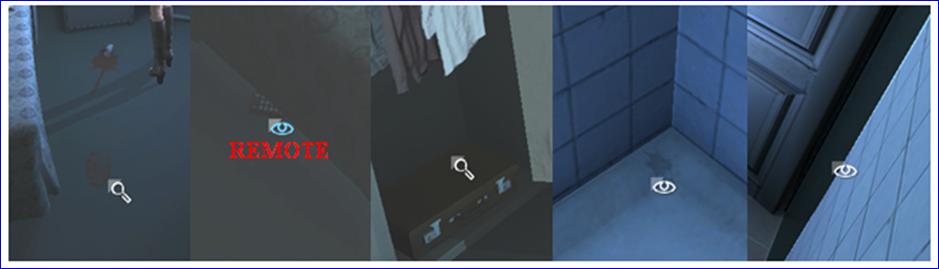
close up first on the closet outside on your left. Click on the "SUITCASE"
at the bottom of the closet (see picture above) to learn that it is
locked. Talk to Garris about it, to receive a PICK GUN WITH BATTERY
& TENSION WRENCH. Go back to the "suitcase," use the
pick gun to open it, and retrieve the MINI-DVD from inside.
Step out of the close up and enter the bathroom. Click on the bullet hole
in the door on your right. Click on the corresponding hole in the tile on
the wall on your left. Click on the VENT in the wall in the
upper-left corner of the screen. Open your inventory, and click on the
CSIA Kit on your right to bring it up in the center of the screen. Use
the ELECTRONIC NOSE on the vent to collect the clue; and then, analyze
it.
Click on the close-up icon at the bottom-center of the screen to see the shower
area. Click on the white icon on the gray spot in the corner of the
shower in the center of the screen (see the set of 5 pictures above) to learn
that there is a DETERGENT RESIDUE there. Use the REVEALER SPRAY
from the Kit to learn that it is a blood stain. Use the SAMPLING SWAB
to collect the clue, and then analyze it. Note: You will
have to run both the "Chemical Analysis" and also the "Database
Analysis" to get 100% information from this clue.
Step out of this close up and click on the white icon on the wall (see the set
of 5 pictures above), which appears actually on the right jamb of the door on
your right, to learn about the CLOTHING FIBERS. Use the SAMPLING
TONGS to collect the clue, and analyze it.
Step out of the close up and go back out to Garris. Click on the broken LAPTOP
on the ground left of Garris’s left foot. Use the COMPUTER KEY to
collect the clue, and then analyze it. Click on the results then to open
and read the Repaired File.
Click on the CAMCORDER lying on the chest-of-drawers, just left of the
television set. You will get a brief close up of it as Victoria comments,
and then will be automatically taken out of the close up as a tool icon will
now appear where you had gotten the white icon before. Bring out the MINI-DVD
from your inventory and click on that tool icon. A series of cutscenes
will follow, switching the story to Paloma once more.
Killer’s House (Paloma: 2008)
The Cell
Note the pulsating red aura around the screen. This means that Paloma is
hurt, but we don’t know what is wrong just yet. Go to the cell phone (the
blinking green dot on the ground a bit left of the door). Try to pick it
up, but Paloma gets hurt by the broken glass around it. Try again, and
you will be able to pick it up this time. A dialog follows, and now we
know just what is wrong with Paloma: she has been poisoned, and we must find an
antidote for her — quickly, because the countdown clock has begun to run in
the upper-right corner of the screen.
NOTE: SAVE YOUR GAME AT THIS
POINT!
Don’t worry about the clock too much though: there is more than enough time to
beat it. Also, feel free to check out your objectives because the clock STOPS any time you open the Inventory Menu
(to check your objectives or something in the actual inventory or to go to the
Main Menu). Click at the lower-right corner of the screen and
go to the First-Aid cabinet on the wall there. Try to open the cabinet,
but it is too high to reach.
NOTE: To avoid any confusion, the HEADBOARD
refers to the end of the bed next to the gray board with the white writing,
while the FOOTBOARD refers to the end of the bed closest to the
First-Aid cabinet. As you will see, you can move the bed only to the left
or to the right, and the gear icon to do this appears only on the Headboard.
So go to the Headboard in the lower-left corner
of the screen, and click on the gear icon on it to move the bed under the
First-Aid cabinet. Click on the cabinet now to open it. Pick up the
BOTTLE FILLED WITH TWO THIRDS (the bottle with the green liquid)
from the bottom shelf. Paloma will tell us that, according to the label,
the bottle is a chemical reactant — "to separate the true from the
false." Pick up the TUBES FILLED WITH LIQUID — WHICH ONE? (a
set of four vials) from the upper shelf. Click on this set and then the
"Separate" icon (to the right of the inventory) to SEPARATE the four
vials in the set. Note that each vial has a different colored cap on it.
THE
PROBLEM: Only one of the four vials
contains the antidote. The other three vials are apparently filled with
poison because Paloma will die instantly (regardless of the time remaining on
the countdown clock) if she drinks from any one of these other vials.
Therefore, the object of the puzzle is to determine which of these four
vials has the antidote. Unfortunately, I cannot tell you which vial
contains the antidote because that is determined randomly by the
computer. So I can only help you figure out the solution yourself.
THE
SOLUTION:
Combine the bottle
with the green liquid with one of the four vials. IF THE VIAL CONTAINS THE ANTIDOTE, THE LIQUID IN IT
WILL TURN BLACK; OTHERWISE, IT WILL TURN WHITE. If the
liquid turns black, right-click to open the Inventory Menu, pick up that vial
from the inventory and click on Paloma’s card (which is left of the inventory)
to have her drink from it. Paloma will tell us that she is feeling
better, and you will hear the Killer’s comment in the background. But if
the liquid in the vial does NOT turn black, combine the bottle with
the green liquid (now called BOTTLE FILLED WITH ONE THIRD) with
another vial. Again, if the liquid in the vial turns black, have Paloma
drink it; otherwise, DON’T or she will die and you will have to start
over.
Unfortunately, there is only enough green
liquid in the bottle to test two vials. After that, the bottle with
the green liquid will disappear from your inventory. But don’t
worry. Even if neither vial you tried turned black, you have at least
eliminated those vials from consideration. Thus, you now have a 50/50
chance of getting the right vial from the two that are left. In other
words, GUESS! Just pick up one of the two untested vials and click
on Paloma’s card left of the inventory. If it is the correct vial, you
will hear Paloma’s comment and then that of the Killer in the background.
Otherwise, you will get a (morbid) cutscene showing her die, and will then be
told to RELOAD your last save to try again. Just remember: the computer randomly
decides which vial will contain the antidote each time you load the game to
retry. So don’t think that if the vial with the red cap, for instance,
would have been the correct vial in the game where you failed, that it would
also be the correct vial the next time you try.
The countdown clock will disappear as soon as Paloma takes the antidote.
Step out of the close up on the First-Aid cabinet and click on the wall poster
left of that cabinet. Click on the gray wall cabinet (the Storage), which
is left of the poster. Put away the unused vials and the bottle with
the green liquid, if any, in that Storage.
Move the bed right to its original location. A short cutscene will show a
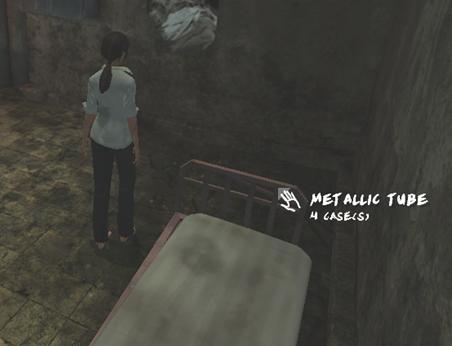
couple of pipes lying on the ground left of the bed. Go to that area and
pick up the METALLIC TUBE. (See picture below.)
Move the bed left under the First-Aid cabinet again. Go to and click on
the grating that was under the bed on your right. Paloma will
exclaim. Use the METALLIC TUBE to pry open the grating. A
short cutscene will show a bunch of rats gnawing at a severed hand holding a
key. (Ugh…) You can try to pick up that key, but Paloma will
refuse to stick her hand in that "rat-infested hole" (of course!)
Click on the surveillance camera in the corner of the ceiling up on your
right. Close up on the gray board on your right. Paloma will
comment. Note the number written on that board: 2324. Step out of this close up
and close up next on the little mirror above the wash basin on your
right. You will automatically get yet another close up. Click on
the white icon. Paloma will comment, and a tool icon will appear on the
four holes at the bottom of the screen. But we don’t have the tool we
need to use here. So step out of this close up and click on the tool icon
under the mirror to learn that the tap is working (should we need to get
some water later).
Click on the first locker on your right, but it is locked. Close up on
the ground in the lower-right corner of the screen. Paloma tells us about
the broken glass. Put your cell phone in the storage, to make room in the
inventory for the mattress on the bed. Then, go and pick up the MATTRESS
and put it on the broken glass.
Note the two boxes on the shelf on the wall in front of Paloma. Click on
the box on the left to learn that it is a Fuse Box and that its cable runs
through the wall. Close up on the box on the right. Pick up the HEXAGONAL
KEY. Click on the Memory Card, to get a notification of a new
document in the upper-left portion of the screen. Open the Inventory Menu,
and click on the Voice Recorder on your left to bring it to the center of the
screen. Click on the orange button ("Documents") at the
center-left of the Recorder to see the three documents you now have.
Click on the top round image on the left to listen to the first
recording. You will be brought out of the Inventory Menu automatically as
Paloma comments. Open the Inventory Menu again and listen to the other
two recordings.
Now go to the locker on your left, and use the HEXAGONAL KEY to open
it. Pick up the DRY POWDER EXTINGUISHER. Go to your left,
and use the Extinguisher on that "rat-infested hole" in the
ground. Pick up the KEY. Feel free to click on the hole
again to hear a new comment by Paloma.
Go to the door by the mattress. Click on
the camera in the corner of the ceiling up on your right. Then click on
the gear icon on the door to learn that it is locked. But now
click on the tool icon on the latch (just above the door handle) to
learn that it is not very strong. You can use either the KEY (to
unlock) or the Extinguisher (to just break open) on the latch to open the
door. Enter the room on the other side.
The Electric-Chair Room
A dialog follows. Exhaust all topics of
the conversation. Check out your new objective. Click on the gray
box with the High Voltage sign on your right to hear Paloma’s comment. If
you click on it again, Paloma will receive a (harmless) electric shock.
Go back to the Cell, and click on the tool icon on the fuse box left of the door.
Use the Extinguisher on that fuse box to short-circuit it. Return to the
Electric-Chair room and click on the "Electrical Cupboard" now to
open it. Click inside the cupboard, but it is too dark to see anything in
there.
Step out of the close up. Click on the gear icon on the door on
your left (the one you had used to enter this room) to close the door and get
an automatic close up of the two-button switch behind it. If the door is
already closed, however, just close up on that switch (on the wall, left of the
door). Click on that switch to press the green button with the vertical
line on it. Go to and open the electrical cupboard to see a bulb now lit
inside. Pick up the IRON THREAD lying at the bottom of the
cupboard.
Go back to the Cell, approach the wash basin, and close up on the mirror above
the tap. Once again, you will get a further close-up automatically.
Use the IRON THREAD to click in the numbers (2324) we had
noted earlier (from the gray board on your left), as follows: moving from left to right, click TWICE
on the first hole, THREE TIMES on the second hole, TWICE
again on the third hole, and FOUR TIMES on the last hole. A
cutscene will follow showing Paloma throwing away the collar.
Return to the Electric-Chair room. Note that there are six doors in the
room in addition to the one you had used to enter this room. Feel free to
click on these doors to find that they are all locked. Click on the
electric chair in the center of the room to get a new objective and also to get
a gear icon now on the chair. Click on this icon once, to get Paloma to
slide the chair in place. Click on it again, to get her to sit in the
chair.
Click on the LEVER on your right (see Picture
A below) to turn the chair left to face one of the six locked
doors in the room. The light above that door will go on, illuminating a
name and a number on the door. Click on the white icon on that writing,
and Paloma will read that name and number. Click on the lever again to
turn to the next door. Feel free to click on the white icon on that door
to get Paloma to read the name and number there as well. Repeat this
procedure until your reach the fifth door, which carries Paloma’s own
first name and the number 129. Click on the white icon on
that door to hear Paloma’s comment. [Note: Feel free to turn
the chair to the last room, and read the name and number there as well.
But you will need to go through all the other doors again to return to what we
might call Paloma’s door, if you would like to see the number on that door
again.]
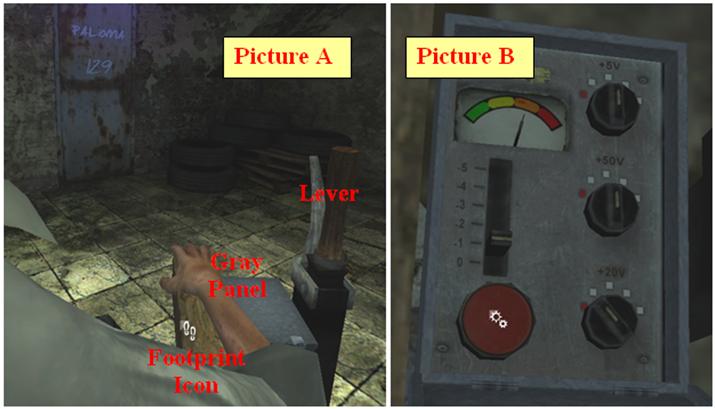
Click on the GRAY PANEL between the lever and Paloma’s right hand (see Picture A above) to open that panel and hear
Paloma’s comment. Click on the FOOTPRINT ICON (see Picture A above) to get Paloma out of the
chair. Click on the lower-right corner of the screen to bring Paloma
close to the Electric Box. Go and open that box, and click on the handle
bar in the lower-right corner of the box to turn it to the ON
position. A short cutscene of the electric chair follows (indicating that
the power to its "Fuse Box" has now been turned on).
Click on the chair to return Paloma back in it. Open the Gray Panel
("Fuse Box"). We must now set the voltage to 129,
i.e., the number indicated on Paloma’s door. Picture B above illustrates how to do
it. Simply click on the different dials inside as follows:
TWICE on the +50 dial ……………………….. (50 x 2 = +100)
ONCE on the +20 dial
………………………. (20 x 1 = +20)
TWICE on +5 dial
……………………….
(5 x 2 = +10)
ONCE on -1 dial
……………………….
(-1 x 1 = -1)
Thus, (100+20+10) – 1 = 129.
After adjusting the dials, click on the RED round button at the bottom-left of
the screen. (See Picture B
above.) A cutscene, along with the killer’s voice in the background, will
follow as Paloma’s door opens. Go to that door and enter the next room.
The Locker Hallway
Check out your new objective. Click on the camera up on the ceiling,
right of Paloma. Open the gray locker, right of Paloma. Pick up the
EMPTY SPRAY. [Note: you might have to rearrange the items
in your inventory to make room for it.] Click on the lower-right corner
of the screen to get a view of the bottom of the stairs. Click on the
camera up on the ceiling, right of Paloma. Go upstairs and enter the next
room.
The Morgue
A dialog follows. Exhaust all topics of the conversation. Check out
your new objective. Click on the white jacket hanging on the wall on your
right. Click on the countdown clock (the black square with a red dot at
the top) up on the wall, right of Paloma. Click on the tiles under the
clock. Click on the camera on the ceiling, right of Paloma. Try to
open the rusty green door in front of you, but it is locked.
Close up on the white table right of the green door. Click on the large
splatter of blood in the center. Pick up the POWDER REVEALER from
the left of the blood, and the SURGICAL INSTRUMENT below the sink on
your right. [Note: If you used the Extinguisher, and not the
key, to come out of the Cell downstairs, you will still have that key in your
inventory. In that case, there won’t be enough room in your inventory to
pick up the two objects on the white table. But that’s okay. Just
pick up the Powder Revealer at this time. You won’t need the surgical
instrument until much later anyway.]
Step out of the close up. Click on the
camera (the red dot on the ceiling on your right). Click on the red
drawing of a cow on the gray cabinet-like structure on your right. Paloma
calls it a "Butcher’s Sign."
Go to the gray, large drawers now on your
right. Feel free to click on the camera in the corner of the ceiling
above the drawers. Note the gear icons on three of the six drawers below
that camera. Click on these three drawers, but they are all locked.
Close up on the electronic Keypad on the wall on your right. Open your
Inventory Menu. Click on the Voice Recorder to bring it to the center of
the screen. Click on the Documents button, and note the three dates
of the interviews: 10/22, 02/29, and 01/13. [Note: Each date is
actually a code we must punch in the Keypad to open a drawer on your left, as
described below.]
Step out of the Inventory Menu to return to the close up on the Keypad.
Click on the numbers for the first date on the Voice Recorder: 1,
0, 2, 2; then, click on OK. A cutscene will follow, showing one of
the drawers open on your left. Step out of the close up on the Keypad,
and click on that drawer. A table will slide out and Paloma will
comment. Click on the tag tied to the mannequin’s foot to learn that the
letter P has been underlined in that tag.
Close up on the Keypad again, and click on the numbers for the second date: 0,
2, 2, 9; then, click on
OK.
Another drawer opens. Click on that drawer, and then on the tag tied to
the foot of this mannequin to learn that the letter E has been underlined in this tag.
Finally, close up on the Keypad and click on the numbers for the third date: 0,
1, 1, 3; and then,
click on OK. Another drawer opens. Go and click on this drawer, and
then on the tag inside to learn that the letter H has been underlined this time.
Now go down to the Cell (where Paloma had woken
up at the start of this section of the game). Go to the wash basin on
your left, bring out your EMPTY SPRAY and click on the tap to fill the
bottle with water, i.e., get the WATER SPRAY. Combine the WATER
SPRAY with the POWDER REVEALER to get LIQUID REVEALER.
Go back up to the Morgue, and use the LIQUID REVEALER on the tiles under
the countdown clock. The words "PRESS HERE" will appear
on those tiles as a dialog follows and the Countdown Clock begins to
run!
But there is no need to worry or save the game, because we have more
than enough time to solve this puzzle. Recall the letters that had been
underlined on the tags in the three drawers in the morgue: P,
E, H. Close
up on the tiles on the wall and just press P, E, H, in the words "Press
Here," as shown below.
PRESS HERE
A brief cutscene will show the countdown clock slow down and stop, and a shot
of the rusty green door. Click on that door now. Another cutscene
and dialog follow. Feel free to check out your new objective OR
just wait. If you wait long enough, you will first get a shot of the vent
under the "Butcher’s Sign"; and then, Paloma will appear right next
to it.
Click on the Butcher’s Sign, and Paloma will
tell us that it sounds hollow. Use the Extinguisher on that sign.
Step inside the new opening (the Shaft), and click on the panel in front
of you. But it is too dark for Paloma to see anything in there.
Step out of the close up. (Note:
This would be a good time to pick up the SURGICAL INSTRUMENT from the
table on your left, if you haven’t already done so.) Go down to the Cell
and retrieve your CHARGED CELL PHONE from the Storage. Step out
into the Electric-Chair room, open the Electric Box on your right and pick up
the SMALL BULB (right of the lit bulb in the upper-right portion of the
box).
Return to the Morgue, enter the Shaft, and put
the SMALL BULB in the dark hole just above the white panel. Use
the SURGICAL INSTRUMENT to unscrew the panel and reveal the circuit
behind.
Note the three black fuses, one on top of the other, on your right. Click
on the fuse at the bottom, to hear Paloma’s comment. Attach the IRON
THREAD to that fuse. Click on the two fuses at the top, to hear
another comment from Paloma. Attach the SURGICAL INSTRUMENT to
those fuses. A cutscene will bring you down to the next room.
The Kitchen
Note the gear icon on the door on your left. That is the back door, but DON’T
open it just yet. Check out the Kitchen first. Start by closing up
on the switch (to the right of the shaft from which Paloma had come down), but
we don’t have the key for it. In fact, you won’t even find any icon on
that switch. So step out of this close up and move Paloma to your right.
Click on the door to the right of the
shaft, but it is locked. Click on the phone to the right of the door, but
it isn’t working. Move to the table at the lower-right corner of the
screen, and click on the newspaper there to hear Paloma’s comment. Click
on the two windows now in front of you, to find that they are both
barricaded. You can check out the kitchen cabinet (Storage) on your
right), but we don’t need to use it.
Now that we have checked out everything in the Kitchen, go to that back door left
of the shaft, and click on it. A cutscene will follow. Note:
the bomb and the black screen that follows might make you think that it’s GAME
OVER, but it’s not. Just wait a while and the cutscene will continue,
switching the story to Victoria’s point-of-view.
Killer’s House (Victoria: 2008)
A dialog follows. Exhaust the conversation with the Sheriff. She
will give you a New Document (the contents of the Memory Card), but you cannot
check it out yet as another dialog follows. Exhaust the conversation with
Garris. He also gives you a New Document (Hawker’s File), but you
cannot examine that document yet either. At the end of that conversation,
you will get a New Objective. You can now examine that objective as well
as the two new documents. [Note: The contents of the Memory Card
will appear as the three separate interviews that we had seen earlier in
Paloma’s Voice Recorder in the previous section of the game.]
The Front Yard
Feel free to click on the trunk of the Sheriff’s car, but it is locked and
Victoria will refuse to even try to open it. Note the dumpster (Storage)
before the stairs, on your right. But we don’t need to use it. Note
the two magnifying-glass icons shown in the picture below.

Click on the magnifying-glass icon labeled "TIRE TRACKS" in the above
picture. You will actually find two clues in this close up, both in the
upper-middle portion of the screen. Click first on the brown SHOE
PRINT on left. Use the 3D SCANNER to collect the clue, and
then analyze that clue. Now click on the black TIRE TRACKS up on
right. Use the 3D SCANNER to collect this clue also, and then
analyze this clue as well. Victoria will suggest getting Claire’s help to
get more information on this clue. Just step out of the close up, and she
will call Claire automatically for this purpose.
Now click on the magnifying-glass icon labeled "TRUCK MARKS" in the
above picture. You will actually find three items in this close up.
Click on the pair of TIRE TRACKS in the upper-middle portion of
the screen. Use the 3D SCANNER to collect the clue, and then
analyze that clue. Now click on the BARE FOOTPRINT in the
lower-middle portion of the screen. Use the 3D SCANNER to collect
this clue as well, and then analyze this clue also. Finally, click on the
BROKEN GLASS on your right. Victoria will comment, but we won’t
collect or analyze any clues here.
Click, and keep clicking, in the lower-right portion of the screen until you
see the shed with the stack of logs in the area left of the house. Note
the two beams holding up the top of the shed on the right. Close up on
the first of these two beams (i.e., the one that Victoria approaches
first) to see an insignia engraved in the wood. Victoria will
comment. Click on the phone icon that now appears, to photograph that
insignia. Open the Inventory Menu, and click on the phone in the
upper-left corner of the screen to transfer the photograph to the Kit.
Analyze that clue, and Victoria will indicate we need to call Claire for
further help with this clue. Just step out of the close up on the beam,
and Victoria will automatically make that call.
Close up on the "Crossbeam" (the wooden plank lying diagonally
between the shed and the fence). Victoria will comment, but you won’t
find any clue to collect or analyze. So step out of this close up, and
click on the mud just over the Metal Grate at the bottom of the opening
in the fence (the fence gate) in front of you. You can try to talk to
Garris, on your right, but he has nothing new to report. So go through
the fence gate to arrive in the Backyard.
View this guide raw, exactly as the archive holds it