Still Life 2
Corridors
Close up on Anderson’s cell on your right. Try to talk to him, but he has
nothing new to say. Step out of the close up. Click on the Grate
on the floor between the two cells, to hear Paloma’s comment. Go up the Ladder
at the end of the corridor in front of you, but the Hatch is locked.
Close up on the Wall Switch, left of the Ladder. Click on the gear
icon on the Switch. Step out of the close up, and go up the Ladder
now. A cutscene follows.
The red pulsating aura around the screen indicates that Paloma is hurt.
But don’t worry. She just needs some First Aid; and, since there is no
countdown-clock, we don’t have a time limit to get her that Aid. Go into
the Side Corridor to the right of the Ladder. Open the Wall Cabinet
on your right. Pick up the FIRST-AID KIT (left of the Top
Shelf). As the Kit appears in your inventory, click on it and then, on
Paloma’s I.D. Card on your left, to have Paloma use that Kit. You will be
automatically brought out of your Inventory Menu. The red aura around the
screen is gone, indicating that Paloma is okay now. Pick up the COLORED
DISINFECTANT SPRAY from the right of the Top Shelf. Click on the
small Box in the Bottom Shelf, to learn that it is an empty box of
Amphetamines.
Step out of the close up on the Medicine Cabinet. Click on the Camera
(with the orange light) in the top-left corner of the ceiling above the
door. Use the COLORED DISINFECTANT SPRAY on this Camera. A
cutscene will follow. Feel free to check out the large Gray Wall
Cabinet (Storage) on your left, but we don’t need to store anything.
Click on the Ladder at the bottom-left corner of the screen, but Paloma will
refuse to go up again. Click on the Camera in the upper-left
corner of the ceiling above the Ladder. Use the Spray to "neutralize"
this Camera as well.
Feel free to talk to Anderson in his cell on
your right; but he has nothing new to say. So, click at the bottom-center
of the screen until you get to the other end of the Main Corridor, i.e.,
opposite the ladder. Use the Spray to "neutralize" the Camera
in the upper-left corner of the screen. Click on the Electronic Lock
left of the door in front of you, but Paloma does not have the Key to it.
Click on that Door, to hear Paloma’s comment. Put the METALLIC
PIPE on that door, to barricade the door and hear another comment.
Click on the gear icon on the door on your right, to find that the door
is locked. Click on the magnifying-glass icon at the lower part of that
door, to see Victoria inside. Talk to her, to get a New Objective.
Exhaust the conversation.
Step out of the close up on Victoria’s
Cell. Go and talk to Anderson in his cell. Exhaust the
conversation. Step out of the close up on Anderson’s cell. Try to
open Paloma’s cell door, but it is still locked, of course. Close up on
the Digital Lock on the wall, right of the door. But we don’t know
the code. Step out of that close up, and talk to Anderson about this
lock. He tells us that the code to Paloma’s cell door consists of 5 or 6
numbers; that he is sure the code begins with a 4, and thinks that the last
number is a 5. But we still need more information.
Go and talk to Victoria again. She tells us about that list of codes in
which her name is associated with STANTON, while Paloma’s is associated
with MARTIN.
The Digital Locks
The key to this puzzle is as follows. As you know, there are 26 letters
of the alphabet. To decode, you must transcribe each letter of the Name
associated with the Code into the number of the order in which that
letter appears in the alphabet. (Thus, A = 1, B = 2, C = 3, etc.)
If the number consists of two digits, you must add the two digits together to
get a single digit. (Thus, for example, Z = 26 = 2 + 6 = 8.) As
Victoria indicated, the Name associated with the Code for the Digital Lock to
Paloma’s cell door is MARTIN. So we decode it as follows.
M = 13 = 4
A = 01 = 1
R = 18 = 9
T = 20 = 2
I = 09 = 9
N = 14 = 5
Go to Paloma’s cell door, close up on the Digital Lock right of the door, and
click in the above code = 4 – 1- 9 – 2 – 9
– 5; and
then, on OK. You will hear the door unlock, and get a cutscene of the
door. Step out of the close up on the Digital Lock, and enter Paloma’s
cell.
* * * * * * * * * * * *
Go to the Bed at the bottom of the screen. Click on the gear icon
on the right of the Bed, to move the Bed to the left. Click on the Crack
in the Wall between the Metallic Shelves on your right, to get a close up
of the Crack. Use your MAGNET + STRING (or you can separate the
combination, and just use the MAGNET) to retrieve the RING from
that Crack. Paloma will comment.
Step out of the close up, leave the cell, and
go talk to Anderson in his cell across the corridor. Exhaust the
conversation. [Note: if you give him the ring first, the
conversation will be interrupted. So you will have to click on him again,
to complete the conversation.]
* * * * * * * * * * * *
Go to Victoria’s cell, at the lower-left corner of the screen. Close up
on the Digital Lock right of the cell door. We use the same technique as
we did to open Paloma’s cell door to figure out the Code for the Digital Lock
to Victoria’s cell. As Victoria indicated, the Name associated with that
Code is STANTON. So we decode it as follows.
S = 19 = 1
T = 20 = 2
A = 01 = 1
N = 14 = 5
T = 20 = 2
O = 15 = 6
N = 14 = 5
So, click in the above code = 1 -2 -1 – 5 – 2 – 6 – 5; and then, on OK. You will hear the door
unlock, and get a cutscene of the door. Step out of the close up.
Enter Victoria’s cell, and talk to her. [Note: a New Objective
notification will appear but, if you stop the conversation there and check out
your objectives, you will find that there is really no new
objective. So, it is a technical bug in the game, of course.] Click
on the topic of the Amphetamines, to give the pills to Victoria. A
cutscene and dialog will follow. The story will then switch to Victoria’s
point-of-view. [But note: there will be no Auto-Save or caption
(like the one I have given below) when the story switches the point-of-view
this time.]
Killer’s House (Victoria:
2008)
Fallout Shelter
Victoria’s point-of-view will begin as a New Objective notification appears in
the upper-left corner of the screen, and a Note in red appears at the bottom of
the screen informing that the objects from Paloma’s inventory have been
transferred to the Storage, i.e., the Gray Cabinet out in the Side
Corridor.
Talk to Paloma. Exhaust the conversation. Pick up the GINGER
BREAD from the table on your left. Click on the METAL DETECTOR
on the floor, left of that table, to hear Victoria’s comment. Pick up the
Metal Detector. There is nothing else of interest in this cell. So,
step out of the cell. A cutscene will follow.
The New Objective told us to explore the Shelter. Start with the end of
the corridor at the bottom of the screen. Click on the Gray Door
in front of you, to learn that it is locked. Click on the Electronic
Lock left of the door, to hear a comment from Victoria.
Go back down the corridor past
Victoria’s cell. Click on the Grate on the floor between Paloma
and Anderson’s cells. Enter Paloma’s Cell on your left.
Click on the Grate on the floor on your right. Come down to the
wall at the bottom of the screen. Close up on the Crack on the Wall between
the Metal Shelves on your right; but there is nothing there now. Step out
of the close up on the Crack. Click on the gear icon on the Bed,
to move the bed to the right. Click on the empty Package of Cookies
on the left of the bed.
Step out of Paloma’s Cell,
and close up on Anderson’s cell at the bottom of the screen. Talk
to Anderson. Click on the topic "Ginger Bread" to give
him that bread; then, exhaust the conversation. You can try to talk to
him again, but he has nothing new to say. So, step out of the close up on
his cell. Try to talk to Paloma, now standing left of Anderson’s Cell. But
she has nothing new to say either.
Go into the Side Corridor, right of the Ladder. Open the Medicine
Cabinet on the wall on your right. Click on the small Box in
the bottom shelf, to hear Victoria’s comment. Step out of the close up on
the Medicine Cabinet. Feel free to check out the Gray Cabinet
(Storage) on the wall on your left. But I would suggest not cluttering
our inventory with any of Paloma’s objects just yet. So, leave the
Storage as it is, for now.
Now that we have explored the Shelter, it is time to see what we can find
outside. So, click on the Ladder, now in the lower-left corner of
the screen. A cutscene and dialog follow. Click on the Ladder
again. Another cutscene and then, a comment will follow.
The Backyard
Check out your New Objective.
Click on the Man hanging down by a rope from a tree across the fence on
your left, to get a close up. Victoria will comment. Step out of
the close up, to hear another comment. Go to your right, past the Gray
Trailer, but BE CAREFUL! There are three Mines (in a row,
from Victoria’s point-of-view) on the ground in front of the Back Porch
stairs. Thus, there is no way to go up the stairs, or go past them in the
Backyard, without setting off one of these mines, causing Victoria to get hurt.
Note: Even if you do accidentally set off one
of these mines, don’t worry. It’s not Game-Over, nor will you get a
Countdown clock. You will see the red pulsating aura around the screen,
meaning you will just have to go back down into the Shelter and use Paloma’s
First-Aid Kit (in the Gray Storage Cabinet) to treat Victoria. In order
to avoid all this hassle, however, proceed as follows.
Neutralizing the Mines
Look for the White Icon on the ground in front of the Back Porch
stairs. (See Picture "A" in the Set of four pictures
below.) Click on that white icon, to get a close up of that spot and hear
Victoria’s comment. Click on the gear icon, to expose the mine;
and then, on another white icon to hear Victoria’s comment and also get a New
Objective. Step out of the close up. Click on the ARCHERY TARGET
on your left, to hear Victoria’s comment. Pick up that Target (but you
might have to rearrange the Metal Detector in your inventory to make room for
the Target). Put this Target on the Mine you just found in front of the
stairs.
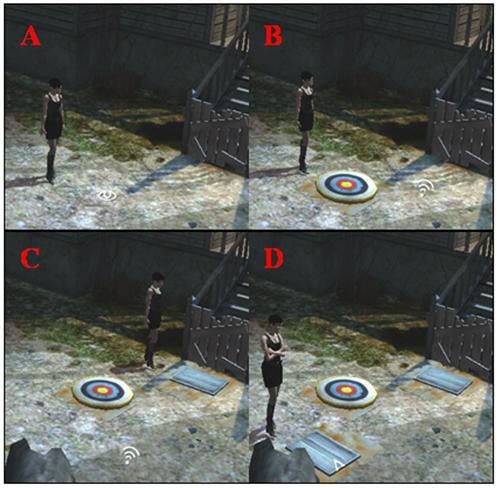
We must now find the other two Mines in this area. Open your Inventory
Menu. Set your METAL DETECTOR to 1. Close the
Inventory Menu, and look for the Metal Detector Alarm (MDA) cursor on the
ground between the stairs and the Archery Target. (See Picture "B"
in the Set of four pictures above.) Bring out the Metal Detector from
your inventory, and click on the tool icon now in that cursor spot below
the stairs, to see a cutscene of Victoria examining the spot with the Metal
Detector. She will then confirm that it is a Mine. Click on the gear
icon now on that spot, to expose the Mine.
Go down into the Shelter. Talk to Paloma. Enter her cell on your
left. Click on the VENTILATION GRATE on the ground on your right,
to hear Victoria’s comment. Pick up that Grate, and go back out to the
Mine you just found below the Back Porch stairs. Put the Grate on that
Mine to neutralize it.
But we are not done yet! Note another MDA cursor below and to the right
of the Archery Target on the ground. (See Picture "C" in
the Set of four pictures above.) Note: Even though you
might see the MDA cursor, the Metal Detector setting went back to "0"
when you went down into the Shelter to get the Grate. So, Reset the
Detector to 1. Bring out the Detector from your inventory, and
click on the tool icon now on the spot where you just saw the MDA
cursor, to have Victoria check it out. She will not comment this time,
but you will find a gear icon now on that spot. Click on that gear
icon, to expose the Mine.
Go back down into the Shelter.
Click on the VENTILATION GRATE on the ground between Paloma and
Anderson’s cells, to hear Victoria’s comment. Pick up that Grate, return
to the Backyard, and place that Grate on the Mine you found below the Archery
Target. (See Picture "D" in the Set of four pictures
above.)
* * * * * * * * * * * *
Now that we have neutralized all the mines in the Backyard, go back down into
the Shelter. Retrieve all the objects from the Gray Storage Cabinet
in the Side Corridor. Come back out into the Backyard.
Go right, past the neutralized
Mines, towards the Fence that divides the Front and the Back
Yards. But BE CAREFUL! There is an electric current running
through the Fence. So if you try to go through, Victoria will get hurt.
Note: Again, don’t worry if you missed
this trap and Victoria got hurt. It is not Game-Over, nor is there a
Countdown clock. You will see a red pulsating aura around the screen,
indicating that you just need to use the First-Aid Kit in your inventory.
There are actually two icons around
the Fence Entryway. The footprint icon allows Victoria to go
through the Fence, causing her to get hurt. But there is also a white
icon that is just before the footprint icon, on the dirt before the
Entryway. Click on this White Icon, to hear Victoria’s comment and
receive a New Objective.
Neutralizing the Entryway
Note the Grate lying in the lower-right corner of the screen. If
you click on it, Victoria will comment about using it to neutralize a
mine. You will then be able to pick up that GRATE PIECE. But
we have already neutralized all the mines! So there is no need to click
on, or pick up, this Grate. [Apparently, this was just another Grate
introduced in the game for you to use, in case you forgot the one in Paloma’s
cell.]
Click on the small Gray Box on the Fence, left of the Entryway.
Victoria’s comment indicates that the box might control the electric current
running through the Fence. But the box is locked, and we don’t have any
picking tools right now.
Note the MDA cursor on the ground in the lower-left portion of the
screen. Set your Metal Detector to 4. Bring out the Detector
from your inventory, and click on the tool icon now on the spot where
you had seen the MDA cursor. Victoria will examine the spot, and tell us
that it is Part of a Half-Buried Bicycle Wheel. [Recall that we
had found this object during the day as well, when we first used the Metal
Detector to explore these grounds.] Click on the gear icon now on
the spot, to get a close up of the Wheel and to hear Victoria’s comment.
Pick up the IMPROVISED PICKING TOOLS.
Step out of the close up on the Wheel. Use the Picking Tools to unlock
the Gray Box on the Fence. Close up on the Box. Click on the empty Dark
Slot ("Base") on your left, but we don’t know yet what can
be plugged in here. Click on the Pattern & Some Initials at
the bottom of the Box, but we don’t know yet the purpose of these carvings
either. Click on the Metallic Plate on the Keypad on your right,
to hear Victoria’s comment. Use the FORK to unscrew the
Plate. Click on the Keypad, to hear another comment. Pick up the KEYPAD
BOX.
The Entryway trap has been
neutralized! So step out of the close up on the Gray Box, and go through
the Fence. A cutscene will bring you into the Front Yard.
The Front Yard
Try to move further down in the Front Yard, but you will be stopped
automatically as you receive the notification of an Unread Message in your cell
phone. Check out the message ("Text Unknown," in
Messages & Contacts) in your cell phone.
Click at the bottom-center of your screen a couple of times, until you
see a Police Officer’s Body in the lower-right corner of the
screen. Close up on this body, to hear Victoria’s comment. Step out
of this close up; and then, close up on the other Police Officer’s Body
on your left, to hear another comment.
Go to the Fence on your left. Click on the white icon on the
Fence, to learn that there is electricity running through it. A gear
icon now appears on the Fence. If you click on this icon, Victoria will
get an electric shock. But don’t worry. She will not be hurt
seriously enough to require even First Aid. She will also refuse to touch
the Fence, if you click on it again.
Click on the end of the Fallen Tree Trunk touching the extreme
left-center of the screen. This will allow you to see the third Police
Officer’s Body, lying on the far side of the Yard away from the house and
below the first two bodies we have already checked. Close up on this
body, to hear Victoria’s comment. Pick up the POCKET-KNIFE, from
your left.
Step out of the close up on this
body. Click on the magnifying-glass icon in the lower-right corner of the
screen, to close up on the fourth Police Officer’s Body (lying on the
ground in front of the front of the Sheriff’s car) and to hear another
comment.
Click on the Hood of the Sheriff’s Car, to hear Victoria’s
comment. Close up on the fifth Police Officer’s Body, now
right of the Sheriff’s car, to hear Victoria’s comment. Pick up the BROKEN
QUARTZ WATCH WITH BATTERY, lying on the ground between the officer’s right
leg and arm.
Step out of this close up, and open
the Trunk of the Sheriff’s Car. A cutscene and a comment will
follow. Pick up the MULTISPECTRAL LAMP from your right. If
you click on the white icon inside the trunk, Victoria will merely
repeat the comment she just made.
Step out of this close up, and go up the stairs leading to the front of the
house. Click on the magnifying-glass icon on the reddish-brown dot on
the left post at the top of the stairs, to get a close up of a Bullet Hole.
Click on this Hole, to hear Victoria’s comment. Go through the Front Door
to enter the house.
The Hallway
Take a few steps into the Hallway. Victoria will automatically
stop. Close up on the Dead Rat down on your left, to hear
Victoria’s comment. Step out of the close up, to receive a New Objective.
Neutralizing the Hallway Traps
There are actually two traps in the Hallway: one is at the Living Room doorway,
and the other is at the bottom of the stairs leading up to the Second
Floor. Thus, Victoria will get hurt if she tries to enter the Living Room
or go upstairs.
Note: Don’t worry though if you missed either
of these traps and Victoria got hurt. It will not be Game-Over, nor will
you get a Countdown clock. You will see a red pulsating aura around the
screen, meaning that you must treat Victoria with your First-Aid Kit. In
fact, that is one way to neutralize these traps. Enter the Living
Room and go upstairs, one by one, using the First-Aid Kit to treat Victoria
each time she gets hurt. Keep in mind though that there are only two
"treatments" left in the First-Aid Kit. So, even though you
will be able to neutralize both the Hallway traps this way, you will also use
up the First-Aid Kit. Proceed as follows, if you would like to try
something more clever.
Use the COLORED DISINFECTANT SPRAY on the tool icon on the Living
Room doorway. A cutscene will follow. Use the POCKET-KNIFE
to cut the wires stretching across the Living Room doorway, to neutralize this
trap. Feel free to close up on the Dead Rat again, to hear another
comment.
Click at the bottom-center of the screen twice, to move slowly
towards the stairs leading up to the Second Floor. Don’t click on the footprint
icon on the stairs, of course, or Victoria will get hurt! Rather,
click on the white icon on the Four Black Holes, vertically
aligned under the top painting which is to the right of the Kitchen door.
Victoria will comment. [Note that the footprint icon on the stairs
has become a tool icon.] Click on a similar set of Four Black
Holes, vertically aligned on the wall left of the Cellar door, to hear
another comment. Use the SPRAY on the tool icon on the
stairs, to see a cutscene. Use the POCKET-KNIFE to cut the wires
stretching between the two sets of Black Holes, to neutralize the last Hallway
trap!
* * * * * * * * * * * *
Recall that our main objective is to try our luck on the computer down in the
Computer Room. But I prefer to explore the rest of the house first, to
see if we can find something new that might prove to be useful later.
Start with the Kitchen on your left.
The Kitchen
Click on the Dumbwaiter on Victoria’s right, to learn that its door has
now been "blocked." Close up on the Refrigerator on your
left. Click on the Red Envelope inside, to hear Victoria’s
comment. Pick up the Envelope, and its contents will be presented on your
screen. [If you would like to refer to this information later, you will
find it stored as "Contents of Red Envelope in the Kitchen" in
the Documents folder of your cell phone.]
There is nothing else new in the Kitchen. Before we leave, however, we
need to make some room in our Inventory. So go to the Storage Cabinet
up on your left, and put away your First-Aid Kit and the Metal Detector.
Step out into the Hallway, and go upstairs.
The Second Floor
·
Start with the Bedroom on your left. But there is nothing
new there. So step back out into the Hallway.
·
Go into the Bathroom on your right. Close up on the Medicine
Cabinet on your left. Pick up the FIRST-AID KIT from the top
shelf. Step out of the close up. There is nothing else new in this
room. So step back out into the Hallway.
·
Go into the Charred Room on your right. Pick up the Red
Envelope lying on the floor, under the mannequin on your left, to hear
Victoria’s comment. The contents of the Envelope will then be presented
on your screen. [If you would like to refer to this information later,
you will find it stored as "Contents of Red Envelope in Charred Room"
in the Documents folder of your cell phone.] There is nothing else new in
this room.
·
Go out into the Balcony on your right. But there is nothing
new here at all. So go back into the Charred Room and step out into the
Hallway.
·
Go to the Roof through the Brown Door on your right.
Click on the white icon on the small object lying on the ground in front
of Victoria, in the corner of the Roof on your left, to hear her comment.
Pick up the REMOTE CONTROL (NOT INITIALIZED). Click on the white
icon in the center of the railing’s top (where Victoria had found a device with
the satellite dish during her daytime investigation of the house), to hear
another comment.
* * * * * * * * * * * *
We are done on the Second Floor. So, go back down to the Main Hallway on
the First Floor. Enter the Kitchen. Go to the Back door, but you
will be stopped before you reach it as you receive the notification of an
Unread Message in your cell phone. Check out the Message (the unopened
"Text Unknown," in Messages & Contacts) in your cell
phone.
Go out of the Back Door, and down the stairs. [Note: if you hadn’t
opened the new gate at the bottom of these stairs when you were out in the
Backyard earlier, then a gear icon (instead of the usual footprint
icon) will appear on the stairs. Moreover, when you click on this gear
icon at this point in the game, you will get a rather funny cutscene: Victoria
climbing down from the other side of the stairs! But don’t
worry. It is just a technical bug in the game, but nothing that will
affect your gameplay in any way.]
Go down into the Shelter. Talk to Anderson in his cell. Exhaust the
conversation. Go back up to the Backyard, and use the Back Porch door to
return to the Kitchen. We need to make some more room in the
Inventory. So use the Storage Cabinet again to put away everything
but the Spray, the Pocket-Knife, and the Multispectral Lamp. Step
out of the Kitchen, and enter the Living Room on your right.
The Living Room
Go to the window on your left, to get a closer shot of that area. Note
the two new and rather tall objects on the floor, in front of that
window. Pick up the REFLECTOR, right of the coffee table.
Click on the white icon on a similar but brown object, left of the
television, to hear Victoria’s comment. Pick up this object = LASER
TRANSMITTER. [Note: You will have to rearrange your inventory
to make room for it.] Click on the gear icon on the television, to
see the video clip we had seen in Paloma’s section at the beginning of the
game.
There is nothing else new in this room. So step out into the Main
Hallway, and go down the Cellar Door. Go left to enter the Workshop.
The Workshop
Click on the gear icon on the Blackboard down on your left, to
see a short cutscene. Click on the Dumbwaiter behind Victoria, to
hear a comment. Click in the lower-left corner of the screen, once or
twice, to approach the entrance to the actual Workshop Area. Go
right to enter this area.
Click on the orange Gas Cylinder on the floor, right of the saw table,
to hear Victoria’s comment. Click on the Furnace, right of the Gas
Cylinder, to hear another comment. Click on the tool icon on the Small
Wheel on the Furnace, to hear yet another comment. But we don’t have
the tool (either in our inventory or down in the Kitchen’s Storage
Cabinet) that can be used on this Wheel. So leave the Wheel alone for
now.
Note: There are actually a few other new
objects in the Workshop Area, but there are no icons on them to enable us to
examine or interact with these objects. Thus, there is nothing more we
can do at the Workshop, at least right now. So leave the Workshop, to
return to the landing in front of the Blue Door.
* * * * * * * * * * * *
We are ready to go into the Computer
Room now. So go through the Blue Door. Try to enter the Computer
Room, but you will be stopped by the notification of an Unread Message in your
cell phone. Check this message (the unopened "Text Unknown,"
in Messages & Contacts) in your cell phone. Enter the Computer Room.

The Computer Room
Recall that the Computer Room is divided into two parts: the Empty Section,
which has nothing but three oil or gas cans along the wall right of the door;
and the Main Section, which is filled with all kinds of things (autopsy
table, stereo, computer, etc.) Click on the second Oil or Gas Can
on your right, to go to the end of the Empty Section. But BE CAREFUL!
There is a trap set up ahead.
Note: Again, don’t worry even if you walk
into this trap. It will not be Game-Over, nor will you get a Countdown
clock. A cutscene will show Victoria back outside the Computer room, and
the red aura pulsating around the screen would mean that you would have to go
up to the Kitchen, use one of the First-Aid Kits in its Storage Cabinet to
treat her, and go back to the Computer Room to neutralize this trap. In
order to avoid this hassle, however, proceed as follows.
Click on the Electrical ("Power") Outlet, just right of the
three Oil or Gas Cans, to hear Victoria’s comment. Click on the white
icon on the Reflector (like the one you picked up earlier in the Living
Room), just right of the end of the wall, to hear Victoria’s comment and
receive a New Objective. Click on the Green Cylinder (with a red
light flashing on its left) on the ceiling on your right, to hear another
comment and receive a New Objective again. [But in fact, both of these
Objectives are one and the same. Apparently, the idea was to inform you
of the trap when you clicked on either the Reflector or the Cylinder.]
View this guide raw, exactly as the archive holds it