Still Life 2
Neutralizing the "Basement" Trap
Click on the White Base up on the second pipe on the wall on your left,
to hear Victoria’s comment. Place the MULTISPECTRAL LAMP on that
Base. A cutscene will reveal the trap on your right: a web of Yellow
Laser Beams stretched beyond the entryway to the Main Section of the
room. Victoria will move close to that web, and comment. Click on
the magnifying-glass icon on the web on your right to get an aerial view of the
trap.
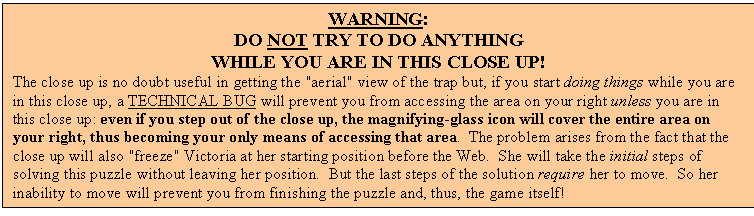
Step out of the close up on the Web on your right. Click on
the Electrical Outlet on your left, to hear Victoria’s comment.
Plug your LASER TRANSMITTER into this Outlet. A web of Red
Laser Beams will now appear along the Yellow Beams on your right.
Note that the (dangerous) magnifying-glass icon on the Web has also now
disappeared. Moreover, now that Victoria is aware of the trap and
can see how it is laid out, she will not (for the most part of the puzzle) go
through any beams that are not safe to cross. Thus, you can now move
through the Web relatively safely.
Click on the white icon in
the area around the Laser Transmitter you just plugged in, to hear Victoria’s
comment. Click inside the Web on your right, to move Victoria into the
Main Section of the room, and get an aerial view of the trap without being in a
close up.
Note: Refer to the following picture as you
read the instructions below. [But, please, do not be confused to see
Victoria appear in two places in this picture. I have combined two
pictures, of course, to give you an overall layout of the trap, so you would be
able to see all the points of the room you must visit to neutralize this trap.]
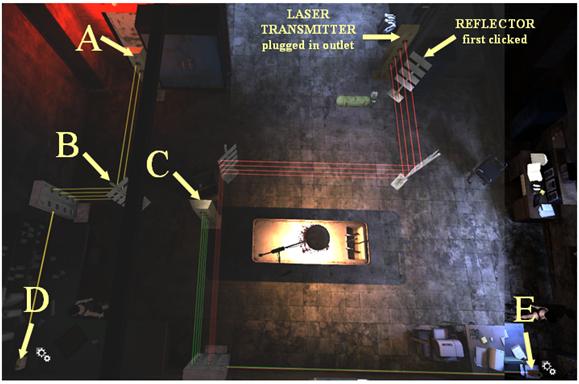
- Click on the Laser
Transmitter ("A" in the above picture), to
learn that it can turn 90 degrees. Click on the Transmitter again,
to turn it.
- Click on the tool icon
on what looks like a metal plate, below the above Transmitter, to learn
that it is a "Support Base" for placing a
Reflector. So bring out the REFLECTOR from your Inventory and
put it on this Base. (See "B" in the above
picture.)
- Click on the Laser
Transmitter ("C" in the above picture), to
hear Victoria’s suggestion about changing its trajectory. Click on
the Transmitter again, to make this change.
- Go to the lower-left corner of
the room. Click on the Device with the Red Blinking Light in
that corner ("D" in the above picture), to hear
Victoria’s comment and receive a New Objective. [But, again, it is
actually the same Objective we got at the beginning of this puzzle.]
Click on that Device again, to turn it off.
- We must now go to the lower-right
corner of the room. But you cannot go through the Green Beams
to do so. Be careful because it is still possible to
trigger the trap if you click on the wrong places a few times. Click
just left of the Green Cylinder, to bring Victoria towards the entryway
and to shift the aerial view to the right side of the room; and
then, click in the lower-right portion of the screen to bring Victoria to
the corner right of the Computer Table.
- Click on the Device with the
Red Blinking Light ("E" in the above picture),
to hear Victoria’s comment. Click on that Device again, to turn it
off.
A cutscene will follow, ending with
the disappearance of the Web of Laser Beams around the room. We have
neutralized the trap in the Computer Room!
* * * * * * * * * * * *
There is not much of the house left to explore in search of something new or
that might prove to be useful later. So let’s finish that exploration
before attending to our Main Objective of trying our luck on the computer.
You won’t find anything else new in
the Computer Room. So go to the door under the Red Bulb, left of the
large Blue Cupboard. Enter what the developers call the
"Basement," but what I called the "Underground" in order to
distinguish this area from the non-secretive parts of the Basement: the
Workshop and the Computer Room. In fact, you can think of the following
area as the secret part of the Basement.
The Secret Part of the Basement
- The Locker Hallway: The only thing new here is that Victoria can now open the Gray
Locker, but there is nothing in this Locker.
- The Electric-Chair
Room: There is nothing new here except that
there are two white icons (one above the other) now on the
door marked "Paloma," and the one at the bottom prompts Victoria
to make a new comment.
- The Cell: The only thing new here is a little Yellow
"Sticky" Note on the small mirror above the washbasin.
Click on this Note to hear Victoria’s comment, but we will not get a close
up or otherwise learn what the note said.
- The Morgue: There are only two new things here — (1) the Keypad
on the wall left of the door is no longer working; and (2) the comment
that Victoria makes when you click on the white icon on the Tiles
under the Countdown Clock.
This concludes our exploration of
the house. So go back down to the Locker Hallway, and return to the
Computer Room.
The Computer Room: Discovery
Close up on the Computer Table. Click on the Telephone, to hear
Victoria’s comment. Click on the computer’s Keyboard. A
cutscene, a comment, and then a dialog will follow. At the end of the
dialog, you will receive a New Objective as the Countdown clock begins to
run. But don’t worry. You will have more than enough time to beat
this clock. In fact, you do not even have to save your game!
Step out of the close up on the
computer. You will get an obscure screenshot. If you listen
carefully, you will also hear the ominous sound of footsteps at a
distance. Again, don’t panic. Go to the right of the Computer
Table. Open the Vault in the wall; and then, click inside
the Vault. The Countdown clock will disappear, and you will get another
cutscene. At the end of this cutscene, you will receive another New
Objective.
Note: You can call the Killer right now, if
you like. He will even answer, and a dialog will follow. But you
will not get an answer if you call him again — at least not until after
you have set the trap for him…
Trapping the Killer
Go up to the Main Hallway on the First Floor. You cannot go out into the
Front Yard because you will find the Killer is waiting there for
Victoria. Feel free to try it! Step out of the Front Door and go
down the stairs. You will get a screen shot of the Killer. You will
then see Victoria back upstairs, as the Countdown clock begins to run!
Just step back inside the house, and the clock will stop.
Go into the Kitchen. Retrieve all the objects from the Storage Cabinet.
[Note: You will be able to fit everything in your inventory if you have
the String combined with the Magnet.] Use the Back Door to go out into
the Backyard. Go to your right, towards the Fence that divides the Front
and the Back Yards. Close up on the Gray Box on the Fence, left of
the entryway. You might have to wait for a few seconds before the tool
icons appear on the two slots in the middle of the box. After
they do, plug the REMOTE CONTROL (NOT INITIALIZED) into the slot on your
left, and the KEYPAD BOX into the slot on your right.
We must now figure out the code to
punch in the Keypad Box to initialize the Remote Control. Note the Pattern
& Initials at the bottom of the Gray box. Check out the document
"Photo of Engraving taken with the Smartphone" in the
Documents folder of your cell phone. Note that the pattern and initials
that appear in this document are the same as those at the bottom of the Gray
Box. But the document also shows some numbers which did not appear on the
Gray Box: 8541. Punch in these numbers on the Keypad; and then, click on "OK." The Remote Control is
initialized!
Pick up the INITIALIZED REMOTE
CONTROL, and step out of the close up on the Gray Box. Call the
Killer now. A cutscene will follow. Victoria will comment.
You will then get a New Objective.
* * * * * * * * * *
Click on the Gray Box on the Fence now, to hear Victoria’s comment. Close
up on the Killer. Pick up the KILLER’S ELECTRONIC KEY from the
ground on your right (just above his left shoe). Click on the Killer’s
head, to hear Victoria’s comment. Click on his right hand, to hear
another comment. Finally, but most importantly, click on his right coat
pocket. Note the word that Victoria reads: "NAMLEKCO."
Step out of the close up on the Killer. Try to go down into the Shelter,
but the hatch is locked now. Go into the house, and down into the
Computer Room. Close up on the Computer Table, and click on the
Keyboard. Click on USER: KILLER. Then, click on the password
choice NAMLEKCO, to be
granted access by the computer.
You can immediately see the big shock here: Internet Search deactivated.
But click on that option nevertheless
(to let the computer "know" that you have seen it), to hear
Victoria’s comment. Check out the other Main Menu options, to find the
following.
- Photos & Videos: This option now contains only "Photos," and there
is nothing new there. So return to the Main Menu.
- Access Control: Click on East Hatch (locked), and use the old code H103123D55
to unlock that hatch again. Return to the Main Menu.
- Surveillance Cameras: Note that the Group 6 Cameras are now
"broken." It is unclear and perhaps irrelevant whether
these are actually broken or just rendered useless by the spray that we
used on them earlier. The point is that you cannot use these cameras
anymore to see inside the Shelter. Return to the Main Menu.
- Karson File: Victoria will comment as you click on this option. Be sure to
check out the picture on the second page. Close the document,
to hear Victoria’s comment. You will have to close the document
again.
Close the Computer, and step out of
the close up on the Computer Table, to receive a New Objective. We must
now go to the Shelter, to see what we find there.
The Shelter
Check out your New Objectives. We need to make room in our
inventory. So use the Storage Cabinet in the Side Corridor on your
right to put away everything except the KILLER’S ELECTRONIC KEY
and the BROKEN QUARTZ WATCH WITH BATTERY.
Click on the white icon on the ground on your left, between Victoria and
the door at the end of the corridor, to hear a comment. Go to the Main
Corridor, and enter Anderson/Karson’s Cell on your right. A
cutscene will follow, ending with a close up of the Pictures on the wall
facing the entrance. Step out of this close up, and close up on the Vent
above the bed. Click on the tool icon on this Vent, to hear
Victoria’s comment.
Step out of the close up, and click on the Books on the floor in front
of the bed, to hear Victoria’s comment. Note that a blue icon now
appears on those Books, but we would need our Kit to check it out.
Click on the Wall left of the entrance, to hear a comment. Click
on the Grate right of the entrance, to hear another comment. Note
that a blue icon now appears on that Grate; but, again, we would need
the Kit to check it out.
Return to the Main Corridor, and go into Paloma’s Cell across the
corridor. But there is nothing new here. So return to the Main
Corridor, go to your left, and enter Victoria’s Cell. But
there is nothing new here either.
Return to the Main Corridor once again. Click on the Door in front
of you, to hear Victoria’s comment. Click on the Metallic Pipe on
that door, to remove it. Use the KILLER’S ELECTRONIC KEY on the Electronic
Lock on your left, to unlock the door. Click on the door again, to
enter what we will call the "Killer’s Room."
The Killer’s Room
Close up on the Pictures on the wall right of the door, to hear
Victoria’s comment. Close up on the Flag above the bed on your
right, to hear another comment. Click on the Magazines on the
floor by the bed, to hear yet another comment. Note the blue icon
now on the Magazines; but, once again, we would need the Kit to check out that
icon.
Click on the Stereo on the
small table behind Victoria, to turn it ON. Victoria will comment.
Click on the Stereo again to turn it OFF.
Open the Chest in the
lower-left corner of the screen. Pick up the PRESSURE-RELEASE MINE,
the FIRST-AID KIT and what looks like a Brown Stick, but is actually the
Ammunition for your Gun (as confirmed by Victoria’s comment and the fact
that the gun in your Inventory is now loaded).
Step out of the close up on the
Chest, and click on the blue Map on the wall on your left, to hear
Victoria’s comment. Pick up the gray Metallic Case from the ground
right of Victoria, to learn that it is your CSIA Testing Kit!
Close up on the Table on your right. Pick up the POCKET-KNIFE,
the NYLON THREAD, and the ADHESIVE TAPE. Step out of the
close up, and click on the Small Table right of Victoria, to hear her
comment. Click on the Crossbow on the wall on your right, to hear
another comment. Pick up the ELECTRIC EXTENSION CORD plugged in
the electrical outlet below the Crossbow.
Close up on the Desk at the bottom of the screen. Click on the Books
on your left, to hear Victoria’s comment. Pick up the STEEL TENSION
WRENCH, left of the large yellow padlock. Click on the Notepad
to get an automatic close up of its contents. [If you would like to refer
to this information later in the game, you will find it stored as the "Report
on the Killer’s Modus Operandi" in the Documents folder of your cell
phone.] Click on the two Photographs on your right, to hear Victoria’s
comment.
Check out the contents of the Desk
Drawer, beginning with the Packets of Chewing Gum Sticks on your
left. Click on those Packets, to hear Victoria’s comment. [Note
the "brand name," or rather the logo, that Victoria reads: "Brain Jack, since 1884." This
information will come in handy later.] Next, click on the Documents
right of the Chewing Gum, to get a close up of their contents. Victoria
will comment.
BEWARE! The New Document notification that
popped up when you got the close up of the above Documents does not
relate to what you see on the screen. You will also not get an icon on
those Documents again, after you leave this close up. So read the
information in the close up as carefully as you like, because you will not be
able to see it again. Also, be sure to check out the second page of the
close up, to see the pictures of the Killer who was just electrocuted out in
the Backyard.
Step out of the close up on the
Documents, to hear Victoria’s comment. Check the Documents folder in your
cell phone to find that only a recording of the Killer’s voice ("Message
Recorded by the Killer") was just stored as the New Document.
Step out of the close up on the Desk. Pick up the PICK GUN
WITHOUT BATTERY from the floor left of the Desk, to learn that it is
missing both its tension wrench and battery. So open your Inventory Menu
and proceed as follows to fix the problems. Combine the POCKET-KNIFE
+ BROKEN QUARTZ WATCH WITH BATTERY to obtain the QUARTZ WATCH BATTERY.
Combine this Battery with the Pick Gun to obtain PICK GUN WITH BATTERY.
Finally, combine the Pick Gun with the STEEL TENSION WRENCH to obtain a
completely functional Pick Gun.
* * * * * * * * * * * *
Now that we have our Testing Kit back, let’s check out the blue icons we
found.
The Blue Icon clues
Inside the Shelter
- Killer’s Room: Go to the Magazines on
the floor by the bed. Use the FINGERPRINT POWDER and then,
the 3D SCANNER to collect the clue on those Magazines. Analyze
the clue.
- Anderson/Karson’s Cell: Use the FINGERPRINT POWDER
and then, the 3D SCANNER to collect the clue on the Grate
right of the entrance. Analyze the clue. Go to the Books
on the floor by the bed. Use the FINGERPRINT POWDER and then,
the 3D SCANNER to collect the clue on those Books. Analyze
the clue.
- Side Corridor: Click on the blue hand icon on the
floor in front of the door, to learn that there is some Blood
there. Use the SAMPLING SWAB to collect that clue.
Analyze the clue by first running the Chemical Analysis and then, the
Database Analysis.
In the Front Yard
- Climb up the stairs leading to
the Front Door of the house. Click on the magnifying-glass icon on
the left Post at the top of the stairs, to get a close up of the Bullet
Hole. Use the SAMPLING TONGS to collect that clue.
Analyze the clue by first running the Chemical Analysis and then, the
Database Analysis.
* * * * * * * * * * * *
Go back into the Shelter. Enter Anderson/Karson’s Cell on
your right. Close up on the Vent above the Bed. Combine the PRESSURE-RELEASE
MINE with the ADHESIVE TAPE, and attach the resulting combination to
the Vent. You can click on the Vent again, to learn that we are not done
yet. Attach the NYLON THREAD to the Mine already attached to the
Vent. A cutscene will follow that will bring you out of the cell.
Go back into the cell, and climb into the Vent opening to arrive on the other
side of the Shelter.
Note: Recall that the computer back in the
house had indicated two hatches: the East Hatch and the West Hatch. Since
we used the East Hatch to enter the Shelter, and did not find any other hatch
in the part of the Shelter we just left, that must have been the Eastern
section of the Shelter. So I will call the following the Western section
of the Shelter.
The Western Section of the
Shelter
You will find Victoria standing in the middle of a Corridor. Note that we
cannot use the vent we had used to come down into this area to return to the
Eastern section of the Shelter. But don’t worry. There is
another way to get back there, as you shall shortly see.
Click on the Blue Door in
front, to learn that it is locked. Close up on the Electronic Lock
on the wall left of the door, to learn that it has a different color than the
ones we have seen before. But then, there is no icon on this lock, so we
cannot even try a key on it.
Step out of the close up on the Electronic Lock, and click on the Gray Rusty
Door on your left. Victoria will comment. Use the Pick Gun to
unlock the door, and enter what Victoria later calls the Control Room.
The Control Room
Click on the Computer on your left, to learn that its power is
OFF. Close up on the Table on your left. Click on the gray
box (Processor) on your right, to hear Victoria’s comment. Click
on the DVD left of the Processor, to hear another comment. Pick up
the COMPUTER KEYBOARD and the WRENCH.
Step out of the close up on what we will call the Processor Table. Click
in the lower-left corner of the screen to approach the Ladder in that
corner of the room. Try to go up the ladder, but the Hatch above
it is locked. Close up on the Switch on the wall left of the
Ladder. Click on the Switch to unlock the Hatch. Step out of the
close up, click on the Ladder, and a cutscene will bring you in that part of
the Backyard where a man is hanging by a rope from a tree.
The Body in the Backyard
Close up on the gray Plate on the ground above the Hatch, to learn that
the Reference Number for this Hatch = H061914. Step out of this
close up. Close up on the Man Hanging down from the Tree, but we
can’t do anything because there is no icon on him. [If you step out of
the close up and then close up again, Victoria will repeat the comment she had
made before, from the other side of the Backyard.] Step out of the close
up, and use your POCKET-KNIFE to cut the Rope tied around the
tree on your left. A cutscene will follow.
Close up on the Body again, to hear another comment. Click on the white
icon on a tiny square object on the ground by the man’s left arm, to learn that
it is a Memory Card. Pick up the Card to learn that you have
received: (1) New Data waiting to be transferred to your Kit, and (2) a New
Document.
Open your Inventory Menu. You can check out the New Document ("Incomprehensible
Recording") in your cell phone, but you will hear only some hissing sounds.
Click on the Kit to bring it to the center of the screen. Click on the
data in the cell phone on your left, to transfer it to the Kit’s inventory
section. Click on that clue in the Kit’s inventory section to transfer it
to the blue screen at the top of the Kit. Analyze this clue, but you will
get only 50% results along with a note that reconstruction is impossible.
Click on the results to "open" the file, but you will just hear the
same hissing sounds you heard on the recording stored as a New Document.
There is nothing more we can do in this area. So go back down into the
Control Room, and step out into the Corridor.
In the Corridor
Click on the Electrical Outlet
(with the two tiny red lights on top) down on the wall left of the Control Room
door, to hear Victoria’s comment.
Click in the lower-left corner of your screen to approach the second Blue Door
in this Corridor. Click on the red smudge on the floor right of this Blue
Door, to learn that it is Fresh Blood. Use the SAMPLING SWAB
from your Kit to collect this clue. Analyze the clue by first running the
Chemical Analysis and then, the Database Analysis.
Go through the Gray Rusty Door on your left, to find yourself back in
the Eastern part of the Shelter. But we don’t have anything to do here
just yet. So use the same door to return to the Western part of the
Shelter.
Close up on the Plate on the wall left of the Blue Door. Victoria
will read the reference number for that door = T082445.
Step out of the close up, and go through the Blue Door.
Upstairs Corridor
Close up on the Plate on the wall left of the Blue Door, to find the
same number on it as the one we had found on the Plate on the other side of
this door. [Apparently, the significance here is that we now know that we
can find the reference number for such doors on a plate on either side of these
doors.]
Step out of the close up. Click on the red smudges on the floor left of
the stairs, to learn that it is Blood. Use the SAMPLING SWAB
from your Kit to collect this clue. Analyze the clue by first running the
Chemical Analysis and then, the Database Analysis.
Go up the Stairs. Close
up on the Red-&-Black-Striped Box on the wall on your left.
Click on the white icon on the Box, to learn that it is a Valve but
that its opening mechanism has been removed.
Step out of the close up on the Valve, and go up the Stairs at the
bottom of your screen. Close up on the Plate on the wall left of
the Blue Door, but the reference number is illegible. Step out of the
close up, and click on the Blue Door to hear Victoria’s comment.
Fixing the Control Room
Computer
Go down to the first Corridor you had entered in this section of the
Shelter. Use the gray door on your left to return to the Eastern section
of the Shelter. Use the Hatch there to return to the Backyard. Go
to your right, towards the Fence dividing the Front and Back Yards. Close
up on the Killer’s Body. Click on the Killer’s Face, to
hear a new comment. Click on the Killer’s Right Hand, to hear
another comment. Use your POCKET-KNIFE on that hand, to retrieve THE
KILLER’S FINGER. [Don’t worry: you won’t actually see anything being
done.]
Note: Recall Victoria’s comments when you had
clicked on the Blue Door upstairs in the Western part of the Shelter. She
mentioned hearing a circular saw, and assumed that the sound was coming from
the Cellar. So long as we are out here, feel free to go inside the house
(using the front or the back door) to investigate. But you will
find that the Cellar door is locked.
Return to the Backyard, and go down
into the Shelter. Go into the Western part of the Shelter (using either
the door in the Side Corridor or the Vent in Anderson/Karson’s Cell),
and enter the Control Room.
Go to your left and close up on the Processor Table. Use THE
KILLER’S FINGER on the Processor. A cutscene will follow,
automatically bringing you out of the close up on the Processor Table.
Close up on the Computer Table.
Click on the Keyboard. Click on User: Brainjack. The
computer will ask for a password. Recall the "brand name" on
the chewing gum packets in the Killer’s Room in the Eastern Part of the
Shelter: "Brain Jack, since 1884." Since the User is
"Brainjack," try the password choice "1884." It works!
Click on the options as follows.
- Access Control
- Upper Door (locked).
- The computer asks for a
password, and we are given a few choices. But we need to input a
Reference Number for that door, and the only such code in the choices is
for the second Blue Door in the Downstairs corridor. As you might
recall, it was impossible to read the Reference Number for the door
upstairs that we are now trying to unlock. So just Return to the
Main Menu. - Cameras System.
- Group A Cameras. You will get views of the Front and Back yards.
- Group B Cameras. You will get views of Anderson/Karson’s Cell.
- Group C Cameras. You will get views of the Kitchen.
- Group D Cameras. You will get views of the Computer Room.
- Group 4 Cameras (ENCRYPTED). Even though the option states that these cameras are
"encrypted," click on it anyway, to let the computer
"know" that you know. Victoria will comment. We need
to decrypt this "camera feed" before we can proceed further in
the game. So just Return to the Main Menu and then, Quit.
Step out of the close up on the Computer Table, and close up on the Processor
Table. Click on the blue icon on the Processor, to hear
Victoria’s comment. Use the Kit’s COMPUTER KEY on the Processor,
to hear another comment.
Step out of the close up on the Processor Table, and close up on the Computer
Table again. Click on the Keyboard, Cameras System, and then on Group
4 Cameras to see if they will work now. A cutscene and dialog follow.
Conversation with Karson
The length of the conversation does not seem to actually affect the
storyline. But you can certainly gain the maximum possible information
from Karson if you stretch the conversation the longest by addressing the
topics in the following order.
·
Toughen the Tone
·
Calm things down
·
Karson’s Torture
·
Gary Anderson
·
Registrar’s File
·
Make the Killer Talk
A cutscene will follow, providing Paloma with a New Objective as the story
switches to her point-of-view.
View this guide raw, exactly as the archive holds it