Schizm: Mysterious Journey – Copyright © 11/2001  MaGtRo

by MaGtRo about 34 minutes to read


SCHIZM


MYSTERIOUS
JOURNEY


(CD-Rom
version)


By LK
AVALON


Walkthrough by
MaGtRo


November 6,
2001


Game play:
CD-Rom version of the game has less puzzles and animated scenes than the
DVD version. Full installation will allow the gamer to play the game
without changing CDs but requires CD 1 on the drive at all time. The Main
menu is at the top of the screen. Shown at the bottom of the screen are
the inventory bar and an icon that shows the possible panning view that
can be accessed at that screen stop. The 2 main characters can be played
by clicking on their picture on bottom right of screen. Pressing the
spacebar allows the game to be paused and pressing ESC allows skipping the
introduction. Press and hold the cursor to pan. 


Hannah Grant and Sam Mainey land
on Argilus, a planet discovered 10 months ago that has cities and
machineries but no inhabitants. They find that the science team also
vanished. The mystery deepens.


Living Ships –
Hannah


Upon landing, Hannah realizes that
she is separated and cannot communicate with Sam. Climb up the ramp and
see the optical effect. Turn right and up another ramp to the next
landing. Move forward on the first floor, turn right, look close on table
and see wiped mission log. Turn back, forward, enter elevator, click the
up arrow and exit elevator.


On the second floor, a console that
brings a gondola from another island is found upon panning right. Go
forward to the middle of the second floor. To the right is another
elevator and ahead is another ramp. Go forward to the ramp, climb up, see
and hear bees. Turn right, go forward to the pear-shaped bottle, look
close and note down the markings. Look close at the blue bottle at the
side and the bee picture behind it. Go back down the ramp to the elevator
on the main floor, enter and go up.


On the third floor, bees and a green
pool is seen. Turn right, forward and see another ramp going up and a
broken wood bridge. Move forward around the bend and see a lantern like
object. Press the top and see the spines move on the wall. Click on
lantern to pick it up. Climb the ramp to next level.


Upon reaching the fourth floor, go
forward, pan right and look close at another mission log. Turn back and go
up another ramp.


Upon reaching the fifth floor, a
missing scientist appears and says that the old coordinates to move the
living ships are being replaced by new ones and those are deliberately
being scattered
. This stops them from going to the Bosch Tunnel. Pan
right and see 8 tulip-like structures on the edge of the landing. Go there
and look close at the closest tulip opening and closing. Pan left, go
forward, turn left, go forward, turn right and go up the stairs. Pass the
instrument panel with 5 circular adjustments to the top floor. On the top
floor, pan right and look close at plaque of coordinates – note it
down. 


Tulip puzzle –
Go back midway down to the instrument panel. Look close and see 5
circles with movable gold arrows on the panel. Beyond the panel, note
the 8 tulips. The purpose of the puzzle is to get the object inside the
top tulip by moving it to the accessible bottom
tulip. 


By going through all the possible
combinations, clicking on (from left to right) 3, 1, 4, 2 and 5 moves
the object to the bottom tulip. Go down and pick the object up – it is a
plaque of coordinates – note it down.


Go back to the second floor where
the console to the gondola is – 2 ramps and elevator down to the area
close to the first elevator. Click on the button on the console and enjoy
the ride to the next island. Pan right, go forward, up the ramp and look
close at the spines. Looks familiar – like the ones where the lantern was
taken. Move back and pan right to the ramp, go forward and look close
behind the tentacles. Aha, a stand similar the one where the lantern was
taken. 


Spine puzzle –
Place lantern on stand by clicking on the stand (note the lantern is
highlighted). The object of the puzzle is to extend all the spines on
the opposite wall. The arrow on the stand can be moved to each line and
when the top of the lantern is pushed after a change of line, the spines
on the opposite walls protrudes in different sequence. By starting from
the right first line going to the left, note down different sequence of
the protruding spines. Moving away from the stand resets the puzzle.
When starting on line 2 on the right side to line 14, a pattern is
revealed and the sequence can be obtained. 


The correct sequence is (from
right to left) 2, 3, 4, 5, 7, 10, 11, 12 and 13. Don’t forget to click
the top of the lantern after changing the
lines.


Zoom out, turn around, go forward,
turn right and go forward walking over the protruding spines to the other
side. Look close on the object sticking out the bottom of the long
pole/tentacle. Click on it and will travel to the next island via
chair.


Turn right and go down the ramp, go
to the elevator, go up and out. On the left look close at a set of
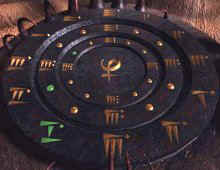
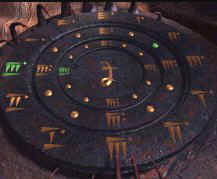
tentacles directed at a central bud.  Forward to the main console. At
the console, there are 2 big circles on both sides and a smaller one with
a hand scanner in between. The big circles have familiar icons from the 2
coordinate plaques and each are made up 3 concentric circles. Now, to
translate them. 


Coordinates
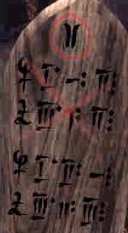
puzzle – Based on what the ghost scientist said, there are old
and new coordinates found on the 2 plaques recovered. Looking at both
plaques, the icons with the red x mark must be the old coordinates and
the bottom ones, the new coordinates. The big circles have 3 concentric
circles with dot/s beside the icons corresponds to the position of the
circles. 


So clockwise, the markings are 1-
12, 12 topmost. The existing lit up icons are from the new coordinates
from the plaque from the top floor of the other island. Look close on
the smaller center circle with the hand. Note the lit green button on
the left denoting the existing coordinates entered which must be here –
the living ships area. The new coordinates to be entered then should be
the one from the tablet recovered from the
tulip.
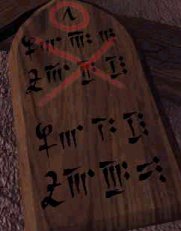


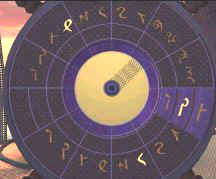
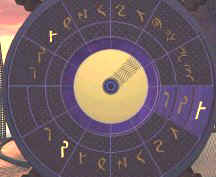
Plaque showing existing
coordinates

Plaque showing coordinates
to be entered


Left circle with new
coordinates
Right circle with new
coordinates

Enter the coordinates on the left
circle, then the right circle and then
click on the hand scanner on
the small central circle. We’re on a floating island – And away we go!
Note the second green ball is lit on the small central circle denoting the
new destination – Bosch Tunnel.


Bosch Tunnel –
Hannah


Go to the elevator, down, up the
ramp and click on chair lift on the long pole/tentacle. Enter the tunnel,
go forward 2x and look close at the statue that has a metal ring in front
of the face. Turn around and down to see that the ring shines light to a
metal plate on the floor. Look close at the metal plate and see some icons
– like the label for the left and right circle for the console. Move
forward, turn right, forward and meet a female ghost inhabitant. She gives
Hannah a rectangular plate. Continue forward 2x,turn left and up the
structure. Examine the organ like computer setup – something to remember
and work on later. Go around to check the building and Hannah starts to
get nervous. Nothing for her to do except wait for Sam.


Balloon Field –
Sam


Click on Sam’s picture. Sam came
down in a deserted balloon field, 2 – 3 thousand feet above the continent.
Look close at blue circle on the floor, it looks like a compass – record
the direction it is pointing. This changes for each game play. Zoom out,
turn right, enter the building, turn left, forward, left and look close at
another blue compass – record the direction it is pointing. Back to wooden
walkway, forward 2x and see a gondola to be checked later. Go forward and
see another compass on the left – record the direction it is pointing.
Zoom out, turn right, forward, left and look close at the fourth compass –
record the direction it is pointing. Turn right, forward and look close at
the fifth compass – record the direction it is pointing. Turn right and
see a mission log belonging to a Dr. Francis Bremmer. She states that
there’s only 4 out of 32 left and that Angela Davies found something at
Bosch Tunnel.
Go back to the first entry point on the wooden walkway.
Turn left look close on the metal stand on left and see the Dr. Hovis’
log. Click on log and listen to his warning. Look close on the large blue
compass, similar to the small ones outside. Click on each icon and record
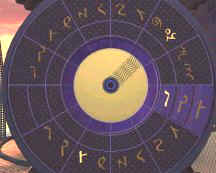
the sound made. Zoom out to reset the big compass.
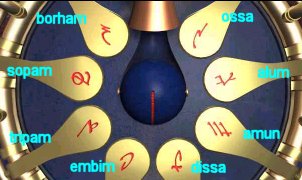

Approximate sound of
directions


Big Compass puzzle –
This a random puzzle. The compasses outside must mean something.
Click the directions in the sequence the compasses outside are found.
Get 9 blue pearls.


Go back to the gondola, enter, click
the lever and enjoy the great view and ride. Forward, turn around, forward
and look close at stand with gold icons on blue circle – something to
check later. Enter building, go to the other end, turn left, look down and
see a gorgeous fish balloon. Go back inside to the middle area and look
close at the 2 apparatus on both sides. Press some handles and walk back
to the other apparatus – this will trigger the appearance of Dr. Bremer’s
ghost and she tells you that one gas is 2x stronger than the rest,
unstable, changes every time and to guess which pipe it is
on.


Air Compressor puzzle
– This is a random puzzle. The object of the puzzle is to find
the strong gas (2x stronger than the rest) on both apparatus and pipe it
in to the balloon ship outside. Look close at one of the apparatus –
there are 10 gas handles, a large pipe on the left side leading to the
fish balloon and a small coiled one leading to a miniature balloon and
meter. By clicking a handle, gas is piped in. Then click on the center
ball (with a directional arrow) and the gas is piped into the miniature
balloon on the right side. The circle meter shows the strength of the
gas. After pumping gas to small balloon, click the determined strong gas
handle to pump the gas to the fish balloon. The center directional arrow
now faces the large pipe.


By mixing all the gasses together,
individualize each gas and then reading the meter; the stronger gas can
be identified. Individualize each gas by numbering them 1-10 – for ease
#1 gas is the one at 1 o’clock position. Pump gas #1 once, gas #2 twice
and so on until gas #10 10x to the small balloon. 


If all the gasses have a strength
of one, the meter should read 55 (1+2+3+4+5+6+7+8+9+10). The outer and
inner meter indicator is divisible by 12. The outer meter indicator is
12 units at each indent. The inner meter indicator is one at each point.
(ex. outer meter is at 5; 5 x12 = 60 and inner meter is 5; 5 x 1 = 5;
therefore 60 + 5 = 65). After pumping all the gasses, read the meter and
subtract 55 to that reading (ex: 65-55=10) The result is the strong gas.
Click strong gas handle (ex: #10) to pump the gas to the fish balloon
and see it rise. Do this procedure to the other compressor and the
balloon ship rises once more and can now be
accessible.


Now that the fish balloon is here –
where do we go? Go to the raised fish balloon, enter, turn around,
forward, turn left, forward, look close on chair and pick up the CD. Move
out, turn around, forward 2x, look close at the other chair and the
steering mechanism. The steering mechanism has familiar symbols – like the
gold icons on the stand. There is a lit button on the left side. The gold
icons back at the first entry here might be the answer.
Get off the
fish balloon via the stairs and go to the other end of this floating
building where first landed.


At the other end, look close at the
stand, place the CD at the center of the blue disk. The 3 blue lighted
symbols are similar to the icons controlled by left handle of the steering
mechanism. The other icons are similar to the icons on the top arch and
the ones controlled by the right handle of the mechanism. Click each of
the blue lighted symbols and note down the 2 new lit icons for each of
them.


Go back to the fish balloon, go to
the right chair and look close at steering mechanism. For each set of
icons, starting from the inner blue lighted icon – turn the left handle to
the first icon, move the top arch indicator to match the lit icon on top
of the blue disk and move the right handle to match the lit icons on the
bottom of the blue disk. Do this for all the 3 blue lighted icons on the
blue disk. Press the middle button. Oh, I love riding on air and the view
is just wonderful!


Temple by Bosch
Tunnel – Sam


Get off the fish balloon and now be
in contact with Hannah. After catching up on all the happenings, go down
stairs on the right, forward, right, left and enter the elevator. Click on
handle on the left post, go out to the metal ramp, forward 8x, left,
forward, pan right and click on button on right of lotus door. Move
forward until the landing of the main temple. Turn left, forward and see
the Science Base. Turn left again, forward, pan left, look close at pillar
and press button to call the rail car. 


Enter car and click on the right
knob (it’s the only one not destroyed). Move forward through dark tunnel
and forward at the center of the prayer grinder/wheels. Click on prayer
wheels and take note of the sounds. The first word is that of the wheel –
note the designs of the prayer wheels to match that sound. The next
word of the sound is that of the colored plate – note sound to match the
color of the plate. The colored plates can be changed by moving it up or
down. The sounds below are only approximations.


wheel plate
green    tossi   tuma
white    res   herma
purple   dima   dima


`      


wheel  plate 
orange   an  esaji
pink anhan  kriso


wheel  plate
red trai  som
black ranu  sanktu
yellow   tulji  makrani

Exit between yellow and green prayer
wheels and go back to the temple via the rail car. Explore the rest of the
landing. Go to the other side of the stairs and see a drawing on the wall
of the temple. Pan right, forward, walk wire bridge that goes to a round
shaped console. Look close at console. While sitting down, look across
beyond the console to a metal pillar. Look down, click knob and examine
the different parts of the console – the dumbbell like icon and the white
graduated panel. Note that the chair can be rotated right and left while
sitting on the console. In doing so, see 5 of those pillars around the
area. Move back to get off the chair and go back to the dark temple
entrance.

Enter the temple proper and see a
large pool at the center of the complex. Turn left, forward 2x and note
the prayer wheels on the left. Continue down the hallway to the end, turn
right, climb stairs, left and enter room. Note the bee tablet below the
picture of the Oriental monk similar to the one behind the Living Ship’s
pear shaped bottle. On the left side of the altar on the wall is a plaque
that shows the icon for #9 at the center. Exit the room and turn left to
continue exploring. Go down the stairs, turn right, forward, note the
prayer wheels on the left, forward 2x and see stairs on the left.

Climb stairs, turn right and forward
to the second floor. Turn right, forward 3x, pan right and see a blank
mission log. Turn right, go forward once, turn left and enter the dark
room. 

On the right wall is a mural, take
note of the parts of the drawing. The pillar on the right is similar to
the ones outside the temple by the round console. The scientist is sitting
in front of the console like what we did. The markings on bottom line of
the triangle matches the one on the console and is divided into two parts.
The marking on the right side of the triangle matches that on the wall of
the temple. Turn around and see a console. Look close at the console.
There are 5 of those pillars on the top and 5 white graduated panels
similar to the console’s white graduated panel. So, each of the white
graduated panels are for each of the 5 pillars. Go back outside the temple
to the real console.
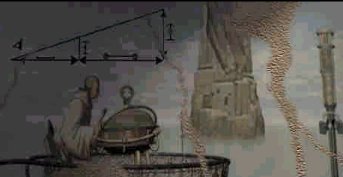


Hermat’s Pillar
puzzle – The object of the puzzle is to calculate the height of
each of the pillar and enter it on the console at the second floor of
the temple.

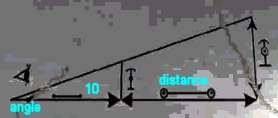
Console – The console is an
altimeter that has an oval sight with red lines that can be raised up
and down. When raised a measurement of the top of the pillar and the
angle can be obtained – it is graduated to 7 lines. The distance from
the pillar to the console is measured by the white graduated panel at
the bottom. The graduations of this panel is in increments of 0 to 50.
The dumbbell ruled lines at the middle of the console is a constant of
10. 

Measurements of the pillars
– Standardize the console/instrument by reading the drawing on the wall
of the temple. Raise the sight to get the red lines on top of the
drawing, setting the angle measurement and the ruled bar is extended to
the full 7 lines. On the white panel at the bottom, press 0 to bring the
graduation to 0 and then press + to see the distance. No change occurred
since the machine has a constant of 10 (shown by the dumbbell ruled
part). Now, measure all the pillars starting from the closest right one
as #1 pillar.

In summary – raise sight to top of
pillar even with red lines to get angle – record that down and then
press o, press +, read distance – record that down.

Calculations
– 


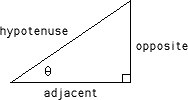
based on the trigonometric formula –


Tan q (angle) =
opposite (height) / adjacent (distance) 

or
height = angle x distance. 

based on mural, height = angle x
distance measured + 10. But final calculation has to account for
the wall mural measurements and the result should be divided by
10.


Pillar  


Angle  


Distance  

angle x distance
+10  
 = height /
10

1  


4  


45

4 x 55  22

2  


5  


16

5 x 26 13

3  


7  


20

7 x 30 21

4  


4  


25

4 x 35 14

5  


6  


35

6 x 45 27


Go
back to the dark room on the second floor of the temple. Now, enter the
height of each pillar on the each of the white panel starting from left
to right – pillar 1 to 22, pillar 3 to 21 and pillar 5 to 27 at the
bottom and pillar 2 to 13 and pillar 4 to 14 at the top. The panels
are graduated 0 – 50. If done correctly, the drawer opens. Get the green
round plate.


Go
back down to the first floor of the temple and then turn left on the
corridor. Go forward, note another set of prayer wheels on the left,
forward 1x, another set of prayer wheels on the left, turn right to the
wooden bridge and go forward. See the spaceman idol sitting Buddha like.
Save game here for ease in the next puzzle.

Go
forward. See and hear a monk behind the statue say words that are familiar
– words of the prayer wheels and colored plates. He disappears down an
opened lotus petal. Well!!! Turn right, forward, turn right, forward, left
and look close on the prayer wheels.


Prayer Wheel puzzles – The object of the puzzle is to
arrange the prayer wheels based on the words, the ghost monk recited. He
said – tossi, sanktu, tulji, herma, an, tuma. Words tossi, tulji
and an are prayer wheel words and sanktu, herma and tuma are colored
plate words. 

To
identify tossi, tulji and an – match the prayer wheels words to the
prayer wheels based on what it looks like in the room that was reached
by the rail car. Then change the colored plates to match the wheels
based on what the monk said – tossi – sanktu (black),  tulji –
herma (white) and an – tuma (green). The colored plates changes when one
plate is flipped. 
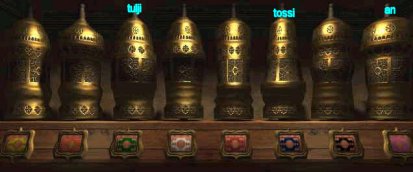

By the way the wheels look like,
from left to right – #3 is tulji, #6 is tossi and #8 is an. Change the
plate under #6 tossi to black (sanktu) – note that #3 tulji turned to
white (herma) and #8 an to green (tuma) automatically. That easy! Now
say a prayer by clicking on #6 tossi, #3 tulji and then #8 an. If
correct, the prayer will be recited throughout the temple and the lotus
petal will rise to reveal the secret opening under the spaceman statue.
Move back, left, forward 3x and down the secret passage.


Bosch Tunnel Proper-
Sam

Sam contacts Hannah in front of the
computer structure at Bosch tunnel. They have radio contact but not see or
touch each other. They agree to separate to explore and meet later.
Leave Hannah here. Go to statue, climb the stairs and look close at the
metal ring on the face of the statue. Place green circle on it. Go down to
the metal plate and see new icons revealed showing new coordinates. But as
we know the coordinates are replaced with new ones, as shown by the 2
previous coordinates. Now, to get the revised new coordinates.


Third Coordinate
puzzle – The object of the puzzle is to revise the new
coordinates based on pattern of changes on the previous coordinates.
First, transform the icons to numbers, look for pattern changes and
calculate new coordinates.

Icon to numbers – Based on
the markings on the Big circle on the console of the floating island,
the numerals of the icons can be obtained.


6   2
8 7
3 4 7
6 9 11


7 10 5
9 1 5
7 8 10
9 2 9


Living ship
coordinates


Bosch tunnel
coordinates


New
Coordinates

Pattern changes
duplicated changes is seen for the left and right console
circle.


Living
ship coordinates 
 
Bosch
tunnel
coordinates 

Coordinates for left console
circle


new


3


4


7


old


3


6


2


changes


none


-2


5


new


7


8


10


old


7


10


5


changes


none


-2


5


Coordinates for right
console circle 


new


6


9


11


old


6


8


7


changes


none


1


4


new


9


2


9


old


9


1


5


changes


none


1


4


Adjust new coordinates
the Argilian numeral system is to 12 compared to 10 of our numbering
system. 


Coordinates for left console
circle


old


10


1 +1 =2


9


changes


none


-2 


new


10


0
(12)


14-12
(2)


Coordinates for right
console circle


old


3


12 + 1 = 13


10


changes


none


1


new


3


14 – 12 (2)


14-12
(2)

1came from the 12 carried
up. 
1came from the 12 carried
up.


The new corrected coordinates is:
Left = 10, 12, 2 and Right = 3, 2, 2. There is no 12 on the console, so
0 is 12. 


Now, let Sam explore the place
Hannah went to. Left, go out of Bosch tunnel, ride the chair lift to the
floating island. Go down the ramp, up the elevator to the main console.
Click on first lighted button at bottom left, place hand on scanner and
travel to the living ships area that Hannah has explored.
(If you go
to the new coordinates, a puzzle at the Living Ship will not be triggered
and but can be retriggered (sic) by the appearance of 2 ghosts outside the
temple – I found out the hard way!).


Living Ships –
Temple – Living Ships – Sam


It is night here. Get off ship via
chair lift, cross the spines, down the ramp, forward to the console for
the gondola and ride the gondola across to the other island. Go forward,
turn right, forward, up the ramp and see a man come out of a door. He says
that Matia thinks the inhabitants are contaminated too, if it is not
done correctly now, the Good Servant will complete what it began and then
no more Wanderer, no chance. He offers precious oil, one unit of oil for
one pearl, use balance to measure what is required and take it to the
temple.


Turn right, forward to pear shaped
flask, look close, click on any number, automatically 9 units of oil is
pumped out and the 9 pearls disappears – remember the icon 9 on the wall
at the altar room at the temple. Look close to the right side and get the
blue flask of oil. 


Move back, go back to the floating
island and up to the main console. Press second lit button, click hand and
travel to Bosch tunnel. Enter Bosch tunnel, forward, left, forward to
computer structure, right, forward until stairs and go back to the
temple.


Go right, forward 2x, right, forward
3x, left, forward 5x, left, forward and right to the altar room where
there is a picture of an Oriental Monk. A monk appears and it seems that
we need one more unit of oil but we don’t have anymore pearls and we got
the required 9 units – didn’t we?


Go back to Bosch Temple. Get on the
floating island. Click on Hannah and get her on to the floating ship also
– this will save a trip later. Go to the Living ships area again to talk
with that man. Get both Sam and Hannah off the ship at the Living ship
area, cross the spines, down the ramp and ride gondola to the next island.
As Hannah, move forward after getting off the gondola, right and forward –
near the elevator. As Sam, continue up the ramp to talk to the man. He
says go to the elevator, the pearl is there. Aha! so somebody stole
one pearl and got us only 8 units of oil! Turn around, down the ramp,
forward to where you left Hannah, by the elevator. Turn left to look at
elevator, look close and see pearl wedged underneath the elevator car. Get
Hannah to ride elevator one floor up. Get Sam to pick up the pearl. Bring
Hannah down and off the elevator. Sam goes back up the ramp, to the pear
shaped flask, click blue flask on stand, move back, look close on numbers
and click on it to get one more unit of oil. Look close on right side and
get blue flask of oil. Now we have 9 units of oil, time to go back to the
temple. On the way down, the man appears again, says to get to the
balloon, there’s still time and the Good Servant might still be convinced
to stay it’s hand.


Bring both Sam and Hannah back to
the floating island. Bring Hannah to the main console of the floating
island. Get Hannah to click on second lit button and click the hand
scanner to go to Bosch tunnel. Leave Hannah on the floating island while
Sam goes to Bosch tunnel and then temple.


Temple – Sam


Sam rides the chair, enter tunnel,
goes to the temple and to the altar room. The ghost in blue gives a CD in
exchange for the oil. Looks like the CD for getting coordinates for the
balloon ship. Go to the parked fish balloon then. It is also an advice by
the man on the Living ship area. 


Go back to the temple landing
outside, down the stairs, bridge and before the next bridge meet Angela
Davis’ ghost. She says that you should go to Matia’s Zone, new
coordinates to get there, rituals abound, calculations might be key to
heaven and possibility to get off the world
. Dr. Hovis comes out to
say his own warnings. Cross bridge, cross metal bridge, tunnel
gate, left, forward, right, forward to cross the metal ramp, up the
elevator by clicking the lever on the pole on the right, cross bridge, pan
right and forward up the stairs to the fish balloon. Go to the chair with
the steering mechanism that has icons – the one to the right. Click
leftmost lit button at bottom left of screen and then click the round
button at the center of the steering mechanism. Such a
view! 


Balloon Field
– Sam


Get off fish balloon via stairs, go
to the opposite side of the floating structure and place the CD on the
stand with gold icons. Click on the highlighted symbols and note down the
new lit icons.


Go back to the fish balloon, climb
stairs and sit on the right chair. As before, pull the left lever
downwards to get the first icon, then move the selector on the arch for
the icon that is found on top of the blue disk, in this case the spiral
and then move the right lever to get the icon on the bottom of the blue
disk, in this case – like the letter l. Do the same for the other 2 sets
of icons. Press the middle blue button. There will now be 3 lit buttons on
the bottom left.


The fish balloon settles on a cliff
on a new island. Matia Island? Let us leave Sam for a while and see what
Hannah is doing at the floating island by Bosch tunnel. Click on Hannah’s
picture at bottom right of screen.


Matia Island –
Hannah and Sam


Hannah – Enter
the new coordinates calculated by Sam on the left and right circle of the
main console of the floating island. Left = 10, 12, 2 and Right = 3, 2, 2.
Click the hand scanner. Wonder where we’re going?


Now there’s a third lit button on
the hand circle. Move back and go to the chair lift. After getting off the
chair lift, the first scientist Hannah saw appears again, asks for help
and explains things – how Matia is just not only a defense mechanism but a
custodian and cultural heart of the Argilans, that the Wanderer is not a
treasure but maybe a doomsday device and that Matia thought that the
scientists were plundering and not realizing that they were
studying. 


Pan left to the trolley, enter,
click on control mechanism, pull up or down the lever on the right 
to change icons for different destinations and then click on the right
square button. The Y shaped icon works and moves the rail car to the first
stop. Turn the lever up to the icon that looks like a letter I above the Y
shaped one and press the button – didn’t go far – something is wrong with
the rail tracks. Automatically, go back on the Y-shaped icon stop, pan
right, get off the car and look at all the houses on the cliff, the
Argilans must live here. Turn right, forward 4x. 


Sam –  Move
back, get off ship and see a meshed
gate. Turn right, see a closed panel and a lock mechanism on the left side
of the screen. Click on lock mechanism, the panel opens to show 9 icons –
the fish balloon coordinates to get here. Click the lock mechanism again,
the panel closes and get a key. Go out through the meshed
gate to the elevator. The elevator has a central stand with button that
can be pulled up or down, push or pull to stop/floor wanted and release.
It has 4 stops, highest or 4th floor – meshed
gate where the fish balloon is, second from top or 3rd floor- the level to
the rail tracks, third from top or 2nd floor – off limits housing area and
the lowest or 1st floor – to some housing area, dam and tunnel. Click/hold
/release the button one stop, to go to the rail car area. Get off
elevator, forward pass a locked metal door and stop at the unlocked metal
door where Hannah is – together again. 


Hannah or Sam
–  Look close at the lock mechanism of the metal door, record it
down, press center button and enter the passage. See an oval structure
mounted on 4 legs – looks like a giant bud at the end of the rail track on
the other side of the cliff, turn right, forward and look close on a rail
track puzzle board.


First rail track
puzzle – The object of the puzzle is to build an unblocked
continuous railway track from the left side to the right side. The first
move is done by ?Matia and it will try to build a continuous wall
vertically and block your moves. It is a random puzzle and two wins in a
row is necessary. Saving a game in between the 2 wins is not possible. I
did not find a fixed strategy for this puzzle –
The wins I got were
a staggered path from top to bottom diagonal or start 2 paths,
concentrated on one and slowly build the other #2 path while the other
is being blocked by Matia (to distract) – the other #2 path usually gets
a win. When 2 wins are accomplished, the bridge is raised but upon
riding the trolley will realize that it is only a part of the bridge and
that another part has to be done yet.
This puzzle can be done later
– until after the metal door puzzle.


Move back, turn, forward, left and
go out to the other side of the cliff. Turn right, forward 2x, turn right
and see another door. This one is locked. There might be another of the
rail track puzzle here to raise the rest of the bridge to get through to
the Giant bud. Have to look for more clues. Move back, turn left and
forward until the elevator. 


Tunnel


Both characters should go down the
elevator to the 1st floor or lowest level. Here, the elevator has 2 exits,
one to the dam and the other to the village and tunnel. Take either Sam or
Hannah to look around the tunnel and see a man imprisoned at the other
side of the water. To the left is a mechanism that has 4 squares –
something to do later. Get the other character still by the elevator to go
to the other exit by the dam. See and hear water flowing off the dam, turn
left and see a water wheel, click/hold turn up on the left side of the
wheel and note that the sound of the water falling off the dam is gone.
Now, click on picture of the character inside the tunnel. Walk across the
now dry reservoir and talk to the man – take note of what Dr. Charles
Santo says. Thinking that there’s a watch system – Matia, they tried to
make it mad by taking things. Angela Davis calls the Wanderer based from
old text – treasure beyond price – the old name is Good Servant and
might have a doomsday function. Richard Hovis came here and said that the
village of Matiani makes dimensional shifts and the key are the houses –
enter twice, exit once. The  Wanderer is on the other side of the
dam. Hovis found the safety measures in unlocking the Wanderer but
cautions not to. As for him – unlock it.  Come back for me –
Promise.
Turn around and exit the tunnel.


Matiani


Sam and Hannah –
As Sam – go to the pathway away from the tunnel to the raised drawbridge.
Press the button on the stand and see that the bridge is uneven and barely
move.
  Hannah – Go to the front of the tunnel. Turn the wheel
to the right of the tunnel while facing the tunnel clockwise. Sam – push
the button and check the bridge.  Do this back and forth the two
characters until the right bridge goes down even and back up again. Hannah
– go to the wheel to the left of the tunnel while facing the tunnel and
turn the wheel clockwise. Sam – push the button and check if the left side
of the bridge is even to the right. Turn wheel one increment at a time
when the bridge is close to being even. Do this cooperation between the
two until the bridge is even.


Sam – Cross the
bridge and see 4 houses on the left and one on the
right. 


House puzzle –
Remember what Dr. Santo said – Hovis rambled about entering a house
twice and leaving it once. Check each house on the left and see that you
can go out of the same house, the house on the right or out of another
house. While exploring, a man appears at the right house and gives a
metal plate similar to the one Hannah has except with a different icon
-with a knob at the center. By trial and error the answer can be
obtained. A flash seen  by opening the right house resets the
puzzle and that the right house doesn’t matter to the house entry and
exit count. Number the houses to the left
1-4. 


  Enter
house  
    Exit
house  
  2     right
 
  4    
1  
 
1  
 
right  
 
1  
  3  
 
3  
 
right  
  3     2  
 
4  
  4  
  2    
right  

Come out of the right house into the
night. Walk towards the bridge and see a woman looking up to the left. She
says the decision is yours the Wanderer or the Good Servant.
Didn’t
Dr. Santo say that they’re one and the same? Wanderer, new name of Good
Servant or this a choice between old and new future? Look at what she’s
looking at. Look up to the left. It looks like the knobs on the top
portion of the computer setup at Bosch Tunnel. Take note of sequence of
which ones are raised out of the 12 lights. From left to right – 1, 5, 7,
8, 10, 12.  


Enter the right house and come out
to daylight. Walk over the bridge towards Hannah.


Sam and Hannah –
Enter the tunnel and go to the machine on the left. 


Metal door code
puzzle – Find the code to unlock the metal door on the third
floor. Place Sam’s metal plate on the top slot. Icons now are seen on
the white squares. Move the squares until the icons from the unlocked
metal door is shown. Remember the position of the squares. From top to
bottom – left 1x, right 2x, left 1x and right 1x. Remove Sam’s plate and
replace it with Hannah’s plate. Then move the squares to the position
shown by Sam’s plate. Record the icons.


Icon on unlocked metal
door
Position of icons from
unlocked metal door using Sam’s plate
New icons shown when
squares moved to new position using Hannah’s
plate

Sam  – Go
up to the locked metal door while Hannah stays in the tunnel. Enter the
icons found doing the metal door code puzzle. Press the
button. 


Enter and see the bridge and the
Wanderer across the cliff.
If you have not done the other rail car
puzzle do so now and also see that 2 parts of the bridge is not raised.
If you have done the other puzzle, see that one part of the bridge is
still not raised. Turn left and do another railway puzzle. Same
procedure applies. After winning 2x in a row, the bridge is raised and
passable.


Go out to the trolley area, click on
stand to call the trolley, ride the trolley, change the icon to I shaped
one, click right button and finally get on the Wanderer area. Exit the
trolley, forward and turn right or left and forward. See houses on the
left and right that have a large pipe connected to it. The pipe has 8
buttons that can be moved up or down by clicking on it. Go back to center
path, forward under the Wanderer and enter the center raised platform. See
a panel similar to the one where the fish balloon is. Place key on the
lock mechanism on the left side of the arch and click. The panel opens and
new coordinates for the fish balloon is seen. Record it
down.


Turn around and see a button at the
center of the pipe. Press button and see the Wanderer try to open. It
needs something else. Go back to where you left Hannah. Call trolley by
pressing button on stand, change icon stop to the Y shaped one and press
right button. 


Go to the wheel by the dam. Turn the
wheel and again the water flow is stopped.


Hannah – Walk
over to Dr. Santos and he says to do Ossa and Dissa at Bosch tunnel and
not to forget him. Go to the floating island via the trolley using the
slanted X icon and chair lift. Up on the main console, press the second
lit button and click the hand scanner. 


Bosch Tunnel –
Hannah


Get off the floating island and go
to Bosch tunnel. Enter and go to the computer structure. Climb up and face
the keyboard.


Computer code
puzzle – The object of the puzzle is to get the sequence for the
8 pins for each of the houses by the Wanderer. From the lights up on the
cliff seen by Sam, words given by Dr. Santos and the icons from the big
blue compass at the balloon field Sam came down on, the solution can be
obtained.


Pull the top knobs in the sequence
shown by the cliff lights – from left to right – 1, 5, 7, 8, 10, 12.
Press ossa (second from the left, top row icon) see the pins at the
bottom rise, then press dissa ( last icon at the bottom row) and a new
set of raised pins at the bottom is seen. Record the sequence of the
raised pins on the left and right side. Left – (L-R) 3, 5, 7, 8. Right –
(L-R) 1, 5, 8.


Go back to the floating island and
click the third lit button and then the hand scanner. Travel back to
Matia’s island.


Matia’s island –
Hannah and Sam


Hannah – Get off
the floating island, ride the trolley to the Wanderer. Go to the left
house and raise the buttons from left to right 3, 5, 7, 8. Then go to the
right house and raise the buttons from left to right 1, 5, 8. Go to the
raised platform area and press the button across from the coordinate
panel. See the Wanderer open and close. Turn to the right and see a ghost
that says – So
that is your decision. So be it. There is still time to save your friends.
Get to the balloon. Matia will do what it must do.
Travel back to
the tunnel where Dr. Santo is.


Sam – Go to the fish balloon
on the top floor behind the meshed gate. Enter the new coordinates taken
from the panel under Wanderer. Press center button.


The
fish balloon
flies to the Wanderer, pulls something out, travels to the floating island
and drops the  round object there. Green smoke rises from a ?chimney
on the floating island and the blue and pink material on the wings
disappears.


Go
to the wheel by the dam and stop the water flow
again.


Hannah – Walk towards Dr. Santo and he says – You came
back, kept your word, keeping faith is what matters, you and your friend
must stay together, we can go now.
He
disappears.


Bring
Sam and Hannah to the floating island and up to the main console. When
both Sam and Hannah are up  by the main console, a man appears and
points to the tentacles directed to a bud. Look close and see a gold sun
like object on top of the bud. 


Click
on it and explanations are given by Angela Davies.


Safe
Voyage to the …… 3 of you!!!


This document may not be distributed without express written
permission of the author and the content may not be altered in any
way.


For Questions
or Comments on this Walkthrough,
Please write to: MaGtRo


Copyright ©
11/2001  MaGtRo

Other guides for Schizm: Mysterious Journey