Schizm: Mysterious Journey – Chapter 6

Written by Bert Jamin (www.gamesover.com)
August 2001
Click at one of the images to go directly to that part of the
walkthrough.


Or click at the image of Hannah and Sam at the bottom of this page to go to
the next part.
Matia Island, Part One
Sam:
When you arrive at your
new destination, zoom out and exit the ship. You are facing a closed fence. Switch over to
Hannah.
Hannah:
Hannah is still standing
near the big wheels. By pushing the right signs, she’ll travel by the floating island to
Matia Island.
As you’ll remember I
explained the calculation of the new coordinates all the way back in chapter 4.
If you would like to see it once more, be my guest! If not, just use these
calculated new coordinates.
Zoom in on the left
wheel.
The outer rim: push the
sign at the 10 o’clock position
The second rim: push the sign at the 12 o’clock position
The inner rim: push the dot at the 2 o’clock position
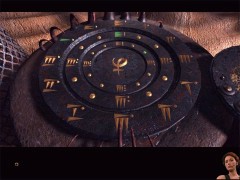
The correct coordinates on the left wheel
Zoom in on the right
wheel.
The outer rim: push the
sign at the 3 o’clock position
The second rim: push the dot at the 2 o’clock position
The inner rim: push the dot at the 2 o’clock position
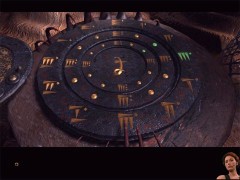
The correct coordinates at the right wheel
Zoom in on the hand sign
and push it. When the island has docked, you’ll see that the tentacle isn’t long
enough to reach the island. Great… does this mean you’re stuck on the island
or you did something wrong?
No, there is another way!
Notice:
In some games the tentacle is always long enough to reach the island. In
that case you can skip the next part about the Morse code and go on with the
next chapter. The only thing is that you’ll miss a more difficult and nice
puzzle…
Zoom out and turn to the
right. Enter the elevator and push the down button. Exit the elevator and climb
up the path. Look at the left and see the hanging tentacle. Darn, no chair to
cross the ocean this time.
Turn around and climb
down the path. Walk passed the elevator this time. Walk forward towards the
telescope. Believe me, you are not only facing the telescope but also the
beginning of one of the toughest puzzles in Schizm!
When you’re finished with
the telescope you might think is that all? No… that’s just the beginning!
Your goal is to focus the
picture by adding or removing lenses. I can’t give you the exact lenses which
have to be added. This differs from game to game. Some times I had to add 4
lenses and sometimes I had to add up to 7 lenses. But… it’s very easy. That is, once
you know the trick.
Look through the
telescope. You’ll see a faint picture. At the right side, you’ll see a down
arrow and an up arrow. At this time the down arrow will be highlighted.
Zoom out and look at the
boxes beneath the telescope. You’ll see two boxes each containing seven lenses.
When you start adding and changing lenses at random, you can be busy for days or
even for weeks with that amount of lenses.
When you looked through
the telescope, you saw the highlighted down arrow. This is very important. When
you take a lens from one of the boxes and you look through the telescope again,
this lens will be added to the telescope automatic.
The best way to solve
this puzzle is to start with the left lens from the left box.
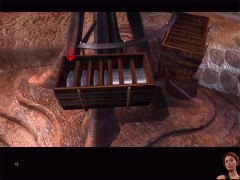
Start with the left lens from the left box. Try the next lenses one by one…
So zoom in on the left
box and take the left lens. Zoom out and zoom in on the telescope. If the down
arrow is still highlighted, this is a correct lens. In that case zoom out and
take the next lens from the left box and zoom in on the telescope again.
Every time the up arrow gets
highlighted when you added a lens, this means that you placed the wrong lens. In that case put back
that last added lens into the box and try the next one. You can put back a lens by clicking on
the empty slot of the box it came from.
So to summarize: start
with the left lens from the left box. Zoom in on the telescope and see if the
down arrow is still highlighted. If yes, take the next left lens and zoom in on
the telescope again. Every time the up arrow gets highlighted, put back the lens
where it came from and try the next one. Repeat this until you get a clear
picture trough the telescope.
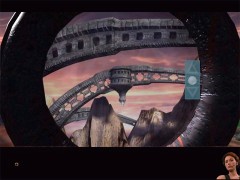
The clear picture…
After a number of lenses
you’ll get a clear picture. When you’ve gotten the clear picture, you’ll see a
small blinking bulb in the distance. As you watch it, you’ll notice that it
sometimes shines longer and sometimes shorter.
Any scout or army man
will recognize this as a Morse code. Note down this code. I can’t give you this
code because it changes all the time also. Even when you look through the telescope
again, it might be changed! So you really have to note it down!!! Also count the
times the light blinks.
If it all went to quick,
you can always look through the telescope again to see the Morse code once more. But don’t
be surprised if the code has changed by than…
When finished, zoom out.
Turn around and enter the elevator. Push the up button. Exit the elevator and
enter the room with the devices. You’ll have another close encounter with this
guy in leather jacket.
When he’s finished, go forward
one time. Turn to the right. Zoom in on the device. Your goal is to send out a
Morse code with this device. First you have to adjust the device to the number
of blinks you saw through the telescope.
In my game the light
blinked nine times. So in this case I had to move the big green highlighted knob
at the outer rim of the device at the 9 o’clock position. No need to tell you that you have to
move the knob at the position corresponding with the number of times the light
blinked in your game. So if it blinked eleven times in your game, you have to
place it at the 11 o’clock position…
Beneath the circular part
you’ll see a row of small handles. By moving these handles, you can change the length
of the blink from short to long.
In my game the down
position of a little handle caused a long blink and the up position caused a
short blink. But this can also be different in every game… To find out which
position causes which blink, pull the left handle to the down position and just leave all handles in the up position and push
the circular button in the center of the device.
After that, move the
handles in the correct position which must correspond with the Morse code you
saw through the telescope. After that, push the center button again. You now
should see that Morse code now. But… nothing happens!!!
Zoom out and turn to the
left. Go forward one time. You’ll have a close encounter with the native girl.
She explains how to use the device. The only problem is that she apparently
hasn’t learned the English language yet. Thank God the English scientist will
explain the meaning of the device also.
She tells you to use your
signal lamp. She also tells you to use the negative sequence. And not only that,
she also tells you to use the negative sequence of the pattern you saw… Well,
that explains a lot!?
Go forward to the
blinking device and zoom in again. One thing is for sure, you have to change
your Morse code. But how? What could this mean, a negative sequence and a
negative sequence of the lights you saw???
I think it’s the best
when I explain what this meant to my Morse code. The Morse code I saw through
the telescope was:
long-long-long-short-long-short-short-short-long
The negative of this
sequence means that you have to change every "long" to
"short" and every "short" to "long". This results
into:
short-short-short-long-short-long-long-long-short
The negative of the
sequence of the lights I saw means that you have to use the negative sequence
backwards. This results into:
short-long-long-long-short-long-short-short-short
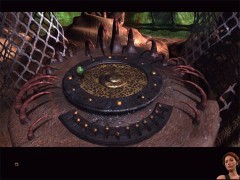
All set up correct in my game…
So this must be it!!! And
yes, it was… So to put it simply, just do the same with the Morse code you
saw through the telescope. Adjust the position of the little handles to that
adjusted sequences and push the center button.
If you adjusted the Morse
code in the correct way, you’ll see the tentacle reach the island. If not, you
did something wrong with the device and have to try again.
When finished, zoom out.
Turn to the right and enter the elevator. Push the down button. Exit the
elevator and climb up the path. Look at the left and voila, the tentacle with
the chair. Use the chair to cross the ocean.
To go to the next chapter
of this walkthrough, click on the image below…
…to go to

Matia Island, Part Two
View this guide raw, exactly as the archive holds it
Parts of this guide
One guide by Bert Jamin, in 8 parts. They read in order, and the part you are on is marked.