Schizm: Mysterious Journey – Chapter 4

Written by Bert Jamin (www.gamesover.com)
August 2001
Click at one of the images to go directly to that part of the
walkthrough.


Or click at the image of Hannah and Sam at the bottom of this page to go to
the next part.
Bosh Tunnels, Part Two
Hannah:
Walk forward two times. Turn to the left and you’ll see a
highlighted image. Zoom in on the image. One thing is for sure… this image
isn’t completed yet! Zoom out.
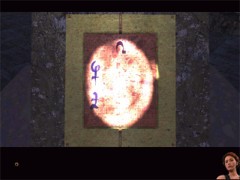
The unfinished image
Turn around and you’ll see a statue with a ladder next
to it. Walk to the statue and climb up the ladder. Turn to the left and zoom in
on the statue. You’ll see and empty sight. And you have nothing that fits into
the sight.
Zoom out, look down and climb down the ladder. Turn to the left and walk
towards the entrance one time. Turn to the right. Walk straight ahead all the
way to the end of the passage.
Important:
at this point the game can go different. Sometimes Hannah gets another close
encounter with a native girl over here. This girl gives a metal plate to Hannah.
In other games Hannah doesn’t have this close encounter with the native girl at
all. In that case, Sam will have that close encounter with her and receives the
metal plate.
When you can’t go any further, turn to the right.
Walk all the way to the end again. When your way is blocked
by a closed tunnel, turn around. You’ll have another close encounter. But this
time with two different characters. When they’re finished, walk straight ahead two times.
Climb up the ladder. Turn to the left and walk forward one time.
Turn to the right and you’ll see some kind of organ. Zoom in but don’t touch
anything yet. You don’t know what to do with this thing yet. Right? Okay… zoom
out and save
your game. Switch over to Sam.
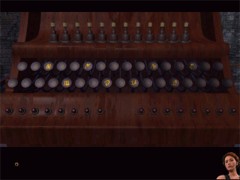
Leave it alone for now
IMPORTANT: my game has a little bug at this part. Instead of
loading Sam’s last saved game, the game took me back to the very beginning of
Sam’s adventure. If this happens to you too, load the last saved game of Sam
yourself. This also happened a few time further in the game. So save your game
often…
Sam:
Walk across the footbridge leading over the water.
Save your game. After two
steps you’ll have a not so very close encounter with a priest. You hardly can’t
hear what he’s saying. But after playing this part over and over and over again
I made the next sentence out of his wise words:
doss thanduh thuldih hellah drahin tundrah
After these words the priest will disappear through some kind
of secret passage… By the way I don’t know if these words differ from game to
game. In my game I always got these words.
These words of course remind you of the sounds the prayer
vases were making. Turn to the right and walk to the end of the footbridge. Turn
to the right and go forward one time. Turn to the left and zoom in on the prayer
vases.
Number them from the left to the right as number 1 up to and
including 8. As you know, you can switch the plates at the bottom of the vases.
Switch the plate of vase number 6 to black (thanduh). As you do so, you’ll see the plate of
vase number 3 will be changed into white (hellah). The plate of vase number 8
will be changed to green (tundrah). Now push the vases in the order 6, 3 and 8.
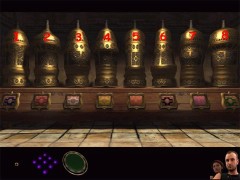
Look at the colors of the shields…
You’ll hear the sentence be repeated. You’ll also see the
secret passage of the statue be opened. This is the same secret passage the
priest entered.
Zoom out and turn to the left. Walk forward and go through
the dark tunnel. Go forward one time. Turn to the left and go forward, down the
secret passage.
Now you’ll be taken all the way to the organ where you left
Hannah. You are standing next to each other. But you can’t see or touch each
other…
After the conversation, turn to the left and walk into the
direction of the statue and the highlighted image. After two steps you’ll have
another close encounter with one of the female inhabitants. She’ll give you a
metal plate. Turn to the left and walk to the statue.
When you are facing the statue, switch over to Hannah. Walk
all the way to the statue as well. When you arrived at the statue, switch over
to Sam again.
Look at the statue and climb up the ladder. Zoom in on the
statue. Place your lens into the sight. Zoom out and climb down the ladder. Turn
around and zoom in on the highlighted image. Now it’s finished. Make a note of
these coordinates.
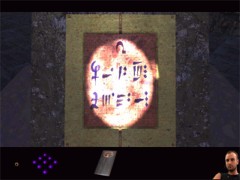
The finished image with coordinates
Great… you think,
coordinates! Well it’s not that simple! You’re now facing a
difficult task. These are old coordinates!!! You have to make a set of new coordinates
out of these old ones now. In chapter number one, you found old and new coordinates on
the two wooden tablets. The first ones were:
The old coordinates with the
red cross:
3 6 2
6 8 7
and the new ones:
3 4 7
6 9 11
The second ones you found on
the second tablet. Those were:
The old coordinates with the
red cross:
7 10 5
9 1 5
and the new ones:
7 8 10
9 2 9
Now you have to calculate
the new coordinates. I must admit, this took me a whole lot of time to figure it
all out. I’ll explain this by giving you my calculation. Here you go…
Compare the old coordinates
with the new ones on both wooden tablets you found in chapter one. This makes:
3 4 7
3 6 2 -/-
As I explained in chapter
one, you can compare the big wheels for the coordinates with a clock. The only difference is that
this clock has 12 minutes and 12 seconds. So this sum can be translated to:
3 4 7
3 5 14 -/-
-1 -7
The next sum is:
7 8 10
7 10 5 -/-
This sum has to be translated to:
7 8 10
7 9 17 -/-
-1 -7
So comparing the first
coordinates on both wooden tablets result in the same outcome. Of course this can’t be a coincidence. So to find the new
coordinates for the left wheel you have to subtract the old coordinates with 1
minute and 7 seconds. The same goes for the wheel at the right. Here’s my
calculation:
6 9 11
6 8 7 -/-
1 4
9 2
9
9 1 5 -/-
1 4
So to find the new
coordinates for the wheel at the right you have to add 1 minute and 4
seconds of the old coordinates of the image above.
The first row of old
coordinates on the image above are translated into the numbers 10, 1 and
9. So the new coordinates for the wheel at the left must be:
10
1 9
1 7
-/-
10 0 2
As we all know, a clock has
no zero position. So to make it hard on you (and me) this zero has to be
translated into 12. So the new coordinates for the wheel at the left is:
10
12 2
To find the new coordinates
for the wheel at the right you have to add 1 minute and 4 seconds to the old
coordinates.
The second row of old
coordinates on the image above are translated into the numbers 3, 12 and 10. So
the new coordinates for the wheel at the right must be:
3
12 10
1 4 +/+
3 13 14
To make it even more hard on
you (and me) you know by now that this clock only has 12 minutes and 12 seconds.
So what to do with these 13 minutes and 14 seconds!?!? Well, you have to adjust
this sum as follows. You have to translate 14 seconds into 1 minute and 2
seconds. While doing this, the 13 minutes will change into 14 minutes. So these
14 minutes have to be translated into 2 minutes and 1 hour. Because you know by
now that the hour always stays the same, the outcome of the new coordinates for
the wheel at the right is:
3
2 2
Are you still with me!?!?
Just for the record and for your comfort… this one caused a severe headache to
me! Zoom out.
Turn to the left and walk towards the tunnel. Enter the
tunnel. Zoom in on the hanging chair and use it to cross the ocean. Turn to the
right and walk down the path. Enter the elevator, turn to the left and push the
up button.
Turn to the left and exit the elevator. Walk towards the two
big wheels and zoom in on the hand sign. Push the upper green highlighted button
at the rim. Push the hand sign. Now the island is heading back to the place
Hannah came from.
When the island has docked, zoom out and turn to the right.
Enter the elevator and push the down button. Exit the elevator and climb up the
path.
Turn to the left and zoom in on the hanging chair. Use it to
cross the ocean. Walk forward to go across the tentacles in the rocks. Go
forward to climb down the path. Go forward and turn to the left. Push the button
to call the gondola.
After your free ride, go forward. Turn to the right and go
forward two times. Climb up the path. Now the door of one of the houses opens. A
men appears. The most important thing is that he offers you a pearl in exchange
of one unit of oil. He also tells you that when you’ve got the oil, you have to
take it to the temple.
Turn to the right and walk towards the pear shaped device.
Now what the hack could be one unit of oil!?!? Remember the stone tablet on the
wall in the temple. There was a sign on that tablet which looked like a roman
III… Zoom in on the pear shaped device. Push on that sign, it’s the ninth
sign from top.
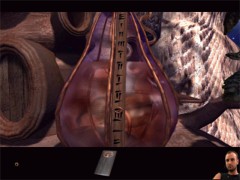
The ring at the ninth sign
Zoom in on the
little shelf at the right of the device. Pick up the blue bottle. Zoom out. Now
you have to go back all the way where you left Hannah. So turn to the left and
go forward. Climb down the path. Go forward two times. Turn to the left and head
for the device. Push the button to call the gondola.
Turn to the right and walk towards the path leading up. Climb
up the path. Cross the tentacles in the rocks and use the chair to cross the
ocean.
Turn to the right and climb down the path. Enter the elevator
and push the up button. Exit the elevator and walk towards the big wheels. Zoom
in on the hand sign. Zoom in and push the second green highlighted button from
top. Push the hand sign to sail back with the entire island.
When docked, zoom out and turn to the right. Enter the
elevator and push the down button. Exit the elevator and climb up the path. Turn
to the left and use the hanging chair to cross the ocean.
Cross the footbridge. Back in the temple go forward one time.
Turn to the left and walk straight ahead until you can’t go any further. Turn to
the right. Go forward until you enter the tunnel. Turn to the right and go
forward through the dark tunnel.
Turn to the right and cross the footbridge leading over the
water. When you’re facing the prayer vases, turn to the left. Walk forward five
times. Turn to the left and climb up the stairs.
Turn to the right and enter the room with the painting.
You’ll have a very brief and even more disappointing encounter with the priest.
He’s sticking up one finger (no, not that one) and disappears… Now what??? I guess
it’s obvious that he wanted to make clear that you don’t have the required
one unit of oil.
So… no pearl this time. But which is much more worse, you
have to go all the way back to that pear shaped device. And not only that, this
time you have to bring Hannah along too!
Exit the room and turn to the left. Climb down the stairs and
turn to the right. Go forward five times. Turn to the right and cross the
footbridge. At the end turn to the left and enter the dark tunnel. Go forward
one time and turn to the left. Enter the secret passage. Go forward three times
and turn to the left. Go forward three times. Turn to the right and go through
the tunnel.
When you are facing the hanging chair, switch over to Hannah.
Hannah:
Turn around and walk forward towards the tunnel. Go through
the tunnel. Although you are both standing near that chair, you still can’t see
each other. Use the chair to cross the ocean. Now Hannah says: "So now the
chair is working again"!?!? Switch over to Sam.
Sam:
Also use the chair to cross the ocean. Turn to the right and
climb down the path. Enter the elevator and push the up button. Exit the
elevator and walk towards the big wheels.
To go to the next chapter
of this walkthrough, click on the image below…
…to go to

Bosh Tunnels, Part Three
View this guide raw, exactly as the archive holds it
Parts of this guide
One guide by Bert Jamin, in 8 parts. They read in order, and the part you are on is marked.