Schizm: Mysterious Journey – Part 7

Written by Bert Jamin (www.gamesover.com)
August 2001
Click at one of the images to go directly to that part of the
walkthrough.


Or click at the image of Hannah and Sam at the bottom of this page to go to
the next part.
Matia Island, Part Two
Hannah:
You’ll have another close
encounter with the scientists Tomlin. Walk towards the trolley and enter it. Push
the angular device. This turns out to be the control panel of the trolley.
You’ll see a sign on the
display, a thick copper colored dial and two buttons. The sign on the display
corresponds with the place the trolley is standing right now. So make a note of
the sign in case you have to go back to this place!
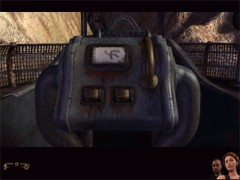
Remember this sign
By moving the dial, you
can choose other signs and with that other destinies. Because you don’t know any
other destination yet, leave it alone. Switch over to Sam.
Sam:
He’s still standing in
front of the closed fence. Turn to the right. You’ll see a closed panel. Between
yourself and the panel you’ll see a big dark arch. At the left part of the arch
you can see some sort of key.
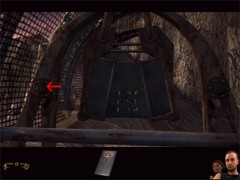
The key
Turn the key and the
panel will open, revealing the coordinates of Matia Island. But you are already
standing there!?!? Turn the key once more. The panel closes and which is much
important, you’ll get the key.
Turn back to the left to face
the closed fence again. Open the fence and go forward. Enter the elevator. In
the center of the elevator you’ll find the lever to control the elevator. When
you practice the functions of this lever you’ll notice that is can be moved
into three positions. With every different position, you’ll here a click.
These three positions
correspond with the three floor this structure has. On the first floor is
nothing but a closed building. So you won’t have to go to that floor at all.
You are standing on the
third floor right now. Because you’re going to
the second floor now, move the handle down until you hear one click. Then let go the
lever. On the second floor walk ahead until you are facing the rocks. Turn to
the right and go forward one time.
Turn to the left and look
at the door. Notice that this closed door has the same red sign as the one on
the metal plate you or Hannah received from the native girl back in the temple. Zoom in
on the door and notice some kind of safety lock. Ignore it for now.
Zoom out and turn to the
right. Walk forward two times. Turn to the left to see the same kind of door.
Make a note of the red sign above the safety lock. Zoom in on the door and make
a note of the combination of the safety lock.
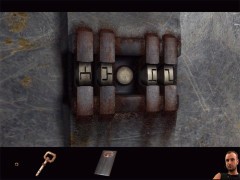
You’ll need this one later on
Push the circular button
and enter the door. Turn to the right and walk toward the square device. Zoom in
on the device. Great… building bridges!!!
Your goal is to connect
the left and the right part of the device to each other. It’s not very hard but
a little annoying. You have to play against the computer. And you have to win
this game twice before you can go further. One annoying part is that you can’t
save your game. Another annoying part is that if you win the first game, you’ll
see a railway bridge raise halfway up. But when you lose the second game, you’ll
see the bridge be lowered and you have to start all over again. I can only wish
you luck and patience with this one. Just use you brains or skills.
When you won the game
twice, you’ll see the bridge be raised all the way up. Zoom out and turn around.
Go forward one time. Turn to the left and enter the door. Turn to the left and
walk towards the stairs. Climb up the stairs.
Turn to the left and go
forward two times. Look at the left and you’ll see the rails leading through the
tunnel. Look at the right. Now you’ll see the raised railway bridge. Look at the
sign on the display of the device next to the rails.
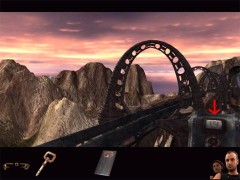
Remember this sign also
This is the sign Hannah
needs to travel to this spot. So make a note of the sign. Save your game and
switch over to Hannah.
Hannah:
Enter the trolley and push
the steering device. Don’t forget to make a note of the sign on the display.
Turn the thick copper colored dial two signs down to get the correct sign on the display. This sign
is the one Sam just saw near the railway bridge.
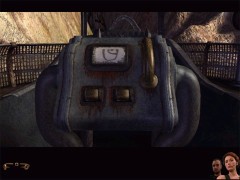
And this one
Push the right button.
When the trolley stops, turn to the left and exit. Now you’re standing at the
same spot as Sam. You have to go back to the elevator. So turn to the right and
go all the way back until you reach the elevator. Enter the elevator and push
the lever all the way down. Exit the elevator and switch over to Sam.
Sam:
Go all the way back to
the elevator also. Enter the elevator and push the lever all the way down.
Exit the elevator. Turn to the right and walk towards the big gray tubes. Go
through the dark tunnel.
You’ll end up in a cave.
At the opposite side you’ll see a imprisoned scientist. You can’t near his cell
because the cave is flooded with water.
Turn to the left and zoom
in on the hoses. If Hannah left her metal plate on top of the hoses, pick it up.
You’ll see four
different signs. You can change these signs by moving the display to the left
and to the right. You have no idea which combination you have to make and what
for. So ignore it for now. Just remember it’s there. Take back the metal plate
and zoom out.
Turn to the left and exit
the cave. Go passed the left side of the elevator to follow the big pipes. Go
forward one time and look to the left. You’ll see a big wheel and you’ll hear
water flow through the pipes. Place your cursor at the left side of the wheel
and turn it upwards one time. You’ll hear the water stop flowing.
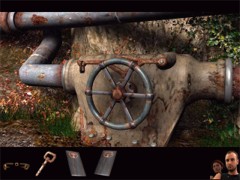
The wheel to shut off the water
Turn to the left. Hey,
the wheel goes back and so does the water! Good thing that you brought Hannah
along… So turn the wheel once more up to stop
the water again. Now switch over to Hannah.
Hannah:
Enter the cave with the
prison cell. If Hannah received a metal plate from the native girl back in the
Bosh tunnels it’s the best if you leave it here. To do so, turn to the left and
zoom in on the hoses. Place your metal plate on top of the hoses and zoom out. Walk to the cell and listen to the story of the imprisoned
scientist Dr. Charles Santos.
Turn around and exit the cave. While standing in front of the elevator, switch
over to Sam.
Sam:
Turn around and walk
towards the elevator. Enter the elevator and exit through the opposite side. Go
forward two times. You’re standing at the right of a drawbridge and in front of
a button. Push the button to see the bridge move. But… it won’t go down all
the way. One thing is for sure, both parts of the bridge aren’t equal to each
other. You need Hannah’s help with this one. So switch over to Hannah.
Hannah:
Hannah is still standing
near the elevator. Look at your left and at your right. You’ll see two big
wheels. When you’re facing the elevator, start with the left wheel. You have to
turn it one time and then switch over to Sam.
Sam:
Push the button to see
the bridge lower a bit more and raise again.
Hannah and Sam:
The both of you have to repeat this until the
right part of the bridge is horizontal but still goes up again. So you’ll have to change from Hannah to
Sam several times. But the bridge will still be raised every time. This is
caused by the fact the two parts of the bridge aren’t equal to each other yet.
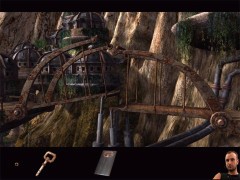
Get the right part to horizontal position first
When the right part of
the bridge is lowered to it’s horizontal position (and goes up again), Hannah
has to move the wheel to her right side when facing the elevator. Sam has to push the button every time
Hannah moved the wheel. The two of you have to repeat this also until the bridge stays lowered. So you have to switch
from Hannah to Sam and back several times again.
Sam:
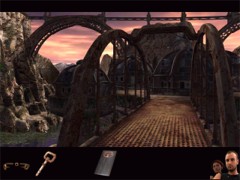
The bridge lowered at last
When the bridge stays
lowered, cross it. Go forward two times. Look around and you’ll see one central
house surrounded by four other houses. Turn to the right and walk towards the
door. Open the door and you’ll see a bright flash of light. You can’t enter this
house. Turn around and
you’ll see four of these kind of houses.
Now remember the words of
the imprisoned scientists that you should enter each house twice and leave it
once… Okay, here we go. First of all I’ll give you the explanation of this
puzzle (okay Mario Buteau, you asked for this :-). After that I’ll give you some
correct orders of entering the houses.
This central house we’ll call house A. Number the
four other houses from the left to the right as 1, 2, 3 and 4, standing with
your back turned to house A.
What you have to do: enter
each house twice and exit each one once. You cannot enter house A. So by entering twice in each house, a total of 8,
you will necessary have to exit house A four times in order to accomplish your
task. House A functions as a reset. Every
time you open its door, you reset the whole thing. This is acquired
by experimentation.
With that all in mind,
let’s start the fun !!
1.
You have to establish for each house (1, 2, 3 and 4), its sequence, if there is any. If
such a sequence exists, it will then be easy (???) to determine which house to
enter because you would KNOW exactly
where you would EXIT !!!!
2. To
determine the sequence, enter house 1 as many times as it takes and write down the
exiting house. After 8 times entering house 1, you come up with entering that
house and exiting that SAME house
over and over again !!!! So, that’s it !!! The sequence has ended after
having entered the house 8 times. This can’t be a coincidence!
Open the door of house
A to
reset the whole thing and begin to write down the sequence for house 2 as
well. The same applies: 8 house-sequence and then, you enter and exit house 2
over and over again.
Do this for houses 3
and 4 as well (don’t forget to reset after the sequence of house 3 of course by
opening the door of house A). Finally, you come up with this exciting table,
where the number at the left is the house you enter and the number at the right
is the house you exit (so for instance 1-3 means that you enter house 1 and exit
house 3 and 2-A means that
you enter house 2 and exit house A).
Sequence for each house
is written vertically:
| House 1 |
House 2 |
House 3 |
House 4 |
| 1-1 | 2-A | 3-4 | 4-2 |
| 1-3 | 2-2 | 3-1 | 4-1 |
| 1-A | 2-A | 3-3 | 4-2 |
| 1-3 | 2-1 | 3-4 | 4-4 |
| 1-A | 2-4 | 3-A | 4-3 |
| 1-1 | 2-2 | 3-2 | 4-3 |
| 1-2 | 2-1 | 3-3 | 4-4 |
| 1-4 | 2-A | 3-1 | 4-3 |
3. To
make sure that the sequence is now correct horizontally, you have to reset the whole thing by opening
the door of house A. If you enter house 1 you will of
course exit house 1 similar to the sequence. If you now enter house 4 (without resetting),
you’ll exit
house 1 !!! This means that the sequence is valid horizontally as well.
When you enter a particular house on one line, you now know that the next time
you will
enter a house, the next line will be used.
4.
You have to exit house A four times. Notice that this house is accessible through
houses 1, 2 and 3 only and never through house 4. The sequences tell you that
you can
exit exactly four times from house A on move one, three, five and eight.
5. So,
the moves one, three, five and eight are a must to exit house A four times!!! So
these are forced moves. This implicates that you only have to find the correct
combinations for the moves two, four, six and seven yourself.
6.
With the house-sequence in mind you know exactly which house to enter and where
you would exit. So… the only thing you have to keep in mind by choosing the
correct order for the moves two, four, six and seven is that you have to enter
each house two times and exit it only once. Based on this,
there are several correct orders. I tried different orders and they all worked
perfect. I give you three different orders. So if you’re a good adventurer, you
should try them all. And if you are a very good adventurer you should try to
find other combinations yourself of course.
One order to solve the
house puzzle:
enter house number 2 to come out of
house A
enter house number 4 to come out of house number 1
turn around and re-enter house number 1 to come out of house A
enter house number 1 to come out of house number 3
turn around and re-enter house number 3 to come out of house A
enter house number 3 to come out of house number 2
Now you’ll have another close encounter and you’ll get another metal plate.
Don’t let this disturb you!!!
enter house number 4 to come out of house number 4
enter house number 2 to come out of house A.
And another one:
enter house number 2 to come out of
house A
enter house number 3 to come out of house number 1
turn around and re-enter house number 1 to come out of house A
enter house number 4 to come out of house number 4
turn around and re-enter house number 3 to come out of house A
enter house number 4 to come out of house number 3
Now you’ll have another close encounter and you’ll get another metal plate.
Don’t let this disturb you!!!
enter house number 1 to come out of house number 2
enter house number 2 to come out of house A.
And another one by
Robert C. Stevens from Uhrichsville, Ohio
enter house number 2 to come out of
house A
enter house number 4 to come out of house number 1
turn around and re-enter house number 1 to come out of house A
enter house number 4 to come out of house number 4
enter house number 1 to come out of house A
enter house number 3 to come out of house number 2
Now you’ll have another close encounter and you’ll get another metal plate.
Don’t let this disturb you!!!
enter house number 3 to come out of house number 3
enter house number 2 to come out of house A.
Thanks a lot Robert!!!
If you
figure out another combination for this puzzle, just let me know by sending me
an e-mail ) and
I’ll add it to this page, including your name as a kind of reward !!!
As you can see, you now
entered each house twice and left them once. Besides that you have exited house
A four times.
Notice that it’s dark
now. Turn to the left and walk towards the drawbridge. You’ll have another close
encounter. Boy, is she taking her time! The most important thing she tells you
is that you have to choose between The Wanderer and the Good Servant. And why is
she looking up in the sky so remarkably?
When she disappears, look
up in the same direction as she did. On top of the dam you’ll see some kind of
bottles with highlighted caps. Notice that some of these "bottles" are
raised. Number these bottle from the left to the right as number 1 up to and
including 12 and make a note of which
"bottles" are down and which are up.
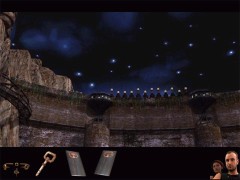
See that the "bottles" number 1, 5, 7, 8, 10 and 12 are sticking up
Turn to the right and go
forward two times. Turn to the right and walk to the door of the house (A). Open
the door and enter the house. You’ll have another close encounter. When you’re
standing outside again, turn to the left and walk to the bridge. Cross the bridge and walk towards
the cave with the prison cell.
Enter the cave. Turn to
the left and zoom in on the hoses. Place your metal plate on top of the hoses.
Number the hoses from top to bottom as 1, 2, 3 and 4. With this plate at the
top of the hoses you have to change the order of the signs so they correspond
with the signs you saw on the safety lock at the second metal door. This is the
correct combination:
hose number 1: pull the
display one time to the left
hose number 2: pull the display two times to the right
hose number 3: pull the display one time to the left
hose number 4: pull the display one time to the right.
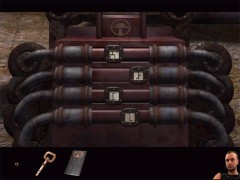
The combination for the second door
Get back your metal plate
from the top of the hoses and zoom out. Now place the other metal plate on top
of the hoses. Now you have to pull the displays in the same way you just did.
So:
hose number 1: pull the
display one time to the left
hose number 2: pull the display two times to the right
hose number 3: pull the display one time to the left
hose number 4: pull the display one time to the right.
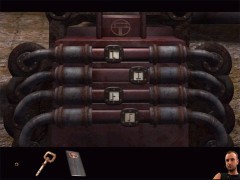
The combination for the first door
Because you just
discovered the combination for the safety lock of the first metal door, make a
note of the combination of these signs. Zoom out and exit the
cave.
To go to the next chapter
of this walkthrough, click on the image below…
…to go to

Matia Island, Part Three
View this guide raw, exactly as the archive holds it
Parts of this guide
One guide by Bert Jamin, in 8 parts. They read in order, and the part you are on is marked.