Schizm: Mysterious Journey – Chapter 2

Written by Bert Jamin (www.gamesover.com)
August 2001
Click at one of the images to go directly to that part of the
walkthrough.


Or click at the image of Hannah and Sam at the bottom of this page to go to
the next part.
Gas Collector Island
Sam:
Zoom in on the device at
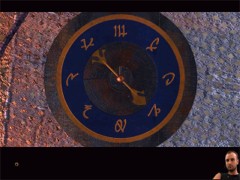
the floor. It turns out to be a compass. Note the direction the needle is
pointing to. You’ll have to find four other of these compasses in the next part of the
game. The directions of the needles are different every time. So you really have
to write down each and every direction this time!!! Also make a drawing of every sign for
each direction on the compass and write down which direction (north, north-east,
east etc.) belongs to each sign.
Make a note of every point of the compass
Zoom out and turn to the
right. Walk towards the big wheel shape device. Zoom in on the blue pedestal at
the left of the device. It’s another mission log. Zoom in and switch it on.
You’ll get a brief message this time from Dr. Hovis. Zoom in on the wheel and you’ll see the
same signs as on the compass.
Your goal is to find the
other four compasses. So there are five compasses in total. You already have found
one of them at the beginning of this part of the game. Now we’ll just go and
find the other four. Make a note of the direction each and every needle is pointing
to and also note the order in which you find them. After you have found all five compasses, you have to
push the directions on this big
wheel in the same order as the directions you found on the five compasses. So
leave the wheel alone for now.
Turn around and go
forward once. Turn to the right and go forward one more time across the wooden
planks. Turn to the left and head for the next compass on the floor. Turn to the
right and zoom in on the compass. Note the direction the needle is pointing to. Zoom out and step back on the
wooden planks.
Go through the tunnel and
you’ll arrive at some sort of cable-railway. Walk passed the gondola and look at
your left to find another compass on the floor. Zoom in and note the direction
the needle is pointing to.
Zoom out, turn to the
right and walk forward
one more time to find the next compass. Turn to the left, zoom in on the compass
and note the direction the
needle is pointing to. Zoom out, go to the right and walk forward one more time to find the last
compass. Zoom in and note the direction the needle is pointing to.
Zoom out and turn to the
right. You’ll see another mission log. Zoom in on the mission log and switch it
on. You’ll get a message from Dr. Francis Bremmer this time.
Zoom out and go all the
way back to the big wheel shape device. Zoom in on the device and push the
signs on the device in the same order as the five compasses have been pointing to.
When you’ve done well, the
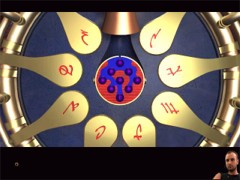
blue bulb opens and reveals 9 blue balls. Take them! After that also make a note of each word that you’ll hear in the foreign
language by pushing each and very sign on the wheel. I think
these are the correct words:
north: malum
north-east: dissa
east: ernje
south-east: trila
south: soha
south-west: oram
west: ossa
north-west: arhu
You’ll need to know two
of these words at the end of the game. By the way, don’t e-mail me for typos on
these ones also…
That’s why you had to make those notes
Zoom out and head back all the way
to the gondola you just have seen. This time enter it. Pull the lever. When the gondola stops,
exit. Turn around and walk towards the tunnel. Enter the tunnel and walk until
you are standing on a crossing. Look around and you’ll see a wheel shape device
at your left and the same one at your right. Walk towards the gas collector at
the right side. You’ll have another close encounter with Dr. Bremmer.
Her message isn’t very
clear. But she’s telling you one very important thing. This is that you’ve to
find a gas that’s two times stronger then the other gasses. She also mentions
that the gas collector is unstable and that when you do something
wrong during this gas actions, the collector will be reset. This causes the
gasses go through other hoses… So in that case you have to start all over again!
So a very valuable tip:
save your game every time you did things correct. This time you can see if you
did things correct. When you are filling the vessel with the correct gas, it
will raise. When you used the wrong gas, it just won’t raise…
You can solve this puzzle
in a very simple mathematic way! Zoom in on one of the gas collectors. It
doesn’t matter which one you are doing first. And… this mathematic way goes
for both gas collectors.
When you look at the
collector you’ll notice 10 hoses with 10 handles attached to them. Start with
the handle on the 1 o’clock position. Move this handle one time, move the second
handle two times, the third handle three times, the fourth handle four times and
so on. When you have moved them all this way (with moving the tenth handle 10
times), press the center of the device.
Now you’ll zoom in on the
pressure meter. If all gasses where of equal strength the meter should indicate
a pressure of 55 (1+2+3+4+5+6+7+8+9+10). As you’ll see the meter indicates a
higher pressure… Any idea how this is caused??? It’s very simple… as Dr.
Bremmer told, one of the gasses is two times stronger then the others.
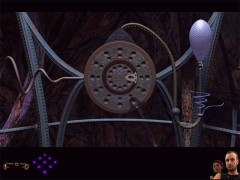
The outer marks are
showing the pressure in 12 units. So if the outer meter points to 5, this means
a pressure of 60. The inner marks are showing the pressure in 1 unit. So if the
inner meter points to 3, the total pressure is 63. So what, you might think…
Well, because of this mathematic way you now can simply tell which hose contains
the twice as strong gas. In this example the hose with the correct gas would be
63-55=8. So in that case I had to turn around to the gas collector and pull handle 8
once.
The outer pointer points to 5, the inner pointer points to 3. So that makes (5×12) + 3 = 63
So in this case the correct hose must be 63 – 55 = 8
Because the hose with the
correct gas differs from game to game, I can’t give you the exact solution.
But the one I explained before is simply the best and hardly can go wrong! By
the way, if the inner pointer stays on top, you only have to count the pressure
of the outer pointer.
When you did this trick
with the first collector, you’ll see the air vessel getting filled with gas and
raise half way up. If not, you did something wrong…
When the vessel raised,
walk to the other gas collector and do the same trick. When you did things correct,
the vessel will go all the way up this time. If not, you did something wrong again…
When the vessel is in
top, zoom out, turn around and
step forward to the crossing. Turn to the left and go through the tunnel. When
you’re standing outside, turn to the left and walk to the parked air vessel.
Enter the vessel. When
you are facing the wooden stairs, turn around and go one time forward. Turn to
the left and walk towards the hanging chair. Zoom in on the chair and pick up
the cd. Zoom out
Look around and you’ll
see the same kind of steering device at the opposite site. Walk to that opposite
cockpit. Zoom in on the
steering device of the vessel. You’ll see a handle at the left and the same kind
of handle at the right. Above these handles you’ll see some kind of graduation
arc. Also notice the strange signs on the handles and on the arc. Zoom out.
Turn around and go one
step forward. Turn to the left and head into the direction of the wooden stairs.
While you are facing the wooden stairs, turn around. Look down and exit the
vessel. Walk towards the crossing to have another close encounter with Dr.
Bremmer. She tells you very urgent to go to the Bosh Tunnels.
Turn to the right. Keep
on walking forward until you’re standing outside again. Turn to the right and zoom in on the blue pedestal. Place the cd
in the center of the device. You see three blue symbols on the device. Don’t
they look familiar? Yep these are the same as you saw on the steering device.
The three blue signs represent the signs of the left steering handle.
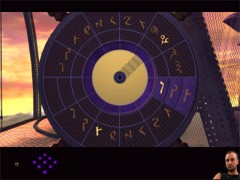
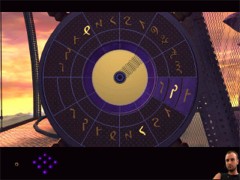
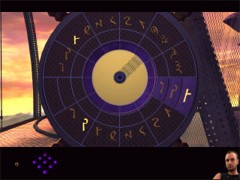
When you push one of
the blue signs, the cd will spin and two other symbols get highlighted. You can divide
this device in an upper and a lower part. The highlighted symbols at the
upper part have to be used with the graduation arc. The highlighted symbols at the lower part have to be used with the right steering wheel.
Push
the three blue
symbols and note the signs for the graduation arc (the upper highlighted signs)
and for the right steering wheel (the lower highlighted signs) all three times.
The first set of signs
The second set of signs
The third set of signs
When you pushed all
three signs and noted down all signs, zoom out and go back to the airship. Enter the
airship. When you are facing the
wooden stairs, turn around and walk forward one time. This time turn to the
right and enter the cockpit. Zoom in on the steering device. Save your game here in
case you are doing something wrong with the steering device.
The left steering wheel
is in the correct position now, so leave it alone. Move the pointer of the
graduation arc to the correct position and pull the right steering wheel into
the correct position also.
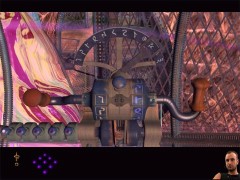
The pointer and steering wheels in correct position…
Now you have to make the
next combination of signs. So don’t touch anything else yet!!!
Pull the left steering
wheel into the next position (the sign looks like a P). Move the pointer of the
graduation arc to the correct position. Pull the right steering wheel into the
correct position.
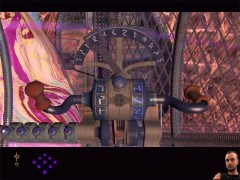
…and again…
Now you have to make the
last combination of signs. So again, don’t touch anything else yet!!!
Pull the left steering
wheel into the next position (the sign looks like an r). Move the pointer of the
graduation arc to the correct position. Pull the right steering wheel into the
correct position.
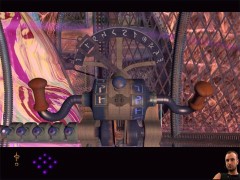
…and again. Now you may push the big blue button!!!
After you did all three
combinations push the big blue button between the steering wheels. If you done
well your vessel will take off to your new destination. When you are landing on
a place like this, you’ve done things well.
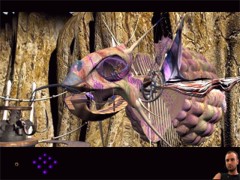
Good job!
If you’re vessel stops
above the ocean in the middle of nowhere, you did something wrong in the cockpit. In that case you have
to do the trick with the steering device again.
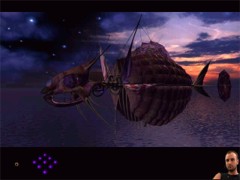
No good job!
If you did everything
okay, you’ll go to the next part of the game…
To go to the next chapter
of this walkthrough, click on the image below…
…to go to

Bosh Tunnels, Part One
View this guide raw, exactly as the archive holds it
Parts of this guide
One guide by Bert Jamin, in 8 parts. They read in order, and the part you are on is marked.