The Secrets of Da Vinci: The Forbidden Manuscript
The Cups & Balls Puzzle
Again, it
is much more complicated to explain the solution than to solve the puzzle
itself.Take a moment to familiarize
yourself with the set up.There are two
cups, at the bottom of the cabinet, under the round mechanical plate.There is a red dot on the left cup,
indicating that we must put only red balls in this cup.So we will call it the RED CUP.Similarly, there is a yellow dot on the right
cup, indicating that we must put only yellow balls in that cup.So we will call this the YELLOW CUP.
Now look
at the round mechanical plate above the two cups.If we pull the chained handle on the right,
the plate will start rotating clockwise, and several red and yellow balls will
slide down from the upper left side of the mechanism and fill the holes in the
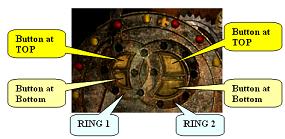
outer edge (or rim) of the metallic plate.Note the two interlocking rings, with holes of their own, in the top
half of the plate.Let’s call the
smaller ring on the left "RING 1" and the larger ring on the right
"RING 2."(See Picture
below).Note that you can drop the balls
into the Red and Yellow cups only by moving them through RING 2.Moving the balls through RING 1 only returns
the balls into the outer edge of the round metallic plate.
Examine the two arc-like, gold-colored buttons,
in each of these two rings.Clicking on
the button at the TOP of RING 1 will move the ring (and the balls in its holes)
clockwise, while clicking on the
button at the BOTTOM of this ring will move the ring (and the balls in its
holes) anti-clockwise.The set up in RING 2 is the direct opposite
of this, in that clicking on the button at the TOP of RING 2 moves that ring
(and the balls in its holes) anti-clockwise, while clicking on the button at
the BOTTOM of that ring moves that ring (and the balls in its holes)
clockwise.Finally, note that the puzzle
is set up so that the balls will alternate between the cups as they drop, i.e.,
the first ball to go down will automatically drop in the RED CUP, the second
will drop in the YELLOW CUP, the third will drop in the RED CUP again,
etc.So it is very important that you
line up the balls in alternating colors as well, so that only the red balls
will go into the RED CUP and only the yellow balls will go into the YELLOW CUP.
Now that we have figured out the set up, let’s solve the
puzzle!Please, keep in mind, however,
that the order of the balls filling in the metallic plate might be randomly
generated by the computer.So they might
turn up in a different order for you than they did for me.Just be sure to drop the red balls in the RED
CUP and the yellow balls in the YELLOW CUP.In fact, you must drop a total of 7 red balls in the RED CUP and 6
yellow balls in the YELLOW CUP.If you
miss, and a ball goes in the wrong cup, don’t worry.Just click on the "Exit" icon, step
away, and then come right back and start the puzzle, to find that the puzzle
has been reset for you.Here is how it
worked out for me.
As I started the puzzle, I found a red ball was already
in RING 1, before I even pulled the chain.So I clicked ONCE on the top button in RING 1, to move the red ball into
RING 2.I then clicked THREE times on
the top button in RING 2, to move the red ball down and into the RED CUP.I then pulled the chain.As the metallic plate started rotating, a
yellow ball immediately slipped into RING 1.I then waited for a red ball to appear in the metallic plate’s outer
edge, just above the yellow ball in RING 1.As the red ball appeared, I clicked ONCE on the top button in RING
1.Thus, the yellow ball moved into RING
2, while the red ball slipped into RING 1 right behind it.I then clicked THREE times on the top button
in RING 2, to deposit the yellow ball in the YELLOW CUP.
I then waited again, this time for a yellow ball to
appear in the metallic plate’s outer edge, above the red ball already in RING
1.As the yellow ball appeared, I
clicked ONCE on the top button in RING 1, thus moving the second red ball into
RING 2 as the second yellow ball slipped into RING 1 behind it.I then clicked THREE times on the top button
in RING 2, to deposit my second red ball into the RED CUP.[Note:Don’t worry if, let’s say, a red ball slips into RING 1 instead of the
yellow one you were trying to get in there.Use the button at the bottom
of RING 1, to move the ring anticlockwise,
just as a yellow ball appears in the metallic plate’s outer edge.The yellow ball will slip in the empty hole
in front of the red ball you just moved away.Thus, you don’t have to start all over.By clicking repeatedly on the button at the bottom of RING 1, you can
even return the wrong ball to the outer edge of the metallic plate.Be careful in using the button at the bottom
of RING 2, however, because if pushed repeatedly at a time, it will just move
the ball clockwise only to still drop it into one of the cups, when you might
have been trying to just move that ball back to RING 1.]
Note also that the metallic plate tends to stop rotating
after a while, so you will have to pull the chain on your right, from time to
time.After dropping 6 balls into each
cup (first in red, then in yellow, then in red again, etc.), when you drop the 7th
red ball in the RED CUP, both the
cups will go down and then come back up again, as the "Exit" sign
in the lower right-hand corner of the screen disappears.This means that you have solved the
puzzle!At that point, click on the
wooden lever sticking out from the bottom right portion of the cabinet.The camera will automatically pan to your
right, and you will see a wooden platform come up.
Step onto the platform, turn around and pull the lever in
the floor, on your right.A short cut
scene will follow, as the platform serves as an elevator to take the hero down into
what we will call the Workshop Cellar.The cut scene will end, focusing our view on the lever on the floor,
showing that it is now on our left.Turn
right and take a step forward in this Cellar.Look to your right, and click on the gray wall cabinet, to open it and
find the same kind of mechanism inside that you had just used upstairs to
summon the platform elevator.But you
don’t have to solve a puzzle here.If
you click on the lever at the bottom right of this cabinet, the camera will
automatically pan to your right and show that the elevator has gone up.Click on the lever again, and the camera will
pan to the right to show that the elevator has returned.But there is no need to fiddle with this
mechanism at all.Apparently, it was put
here only to show us how someone approaching from the other side of the Cellar
would be able to summon the elevator to take him up into the Manor.
Step forward to your left, and the camera will
automatically pan down further to your left, as the hero will comment,
"Ah, what’s this?"Click on
the ground, to clear away some of the dirt and reveal a set of marks.Bring out the Short Broom from your
Inventory and click on the marks, to reveal a similar set of marks above the
one already exposed.Take out the incomplete Sheet of Paper, from
your Inventory, and place it on these marks.Now bring out the Charcoal Crayon, and click on the Sheet of
Paper you just placed on the ground, to trace the marks onto the Sheet of
Paper.Pick up the Sheet of Paper,
and the hero will inform you that we don’t have a key yet to decode these
marks.Open the Inventory and attach
this Sheet of Paper to the Portfolio.Thus, we will finally be able to see the marks but, as the hero warned
us, we don’t have enough information yet to decipher them.
Step forward into the Cellar, turn right and click on the
door.Listen to the hero’s comment, and
note the round gray plate in the upper part of the door.Bring out the Sun/Moon Medallion from
your Inventory, and place it in the gold-colored round slot, on the right side
of the gray plate.Bring out the
Crescent-Moon Medallion from your Inventory, and place it in the
gold-colored crescent-shaped slot, in the top left portion of the plate.The door will swing open, but it is dark
inside.So bring out the lantern
("Lamp") from your Inventory and step forward, to come down a set of
stairs.
Turn slightly to your right and step forward.Then turn slightly to your left, and step
through the Iron Gate.Turn slightly to your left again and step
forward, to reach an arched doorway leading to a lighted area.Step through this doorway, look down on the
ground and pick up the Precious Stone.As the hero finishes his comment, look up at the door leading to a
well-lit stairwell, in front of you.But
if you click in this direction, the hero will decline to go there.So turn left and click on a door that is
slightly ajar, to open it completely.Step through this door, and the camera will automatically pan to your
left.As the hero finishes his comment,
click on the metal plate in the door, but it will squeak and the hero will
advise us to be more discreet.So bring
out the Oil from your Inventory, and click on the plate to oil it.Now click on the plate again, to open
it.A cutscene will follow.
By the end of the cutscene, the hero will be out of that
room and decline to go back in there.The stairs to the King’s castle are on your left, and the way back up to
the Workshop Cellar is on your right.So
turn right and take two steps forward. There is no icon to allow you to go down the
passage in front of you.So turn
slightly to your right again, and step forward.Turn slightly right again, to see the foot of the stairs leading back to
the Workshop Cellar.Note: It
would be a good idea to SAVE your game here.Click in the direction of the stairs then,
and a cut scene will follow, taking you to yet another new day at the Manor.
Day 4 – (25 September
1522)
Francois I had given his Signet Ring and a Sheet of
Paper.As the cut scene ends, open your
Inventory and attach that Sheet of Paper to the Portfolio.In the close up that follows, the right page
shows the marks you had traced in the two Cellars.The left page is the King’s sheet, which is
in fact the key to the marks on the right page.But we need to take care of something else before deciphering these
marks.So go down to the Kitchen and
find Saturnin sitting on the table in front of the fireplace.Approach the fireplace and a cut scene will
follow.
As the cut scene ends, go back up to Babou’s
apartments.As you approach the door to
her Sitting Room, turn left and pick up the Key from the mannequin.Enter the Sitting Room, and the camera will
automatically pan to your left, focusing your view on the Venetian
cabinet.Bring out the key (that you
just retrieved from the mannequin) from your Inventory, and click on the
keyhole in the top center of the cabinet, to start yet another puzzle.
The Cupboard Puzzle No. 2
As you can see, this puzzle is similar to the one we
solved in Leonardo’s Bedroom on the second day [i.e., "The Cupboard
Puzzle No. 1"].Once again,
take a moment to study the set up and get comfortable with it.Thus, note how the cabinet is divided into
five vertical columns and four
horizontal rows.The keyhole (indicated by the green cell
marked "K" in the picture
below) appears at the top of the central section, i.e., in Row 1, Column 3.Again, there is a rectangular compartment
under this keyhole, just as there was in Leonardo’s cabinet. But instead of the large diamond-shaped socket
we had in that puzzle, there is a colored
circular pattern (in Row 4, Column 3) under the compartment, in this
puzzle.Thus, this pattern is our
Reference (indicated by the green cell marked "R" in the picture below), in this particular puzzle.
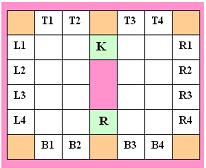
Again, there are
eight other cells on either side of Column 3 (i.e., the 16 unmarked white cells
in the above picture), and we find a variety of patterns in these cells.The objective, once again, is to make the same
pattern appear in each of these sixteen cells as the one that appears in our
Reference/Fixed cell.
Note that we
have sixteen Control Knobs in this puzzle.I have labeled the four control knobs at the TOP as T1, T2, T3 and T4; the
four at the BOTTOM as B1, B2, B3 and B4; the four on the LEFT
side of the cabinet as L1, L2, L3
and L4; and, finally, the four on
the RIGHT side of the cabinet
as R1, R2, R3 and R4.Thus, we must click on these Control Knobs to set the pattern in each
of the sixteen cells in columns 1, 2, 4 and 5, to match the pattern that
appears in the Reference/Fixed cell.Once again, the Control Knob at the Top of a column adjusts the four
Knobs under it; the Control Knob at the Bottom of a column adjusts the four
Knobs above it; the Control Knob on the Left side of the cabinet adjusts the
four Knobs to its right; and the Control Knob on the Right side of the cabinet
adjusts the four Knobs to its left.
Again,
I am not sure if the computer sets the patterns for the sixteen cells randomly
in each game, but this is how it worked out for me (and, hopefully, it will for
you too).I clicked
(1)Once on R1.
(2)Twice on R2, and once on L2.
(3)Twice on R3.
These first three steps
set the correct pattern in all four cells in the T3 column.I then
clicked
(4)Twice on T1, and once on B1,
to set the correct pattern in all 4 cells in the T1 column.
(5)Twice on T2, to set
the correct pattern in all 4 cells in the T2
column.
(6)Once on T4, and once on B4,
to set the correct pattern in all 4 cells in the T4 column.
Thus, as soon as I finished Step 6 above,
the left desk drawer opened.
Click
on the document inside the drawer, to find that it is the Letter of
Introduction that you had given to Babou on the 2nd day.Pick up the gray sheet (on the left of the
letter), place it above the letter and click, to find that the letter contains
a secret message.A cut scene will
follow, bringing the hero back out in Leonardo’s Study.He will refuse to go back into Babou’s
apartments.So go down to Saturnin who
is still in the Kitchen.Click on him
and you will be presented with two topics.You don’t need to buy anything from him, but click on that choice
anyway, to find that no bargaining is possible anymore because of the guards
outside.Click on Saturnin again, and
the dialog will automatically follow.
The Four Signs Puzzle
It’s
time to use the King’s key to decode the marks we found in the two
cellars.So go to those two pages in the
Portfolio.Examine the key on the LEFT
page.Note the numbers 1-4 around the
symbol in the upper left-hand corner of the page.Note also that this one symbol is in fact a
combination of four symbols, each adjacent to a number from 1 to 4.Thus, each symbol represents the number that
is closest to it.We find the symbols
representing the numbers 5-8 and 9-0, in the same way.
Look
at the marks on the RIGHT page now.There are four rows, each of which begins with a circular drawing on the
left, followed by two or three symbols.Note the image of a heavenly body inside each circular drawing.So let’s refer to each drawing by the object
in it.Thus, going from the top to the
bottom of the page, we have the SUN, the STAR, the MOON and Saturn, i.e., the
PLANETS.
Pick up the Blood
Stone, from the right of the Portfolio, and it will appear as your cursor.
Click on the first symbol after the Sun drawing, on the right page; and
then, click on number 1, on the left page.Since this is a correct match, a white space will appear at the end of
the row.Click in this white space, to
see number 1 appear in it.Click on the second symbol now; then on
number 2; and then, on the white space.Since this is also a correct match, number 2 will
appear in the white space.Finally,
click on the third symbol; then on number 0;
and then, on the white space, to see number 0 appear in it.Thus, you will now have 120 in the
white space at the end of the first row.Proceed in the same way for the other rows, to obtain the following
results:
Row 1: SUN —————– 120
Row 2: STAR————— 240
Row 3: MOON ————–60
Row 4: PLANETS
———- 310
Turn
to the next page in the Portfolio: "Plan
of Cloux Manor – First Floor."The
circular drawings we just saw in the previous page now appear in the four
corners of this Plan.It is much easier
to identify the heavenly bodies in these drawings, however, because of the
sketch of those bodies (the Sun, Star, Moon or Planets) next to the
drawings.Note how each circular drawing
is divided up in 360 degrees.The four
main degrees (0, 90, 180, and 270) have been marked for our convenience.Note the two arrows around each circular
drawing.If you move your cursor over
them, a gear icon will appear on each arrow.Clicking once on either arrow will move the dial (along the inner edge
of the circle) by 10 degrees.Based on
this information, set the dials in the drawings as follows:
SUN (in the upper-left portion)
———— 120
STAR (in the upper-right portion) ——— 240
MOON (in the lower-left portion)
———60
PLANETS (in the lower-right portion) — 310
As
you adjust the degrees, a gray beam from each drawing will move across the
Plan.If you have set the correct values,
the four beams will overlap and a red "X" will mark the
juncture.Move your cursor over this X,
and the Text Field will show that "The
Manuscript is hidden somewhere in front of the entrance to the manor."Close the Portfolio and the Inventory, to
hear the hero’s comment.Click on
Saturnin, to be presented with two topics, the first of which we have already
addressed.So click on the second topic,
to learn the secret: you must subtract 10 from the Stars and 10 from
the Planets, and add 10 to the Moon.So go back to the "Plan of the Cloux Manor," in your Portfolio, and make the
following changes:
STAR (in the upper-right portion) ———240 to 230
PLANETS (in the lower-right portion) —310 to 300
MOON (in the lower-left portion)
———60
to70
The
gray beams will now overlap at a slightly different point.Move your cursor over the new X, and the Text
Field will show that "The
Manuscript is hidden in the chapel."
Close
the Portfolio and the Inventory, and click on Saturnin, to be presented with
two topics again.Click on the first
topic (the key to the chapel).Click on
him again to address the second topic (why Leonardo entrusted him, rather than
Melzi, with this secret).Then go
upstairs to Babou’s Sitting Room.She
will start speaking as soon as you approach her, and you will get a choice of
two responses.Although neither will
affect your Conscience gauge or Bonus points, pick the SECOND response ("I
shouldn’t have lost my temper…") because it will give you a choice at
the very end of the game that you won’t get otherwise.Click on Babou again, for another exchange of
dialog.
Go
down to the small hallway, and step into the corridor.Turn left, to see a guard in front of the
Main Entrance.We don’t want to be
caught, so turn right and step forward in the corridor.Use Babou’s Key to unlock and open the
Chapel door on your left.Enter the
Chapel, to hear the hero’s comment.Turn
slightly to the left and pick up the Sceptre.Now click on the golden Lily (under the Cross),
to hear another comment by the hero.Bring out the King’s Signet Ring from your Inventory and put it
in the hole under the Lily.Now bring
out the Sceptreand put it
through the ring, to open a door below.Pick up the Manuscript by Leonardo Da Vinci from this
opening.Click under the Lily, to
retrieve both the Signet Ring and the Sceptre, in one
swoop.Then turn to the wall on your
right, and click in the empty picture frame (to the left of the door), to hear
the hero’s comment.
We
are done in the Chapel and must contact the King’s messenger now.So go back upstairs and enter the Balcony
(across the corridor from Leonardo’s bedroom).The camera will pan to your right to show the guards below, as the hero
makes a comment.Step forward in the balcony.Try to pick up some pebbles from the floor to
your left, but the hero will decline to do so, because you already have
some.So bring out the Pebbles
from your Inventory, turn right and study the movements of the two guards
below.Note that the guard stationed in
front of the Main Entrance doesn’t move at all.There is another guard to his left, however, that goes back and forth
along the side of the house.Wait until
he starts moving towards the house, and then throw the Pebble between the stationary
guard and the Main Entrance.Thus, with
both guards now moving towards the house, turn quickly and step into the
Stairwell.Then turn quickly to your
extreme left, and take two steps; and then, turn left again and step forward,
to arrive in front of the moveable bridge.
We cannot cross
the bridge, however, because a guard is stationed there as well.So step to the right of the bridge.Turn left, pick up the brush off the boat and
place it on the ground, to your right.Click twice on the boat (first to hear a comment by the hero, and then
to get in it).You can reach the Dovecot
now in one of two ways: (1) go to the Mill across the canal, get out of the
boat, and walk over to the canal across the Dovecot; or (2) take the boat to
the Bridge, then down the canal to your right to reach the Dovecot.A guard is stationed before the Dovecot also,
so you will still have to get out of the boat on the ground to the right of the
canal.Thus, either way, you will arrive
at the same spot.As you do, bring out
the Ladder from your Inventory and place it across the canal.Then bring out the Pebbles, and throw
one on the fixed bridge to your left.As
the guard moves in that direction, cross the canal and enter the Dovecot.
Turn
right to note an object barely hidden by the three sacks against the wall.Pick up the Sheet, to find the Mona
Lisa painting behind it.Pick up the
Mona Lisa, and the hero will make a comment.Pick up some more Pebbles from the
ground, behind you.Go up to the loft,
and a black bird will arrive at the window.Bring out the King’s Signet Ring and click on the bird, to hear
another comment by the hero.Meanwhile,
the guard should have returned to his post before the Dovecot.Wait for him to turn his back to you, and
then bring out the Pebbles from your Inventory and throw one at the
ground floor window behind you.The
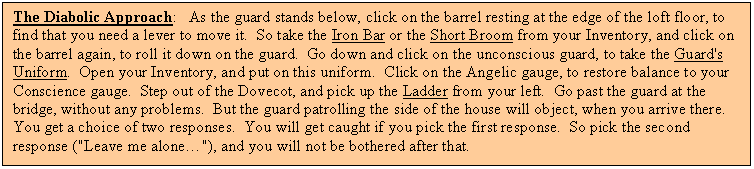
guard will come into the Dovecot, and you will get a choice of two approaches
to return to the Manor.
|
The Angelic Approach:Pick
The Diabolic Approach:As
|
![Text Box: The Angelic Approach: Pick up the straw from the ground on your left and throw it out of the loft window. Then jump out of the window. Turn left, cross the canal, and then turn around and pick up the Ladder. Return to the boat, take it back to where you had first found it, and step back out on the ground. The moveable bridge would be to your right, but you must wait for the guard to look away before going there. Thus, you must sneak behind the guards' backs to return to the Manor. [Note: This approach does not affect your Conscience gauge. I call it the Angelic approach only to contrast it with the Diabolic approach described below.]](https://img.nivoli.com/justadventure/cdn-cgi/image/w=1920,fit=scale-down,f=auto/wp-content/uploads/spoiler/adventure-kheops.studios-the.secrets.of.da.vinci.2-vinci_files/image013.gif)
As soon as you step into the Manor, the
hero will indicate that Hector must have come via the Underground Passage, and
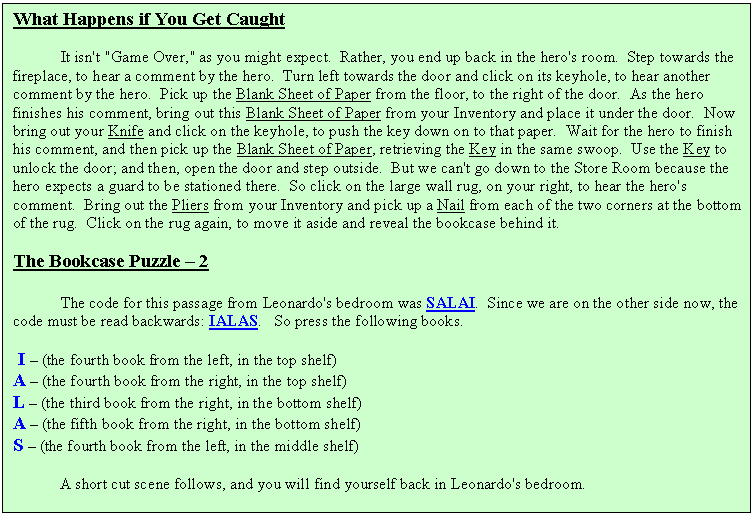
suggest that we go down and meet him.[If you were caught, this comment will come after you enter Leonardo’s
bedroom through the Bookcase and can thus move about freely again.]Go down to the Workshop, and approach the
gray wall cabinet.Open the cabinet and
use the lever at the bottom right, to summon the platform elevator.Step on the platform and go down to the
Cellar.Step out of the platform and a
cut scene will follow.Click on Hector
again, to cover another topic.Then,
return to the Workshop.
We must now make a
copy of the Mona Lisa.So go to the
fireplace and turn left to face the easel.Click on the sheet, to remove it from the easel.Then bring out the four cans of (Red, Blue,
and Yellow) Paints and Varnish, one by one, and place them in the slots under
the canvas.Now click on the Reference
frame on your left, to hear the hero’s comment.Bring out a Nail from your Inventory and click on the frame, to put
it on its left edge.Now bring out The
Mona Lisa and put it on the Reference frame.We are now ready to make its copy.
The Mona Lisa
Puzzle
This puzzle actually consists of three parts.In the first part, we have to make a charcoal
sketch of the painting.Don’t worry
though, because no artistic talent is required.So pick up the Charcoal Crayon, lying to the right of the cans of paint
and varnish; and click on the boxes in the easel, to turn the blank canvas into
the sketch.It is not as easy as it
sounds, however, because while a click on one box might turn it into a piece of
the sketch, a click on another box might return the first box to blank
canvas!So click on the shaded boxes
below, in the order in which they have been numbered, i.e., click first on box
number 1; then on 2; then on 3; etc.
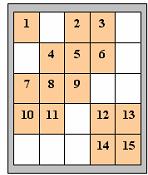
The
sketch will be completed as you click on box number 15, concluding the first
part of the Mona Lisa puzzle.Right-click, to put away the Charcoal Crayon, and note the 16 large black
dots in the completed sketch.In the
second part of the puzzle, we are supposed to be roughly painting the
portrait.Again, no artistic talent is
required.Begin by clicking on each
box.It will look as if you were
flipping each piece, turning the sketch into a dull-colored portrait, but all
the pieces of this portrait will appear to be jumbled up.Now click on any one of the 16 black dots and
see how that rotates the four boxes around it.Thus, we must click on these dots to rearrange the pieces of the
portrait until they form a coherent whole.
Note:I have often run into puzzles of this kind
and found that while some people relish them, others absolutely dread or detest
them.There is good news for the second
group though.As I was working on this
puzzle, one of my automatic programs kicked in, minimizing the game to the task
bar.I closed that program and restored
the game (by clicking on its name, at the bottom of the screen), to find the
puzzle solved!As they say, Serendipity brings Good Fortune.But you don’t need serendipity to solve this
puzzle for you.All you need is
something to minimize the game to the task bar, and Windows offers several ways
of doing that.For instance, you can
press CTRL+ALT+DELETE.The game would be minimized, as the Windows
Task Manager window will pop up.Close
that window, and click on the name of the game at the bottom of the screen, to
return to the game and find the puzzle solved.OR:You can click on either one of the WINDOWS LOGO keys (that appear next
to the ALT button, on either side of the Spacebar).The game would be minimized, as the Start
Menu will pop up.You don’t even have to
close this menu, because it will disappear as soon as you click on the name of
the game at the bottom of the screen.Once again, you will return to the game to find the puzzle solved.
Note:I don’t know if the above is just a
technical bug in the game or a technique that the developers deliberately
introduced to help out the gamers that dislike such puzzles.But I did go back and try it with some
other puzzles in this game, to find that it works only with this particular
puzzle.

We will actually use some paint in the third part of the
puzzle.But again, no artistic talent is
required.Just pick up the Paint Brush
(from the right of the Charcoal Crayon), dip it in Red Paint, then in Varnish,
and then click THREE times on
your painting.Wipe off the red paint,
by clicking on the piece of cloth hanging down from the bottom right of the
easel.Now dip your brush in Yellow
Paint, then in Varnish, and then click THREE
times on the painting again.Wipe off
the brush on the cloth once more.Finally, dip your brush in Blue Paint, then in Varnish,
and then click TWICE on the
painting.And voila!The painting is finished.Right-click, to put away the paint
brush.Pick up your copy of The Mona
Lisa, and then the original, to receive the Sewing Spool along with
the original.
There is no use going back to the Dovecot, because the hero
will decline to put the copy of The Mona Lisa where he had found the
original.So go to the Kitchen instead
and click on Saturnin.A dialog and a
cut scene will follow.[Note:The phrase "a little over three hundred
years ago" in the cut scene is a typographical error, of course, because
Saturnin also mentions the date 1519, i.e., just three years before the events of the game.Besides, Saturnin himself was part of that
cut scene event, and he certainly can’t be 300 years old!]
In addition to information, Saturnin gives the hero a Wooden
Bow and permission to take whatever the hero may like from the Barn.So go out of the Store Room exit and into the
Barn.Pick up the bowl of Sugar.Return to the Store Room, and pick up two
handfuls of Charcoal, from the sack on the ground to the left of the
staircase.[Note:Once again, you will not have any problems
getting in and out of the Manor, if you took the Diabolic approach in returning
from the Dovecot with the Mona Lisa, and are still dressed in the Guard’s
Uniform.This is true even if you
had been caught coming back.You would
have to check to make sure the guard is moving away from you, however, if you
had taken the Angelic approach.]
Go up to Leonardo’s Study.[If you were caught, you can use the passage
through the bookcase to return to Leonardo’s bedroom, of course, and then go
directly to his Study from there.]Approach the lab area.Feel free
to refer to Leonardo’s notes (in the Portfolio) about making Powder and
Fumigants.Then open the boiler door, put
in some Charcoal, and use your Lighter to light up a fire.Close the boiler door, and remove the Gooseneck
from the top of the Still.Put in the
rest of the Water from your Opened Bottle of Water + Sugar + Saltpetre,
one by one, into the Still.The hero
will tell you that the product appears to be ready.Bring out the Iron Box from your
Inventory and click on the Still, to retrieve the Fumigant.
Now put a handful of Charcoal in the Mortar to
your right.Use the Pestle to grind it,
and then pick up the Charcoal Powder.Bring out the Charcoal Powder from your Inventory and put it in
the bowl to your right.Bring out the Phial
of Sulphur and add the Sulphur
to the same bowl.Finally, add Saltpetreto the bowl as well.Pick up the (explosive) Powder.
Go to the Workshop.There is no use going down to its cellar, because you will find that
Hector is not there anymore.So approach
the sawing table instead.Remove the
thick Drill Bit and replace it with the thinner Drill Bit from
your Inventory.Bring out the Crank
from your Inventory, and attach it to the side of the Drill Bit holder.Now bring out the Wooden Bow and put
it under the Drill Bit.Click on the gear icon on the Crank, to drill a hole
in the Wooden Bow.Pick up both the Crank
and the Bow made of Perforated Wood.
Go to the
Kitchen now and down the Trap Door Cellar.[Note: You won’t need the Lamp anymore, because there is plenty
of light now from the chandelier.]Go
forward and turn right to face the Flying Machine.Feel free to click on it, to hear just what
is wrong with it.Bring the Wooden
Shaft from your Inventory, and click anywhere on the Flying Machine, to see
the shaft attach to the machine’s top front.Now bring the Bow made of Perforated Wood from your Inventory and
click anywhere on the Flying Machine again, to see it attach along the side of
the machine.Finally, bring out the Fumigant
from your Inventory and put it on the ground (next to a chest, to the right of
the Flying Machine).
Return
to the Kitchen, to find that Saturnin is not at the table anymore.Step in one of the following directions: (1)
forward (to the corner of the Kitchen, to the right of the table with the bowl
of eggs on it); or (2) to your left, to the door leading to the Dining Room; or
(3) through the door on your right, to step out into the small hallway, and
then come right back into the
Kitchen.As you follow any of these
directions, you will hear a rumbling noise in the distance, as well as a
comment from the hero indicating that we have no choice but to use force.
Go to the
Workshop and try to approach the platform elevator, but the hero will decline
to take that route.So go back to the
Kitchen and down into the Trap Door Cellar.Step forward and the camera will automatically pan to your left, towards
the bricked-up door, as the hero will make another comment.Bring out the Jack from your
Inventory, and click on the cannon below, to place the Jack under it.Now attach the Crank to the Jack, and
then click on the gear icon on the
Crank, to straighten the cannon.Load
the Cannon Ball from the front end of the cannon.Click on the small cover at the back of the
cannon, to open it.Put your (explosive)
Powder in this opening and the cover will close automatically.Finally, use your Lighter, to light
the fuse just behind the cover.A short
cut scene will show the cannon firing through the bricked-up door. Go through
that door, to find Hector sprawled on the floor.
Check your
Conscience gauge, and you will find that there is no loss in your Angelic
gauge!Pick up the Manuscript by
Leonardo Da Vinci, lying just above Hector’s left thigh.A cut scene follows.[Hints of a sequel?]Now there are two ways to get out of this
place: you can either go back to the cellar through the bricked-up doorway you
blew up, or use the platform elevator (summoning it by using the lever in the
large gray cabinet to your left) to go up to the Workshop.Neither method will affect either your Conscience
Gauge or your Bonus Score.As you start
to leave, however, the hero will indicate that we must leave the Mona Lisa
painting here [to the left of the bricked-up doorway].If you leave the copy, your Angelic gauge
will go down.But if you leave the
original, your Diabolic score goes down.Thus, either way you will have to spend 20 bonus points, to restore
balance in your Conscience gauge.I
suggest that you SAVE your game first and then, try it both ways, to see
how it affects the ending!
Go to Babou’s Sitting Room now and click on
her, to say your Farewells.A cut scene
follows.If you had picked that second
choice (when you came to get the Chapel key from her) and apologized to Babou
for having lost your temper, she will now ask the hero to take her with
him.You get a choice of two responses,
of course.Feel free to use the SAVE
I just suggested to try each response and then,
Sit back and enjoy the ending(s)!
* * * * * * * * * * * * * * * * * * * * * * * * * * * * * *
* * * * * * * * * *
View this guide raw, exactly as the archive holds it