The Secrets of Da Vinci: The Forbidden Manuscript
The Cupboard Puzzle No. 1
This is really a very easy puzzle which is actually more
complicated to explain than it is to solve.Take a moment to study the set-up and get comfortable with it.Note how the cupboard is divided into five
vertical columns and four horizontal rows.The keyhole appears at the top of the central section, i.e., in Row
1, Column 3.There is a rectangular
compartment under this keyhole, and a large diamond-shaped socket under that
compartment (in Row 4, Column 3).Note the location of the pink Knob
at the top of this diamond-shaped socket, above three gray (actually empty)
slots.This is our Reference or the Fixed cell.

There are eight
other cells on either side of Column 3 (i.e., 16 cells in all), and each pink
knob appears in different locations (within its diamond-shaped socket) in all
of these sixteen cells.The objective is
to bring all those pink knobs at the
top of the three empty gray slots, just as it appears in our Reference/Fixed
cell.
Note the eight
Control Knobs – four at the top of Columns 1, 2, 4, and 5; and then, two on the
left, and two on the right, side of the cupboard.As you can probably guess, the Control Knob
at the top of a column (1, 2, 4, or 5) controls the adjustment of all four
Knobs under it, in that column.Similarly, each Control Knob on the Left side of the cupboard controls
the adjustment of the four Knobs appearing to its right, in that row; and each
Control Knob on the Right side of the cupboard controls the adjustment of the
four Knobs appearing to its left, in that row.Thus, we must click on these Control
Knobs to set every pink knob at the top of its socket, in the sixteen cells
on both sides of the Reference/Fixed cell.
Now
I am not sure if the computer sets those pink knobs randomly in each game, but
this is how it worked out for me.I
clicked on the Control Knob at the top in
(1) Column 1, three times, until the pink knob in
Row 1, Column 1 was set at the top;
(2) Column 2, twice, until the pink knob in Row
1, Column 2 was set at the top;
(3) Column 4, none, because the pink knob
in Row 1, Column 4 was already set at the top; and (4) Column 5, once,
to bring the pink knob in Row 1, Column 5 at the top.
I then clicked
on the Control Knobs at the sides of the cupboard as follows:
(5) Right Side (Top) à none,
because all the pink knobs in Row 1 were already set at the top;
(6) Right Side (Bottom) à three
times, to bring the four pink knobs in Row 3 at the top;
(7) Left Side (Top) à once,
to bring the four pink knobs in Row 2 at the top; and
(8) Left Side (Bottom) à none,
because all the pink knobs in Row 4 were already set at the top.
Thus, the rectangular compartment
opened as soon as I took Step 7 above.
Pick
up the Mould for Gold Blanks, the Coining Die, the Hammer,
Leonardo’s Jewel, and the Roll of Parchment from this
compartment.Be sure to retrieve your Bronze
Key from the cupboard keyhole as well.Open your Inventory then and attach the Roll of Parchment to the
Portfolio.The close up you get shows
that it is a "Plan of Cloux Manor – First Floor."If you move the cursor around, the Text Field
will indicate the various areas in and outside the Manor.Note the gear icon you get, when you move
your cursor around the circular drawings in the four corners of the
document.But we don’t have any
information about what they represent or how to use them.So let’s just ignore them for now, and head
for Leonardo’s Study.
As you enter the
Study, turn left and step towards the table to the right of the fireplace.Turn right and look down at the table.Click on the drawer, to open it.Pick up the Monocle and the Blood
Stone you find inside.Close the
drawer and step towards the lab area.
Use
your Bronze Key to open the cupboard on the right, above the table.Pick up the Nuggets of Gold from the
top shelf, and the four small glass jars (one filled with Varnish and
the other three with the Red, Blue, and Yellow paints)
from the bottom shelf.Close the
cupboard, and retrieve your Bronze Key.
We
need to make some Blank Ink now.Feel
free to refer to Leonardo’s notes about making this ink, in your Portfolio, to
note that we can use either Charcoal or Gall Nut as the powdered
black pigment necessary in making the blank ink.So put either Charcoal or Gall Nut
(whichever you prefer) into the Mortar, and use the Pestle (on the right of the
Mortar) to grind it.Pick up the powder
from the Mortar; and then, bring it out of your Inventory and put it in the
empty dish on your right.Add an Egg,
and then some water from your Opened Bottle of Water, into this
dish.The solution is ready, so bring
out your Empty Phial of Ink and click on the dish, to fill this phial
with the newly made Blank Ink.
Go
down to the Workshop and approach the Press.Note the thin drawer right under the Pressing block.Click on the handle in the center of this
drawer, to pull out the drawer.Click on
the top of the drawer, to open its cover.Note that there are four (little balls of) Paper Maché in your
Inventory.Take out one of them and put
it in the drawer; and then, close the drawer and push it back in.Click now on the hammer-like handle above the
Pressing block.The handle will move to
the left, pushing the Pressing block go down.Click on the handle again, to move it to the right, bringing the
Pressing block back up.Pull the drawer
out, open its cover, and remove your first Blank Sheet of Paper.Repeat this procedure to make three more
Blank Sheets of Paper out of the other three (balls of) Paper Maché in
your Inventory.
Now
that we have some paper, let’s print the two Engraved Plates that we have in
our Inventory.So open the cover of the
drawer (unless it is already open, of course, after you made your last Blank
Sheet of Paper), and put one of the two Engraved Plates in it.Bring out your newly filled Phial of Ink
and click on the Engraved Plate inside the drawer, to spread some ink on
this plate.Put a Blank Sheet of
Paper on the now-inked plate, close the drawer and push it back in.Now click on the handle above the Pressing
block, to push the Pressing block down; and then, click on the handle again, to
bring the Pressing block back up.Open
the drawer and remove both the
just-printed Sheet of Paper and the inked Engraved Plate.Now print another Sheet of Paper from
your second Engraved Plate in
the same way.Again, remember to remove
both the newly printed Sheet of Paper and the inked Engraved Plate.We are done printing, for now.So close the drawer and push it back in.
Well,
now that we have printed both our Engraved Plates, let’s see what we got.So attach each of these new Sheets of Paper
to the Portfolio, one by one, and examine their contents.It’s all right if you lost track of which of
the two Engraved Plates you had received from the lady, and which one you found
right here in the Workshop, because it really doesn’t matter.If you have
kept track though, you will find that the Sheet of Paper printed from
the lady’s plate tells us a little bit about the bridge we fixed earlier.[Note:Use the mirror to decipher the writing in the top and central portions
of this Sheet.]As for the Sheet of
Paper printed from the second plate, use the Mirror at the top of the page
to learn something about the "fumagents" and how to make them.Now click on the drawing of the two cannons
in the lower-right hand portion of the page, and those cannons will "go
off," spilling some writing of their own.Use the Mirror again on this writing to learn how to make gun powder.
Go
down to the Store Room.Step outside the
house, and Saturnin will call you from behind and give you a jar of Honey.Go to the Mill now.[Note:You will have to click on the right anchoring device to move the bridge
in the Mill’s direction first.]Put the Split
Logs into the Furnace, to revive the fire.Put the Nuggets of Gold into the Crucible.Click on the Metallic Arm, to bring it back
to the table.Click on the crank at the
side of the metal pole, to lift the Crucible off the table.Click on the Metallic Arm again, to move the
Crucible into the Furnace.Click on the
crank again, to lower the Crucible into the Furnace.The hero will note that it is not hot enough
(meaning, we must cover the furnace, of course).Click on the Mechanical Arm, to move it out
of the way.Pick up the large cover from
the ground and put it on the Furnace.Put on your gloves then, and try to remove the Furnace Cover.[Note: You might have to wait a few
seconds and try again though, as you did when you had made the bronze.]After removing the cover, click on the
Metallic Arm again, to bring it back to the Furnace.Click on the crank, to raise the
Crucible.Click on the Metallic Arm once
more, to bring the Crucible back to the table.Click on the crank again, to lower the Crucible down on the table.Finally, click on the Metallic Arm, to move
it out of the way.
Place the Mould
for Gold Blanks on the table, in front of the Crucible.Click on the Crucible, to pour the Molten
Gold into the Mould.Click on the Mould
twice, to recover first the four Gold Blanks; and then, the Mould itself.Bring out the Coining Die from your
Inventory, and place it in the circular slot on top of the Anvil (to the right
of the table).Bring out one of the
four Gold Blanks then, and place it on top of the Coining Die.Use the Hammer on the Gold Blank;
and then, pick up the Gold Coin.Place the other three Gold Blanks, one by one, on top of the Coining Die
still in the anvil slot.Use the Hammer
on each of these Gold Blanks, to produce three more Gold Coins, one by
one.Keep picking up each Gold Coin, as
you make it.After you make your last
(fourth) Gold Coin, pick up your Coining Die.[Note:The coins you just made are added to the coin collection that appears
under the Diary, in your Inventory.]
We are done in
both the Mill and the Forging areas of the Mill.So take off your gloves and return to the
Manor.Go back up to Leonardo’s Study
and approach the lady, still seated on the couch.Give her Leonardo’s Jewel (that you
had found in the cupboard in his bedroom).She will thank you, and you will be given a choice of two
responses.Pick the first response, telling her that you had found the jewel in
Leonardo’s cabinet.This response will
not affect either your Bonus Score or your Conscience gauge, but the other one
would have cost you Angelic points, without gaining anything in return.
Click
on the lady and the hero will tell her about having fixed the bridge.She will be pleased, of course, but would
like yet another favor from you.Again,
you are presented with a choice of two responses.Although neither choice will affect either
your Bonus Score or your Conscience gauge, pick the first choice anyway, because
the other one is rather rude and the lady’s reaction will be understandably
unpleasant as well.So tell her that you
are listening, and she will now ask you to play your lyre.Bring out the Lyre.As you do, the instrument will appear fixed
in the top left portion of the screen, while the lower portion of the screen
will be subdivided into three portions, featuring the strings of the lyre on
the left, a musical sheet in the middle, and the Sun/Moon "Exit" sign
on your right.You will also hear the
first three sample notes, inviting you to solve this puzzle.
The Lyre
Puzzle
The objective is to pick the
right strings to match the notes you just heard.Move your cursor
across the strings in the lower left portion of the screen, and note the five positions
(each appearing after each string) in
which the gear icon appears.Imagine as
if these clickable points were numbered 1-5 as follows:
1 – 2 – 3 – 4 – 5
Play the following notes:
(1)Click on the 1st position.
(2)Click on the 2nd position.
(3)Click on the 3rd position.
As you play each note, a symbol will appear in the
musical score sheet in the middle of the lower part of the screen.The color of this symbol will be dark
brown, if you have played the correct note; but red, if you have
not.[Note:You can click on the lady at any time, to
hear the sample notes again.Apparently,
she is the one who is – perhaps whistling – these notes for you to play!]If you have played the first three notes
correctly, you will hear another sample of notes that you must match.This time, play the following notes:
(4)Click on the 4th position.
(5)Click on the 2nd position.
(6)Click on the 2nd position again.
(7)Click on the 1st position.
As you play the last note correctly, a cut scene will follow showing the hero and the lady, sitting
together on the couch, apparently singing and laughing, as the tune you started
plays on sweetly in the background.Bad
news follows this cut scene, however, as the lady declares that her throat is
sore from all the singing.You must now
arrange for a cure.The hero thinks that
Saturnin might be able to help.So go
down to the Store Room, step outside and talk to Saturnin.He will tell you about a remedy consisting of
honey, thyme, lemon and water.Turn
around and click on the second arrow
to your left, to arrive directly at the pool.Fill up your now-Empty Bottle of Water with water again, and
return to Leonardo’s Study.
Go
directly to the lab area.Remove the Gooseneck
from the top of the Still.Put the Honey,
Thyme, Lemon and some water (from your Bottle of Water),
one by one, into the Still.[Remember to
click in the center of the Still, to
put in the ingredients.]The hero
indicates that the remedy is ready.[Note:
At this point, you can put in the
Sleeping Potion in the Still, but you will just lose 20 + 10 = 30 Angelic
points, altogether, and gain nothing at all.Moreover, you would not be able to go into the lady’s apartments by
yourself either, because the door is locked.So you would have to wait, i.e., go out of the room and then come back,
for her to wake up and take you there herself.In short, there is no use in resorting to the Diabolic approach at all.]So just bring out the Empty Bowl (the
tea cup) and click on the Still, to get a Bowl full of Syrup.Go to the lady then, and offer her this
syrup.The lady will be pleased and will
take you to her apartments without any further ado.
After the dialog, step to your
left.Click on the drawing set in the
corner on an easel, on your left.As the
hero finishes his comment, the gear icon on the drawing will turn into a hand
icon.But if you click on this icon, the
hero will decline to pick up this drawing, saying that he will do so
later.So turn now to the large drawing
on the wall, on your right.Click on it,
and listen to another comment by the hero.Note the sketch of a hand, in the upper left portion of the drawing.Feel free to refer to Leonardo’s notes about
the invisible ink, in your Portfolio, and see that the same sketch appears in
those notes as well.Thus, this is a
clue that there might be something written in invisible ink on the sketch on
the wall also.So bring out your Lighter
and click anywhere at all on the wall
drawing.Sure enough, a line sketch of a
telescope will appear, right between the sketch of the hand on the left and
that of the woman on the right.Wait for
the hero to finish his comment, and then return to the lady on the couch.
Click on the lady and listen to the
dialog about the sketch of the Battle of Anghiari.You will then be presented with a choice of
two responses.Feel free to pick either,
because neither choice will affect your Bonus Score or your Conscience
gauge.Turn around then and look at the
telescope.Click on it and another
dialog will follow.Click on the
magnifying-glass icon now, appearing at the eye-piece, to try to look through
the telescope.As the hero finishes
speaking, click on the gear icon on
the telescope, to open a small cover at the top, a little further up from the
eye-piece.Click on this new opening,
and the hero will tell you that the lens is stuck.Use your Knife, on the opening, to
remove the Broken Lens.Then,
bring out the Monocle from your Inventory, and insert it in the opening,
to serve as the telescope’s new lens.[Note:If you click on the handle, sticking out from
the right of the telescope, to change the telescope’s position, the hero will
tell you that it is jammed.If you try
to oil it then, the hero will decline to do so, at this time.]Click on the magnifying-glass icon on the
eye-piece, to look through the telescope again.A cut scene will follow, taking you on to the next day.
Day 3 – (24 September
1522)
As the
hero wakes up, he wants to look at Leonardo’s telescope again.So go down to the Kitchen, and step forward,
to the door that leads to the small hallway with the stairs going up to the
First Floor.Instead of stepping out
into the hallway, however, take a step to your right.Turn right again, and pick up the Full Bottle
of White Wine from the table in front of the fireplace.Turn around and note that several sacks that
had been there on the ground since your arrival, have now been removed,
revealing a trap door.Click on the
door, to hear the hero’s comment.But
let’s ignore the door for now, because we need to find out more about that
telescope upstairs.So step out of the
Kitchen, and go upstairs to Babou’s apartments.Go past her bedroom and enter her Sitting Room.
Approach
and click on Babou.After the dialog,
turn around to the telescope and click on its handle, to find that it is still
jammed.So bring out the Oil from
your Inventory, and click on the handle, to oil it.Right-click, to put away the Oil; and then,
click on the telescope’s handle again, to see the telescope swing to the
right.Another dialog follows.Click on the magnifying-glass icon appearing
at the left end of the telescope, to look through the telescope.Turn around now and click on Babou.Two topics will be presented to you.Click on any one of them; and then, click on
Babou again, to address the other topic as well, thus gaining some information
about both Leonardo and his telescope.
Go down to
the Store Room, step outside and click on Saturnin, sitting down on a bench
today.As the dialog ends, we must now
calm Saturnin’s suspicions, to get those "two circular lenses" that
the hero suspects he is hiding.Bring
out the Brandy from your Inventory, and give it to him.But he seems even more suspicious now, or
perhaps just greedy for some more Brandy.You are presented with a choice of two responses, each representing a
different (Diabolical or Angelical) way of dealing with this situation.
The Angelic Approach:Pick the second choice, telling Saturnin that you were just trying
|
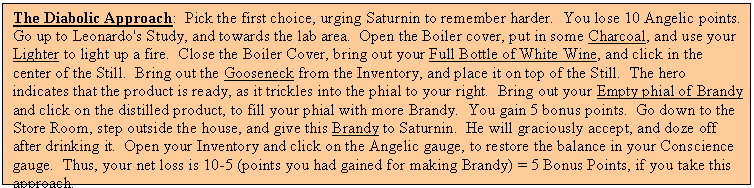

In short, there is really no
difference whether you choose the Angelic or the Diabolic approach, at least as
far as the Bonus points are concerned.But the Angelic approach is quicker. Moreover, you won’t really need
either the 5 points from making Brandy, or any more Brandy itself.So there is no need to make the Brandy at
all, making the Angelic approach that much quicker than the Diabolic approach,
in getting on with the real story.
As you
step into the Barn, look at the cabinet on your left.Click on the left door, to open it and see
the two Colored Lenses on the middle shelf.Pick up the two lenses, one by one.Turn right and click on the white piece of paper, on the stool in front
of the table with all the items that Saturnin had offered for sale.Listen to the message read by the hero.Then, click on the gear icon appearing on the little red-and-white cloth napkin on the
table, to remove the cloth and reveal the coin that you had used to bribe
Saturnin the day before.After the hero
finishes his comment, a hand icon will appear on the coin.In fact, a hand icon appears on all the items
for sale as well, allowing you to pick up anything and everything from the
table.The first time that you try to
pick up anything, however, the hero will suggest not doing so.In fact, I would suggest the same, because
you will only lose Angelic points, and gain nothing in return.
As you
step outside the Barn, you will find Saturnin asleep, even if you had followed
the Angelic approach.Go back up to
Babou, in her Sitting Room.Click on
her, and tell her about the message you found in the Barn.A dialog will follow; and then, you will be
presented with a choice of two responses.Picking the first one will cost you Angelic points, without gaining
anything in return.So pick the second
choice and "confess."You will
lose Diabolic points and would therefore still have to use bonus points to
restore the balance in your Conscience gauge.But you will also gain some information and, probably, a new ally.
Now turn
around and note the two slots at the front end of the telescope.Bring out the two Colored Lenses from your Inventory, one by one, and click on
the front end of the telescope, to put the lenses in those two slots.Note:The telescope will reveal three parts of a message.The order in which these parts come up seems
to be randomly generated by the computer.Thus, no matter which of these two colored lenses you click on the first
two times, you will get only Parts 2 and 3 of the message; Part 1 is revealed
only after you have already discovered the first two parts.So, proceed as follows.
1.Click ONCE on the
outer colored lens, and then look
through the telescope, to hear the hero read Part 2: "then
find the Philosopher’s stone,".
2.Click ONCE again
on the same lens, and then look
through the telescope, to hear the hero now read Part 3: "and the
path to power will open up before you."
3.Finally, click
TWICE on the inner colored lens, and
the hero will read Part 1: "First, look for the stars".
After this, the hero will automatically read all
three parts of the message in the correct order, and then restate the message
(or rather, the riddle): "First seek the stars, then find the Philosopher’s
Stone and the path of power will open up before you."He
will then turn to Babou, and a dialog will follow.
We must
now find the constellation corresponding to the one we saw through the
telescope.As the hero described it, it
is a lozenge topped by a fifth star.Babou identifies it as the constellation of Lyre, and suggests using
Leonardo’s celestial globe.So go out to
Leonardo’s Study and step towards the Celestial Globe, to the right of the
fireplace.
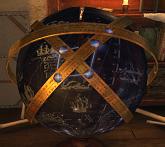
Note that the globe seems to be "lit
up" now, with five bright points on it.These points correspond to the five points of the Lyre constellation we
saw through the telescope.Note also the three metallic gold strips
across the globe.One of these strips
crosses the globe horizontally at the
top, while the other two cross it diagonally.We must ALIGN these three strips, and the
globe itself, so that the five "lit" points on the globe will come to
the front and shine through the
overlapping holes in all three metal strips.(See Picture below.)
As soon as
you achieve the correct alignment, the globe will split open, holding out at
its top a medallion that looks like the combined image of the Sun and the Moon,
just like the "Exit" icon in the Inventory.Pick up the medallion and a cut scene will
follow.
After the
cut scene, go down to the Store Room, step outside and speak to Saturnin.He will introduce you to the black cat,
curled up on the bench beside him.Feel
free to click on the cat itself, to have Saturnin repeat the introduction.Now go back upstairs to Babou, still in her
Sitting Room.Click on her, and you will
be presented with a choice of four topics.The new topics will be highlighted in white, while the old one is grayed
out.Feel free to address the old topic,
if you like; but you must cover the
three new topics (clicking on Babou repeatedly to do so), in order to proceed
forward in the story.Thus, you learn
that "Alkahest" (the name of the manor cat) also means the
Philosopher’s Stone, and that the cat wears a medallion.
Go down to
Saturnin, but neither he nor the cat is at the bench anymore.So go to the Dovecot.[Note: You will have to move the bridge
in that direction first by clicking once on the left anchoring mechanism.]As you approach the Dovecot, you will see the
cat sitting up in the loft’s window.Click on the magnifying-glass icon that appears on the cat, to hear an
amusing comment by the hero.Then, step
inside the Dovecot, and go up to the loft.The camera will automatically pan down to the cat, as the hero makes
another comment.As he finishes, click
on the cat to retrieve the second medallion, which looks like a silver crescent
moon.
Return to
the manor and go to the Trap Door now, in the Kitchen.Note the two sacks lying on the left portion
of this door.Pick up the one on the
right.You can’t put this sack in your
Inventory, of course.Rather click on
the floor, to the left of the door, to put the sack there.Put the other sack there as well.Then, click on the little circular hook that
had been hidden by the two sacks, to try to lift the door.The hero will tell you that it’s too
heavy.Look up at the ceiling, and note
the brown pulley.Bring out the Long
Rope from your Inventory, and click on the pulley.The rope will be automatically slid through
the pulley, and one of its ends will be tied to the hook in the door and the
other to a wheel on the wall.Bring out
the "multi-purpose" Crank from your Inventory, and click on
the wheel, to attach the crank to it.Now click on the wheel, to
lift the door.Then click on the hand icon on the Crank, to
retrieve it.
Bring out
the Lighter from your Inventory, and click on the lantern hanging down
from the lifted door.Pick up the lit
lantern ("Lamp"); then, bring it out of your Inventory and step down
the stairs of what we will call the Cellar.As you come down, turn left and pick up two handfuls of Saltpetre from the wall.Turn right and pick up the Cannon Ball from the floor.Turn further right and note the three barrels
(one on top of two others) on the ground, to the left of the staircase.Pick up the Engraved Plate, leaning against
the left side of the top barrel.Turn
back around then, and step further in the Cellar.Turn left and click on the bricked-up
doorway.Turn right, and click down on
the cannon.Now turn further right, and
click on the prototype of Leonardo’s flying machine.Note that even though the hero says that he
would take care of that (machine) later, he also complains about its being
"pitch black inside."So look
up, to your right, and use your Lighter to light up the chandelier.
Turn left
and click on the flying machine again, to hear the hero describe what is wrong
with it.But we don’t have any reason or
equipment to try to fix it just yet.So
ignore it for now, turn right and step forward, to return to the first part of
the Cellar.Turn slightly left and click
on the magnifying-glass icon now appearing on what looks like another Engraved
Plate (on the ground, leaning against a table or a bench).The hero indicates that we need some kind of
a powder to make the marks on the plate more visible.So bring out the Flour from your
Inventory, and click on the plate, to spread the flour over the plate.A short cut scene will follow, showing the
hero making a note of those marks on a Blank Sheet of Paper.But you can’t attach this Sheet to your
Portfolio just yet, because it is "still incomplete."Thus, you can’t even see the marks the hero
just noted.We need more information to
proceed further anyway.So let’s ignore
the marks and the sheet, for now, and proceed with the story.
We are done
in the Cellar for now, so return to the Kitchen and head for the Workshop.Go to the Sawing machine, and place the Broom
in front of the sawing blade.Click on
the foot pedal to start the sawing.Then, click on the Broom, to move it against the blade and saw the Broom
in half.Pick up both the Short Broom
and the Wooden Shaft.
Turn left
and step over to the Press.Click on the
drawer, under the Pressing block, to pull out the drawer.Open the cover of the drawer, and place the Engraved
Plate you just found in the drawer.Now bring out the Phial of Ink from your Inventory, and click on
the Engraved Plate, to ink it.Then,
bring out your last Blank Sheet of Paper and place it on the now-inked
Engraved Plate.Close the cover of the
drawer then, and click on the drawer, to push it back under the Pressing
block.Click once on the handle above
the Pressing block, to push the block down; and then, click on the handle
again, to bring the block back up.Pull
out the drawer, open the cover, and retrieve both the Sheet of Paper and
the now-inked Engraved Plate.Close the drawer and push it back under the Pressing block again.
Open your
Inventory and attach the printed Sheet of Paper to the Portfolio.Use the Mirror to read about "Alberti’s
Grid" at the bottom of the newly printed Sheet of Paper (the page on the
right, in the Portfolio).As you exit
the Portfolio, feel free to click on the Diary and flip back to the "To be
done as quickly as possible" list for the date of 23 September 1522.You will find that the second item, about
printing Leonardo’s plates, is now crossed out, indicating that we have
recovered and printed the last of the Engraved Plates we were supposed to
print.
Turn
around and approach the crooked door.If
you click on the handle, the hero will tell you (once more) that the door has
come off its hinges.So open your
Inventory, bring out the Jack, and place it under the door.Now bring out the Crank from your
Inventory, and place it on this Jack.Click on the gear icon on the
Crank, to straighten the door.Click on
the hand icon appearing on the Jack then, to pick up both the Jack as
well as the Crank in one swoop.Click on the doorknob then, to move the door aside and reveal a large
gray cabinet behind.Click on this cabinet,
to open it.Click inside, to start yet
another puzzle.
View this guide raw, exactly as the archive holds it