The Secrets of Da Vinci: The Forbidden Manuscript Walkthrough by MaGtRo
The Secrets of Da Vinci: The Forbidden
Manuscript
by Kheops Studio
Walkthrough by MaGtRo May 2006
version 1.02
Gameplay: The Secrets of Da
Vinci is a third person point and click game. The main menu has new game, load
game, options, credits and quit game. The options menu has subtitle, speed of
the camera and volume selections. After installation (2 CDs) choose a symbol for
individual gamers. 5 players can play at a time. CD2 has to be in the drive to
start the game.
Right mouse click accesses the inventory screen. The
inventory has the portfolio at top of the page. It is used for arranging all the
documents found during the game. There are 5 tabs of 21 items each in the bottom
inventory. It is recommended that items in inventory be arranged by types or use
to lessen confusion.
At top left is the conscience gauge: red for diabolic and white for
angelic actions or dialogues. If too angelic, lying and stealing is not
possible. If too diabolic, certain generous actions are not possible. Points are obtained by performing actions or puzzle completion. These points can be added
to balance the gauge. A balanced gauge opens most dialogues and choices.
At top
right is your character and is where you can change clothes. Click the item of
clothing on Valdo and he will wear it for the duration until you click to remove
it. Directly below Valdo is the diary that holds information collected during gameplay.
Read it frequently to know what is needed to be done. Below that
is the coin selection, where the amount of coins to be used is taken and
counted. The yellow button returns to menu while the sun-moon button quits the
present page featured.
The gameplay menu has the save, load, options, return
to game and exit game.
Valdo, a former student of Francesco Melzi (Leonardo
Da Vinci’s heir) has accepted the mission of finding Leonardo Da Vinci’s
notebook from an unknown patron. He arrives at Cloux Manor and greeted by
Saturnin, the caretaker. Madame Marie Babou de la Bourdaisiere,
his hostess is away at the moment. Curiosity is Valdo’s motivation in accepting the
task.
Note: This
walkthrough tries to maintain an even conscience gauge. This opens most
dialogues and actions. Actions done give points. If the gauges are off balance,
you can add to either gauge to even it up but points are used. The path taken by this walkthrough is
just one of many since the game is
nonlinear. Some of the items have alternative ways to be obtained and some
actions have alternative paths. There might be alternatives missed in this
walkthrough.
Day
1: Night, 22 September 1522
In inventory is a sealed
letter for Madame de la Bourdaisiere sent by Valdo’s mysterious employer. Read
the portfolio for the letters of the patron – Florence: 2 September 1522 and 19
September. Learn about the mission – to look for the codex-notebook. Read the diary frequently to learn the progress of the adventure
and to learn about the various characters.
Get
into Leonardo’s study:
Valdo’s room:
Look around. Take the doublet from the dresser’s top drawer and brandy
from the bottom drawer. Take the knife and charcoal crayon from
the drawer of the table by the window.
Kitchen:
Exit the room, go down the stairs to the second level pantry (has stairs to
lower level) and forward to the kitchen. Take the bottle of milk, oil and
egg from the hutch. There’s an empty bowl for the cat on the floor. If you
place milk on the bowl, the angelic gauge goes up but can be balanced by doing a
devilish act or use points. There’s knife on the center
table that can be taken if needed.
Workroom:
Go across the dining room accessed right of the fireplace and see a workshop. Take the stick leaning on
the bench on the right upon entering. Take the link-string from the floor
in front of the bench. The saw and the borer can be used. Turn around and see
the adjacent room – It’s too dark to check things here.
Saw – Go back to
the saw machine. Place the stick on the saw table.
Use the pedal and immediately push the stick towards the saw. Take the 2
small sticks.
Leonardo’s bedroom: Go
forward through the door by the cat or the other door by the dining room, left
and go up the stairs. Turn right and then go left to enter Leonardo’s room. The study must be near.
Check the paintings by
Leonardo around the room. A door right of the fireplace is locked. It might be
Leonardo’s study. Check the bookcase and
clicked on the etched words above it – The path of pleasures.
Bed – Note the
geometric shapes on top part of the posts of the bed. They must have a
meaning. Take the mirror from the Venetian cabinet left of the
fireplace.There’s a charcoal
crayon right of the bed if needed. Take the sheet of paper from the side
table. It has the triangles from the posts of the bed. Look at it in inventory
and click-add it to the portfolio. At the portfolio, use the mirror and see
that they are the signs for fire, air, water and earth. Flip to the previous
page of the portfolio and see that the back of the paper has indentations made
by handwriting. Use the charcoal crayon on that page. Read the translation
at the bottom of the screen.St John the Baptist –
Go to the painting of St John the Baptist at the corner by the locked study
door. The finger of St John the Baptist is pointing up. Move the cursor to top right
corner and take the key.Secret compartment
– Go to the sign of fire (upright triangle)
bedpost at bottom right of bed) and click on the fire sign. Valdo will quote – "at the foot of the
sacred fire of the house of dreams". Look down under the carpet and see a board.
Use the knife on the board. Take a new sheet of paper and key mould.
Add the new sheet of paper to the portfolio. Read the illegible text at the
bottom of the key mould drawing using the mirror. Read the next page also. Bronze is
an alloy of copper and tin. Gold is malleable metal.
Leonardo’s Study: Use the key
on the locked door right of the fireplace and enter.
Alternative to entering the study – Use
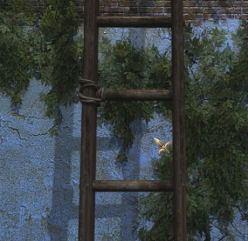
the ladder on the outside wall of the manor by the roses.A. Climb up but the ladder breaks. Fix the ladder with
2 sticks cut from worksop and climb up to Madame’s bedroom.b. Pan down and look at the ladder leaning on the
wall. See that one rung is off. Use the link taken from the workroom on the
loose rung. Then climb up. (Thanks, Benoit.)
Go to the door and click on the key. Then use the
handle to gain entry to Leonardo’s study.Sealed letter for
Madame de la Bourdaisiere – Time to snoop and see what the sealed letter
contains. It might tell us who the unknown patron is. Place the letter on the
desk. Take a stick from the box on the right. Turn around and use that stick on
the fireplace. Light the candle using the lit stick. Right click to remove the
lit stick. Take the knife on the right and use it on the seal of the letter.
Click to read it. The unknown patron did not sign the letter. Right click to
remove knife. Click on right page to close the letter. Take the red seal wax on
the left and heat it on the candle flame. Use it on the seal of the letter. Take
the sealed letter.Drawer – Open the
drawer and take the monocle and bloodstone.Look around and check
the globe. Go to the laboratory bench at the corner of the room. Click on the
still over the stove. Take the phial of sleeping potion from
top left shelf and the empty phial of ink and phial of sulphur
from bottom shelf. Take the sheet of paper hidden by the 2 phials. Enter
the paper in the portfolio. Read: Black ink is made from mixture of egg yolk and
black pigment with water. Invisible ink becomes visible under heat. We can use
the lab items later.Clock – Turn around and
forward. Click on the picture of Leonardo on the wall right of the left window.
Take the sheet of paper and enter it in portfolio.Get the clock working by
arranging (click hold drop) the gears to form a continuous path from the left
large gear up to the clock. Progress can be checked by clicking on the large
gear and see which gear will not move.One possible solution:
Amboise, 23 April 1519.
Watch and listen to Leonardo decide about his codex.

Day
2: 23 September 1522
Wake up and think that
it was all a dream. Talk to Saturnin, the guardian of the manor about the
gardens, workshop and Madame Babou. Hmm. Words and gifts to softening her
heart...
Read the diary to review
the events and new task to do. The conscience gauges are even, even after giving
milk to the cat yesterday.
Check
the manor:
Gardens:
Go left of Saturnin and take the ladder in front of the door. Pick up
gall nut from tree left of the carriage in the garden. Go back
inside and turn around. Take the pliers hanging on the door.
Kitchen & Pantry:
Turn around and get 3x charcoal from the sack left of the steps and
split logs right of the steps. Climb up the ladder to the pantry and take
3x
grains of wheat from the sack by the wall.
Take the broom by the door.
At the kitchen, take
thyme from side table by the window. Go forward towards the dining room and
turn around. Take the lemon from the table.
Dining room:
Go right of the cooking fireplace. Take the bottle of water from the
table.
Workshop:
Go to room pass the dining room. Now we can check the workshop. Take the
large spiny gear
leaning on press table at area on the left. Take large drill bit,
lighter and iron box from fireplace mantle.
Water pump-fountain
paper – Use the pliers on the paper nailed on the chimney wall to get
sheet of paper and nail. Add the sheet of paper to the portfolio.
Read the paper in the portfolio. We will do this later. It is a trigger for
another action.Easel – Remove the cover from
the easel and check the nails on the frame on the left.Jack – Go towards
the other door and look at the table. There’s a pair of pliers on the table if needed. Take the
small gear from the floor. Note the jack on top of the crate. It doesn’t
seem to work. Go to the saw and borer machine on the far area.Borer – Face the borer and take
the small drill bit from the machine. Replace it with the large drill bit. Place
the small gear on table. Use (gear icon) the
crank handle. Take the small perforated gear.Place the large gear on
the table and again use the crank handle. Take the large perforated gear. Take the crank handle.Go back to the jack on
the box (crate) 😉 and place the small perforated gear above the other gear
already there. Take the jack and
the engraved plate beside it.Lopsided door – Turn around. Use the jack on the base
of the leaning door. Attach the crank handle on jack. Turn (gear icon) the crank
to straighten the door. Take jack and crank handle.Close door. See a metal door that has
gears, colored balls and cups. We will come back to this puzzle later.
Exit via the formerly leaning door. Note the locked chapel on right side. Go up the
stairs and look down on the floor of the first landing by
tapestry. Take the collar-necklace. A stone is missing from it.
Leonardo’s study:
Change clothes by clicking the doublet on Valdo before entering the study. Talk
to Madame Babou. She talks about an unused bridge and gives another engraved plate ready for printing.
Turn around and take the empty bowl and empty perfume bottle from
the coffee table. Take the lyre under the window.
Ink – Go to Leonardo’s lab
bench. Place charcoal or gall nut on the mortar. Use pestle on charcoal or
gall nutand
take charcoal powder. Place egg, charcoal
powder or gall nut powder and water on bowl on the right. Use the empty phial of ink on the bowl
to get phial of ink.
Find
the dovecote for messages:
Exit the study and
bedroom. Go forward to the balcony. Take pebbles from the floor before
the stairs. Go down the stairs and go forward. Take the left path away from the
manor and tracks.
Bridge:
See Leonardo’s turning bridge. Pan right and go forward to see a clearing by the
stream – a perfect landing site.
Turn bridge – Go back to the bridge. Place the large perforated gear on
top of the large spindle on the left. Pan right and take the iron bar
that stops the other large spindle. Pan left back to the other spindle and turn
it. Cross the bridge.
See chopped logs on the left that are ready to be
split. Go forward and see a beehive on the left. Go forward to the dovecote. See
a pile of dry leaves, take if needed.
Dovecote:
Take the long rope hanging from the beam, the copper object on
the window sill, old clothes from the ground and pebbles if you need any.
Climb the steps. See packed straw and a heavy barrel on the
floor. Take the pewter dish from the floor.
Call the dove for
the message – Take the dove call left of the window. Look up and see 5
doves in their stalls. Take the dove call
from inventory and it will appear on the game screen. Call all the doves to
pop out of their coop by clicking on the holes.Click on holes: (left
to right) 4 3 5 1 2. Click on the rightmost
top dove to take the message. Valdo reads and answers the message.If you feed the doves
grains of wheat, the angelic guide goes up.
Cross the stream:
Exit dovecote and turn to stream.
Alternative – Another place to cross the
stream is just after the bridge.
Ladder – Place the ladder on the water. Go to the other side. oops! Use the 2 small stick
previously cut from the stick that was found in the workroom on
the empty rungs of the ladder. Now cross to the other side.Reeds – Turn left and use knife on reeds to get
reeds. There are pebbles on the ground if needed.
Forge-mill: Go forward to the forge. Pick up dry leaves
and axe outside the forge. Enter and look
around and see the furnace, anvil on the lower level and the mill on the right
side. Pick up the beekeeper’s veil hanging from the shelf.
Furnace – Place
dry leaves and split logs in the furnace. Use the lighter on the logs.Key – Place the key
mold on the table on the right of furnace. Place pewter dish and copper object
(alternative is bronze that can be bought from Saturnin) in the crucible. Click
on handle of the post on the left to raise the crucible. Swing the arm to
move it inside the furnace. Click on handle again to lower the crucible with
bronze. Remove the arm out of the furnace. Lift the furnace cover and place it
on furnace.Turn right and take
the gloves from side of the table. In inventory, click the gloves on
Valdo.Take the furnace cover
off after wearing the gloves and lay it on the floor. Swing the arm to the furnace, click the handle,
swing the arm out and click the handle again to lower the crucible.With gloves on, pour
the molten bronze on the key mould. Open the mould and
take bronze key. Take the key mould again. Click the gloves off
Valdo.Mill – Look
outside and see that the water wheel is stopped. In inventory, click the reed on Valdo. LOL!Dive in the water. Look at the water wheel clogged
by sticks. Use the knife to cut the sticks. The water wheel turns.Flour – Go back inside the
mill. Place grains of wheat on the bin at top level. Pull the lever beside
the bucket by the door to get flour.
Go back to the back of the manor by the garden If you
haven’t yet; use the pliers on the climbing rose at the corner of the manor to
get roses.
Print
Leonardo’s engraved plates part 1:
Saturnin the
caretaker: Talk to Saturnin about the mill. He will
explain how to make paper. If you talk to Saturnin with
the snorkel still on Valdo – listen to what he says. Hahahaha! If you need to
replenish the water bottle, use the water bottle on the pool.
Paper preparation –
Paper mache – Go back to the mill-forge. Go to mill at right side of the hut.
Place old clothes on the bin under the 3
big hammers-pounders. Pour water on old clothes. Click the pounders to touch the round roller on the left. Pull the lever at end of the
roller. Pull the lever from the roller to stop that noise. Click the pounders off the bin and take
4 paper mache.Press paper – Go back to the press at the
workshop.Pull out the wood box below the press. Open the box, place
one paper mache and close lid. Push back the box under the press and turn the lever
to lower the press. Turn the lever again
to raise the press and pull out the wooden box. Open the lid, take paper.Do this to the other 3
paper mache to get 4 papers.
Leonardo’s engraved plates:
Printing – Pull out the wood box below the
press. Open the box, place
the engraved plate, add ink and then paper over the inked plate.Close the lid. Push
back the box under the press and turn the lever to lower the press. Turn the lever again
to raise the press and pull out the wooden box. Open the lid; take the
sheet of paper and the inked engraved plate.Enter the sheet of
paper in the portfolio. Do this to the other engraved plate.Information – Look in the portfolio,
use mirror and see that the engraved plate given by Madame Babou is about the
bridge.The engraved plate from this room shows preparation
for diverting enemies. It is made up of water, sugar and saltpetre.Click on the cannon pictured and see new words
appear. It gives the ingredients for gunpowder – saltpetre, sulphur and
charcoal.
Convince Marie Babou to invite into her apartments:
Talk to Madame Babou at
Leonardo’s study. Be sure that Valdo is wearing the doublet. Answer with ‘Thank you, Madam. You flatter me…’ Learn about Salai. Give Madame Babou the rose and she reprimands Valdo.
Give her the collar-necklace which increases the angelic gauge. Look at Valdo and Babou’s picture in inventory –
she moved.
Perfume
preparation: Go to the corner laboratory bench.Open the door of the
stove. Place charcoal in the stove. Use the lighter on the charcoal. Close the
door. Take the gooseneck
off the still. Place rose and water on the open still. Place the gooseneck
back on the still. Pour water on the
funnel. Click the empty perfume bottle on the flask at the bottom of the
condenser to get bottle full of rose oil.
Repair
the fountain: Give the perfume to
Madame Babou. Talk to her again about bridge. She wants the fountain to be
fixed. She might mention that Saturnin might have some parts (even
conscience gauge).
Water pump-fountain
paper – Read the water pump-fountain paper in the portfolio. This is the one
taken from above the fireplace in the workshop. If you do this puzzle ahead of
time, Saturnin will be in his room and might skip the mill-paper mache dialogue
until later in the game.
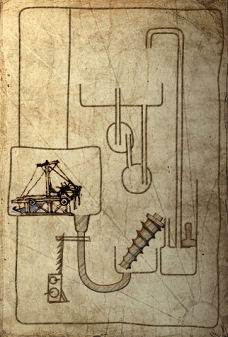
Sheet of paper – Move the cursor over the
picture to identify the different parts. The water pump is to the
left inside the square. Below that is the jack that linked to a system of pools.
The Archimedes screw pumps water from the pipe to water pump to the perforated
tank above. The lines and broken circles at top left are glass tubes and flasks.The aim of the puzzle is
to make a fountain and complete a circuit from water pump to the fountain.Fountain – Place and connect the
glass tubes and flasks under the perforated tank to make a fountain. Place the
long tube to the right hole of the tank, the medium tube to the left and place
the flasks with 2 holes on top under the long tube. Place the other 2 holed
flask under the medium tube. Connect the 2 flasks using the short tube. See
picture below.Pump water – Lower the hydraulic
press. Raise the jack to connect the funnel to the water pump. Click on the water pump
and then click on the Archimedes screw to pump the water to the holding
tank on the right. See the fountain.Watch Leonardo talk to
Francois I.
Saturnin, the enterprising caretaker:
This part is triggered by the completion of the water-fountain puzzle above. Enter the open door left of the entrance to the
lower pantry and talk
to Saturnin. Take the fountain mechanism- system at left on the floor. Buy
1 paper for 1 gold coin, sugar for 2 gold coins and sewing spool behind the bronze
(alternative – you can buy bronze to make key).
Fountain:
Go to the
center of the garden and place the fountain system at the center of the pond.
Madame is delighted.
Automatically be
talking to Madame in Leonardo’s study. Answer with ‘You flatter me Madam….’.
She wants one last thing; answer her with ‘Of course, I’m listening.’ If you
need to raise the diabolical red conscience gauge and/or to get Babou closer to
Valdo then give Leonardo’s jewel to Babou and lie (2nd
choice). Thanks, Joao!
Lyre – Take the
lyre from inventory and see the lyre on the screen.Madame will sing the
first 3 notes. Reproduce her trill on the lyre. Click on (left to right) 1 2 3
strings.She will trill another
4 notes. Reproduce it by clicking on 4 2 2 1 strings.She sings and loses
her voice.Look in inventory and
see that the picture of Madame and Valdo has changed.
Saturnin:
Go back to Saturnin and talk to him about Madame completely. He gives the recipe
for a cold remedy.
Honey:
Go across the bridge and forward to the beehive.
Click the beekeeper’s veil
on Valdo’s picture.Open the smoker on the right of the hive. Place dead leaves
in the smoker. If you don’t have any, go right and take some dead leaves outside
the entrance to the dovecote. Use lighter on dead leaves. Close the lid and take
the bee smoker. Use bee smoker on beehive. Raise the cover of the bee
hive and drop it on the stool left of hive.Take 2 honeybee combs. Place
the cover back on the hive. Take the veil off Valdo’s picture.
Saturnin:
Go back to the mansion and talk to Saturnin
about honeycomb. Fill the empty bottle of water from the pond, walk to
side of manor and back to Saturnin to get honey.
Cold remedy:
Go back to Leonardo’s study.
Go to the distiller. Take the gooseneck off. Place
thyme, lemon, honey and water in still. Click the empty bowl (cup and saucer) on
the still to get bowl full of syrup. Place the gooseneck back on the
still.Alternative: Prepare the cold
remedy. When Valdo says ‘It’s look like it’s ready’, add the sleeping potion on
the still. He will say "Idon’t think that’s a good idea’. Click the
sleeping potion again to get bowl of syrup with sleeping draught. The red
gauge will go up. (Thanks, Benoit).Give Madame the bowl of syrup. If it has sleeping
draught, Madame will fall asleep. She will wake up later feeling refreshed.
Madame’s apartment:
Babou tells Valdo about the drawings and the telescope. Check the picture of
Babou and Valdo in inventory. Go to the other side of
the room and look at the picture on the wall and the one on the easel.
Telescope –
Look through the telescope and see that one of the lenses is broken. Click on
the gold cover middle of the telescope to open it. Use knife (or nail –
Thanks, Joao!) to remove the
broken lens. Use the monocle as replacement.Look through the telescope and
see Saturnin hiding a boat. This is the trigger for end of the day. Babou dismisses the idea of Saturnin being
mysterious.
Valdo succeeded in
seducing Madame Babou.
Day
3: 24 September 1522
Leonardo’s locked
laboratory cabinet: Go forward to Leonardo’s study and
right to the lab bench. Use the bronze key on the cabinet to get gold nuggets,
red paint, blue paint, yellow paint and varnish.
Close cabinet and take bronze key.
Leonardo’s locked
Venetian cabinet: Go to Leonardo’s bedroom and to the
locked Venetian cabinet left of the fireplace.
Insert the bronze key
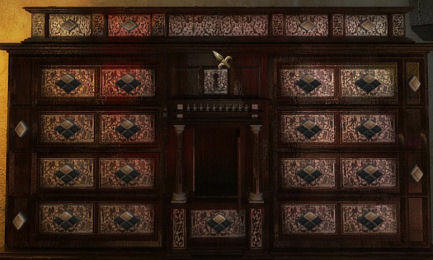
on the keyhole at center of the locked cabinet.See that there are
diamonds on one end of each row of ornate panels and on the top of each column. The top diamondsturns the smaller diamonds in the panels below it.
The object of the
puzzle is to have all the diamonds in the panel to be on the top as seen on
the single panel below the center statue.Click on the top
diamonds: (l-r) 1 2 and 4, to get the top row of smaller diamonds to be on top.Click the diamond on
the left side of the second from the top row to get the diamonds to be on top.Click the diamond on
the right side of the second from bottom row to get the diamonds on the panel
to be on top.The center cabinet
opens. Take the roll of parchment, Leonardo’s jewel, hammer,
gold blank mold and coining die.Take the bronze key.
Map of Cloux Manor: Add the
parchment to the portfolio and see a map of Cloux Manor. It has 4 circles with
celestial bodies on
each corner: sun, moon, star and planet.
The Path of Pleasure
bookcase: Go to the bookcase across the room. Click on the
words etched above the bookcase. Babou stated that Salai is Leonardo’s lover.
Click on the books that have S A L A I. Note that there are 2 A’s. See that it
goes to Valdo’s bedroom (formerly Salai’s). Turn around and note that the
passage also opens on this side. We will do that puzzle later.
Discover what is hidden under the
trapdoor:
Go down and forward to kitchen. Take the bottle of white wine on the
table. Look at area right of the door to the stairs. Saturnin revealed a trap door under the sacks left of the fireplace.
Open the trap door – Move the 2 sacks off the
trap door and place them on the left side. Look up and use the long rope on the pulley on the ceiling. Use the crank handle on the wheel
on the wall. Click the crank handle to raise the trap door. Take the crank
handle.Light the lantern hanging on the raised trap door.
Take the lamp. Use the lamp and go down.Cellar – Go forward, turn around and look up at
the ceiling. Use the lighter on the candles on the chandelier to get light.Go forward towards the stairs. Pick up the cannon ball
on the floor by the stairs. Take 2xs saltpeter
from wall at bottom of stairs.
Metal plate – Look at
the metal plate leaning by the bench close to the stairs. Use flour on the plate
and see some drawing. With paper in inventory, Valdo notes the drawing down to
get incomplete sheet of paper. If you don’t have paper, buy some from
Saturnin later and come back. Pan right and take an
engraved plate.Cannon – Turn around and go forward. See a broken
down cannon. Use the jack on the cannon. Place the crank handle on jack and use
it straighten the cannon. It is facing a bricked entryway. Place the cannon ball
on the cannon.You can fire it now or later when you need to use the cannon.
There is an alternative if you fire it now – don’t worry.Flying machine – Pan
right and see a prototype of Leonardo’s flying machine. Steering shaft is gone and right wing lost
its strut.
Print
Leonardo’s engraved plates part 2:
Go back up to the
workshop and print the last of the engraved plates. Place the plate on the open
box of the press, Place ink over the plates and lay a paper over it. Close the
lid, push to press, press and take the paper from box. Enter the sheet of paper
in portfolio. Read about Alberti’s use of the grid to paint.
Gold coin
preparation:
Go to the forge. Take split logs from lower level of pantry or split logs
using the axe just after the bridge.
Furnace – Place split logs
on the embers in the furnace.Gold blanks –
Place the gold blank mold on the table on the right of furnace. Place gold
nuggets in the crucible. Click on the handle of the post on the left to raise
the crucible. Swing the arm to move it inside the furnace. Click on handle
again to lower the crucible with bronze. Remove the arm out of the furnace.
Lift the furnace cover and place it on furnace.In inventory, click the gloves on Valdo. Take the furnace cover
off after wearing the gloves and drop it on the floor. Swing the arm to the furnace, click the handle,
swing the arm out and click the handle again to lower the crucible.With gloves on, pour
the molten gold on the gold blank mould. Take 4 gold blanks
from the mould. Take the gold blank mould. Click the gloves off Valdo.Gold coins –
Turn to the anvil. Place the coining die on the circular indentation on top of
the anvil. Place a gold blank on
top of the die. Use the hammer. Take the gold coin. Do this to the other 3
gold blanks to make 4 gold coins. They are added to the coin count on
the right side of inventory screen. Take the coining die from the
anvil.
Boat ride: Exit the forge and
look across the stream by the water wheel. Saturnin’s hidden boat is on the
bank. Cross the bridge and go left. Turn left to the bank and remove the
camouflage of the boat. Turn right and drop the camouflage.
You can take a ride up and down the stream from the mill to the dovecote by
click point to the direction you want to go. If you placed the ladder by the
bridge, remove it now. Go back to the bank after a nice day out and return to
the manor.
Recover lens from Saturnin:
Babou’s sitting room: Talk to Babou at her
apartment.
Telescope -Leonardo’s drawing – The telescope
is stuck. Use oil on and then click on rod handle. The telescope turns to the drawing on the wall. Look though telescope.Go to the drawing and
use the lighter to expose hidden drawing using invisible ink. Look through
telescope again and see the secret writing is a picture of the telescope and a
constellationTalk to Babou about Leonardo, the hidden drawing and
telescope. She states that Saturnin cleaned the room before she got here.
Saturnin: Talk to Saturnin
about the lenses. He states that he doesn’t know about them. Give him brandy.
White wine is not strong enough for him.
You will now have 2 choices of dialogues in
response to his ‘need to be friendly’.:.1. I’m sure that by trying harder… This would make Saturnin clam up and you need
to make brandy to give him. This also raises the diabolical red conscience
gauge.2. Your thoughts are running wild… This would make Saturnin admit that he has
the lenses and gives permission to enter his room. This raises the angelic
conscience gauge.Continuation of #1 choice: We need more
brandy. Pick up more charcoal if needed.Make brandy – Go back to lab bench In
Leonardo’s study. If the stove is off, place charcoal and light it. Place
white wine in the still. Place gooseneck back. Click the empty brandy bottle on
the stilled brandy.Go back and give it to Saturnin. He falls asleep.
Saturnin’s room – Enter his room and open the
cabinet on the left. Take the 2 color lenses. If you need things from his selection
of wares or take the gold coins back, take it. It will increase your red conscience, maybe to balance if
you have a rise in angelic gauge. Read the note on the stool – Spied on?
Babou: Go back to Babou’s sitting room-apartment.
Talk to her about Saturnin.
Choices: 1. No, it would be rash… 2. Confess. Angelic gauge goes up.
Decipher the puzzle of the hidden words:
Telescope + lens: Place the
2 lenses on the holder in front of the telescope.
Position blue and red lens in front of telescope.
Look through telescope to see purple. First look for the stars,Position red and yellow lens in front of telescope.
Look through telescope to see orange. Then find the philosopher stone.Position blue and yellow lens in front of telescope.
Look through telescope to see green. And the path of power will open before you.
First look for the stars: Talk to Babou and she will
help with recognizing the constellation Lyra and points Valdo to the globe.
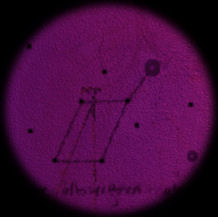
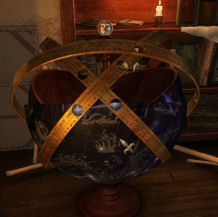
Globe – Go to the study and examine the globe by the fireplace. Turn the globe to the Lyre constellation. It is a 4 star diamond with a
single star above it. It will be at the center of the intersecting ruled bars.Then turn the bars to position the 5 holes over the 5 stars. Take the
medallion on top. It has a depiction of 2 kissy faces like the return button in the
game.
Watch the discussion between Leonardo and Francois I. There is a path from
here to the King’s castle.
Then find the philosopher stone: Talk to Babou
about the globe and medallion. Go to Saturnin and see that the manor cat is there. Talk to him and find out
that the cat’s name is Alkahest. Go back to Babou and ask about Alkahest.
Alkahest means philosopher stone and he wears a medallion.
Look for Alkahest. The cat and Saturnin is not at the bench anymore. Go to the dovecote and see Alkahest sitting by the top entrance. Enter
dovecote and approach the cat. Take the half moon medallion. If the cat
is ‘still wary’ (depending on previous choices and the gauges or no milk was
given to cat before), use gloves on Valdo and then take the medallion from the
cat.
View this guide raw, exactly as the archive holds it