The Secrets of Da Vinci: The Forbidden Manuscript
The Clockwork Puzzle
Note that there are three gears in the "clock" at
the top of the page, and a lone gear at the lower left-hand corner of the page.Note also the seven gears of varying sizes at the very bottom of the page.Click on the lone gear, and it will start running.Now pick up a small gear from the bottom and
click around the lone running gear.[Note:
You can place a gear anywhere that
the Specific Use icon does not appear.]The objective is to attach the new gear to the lone running gear, so that the new gear
would start running as well.You must
thus attach all seven gears from the bottom of the page, one by one, arranging
them all the way up to the third gear sticking out of the
"clock."When the last gear is
successfully attached, the clock will start running.

Sit back now and watch the cutscene that marks the end of
the day as well.
Day 2 – (23 September
1522)
As the day
begins, you are taken out of your room and brought out of the house, through
the Store Room Exit, where you find yourself engaged in a conversation with
Saturnin.While you gain some important
information, you also find out that Saturnin has discovered your little
"indiscretion" the night before.You must now pay him to keep his mouth shut.So open the Inventory, click once on the coins (appearing under the
Diary), close the Inventory, and click on Saturnin to pay him that one
coin.A short dialog follows.Feel free to click on Saturnin again, to have
him repeat the last part of the second dialog.
If you haven’t done so already, put on the Doublet you
had found in your room.Turn around and step
forward, to reach the corner of the house where you had put your ladder the
night before.There will be no icon to
allow you to put a ladder there today, of course, but there is an icon on the rose bush at that
corner of the house.Use your Knife to
pick up some Roses from this rose bush, and then step back to the Store
Room.Enter the Store Room.
Pick up three
handfuls of Charcoal from the sack on the floor to the left of the
stairs.Next, pick up some Split Logs
piled up on the floor to the right of the stairs.[Note: The hero will refuse to take
more than once.]Turn further to your
right and grab the pair of Pliers from the back of the closed half of
the door.Go upstairs now to the
Pantry.Look down slightly to your left
and pick up three handful of Grains
of Wheat from the sack on the floor.Turn to the (Kitchen) door on your right and pick up the Broom,
leaning against the wall, to the right of this door.Enter the Kitchen now.Turn right and pick up the Thyme from
the top of the floor-cabinet against the wall.Step forward then, turn around, and pick up the Lemon from the
top of the other end of the same cabinet.
Turn right and step forward, going past the
fireplace.Turn left and step through
the door, to arrive in the small hallway with the set of stairs leading up to
the First Floor.Go all the way up the
stairs, turn right and step through the door to arrive in the corridor in front
of Leonardo’s Bedroom.Turn right and
note that the door on the other end of the corridor is now open.You can even see a balcony outside.But there is no need to go there yet.So just turn around and enter Leonardo’s
bedroom, to the left of the door you had used to enter the corridor.
|
Step forward to your left, to
|
![Text Box: Step forward to your left, to reach the door next to the painting of St. John the Baptist. Recall the first riddle in Leonardo's message from the night before, telling us to "follow Saint John the Baptist." Note how St. John's finger is pointing up. Move your cursor on the upper right-hand corner of the picture frame until a hand icon appears. Click on the hand icon, to retrieve a Key. Use this key now on the keyhole to open the door to your left. Enter Leonardo's Study once more. [Note: Your Conscience gauge will not be affected by entering the Study this way. I merely call this the Angelic way, to contrast it with the Diabolic method we had used the night before. At any rate, you do gain 4 points for using a different method this time.]](https://img.nivoli.com/justadventure/cdn-cgi/image/w=1920,fit=scale-down,f=auto/wp-content/uploads/spoiler/adventure-kheops.studios-the.secrets.of.da.vinci.2-vinci_files/image005.gif)
As you enter the Study, a cutscene follows.You finally get to meet Madam Babou.In addition to some helpful information, she
gives you a couple of tasks to perform for her.She even gives you an Engraved Plate, just before retrieving the Letter
of Introduction from you.As the
cutscene ends, feel free to click on her again, but she is not in the mood of
chatting anymore, at least at the moment.Recall Saturnin’s last words about trying to soften the lady’s heart
with words and gifts.So give her the Collar
(necklace) that you had found on the stairs the night before.Another short dialogue follows; but if you
click on her again, you realize that it would not be so easy to persuade this
lady to let you visit her apartments where you hope to find some critical clues
to your actual quest.Try to give her
the Roses you had just clipped outside, but she is not pleased by the
fact that you cut her roses.[No harm in
having tried though.]
Turn right, and pick up the Lyre leaning against
the wall, under the window.Turn further
right and pick up the Empty Bowl (actually a tea-cup) and the Empty
Perfume Bottle, from the small round table in front of the couch.Step towards the lab area then.Click on the small cupboard to your right,
above the table, and listen to the hero’s comment about making a key from the
mold you found the night before.Turn
around and return to Madam Babou, now seated on the couch.As you approach her, she compliments you on
the Doublet you are wearing.You are
given a choice of two possible responses.Feel free to pick either one, because neither will affect your
Conscience gauge or award you with bonus points; and the lady will give you the
same information in return, no matter how you respond to her compliment.As she finishes, feel free to click on her
again, to have her repeat the information she just gave you, but it will now be
delivered as separate responses to the four choices presented to you.
Turn right then and step into Leonardo’s bedroom.Step forward and turn left, to face the tall
bookcase against the wall.Click on the
markings above the bookcase.The hero
will first repeat the phrase from the night before ("The path of
pleasures"), and then notes that the room he slept in the night before
must be right behind this bookcase.Note
that you also get a gear icon on each of the books today.In fact, this is another puzzle; and the
hero’s remark is actually a clue to the solution, which is as follows.
The Bookcase Puzzle – 1
You must click on the books so as to spell out the name of
the person Babou mentioned in her last statement:SALAI.Here are the
books you need to press.
S – (the fourth
book from the left, in the middle shelf)
A – (the fourth
book from the right, in the top shelf)
L – (the third
book from the right, in the bottom shelf)
A – (the fifth book
from the right, in the bottom shelf)
I– (the fourth book from the left, in the top shelf)
Note: It really doesn’t matter which "A"
you pick first.All that matters is to
get the spelling of the name right.In
this connection, note that "I" = i.Note also that you must click a little to the right of the book you would like to press in order for the right
one to go in.
As you click on the last book, a short cutscene shows the
opening of a passage.You find yourself on
the other side, back in front of your room.Note:When you go back to
Leonardo’s bedroom, you will find that the bookcase still appears as before,
but there is an arrow on it now, allowing you to go through.Thus, from now on, you can use this route as
a shortcut to your own room, without having to tinker with the books
again.Unfortunately, however, there is
no such shortcut to get back in Leonardo’s bedroom.If you turn around and look at the wall rug,
you will see a gear icon on it.However,
when you click on it, the hero notes that the "passage must also open on
this side," but that he will "take care of that later."[See The Bookcase Puzzle – 2, much
later on Day 4.]
Go down to the Pantry and enter the Kitchen.We need to go to the Workshop now, but let’s
try a different route than the one we used the night before.So as you enter the Kitchen, take two steps
forward, to enter the small hallway with the stairs leading up to the First
Floor.Turn right and step forward, to
find yourself in a corridor.The Dining
Room is on your right; and another door leading out of the house is now open on
your left.[For the sake of
clarification, we will call this the Main Entrance/Exit, because it is the only
one we will find in this game that can properly be called as such.]We are not leaving the house just yet, so
keep going forward in the corridor.The
next step brings you into another small hallway.Feel free to click on the wall painting to
your right.Click on the double doors to
your left, only to find them locked.Step forward now to enter the Workshop.
As you enter, you find yourself facing a Press.The hero will automatically indicate the
machine’s purpose, but there is no need to start tinkering with it just
yet.Instead, look down on the floor and
pick up the Gear (which looks like a ship’s helm or a rimless wheel with
spokes sticking out; so, for the sake of clarification, we will call this the
"wheel-like Gear.")Turn left
and approach the fireplace.Moving left
to right on the mantel, pick up the Iron Box, the Lighter, and a
thick Drill Bit.There is also a Sheet
of Paper stuck on the wall above the mantel, but you must use your pair of Pliers
on the sheet to pick it up.You thus get
both the sheet and the Nail that had pinned it to the wall.Open your Inventory then and attach this
Sheet of Paper to the Portfolio, to find a diagram on some kind of
waterworks.In fact, this is a puzzle
that you must solve in order to provide Madam Babou with her fountain.Here is how to do it.
The Waterworks
Puzzle
Note:Please, don’t be overwhelmed by the following
instructions.It is actually much easier
to solve this puzzle than to describe the solution itself!Moreover, be sure to look at the Diagram
following these instructions, and you will see just how simple it all really
is.With that in mind, begin by moving
your cursor (which is in the form of a gear icon right now) on the various
parts of the diagram and noting the name of each part in the Text Field.Thus, we find:
1.Water Pump
2.Jack linked to a system of communicating
pools
3.Archimedes Screw, a device for pumping water
4.Hydraulic Press
Click on the Water
Pump and the water will come out of the pump and "flood" the
whole page.Click on the Jack, and it will be connected to the Water Pump.Click on the Water Pump now, and this time the water will go all the way to the Archimedes Screw.Click on this Screw, and the water will go to the Hydraulic Press.Click on
the Hydraulic Press, and the water
will move up and "flood" your whole page again.But note how this happened.There is a horizontal line, with two vertical
lines on either end, in the upper portion of the diagram.There are two breaks (or gaps) in the
horizontal line.Thus, when the water
came out of the Hydraulic Press, it went through these gaps in the horizontal
line and flooded the page.Hence, we
must find a way to plug up these gaps, and reroute the water so that it would
sprout like a fountain at the top, instead of leaking from the bottom and
flooding the whole page.
Note the five geometric lines in the "box"
above the Water Pump.Three of these are
straight, double (or pairs of) lines, which you can think of as
"pipes."There are two curved
lines also (with two openings each), which you can think of as
"bowls."You must use these
five geometric forms to plug the two
gaps in the broken horizontal line.In
fact, it will take you only ten simple clicks to do it.Moreover, you don’t need to be precise in
your placements.Just click close to the
areas indicated below, and each line will automatically go where it is supposed
to go.With all this in mind, here is
how you place those lines.
1.Click
on the tallest "pipe" (or double line), and then click on the second (counting left to right) gap in
the horizontal line, to place the pipe under
that gap.
2.Click
on the medium-sized pipe and then click on the first gap in the horizontal line, and the pipe will automatically
connect, going halfway up through the gap.
3.Click
on the shortest pipe and then click in the middle of the two pipes we just attached, to put the shortest pipe
between the other two.
4.Click
on the bowl (curved line) that has both its two openings at the top, and then
click between the tallest and the
shortest pipes, close to the bottom
of both those pipes, so that the end of the tallest pipe would appear to go
through, while that of the shortest pipe would only touch, the bowl opening
next to it.This bowl will thus direct
the water flow from the tallest pipe to the shortest pipe.
5.Now
click on the bowl that has one opening at the top and the other at the bottom,
and then click in the area between the bottom
of the middle-sized pipe and the top of
the shortest pipe, so that the shortest pipe will appear to go through, while
the end of the middle-sized pipe will appear to only touch, the bowl opening
closest to it.This bowl will thus
direct the water flow from the shortest pipe to the medium-sized pipe.
Once done, your "construction" should look
something like the following.
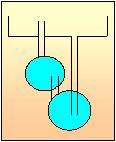
Now let’s see if it works!So click on the Jack first, to connect it again to the Water Pump.Then click on
the Water Pump, and watch the water
flow up to the Archimedes Screw.Click on this Screw, and the water will now go up to the Hydraulic Press.Click on
this Press, and the water will come
out of the top of the Hydraulic Press, pour into the horizontal line, enter the
system of pipes and bowls you arranged, and finally sprout out of the top of
the medium-sized pipe in the form of a fountain that the lady had desired!
A cut scene follows, after which the hero indicates that
we must find the prototype of Leonardo’s fountain in the barn.Before we get to that, however, let’s take
care of a few things right here in the Workshop.If you are still facing the mantel, turn
around to your left and step towards the "crooked" door.If you click on the door knob, the hero will
explain that the door has come off its hinges.Turn down slightly to your right, to see a pair of Pliers on a
small floor cabinet.The hero will
refuse to take these pliers, however, because you already have a pair in your
inventory.Turn further right and pick
up the Gear from the floor.[We will
call this the "small gear," to distinguish it from the wheel-like
gear we had picked up earlier.]Turn
right yet further and click on the Jack sitting on a wooden box.The hero notes that it doesn’t work at the
moment.Pick up the Engraved Plate,
to the right of the Jack.
Turn right and take two steps forward, to approach the
drilling machine.The bit currently in
place will prove to be too thin for our present purposes [although you are
welcome to try using it, of course!].So
remove (pick up) this thin Drill Bit, and replace it with the thicker Drill
Bit you had retrieved from the mantel earlier.Now put the wheel-like Gear on the
table, under the drill bit, and click on the Crank (sticking out from
the left of the drill-bit holder).The
machine will drill a hole in your wheel-like gear.Pick up the wheel-like (now Perforated)
Gear, and then put your other (the small) Gear on the table and
drill a hole in that gear as well.Pick
up that (also now Perforated) Gear.Having drilled a large enough hole in both of
your gears, pick up the Crank from the machine.
Return to the crooked door and turn to the Jack on the
box (no pun intended, all ye American fellow gamers!)Put the small Perforated Gear on the
Jack, and then pick up the Jack.We are done in the Workshop for now, so let’s step outside the house
through the Store Room Exit.(Note:There are three different ways you can go
down to or come around to this
Exit, but the simplest to explain would be to use the other door to go directly into the Dining Room; then go into the
Kitchen, and then into the Pantry, down to the Store Room and out).As you step out of the Store Room Exit, look
around to your right to find an open door now to the left of the Exit you just
used.This is the Barn. Step inside, and a cut scene follows.
As the cut scene ends, look at the table on your
right.There are several things on it
that you can purchase from Saturnin.Click on the table, after Saturnin stops speaking, and he will repeat
his offer.After that, you will be able
to click on individual objects, and Saturnin will just tell you the price he is
asking for that object.Bring out the
number of coins he wants, from your Inventory, and click on him, to pay him that
price.Then, just click on the object
and (if you have paid the right amount) you would be able to pick it up.However, there is nothing here that we might
need shortly that we cannot find or make ourselves.So just turn to Saturnin’s left, and pick up
the Fountain System from the floor.
Step out of the Barn.Turn right, step forward, and pick up the Ladder from the ground
on your right.Turn left then and step
towards the Pool.Turn right to face the
Pool and place the Fountain System in its center.A cutscene will follow, taking you back up to
Madam Babou in Leonardo’s Study.Feel
free to pick either one of the two choices presented in response to her
compliment, because neither will affect either your Conscience gauge or your
bonus points.Feel free also to click on
the lady then, and ask her to let you visit her apartments; but she is
"not at all in the mood" to allow you to do so.So turn to your right and approach the lab
area.Click on the small boiler door
below, to open it, and put some Charcoal inside.Use the Lighter then, to light up a
fire; and then, close the boiler door again.
Next, remove the Gooseneck connecting the Still to
the Funnel at the top of what we might call the Distillation area of the
mechanism.Put the Roses into the
Still (it looks like a pot or a tiny cauldron, and you must click in the center of the pot, not at the top).Next, bring out your Bottle of Water
and click on the Still, to add some water to the roses you had just put in the
Still.Put the Gooseneck back in
its place, and the hero will say that something is still missing.Put the rest of the water from the (now Opened)
Bottle of Water into the Funnel at the top of the distillation
area.The hero will indicate that the
product is ready, as a pink liquid trickles down into the phial at the bottom
of the distillation area.Bring out the Empty
Perfume Bottle and click on the phial with the distilled product, to fill
your bottle with the newly made perfume.Return to the lady and present this Perfume Bottle full of Rose Oil
to her.She will accept it graciously
enough; but if you click on her and ask her again to let you in her apartments,
she will firmly decline to do so.Offer
her the Brandy, but she will not appreciate that.[There is no harm in having tried though; and
it does add an entry to your Diary about her.]
It is time now to head for that bridge that the lady had
indirectly asked you to repair.Take the
shortcut through the bookcase in Leonardo’s bedroom.Go down to the Store Room and step outside
the house.Look to your right and find
that Saturnin is back there again.You
can click on him and still ask him about purchasing something from him, and he
will take you to the Barn.But as
mentioned earlier, there is nothing that we need from him right now. Feel free to ask him about how to soften the
lady’s heart.He will tell you to give
her gifts like perfumes and flower oils, but we have already done that.Other than that, he will tell you to just
continue with gifts and compliments.Turn left now and take two steps forward, to reach the other end of the
garden.Turn right and take a step
towards the coach that had brought you to the Manor the night before.You will not be allowed to reach the coach
itself though.Instead, turn left and
grab the clump of Gall Nuts hanging down from the big tree.
Turn left then and take three steps forward, to reach the
unusable Bridge.Note how it is anchored
by two mechanical units on your left and right.Pick up the Iron Bar sitting on the wheel-like gear, on top of
the unit anchoring the bridge on your left.Look to your right and note that a similar wheel-like gear is missing
from the anchoring unit on that side.Bring out the wheel-like Perforated Gear from your inventory, and
place it on this unit.The bridge is now
fixed!Note that it can be moved to three different positions:(1) the present position, pointing into the
canal; (2) towards the first parcel of land on your left, where the Dovecot is
located; and (3) across the canal, to the second parcel of land on your right,
where the Mill is located.
If you look at your Diary, one of your assignments is to
locate the Dovecot where we are expecting a message for the hero.So let’s head there first.Click once on the right anchoring device, and
then step forward on the bridge.Look to
your left and note the pile of logs on the ground.You can pick up one of these, but you cannot
put it in your Inventory.You can only
place it on the tree stump to the right of the pile of logs.But then, you don’t have an axe to chop up
the log, before you can pick up the split logs.Besides, you already have some split logs, and you don’t need anymore
just yet.So ignore the pile for now,
turn right and take another step forward on the path in front of you.
Look to your left again, and note the beehive buzzing with
bees.Obviously, it would not be a good
idea to disturb these bees, because you don’t have any protection; and if you
click on the hive, the hero will say so.So turn right and cross another bridge which is fixed, unlike the one we
just repaired.Pick up the Small Logs
and Twigs from the ground on your right and a handful of Dead Leaves
from the ground on your left.Step
forward then, towards the red-brick building in front of you, to enter the
Dovecot.
As you enter, the camera automatically pans to a
half-open window on your right, and then up towards what we will call the
Loft.As the hero finishes his comment,
look down to your right and pick up a handful of Pebbles from the
ground.Continuing to move to your right
then, pick up the Copper Object sitting on the window sill, the Long
Rope hanging down from the wooden beam, and the pile of Old clothes
lying on the ground.
Go up to the Loft now.Note the barrel towards the edge of the Loft to your left, and the patch
of hay or straw on the ground to your right.But there is no need to tinker with either of these, because they don’t
become significant until much later in the game.So just pick up the Pewter Dish from
the floor on your left.Then, look at
the six pigeonholes vertically aligned to the left of the window.Pick up the Call from the second from the top of these
pigeonholes, and then bring out this Call from your Inventory.As you close the Inventory, you will see the Call
suspended in the air in front of you, inviting you to yet another puzzle.
The
"Call" Puzzle
This is actually a very simple puzzle in which you must
play the right notes to summon all the birds out of their holes, so that we can
see if any of them has a message for us.Imagine as if the holes that you see on the Call were numbered
1-5 as follows:
1 – 2 – 3 – 4 – 5
Play the notes in the following order:
(1)Click on the 4th hole.
(2)Click on the 3rd hole.
(3)Click on the 5th hole.
(4)Click on the 1st hole.
(5)Click on the 2nd hole.
As you play each correct note, a bird will come out of
its pigeonhole.Miss a note and all of them will withdraw, and you will
have to start all over again.After you
have played all five notes correctly, all of the birds will be out and the Call
will disappear from your view, indicating that you have solved the puzzle.You must now click on the magnifying-glass
icon appearing on each bird, to check to see if it is carrying a message.As you click on the fifth bird (the one in
the top pigeonhole, in the extreme right), a cut scene will follow that will
show the hero reading the message sent to him and then his own response to
it.[Note: you might want to save
your game just before clicking on this bird, if you would like to hear these
messages again, because they are not reproduced in your Diary or Portfolio.]
We are done in the Dovecot for now, so step outside and
head back across the movable bridge that we had repaired.Click once on the right anchoring device
again, to move the bridge towards the Mill on your right this time.Step forward on the bridge.You will find a path in front of you, while
the Mill is on your right.Before going
in the Mill, however, take a step forward on the path.Look to your right, and use your Knife
to cut and pick up a Reed.There
are some Pebbles lying on the ground to the right of the crop of reeds,
but the hero will refuse to take them, because you already have some.
Return to the bridge now and step towards the right of the Mill.Pick up the Axe, leaning against the
door frame, to the right of the Mill’s entrance.You will find another batch of Dead Leaves
on the ground to your left; but if you try to pick some, the hero will refuse
to do so, because you already have some in your Inventory.Turn further left, towards the canal.Bring out your Empty Bottle of Water
and click on the canal, to fill up your bottle with water again.Turn further left then, and click on the
arrow pointing into the canal itself.The
hero will note that you need to find something to help you breathe in
there.So open your Inventory, click on
the Reed and then on the hero’s portrait, to put the Reed on his
face.Jump into the water now and look
up, to your left, to find a tangle of twigs blocking the water-wheel.Use your Knife on this tangle, to free
the wheel, allowing it to run again.Turn further left and click on the arrow to come out of the water.Open your Inventory now and remove the Reed,
by clicking on it in the hero’s portrait (unless you want to hear Saturnin’s
"crack" about your appearance, when you later approach him and start
to move away!).Turn right and enter the
Mill.
As you step inside, note how the Mill is divided into two
separate areas: the actual Mill area, to your right, and what we might call the
Forge area, to your left.We will need
both these facilities to achieve some of our objectives.Before we get to that, pick up the Beekeeper’s
Veil (hanging under the shelf on the wall, to the right of the window) and
the Gloves (hanging down from a hook, on the front edge of the
worktable).
Turn now to the Furnace on your left.Place the Small Logs and Twigs
inside.Next, put in the Split Logs.Use your Lighter then to start a
fire.Now turn to the worktable on your
right.Our first task is to make a key
for Leonardo’s cupboards.Feel free to
refer to Leonardo’s notes in your Portfolio, about making a key.We will need Bronze (which is said to be an
alloy of copper and tin), for this purpose.So put the Copper Object and the Pewter Dish in the
Crucible.Click on the crank (which is
attached to the side of the metal pole that is on the left of the Crucible), to
raise the Crucible.Click on the
metallic "arm" above the Crucible, to move the Crucible into the
Furnace.Click on the crank again, to
lower the Crucible on the Furnace floor, and the hero will say, "Perfect,
but it is not hot enough."Click on
the metallic "arm" again, to move it out of the Furnace, leaving the
Crucible inside.
Click on the huge metallic cover, sitting on the floor
under the Furnace, to pick it up.You
can’t deposit it in your Inventory, of course.Just move it up to the Furnace and click, to place the cover on the
Furnace.Open your Inventory and put on
your Gloves (by clicking on the gloves and then on the hero’s portrait,
in the upper-right portion of the Inventory).Click on the Furnace cover again, but the hero might ask you to wait for
just a few more seconds.In fact, it will be only a few seconds before you
can click on the cover again, to remove it and place it back on the floor.Click on the metallic arm now, to bring it
back above the Crucible.Click on the crank,
to raise the Crucible.Click on the arm
again, to bring the Crucible back to the table; and then click on the crank
again, to lower the Crucible on to the table.Click on the arm, one more time, to move that device out of the way for
now.
Place the Key Mould on the table, in front of the
Crucible.Click on the Crucible, to pour
the contents into the mould.Click on
the gear icon on the mould, to open
its cover.Pick up the Bronze Key,
and then the Key Mould.We are
done with the Forging area for now, so let’s take care of a few things in the
Mill area.[Note:You can go back to Saturnin and he will tell
you generally how to use the Mill to make paper and flour; or just proceed as follows.]
Put the Old
Clothes in what looks like a trough, on the left side of the Mill
area.Next, put in some water from your Bottle
of Water.Close the cover.Click on the handle, which appears under and
to the right of the anvil.The machine
will start grinding.You don’t need to
wait at all.Just click on the same
handle again, to stop the grinding; open the cover; and then, pick up the Paper
Maché.
Bring out a handful of Grains of Wheat and put it in
the large metallic Funnel that you see up on the loft, against the left side of
the ceiling.Look down on the floor to
your right, and pull the handle on the left of the bucket by the door.Pick up the Flour from the
bucket.Feel free to pull the same
handle again, to stop the machine.We
are done in the Mill area as well, so let’s return to the other side of the
movable bridge again.
We still have two more things to take care of, before we
can return to the Manor.So click on the
left anchoring device this time, to move the bridge back towards the Dovecot
parcel of ground again.Step across the
bridge, and then turn left.Pick up a
log and place it on the tree stump.Use
your Axe to chop this log.Pick
up the Split Logs from the ground.[Note: one click will pick up both pieces that have fallen on
either side of the tree stump.]
Turn right now, step forward, and then look at the beehive
on your left.Put on your Beekeeper’s
Veil.Click on the smoking apparatus
("Bee Smoker"), sitting on the ground to the right of the beehive, to
open it.Put some Dead Leaves in
it; use your Lighter to light a fire in those leaves; and then, pick up
the Bee Smoker.Bring out the Bee
Smoker and click on the beehive, to chase the bees away.Put away the Bee Smoker (just
right-click), and then click on the top of the beehive to pick up its
cover.You cannot put this cover in your
Inventory though.Instead, put it on the
small stool, to the left of the beehive.Click on the beehive now, to remove two Honeybee Combs.Feel free to replace the beehive cover.Now take off your Beekeeper’s Veil
(again, unless you want to hear Saturnin’s "crack," when you approach
him and start to move away).You can
take off your gloves as well.
Return to the Manor now and approach Saturnin, standing
to the left of the Store Room Exit.Feel
free to tell him that you have repaired the bridge, even though doing so will
not affect either your Bonus Score or your Conscience gauge.The only new thing you will learn is that you
need to use the press to make sheets of paper out of the paper maché you made
in the mill.More importantly, however,
talk to him about the two Honeybee Comb frames you removed from the beehive.At the end of the dialog, he will take both
of them from you, to keep one for himself in exchange for making honey for you
out of the other one.[Note: Once
again, you may ask him about purchasing something from him, even though you
really don’t need to do so.But if you
do ask him about it, be sure to do that at the end of the conversation, because
he will not talk to you about anything except the purchases when he is inside
the Barn.He talks about other matters
only when he is standing outside next to the Store Room Entrance, and you would
have to go elsewhere and then come back before he returns to that location
again.]
Go upstairs now to Leonardo’s bedroom.Approach the locked cupboard, under the
painting, on the other side of the bed.[Remember,
it was in front of this cupboard that you had found your mirror the night
before.]Use your newly made Bronze
Key on the keyhole in the top center of this cupboard.The "Exit" image (of the combined
Sun and Moon) appears in the lower right-hand portion of the screen, indicating
the beginning of this puzzle.
View this guide raw, exactly as the archive holds it