Dracula: Origin
Therefore press the keys for: 1 – 2 – 3 – 5 – 8
– 13.The door opens.
Cave: Read the
inscription on the slab – Enter freely and of your own will.It is dark in there. Use the lighter taken from
Janos’ room on the torch on the left inside wall. It lights up all the torches
in the path.Sarcophagus: Go forward
and see a sarcophagus in a cavern. Go close to the sarcophagus and see
rats come out.Read the inscription on the sarcophagus. Vlad
the Great?Turn-click the skull on the lid. Look inside and
see that it has bones from a horse.Rats: The exits are
blocked by the rats.Use the oil can on the water. Use the lighter on
the oil slick.Watch as the fire flows over the oil slicked
water and destroys the rats and also the entrance-chapel.Memories pass through his mind. Arno’s life
passes before him.Escape the sarcophagus: To
escape the fire, Father Arno jumps in the sarcophagus and close the lid.His nightmare revisited. It is dark in there
but he has now night vision. Uh oh!Circular lock: The
circular lock hold the bars in place.Use the Charon skull medallion-old coin that Maria left on the
bed on the slot of the circular lock.It unscrews the lock.
Bars: Look at the 4
bars that seals the lid.Click-hold-move a bar to push it inwards away
from the wall slots. Do this to all the bars.Push the lid away.
The smoke is suffocating. The outside path is
still burning and is blocked by the destroyed chapel. Go the other way.Maze: Father Arno falls
down a trap door.Clue: Read the
inscription on the floor. It is not suitable that the sequence of the
immortals grow infinitely. Of those who come, few will be chosen. The
immortals want that their number be limited and the rest be their victims.This inscription is also a clue. Since the
immortals wants limited immortal servants, it follows that numbers should
decrease, not increase. We already saw a mathematical progression on the
entrance number lock. So the clue to the maze is a sequential decrease in
number.Take note of the Roman Numerals above each
spiked gate.If we continue the entrance number lock
progression, we will reach up to the number of the only spiked gate open – MDXCVII (1597).Going in reverse from the calculated sequence,
enter the spiked gate that has these numbers:Forward to MDXCVII (1597) There’s an odor of
tobacco.Right to CMLXXXVII (987)
Left to DCX (610)
Forward to CCCLXXVII (377)
Forward to CCXXXIII (233)
Forward to CXLIV (144)
Forward to LXXXIX (89) Smells like tobacco –
Horizont brand. Look at the floor and see fresh blood.Right to LV (55) Strange odor, much stronger
than tobacco.Right to XXXIV (34) Fresh blood on floor.
Advance in spite of risk.Left to XXI (21)
Forward to XIII (13)
Forward to VIII (8)
Left to V (5)
Right to III (3)
Left to II (2)
Right to I (1)
Forward to I (1)
Forward to blank.
Before the Per Aspera gate, Father Arno falls
down again through another trap door. Meet Janos.Mythical Beasts Duel:
Talk to Janos and learn about his involvement. He says that he did not
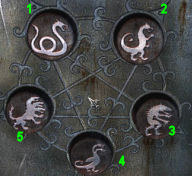
kill the Irina or Stephan. Is his pants on fire? He also says that Maria is a servant of Dracula.See that there is a panel with 5 mythical
beasts: Water serpent, basilisk, griffon, hydra (2 heads) and Cerberus (3
heads).The object of the puzzle is to select a beast
and Janos selects his beast. If a player’s beast wins, the partition
that separates the men moves towards the loser. The partition pushes the
loser closer to the back wall. After 4 wins, the back wall of the loser
shoots out spikes. The fifth win kills the loser.Clue: Take note of the
panel and the lines that joins the beasts. There are arrows on those lines
that point to the beasts that can be defeated by that beast.The water serpent at top left defeats-points to
basilisk at top right, cereberus at bottom left and griffon at bottom
right.The basilisk at top right defeats the griffon at
bottom right and the hydra at bottom.The griffon at bottom right defeats the hydra at
bottom.The hydra at bottom defeats water serpent at top
left and cereberus at bottom left.The cereberus at bottom left defeats the griffon
at bottom right and the basilisk at top right.Knowing the strength of the beasts will aid in
the selection of your beast to fight the next opponent.The water serpent at top left is the strongest
since it wins against 3 opponents but can be defeated by the hydra. The
weakest is the griffon but can defeat the hydra.Play: Select a beast by
pressing an icon. Janos will select his beast without knowing what you
selected.Look up and see the selected beast and who won
on that round. The defeated one falls down.Result: After 4 wins of
Father Arno, his conscience would not allow for murder by winning the
fifth and final round. Janos does not have the same compunction but will
kill Arno on the fifth round.My solution which may be different from
yours is: 4111 and then 1 or 4113 and then 1.
Escape Duel room: If Arno
wins 4 times and has moved the partition to push Janos, a panel at left
side is exposed.Spike cable: Use the
monkey wrench to open the panel at left wall.See the wire held by metal link that springs
the spikes. The link cannot be cut but is screwed in to the wire.Insert the knife inside the link. Turn the link
to the left until the knife is at the back.Take the knife and repeat until the link is
unscrewed from the holder. This stops the spikes from springing-shooting
out.Take the steel wire that held the link.
Play the game one more time to win and move the
partition.This exposes the exit door completely. Exit the
duel room.Hallway: Enter a
hallway that has a gate at other end. There must be no light here since
Arno is using his night vision. There are 2 puzzles here, one on each side
of the hall.Blood, sweat and tears:
Study the left side puzzle.Read the text at top of the puzzle: Tears to
tears. Sweat to sweat. Blood to blood.The puzzle is made up of squares that has gates
on each of its 4 sides. By opening a gate, liquid flows to the next
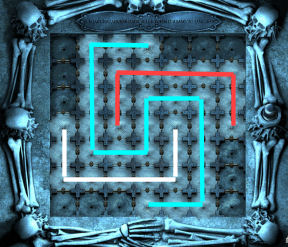
square.See 6 of those squares releases liquid. There
are 2 sweat squares, 2 tears squares and 2 blood squares.The object of the puzzle is what the text states
– to join similar squares blood to blood, sweat to sweat and tears to
tears by opening gates without the liquid crossing a square of another
liquid.Identify the liquids:
Use the cup on the right side and dip-click it on the liquid.Taste the liquid. Blood is
like wine for Arno. Sweat is both acrid and acid. Tears are salty.Puzzle: Open the gates
to make the liquid flow towards the other square.Plan the path that will not make that liquid
cross another liquid.Do the longest and difficult one first – the
sweat ones at top and bottom. Then do the tears and lastly do the blood
squares.When correctly done, hear the removal of one bar
of the gate.
Skull and hat puzzle:
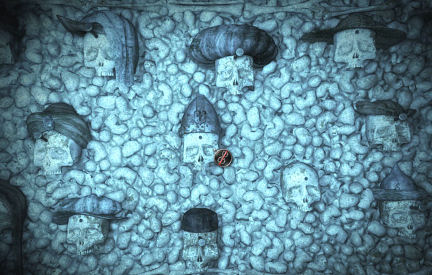
Study the puzzle on the right wall.There are several skulls on the wall, all except one is wearing a hat. 6
of the skulls have a spike or nail on the skull.The object of the puzzle is to place the spikes
on the correct skulls.Recall the drawings from Vlad’s biography that
have reference to his punishing foreigners because they do not remove
their hats. There is the original with the foreigners being Turkish and
the copy has the foreigners as Genoese. The drawings are found in documents
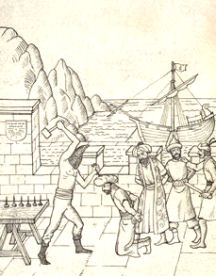
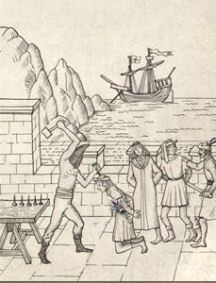
titled Punishments (Vat.) and Punishment (V. Berg).Study the 2 drawings with the enlarger and note
the differences.
 |
 |
|
| There are 6 spikes on the table and one held by the torturer. The foreigners are wearing turbans. So there are a total of 7. |
There are 5 spikes on the table and one held by the torturer. There are 3 men wearing hats. This picture is missing one spike. |
Study the hats of the victims above with the
enlarger.Place spikes on the 3 skulls with turbans. Place
spikes on the Genoese hats.As shown by the drawing, there is one spike
missing and one hat that needs to be identified.The missing one is shown to be on the Genoese
picture.Use the enlarger to find the clue as to the 7th
hat. Check the flag flying on the mast of the ship.See a symbol of Genoa. Find the similar symbol
on the metal hat of the soldier at middle of the wall.Use the syringe that was taken from Irina’s head
on the 7th skull.When correctly done, hear the removal of the
other bar of the gate.
The gate falls down to open the next room.
Japanese Tile Puzzle: Enter a well room. Across is a skull.
There are recessed steps that circle the wall going up close to the
opening at the top opening of the well.Turn around and pull the lever on the floor. The gate drops. The panel on
the floor opens with the words – Don’t look back. If you do turn
around, you die. The skull across the abyss shows the pattern of the tile
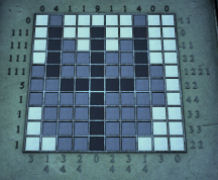
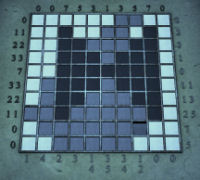
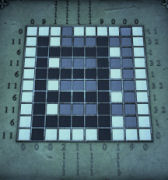
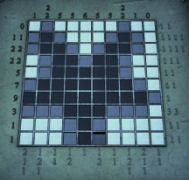
puzzle on the floor.Open the panel on the floor. See a Japanese tile puzzle.
The puzzle is made out of tiles or squares. Clicking on the tile cycles to
white, gray and black tiles.Above and left are black numbers which means the number of black tiles
present. If the number is on top, that shows the number for the column. If
the number is on the left side, it means the number for that row.Bottom and right are gray numbers which corresponds to the gray tiles
present. If the number is at the bottom, that shows the number for the
column. If the number is on the right side, it means the number for that
row.If there are several numbers seen, that means the number
of tiles that are
separated. For example: 2 2 means there are 2 tiles side by side and
somewhere else in that column or row is another 2 tiles side by side.The puzzle is random. Here are some solutions:
 |
 |
 |
 |
Once completed correctly, see that the recessed steps pull out and a
platform slides out on the other side.
Bracelet and mirror: Jump to the other side and
climb on the steps. Hear a voice that states that she lost her bracelet
for the ball. It might be at the bottom of the well.
Get the bracelet: Go down again and on the
platform by the skull, look down and right to see a hook.Use the steel wire on the hook and go down.
Look down and feel through the foot of the skeleton directly below you.
Take the bracelet.A monster growls and Arno drops the bracelet while climbing up the steel
wire.
Get rid of the monster: Jump to the other side of
the well.Pick up a stone from left of the opened gate. Use stone on water. That
didn’t help.Go to Janos at the duel room. On the way, pick up the syringe from
the center skull.
Janos’ drink: Talk to Janos to borrow his
lighter. He will give the lighter only if you find him something to drink.
He gives his empty bottle – flask.If you give him water from the bottom of the well or sweat or tears, he
will taste it and asks for another.Dip the flask on the blood square of the blood, sweat and tears puzzle.
Give the filled flask with blood) to Janos. He gives the lighter.Go down the well via the steel wire.
Go to the mouth of the cave and use lighter on the torch on the right
wall.Bats fly out and extinguishes the torch. Light the torch again. Now
there’s light and the monster will not come out.
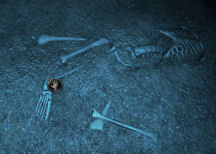
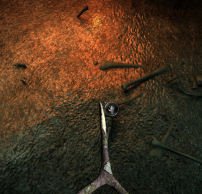
Find the bracelet: Feeling through on the bone
might not work this time.You can use your hands or use the forked stick to find the bracelet. Take
the bracelet from the top part of foot of the skeleton directly
below you.
Mirror: Climb out of the well bottom and up to
the top of the well. See the mirror on the edge of the well.
Ballroom: Click to go somewhere. Realize that all the entrances are
blocked and has no knowledge of where the ballroom is located.The ballroom as stated by Kruger is where the last step of the Path of the
Dragon happens.
Find the entrance to the ballroom: Place the
bracelet beside the mirror on the edge of the well.Hear the ghost voices and then see footsteps leading to an entrance. The
entrance is blocked.Go back and take the mirror from the edge of the well.
Remove the 2 pillars blocking the entrance. Click to remove the rubble. A feather drops down. Take the feather.
The Path of the Dragon:
Recall what Irina stated about the end of the path: The initiate must
accomplish one last rite. He won’t be able to, unless he’s understood all
he’s achieved before, that is, if he knows the order of the trials as well
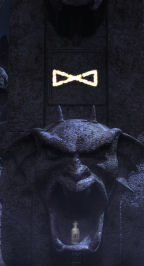
as the objects and symbols related to each of them.Enter the ruined ballroom. See 7 pillars surrounding a circular area. Each
pillar has a gargoyle with an open mouth, an unlit torch at top and a
panel in between the two.The object is to place the appropriate item of that step or path in the
mouth of the gargoyle and draw the correct symbol on the panel.Order and symbol of the path: To learn the order and symbol of the path, study the map of Turkish
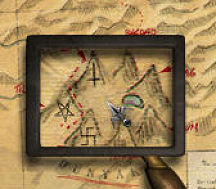
prison, mountain photo and the enlarged microfilm.Map of Turkish Prison: Use the enlarger to see the
meaning of the name of each peak of the Pillars of the World. See that
they go counterclockwise starting at the Mount of Offering ending with the
Mount of Dragon.
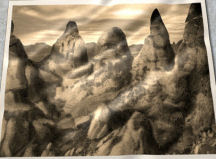
Mountain photo taken by Maria: See that the wedge shaped
symbol is left of the trident.
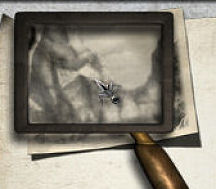
Microfilm: Using the
enlarger, see that to the right of the trident is the
pi symbol and to the right of pi is Jacob’s ladder.
Objects needed: To learn the objects needed for the path, study the documents and find
duplicate items or drawings. Find the difference between those similar
pictures and items.The Runic Anthology also gives the clues to the
object needed here.Draw the symbol fast and covers the entire panel.
Path 1: Go across and look for the pillar
that has the bottle of blood already in the mouth of the gargoyle. It is
right of the clearing with a circular metal hatch on the floor. Draw
the wedge shaped symbol on the panel.
Mountain – Mount of Offering
Test – Blood Offering. Arno has taken his own blood.
Symbol: Wedge shaped symbol
Drawing difference – Crucifixion drawing showed one has an angel with 2
chalices and the other drawing showed an angel with one chalice only.
Object: Bottle of blood #814
Path 2: Go counterclockwise like the order in the
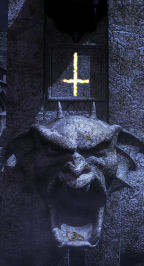
Turkish prison map to the pillar at left.Draw an inverted cross and place the small chain from Stephan’s necklace
in the mouth of the gargoyle.
Mountain – Peak of Sacrifice
Test – Sacrifice under an Oak. Arno took Stephan’s medal. Stephan was
sacrificed under a picture of an Oak tree.
Symbol: Inverted cross
Item difference – Iphigenie’s vases showed one with a necklace and one
without.
Object: Chain of Stephan’s necklace
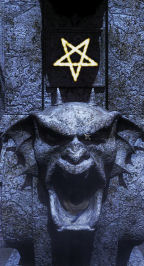
Path 3: Go to the left and draw an inverted
pentagram. Place a feather in the mouth of the gargoyle. There’s a jackdaw
nest in the mouth already.
Mountain – Fox Peak
Test – Fox Flight. Arno escaped from the trap at Vlad’s prison.
Symbol: Inverted pentagram.
Drawing difference – Fox Flight drawing showed one with a bird and one
without.
Object: Feather
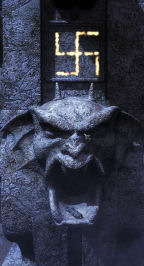
Path 4: Go to the left and draw an ancient cross
or swastika. Place a syringe in the mouth of the gargoyle.
Mountain – Mount of Punishment
Test – Punishment. Arno takes the syringe from Irina’s head.
Symbol: Ancient cross or swastika.
Drawing difference – The 2 Punishment pictures showed difference in number
of spikes or nails.
Object: Syringe
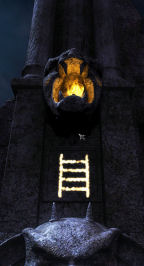
Path 5: Go to the left and draw (Jacob’s) ladder.
Light the torch at top of pillar.
Mountain – Mount of Purifying Fire
Test – Purify by fire. Arno made fire at cavern by the chapel and killed
the rats.
Symbol: Jacob’s ladder
Drawing difference – The 2 Fire picture showed one man standing by the
building with a torch and one without.
Object: Light the torch.
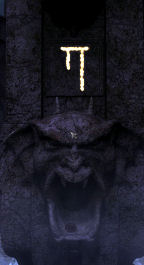
Path 6: Go to the left and draw a pi shaped
symbol. Place the Charon medallion (old coin) given by Maria in the mouth
of the gargoyle.
Mountain – Mount of Death
Test – To die. Arno trapped in the sarcophagus and released by the use of
the Charon medal.
Symbol: pi shaped symbol
Drawing difference – The 2 Funeral of Patroclus
painting showed one with a coin in
the mouth and one without.
Object: Old coin.
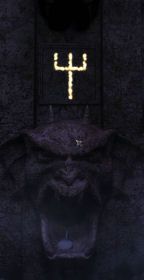
Path 7: Go to the left and draw a trident. Place
the mirror in the mouth of the gargoyle.
Mountain – Mount of Dragon
Test – Baptism of blood. Arno has not done this.
Symbol: trident
Drawing difference – Blood of Dragon picture showed a mirror.
Object: Mirror
If correctly done, see that the cover of the circular plate in between the
pillars 1 and 2 opens up.
Count Dracula: Go down the opened hatch. See a lever
on the wall that closes the entry above.
Sarcophagus: Enter the chamber and go forward to
the sarcophagus.Read the text on the lid and see that it is Vlad the Great’s sarcophagus.
Turn or click the skull to unlatch the lid.Move the lid and open the sarcophagus.
Count Dracula’s body: Use the different items in
inventory on Count Dracula.Click the (in any order) host, crucifix, wild rose, garlic, Rowan berries,
holy water, hammer and stake.(Hear Kruger asking to be let in. You can stop and talk to him if you
want. It is not necessary.)Slowly Vlad’s hand grows older. All the items that can be used as weapons
in inventory are gone except for the bomb. The bomb can be used as the
last resort.Then the sarcophagus disappears. It is an illusion.
Maria – Martha: The door opens and Maria comes
forward. Talk to her completely and learn what happened to her and what
brought her to this state. She leaves after advising Arno, Dracula will
know if he says the truth.
Count Dracula: Dracula arrives. A circle of fire
prevents Arno from getting close to Dracula.Arno wants Dracula closer to him. Dracula asks question and if he likes the answer he
will come closer to Arno at the end.There is only one good answer to each of Dracula’s question.
Be truthful or answer in a vague way.Question 1: How shall I judge your deeds?
Answer: I had no choice. It was the only way to
come to you.Question 2: Twice your enemy Janos was at your
mercy and you spared him. Why?Answer: Yes, I spared Janos and now I am here before
you.Question 3: You desire her, do you not?
Answer: Yes, I desire her.
Question 4: Who gave me immortality?
Answer : Lilith the rebel.
Question 5: Do you fear me?
Answer: I do not fear you since I have come here!
Question 6: Tell me, Priest, you can’t have come with
the absurd idea of fighting me?Answer: Like Siegfried, I was resolved to do anything to
reach my goal…Good answer! On your knees, for your baptism in blood
Watch Arno perform his final act.
Kruger and Hans are blocked by the rabble.
A green mist escapes the destruction.
In 1943, Hans is questioned about Operation D that was done with Kruger.
This document may not
be distributed without express written permission of the author and the
content may not be altered in any way.
For Questions or
Comments on this Walkthrough,
Please write to:MaGtRo
Copyright © 8/2008MaGtRo