Dracula: Origin
Look through the eyepiece.
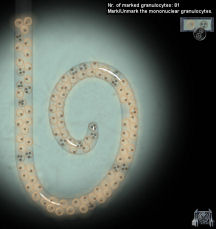
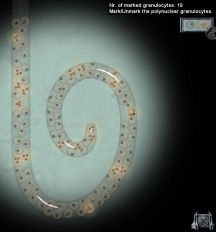
Readouts:1. Note the % mononucleated granulocytes by
clicking-lighting up the left icon on top right of the screen. The readout
is above the icons.2. Note the % polynucleated granulocytes by
clicking-lighting up the right icon on top right of the screen. The
readout is above the icons.3. Note the % of total marked cells by
clicking-lighting up both icons at top right of the screen. The readout is
above the icons.
Procedure for second parameter:
This is explained by the last page of Kruger’s instructions.Take the filament from the microscope with the
marked cells and attach
it back to top of the sampler.Lower the sampler using the lever at left.
Press the – button to eject the marked cells back
in the test tube. This mixes the marked cells with the unmarked cells.Lower the sampler using the lever at left.
Press the + button to take a sample of the mixed
marked and unmarked sample.Take the filament and place it on the microscope.
4. Note the % marked granulocytes in the mixed
sample. The icons should NOT be lit up. The readout is above the icons.Place the filament back on top of the sampler.
Lower the sampler using the lever at left.
Press the – button to eject the marked cells back
in the test tube.It is now ready for the next sample.
Interpretation: Check the
Blood Test Report papers. There are 3 results to be
entered.1. % mononuclear granulocytes on the left and %
polynuclear granulocytes on the right.These are obtained from the readout on the
microscope.2. Total granulocytes/ml of blood is obtained by
calculation using the % marked granulocytes in the mixed sample.Total granulocytes is obtained by 100 (if all
are marked in #3 at the readout above) x 100 (%) divided by the % marked
granulocytes in readout #4.3. Diagnosis:
P anomaly = % mononucleated granulocytes is
definitely lesser than polynucleated granulocytes.Unknown anomaly = % mononucleated granulocytes
is definitely greater than polynucleated granulocytes.No anomaly = % mononucleated granulocytes is
approximately equals to polynucleated granulocytes.Test the donors: Do the above
procedure and reporting for 815, 814, 813, 812 and 811.
| Donor | #1 Marked Mononuclear granulocytes | #2 Marked Polynuclear granulocytes | #4 Marked granulocytes (might need to repeat testing) |
Total # of granulocytes/ml | Analysis | |||||
| 810 | M. Florescu | 100 | 0 | 6 | 1666 | Unknown anomaly | ||||
| 811 | Ionel Martiescu | 46 | 54 | 10 | 1000 | No Anomaly | ||||
| 812 | Janos Pekmester | 89 | 11 | 7 | 1428 | Unknown anomaly | ||||
| 813 | Stephan Luca | 57 | 43 | 10 | 1000 | No Anomaly | ||||
| 814 | Arno Moriani | 56 | 44 | 9 | 1111 | No Anomaly | ||||
| 815 | Arno Moriani | 81 | 19 | 7 | 1428 | Unknown anomaly |
Enter result on
the Blood Test Report: Enter the numbers from the
testing above in the Blood Test Report papers. If correctly done, Father Arno will say so.If not, the #4
readout might need to be redone.1. Fill in the #1 Marked Mononuclear granulocytes
on the left line and #2 Marked Polynuclear granulocytes on the right line.2. Fill in the calculated Total # of granulocytes/ml.
3. Fill in the analysis.
Hear someone and the
door of the lab is slammed shut. Trapped.Locked lab door: Check the lab door.
Use acetic acid on the top hinge of the door. It flows down to the other
hinges.Exit the lab.
Go to the exit door.
Automatically call Kruger. Leave the dispensary.
Go to room and read
mail:
Inn: Enter and talk to
Ojana. Click on the garlic on the counter. Father Arno gets sick and is now
affected by garlic.Bedroom: Go up to the
bedroom. Open the bedroom
door and hear a warning shout – Careful!. Do not open further or the
bomb will explode. There are repeat chances if you die.Bomb: Look at the space
between the door and the door frame. A string is stretched between the 2
places.
Use a thumbtack to hold the doorframe part of
the string and
then use the thumbtack to hold the string on the door or just use the
thumbtack on the door string alone. These actions hold the string in place and not
be pull.Use the knife to cut the string.
Enter and see Maria’s bird on the window –
Boom, boom!Take the bomb on the door.
Mail: Check the table. Open Irina’s packet with the knife.
There is garlic inside the packet. Use the empty
metallic box taken from Maria’s room on the garlic to get garlic in a
box.Read the materials sent by Irina.

Get information:
Ojana: Go down and
confront Ojana. Learn that Janos and someone from Alba Iula entered Arno’s
room.Janos’ Letter: Father
Arno asks about Janos’ letter that is on the counter. Take and read Janos’ letter
from Heinrich von Kruger.Use the enlarger on the letter and see holes.
Take a closer look at the period of the signature of Kruger. Something
stuck here. Hmm…Janos’ room: Go upstairs
and enter Janos’ room. Search the room.Desk: Check the
calendar on the desk left of the door. It is for Dienstag (Tuesday)
September 14, 1920Take the lighter.
Read the letter from the Vesnicie Foundation
and then the Thule brochure. See the Blood of the Dragon
under the brochure.Use the bunch of keys taken from Janos on the
drawer of the desk.Look at the German passport issued to a
Hans Beckermeyer with Janos’ picture. That name is one of the subscribers
to Thule Society.Examine the other pages of Vlad’s biography.
Coffee table: Check the items
on the table by the window. See a paper, pencil and a box.Decode Janos’ messages:
Code 1: The
paper has embossed text.Use the pencil on the paper 3 times.
See a code made up of 4 letters each and September
IV III I V II at the top. Note the underlined letters of the month.Decoder: Use Janos’ bunch of keys on the box and see a
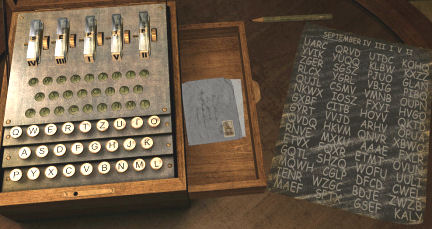
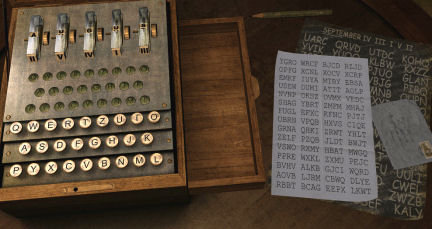
decoder and a letter.The decoder has bars on top that are labeled
with Roman Numerals at the front end.On the top of the bars are letters. In between
the bars are wheels that cycle the letters.The bars can be removed and replace another
bar by clicking on the front end and clicking it on another bar.
Decoding part 1:
Enter the revealed Code 1 info on the decoder.
Roman Numerals: Check
if the Roman Numerals on the decoder is the one on Code 1: IV III I V
II. If not, rearrange them to that sequence.Letters:
Click-hold-turn the wheels to change the letters on the top of the bars
to S E P T E as seen underlined on Code 1.Code: Type in the 4
letter codes on the decoder: UARCQRVDUTDCKOHQYVIKYUQQ…While typing, see the decoded message at the
bottom of the screen. After typing 2-3 rows, the message is automatically decoded and
is placed in documents.Message: Read
Hans-Janos’ Decoded report to Kruger. Learn that Martha’s grave is
empty. Arno is no longer needed. Need to contact the Dragon to enter the
castle. The blood tests are needed to determine who are servants and who
are victims of the Dragon.
Decoding part 2:
Click the letter that is in the drawer on the
codes exposed by the pencil. It shows another set of 4 letter codes.Roman Numerals: Examine
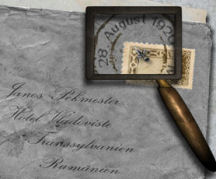
the envelope. Use the enlarger on the date stamp. It is August 28, 1920 from
Munich. Based on the calendar at the desk that gives info that September 14
is a Tuesday; backtrack to learn that August 28 falls on a Saturday.Check the Janos note taken from his pocket at the
shed and see that the numbers for Saturday is erased.
Find the numbers for Saturday:
Study Janos note with numbers.See that the number moved position for the next
day’s sequence based on the number to its right.
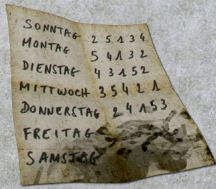
| Day | 1 | 2 | 3 | 4 | 5 |
| Sonntag | 2 | 5 | 1 | 3 | 4 |
| For example the number 2. 2 is beside 5 for Sunday. So for Monday it should be in the 5th column. |
|||||
| Montag | 5 | 4 | 1 | 3 | 2 (to be moved 5th column) |
| Dienstag | 4 | 3 | 1 | 5 | 2 (to be moved 4th column) |
| Mittwoch | 3 | 5 | 4 | 2 (to be moved 1st column) |
1 |
| Donnerstag | 2 (to be moved 4th column) |
4 | 1 | 5 | 3 |
| Based on the above changes, find the numbers for Friday and Saturday |
|||||
| Freitag | 4 | 3 | 5 | 2 | 1 |
| Samstag | 2 | 5 | 4 | 1 | 3 |
Enter II V IV I III on the bars of the decoder by
taking a bar and clicking it on the bar you want replaced.Letters: Since the first
5 letters of the month were used on the first code, enter A U G U S on the
letter above the bars of the decoder.Code: Type in the 4
letter codes from the Munich letter on the decoder:
YGROWRCFBJCDRZJDOPFG…Message: Read Kruger
Decoded letter to Hans-Janos. Learn that the last place of the path is
in the ballroom of the castle. He advises to study the Svenson Runic
Anthology and its Wood of Blood inscription.So Janos aka Hans is an agent of von Kruger. Von
Kruger and Hans are members of the Thule Society. They are following the Path of the
Dragon.Attic: Go up the attic
and check the gramophone now that we have the wax cylinder from Irina.Gramophone: If you have
not gotten the silver needle from Ionel yet, do so. (Go to the first intersection from the inn and
turn right. Go forward and play games with Ionel.)Assemble the gramophone. Use the wax cylinder
from Irina’s safe.Listen to the last words of Herman Von Bergen.
Learn about Dracula, his friend Ioan Hartner, Lucina and the eventual
death of both. Arno’s nightmare is a replay of the incident.Take apart the gramophone by placing all the
parts in the different compartment. Van Bergen’s wax cylinder broke apart.Go down and go to the dispensary.
Dispensary: Enter the
dispensary.
Shed: Go to the shed
and the fuse box at the cellar.Raise the handle to the up OFF position.
Take a copper wire from any of the middle row
ones and place it on the middle top row to get power to the developing
room.Lower the handle to the ON position.
Exit the shed and go to Maria’s room.
Developing room: Enter
the formerly dark room through the door at bottom of the bed.Maria’s portrait: Look at
the light box and see a picture of Maria.Father Arno has an accident and spilled acetic
acid on the picture. Click and then fill the bottle with acetic acid again
from inventory.Look at the disfigured picture of Maria. It’s
Martha – is this an omen? Automatically remove the picture off the
light box.Take the sponge on the sink at right, click it
on the sink to wet it and wipe the light box. Right click to return the
sponge.Janos’ letter: Take
Janos’ letter from inventory. Place it on the light box.Look close and see the holes under specific
letters: C C H H H H O O N A N A S H H O.Look at the chemical formula on the bottles and
deduce that the letters refer to: C2H4O2, Na2S and H2O.On one tray only, mix one click each of Acetic acid
(C2H4O2), Sodium sulfite (Na2S) and then water (H2O) taken from the
bottles in front of the trays.Use the sponge on the mixture and then wipe
Janos’ letter with it.Look close at the letter. Use the tweezers from
inventory on the big period at end of the signature. The tweezers has the
microfilm now.Prepare developing solutions:
Clean the tray with the mixture by clicking on the
handle part and washing it in the sink.Read the paper on the right end of the top
shelf. It has the ingredients for the 3 solutions needed to develop a
picture.Left tray – Developer: Mix hydroquinone, Metol,
Sodium sulfite, alkaline mix and distilled water.Middle tray – Stop Bath:
Make diluted acetic acid (Acetic acid and distilled water).Right tray – Fixer: Mix Sodium thiosulfate
and Potassium metabisulfite.Enlarge the microfilm:
Place the microfilm held by the tweezers on the
glass plate above the enlarger on the left.Change the light to the red bulb by clicking on
the switch above the sink.Now that the light is red, open the black box
left of the sink.Take the tongs in front of the box and
click-hold-move a photographic paper to the bottom of the enlarger. Right
click to drop the tongs.Turn on the switch at the base of the enlarger.
It will automatically turn off when done.Take the tongs and pick up-click-hold the
photographic paper.Drop it in the left tray with developer. Count
off 12 seconds. 1001, 1002, 1003…Pick up the paper using the tongs and drop it in
the stop bath middle tray. Count off 7 seconds.Pick up the paper using the tongs and drop it in
the fixer right tray. Count off 7 seconds.Pick up the paper using the tongs and hang it on
the line above the table.Study the dried picture and see that it is part of the 7 peaks where Vlad
was imprisoned in Turkey. Use the enlarger and see 3 symbols on the peaks:
trident, pi and ladder.Shed: Go back and place
the copper wire back to the 2 left slots of the middle row. This brings
power back to the lab and the blood will not spoil.Exit the dispensary.
So it is Kruger and his agent Hans aka Janos
that killed Irina and Stephan. They are members of the Thule Society.With the help of the Iron guards they ransacked
and burned the village. They also destroyed Martha’s tomb. They are following the Path of the Dragon.
Find Luana the gypsy:
Luana: Go to the Oak
Tree crossroad pass the Field of the Fallen Soldiers.Talk to Luana. Yes, now we know who the enemies
are. Look for a print near the water.Chapel: Go forward on
the path that Luana showed. Father Arno is getting sicker.Look down and see the stele of Lord Mircea XIII
used as a bridge over the spring.Go to the chapel and spring source at the foot
of the mountain. See the stele of Vlad I and Vlad III.The tombstone at right is missing. Go back to
the stele of Lord Mircea. Click and turn it over. It is for Duke Alexander
VIII.Go back to the Chapel that is the spring source.
Look close at the shelf. This looks like a page in Vlad’s biography –
Punishment. There is supposed to be a gold cup on the shelf.See that I and IX keys are missing from the
circle above the cup indentation.Go back to Luana and talk to her. She says to
find the bowl that was stolen.
Find the bowl that was stolen:
Ionel, the young boy:
Go to Ionel at the ruins at edge of the village and end of the road from
the cemetery.Talk to him. Learn that the bowl was taken by
Ariel and Celdric.Inn: Talk to Ojana, the
mother of Ariel.Luana: Talk to Luana at
the crossroads again for advice.
Things to collect to get Luana’s help:Blood of a lost battle:
Maria’s bloody shawl found on the floor of the Dispensary kitchen.Ashes of a vampire:
Remember the information gathered from the Van Bergen’s wax cylinder
played on the gramophone. Luciana Hartner eloped with Dracula and became a
vampire.Go to the cemetery. Talk to the
gravedigger sitting on the steps leading to the church.Give him the matches in exchange for the use of
the shovel. Take the shovel.Turn around from getting the shovel and go
forward to the tomb at the end beside a wild rose bush.Use the shovel on the lid of the tomb. Take
ashes from the body with a stake driven on the chest.Blossom of a rose bush:
Use the knife to cut roses from the rose bush beside the grave of
Luciana Hartner or from the bush on the left side of the road going to the
castle.Ring of a killer: This
is the ring left on the ground by an Iron Guard at the tomb of Martha.Cemetery: Go to Martha’s mausoleum.
Use the key taken from Martha’s box on the locked
door.See that the tomb is empty. Read the inscription
above it.Look down on the floor and see the broken cover of
the tomb. Take the crucifix and the Iron Guard ring.Turn around and see but not take the spare key to
the mausoleum.Hazel wand: Exit the
cemetery.Go to Ionel again at the end of the road from
the cemetery.Give him the gramophone and in exchange, you can
look in his treasure bag.Take the forked stick-slingshot-hazel wand.
Berries of Mountain Ash:
This can be found in front of the castle ruins.Go back to Luana at the Oak Tree crossroad.
Place all the collected items on the box in front of her. She tells you to
wait.Inn: Automatically be
in the bedroom at the Inn, Father Arno writes in his journal. He decides
to mail his journal to Monsignor Briganti in case something happens to
Arno. Take the journal (letter to mail).Ojana: Go down to
the front desk. Ojana said that Luana left a forked stick. Take the
forked stick from the counter.Place the letter to mail on the box at right end
of the counter. Exit the Inn.Chapel: Go to the path
shown by Luana at the Oak Tree crossroad. Luana’s caravan is not the there
anymore.Find the cup:
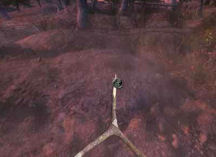
Walk the path left of the Oak Tree.Take the forked stick from inventory and see it in front of you.
Go forward and watch the tip of the forked
stick. You will see the tip move or point to where you should go.After the stele stone bridge over the spring,
see more activity on the tip of the forked stick. Point it and click to a
mound across the stele bridge and Father Arno will say – I should dig
here.
Mound: Use the shovel
on the mound.Mortar shell:
See the gold bowl but it is under a mortar shell.If you take the bowl, the mortar shell explodes.
The game gives another chance.Use your hand or cursor to dig ‘gently’ around
the bomb. Click only on the soil around the shell at the middle and by the
top area.When the bomb is exposed, realize that you need
a tool.Cemetery: Go to the
cemetery and talk to the gravedigger still sitting on the steps to the
church.Talk to him and automatically exchange the
lantern for a monkey wrench.Mortar shell: Go back
to the mortar shell. Use the monkey wrench on the cap-tip of the bomb.Pull the monkey wrench towards you twice in one
click-hold-move. The tip falls off.Push the mortar shell off the cup. Take the
gold bowl.Check the cup and read the engraving on the rim.
He who has intelligence walks in the succession of the immortals. Three
engraved stelae give the six on the dial.
Castle of Twilight:
Enter the Castle:
Go to the chapel and place the cup on the slot on the shelf.Number key circle: See the circle of numbered keys on the dial.
There are 2 missing keys. Use the 2 cartridges
taken from the Oak Tree crossroad.Learn the numbers for the code to push based on
the clue from the cup: Three engraved stelae give the
six on the dial.Check the 2 stele on the ground at left: It is
for Vlad I and Vlad III. The one that is used as bridge on the spring is
for Alexander VIII on one side and Lord Mircea XIII on the other side.The dial has numbers for 1 -13.
Based on the clue there are 6 numbers needed. We
have 1, 3, 8 and 13 as clues.To get 6 logical mathematical progressions, realize that: 1 +
2 = 3; 2 + 3 = 5; 3 + 5 = 8; 5 + 8 = 13.These are obtained by adding the previous number
to the sum of the previous calculation.