Dracula: Origin

by MaGtRo about 73 minutes to read


Dracula 3: The Path of the Dragon


by Kheops Studios


Walkthrough by MaGtRo   August, 2008

Gameplay:    This is a first
person point and click game. The main menu has new game, load game, options,
credits, gallery and quit game.

The options menu has selections for subtitles,
rotation, object info, brightness, overall volumes, music volumes, sound effects
volume and voice volume.

The gallery has picture of specific scenes that have
been seen during gameplay.

At right corner of the screen is an X icon to close
the screen and go back to main menu. The credits screen is closed by pressing
the ESC key.

After starting a new game, there are 5 profiles that
can be selected to represent the gamers’ gameplay.

Right click during gameplay opens the in game
selections and inventory screen.

The in game selection has the choice for the in game
menu, objectives, inventory, dialogues and documents.

The in game menu has the save, load, options, return
to session and quit session.

The objectives give guidance to progress in the game
and point out what needs to be done to progress in the game. The hint shows that
consulting the bible, click on the ‘open the bible at random’ button until the
icon stops blinking can give help.

The inventory has the Transit zone at top right of the
screen. Here are the items that are taken during gameplay. Click the auto button
to place them automatically in the inventory frame. There are 5 tabs on top of
the frame to show 5 different inventory areas to fill up with items. The
inventory items can be arranged as needed on all those 5 frames.

Left click to pick up items and right click to release
or place them in the game screen. Pressing the space bar skips dialogue or cutscenes.

The pdf manual is found at Start, All Programs and
Dracula 3 menu.

Thanks, Benoit!


Arno, a priest is having a nightmare of being trapped
in an enclosed place.


Vatican September 3 1920

Father Arno Moriani of the Sacred Congregation of
Rites discusses his nightmare with the Monsignor Felicio Briganti. His nightmare
is brought about by his unit being buried in Caporetto. Father Arno is sent to
Transylvania to ascertain the sainthood of Martha Calugarul, a physician and
scientist.

On the train, Father Arno strengthens his resolve to
do his duty as Devil’s advocate and Promoter of Faith.

Note:    This
walkthrough is just one way to play the game. Additional actions maybe done or
other ways of doing things are possible.


Vladoviste Day 1

The inventory has a crucifix and bible.


Investigate Martha Calugarul:

Find the inn:    Facing the
train station, turn left and forward to the next corner. Turn right and see a
red building.

Go forward and enter. Ring the bell and talk to Ozana. Learn about her son
and a bit about Martha.

Meet Janos:    From the front
desk, turn left, right by the stairs and forward to the parlor.

Enter the parlor and talk to Janos Pekmeister, an
assistant professor in Medieval History at University of Alba Iula. He invited
Father Arno to see the ruins of Castle of Twilight tomorrow.

Room:     Go back to the
stairs and see a telephone on the wall. Climb the stairs and enter the first
room on the right.

Go to the table and take the letter. It is
Diocesan file of Martha
. Read the document. Learn that she is the first
Romanian woman physician. Her face was burned by acid. See a picture of a
veiled Martha, with Prof. von Kruger, her clinic and her grave-mausoleum.

The documents has the bible. Click the flashing book
icon until it stops. Documents has Roman Numerals chart and
Martha’s Diocesan file.

Check the wardrobe left of the window and right of
the door.

Exit the room and see the door to Janos’ room across
the hall.

Telephone:    Go down the
stairs and use the telephone.

Pick up the receiver and turn the crank. Select
Vatican 65 and talk to Monsignor Briganti.

Learn the politics involving the haste of the
application for the canonization of Martha.


Visit the dispensary where Martha worked:

Vesnicie Foundation Dispensary:   
Exit the Inn and go forward until green building with a 1905 above the door.

See the shadow of a barking dog at right of the building. Read the sign left of the door.

Ring the bell and
enter. Turn right and talk to Dr. Maria Florescu in the kitchen.

Go to the door left of the room. Meet Fidel, the
watchdog.

Exit the clinic. A person with a blood red ring
watches Father Arno.

Turn left and look up at the broken window of the
house beside the clinic.


Visit Martha’s grave:

Cemetery:    If facing the
clinic, turn right and go forward. See the destruction the war has brought to
the homes at edge of the village.

Go left and up the hill. Read the sign left of the cemetery gate. Enter the
cemetery.

Martha’s grave:    Turn left
and forward to the lit mausoleum and the sitting boy. Talk to Ionel.

Check the ribbons on the wreaths in front of
mausoleum. The stone at right side of the gate states that Martha lived from
1871-1920.

Contact the parish priest and talk to him about
Martha
:

Iordan Mitiu:    Turn right
from the mausoleum and see a wild rose bush beside a grave on the left. The
grave is that of Luciana Hartner.

Go right and talk to the gravedigger.

Learn that the parish priest left and went south for
the cure. Father Gregoriu’s phone number is Costantza 1 3 5. Learn about the
miracle the gravedigger attributes to Martha and his opinion of Dr. Maria.

See the church behind the gravedigger.

Turn around and exit the cemetery through the gate
ahead.

Inn:    Go back to the Inn. Go
forward until the end of village, right and see the Inn on the left.

Use the telephone and call Father Gregoriu at
Greenleaf Rest Home. Learn his opinion of Martha’s sainthood.

Go upstairs, enter the first room at right and
sleep.


Vladoviste Day 2

Father Arno has another nightmare. He hears a woman
call from outside the Inn – Ioan, Ioan. A man calls down – Luciana. Luciana is
heard coming up to the rooms. See a door right of the wardrobe. Open the door and see
shadow silhouette of a
man stabbing a woman. Father Arno wakes up.

Check the wardrobe and realize that it is heavy and
cannot just slide. Exit the room.


Put the crucifix back in its place in the cursed room:

Ozana calls out to Father Arno. She mentions that a
reporter from the city wants to talk to Father Arno.

She also asks that the crucifix in the next room be
placed back on the wall.

Cursed room:    Turn right and
enter the other bedroom.

Go forward and check the door seen in the nightmare
that is right of the window.

The bolt was forced a long time ago.

Turn left and check the floor right of the bed. See
the black spot and the fallen crucifix.

Check the painting of the Tower of Babel by Peter
Bruegel on the wall.

Take the crucifix and click it on the top nail on
the wall. Note the shape of an upside down cross on the wall.

Father Arno says a prayer after the cross is placed
on the wall.

Exit the room and reassure Ozana.

Talk to journalist Stephan Luca who is waiting for
me in the parlor
:

Stephan Luca:    Go downstairs and enter the parlor.

Stephan Luca mentions that Martha was murdered for
defying evil.

Read Martha’s letter that Luca places on the
table. She mentions the patients that are afraid to fall asleep, hear voices,
walk in their sleep and present strange stigmata.

Read Martha’s medical files. Note that all
the patients have neck hematoma and has the P anomaly seen in the blood. The
patients are: Marian Prada, Celdric Maliscal, unknown young woman and Ozana’s
son – Ariel Vulpesco.

Check the red book that Janos was reading on the
same coffee table. It is Transylvania: History of a Reconquest (War of
Transylvania).

Go to the phone by the staircase. Use the phone and
call the police. Call Inspector Brutar at Alba Iula 22. Learn that he thinks
that Martha is mad.

Newspaper library:     Go to
the left side of the parlor and see bound newspaper clippings in the bookcase
– Monte Saptamal. They are sorted
by year. Use this library for more information during the investigation.

Go back to Luca and talk to him again. Read the 2
letters. Learn about the Path of the Dragon in Turkey. She mentions a file
that she has put together. To find the key, carefully observe the order of
the paintings on the wall.

Father Arno questions Luca. Click on all the
dialogues.

Go to the phone and call Father Gregoriu. Learn what
they did with Celdric, the young boy. Learn about the other victims. The Path
of the Dragon is an accursed way of the cross that would lead to the source of
the evil.

Call Monsignor Briganti. There is no answer on the
other line.

Dragon stone:    Try to take
the dragon stone right of the phone. Go to the front desk and ring the bell.

Talk to Ozana completely. Learn something about Maria and Ionel. Get permission about
the dragon rock.

Take the dragon from the wall by the stairs-phone.


Luana the Gypsy:

Exit the Inn. Go forward and then left by the train
station. Talk to Luana the Gypsy.

She has 2 games on the plank in front of her.

There is nothing to get from playing these 2
games. It is just for pleasure.

One is the dice game. Click the dice and note the
numbers. Take one of the dice and place it in the container at right. Take
the container to turn it over. Luana selects her die and turns her container
over. The higher die number wins.

The other game is the cards game. Click to turn
the cards over and note the back of the card. Click ‘play’ and Luana will
cover 2 cards. Guess what is the color of the back of the card.

Eventually Father Arno says that he has to
concentrate on his mission.

Check the information in Medical Files mentioned by
Luca:

Cemetery:    Turn around and
go forward twice. Turn left and go up the hill to the cemetery.

Talk to Iordan, the gravedigger. Learn how Martha
died and where Marian Prada is buried.

Grave with rose bushes:    Turn left,
go forward to the grave of Luciana Hartner 1870 that is beside the rose
bush. This is where the unknown woman drained of blood was found.

Turn around and check the tombstone under the dead
tree. It is the tomb of the unknown woman that died 1919.

Look up at the mausoleum up the hill and a crow
flies down.

Talk to Ionel, the young boy by Martha’s grave.
Learn about Celdric and Ariel.

Turn around and see the grave of Celdric, 1902-1916.

Go see Janos Pekmester at the Castle of Twilight:

Exit the cemetery, go down the hill and right. Go
forward until outside of village.

Field of the Fallen Soldiers:   
Read the memorial to the fallen soldiers with the blue, yellow and red flag of
Romania. In November 1916, the battle occurred here.

Continue to the left until the crossroad. See the
gypsy caravan.

Examine the oak tree right of the crossroad. See
that there are fresh bullet holes on the tree. Pan left and take 2 cartridges
from a revolver
from the ground left of the path.

Take note of the shadow (not that of the Oak tree)
on the ground.
It shows a man pierced on top of a pole.

Go forward pass a wild rose bush on the left.

Castle of Twilight:    Look
around at the view at top of the hill.

Go forward and talk to Janos. Learn about the
Dragoman family and Vlad Tepes.

Check the skeletons on the ground left of Janos.

Sundial:    Pan right and
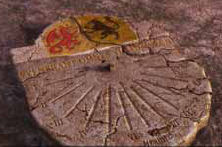
look at the ground. Look close at the Sundial. A piece is missing.

Click to automatically place the piece of the sundial at right with
the bigger piece. Read: All injure, the last one kills.

Click-place the dragon piece from the ground above the
piece with the script.

Take the red dragon piece from the Inn from
inventory and join it with the rest.

Gold dragon with a sable wolf – the personal coat
of arms of Vlad Tepes.

Hear the wolves howl. Click behind Janos and see
that the drawbridge is destroyed.

Pan right and take Rowan berries from the
mountain ash or Rowan tree.
Do research on vampires:

Inn:    Go back to the Inn. Use the phone and call Monsignor
Briganti.

The Monsignor closes the Martha case but opens
another one on vampires. Learn that ‘upstairs’ informed him that the case here
is not isolated. He wants Father Arno to discredit the superstitions about
vampires.

Stephan Luca:    Go to the
parlor and talk to Stephan Luca. He shows Martha’s file from Turkey.

The Path of Dragon comprises of seven trials. The
first folder has the painting of Raphael’s Crucifixion. See 2 drawings; one
part of the first path and one for the second part.

Go towards the door and Ojana mentions that Dr.
Maria Florescu needs blood donor. Talk to Ojana.

Dispensary:    Exit the Inn
and forward to the dispensary. Ring the bell and enter the dispensary.

Go to the kitchen and talk to Maria. She wants
Father Arno to take his own blood and place the bottle in the refrigerated
chest. The combination is the date the dispensary was built. Mark Father
Arno’s blood type in the analysis report and determine the types of the last
three donors.

Sterilize the instruments:   
Go to the treatment room. Pick up the medical instruments from the
table.

Go to the kitchen and take the pot right of
stove. Click the tip of the cursor holding the pot on the middle of the
sink. The pot is filled with water.

Place the pot filled with water on the left side
of the stove above the fire.

Place the medical instrument inside the pot.

Open the door of the firebox. Pan left and take
firewood from left side of kitchen. Place the firewood in the firebox.

The phone rings. Answer the phone. No one is on
the other line. Hang up the phone. Try to go back to the kitchen.

The phone rings again. Answer the phone. It is
Prof. Heinrich Von Kruger. He wants Maria to call Munich 321 941.

Go back to the kitchen. Wash hands by clicking on
the soap on the dish above the sink. Take the sterilized instruments.

Draw blood:    Go back to
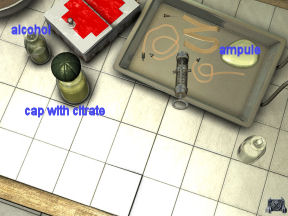
the dispensary. Place the sterilized instrument on the table.

Take the small end of the left tube connection and
insert it on the left side of the syringe.

Place the needle at other end of the left tube
connection.

Place the right tube connection to the right side
of the syringe.

Click the yellow teardrop ampule right side up.

Take the measuring cap containing citrate and use
the cap on the right side up yellow ampule. Place the other end of the right
tube connection on the ampule with citrate.

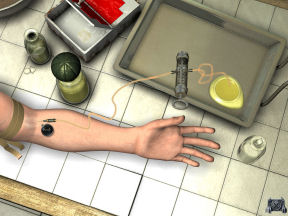
The arm is now on the table.

Take the top off of the alcohol bottle on the
left. Open the red cross box and take cotton. Use the cotton on the alcohol
bottle on the left. Use the alcohol imbibed cotton on the arm by the elbow.
Place the used cotton back in the box.

Take the tourniquet and use it on the arm above
the elbow.

Take the tube connection with the needle and
insert it on the vein. Push the needle in.

Take the tourniquet off. Pull the syringe. See
blood is taken and placed in the ampule.

Automatically remove the instruments when the
ampule is full. Take the ampule – Bottle 814.

Store the blood:    Open the
door at right and enter the room.

Look close at the padlock of the refrigerated
cabinet. Maria states that the combination is when the dispensary was built.
Above the door outside is the year the building was built – 1905. Enter 1905
on the line of the padlock. Pull the hook of the padlock.

Open the cabinet and place bottle 814 on the
middle shelf. Close the cabinet.

Blood Test Result:    Read
the green Blood Test Result folder in front of the refrigerated cabinet.

See that the untyped sample from bottle 813 is
from Stephan Luca, 812 is from Janos Pekmester and 811 is from Ionel
Martinescu.

See that Maria is type O. Father Gregoriu is type
A and has P anomaly. Martha has an unknown anomaly in 1920. Note the rest of
the donors.

Type the blood:    Father
Arno’s and the last 3 donor’s blood need to be typed.

Samples:    Click on the soap on the sink to wash the hands.

Open the cabinet. Take a test tube from the wall
right of the refrigerated cabinet.

Click the empty test tube on bottle 814 to get a
sample. Close the cabinet and place the blood sample back on the test tube
rack.

Do this procedure to get samples from bottle 813
(Stephan Luca), 812 (Janos Pekmester) and 811 (Ionel Martinescu). Be sure
to close the cabinet and place the blood sample back on the test tube
rack.

Reagents:    Take an empty test tube and click it on the bottle
with blue reagent in the refrigerated cabinet. Do the same for the bottle
with yellow reagent. Close the cabinet.

To find out what the blue and yellow reagents do,
take a sample of a typed blood in the refrigerated cabinet and test it
first.

Let’s test it on bottle 809 (Father Gregoriu). He
is type A. Take a blood sample from bottle 809. Close cabinet.

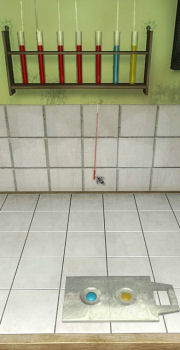
Procedure:    The label of
the tubes are seen at the top right of the screen.

Click on the pipette on top of the blue test tube.
Click the blue filled pipette on the left side of the opaline glass plate.
Place the pipette back on the blue test tube.

Click on the pipette on top of the yellow test
tube. Click the yellow filled pipette on the right side of the opaline
glass plate. Place the pipette back on the yellow test tube.

Take the pipette from the tube of blood to be
tested.

Click the blood filled pipette on the blue and
then on the yellow reagent.

Check the result. A clump of blood seen means
that there is a reaction.

Sample blood:    Do the above
procedure
on Father Gregoriu’s blood (809).

Father Gregoriu’s blood showed clumping on the
blue reagent which means the blue reagent is the antibody for the A
antigen. The yellow reagent is the antibody for the B
antigen.

Wash the opaline glass plate on the sink. Right
click to place the glass plate on the table.

Test blood:   

Sample 814 (Father Arno) = Clumping or positive
on yellow reagent which means he is type B. Enter the blood type in the
Blood Test Report paper.

Wash the opaline glass plate on the sink. Right
click to place the glass plate on the table.

Sample 813 (Stephan Luca) = No clumping on
either the blue or yellow reagent which means he is type O. Enter the
blood type in the Blood Test Report paper.

Wash the opaline glass plate on the sink. Right
click to place the glass plate on the table.

Sample 812 (Janos Pekmester) = Clumping or
positive on yellow reagent which means he is type B. Enter the blood type
in the Blood Test Report paper.

Wash the opaline glass plate on the sink. Right
click to place the glass plate on the table.

Sample 811 (Ionel Martinescu) = Clumping or
positive on blue and yellow reagent which means he is type AB. Enter the
blood type in the Blood Test Report paper.

Wash the opaline glass plate on the sink. Right
click to place the glass plate on the table.

If done correctly, Father Arno will say so.
Perfect! I’m sure of my result
.

Automatically be in the kitchen. Talk to Maria. She
places Bram Stoker’s book about Dracula on the table.

Take the book and read it. Click the flashing blue
icon and read the underlined text.

Talk to Maria completely.

Consult a historian who is an expert on the myth:

Castle of Twilight:    Exit
the dispensary and go right. Go forward until the castle.

Talk to Janos. Prof. Van Bergen’s successor Irina
Boczow is the expert on vampire. Luca knows her number.

Inn:    Go back to the Inn.
Talk to Luca in the parlor. He gives Boczow’s phone number and explains the
documentations to learn more about the Path of the Dragon.

Irina Boczow:    Use the phone
and call Boczow. She will meet Father Arno in Budapest. She mentions the
latest publication of Vlad Tepes’ biography.

Monsignor Briganti:    Call
the Vatican and talk to Monsignor Briganti. He will send the reprinted Vlad
Tepes’ biography to the Inn.

Request the opinion of a doctor or a scientist:

Prof von Kruger:    Use the
telephone and call Prof. von Kruger.

Talk to him completely. Learn about the P syndrome. Father Arno states that he thinks that he is being
observed.

Stephan Luca:    Go to the
parlor and talk to Stephan Luca about von Kruger.

Ozana:    Go to the front desk
and talk to Ozana.

Exit the Inn and hear the train. Go forward to the first intersection and go left.

Train station:    Talk to
Luana, the Gypsy.

Go to the train. See a map. Click on blinking
Budapest.

See Father Arno asleep in the train and Maria
bringing flowers at the grave.

Budapest 8AM Day 3

Consult a historian who is an expert on the myth
(continued):

Irina Boczow:   Knock on the door
and enter the office.

Talk to Irina. Hermann Van Bergen’s strongbox is
locked.

Strongbox:    Look close at
the dials of the strongbox.

Click-hold-turn any dial and see that the rotation
is loud. Father Arno has enhanced hearing now.

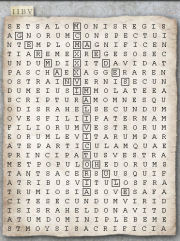
Listen to the sound of the turning of the dial. A distinct click will sound when the correct letter is in position.

The dials show MDCCCXX (1820).

Take the letter and cylinder and place it on the
desk.

Read Bram Stoker’s letter. Learn that Stoker
based his book on the real experience of Van Bergen. His Latin name is
Arminius.

Irina will find a machine that will read the
cylinder.

Click on the big book right of the cylinder. It is
the library catalogue.

Look around the room and click on the bow and arrow
on the wall behind the strongbox. Check the poison-acid above the strongbox.

Talk to Irina again completely. Learn about Serbian
use of stake in the heart. The stake is made of Aspen or Hawthorn.

Irina asks that you read the red book – The Lords
of Twilight or the Fulfillment of the Race
written by Van Bergen. Learn
about the Path of the Dragon.

Talk to Irina again. Learn about the Thule Society.

Irina asks that you read the left book – Hidden
Apocalypse
by Thomas the Greater.

Find the place and date of the origin of the first
war.

Find the prophecy of the next war that is
instigated by the Thule Society.

Talk to Irina again. Learn about the Path of Dragon.
The path is the way to change man to a bloodthirsty monster.

Irina asks that you examine the illustrations in the
cream colored book.

Open the book and see a copy of Raphael’s
Crucifixion.

The documents page is opened. Flip back and forth
between the real painting of Raphael’s Crucifixion and the copy using the
arrows at top left of the right page. The differences will be pointed out.
Use the magnifying glass-enlarger on top of the right page to see the differences
noted.

Exit the office. Turn right from Van Bergen’s bust 1820-1913 and go
forward. Select Vladoviste in the map.
Vladoviste Day 3

Inn:    From the train
station, turn right, forward and right. Enter the Inn.

Talk to Stephan Luca at the parlor. He will
venture the Path of the Dragon himself.

Prof. von Kruger:    Use the
phone and call von Kruger.

Father Arno comments on his sense of hearing and
smell. Uh oh!

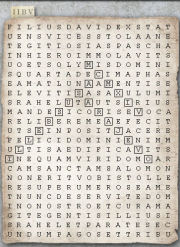
von Kruger wants to show the randomness of the
Hidden Apocalypse.

Find some appropriate words that correlates on
the page. Kruger helps solve the puzzle.

The professor gives tips to win the card and dice
game of the gypsy. To have an advantage at cards, select the visible colors.
To have an advantage at the dice game, let the gypsy start the game and then
select the color that will defeat the gypsy’s color selection. The white die
has better chance to defeat the yellow and the yellow defeats the black and
the black defeats the white.

History of Voivode Dracula:   
Go up to Father Arno’s bedroom. Read the package from the Vatican on the
table.

Move the cursor over the text and read the
translation at the bottom. Use the arrow at bottom right to change pages.
The pictures are in the documents.

Janos:    Exit the Inn and go
to the castle ruins. Talk to Janos.

Other residents:    Talk to
Maria at the dispensary. Climb to the cemetery and talk to Ozana and the
gravedigger.

Ionel:    Climb down from the cemetery and go forward until
the end of the road. This is the edge of the village and is ruined by war.

See Ionel standing by the wall and carrying his bag of possession.
Ionel comments about the underground passage, ghosts and that Father Arno is
pale. Double uh oh!

Ionel’s disk ‘against the wall’ game:   
Each player throws a disk and the one that is closest to the wall without
touching it wins.

Click-hold and release the disk. Play with Ionel
until he shows Father Arno the contents of his bag. There is no need to win
the game.

Take the silver needle. He wants a trade
for the slingshot. See a harmonica in the bag; he likes music.

Inn:    Use the telephone and
call Monsignor Briganti.

Father Arno dreams:    Hear a call
from below, Maria climbs up and in the bedroom drops a medallion.
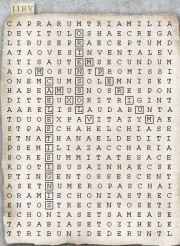

Vladoviste Day 4

Father Arno’s bedroom:    Try
to exit the room. See and take the medallion- old coin left by Maria
on the pillow.

In documents and close up of the medallion, use the
enlarger-magnifying glass to read the words on the rim of the coin about
rendering to Charon.

Exit the room and go down to talk to Ojana.

Stephan Luca:    Ojana cannot
wake Luca. He was supposed to go to Turkey.

Turn right and take the wax from the floor beside
the broom and pail.

Go upstairs and knock on Luca’s door.

Enter Father Arno’s bedroom. Use the wax on the
right side base-bottom of the wardrobe.

Click on the wardrobe and it moves to the left.

Open the exposed door by unlatching the top and
using the door handle. Enter Luca’s room.

Read the newspaper on the table. Take note of the
death of Inspector Lupar at the Broken Oak crossroad.

Note that the crucifix on the wall is again upside
down. Go and place the crucifix right side up.

Automatically see Stephan Luca shot at point blank
range on the floor.

Take the medal from Luca’s neck. Click to read the
words around St. Dimitri’s medal.

The painting on the wall above the body is different now – Solitary
Oak Tree. Automatically, the old Tower of Babel painting is exposed by Arno.

Look at the window shelf right of the washbasin.
There are traces of mud.

Check the bed and Arno mentions a pharmacy kind of
odor. Check the bible in Greek on the bedside table.

Unlatch the door and exit.

Go down and use the phone. Call Inspector Brutar and
report the murder.


Follow the Path of the Dragon until the end and
destroy the evil that I will find there.

Maria places the time of death between midnight and
3 AM. After realizing that there are dark forces at work, Father Arno decides
to walk the Path of the Dragon.

Ojana:    Go downstairs and
talk to Ojana. Luca left his trunk in the attic. Take the hook left of
the door.

Janos Pekmester:    Go to the
parlor and on the way note that the hall mirror is covered. Talk to Janos.

Attic:    Go to the top of the
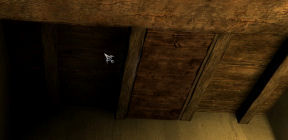
staircase. Look up and see a darker color panel on the ceiling. Use the hook
to pull it down.

Climb up to the attic. See a bat on the window.

Stephan’s trunk:    Use the
St. Dimitri medal on the metal slot at left. A small chain is in inventory now.
Push the medal in the slot.

The panel opens. Read the words on the backside of
the cover – Forever faithful to the motherland. Stephan is patriotic.

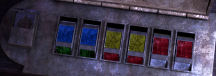
There are 6 colored squares that can be cycled.

The object of the puzzle is to place the correct
color on the slot.

As seen from the Field of Fallen Soldiers, the
Romanian flag is blue, yellow and red or seen in the red book in the
parlor’s coffee table (check documents).
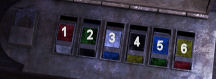
Cycle the squares to show from left to right:
blue, blue, yellow, yellow, red and red.

Cycle #1 to show blue.

Cycle #6 to show red.

Cycle #2 to show blue.

Cycle #5 to show red.

Cycle #3 to show yellow.

Cycle #4 to show yellow.

The trunk opens. Take the vial with holy water,
and host.

Read Martha’s letter to Stephan. It mentions Fox Peak where Vlad the Impaler was imprisoned. Check the enclosed picture with the
enlarger and see the trident shape on the side of the mountain and a wedge
symbol on the mountain left of the trident.

Pan left and open the square box on the crate. 🙂

Hartner trunk:    Turn to
the other side and check the trunk’s tag. Open the Ioan Hartner trunk.

Check the contents and see a copy of the Fire
drawing of Vlad. Check the red folder at right and see the Barber’s Shop
picture of a man feeding a pig. Read the letter of Van Bergen that states
that the picture is linked to the Path.

Gramophone:    Open the
case and see a flag, cylinder and handle.

Place the handle on the left,
the flag at the center and the cylinder on the middle rod.

Click on the

bottom left compartment and note that the needle is missing. Use the
silver needle given by Ionel on the base of the flag.

Lower the lever left of the flag. The flag is
positioned down. Turn the handle. Hear music.

The gramophone will still be used here and we
cannot pick it up yet.


Discover where in Turkey Fox Peak is located:

Go downstairs and talk to Ojana about the covered
mirrors.

Dispensary:    Exit the Inn
and go to the dispensary. Ring bell and enter. Talk to Maria in the kitchen.

She brings out a train ticket to Urguyurt used by
Martha. Written on it is stab the ground and follow the blue light in order
to trace the symbol of the Ancients
.

Maria shows the map where the Turkish prison is
located. The path from Urguyurt  leads to the Pillars of the World. Use
the enlarger and see that there are 7 peaks, each of which has a symbol: Peak
of Sacrifice – inverted cross, Fox Peak – inverted pentagram, Mount of Punishment – ancient
cross, Mount of Purifying Fire, Mount of Death, Mount of the Dragon and Mount
of Offering.

Automatically, Father Arno is on the train on the
way to Urguyurt.


Fox Peak, Turkey

Go inside the prison and search:

At top of the mountain where the prisons are
located, Father Arno has a fire going.

Check the backpack right of the fire. Take the
matches
, portable electric lamp, knife, rag and
rope
.

Pan right and read the words to the beast by the
inhabitants of the valley etched on a stone.

Turn around and go forward to the cliff side. See
the peaks with the etched symbols.

Use the rope on the tree stump at right. Go down
where the rope is dropped.

Vlad’s prison:    Look around
and a crow flies out.

Read Vlad’s words etched on the wall. Pan to the
ground and right. Take the feather in front of the right chain.

Read the words etched on the opposite wall. It
mentions a beautiful woman.

Look down on the ground under the etched words. Look
close and check the Horizont brand cigarette butts.

Check the inscription on the iron collar. Click
again and have a probable meaning of the words – Catch me, I am on the run!
Take me back to the prison.

Pan right and see 3 stacked boulders that can be
moved. Move all 3 boulders to reveal a path to the deep part of the mountain.

Go forward pass skulls. Go forward pass the blood
red eyes.

Temple room:    Enter a temple
room. Look around, climb the steps to the altar area. See roots around the
altar. There is a recessed square on a square in a circle on the wall. It is
missing something.

Exit back through the crack on the wall and be at
Vlad’s prison. See that someone took the rope away. Trapped.

Go back to the temple room.

Blue pentagram:    Pan right
and see a pile of dirt on the floor. Click on it once. Click on the edge of
a buried frame of a sarcophagus. Blue light is seen at the top part of the
buried frame. Remember what is written on Martha’s train ticket – 
stab the ground and follow the blue light in order to trace the symbol of
the Ancients
.

Use the knife on the blue light. Click-hold the
knife on the blue light to form an unbroken line that will not break. Form a
pentagram. It is best to have a steady speed. Remember where the corners are
located and where to change direction.

If error occurs, it will start from another point
of light. The longer the line is unbroken, the brighter it becomes.

Sarcophagus with statue with snake:   
The statue has several bas-relief, some are worn out.

Pick up a shiny stone from held by the
statue on top of the
sarcophagus.

The language is read from right to left.

7th (1st) bas relief – Look close and see a
bas-relief. Click on the words below: Your water is precious, make sure
that it is not spilled in vain.

Click on the arrow at bottom right.

6th (2nd) bas relief – Click on the words: To the dark
lord, throbbing life.

Click on the arrow at bottom right.

5th (3rd) bas relief – Click on the words: Free as a
fox who knows more than one way.

Click on the crack at bottom of the lid. The
sarcophagus is
empty.

Altar:   Go back to the top of
the stairs. See that the altar has sluices for possible blood sacrifices.

Wall square:    Look close
at the square on the wall.

Use the shiny stone on the indent at the bottom
of the square.

On the square, click hold the mouse to form the
same inverted pentagram as seen on the sarcophagus.

I started at the point at the bottom and move
up. Make a continuous line with no break or release of the mouse button.

When done correctly, the inverted pentagram is
lit and the door opens revealing a staircase. Climb out.

 Camp:     Be
outside and see that the fire is out because of the snow. A red fox runs away.

Light a campfire:    
See a bird on the ground that is nearly frozen.

Take the bible from inventory and place it on the
fire pit.

Take the crucifix from inventory and place it on
the fire pit.

Pick up the wet firewood and place it on the fire
pit.

Pan right and use the rag on the stone with etched
words covered with snow.

Use a match on the stone to light it.

Place the lit match on the bible.

See Father Arno with the bird.

Father Arno is now on the train on the way back to
Vladoviste. He talks about his vision and knows the first path already.


Vladoviste Day 4 continued

Talk to Luana, the Gypsy.

Go back to the Inn but Arno wants to check on Maria.
There are S-like graffiti on the walls of the village.

Dispensary:    See graffiti
on the wall of the clinic. Ring the bell and enter the dispensary.

Talk to Maria in the kitchen. Find out what happened
after Martha died. They said farewell.

Inn:    Talk to Ozana. She wants Arno
out of the Inn.

Bedroom:    Go upstairs and
enter the bedroom.

Hear the phone ring. Exit and eavesdrop. It sounds
like Ozana is asked if Father Arno is gone.

Open the letter on the table. It is a threatening
letter that wants Father Arno away from here.

Open the packet under the letter. It is from Irina
in Budapest.

Go downstairs and use the phone. Call Irina in
Budapest.

Go to the train station and click on the train.

Budapest Day 5

Irina Boczow’s office:    The
door has been forced. Enter Irina’s office.

See her with arrows on her arm joints and mouth. A
syringe is on her forehead. Take the syringe.

Look close at her left hand. She wrote words with
her blood: ARMA, SUNT, INDE, MALA.

Take the spool and thumbtacks from the
desk.

Safe:    Open the safe. The first combination was MDCCCXX – 1820. The old
combination must have been changed.  Remember the bust of Von Bergen outside the office
door, he lived from 1820 to 1913.

Enter 1913 in Roman Numerals – MCMXIII.

Take the wax cylinder seen the last visit
here.

Library:    Go to the hall
right of the fireplace.

Check the box on the stand in a corner at left. This
is the one Irina mentioned that has the rare vase of Von Bergen.

Illumination puzzle:    Look
close at the text of the illumination. See 5 dials at the bottom of the
frame.

Read the words of the illumination:    
If you wish to contemplate a hidden, terrible and cruel beauty, yet
admirable to the sight, know that the green truth maybe read in a circle
which you will follow in the right direction…

To make a circle, place the thumbtacks at the
period ending the middle paragraph and above the ornate line-bar. Attach
thread-spool on the thumbtack.

Click move to extend the thread to length desired.
Click hold turn to draw a circle.

Check the green letters (green truth),
the line-perimeter of the circle touches (read in a circle) going
clockwise (follow in the right direction). Right click to release the
thread.

The V – i – r – g – o touches the
circular line.

Enter VIRGO on the dials at the base of the frame.

The box opens. Look at the Iphigenie vase.
Iphigeneia’s Sacrifice is in documents. Use the enlarger to study the
vase. Note that the words on the rim state: The god’s altars are
overflowing with blood. Black and boiling, it flows on the ground and soaks
the roots of the oak tree.


Find the books that Irina wanted Arno to read:   
Using the last clue Irina left, find
the books using her method of cataloging. Remember that she talked about
cataloging and ghosts during the last visit.

Catalogue:    Check the 3
books on her table. Check the tab on the top left side of those pages. See 4
letters written on the tabs. These tabs are the reminders of where those
books are located in the library. In their place, ghosts are inserted. This
is the clue on how to find the other books.

Alcove – There are 5 alcoves in the library.
Each of those alcoves has a Latin sentence on the top of the entryway. The
first letter of the clue word is the last letter in the Latin sentence.

Book case – Enter the specified alcove. Each
book case has a Latin phrase on the top. The second letter of the clue
word is the last letter in the Latin phrase.

Book shelf – Check the bookcase specified. Each
book shelf has a Latin word. The third letter of the clue word is the last
letter of the Latin word.

Book – Each shelf has the alphabet. The
fourth letter in the clue word is the letter on the book shelf.

Click on the book found and Father Arno will read
it. If it is the correct one, the book will be in documents.

    ARMA   SUNT   INDE   MALA
Alcove   Ad astra per
aspera
  Felix qui potuit
rerum cognoscere causas
  Nil admirari   Nil Nimium. Satis
est: ne sit et hoc nimium
                 
Book case   Incerta curatio
certus dolor
  Mirabile visu   Nomen est omen   Acta est fabula
                 
Book shelf   Grumium   Aldebaran   Alfard   Nibal
                 
Book letter   A   T   E   A
                 
Name of book   Click the empty
space.
  Runic Anthology   The Funeral of Patroclus   Iphigeneia’s Sacrifice

There are only 3 books seen. The one at ARMA is
not there and no ghost inserted. Someone stole it.

Note the white cardboard in some shelves. Those
are the
ghosts that mark books taken by Irinal to read or are taken out of the
library.

Exit the office and go back to Vladoviste.

Runic Anthology:    Check
the last page of the Runic Anthology. This is not necessary to finish the
game.

The object is to place together metaphors or
kennings that refer to one item. Click – hold and drop to move a kenning
from one place to another. Separate each group of kennings by a break.

Thank you, Benoit!


Vladoviste

Day 5

The gypsy is gone from her place.

Look around. Go to the Inn and on the way smell
burning.

Go forward and talk to Ionel, the boy. The Iron
Guards from Alba Iula came and painted things around the village. He also
mentions that the adults think that Arno is drawing misfortune to the village.

Cemetery:    Go up to the
cemetery. Enter and see the church burning.

Go forward twice and talk to the gravedigger. Talk
to him twice and inquire about the Inspector that died at the crossroad. Learn
that Martha’s grave was defiled. Turn around and hear what the gravedigger said about
Maria.

Go to Martha’s mausoleum and see that it is closed.

Dispensary:    Better check on
Maria. Go to the dispensary and ring the bell.

No one is home. Enter anyways. There is an odor of tobacco.

Kitchen:    Go to the
kitchen. The power goes off. Take Maria’s bloody shawl from the floor by the
table.

Look around the kitchen. Pull back the curtain
under the sink and take the funnel. Open the drawer left of the sink
and take the copper wire.

Yard:    Exit through the
door at the kitchen.

See Fidel, the dog. He is scared of Father Arno
now.

Turn around and forward. Take the empty can
by the wall. Notice the light at the cellar of the shed at right. That is
where the electric control panel must be.

Shed-Morgue:    Enter the
shed and see a shadow at end of the aisle. Click on the shelves left and right of the aisle.

Janos – At the end of the aisle, turn to
the left, click on a coffin that is not empty. Open it and see Janos. He
is not dead but can not be awakened. Check his pockets and vest.

Look at the Fox’s Flight drawing hidden
in his vest. It looks like part of Vlad Tepes’ biography. This might be
from the missing book, the one that Irina wanted Arno to read.

Take the golden key and bunch of keys
from his right side pants pocket. Check the contents of the left side
pants pocket. Ah – he smokes Horizont brand like the one at Vlad’s prison.
Look at Janos’ note with numbers.

Turn around and open another coffin. The man is
dead; bled dry.

Turn left and open the hatch on the floor going
to the cellar.

Cellar:    Enter and go
forward.

Look at the dynamo-generator. Use the empty can
on the grill in front of the fuel tank. Use the funnel on the empty can.
Open the fuel tank faucet. Take the oil can.

Fuse box:    Turn around.
Open the fuse box on the wall. See that the fuses are broken.

There are 9 fuse slots. There are 4 blown
fuses.

As a matter of convenience, the fuse locations
are for:

Top from left to right:   
kitchen – developing photo room – foyer

Middle from left to right:   
laboratory – treatment room – Maria’s bedroom

Last row:    unknown.

Only the kitchen, photo room, lab and
treatment room are ‘fused’.

Repair the fuses:    Be
sure that the handle at the bottom of the fuse box is at the OFF
position (up) or you die.

Take off the 4 broken fuses from the top and
middle row and place them on the bottom row and middle or top right.

Use the copper wire on 2 of the fuse leads
that you want to have power.

Let’s repair the laboratory and treatment
room; the left and middle fuses of the middle row. See the copper wire
connect the 2 holes-leads of each fuse slot.

Pull down the handle to the ON position.

Hear the phone ring. Exit the shed.


Von

Kruger:
     Answer the phone at the foyer.

Von Kruger wants Father Arno to finish the
analyses that Maria was doing. This will enable him to make a serum against
the illness that is inflicting the village.

Exit the dispensary through the kitchen door.

See something written in Italian on the glass pane
of the door. Seek the Source.

Maria’s bedroom:    Go left
from the shed. See pigeons on the roof. The pigeon coop is on the left. Use
the gold key taken from Janos’ pocket on the door of the building on the
right.

Look up at the ceiling and see that there is no
light bulb on the socket. No need to use a fuse for this place.

There’s a nosy bird left of the door. Listen to him while looking
around. Pick up the feather on the floor right of the
dresser and left of the bird.

Check the magazines on the bed and the dark room
at the foot of the bed. Check the dresser and note her clothes.

Dresser:    Take the empty
metallic box
for photographic papers and tweezers from top of the dresser.

Martha’s box:    Find
Martha’s box at the bottom drawer. It has a lock with 4 numbers.

Look around for clues. This is Martha’s room
before it was Maria’s.

Paintings:    Examine each
of the paintings.

Remove the red cloth left of the dresser and by
the wall. Take the Martha and Maria painting. Place the painting on the
empty space above the dresser.

Check the St Sebastian painting from above the
head of the bed. It seems that this one is not originally on this
location.

Rearrange the paintings:   
Remember what Martha wrote on one of her letters: To find the key, carefully observe the order of
the paintings on the wall.

Place the paintings in their original locations
based on the change in color of the wall.

Take the misplaced paintings off the wall by
clicking on the hook. Place the painting on the empty spot on the floor by
the wall where the Martha and Maria painting was kept covered.

Place the correct painting on the empty slots on
the wall.

Top of the bed:    Gymnosophist

Side of bed:    St Sebastian

Left on the wall by dresser:   
Funeral of Patroclus.

Right on the wall above dresser:   
Martha and Maria found on the floor covered with cloth.

Examine the paintings by clicking on them. Use the enlarger-magnifying lens on the painting and note that
each have references at bottom right of the frame.

Gymnosophist – A4, St Sebastian – A7, Funeral
of Patroclus – B6 and Martha and Maria – AD8.

Look close at Martha’s box again and enter 4 –
7- 6 – 8.

The box opens. Check the contents. See a picture
of Martha disfigured by sulfuric acid September 10, 1902. Take the key
with a tag labeled plot 1415
.

Take acetic acid can from the box left of
the dresser. Take grain from the container in front of the bird
left of the door.

Exit the building.

Pigeons:    See a feeder in
front of the pigeon coop. Place grain on the feeder. The pigeons on the
rooftop flies down.

Check the pigeon on the left. It has a red thing
on his leg. Take the Schwartz filament and Kruger’s note.

Read Kruger’s note. Go back to the treatment room
at the dispensary.

Do Kruger’s research:

Sterilize the medical equipment:   
Do the same procedure as before.

Find and take a hammer and stake
behind the firewood bin.

Draw fresh blood:    Kruger
wants a fresh sample to test. Draw blood as before. Bottle 815 is
obtained.

Place the blood in the refrigerated cabinet:   

Go to the lab
through the door at right.

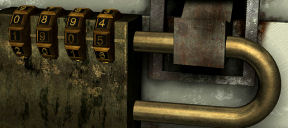
Padlock:    The code has
been changed.

To open the lock, start with the left dial and
enter one number at a time while pulling the hook in between numbers to see
if it moves a bit.

Once that left number is found, do the second from
left number one at a time while pulling the hook in between. If the hook
moves farther; then the second number is determined.

From left to right:    Enter 1 – 0 – 4 –
2 on the line of the padlock. Pull the hook.

Place Bottle 815 on the middle shelf.

Click on 814 and Father Arno notes that his 814
looks lower than before.

Fix the apparatus:   

Battery:    Look down at the
battery on the floor.

The other bulb is off. Open the panel and add the
acetic acid. See the green light turns on.

Filament:    See that a
filament is burned out left of the sampler on the table. We will use the
filament sent by Kruger via the pigeon.

Sterilize the filament:   
In the kitchen, drop the filament in the pot with water. Boil the water on the pot as
done before. Take the sterilized filament.

Sampler:    Go back to the
lab and place the sterilized filament on the top part of the sampler right
of the refrigerated cabinet on the table.

Test the blood:    Read the
Instructions on the table sent by Kruger to Maria explaining how to do the test.
Be sure to read the last page.

Procedure for first parameter:

Take a sample from the refrigerated cabinet by
clicking an empty tube on the bottle. Close the refrigerated cabinet.

Place the tube on the front part of the sampler.

Lower the filament into the blood in the test tube
by lowering the lever left of the sampler.

Press the + button to bring the sample into the
filament.

Take the filament with the sample and place it on
the microscope plate at right.

Look through the eyepiece.


Readouts:

1. Note the % mononucleated granulocytes by
clicking-lighting up the left icon on top right of the screen. The readout
is above the icons.

2. Note the % polynucleated granulocytes by
clicking-lighting up the right icon on top right of the screen. The
readout is above the icons.

3. Note the % of total marked cells by
clicking-lighting up both icons at top right of the screen. The readout is
above the icons.

Procedure for second parameter:   
This is explained by the last page of Kruger’s instructions.

Take the filament from the microscope with the
marked cells and attach
it back to top of the sampler.

Lower the sampler using the lever at left.

Press the – button to eject the marked cells back
in the test tube. This mixes the marked cells with the unmarked cells.

Lower the sampler using the lever at left.

Press the + button to take a sample of the mixed
marked and unmarked sample.

Take the filament and place it on the microscope.

4. Note the % marked granulocytes in the mixed
sample. The icons should NOT be lit up. The readout is above the icons.

Place the filament back on top of the sampler.

Lower the sampler using the lever at left.

Press the – button to eject the marked cells back
in the test tube.

It is now ready for the next sample.

Interpretation:    Check the
Blood Test Report papers. There are 3 results to be
entered.

1. % mononuclear granulocytes on the left and %
polynuclear granulocytes on the right.

These are obtained from the readout on the
microscope.

2. Total granulocytes/ml of blood is obtained by
calculation using the % marked granulocytes in the mixed sample.

Total granulocytes is obtained by 100 (if all
are marked in #3 at the readout above) x 100 (%) divided by the % marked
granulocytes in readout #4.

3. Diagnosis:

P anomaly = % mononucleated granulocytes is
definitely lesser than polynucleated granulocytes.

Unknown anomaly = % mononucleated granulocytes
is definitely greater than polynucleated granulocytes.

No anomaly = % mononucleated granulocytes is
approximately equals to polynucleated granulocytes.

Test the donors:    Do the above
procedure and reporting for 815, 814, 813, 812 and 811.

Donor   #1 Marked Mononuclear granulocytes   #2 Marked Polynuclear granulocytes   #4 Marked granulocytes (might need to
repeat testing)
  Total # of granulocytes/ml   Analysis
                     
810 M. Florescu 100   0   6   1666   Unknown anomaly
811 Ionel Martiescu 46   54   10   1000   No Anomaly
812 Janos Pekmester 89   11   7   1428   Unknown anomaly
813 Stephan Luca 57   43   10   1000   No Anomaly
814 Arno Moriani 56   44   9   1111   No Anomaly
815 Arno Moriani 81   19   7   1428   Unknown anomaly

Enter result on
the Blood Test Report:
    Enter the numbers from the
testing above in the Blood Test Report papers. If correctly done, Father Arno will say so.

If not, the #4
readout might need to be redone.

1. Fill in the #1 Marked Mononuclear granulocytes
on the left line and #2 Marked Polynuclear granulocytes on the right line.

2. Fill in the calculated Total # of granulocytes/ml.

3. Fill in the analysis.

Hear someone and the
door of the lab is slammed shut. Trapped.

Locked lab door:    Check the lab door.
Use acetic acid on the top hinge of the door. It flows down to the other
hinges.

Exit the lab.

Go to the exit door.
Automatically call Kruger. Leave the dispensary.

Go to room and read
mail:

Inn:    Enter and talk to
Ojana. Click on the garlic on the counter. Father Arno gets sick and is now
affected by garlic.

Bedroom:    Go up to the
bedroom. Open the bedroom
door and hear a warning shout – Careful!. Do not open further or the
bomb will explode. There are repeat chances if you die.

Bomb:    Look at the space
between the door and the door frame. A string is stretched between the 2
places.

Use a thumbtack to hold the doorframe part of
the string and
then use the thumbtack to hold the string on the door or just use the
thumbtack on the door string alone. These actions hold the string in place and not
be pull.

Use the knife to cut the string.

Enter and see Maria’s bird on the window –
Boom, boom!

Take the bomb on the door.

Mail:    Check the table. Open Irina’s packet with the knife.

There is garlic inside the packet. Use the empty
metallic box taken from Maria’s room on the garlic to get garlic in a
box
.

Read the materials sent by Irina.

Get information:

Ojana:    Go down and
confront Ojana. Learn that Janos and someone from Alba Iula entered Arno’s
room.

Janos’ Letter:    Father
Arno asks about Janos’ letter that is on the counter. Take and read Janos’ letter
from Heinrich von Kruger.

Use the enlarger on the letter and see holes.
Take a closer look at the period of the signature of Kruger. Something
stuck here
. Hmm…

Janos’ room:    Go upstairs
and enter Janos’ room. Search the room.

Desk:    Check the
calendar on the desk left of the door. It is for Dienstag (Tuesday)
September 14, 1920

Take the lighter.

Read the letter from the Vesnicie Foundation
and then the Thule brochure. See the Blood of the Dragon
under the brochure.

Use the bunch of keys taken from Janos on the
drawer of the desk.

Look at the German passport issued to a
Hans Beckermeyer with Janos’ picture. That name is one of the subscribers
to Thule Society.

Examine the other pages of Vlad’s biography.

Coffee table:    Check the items
on the table by the window. See a paper, pencil and a box.

Decode Janos’ messages:

Code 1:    The
paper has embossed text.

Use the pencil on the paper 3 times.

See a code made up of 4 letters each and September
IV III I V II at the top. Note the underlined letters of the month.

Decoder:    Use Janos’ bunch of keys on the box and see a
decoder and a letter.

The decoder has bars on top that are labeled
with Roman Numerals at the front end.

On the top of the bars are letters. In between
the bars are wheels that cycle the letters.

The bars can be removed and replace another
bar by clicking on the front end and clicking it on another bar.

Decoding part 1:   

Enter the revealed Code 1 info on the decoder.

Roman Numerals:    Check
if the Roman Numerals on the decoder is the one on Code 1: IV III I V
II. If not, rearrange them to that sequence.

Letters:   
Click-hold-turn the wheels to change the letters on the top of the bars
to S E P T E as seen underlined on Code 1.

Code:    Type in the 4
letter codes on the decoder:    UARCQRVDUTDCKOHQYVIKYUQQ…

While typing, see the decoded message at the
bottom of the screen. After typing 2-3 rows, the message is automatically decoded and
is placed in documents.

Message:    Read
Hans-Janos’ Decoded report
to Kruger. Learn that Martha’s grave is
empty. Arno is no longer needed. Need to contact the Dragon to enter the
castle. The blood tests are needed to determine who are servants and who
are victims of the Dragon.

Decoding part 2:   

Click the letter that is in the drawer on the
codes exposed by the pencil. It shows another set of 4 letter codes.

Roman Numerals:    Examine
the envelope. Use the enlarger on the date stamp. It is August 28, 1920 from
Munich. Based on the calendar at the desk that gives info that September 14
is a Tuesday; backtrack to learn that August 28 falls on a Saturday.

Check the Janos note taken from his pocket at the
shed and see that the numbers for Saturday is erased.

Find the numbers for Saturday:   
Study Janos note with numbers.

See that the number moved position for the next
day’s sequence based on the number to its right.

Day 1 2 3 4 5
           
Sonntag 2 5 1 3 4
For
example the number 2. 2 is beside 5 for Sunday. So for Monday it should be
in the 5th column.
Montag 5 4 1 3 2 (to be moved
5th column)
Dienstag 4 3 1 5 2 (to be moved
4th column)
Mittwoch 3 5 4 2 (to be moved
1st column)
1
Donnerstag 2 (to be moved
4th column)
4 1 5 3
Based
on the above changes, find the numbers for Friday and Saturday
Freitag 4 3 5 2 1
Samstag 2 5 4 1 3

Enter II V IV I III on the bars of the decoder by
taking a bar and clicking it on the bar you want replaced.

Letters:    Since the first
5 letters of the month were used on the first code, enter A U G U S on the
letter above the bars of the decoder.

Code:    Type in the 4
letter codes from the Munich letter on the decoder:   
YGROWRCFBJCDRZJDOPFG…

Message:    Read Kruger
Decoded letter
to Hans-Janos. Learn that the last place of the path is
in the ballroom of the castle. He advises to study the Svenson Runic
Anthology and its Wood of Blood inscription.

So Janos aka Hans is an agent of von Kruger. Von
Kruger and Hans are members of the Thule Society. They are following the Path of the
Dragon.

Attic:    Go up the attic
and check the gramophone now that we have the wax cylinder from Irina.

Gramophone:    If you have
not gotten the silver needle from Ionel yet, do so. (Go to the first intersection from the inn and
turn right. Go forward and play games with Ionel.)

Assemble the gramophone. Use the wax cylinder
from Irina’s safe.

Listen to the last words of Herman Von Bergen.
Learn about Dracula, his friend Ioan Hartner, Lucina and the eventual
death of both. Arno’s nightmare is a replay of the incident.

Take apart the gramophone by placing all the
parts in the different compartment. Van Bergen’s wax cylinder broke apart.

Go down and go to the dispensary.

Dispensary:    Enter the
dispensary.

Shed:    Go to the shed
and the fuse box at the cellar.

Raise the handle to the up OFF position.

Take a copper wire from any of the middle row
ones and place it on the middle top row to get power to the developing
room.

Lower the handle to the ON position.

Exit the shed and go to Maria’s room.

Developing room:    Enter
the formerly dark room through the door at bottom of the bed.

Maria’s portrait:    Look at
the light box and see a picture of Maria.

Father Arno has an accident and spilled acetic
acid on the picture. Click and then fill the bottle with acetic acid again
from inventory.

Look at the disfigured picture of Maria. It’s

Martha – is this an omen? Automatically remove the picture off the
light box. 

Take the sponge on the sink at right, click it
on the sink to wet it and wipe the light box. Right click to return the
sponge.

Janos’ letter:    Take
Janos’ letter from inventory. Place it on the light box.

Look close and see the holes under specific
letters:    C C H H H H O O N A N A S H H O.

Look at the chemical formula on the bottles and
deduce that the letters refer to:    C2H4O2, Na2S and H2O.

On one tray only, mix one click each of Acetic acid
(C2H4O2), Sodium sulfite (Na2S) and then water (H2O) taken from the
bottles in front of the trays.

Use the sponge on the mixture and then wipe
Janos’ letter with it.

Look close at the letter. Use the tweezers from
inventory on the big period at end of the signature. The tweezers has the
microfilm now.

Prepare developing solutions:

Clean the tray with the mixture by clicking on the
handle part and washing it in the sink.

Read the paper on the right end of the top
shelf. It has the ingredients for the 3 solutions needed to develop a
picture.

Left tray – Developer: Mix hydroquinone, Metol,
Sodium sulfite, alkaline mix and distilled water.

Middle tray – Stop Bath:   
Make diluted acetic acid (Acetic acid and distilled water).

Right tray – Fixer:    Mix Sodium thiosulfate
and Potassium metabisulfite.

Enlarge the microfilm:   

Place the microfilm held by the tweezers on the
glass plate above the enlarger on the left.

Change the light to the red bulb by clicking on
the switch above the sink.

Now that the light is red, open the black box
left of the sink.

Take the tongs in front of the box and
click-hold-move a photographic paper to the bottom of the enlarger. Right
click to drop the tongs.

Turn on the switch at the base of the enlarger.
It will automatically turn off when done.

Take the tongs and pick up-click-hold the
photographic paper.

Drop it in the left tray with developer. Count
off 12 seconds. 1001, 1002, 1003…

Pick up the paper using the tongs and drop it in
the stop bath middle tray. Count off 7 seconds.

Pick up the paper using the tongs and drop it in
the fixer right tray. Count off 7 seconds.

Pick up the paper using the tongs and hang it on
the line above the table.

Study the dried picture and see that it is part of the 7 peaks where Vlad
was imprisoned in Turkey. Use the enlarger and see 3 symbols on the peaks:
trident, pi and ladder.

Shed:    Go back and place
the copper wire back to the 2 left slots of the middle row. This brings
power back to the lab and the blood will not spoil.

Exit the dispensary.

So it is Kruger and his agent Hans aka Janos
that killed Irina and Stephan. They are members of the Thule Society.

With the help of the Iron guards they ransacked
and burned the village. They also destroyed Martha’s tomb. They are following the Path of the Dragon.

Find Luana the gypsy:

Luana:    Go to the Oak
Tree crossroad pass the Field of the Fallen Soldiers.

Talk to Luana. Yes, now we know who the enemies
are. Look for a print near the water.

Chapel:    Go forward on
the path that Luana showed. Father Arno is getting sicker.

Look down and see the stele of Lord Mircea XIII
used as a bridge over the spring.

Go to the chapel and spring source at the foot
of the mountain. See the stele of Vlad I and Vlad III.

The tombstone at right is missing. Go back to
the stele of Lord Mircea. Click and turn it over. It is for Duke Alexander
VIII.

Go back to the Chapel that is the spring source.
Look close at the shelf. This looks like a page in Vlad’s biography –
Punishment. There is supposed to be a gold cup on the shelf.

See that I and IX keys are missing from the
circle above the cup indentation.

Go back to Luana and talk to her. She says to
find the bowl that was stolen.

Find the bowl that was stolen:

Ionel, the young boy:   
Go to Ionel at the ruins at edge of the village and end of the road from
the cemetery.

Talk to him. Learn that the bowl was taken by
Ariel and Celdric.

Inn:    Talk to Ojana, the
mother of Ariel.

Luana:    Talk to Luana at
the crossroads again for advice.


Things to collect to get Luana’s help:

Blood of a lost battle:    
Maria’s bloody shawl found on the floor of the Dispensary kitchen.

Ashes of a vampire:   
Remember the information gathered from the Van Bergen’s wax cylinder
played on the gramophone. Luciana Hartner eloped with Dracula and became a
vampire.

Go to the cemetery. Talk to the
gravedigger sitting on the steps leading to the church.

Give him the matches in exchange for the use of
the shovel. Take the shovel.

Turn around from getting the shovel and go
forward to the tomb at the end beside a wild rose bush.

Use the shovel on the lid of the tomb. Take
ashes
from the body with a stake driven on the chest.

Blossom of a rose bush:   
Use the knife to cut roses from the rose bush beside the grave of
Luciana Hartner or from the bush on the left side of the road going to the
castle.

Ring of a killer:    This
is the ring left on the ground by an Iron Guard at the tomb of Martha.

Cemetery:    Go to Martha’s mausoleum.

Use the key taken from Martha’s box on the locked
door.

See that the tomb is empty. Read the inscription
above it.

Look down on the floor and see the broken cover of
the tomb. Take the crucifix and the Iron Guard ring.

Turn around and see but not take the spare key to
the mausoleum.

Hazel wand:    Exit the
cemetery.

Go to Ionel again at the end of the road from
the cemetery.

Give him the gramophone and in exchange, you can
look in his treasure bag.

Take the forked stick-slingshot-hazel wand.

Berries of Mountain Ash:   
This can be found in front of the castle ruins.

Go back to Luana at the Oak Tree crossroad.
Place all the collected items on the box in front of her. She tells you to
wait.

Inn:    Automatically be
in the bedroom at the Inn, Father Arno writes in his journal. He decides
to mail his journal to Monsignor Briganti in case something happens to
Arno. Take the journal (letter to mail).

Ojana:     Go down to
the front desk. Ojana said that Luana left a forked stick. Take the
forked stick
from the counter.

Place the letter to mail on the box at right end
of the counter. Exit the Inn.

Chapel:    Go to the path
shown by Luana at the Oak Tree crossroad. Luana’s caravan is not the there
anymore.

Find the cup:   
Walk the path left of the Oak Tree.

Take the forked stick from inventory and see it in front of you.

Go forward and watch the tip of the forked
stick. You will see the tip move or point to where you should go.

After the stele stone bridge over the spring,
see more activity on the tip of the forked stick. Point it and click to a
mound across the stele bridge and Father Arno will say – I should dig
here
.

Mound:    Use the shovel
on the mound.

Mortar shell:   
See the gold bowl but it is under a mortar shell.

If you take the bowl, the mortar shell explodes.
The game gives another chance.

Use your hand or cursor to dig ‘gently’ around
the bomb. Click only on the soil around the shell at the middle and by the
top area.

When the bomb is exposed, realize that you need
a tool.

Cemetery:    Go to the
cemetery and talk to the gravedigger still sitting on the steps to the
church.

Talk to him and automatically exchange the
lantern for a monkey wrench.

Mortar shell:    Go back
to the mortar shell. Use the monkey wrench on the cap-tip of the bomb.

Pull the monkey wrench towards you twice in one
click-hold-move. The tip falls off.

Push the mortar shell off the cup. Take the
gold bowl
.

Check the cup and read the engraving on the rim.
He who has intelligence walks in the succession of the immortals. Three
engraved stelae give the six on the dial.

Castle of Twilight:

Enter the Castle:   
Go to the chapel and place the cup on the slot on the shelf.

Number key circle:    See the circle of numbered keys on the dial.

There are 2 missing keys. Use the 2 cartridges
taken from the Oak Tree crossroad.

Learn the numbers for the code to push based on
the clue from the cup:    Three engraved stelae give the
six on the dial.

Check the 2 stele on the ground at left: It is
for Vlad I and Vlad III. The one that is used as bridge on the spring is
for Alexander VIII on one side and Lord Mircea XIII on the other side.

The dial has numbers for 1 -13.

Based on the clue there are 6 numbers needed. We
have 1, 3, 8 and 13 as clues.

To get 6 logical mathematical progressions, realize that: 1 +
2 = 3; 2 + 3 = 5; 3 + 5 = 8; 5 + 8 = 13.

These are obtained by adding the previous number
to the sum of the previous calculation.

Therefore press the keys for: 1 – 2 – 3 – 5 – 8
– 13.

The door opens.

Cave:    Read the
inscription on the slab – Enter freely and of your own will.

It is dark in there. Use the lighter taken from
Janos’ room on the torch on the left inside wall. It lights up all the torches
in the path.

Sarcophagus:    Go forward
and see a sarcophagus in a cavern. Go close to the sarcophagus and see
rats come out.

Read the inscription on the sarcophagus. Vlad
the Great?

Turn-click the skull on the lid. Look inside and
see that it has bones from a horse.

Rats:    The exits are
blocked by the rats.

Use the oil can on the water. Use the lighter on
the oil slick.

Watch as the fire flows over the oil slicked
water and destroys the rats and also the entrance-chapel.

Memories pass through his mind. Arno’s life
passes before him.

Escape the sarcophagus:    To
escape the fire, Father Arno jumps in the sarcophagus and close the lid.

His nightmare revisited. It is dark in there
but he has now night vision. Uh oh!

Circular lock:    The
circular lock hold the bars in place.

Use the Charon skull medallion-old coin that Maria left on the
bed on the slot of the circular lock.

It unscrews the lock.

Bars:    Look at the 4
bars that seals the lid.

Click-hold-move a bar to push it inwards away
from the wall slots. Do this to all the bars.

Push the lid away.

The smoke is suffocating. The outside path is
still burning and is blocked by the destroyed chapel. Go the other way.

Maze:    Father Arno falls
down a trap door.

Clue:    Read the
inscription on the floor. It is not suitable that the sequence of the
immortals grow infinitely. Of those who come, few will be chosen.
The
immortals want that their number be limited and the rest be their victims.

This inscription is also a clue. Since the
immortals wants limited immortal servants, it follows that numbers should
decrease, not increase. We already saw a mathematical progression on the
entrance number lock. So the clue to the maze is a sequential decrease in
number.

Take note of the Roman Numerals above each
spiked gate.

If we continue the entrance number lock
progression, we will reach up to the number of the only spiked gate open – MDXCVII (1597).

Going in reverse from the calculated sequence,
enter the spiked gate that has these numbers:

Forward to MDXCVII (1597) There’s an odor of
tobacco.

Right to CMLXXXVII (987)

Left to DCX (610)

Forward to CCCLXXVII (377)

Forward to CCXXXIII (233)

Forward to CXLIV (144)

Forward to LXXXIX (89) Smells like tobacco –
Horizont brand. Look at the floor and see fresh blood.

Right to LV (55) Strange odor, much stronger
than tobacco.

Right to XXXIV (34) Fresh blood on floor.
Advance in spite of risk.

Left to XXI (21)

Forward to XIII (13)

Forward to VIII (8)

Left to V (5)

Right to III (3)

Left to II (2)

Right to I (1)

Forward to I (1)

Forward to blank.

Before the Per Aspera gate, Father Arno falls
down again through another trap door. Meet Janos.

Mythical Beasts Duel:   
Talk to Janos and learn about his involvement. He says that he did not
kill the Irina or Stephan. Is his pants on fire? He also says that Maria is a servant of Dracula.

See that there is a panel with 5 mythical
beasts: Water serpent, basilisk, griffon, hydra (2 heads) and Cerberus (3
heads).

The object of the puzzle is to select a beast
and Janos selects his beast. If a player’s beast wins, the partition
that separates the men moves towards the loser. The partition pushes the
loser closer to the back wall. After 4 wins, the back wall of the loser
shoots out spikes. The fifth win kills the loser.

Clue:    Take note of the
panel and the lines that joins the beasts. There are arrows on those lines
that point to the beasts that can be defeated by that beast.

The water serpent at top left defeats-points to
basilisk at top right, cereberus at bottom left and griffon at bottom
right.

The basilisk at top right defeats the griffon at
bottom right and the hydra at bottom.

The griffon at bottom right defeats the hydra at
bottom.

The hydra at bottom defeats water serpent at top
left and cereberus at bottom left.

The cereberus at bottom left defeats the griffon
at bottom right and the basilisk at top right.

Knowing the strength of the beasts will aid in
the selection of your beast to fight the next opponent.

The water serpent at top left is the strongest
since it wins against 3 opponents but can be defeated by the hydra. The
weakest is the griffon but can defeat the hydra.

Play:    Select a beast by
pressing an icon. Janos will select his beast without knowing what you
selected.

Look up and see the selected beast and who won
on that round. The defeated one falls down.

Result:    After 4 wins of
Father Arno, his conscience would not allow for murder by winning the
fifth and final round. Janos does not have the same compunction but will
kill Arno on the fifth round.

My solution which may be different from
yours is: 4111 and then 1 or 4113 and then 1.

Escape Duel room:    If Arno
wins 4 times and has moved the partition to push Janos, a panel at left
side is exposed.

Spike cable:    Use the
monkey wrench to open the panel at left wall.

See the wire held by metal link that springs
the spikes. The link cannot be cut but is screwed in to the wire.

Insert the knife inside the link. Turn the link
to the left until the knife is at the back.

Take the knife and repeat until the link is
unscrewed from the holder. This stops the spikes from springing-shooting
out.

Take the steel wire that held the link.

Play the game one more time to win and move the
partition.

This exposes the exit door completely. Exit the
duel room.

Hallway:    Enter a
hallway that has a gate at other end. There must be no light here since
Arno is using his night vision. There are 2 puzzles here, one on each side
of the hall.

Blood, sweat and tears:   
Study the left side puzzle.

Read the text at top of the puzzle: Tears to
tears. Sweat to sweat. Blood to blood.

The puzzle is made up of squares that has gates
on each of its 4 sides. By opening a gate, liquid flows to the next
square.

See 6 of those squares releases liquid. There
are 2 sweat squares, 2 tears squares and 2 blood squares.

The object of the puzzle is what the text states
– to join similar squares blood to blood, sweat to sweat and tears to
tears by opening gates without the liquid crossing a square of another
liquid.

Identify the liquids:   
Use the cup on the right side and dip-click it on the liquid.

Taste the liquid. Blood is
like wine for Arno. Sweat is both acrid and acid. Tears are salty.

Puzzle:    Open the gates
to make the liquid flow towards the other square.

Plan the path that will not make that liquid
cross another liquid.

Do the longest and difficult one first – the
sweat ones at top and bottom. Then do the tears and lastly do the blood
squares.

When correctly done, hear the removal of one bar
of the gate.

Skull and hat puzzle:   
Study the puzzle on the right wall.

There are several skulls on the wall, all except one is wearing a hat. 6
of the skulls have a spike or nail on the skull.

The object of the puzzle is to place the spikes
on the correct skulls.

Recall the drawings from Vlad’s biography that
have reference to his punishing foreigners because they do not remove
their hats. There is the original with the foreigners being Turkish and
the copy has the foreigners as Genoese. The drawings are found in documents
titled Punishments (Vat.) and Punishment (V. Berg).

Study the 2 drawings with the enlarger and note
the differences.

 
There are 6 spikes on the table and one held by the
torturer. The foreigners are wearing turbans. So there are a total of 7.
  There are 5 spikes on the table and one held by the
torturer. There are 3 men wearing hats. This picture is missing one spike.

Study the hats of the victims above with the
enlarger.

Place spikes on the 3 skulls with turbans. Place
spikes on the Genoese hats.

As shown by the drawing, there is one spike
missing and one hat that needs to be identified.

The missing one is shown to be on the Genoese
picture.

Use the enlarger to find the clue as to the 7th
hat. Check the flag flying on the mast of the ship.

See a symbol of Genoa. Find the similar symbol
on the metal hat of the soldier at middle of the wall.

Use the syringe that was taken from Irina’s head
on the 7th skull.

When correctly done, hear the removal of the
other bar of the gate.

The gate falls down to open the next room.

Japanese Tile Puzzle:    Enter a well room. Across is a skull.

There are recessed steps that circle the wall going up close to the
opening at the top opening of the well.

Turn around and pull the lever on the floor. The gate drops. The panel on
the floor opens with the words – Don’t look back. If you do turn
around, you die. The skull across the abyss shows the pattern of the tile
puzzle on the floor.

Open the panel on the floor. See a Japanese tile puzzle.

The puzzle is made out of tiles or squares. Clicking on the tile cycles to
white, gray and black tiles.

Above and left are black numbers which means the number of black tiles
present. If the number is on top, that shows the number for the column. If
the number is on the left side, it means the number for that row.

Bottom and right are gray numbers which corresponds to the gray tiles
present. If the number is at the bottom, that shows the number for the
column. If the number is on the right side, it means the number for that
row.

If there are several numbers seen, that means the number
of tiles that are
separated. For example: 2 2 means there are 2 tiles side by side and
somewhere else in that column or row is another 2 tiles side by side.

The puzzle is random. Here are some solutions:


Once completed correctly, see that the recessed steps pull out and a
platform slides out on the other side.

Bracelet and mirror:    Jump to the other side and
climb on the steps. Hear a voice that states that she lost her bracelet
for the ball. It might be at the bottom of the well.

Get the bracelet:    Go down again and on the
platform by the skull, look down and right to see a hook.

Use the steel wire on the hook and go down.

Look down and feel through the foot of the skeleton directly below you.
Take the bracelet.

A monster growls and Arno drops the bracelet while climbing up the steel
wire.

Get rid of the monster:    Jump to the other side of
the well.

Pick up a stone from left of the opened gate. Use stone on water. That
didn’t help.

Go to Janos at the duel room. On the way, pick up the syringe from
the center skull.

Janos’ drink:    Talk to Janos to borrow his
lighter. He will give the lighter only if you find him something to drink.
He gives his empty bottle – flask.

If you give him water from the bottom of the well or sweat or tears, he
will taste it and asks for another.

Dip the flask on the blood square of the blood, sweat and tears puzzle.
Give the filled flask with blood) to Janos. He gives the lighter.

Go down the well via the steel wire.

Go to the mouth of the cave and use lighter on the torch on the right
wall.

Bats fly out and extinguishes the torch. Light the torch again. Now
there’s light and the monster will not come out.

Find the bracelet:    Feeling through on the bone
might not work this time.

You can use your hands or use the forked stick to find the bracelet. Take
the bracelet from the top part of foot of the skeleton directly
below you.

Mirror:    Climb out of the well bottom and up to
the top of the well. See the mirror on the edge of the well.

Ballroom:    Click to go somewhere. Realize that all the entrances are
blocked and has no knowledge of where the ballroom is located.

The ballroom as stated by Kruger is where the last step of the Path of the
Dragon happens.

Find the entrance to the ballroom:    Place the
bracelet beside the mirror on the edge of the well.

Hear the ghost voices and then see footsteps leading to an entrance. The
entrance is blocked.

Go back and take the mirror from the edge of the well.

Remove the 2 pillars blocking the entrance. Click to remove the rubble. A feather drops down. Take the feather.

The Path of the Dragon:

Recall what Irina stated about the end of the path: The initiate must
accomplish one last rite. He won’t be able to, unless he’s understood all
he’s achieved before, that is, if he knows the order of the trials as well
as the objects and symbols related to each of them.

Enter the ruined ballroom. See 7 pillars surrounding a circular area. Each
pillar has a gargoyle with an open mouth, an unlit torch at top and a
panel in between the two.

The object is to place the appropriate item of that step or path in the
mouth of the gargoyle and draw the correct symbol on the panel.

Order and symbol of the path:    To learn the order and symbol of the path, study the map of Turkish
prison, mountain photo and the enlarged microfilm.

Map of Turkish Prison:    Use the enlarger to see the
meaning of the name of each peak of the Pillars of the World. See that
they go counterclockwise starting at the Mount of Offering ending with the
Mount of Dragon.

Mountain photo taken by Maria:    See that the wedge shaped
symbol is left of the trident.

Microfilm:    Using the
enlarger, see that to the right of the trident is the
pi symbol and to the right of pi is Jacob’s ladder.

Objects needed:    To learn the objects needed for the path, study the documents and find
duplicate items or drawings. Find the difference between those similar
pictures and items.

The Runic Anthology also gives the clues to the
object needed here.

Draw the symbol fast and covers the entire panel.

Path 1:     Go across and look for the pillar
that has the bottle of blood already in the mouth of the gargoyle. It is
right of the clearing with a circular metal hatch on the floor. Draw
the wedge shaped symbol on the panel.

Mountain – Mount of Offering

Test – Blood Offering. Arno has taken his own blood.

Symbol:    Wedge shaped symbol

Drawing difference – Crucifixion drawing showed one has an angel with 2
chalices and the other drawing showed an angel with one chalice only.

Object:    Bottle of blood #814

Path 2:    Go counterclockwise like the order in the
Turkish prison map to the pillar at left.

Draw an inverted cross and place the small chain from Stephan’s necklace
in the mouth of the gargoyle.

Mountain – Peak of Sacrifice

Test – Sacrifice under an Oak. Arno took Stephan’s medal. Stephan was
sacrificed under a picture of an Oak tree.

Symbol:    Inverted cross

Item difference – Iphigenie’s vases showed one with a necklace and one
without.

Object:    Chain of Stephan’s necklace

Path 3:    Go to the left and draw an inverted
pentagram. Place a feather in the mouth of the gargoyle. There’s a jackdaw
nest in the mouth already.

Mountain – Fox Peak

Test – Fox Flight. Arno escaped from the trap at Vlad’s prison.

Symbol:    Inverted pentagram.

Drawing difference – Fox Flight drawing showed one with a bird and one
without.

Object:   Feather

Path 4:    Go to the left and draw an ancient cross
or swastika. Place a syringe in the mouth of the gargoyle.

Mountain – Mount of Punishment

Test – Punishment. Arno takes the syringe from Irina’s head.

Symbol:    Ancient cross or swastika.

Drawing difference – The 2 Punishment pictures showed difference in number
of spikes or nails.

Object:   Syringe

Path 5:    Go to the left and draw (Jacob’s) ladder.
Light the torch at top of pillar.

Mountain – Mount of Purifying Fire

Test – Purify by fire. Arno made fire at cavern by the chapel and killed
the rats.

Symbol:    Jacob’s ladder

Drawing difference – The 2 Fire picture showed one man standing by the
building with a torch and one without.

Object:   Light the torch.

Path 6:    Go to the left and draw a pi shaped
symbol. Place the Charon medallion (old coin) given by Maria in the mouth
of the gargoyle.

Mountain – Mount of Death

Test – To die. Arno trapped in the sarcophagus and released by the use of
the Charon medal.

Symbol:    pi shaped symbol

Drawing difference – The 2 Funeral of Patroclus
painting showed one with a coin in
the mouth and one without.

Object:   Old coin.

Path 7:    Go to the left and draw a trident. Place
the mirror in the mouth of the gargoyle.

Mountain – Mount of Dragon

Test – Baptism of blood. Arno has not done this.

Symbol:    trident

Drawing difference – Blood of Dragon picture showed a mirror.

Object:   Mirror

If correctly done, see that the cover of the circular plate in between the
pillars 1 and 2 opens up.

Count Dracula:    Go down the opened hatch. See a lever
on the wall that closes the entry above.

Sarcophagus:    Enter the chamber and go forward to
the sarcophagus.

Read the text on the lid and see that it is Vlad the Great’s sarcophagus.
Turn or click the skull to unlatch the lid.

Move the lid and open the sarcophagus.

Count Dracula’s body:    Use the different items in
inventory on Count Dracula.

Click the (in any order) host, crucifix, wild rose, garlic, Rowan berries,
holy water, hammer and stake.

(Hear Kruger asking to be let in. You can stop and talk to him if you
want. It is not necessary.)

Slowly Vlad’s hand grows older. All the items that can be used as weapons
in inventory are gone except for the bomb. The bomb can be used as the
last resort.

Then the sarcophagus disappears. It is an illusion.

Maria – Martha:    The door opens and Maria comes
forward. Talk to her completely and learn what happened to her and what
brought her to this state. She leaves after advising Arno, Dracula will
know if he says the truth.

Count Dracula:    Dracula arrives. A circle of fire
prevents Arno from getting close to Dracula.

Arno wants Dracula closer to him. Dracula asks question and if he likes the answer he
will come closer to Arno at the end.

There is only one good answer to each of Dracula’s question.
Be truthful or answer in a vague way.

Question 1:     How shall I judge your deeds?

Answer:     I had no choice. It was the only way to
come to you.

Question 2:     Twice your enemy Janos was at your
mercy and you spared him. Why? 

Answer:    Yes, I spared Janos and now I am here before
you.

Question 3:    You desire her, do you not? 

Answer:     Yes, I desire her.

Question 4:   Who gave me immortality? 

Answer :    Lilith the rebel.

Question 5:    Do you fear me?

Answer:    I do not fear you since I have come here!

Question 6:    Tell me, Priest, you can’t have come with
the absurd idea of fighting me?

Answer:    Like Siegfried, I was resolved to do anything to
reach my goal…

Good answer! On your knees, for your baptism in blood

Watch Arno perform his final act.

Kruger and Hans are blocked by the rabble.

A green mist escapes the destruction.

In 1943, Hans is questioned about Operation D that was done with Kruger.


This document may not
be distributed without express written permission of the author and the
content may not be altered in any way.


For Questions or
Comments on this Walkthrough,
Please write to:

MaGtRo


Copyright © 8/2008 

MaGtRo

Other guides for Dracula: Origin