Dracula: Origin
Cycle the squares to show from left to right:
blue, blue, yellow, yellow, red and red.Cycle #1 to show blue.
Cycle #6 to show red.
Cycle #2 to show blue.
Cycle #5 to show red.
Cycle #3 to show yellow.
Cycle #4 to show yellow.
The trunk opens. Take the vial with holy water,
and host.Read Martha’s letter to Stephan. It mentions Fox Peak where Vlad the Impaler was imprisoned. Check the enclosed picture with the
enlarger and see the trident shape on the side of the mountain and a wedge
symbol on the mountain left of the trident.Pan left and open the square box on the crate. 🙂
Hartner trunk: Turn to
the other side and check the trunk’s tag. Open the Ioan Hartner trunk.Check the contents and see a copy of the Fire
drawing of Vlad. Check the red folder at right and see the Barber’s Shop
picture of a man feeding a pig. Read the letter of Van Bergen that states
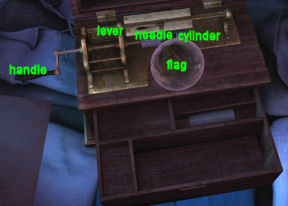
that the picture is linked to the Path.Gramophone: Open the
case and see a flag, cylinder and handle.Place the handle on the left,
the flag at the center and the cylinder on the middle rod.Click on the
bottom left compartment and note that the needle is missing. Use the
silver needle given by Ionel on the base of the flag.Lower the lever left of the flag. The flag is
positioned down. Turn the handle. Hear music.The gramophone will still be used here and we
cannot pick it up yet.
Discover where in Turkey Fox Peak is located:
Go downstairs and talk to Ojana about the covered
mirrors.Dispensary: Exit the Inn
and go to the dispensary. Ring bell and enter. Talk to Maria in the kitchen.She brings out a train ticket to Urguyurt used by
Martha. Written on it is stab the ground and follow the blue light in order
to trace the symbol of the Ancients.Maria shows the map where the Turkish prison is
located. The path from Urguyurt leads to the Pillars of the World. Use
the enlarger and see that there are 7 peaks, each of which has a symbol: Peak
of Sacrifice – inverted cross, Fox Peak – inverted pentagram, Mount of Punishment – ancient
cross, Mount of Purifying Fire, Mount of Death, Mount of the Dragon and Mount
of Offering.Automatically, Father Arno is on the train on the
way to Urguyurt.
Fox Peak, Turkey
Go inside the prison and search:
At top of the mountain where the prisons are
located, Father Arno has a fire going.Check the backpack right of the fire. Take the
matches, portable electric lamp, knife, rag and
rope.Pan right and read the words to the beast by the
inhabitants of the valley etched on a stone.Turn around and go forward to the cliff side. See
the peaks with the etched symbols.Use the rope on the tree stump at right. Go down
where the rope is dropped.Vlad’s prison: Look around
and a crow flies out.Read Vlad’s words etched on the wall. Pan to the
ground and right. Take the feather in front of the right chain.Read the words etched on the opposite wall. It
mentions a beautiful woman.Look down on the ground under the etched words. Look
close and check the Horizont brand cigarette butts.Check the inscription on the iron collar. Click
again and have a probable meaning of the words – Catch me, I am on the run!
Take me back to the prison.Pan right and see 3 stacked boulders that can be
moved. Move all 3 boulders to reveal a path to the deep part of the mountain.Go forward pass skulls. Go forward pass the blood
red eyes.Temple room: Enter a temple
room. Look around, climb the steps to the altar area. See roots around the
altar. There is a recessed square on a square in a circle on the wall. It is
missing something.Exit back through the crack on the wall and be at
Vlad’s prison. See that someone took the rope away. Trapped.Go back to the temple room.
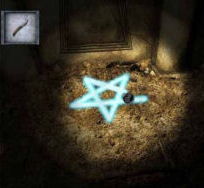
Blue pentagram: Pan right
and see a pile of dirt on the floor. Click on it once. Click on the edge of
a buried frame of a sarcophagus. Blue light is seen at the top part of the
buried frame. Remember what is written on Martha’s train ticket –
stab the ground and follow the blue light in order to trace the symbol of
the Ancients.Use the knife on the blue light. Click-hold the
knife on the blue light to form an unbroken line that will not break. Form a
pentagram. It is best to have a steady speed. Remember where the corners are
located and where to change direction.If error occurs, it will start from another point
of light. The longer the line is unbroken, the brighter it becomes.
Sarcophagus with statue with snake:
The statue has several bas-relief, some are worn out.Pick up a shiny stone from held by the
statue on top of the
sarcophagus.The language is read from right to left.
7th (1st) bas relief – Look close and see a
bas-relief. Click on the words below: Your water is precious, make sure
that it is not spilled in vain.Click on the arrow at bottom right.
6th (2nd) bas relief – Click on the words: To the dark
lord, throbbing life.Click on the arrow at bottom right.
5th (3rd) bas relief – Click on the words: Free as a
fox who knows more than one way.Click on the crack at bottom of the lid. The
sarcophagus is
empty.Altar: Go back to the top of
the stairs. See that the altar has sluices for possible blood sacrifices.Wall square: Look close
at the square on the wall.Use the shiny stone on the indent at the bottom
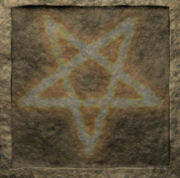
of the square.On the square, click hold the mouse to form the
same inverted pentagram as seen on the sarcophagus.I started at the point at the bottom and move
up. Make a continuous line with no break or release of the mouse button.When done correctly, the inverted pentagram is
lit and the door opens revealing a staircase. Climb out.
Camp: Be
outside and see that the fire is out because of the snow. A red fox runs away.Light a campfire:
See a bird on the ground that is nearly frozen.Take the bible from inventory and place it on the
fire pit.Take the crucifix from inventory and place it on
the fire pit.Pick up the wet firewood and place it on the fire
pit.Pan right and use the rag on the stone with etched
words covered with snow.Use a match on the stone to light it.
Place the lit match on the bible.
See Father Arno with the bird.
Father Arno is now on the train on the way back to
Vladoviste. He talks about his vision and knows the first path already.
Vladoviste Day 4 continuedTalk to Luana, the Gypsy.
Go back to the Inn but Arno wants to check on Maria.
There are S-like graffiti on the walls of the village.Dispensary: See graffiti
on the wall of the clinic. Ring the bell and enter the dispensary.Talk to Maria in the kitchen. Find out what happened
after Martha died. They said farewell.Inn: Talk to Ozana. She wants Arno
out of the Inn.Bedroom: Go upstairs and
enter the bedroom.Hear the phone ring. Exit and eavesdrop. It sounds
like Ozana is asked if Father Arno is gone.Open the letter on the table. It is a threatening
letter that wants Father Arno away from here.Open the packet under the letter. It is from Irina
in Budapest.Go downstairs and use the phone. Call Irina in
Budapest.Go to the train station and click on the train.
Budapest Day 5
Irina Boczow’s office: The
door has been forced. Enter Irina’s office.See her with arrows on her arm joints and mouth. A
syringe is on her forehead. Take the syringe.Look close at her left hand. She wrote words with
her blood: ARMA, SUNT, INDE, MALA.Take the spool and thumbtacks from the
desk.Safe: Open the safe. The first combination was MDCCCXX – 1820. The old
combination must have been changed. Remember the bust of Von Bergen outside the office
door, he lived from 1820 to 1913.Enter 1913 in Roman Numerals – MCMXIII.
Take the wax cylinder seen the last visit
here.Library: Go to the hall
right of the fireplace.Check the box on the stand in a corner at left. This
is the one Irina mentioned that has the rare vase of Von Bergen.Illumination puzzle: Look
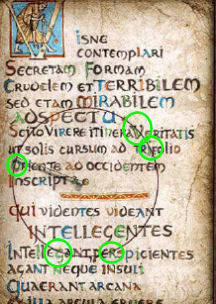
close at the text of the illumination. See 5 dials at the bottom of the
frame.Read the words of the illumination:
If you wish to contemplate a hidden, terrible and cruel beauty, yet
admirable to the sight, know that the green truth maybe read in a circle
which you will follow in the right direction…To make a circle, place the thumbtacks at the
period ending the middle paragraph and above the ornate line-bar. Attach
thread-spool on the thumbtack.Click move to extend the thread to length desired.
Click hold turn to draw a circle.Check the green letters (green truth),
the line-perimeter of the circle touches (read in a circle) going
clockwise (follow in the right direction). Right click to release the
thread.The V – i – r – g – o touches the
circular line.
Enter VIRGO on the dials at the base of the frame.
The box opens. Look at the Iphigenie vase.
Iphigeneia’s Sacrifice is in documents. Use the enlarger to study the
vase. Note that the words on the rim state: The god’s altars are
overflowing with blood. Black and boiling, it flows on the ground and soaks
the roots of the oak tree.
Find the books that Irina wanted Arno to read:
Using the last clue Irina left, find
the books using her method of cataloging. Remember that she talked about
cataloging and ghosts during the last visit.Catalogue: Check the 3
books on her table. Check the tab on the top left side of those pages. See 4
letters written on the tabs. These tabs are the reminders of where those
books are located in the library. In their place, ghosts are inserted. This
is the clue on how to find the other books.Alcove – There are 5 alcoves in the library.
Each of those alcoves has a Latin sentence on the top of the entryway. The
first letter of the clue word is the last letter in the Latin sentence.Book case – Enter the specified alcove. Each
book case has a Latin phrase on the top. The second letter of the clue
word is the last letter in the Latin phrase.Book shelf – Check the bookcase specified. Each
book shelf has a Latin word. The third letter of the clue word is the last
letter of the Latin word.Book – Each shelf has the alphabet. The
fourth letter in the clue word is the letter on the book shelf.Click on the book found and Father Arno will read
it. If it is the correct one, the book will be in documents.
| ARMA | SUNT | INDE | MALA | |||||
| Alcove | Ad astra per aspera |
Felix qui potuit rerum cognoscere causas |
Nil admirari | Nil Nimium. Satis est: ne sit et hoc nimium |
||||
| Book case | Incerta curatio certus dolor |
Mirabile visu | Nomen est omen | Acta est fabula | ||||
| Book shelf | Grumium | Aldebaran | Alfard | Nibal | ||||
| Book letter | A | T | E | A | ||||
| Name of book | Click the empty space. |
Runic Anthology | The Funeral of Patroclus | Iphigeneia’s Sacrifice |
There are only 3 books seen. The one at ARMA is
not there and no ghost inserted. Someone stole it.Note the white cardboard in some shelves. Those
are the
ghosts that mark books taken by Irinal to read or are taken out of the
library.Exit the office and go back to Vladoviste.
Runic Anthology: Check
the last page of the Runic Anthology. This is not necessary to finish the
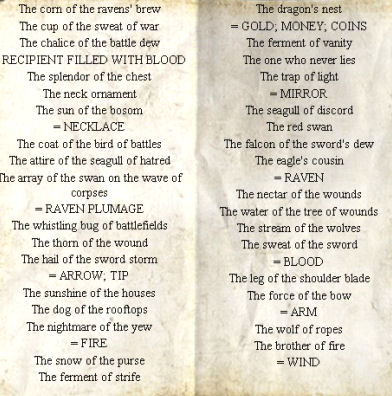
game.The object is to place together metaphors or
kennings that refer to one item. Click – hold and drop to move a kenning
from one place to another. Separate each group of kennings by a break.Thank you, Benoit!
Vladoviste
Day 5The gypsy is gone from her place.
Look around. Go to the Inn and on the way smell
burning.Go forward and talk to Ionel, the boy. The Iron
Guards from Alba Iula came and painted things around the village. He also
mentions that the adults think that Arno is drawing misfortune to the village.Cemetery: Go up to the
cemetery. Enter and see the church burning.Go forward twice and talk to the gravedigger. Talk
to him twice and inquire about the Inspector that died at the crossroad. Learn
that Martha’s grave was defiled. Turn around and hear what the gravedigger said about
Maria.Go to Martha’s mausoleum and see that it is closed.
Dispensary: Better check on
Maria. Go to the dispensary and ring the bell.No one is home. Enter anyways. There is an odor of tobacco.
Kitchen: Go to the
kitchen. The power goes off. Take Maria’s bloody shawl from the floor by the
table.Look around the kitchen. Pull back the curtain
under the sink and take the funnel. Open the drawer left of the sink
and take the copper wire.Yard: Exit through the
door at the kitchen.See Fidel, the dog. He is scared of Father Arno
now.Turn around and forward. Take the empty can
by the wall. Notice the light at the cellar of the shed at right. That is
where the electric control panel must be.Shed-Morgue: Enter the
shed and see a shadow at end of the aisle. Click on the shelves left and right of the aisle.Janos – At the end of the aisle, turn to
the left, click on a coffin that is not empty. Open it and see Janos. He
is not dead but can not be awakened. Check his pockets and vest.Look at the Fox’s Flight drawing hidden
in his vest. It looks like part of Vlad Tepes’ biography. This might be
from the missing book, the one that Irina wanted Arno to read.Take the golden key and bunch of keys
from his right side pants pocket. Check the contents of the left side
pants pocket. Ah – he smokes Horizont brand like the one at Vlad’s prison.
Look at Janos’ note with numbers.Turn around and open another coffin. The man is
dead; bled dry.Turn left and open the hatch on the floor going
to the cellar.Cellar: Enter and go
forward.Look at the dynamo-generator. Use the empty can
on the grill in front of the fuel tank. Use the funnel on the empty can.
Open the fuel tank faucet. Take the oil can.Fuse box: Turn around.
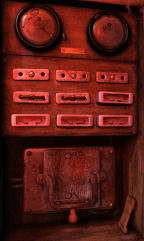
Open the fuse box on the wall. See that the fuses are broken.There are 9 fuse slots. There are 4 blown
fuses.As a matter of convenience, the fuse locations
are for:Top from left to right:
kitchen – developing photo room – foyerMiddle from left to right:
laboratory – treatment room – Maria’s bedroomLast row: unknown.
Only the kitchen, photo room, lab and
treatment room are ‘fused’.Repair the fuses: Be
sure that the handle at the bottom of the fuse box is at the OFF
position (up) or you die.Take off the 4 broken fuses from the top and
middle row and place them on the bottom row and middle or top right.Use the copper wire on 2 of the fuse leads
that you want to have power.Let’s repair the laboratory and treatment
room; the left and middle fuses of the middle row. See the copper wire
connect the 2 holes-leads of each fuse slot.Pull down the handle to the ON position.
Hear the phone ring. Exit the shed.
Von
Kruger: Answer the phone at the foyer.Von Kruger wants Father Arno to finish the
analyses that Maria was doing. This will enable him to make a serum against
the illness that is inflicting the village.Exit the dispensary through the kitchen door.
See something written in Italian on the glass pane
of the door. Seek the Source.Maria’s bedroom: Go left
from the shed. See pigeons on the roof. The pigeon coop is on the left. Use
the gold key taken from Janos’ pocket on the door of the building on the
right.Look up at the ceiling and see that there is no
light bulb on the socket. No need to use a fuse for this place.There’s a nosy bird left of the door. Listen to him while looking
around. Pick up the feather on the floor right of the
dresser and left of the bird.Check the magazines on the bed and the dark room
at the foot of the bed. Check the dresser and note her clothes.Dresser: Take the empty
metallic box for photographic papers and tweezers from top of the dresser.Martha’s box: Find
Martha’s box at the bottom drawer. It has a lock with 4 numbers.Look around for clues. This is Martha’s room
before it was Maria’s.Paintings: Examine each
of the paintings.Remove the red cloth left of the dresser and by
the wall. Take the Martha and Maria painting. Place the painting on the
empty space above the dresser.Check the St Sebastian painting from above the
head of the bed. It seems that this one is not originally on this
location.Rearrange the paintings:
Remember what Martha wrote on one of her letters: To find the key, carefully observe the order of
the paintings on the wall.Place the paintings in their original locations
based on the change in color of the wall.Take the misplaced paintings off the wall by
clicking on the hook. Place the painting on the empty spot on the floor by
the wall where the Martha and Maria painting was kept covered.Place the correct painting on the empty slots on
the wall.Top of the bed: Gymnosophist
Side of bed: St Sebastian
Left on the wall by dresser:
Funeral of Patroclus.Right on the wall above dresser:
Martha and Maria found on the floor covered with cloth.Examine the paintings by clicking on them. Use the enlarger-magnifying lens on the painting and note that
each have references at bottom right of the frame.Gymnosophist – A4, St Sebastian – A7, Funeral
of Patroclus – B6 and Martha and Maria – AD8.Look close at Martha’s box again and enter 4 –
7- 6 – 8.The box opens. Check the contents. See a picture
of Martha disfigured by sulfuric acid September 10, 1902. Take the key
with a tag labeled plot 1415.Take acetic acid can from the box left of
the dresser. Take grain from the container in front of the bird
left of the door.Exit the building.
Pigeons: See a feeder in
front of the pigeon coop. Place grain on the feeder. The pigeons on the
rooftop flies down.Check the pigeon on the left. It has a red thing
on his leg. Take the Schwartz filament and Kruger’s note.Read Kruger’s note. Go back to the treatment room
at the dispensary.
Do Kruger’s research:
Sterilize the medical equipment:
Do the same procedure as before.Find and take a hammer and stake
behind the firewood bin.Draw fresh blood: Kruger
wants a fresh sample to test. Draw blood as before. Bottle 815 is
obtained.Place the blood in the refrigerated cabinet:
Go to the lab
through the door at right.Padlock: The code has
been changed.To open the lock, start with the left dial and
enter one number at a time while pulling the hook in between numbers to see
if it moves a bit.Once that left number is found, do the second from
left number one at a time while pulling the hook in between. If the hook
moves farther; then the second number is determined.From left to right: Enter 1 – 0 – 4 –
2 on the line of the padlock. Pull the hook.Place Bottle 815 on the middle shelf.
Click on 814 and Father Arno notes that his 814
looks lower than before.Fix the apparatus:
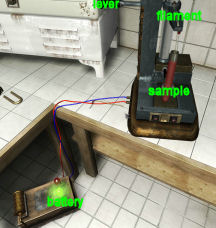
Battery: Look down at the
battery on the floor.The other bulb is off. Open the panel and add the
acetic acid. See the green light turns on.Filament: See that a
filament is burned out left of the sampler on the table. We will use the
filament sent by Kruger via the pigeon.Sterilize the filament:
In the kitchen, drop the filament in the pot with water. Boil the water on the pot as
done before. Take the sterilized filament.Sampler: Go back to the
lab and place the sterilized filament on the top part of the sampler right
of the refrigerated cabinet on the table.
Test the blood: Read the
Instructions on the table sent by Kruger to Maria explaining how to do the test.
Be sure to read the last page.Procedure for first parameter:
Take a sample from the refrigerated cabinet by
clicking an empty tube on the bottle. Close the refrigerated cabinet.Place the tube on the front part of the sampler.
Lower the filament into the blood in the test tube
by lowering the lever left of the sampler.Press the + button to bring the sample into the
filament.Take the filament with the sample and place it on
the microscope plate at right.