Dracula: Origin
Dracula: Origin
by
Frogwares
Walkthrough by
MaGtRo May 2008
Gameplay:
Dracula Origin is a point and click game. The main
menu has: New, Save, Controls, Credits, Resume, Load, Options and Exit Game.
The Controls menu has
configuration options for keyboard keys. The Options menu has Video, Graphics,
Sound and Games Setup selections. The Video setup has resolution, color depth,
vertical sync, antialiasing, anisotropic filtering and gamma options. The
Graphics setup has graphics detail, texture quality, normal mapping quality and shadows options. The Sound setup has master,
voice, music, effects and ambient volume options. The Game setup has subtitles
and
mouse sensitivity options.
ESC key accesses the
main menu during gameplay. The space bar shows all the hotspots in the game
screen. Double click on an exit changes the screen faster to the next scene.
During gameplay, right
click of mouse accesses the journal and inventory. The items has inventory
collected during the game. Dialogues have the discussion done during the game.
Documents are paper collected and Reports have notes of evidences or important
information gathered during gameplay.
Professor Van
Helsing’s home:
Professor Van Helsing
is in his office. He talks about the weapons used against vampires. Aside for
sunlight; folklore, legends and books have mentioned that garlic, their
reflection in mirrors, running water and silver bullets can be used to stop
vampires. His weapons that are decisive are crucifix, holy water and wooden
stake.Maria, the lodger
knocks on the door and inquires about Prof. Helsing. She inserts a letter and
newspaper under the door.The letter is from
Jonathan Harker. It is a sad letter to be read only if ‘a grievous
destiny, worse even than death has put an end to my existence’. Under the
guise of a librarian, he penetrated Castle Dracula. During the interview, he
showed Dracula a picture of his betrothed, Mina. Count Dracula has shown
interest at Mina and has been absent
for three days while he writes the letter.Right click the game
screen and access the documents to read the letter and the newspaper.The News Times
Thursday, September 8, 1898 reports the death of Gerrit Melford and his
wife. He was alleged to have killed her after a visit of a man dressed in black
during his absence. A black bird was seen flying out of the home in New Kent
Road towards the direction of the National Gallery. A cry, struggle and a shot were
heard. Mrs. Melford has a wound on her neck. The newspaper refers to another
incident similar to this reported in Tuesday edition.London
Mina’s apartment:
Automatically be at Mina’s apartment.
Talk to Mina and find
out that her servant’s sister died. Today’s newspaper has the report of the
murder of the servant’s sister.Take The
Courier, Thursday, September 8, 1898 from the chair. Read about the
chambermaid’s corpse found at the banks of the Thames by Southwark Bridge.
There was an incision on her neck. Few trollops were seen going towards the
Tate Art Gallery.Take the Daily Big
Mirror, Thursday, September 8, 1898 from the table on the left. Read about
Sarah MacAllistair’s corpse found at the intersection of Tottenham Court and
Euston Road. There are 2 wounds on her neck. A stranger was seen jumping to
the roof towards St. George’s Cathedral.
Find the newspaper
referred by today’s News Times:Take the pile of
newspaper at other end of the table.Today is Thursday,
September 8 and the referred newspaper was on Tuesday.Select-click on the
News Times newspaper with the date September 6 (691898).Read the News
Times, Tuesday, September 6, 1898. It mentions the lucky escape of Ethel
Basingstroke when she was assaulted at the exit of St. George’s Church by a
man dressed in black. Touching her cross saved her. The assailant changed
into a winged demon that flew towards the direction of Victoria Station.Pickup and look at Jonathan Harker’s framed
picture on the table.Go to bottom screen. Open the curtain to see
Harker’s map of London.
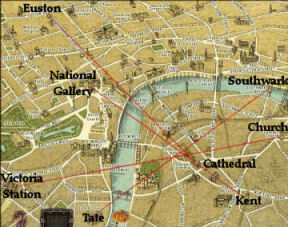
Find the direction where the aggressor fled:Based on the newspaper records of where the assaults
took place and the witnesses’ statement of the direction where the aggressor
went, draw lines to see where the aggressor fled.Check the newspaper items in the documents.
Click to pick up the red pencil at bottom of screen.
If you need to check the documents, click on the items frame at bottom left.
Click the dragon arrow to exit the map.Based on News Times
Thursday, September 8, 1898 concerning the Melford assault; click-hold the
pencil on the circle at the Station close to New Kent Road and move to click-release
on the circle of the National Gallery.Based on The
Courier, Thursday, September 8, 1898 concerning the Jenny’s sister’s assault;
click-hold the pencil on the circle at Southwark Bridge and move it to
click-release on the circle of the Tate Art Gallery.Based on Daily Big
Mirror, Thursday, September 8, 1898 concerning Sarah MacAllister’s assault;
click-hold the pencil on the circle at Tottenham Court and Euston Road and
move it to click-release on the circle of the St. George’s Cathedral.Based on News
Times, Tuesday, September 6, 1898 concerning Ethel Basingstroke’s assault,
click-hold the pencil on the circle at St. George’s Church and move it to
click-release on the circle of the Victoria Station.Click on the circle where the lines intersected –
Godalming Manor next to Bloomsbury Cemetery.
Mina returns to the room. Van Helsing asks Mina to
hang a dozen garlic bulbs on the windows and not let anyone in.
Godalming Manor: Click on
the door and Van Helsing talks to Hendrik, the ‘butler’ of the manor. Hendrik
was told by his master to kill the flies that bothers his sleep and that he can eat
them.
Bloomsbury Cemetery: Enter
the cemetery left of the manor.
Note and click on the urn by the Rest in peace sign
at left. Check the locked tool shed on the right.Paul Long: Go forward to
top path and talk to the grave digger, Paul Long. He is digging the grave using his hands.Open the tool shed:
The hints left by the boss are that the combination
to the lock is the ages of J B Lemon and his wife, marked on the mausoleum,
near the north stairs across the entrance. Another clue is to flip the numbers found – 6
makes 9.Check the empty bottles on the coffin. Take the scraper in front of the grave.
Go back to the gate of the cemetery at right. Right across the gate, click at right of the screen
by the plant to go right.Go down the stairs, go across to the other side and
up the other set of stairs.Climb the stairs and see the mausoleum beside the
stairs.Look close at the framed engravings on the side of
the mausoleum.Use the scraper to clean the writing until Van Helsing reads the dates and it is entered in documents.
Perfect!Go back to the tool shed beside the gate of the
cemetery via around the cemetery or down-around the big mausoleum at the lower part
below the stairs.Click the hand icon on the lock and see a close up
the lock puzzle.Based on the dates: J B Lemon – 1703-1772, he died
at 69 years of age. Suzy Lemon – 1722-1790, died at 68 years old.That makes 6968. Using the flip the numbers hint by the boss,
the code is
9698.Enter 9698 on the lock and then click on the button
at right. Open.Tool Shed: Enter the tool
shed. Look around at the different items: cloakroom and storeroom.Take the spade and the iron bar right
of the door. Take the lantern from the table.Other entrance to the manor:
Go back to the Long, the gravedigger. Talk to Long about the Godalming Manor.Learn about other entrance to the manor. The former
watchman said that there’s a tunnel between the cemetery and manor.Learn that the watchman is dead and buried in the
mausoleum with 2 monks on the gate. He has a book in there that mentions about the tunnel passage.Watchman’s mausoleum: Go
back to the right and then right again across the gate to go down to the
watchman’s mausoleum.Go around to the other side beside the other stairs
and see the gate to the mausoleum framed by 2 monks.Look at the monks and the gate.
Inscription: Try to get in
the gate. There is an inscription on the ground but it is
dark.Select the iron bar in inventory. Right click to see
the iron bar at top right.Click the grate to use the iron bar on the grate of
the gate and get an opening.Use or click-hold-drop the matches on the lantern to
get a lit lantern.In inventory, combine or click-hold-drop the shovel
with the lit lantern to get sconce. Right click to see the selected
sconce at top right and ready for use.Click the opening to see the sconce inserted through
the gate.Click the inscription to read-copy it.
Open the mausoleum gate:
Using the inscription’s poem, let us open the gate.
Poem from the crypt:But in order to move him, you must first sever
the stone heart of the celestial henchmen right
there
Up high to down low you will go;The blood of the eyelids will flow.
The angels can be done in any order.
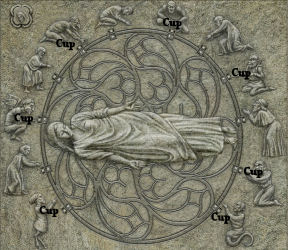
First Angel:Move away from the gate and go to the top path (not
the stairs). See a martyred angel.Look close and see demons and faithfuls surrounding
a saint.Read the inscription at the bottom. When the saint sacrifices himself to redeem our
sins, the demons drink his blood and the pure cry on him.Click on the squares in front of the surrounding
figures.Select cup (drink) for the demons and teardrop (cry) for the faithful.
The demons are hoofed, winged, beaked, has long fingers, has long tongue, has
fangs and has tail.Then click on the saint at top left. If done correctly, hear gears moving. There,
perfect.
Second Angel:Climb the stairs at right. Go to bottom screen. See
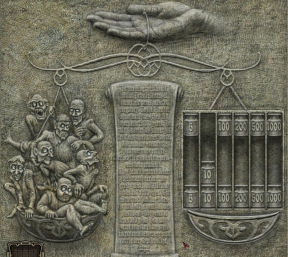
a bent weeping angel at the corner.Look close and see a scale weighing the demons on
the left pan.St. Peter’s judgment is copied in the
documents.Deduce the weight of the demons based on the
inscription.3 wrathful sinners = 300 years (100 each).
Conceited sinner = 300 years
Envious one (half of 300 + 300 of above sinners) = 300
yearsGluttonous (half of 300 + 300 of above sinners) = 300
yearsMiser (2 times of the wrathful sinners 600 + 25) =
625 yearsThese totals = 1825 years.
Place 1825 total weights on the right pan:
click on one 5, two 10’s, one 100, 200, 500 and 1000.Click on the right pan at the bottom of the weights. If done correctly, hear
gears moving. There, perfect.
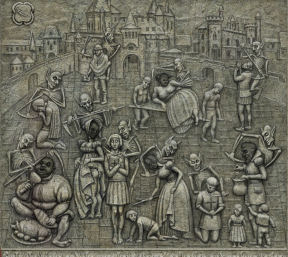
Third Angel:Go to the
right. Take a black veil on top of the cross at bottom left.See a
chained angel. Look close and see the puzzle.See demons
tempting the faithful and the sinners.Read the inscription at the bottom. Only the
pious and the pure have eternal salvation and nothing to fear.Click on the
head of the sinners that succumbed to temptation: Gluttonous one, woman with
raised skirt, woman beating a child, man holding a bag of coins and woman
being carried on a pallet.Click on the sword at top left. If done correctly,
hear gears moving. There, perfect.
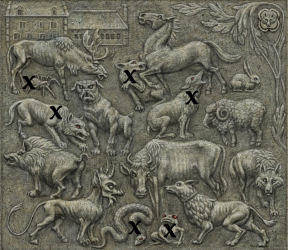
Fourth Angel:Go down, pass the gravedigger, pass the gate and on
to the next corner.See a chained angel. Look close at the angel and see
the puzzle of animal figures.Read the inscription at the bottom. The demon
is everywhere in the eye of the spider, the serpent, the toad and the wolves.Click on the
eyes of the spider, the snake, the toad and the wolves: the wolf under the
spider, the wolf attacking the horse and the howling wolf. The dogs that might
be confused with wolves have collars. (Thanks, Mordack.)Click on the wolf at top right. If done correctly,
hear gears moving. There, perfect.
The mausoleum of the watchman must now be open. Go back left to the gate of the cemetery.
Flies: Click on the urn
that is beside the Rest in peace sign. See flies over it.Use the black veil taken from the cross on the flies
and get a net with few flies.Inside the Watchman Mausoleum:
Go back down to the Watchman Mausoleum.Enter the now open mausoleum.
Take the book from the crypt from the top of
the coffin.Read the book in documents. Learn about Lord
Godalming’s secret passage.It is at the northeast angle between a tomb without
a cover and a large Gothic cross.Secret Tunnel: Go up the
stairs close to the mausoleum gate.Go to the top path. See a tomb with no cover and the
cross at the corner.In between those 2 markers is the tomb with a small
cross on top.Use the iron bar on the cover of the tomb. The
secret passage is revealed.
Godalming Manor: Enter the
secret passage.
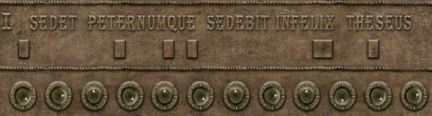
Door: Click on the door and
see the door lock.The object of the lock puzzle is to move all the
left button to the right side.Click on each button to find out which button moves
other buttons.With all the buttons on the left side, click on the
top and the bottom buttons only.Cellar: The secret passage
is hidden behind shelves in the cellar. Look around and see large traps.Check the vise on the worktable. Take nails
in a box on the worktable. Take the pot-glass bowl under the worktable
and the pliers on the base of the pillar left of the worktable. Check
the axe used recently on the right.Go to bottom of screen and look around. Take the
saw on the stairs.Climb up and through the large trap door.
Kitchen: Go through the
door and be at the kitchen.See Hendrik eating and catching his dinner of
bugs.Look at the items on the table and the state of the
kitchen. Take the file from the floor and the wooden spoon from
the table.Try to go through the door.
To keep Hendrik occupied, combine the flies caught
at the cemetery and the glass bowl to get a bowl of flies.Click the bowl of flies on Hendrik. Bon appetit!
Go through the door now.
Bottom Hallway: Go to the
bottom of the screen to the front door. Take a cane from the umbrella
stand left of the door.Salon: Go through the door
across the kitchen.Check the safe that we don’t have info on and the
covered mirror.Go to bottom screen. Check the windows, the painting
of Lady Godalming (she must be from New Orleans) and take pieces of wood
from the floor.Exit the room and climb the stairs until the top
floor.Lady Godalming’s bedroom:
Enter the door on the left.Take and read the brown message from the Lady’s
chamber on the floor left of the small table with candlestick left of the
door. It mentions one of the torches.Take the spool of thread in front of the
armoire.Go to the bottom screen and see the state of the
bedroom. Look around and find out that Hendrik sleeps here.Take the tape measure on the floor at the foot of
the bed and the hammer-mallet under the boarded window.Top
Hallway: Exit the room and go to the bottom screen.
There’s a locked room that Van Helsing feels has a big secret.Library: Enter the room
across the hallway from the Lady’s bedroom. Look around the clutter.
Check the book on the escritoire left of the door. Check the panel right of
door that is similar to
the one below in the salon.Go to right screen and look at the floor. Check the
items in the box on top of the table at right of room.Take the writing papers beside the box.
Safe in Godalming Manor:
Library – Go to the metal plate on the wall right
of the door.Look close and see Greek words etched on the plate.
Below the words are raised bars.Click on inventory icon and take paper. Use paper on
the metal plate in close up view.Move the paper to the bottom part over the raised
bars and click.See that the paper now have holes that correspond
to the raised bars.Salon – Exit the library and go down to the
salon. Look at the metal plate left of the door.Look close and see Greek words etched on the plate.
Below the words are raised bars and under the bars are 12 dials.Click on inventory icon and take paper. Use paper on
the metal plate in close up view.Move the paper to the bottom part over the raised
bars and then click.See that the paper now have holes that corresponds
to the raised bars.Un-highlight the holed paper in inventory.
Library: Go back upstairs
and enter the library.Use the paper with holes from the salon on the
metal plate.Move the holed paper over the words and see that
certain letters are seen through the holes – N E N S SE E. Click to enter the
letters in reports.Un-highlight the holed paper in inventory.
Salon: Go back downstairs
and enter the salon.Use the other paper with holes from the library on the
metal plate.Move the holed paper over the words and see that
certain letters are seen through the holes – SE E N SE N SE. Click to enter
the letters in reports. Exit and if not done yet, un-highlight the paper in items.The code for the safe is the combination of the 2
set of letters obtained. Turn the dials to the compass directions (N for
north, S for south and SE for Southeast) noted: SE E N SE N
SE N E N S SE E.Use the compass direction for N as top line,
SE as bottom right line and S as bottom line.The safe opens. Take the key.
Landing: Exit the room and
climb the stairs to the landing.Check the candlestick on the wall and see that it is
loose. This must be the one mentioned in the message from the Lady’s chambers.Use the pliers on the candlestick and it falls on
the floor.Secret panel: Look close at
the panel and see 4 metal plates.Van Helsing states to make a key for it. Click on a
metal plate and the need to measure the depth of the holes is said by Van
Helsing.Make a measuring tool:
Using the items taken from the Lady’s bedroom and kitchen, combine in
inventory: spool of thread, measuring tape and wooden spoon to get
measuring instrument.Use the picked up measuring instrument on all 4
metal plates of the secret panel to get the measurement of the key to be made: 10, 8, 12, 5 cms.
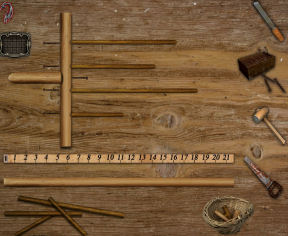
The measurement should be entered in documents.Make a key: Go down to the
cellar below the kitchen.Click on the vise on the worktable to get a close
look at the items needed to make the key.See that the file, nails, hammer and saw that were
picked up earlier are on the
right side. Below the measuring tape are dowels. The main constructing area is
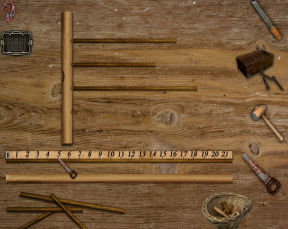
above the measuring tape.Cut and fit the dowels:
Take a dark brown dowel from bottom of screen.Place-click dowel below the measuring tape.
Use the saw and cut the dowel to size 10 (one of the 4
measurements) taken from the secret passage. Do this by clicking the tip of
the saw on the line below the correct number.Take the 10 cm dowel and click the tip on the top
right hole of the dowel above the tape.Do this to cut 8, 12 and 5 cms dowels and fit them from
top to bottom under the 10 cm fitted one.
Now the wide light colored dowel. Take the wide tan
colored dowel below the tape and place it under the tape.Use the saw on the tip of any number until Van
Helsing cuts the dowel. My cut was done on 5 cm mark.Place the wide dowel on the large hole on the left
of the setup above the tape.Trim the dowels: Take the
file and click it on all the dowels to trim the ends.Secure the dowels: Take nails
and click on the opposite side of a dowel (see picture below).Use the hammer on the nails to hold the dowels in
place to get a makeshift wooden key. Now, will this work?
Go back to the landing and use the makeshift wooden
key on the panel.Automatically enter the secret passage. Climb the
stairs. See a hole on the floor with stakes.Use the key taken from the salon safe on the lock of
the door at top of the stairs.Dracula’s room: Look
around.Click on the coffin, covered mirror, his portrait
and the book on the table under the portrait.See a book with a jeweled pentagram.
Check the open window and realize that Dracula has
left.Go left and see a locked door. This must be the
locked door at end of hallway on the top floor.Look at the picture above the door of Castle
Dracula.Check the book case and click on the bloody book on
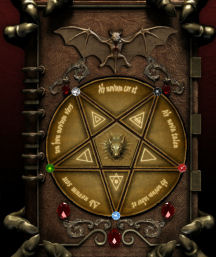
the middle shelf at extreme right.Read the page of blood stained book. The diagram is
similar to the lock of the book under Dracula’s portrait.Open Dracula’s book: Go to
the book under Dracula’s portrait.The blood stained book page shows that the inner
triangles have symbols and the outer triangles have text. The jewels are all
on the tip of the inner triangles.The red jewel at the bottom of the page and
exiting out of the book resets the puzzle.
Show the symbols on the small inner triangles:
Click on one of the small triangles and then another
one. See that they interchange their positions.If the small triangles are in the correct place, a
symbol appears.The object of this part of the puzzle is to show all
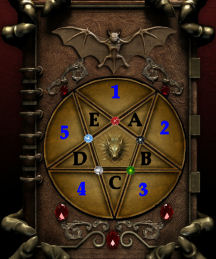
the symbols.There are several solutions to this puzzle. One of them before touching the puzzle is (labeling
the small triangles from top right going clockwise A-E):Click on the bat at top of the circle to show the symbol in D.
Click on A and C. Click on bat.
Click on B and E. Click on bat.
All the small triangles should have a symbol now.
Show the symbols on the large outer triangles:
Click on one of the large triangles (or the ruby
close to the triangle) and then another triangle. See that they interchange their
positions.If the large triangles are in the correct place, a
text appears.The object of this part of the puzzle is to show all
the text.There are several solutions to this puzzle.
Labeling the large outer triangles 1-5, starting at
top going clockwise:Solution 1: Click on 1 and
2. Click on bat.Click on 1 and 4 triangle or the ruby. Click on bat.
Click on 3 and 5. Click on bat.
Click on 1 and 5. Click on bat.
Solution 2: Click on 4 and
5. Click on bat.Click on 3 and 4. Click on bat.
Click on 1 and 2. Click on bat.
Click on 1 and 4. Click on bat.
All the outer triangles should have a text now.
Place the jewels to tip of the triangles:
Click the black jewel, see where they can go and
then click at top right tip.Click red jewel and then click bottom right tip.
Click white jewel and then bottom left tip.
Click blue jewel and then bottom tip.
Click white jewel and then click top left tip.
Click green jewel and then click bottom left tip.
Click on bat.
Read Dracula’s book and learn how he came to
be this way. Learn about Irina, the love of his life, the battle, the slaughter, the suicide, the
possibility of her ‘return’ and Mina. He is searching for the Demononicon of
Wliwggi in Cairo.Hendrik is heard walking the top level hallway
towards this room. Exit
through the secret passage (door with swords).
Mina’s apartment:
Automatically be at Mina’s apartment.
Look at the basket of garlic on the floor by the
table.Check Mina’s door. Van Helsing feels a presence.
Use the crucifix on the door of Mina’s bedroom.
See Mina already bitten by Count Dracula. Dracula
flies off as a bat.Van Helsing sent a telegram to Seward MD,
Director of Carfax Sanatorium asking for his help with Mina and his
crusade against the vampires.Seward reports about Mina’s condition.
Go to bottom screen and click on the map on the wall
to reveal the European map.Click on Cairo at bottom right. There, perfect!
Cairo
Market place: Try to talk to any of the men.
Mustapha: Go forward and enter the market place.
Look at the sign on top of the building at right or above the camels.
Go forward to the path in front of the camels.
Talk to Mustapha. Rent a room and find out where the museum is located.
Go right to the corner and click on the sign on the post of the camel stand.
Go bottom right to the museum
Cairo Museum: Look at the shelves and items by the
door.
Go to the bottom screen. Talk to the man sitting by the desk.
He the assistant director was left in charge by the absence of the Director of
the museum.He is busy. Offer to help to look for items he wants collected.
Item collection: Check documents for the list of
the artifacts. Find out what is a deben.He gives a coiled copper deben and a scribe’s stylus. Take the Giza
pyramids paper on the desk.Pick up any items that are active even though they are not in the list given
by the assistant director.
Far Right shelf: Go to the right and be at the far
end shelving. Press the spacebar to see where the active items are located.Take the papyrus from 1852 from middle shelf. Take the flail of
Nekhnekh and the miniature pyramid at end shelf. Take the key
under the pyramid.
Inner right shelf: Go left from the far right shelf. Press
the spacebar to see where the active items are located.Take the pyramid and the knife with a mother of pearl handle
from the end shelf.Center shelf: Go right via the bottom exit and then forward
to the center aisle. Press the spacebar to see where the active items are
located.Take the Spanish helmet from left end shelf. Take the pyramid
and Heka – crook on top of the chest below the helmet. Take the
pharaoh with broken head from the table at the center.Go to the bottom screen and see another view of the center aisle. Press the
spacebar to see where the active items are located.Take the small pyramid from center table. Take the small granite
scarab from left shelf.Inner left shelf: Go to right
of the door. Press the
spacebar to see where the active items are located.Take the pyramid and head with solar disk. Use the key taken
from the far shelf under the pyramid on the locked chest above the head with
solar disk. Take the pyramid inside the opened chest.
Far wall: Go right to the end of the museum. Press
the spacebar to see where the active items are located. Look at the
sarcophagus.Use the crook-Heka and the flail of Nekhnekh on the hands of the sarcophagus
next to the mummy. There, perfect. Open. Take the large pyramid.Go back to the assistant director and talk to him. Now you have finished the
items in the list.Learn about the Demonomicon and the black sphinx. It might be at the Blood
Rocks.Exit the museum.
Market place: Go back to Mustapha by the camels.
Mustapha: Talk to Mustapha. Learn that the camels
have
all fallen ill.
He mentions the Monk that might help.
Coptic monk: Go to the left and talk to the monk. Go
back to the market place.
Mustapha: Take the casserole dish behind
Mustapha. Take fork leaning on the cart in front of the sick camels.Use the fork to take the fresh herbs-curious plants on the trough in
front of the camels.
Coptic monk: Go to the left and give to-click the curious
plants on the monk.Learn about the poison found only in the desert. He gives a remedy-medicine
for the camels. He warns about the night birds that flew to the desert 2
nights ago.
Mustapha: Go back and give the remedy to Mustapha.
Blood Rocks: Mustapha shows Van Helsing to the Blood
Rocks.
Enter the temple. The exit is blocked by Dracula’s henchman.
First room: Look around. Check the recent
skeleton.Take the pick head and turban from the ground at right.
Take plank from the ground at left.Go to bottom screen and then go right
Abyss: See a hole on the floor and the stakes in the
hole at middle of the hallway.Use the plank on the far end of the hole in the ground.
Cross the plank. Take the lantern. See an opening at the side of the hole in
the ground.Continue to top screen and see ways to the right and left.
Cross door: Go left.
Check the body of the woman on the floor.
Take the belt beside her body. She is wearing a black sari.See a metal door with a cross and sun on it. Examine it closer.
Click on the indentations of the door. The door has indentation for a solar
disk at the center. The top has small fissure. The left one needs something
inserted. The right smells of garlic and the bottom has a receptacle for
liquid.Exit this hallway.
Go right to the other hallway.
Mummification room: Look around.
Look at the painting on the back wall and the medicine table.Take the linen strips from the medicine table and the oil flask
on the table by right wall.Exit the room and go back to bottom screen.
Abyss: In inventory combine (click-hold-drop) the
linen strip with the belt and then with the turban to get rope.Use the rope on the plank that is laid across the hole on the floor.
Combine oil flask and lantern to get lantern with oil Use match on
lantern with oil to get lit lantern.Highlight the lit lantern and then click on the rope to descend.
Underground hallway: Take the spike on the
floor.Go to the hallway at top screen. See a recent skeleton crushed by boulders.
Take the poison-curious plant from the bag of the skeleton.
See an opening at top right of the boulders.
In inventory, combine pick head and spike to get a pick.
Use pick on opening. The pick breaks but the spike is still intact.
Now to find a way to Cairo.Exit through the opening.
Herodotus: See the monk
with the camel. Talk to the monk. He is Herodotus of Judah.Learn about the guardian and the sealed tomb. The
subsequent opening of the tomb. The seal (cross) has been penetrated and he
has not been able to reproduce the seal. The objects on the ends of the cross’ arms
and the sun disk need to be recovered. Return the artifacts taken by the
looters and subsequently by the authorities. The authorities kept the
artifacts in the museum.Herodotus gives a list of the artifacts.
Market place: Automatically be back with Mustapha by
the camels.
Learn from Mustapha that his wife’s niece is missing. The girl wears black
sari. Ah – the girl is the one in front of the seal.Van Helsing says to collect things. Let’s look for things to pick up.
Enter the central market by clicking on one of the side stairs and be in front
of the stall.Take the flask and scale at right table and the strand of
garlic on the left post.Exit the marketplace and go to the museum at bottom right.
Cairo Museum: Talk to the Smail Quahab, the assistant
director.
See Dracula’s henchman try to kill Van Helsing.
Take the thrown knife on the bookcase. Take the mirror from the
table.Click Herodotus’ list on Smail Quahab and talk to him then.
He gives a receptacle with the capacity of a hinu and a necklace.
The necklace has a diamond of great value.Smail advises to recover stolen
Museum artifacts and the authorities will forget about the Coptic artifacts.
Then he will give the Coptic artifacts after the recovery of the Museum
artifacts.Exit the museum.
Market place: Show the knife to Mustapha by the
camels.
The knife is an Ottoman blade owned by a Turk who is the head of smugglers
and thieves.He is gone this morning. The Turk’s house is after the bazaar.
Turk’s house: Go right from Mustapha and then take
the path to go left past the marketplace.
Look at the gate of the house with ivied walls.
Turk’s gate puzzle: See balls and lines. At left is an
arrangement of balls.The object of the puzzle is to arrange the balls at the center to look like
the ball arrangement seen on the left.The red bar at bottom left is the reset button.
To move the balls, hover the cursor over a ball and see red arrow(s).
These arrows are
the directions the balls can be moved.As a hint: Move the balls on the arms first into the correct
column position.Remember the number of balls on the center horizontal line between the 2 arms.
1.
Push column 2 (from bottom) up once. Push top ball of column 2 to the left
once.2.
Push column 3 down 3 times.3.
Push top ball of column 2 left once. Push column 2 down twice.Push
row B (left side) to the right once.———
4.
Push row B, column 4 to the right twice. Push row C, column 4 to the
right once. Push row D, column 4 to the right twice.You
now have column 6 and 7.5.
Push column 7 (from top) down twice.6.
Push last ball at right side of row E to the left once.7.
Push row F to the right twice.8.
Push bottom of column 3 up once.9.
Push row G to the right twice.10.
Push row F to the right twice.11.
Push row G to the right once.12.
Push bottom ball of column 7 down once.13.
Push row F to the right once.12.
Push bottom 2 balls of column 7 that are at the bottom down once.13.
Push last ball of column 7 to the left once.14.
Push top ball of column 7 down once.15.
Push row C right side to the right once.
There. Perfect!
Turk’s room: Enter and look around the room. Press the spacebar
to see all the items that can be picked up.Take the black sphinx on the chest at bottom left. See
hieroglyphs
of the black sphinx.Take the pyramid on the chest and the axe in front of the chest.
Look at the table on the right and see a bag of jewels and a smoking
brazier.Take the torn parchment from the table.
Torn parchment: Put together the torn pieces.
Right click to turn the piece of parchment.
Do the corner first, edges next and then fill up the center.
The hieroglyphs on a parchment found at the Turk’s is now in documents.
Cobra: Go to bottom screen. Check the door. The urn on the right vase breaks and a
cobra falls out.Add the curious plant on the smoking brazier on the table. Watch the poisoned
smoke affect the cobra.Look at the broken vase and take key. Use the key on the door.
Turk’s locked room: Enter the room and look around. See that
the loot are in here.Take the sachet of gold powder from the shelf left of the window. Take
the solar disk on the floor at back wall.Take scrolls and letter in the vase on the table at bottom right. Read the
letter found at the Turk’s and piece of a letter found at the Turk’s.Exit the Turk’s house and go back to the museum.
Cairo Museum:
The assistant director informs Van Helsing that the Turk is named Suleiman and
that the authorities have gathered the loot but the Turk has not been caught.Talk to Smail about the Coptic artifacts. He gives a bag of Coptic treasure.
Show the Turk’s letter to Smail.
Decipher the hieroglyphs on the Turk’s letter:Take the book on the table. See the hieroglyph puzzle
in close up.There are words on the left that corresponds to the hieroglyphs on the right.
Click on a word and place it under the hieroglyph.
First line: Weapon – With – Magical Powers – Within – Seker – Head.
Second line: Cursed – Blood – Hidden – Under – North – Altar.
Third line: Before – Enter – Darkness – Destroy – Guard – Curse be on you
forever. If correct the words turn red.See the translation of hieroglyphs on a parchment found at the Turks in
documents.Show the black sphinx to Smail. It has the phrase ‘Ny ar lut hotep’.
Exit the museum.
Marketplace: Talk to Mustapha.
Herodotus, Coptic monk: Go left from Mustapha’s place
and talk to the monk.The monk gives a host and states that he doesn’t know about the 2 items
feared by demons.He needs clean water that hasn’t touched the earth to make
holy water.Show the black sphinx and he recommends to smash it. The hieroglyph on the
sphinx that was translated by Smail is the name of the messenger of the
ancient gods.
Mustapha’s place: Go back by the camels.
Prepare water that hasn’t touched the earth:Use the casserole dish taken from the shelf of Mustapha’s house and use it on
the water trough in front of the camels to get casserole dish full of water.Use the knife on the necklace in inventory to get a diamond.
Use the diamond on the mirror to get a square mirror.
Place the casserole dish full of water on the barbecue grill at the corner to
get a steaming casserole dish full of water.In inventory, use the square mirror on the casserole dish full of water to get
a mirror with condensation.In inventory, use the flask on the mirror with condensation to get flask
with condensation.
Herodotus, Coptic monk: Go back to the monk and give him
the flask with condensation. The monk gives holy water.
Blood
Rocks: Automatically be at the Blood Rocks.
Enter
through the opening at the side. Go forward and climb the rope. Go forward and
then to the cross seal at left passage.Seal:
Look close at the seal.Place the
solar disk at the center indentation.Place the
Host at the top slot.Place the
garlic at right slot.Place the
cut square mirror at left slot.Place holy
water at bottom slot. There, perfect.See Van
Helsing recite the words given by Herodotus.The door
rises. Enter.
Large
chamber: Look at the whirlpool in a large basin at the
center of the chamber.Based on
the translated hieroglyph on a parchment found in the Turk’s:
First line: Weapon – With – Magical Powers – Within – Seker – Head.Look at the fallen statue at right of the chamber. It is Seker.
Use axe on the head. Take the silver spearhead-tip from the cut head.
Second line: Cursed – Blood – Hidden – Under – North – Altar.Go to the short pillar at bottom left of screen, one of 4 at corners of the
outer circle seen on the floor.See hieroglyph on the stone pillar. It has the hieroglyphs in the black
sphinx.Remember that Smail said that it is the phrase ‘Ny ar lut hotep’ and the monk
said that it means the messenger of the ancient gods.Click in order the hieroglyphs seen on the black sphinx on the stone pillar.
There, perfect!The stone pillar moves and blood is seen on the floor cavity.
Use the hinu receptacle on the blood as mentioned by Herodotus and get a hinu
of cursed blood.
Remember what Herodotus said: To open it (secret passage just after the
cross), you must put a gold deben and a hinu of cursed blood into the basin).Gold deben:
Go to the chest at left and between the 2 pillars
left of chamber. Place the scale on top of the chest.Take the bowl from the floor and left of the chest.
Go to the pot at right side of the chamber and
beside the broken statue of Seker and take a copper deben.Weigh gold deben: Click the bowl on the
scale and see the close up of the scale.The reset button is the bar with hieroglyphs at
bottom of scale.See the copper deben from museum, copper deben from
the pot and a stiletto.Weigh each of the items using scoops of gold dust
from bottom left.Find out that each copper deben weighs 27.3 grams
and the stiletto weighs 41.0 grams.We need 13.6 grams as stated by the black sphinx
hieroglyphs.Place the 2 copper debens in one pan to make 54.6
grams counterweight.Place the 41.0 grams stiletto on the other pan.
Add scoops of gold (3 scoops) to the pan with the
stiletto until it balances to show 54.6 grams.Automatically get the bowl at bottom right.
Scoop the gold off the pan to the bowl to get 13.6
grams of gold – a gold deben. There, perfect!
Basin: Place the hinu of blood and the gold deben in
the whirlpool.The basin changes into sand.
Another counsel from Herodotus: Directly afterwards, the
sun must hit the summit of the Pharaoh’s tombs.
Select the pharaoh’s tombs:
Read-click the middle pillar at left of chamber. Use the lit lantern on the
pillar.The selection of pyramid puzzle screen is seen.
The object of the puzzle is to select the correct pyramid by the way the light
is reflected on it.Place pyramids that corresponds to the size of the etched pyramids above the
lantern.To start, place a large pyramid above the lantern placed at left.
See the shadow of the pyramid overlay the etched pyramid above.
Click the bar of lined arrow on the left to the middle line to get an exact
fit of the shadow on the etched pyramid above. If the shadow doesn’t fit the
etched pyramid, try another large pyramid.
Do the middle sized one. Place the lantern at the middle so that it casts a
shadow on the middle pyramid. Find the middle sized pyramid that has a shadow
that correctly fit the etched middle sized pyramid above while the bar is at
the middle of the arrow on the left.
Move the lantern to the right and find the correct small pyramid. There
perfect!When all 3 correct pyramids are found the rest of the pyramids in inventory
are gone.Place the correct pyramids on the sand of the basin:
the large pyramid on the right, middle sized one at center and small one on
the left. They are the pyramids at Giza.Hear and see the secret door opens.
Third line: Before – Enter – Darkness – Destroy – Guard – Curse be on you
forever.Go through the secret door. See a crocodile on the barge at the skeleton ridden platform.
Make a path to the platform:
Go back upstairs.Look at the funerary barge between the 2 statues by
the wall.Take the metal bar held by the left Egyptian
snake-faced statue.Take the broken piece of column from the
floor right of the monkey-faced statue.Look at-click the right support of the boat. Van
Helsing says to break the support. Use axe on
the right support of the boat.Use the piece of column under the right side of the
now unsupported boat.Use the metal bar on the piece of column. Use the
metal bar again to push the unsupported boat down the stairs to the pool
inside the secret room.Go down to the secret room and walk over the
funerary barge that is now on top of the water.Look at the metal structure on the platform and
learn
that inside is creature that is in ‘non-death’. This is explained at the reports.Go forward to the darkness at left or end of the
platform (see third line above). A mist, supernatural force stops forward progress.Destroy the guard. In inventory, use the axe on the black sphinx.
Use the broken black sphinx on the mist blocking the way.
Enter the room ahead.
Look around the room and take the papyri written in a strange language
from the altar. An earthquake occurs. Exit the room.
Marketplace: Automatically be at the marketplace.
Herodotus, Coptic monk: Go left from Mustapha’s place
and talk to the monk.Learn that the papyri can be read by a Brother
Alberto that knows the language. He can be found at St. Carousel Abbey in
Vienna where he works as an illuminator.Mustapha: Go back and talk
to Mustapha. He gives a letter forwarded through the museum director. A tall tale about the niece is said by Van Helsing. He gives the
gold dust for Mustapha and the diamond necklace for the niece’s family.Vienna
Learn that Mina is getting worse and wants to go
East to join her lover. Seward with Mina will join Van Helsing in Vienna at the
manor of Duchess Orlowski.
Orlowski Manor: Talk to
Seward and the Duchess.
Learn about the Abbey, the order and the inability
to see Brother Alberto.Learn from Seward that the abbey and the university
is one large building. There is one door that connects the university
to the abbey and it is in the library.Look around. Go to the bottom screen.
Check the locked door and find out that the door
leads to the library.Check the painting of piano keys with chemical
formulae left of the locked door and get Professor Orlowski’s painting
in documents.Check the closed panel on the left part of the
bookcase and see a small laboratory setup.Check and get Chemistry book from the lowest
shelf of the middle part of the bookcase.Talk to the Duchess and hear her hum a melody. Ask
about a key kept by Duke Orlowski, the test for his students with the
key as the prize. Learn that the melody is one that Duke Orlowski played
in the piano during his later days.Check Duchess Orlowski’s Song in documents and see
that it is C, G, D#, F, D, A#, C2.Chemistry Laboratory litmus test:
Go back to the chemistry laboratory at the bookcase and see it explained atreports.
The small lab has test tubes with chemicals. Dip
litmus paper on specific chemicals in a certain order in order to produce a
result.Using the clues of the melody hummed by the duchess
and the painting of the duke, deduce the sequence-order of dipping the litmus
paper on the test tubes.1. Find the sequence of the keys. The documents has
the sequence of the duchess’ melody-humming.2. Find the sequence of the chemicals. Identify the
duchess’ melody on the painting of the piano
keys-scales. Find out then the chemicals that corresponds to
those piano keys-scales.3. Find out the color of those chemicals. Learn the color of those chemicals
using the paper on the right.4. Take a litmus paper on the right and dip it on a
test tube with chemicals on the left following the sequence of the deduced
colors.Using the painting and the piano scale clues, dip
the litmus paper on the test tube in the order from left to right: 1, 5, 3, 4,
2, 6, 7 or yellow, blue, green, black, red, orange, white. I found it!See numbers below the test tubes: 2, 6, 8, 12, 14,
15, 18. Perfect, on to the next step.
Safe: Go to the left corner
of the room; left of the piano.Duke’s safe: Open the
marble structure and see a safe.Use the numbers taken from the litmus test of the
chemicals as the code.Use the arrows on the top to turn the dial’s arrow
to point at a number.Be sure to click the handle on the right after each
number is pointed by the dial’s arrow.The bar at the bottom of the dial is the reset
button.Turn to 2, click on handle, 6, handle, 8, handle,
12, handle, 14, handle, 15, handle, 18 and handle. Perfect, on to the next
step! Open!Take the key, angel and Duke
Orlowski’s letter from the opened safe.Read the Duke’s letter and learn about missing
students at the university. Baker, a chemistry student talks about angels and
demons and was searching for an explanation to the missing students.
University library: Use the
key on the locked door right of the bookcase.
Look around. Go to the desk at bottom of the room.
Check the curtain with the insignia of the
university.Look at the circle and see black demons and white
angels. Van Helsing says that some characters are missing.Search for angels and demons:
Go to center of library and climb the stairs to top
level.Top floor: Look close at the map of Europe. See and click on
Transylvania. Take the angel hidden behind the map of the country.Go right to the row of bookcases. Move one
step forward on the aisle. Take the angel on the cover of the book at
end of middle shelf. Read about Robert "Bob" Herzog’s Work, a study on
crossbow.Go down the stairs and then left of the stairs.
Dissecting area: Look at the items on the dissecting table. Take
paper cutter-scalpel and tweezers from the table. Look at the
dissected frog. It seems someone
left in haste.Look at butterfly display on the wall, one
is uncommon. Use the paper cutter on the door of the butterfly display case.
Take the angel.Radio: Go to the radio
right of the butterfly display. See a close up of the radio with a head
wearing a hat on top of the radio. Take the angel.Chandelier: Go right towards the fireplace. See a winch on the
side of the stairs. Use the crank-winch and see that it lowers the chandelier.
Take the poker at left propped on the wall.Go to center of room and look-click on the chandelier.
Something is on the chandelier.Click on the rolling staircase on the left.
Now that you saw ‘something’ on the chandelier, it can be taken. Place the
rolling staircase on the floor below the chandelier by clicking it on the
chandelier itself. Click on chandelier again and take the angel.Anatomy display: Go right of the staircase. Look at the skeleton
display. One of them has a hat and pants held by suspenders-braces.
Take the braces.Biology display: Go to bottom of the room. Look at the specimen jars
on display case at left of desk.The jar at middle left is sealed by a stopper. In inventory,
combine the poker and braces to get an obedience collar. Use obedience
collar on the stoppered specimen jar. Open.Use the tweezers on the
specimen jar to get a demon.Angels and demons: Look
close at the circle on the wall and see demons and angel on the side.Place the angels and demons in their proper place.
Click hold and drop the figures in their proper
place. If they are correctly placed, they cannot be moved anymore.The angle of the figures is the clue where they can
be placed.
Perfect, on to the next step. The connecting
door to the abbey opens.
St. Carousel Abbey: The
connecting door closes.
Wine cellar:
Check the desk and see the dragon head on the front of the
desk that protects the drawers.The window is barricaded.
Take the linen cloth that is over a basket
right of the door.Take St Michael’s spear from the statue on
the left bookcase. Use the spear on the head front of desk. Open.Safe puzzle:
The object of the puzzle is to light the balls
at the tip of each triangle.Click on a ball and it will show the paths it
can go to.The next position to be lit has to be connected
by a line to the recently lit positioned ball.The ball is held in place if 2 actions are
done: light the ball in a slot ahead of where you want it to be and then
click on the slot-place you want it to go. So think ahead where you want a ball
to go.
One possible solution:
Click on the numbered holes in sequence
1-15.
Open!
Take the key and chalice, the Cup of
Targovise.Go to bottom screen. Take an old broomstick (handle) on the floor right of
the shelf.Check the Schnapps barrel on the bottom shelf. Use
the paper cutter to open the schnapps’ keg and see the alcohol pour on the
floor. Watch out!Food cellar: Go to the
right.Look at the tortured body of the hanging man at
right.See rats below the man. They are on top of a student’s
pack. Check the student’s pack. The man must be Baker mentioned in Duke’s letter.In inventory, combine the broomstick and the linen
cloth to make a torch. Light the torch using the matches.Use the lit torch on the rats. Open the student’s
pack and take holy water.Hallway: Go to the top
hallway.Check the locked door. The key doesn’t work on it.
Take and automatically wear a dirty monk’s robe
hanging on the wall.Wine cellar: Go back to the
wine cellar.A creature from hell monk comes in and goes to the
wine cellar. He blocks the way and he must be taken care of.Use the lit torch on the spilled liquor on the
floor.Take the key from the ashes of the devil
monk.Hallway: Go to the hallway. Use the key taken from the monk on the locked door.
Altar room: See monks
worshiping a devil. One of them drank from a chalice at right side of room.See Brother Alberto chained and imprisoned at bottom
right corner. Go and talk to Brother Alberto.Get rid of the monks:
Look around at the ghastly room. Go inside
the pentagram.See a stand with a goat’s head right of the
pentagram on the floor stand. On top of the goat’s head is a chalice.In inventory, combine the chalice and holy water to
get chalice of holy water.Exchange-click the chalice of holy water on the
chalice on top of the goat’s head.Move away from the stand and see what happens. The
other monks cannibalize the dead monk.Talk to Brother Alberto. Find out that his leg is
broken. The text cannot be read by Brother Alberto because they blinded him.Learn that Dracula must be conquered and forced to leave
this earth in his own soil. The link Dracula has with those he controls will vanish
also.Use the dark key taken from the safe in the wine
cellar on the door at right of Brother Alberto.
Orlowski Manor:
Automatically be at the manor. Mina was taken by Dracula.
Transylvania
Van Helsing and Seward travels to Castle Dracula.
Seward got sick during the trip. Van Helsing makes an arrow for a crossbow
from the blade from Cairo
during the trip.
Tavern: The inn close to
Castle Dracula is far from any village.
Talk to Seward and automatically enter the tavern.
Talk to the innkeeper, Abraham du Varmin.
What a name. Lion, tin man, scarecrow. Oh my!Try to take the menu-paper from the counter. Ah.
Look around the inn and take note of garlic strands
and devils on the posts.Go to the bottom screen. Look around.
Take circle and rod looking pretzels from the
bowl on the table. Take silver paper from the table just in front of
Seward. Take a spoon by the wine bottle from the table.Use the spoon on the sticky slimy substance
from the bench under the window on the right.Try to take the key left of the door. Take note that
the key is silver.Try to open the door on the left. It is the door to
the stable.Seward is getting very sick. Van Helsing says to ask
for medicine.Talk to the innkeeper again about remedy. Abraham
looks for a potion at the stable.Now that Abraham left, check the menu-paper on the
counter. They are from the Castle and one of them is in Harker’s writing. Read
Extract from Harker’s Journal. Harker has been made a vampire.Abraham comes back with potion in a flask.
When he closed the door, the boar’s head falls off from the wall. Pick up the molar that detached from the boar’s head.
Make a stable door key:
In inventory, combine the silver paper and sticky
substance to make silver paper glued together.Use the silver paper glued together on one of the 2
pretzels shaped like a rod and circle. This wrap around the pretzel made a glossy pretzel.Use the silver paper glued together on the other of
the 2 pretzels. This wrap around the pretzel made another glossy pretzel.Combine the 2 glossy pretzels to make an assembled pretzel.
Use the silver paper glued together on the wild
boar’s molar to get a shiny molar.Combine the assembled pretzel with the shiny molar to get a false key.
Use the false key on the key hanging left of door.
Talk to innkeeper again to distract him.
While Abraham looks for bootleg behind the bar, use the stable key on the
locked door (footprint cursor).
Stable: Look around.
Check the coach. Van Helsing needs to hide in the coach to get to Castle
Dracula.Look at the cask above the coach. He needs to hide in the cask.
Look at the hole in the ground beside the table behind the coach.
Check the horses and see that they are agitated.
Calm the horses:
Go to the right and be at the workbench.
Take the empty bucket on the floor behind the bottles left of the
workbench.There ‘s a bucket of oats in front of the bottles on the ground.
Use the empty bucket on the oats to get bucket of oats.
Go back close to the door.
See blood dripping from the hanging carcasses.
Use the bucket of oats on the carcass to get bucket of oats and
blood.Give the bucket of oats and blood to the horses. That calmed the horses.
Collect items for wine cask:
Now that horses are busy eating, go to the front of the horses.
Take the funnel in front of the cask and the chest-box on the
table.Take the old trough (half a metal pipe) from under the table.
Take the tube-pipe in front of the left horse.
Take the beaver’s cadaver-carcass beside the bloody chopping block
at right and by the gate of the stable.
Empty the cask of wine:
Go back to the coach.
Place the box-chest on the ground in front of the back wheel.
Place the trough-half a pipe on top of the chest.
Place the beaver carcass on top of the trough.
Place funnel on top of the beaver.
Place the tube at the bottom of the trough to lean on the chest and to the
hole on the ground.Open the tap of the cask. Now will this work? Wine goes down the hole in the
ground.Click the setup and it will all be removed automatically.
Castle Dracula: Automatically, Van Helsing is in the
cask and is watching the ride to the castle.
Stables: Van Helsing says to lure the coachman under
a trap. Look around the stables.Make a trap: Take the leghold trap on the worktable left of the coach. See a bucket
of blood on the floor at the end of the worktable. It cannot be used yet.Go to the bottom of the screen and see the door where the coachman went
through. There is an impressive collection of hides on the wall.Take the 2 ropes on top of the barrels on the left wall.
Look up at the ceiling and see a pulley. Use a rope on the pulley and see it
hang from it.
Use the leghold trap on the rope and see it attached and on the floor.Use the other rope on the leghold trap on the floor.
.
Go to the right and be behind the coach.
Click on the pulley on the ceiling above the worktable and see the rope strung
across.Bait the trap: Take 2 meat hooks from the worktable in the foreground.
Move the cursor to the middle part of the worktable just above the tree stump
on the floor and see a close up of a dead rat caught in a trap. We need that
rat. The meat hooks are at bottom of screen.Use a meat hook on the right of the trap and one on the left side of the trap.
Take the rat.
Bait the trap. Go back to the leghold trap left of the coach.
Place the rat on the leghold trap and the trap is baited.
Watch the trap sprung.
Talk to the coachman. Learn about Mina. Dracula is
singing to the sleeping girl to bring back his first one. The beauty (beast) with black hair is
waiting to prevent entry to where Dracula and Mina are located.Talk to Igor again. Take the axe in front of Igor.
Use the arrow for crossbow on the red wrapped object left of the coach. Take
the jam pot with preserved hearts.Take the gold bowl-vase above the red cloth left of the coach.
Give the jam pot to Igor. Igor says that he owes you.
Go to right screen and front of the coach. Use the bowl-vase on the bucket of
blood left of the coach to get blood.Go right and go through the door to the
castle.Storeroom: Take the cord
on the red curtain at right. Take the fur coat on top of the barrel at
bottom center.Crypt: Enter the door top of the room and be in front of locked gate to the crypt.
Look at the gate. Look close at the panel at right.
Dracula’s picture puzzle: This
puzzles consists of several steps. (Thanks, tyke!)Take note that Dracula’s picture on the left is made
up of squares.The top and right side of the big square have 4 symbols
each. Pass the cursor over the symbol tile and see part of Dracula’s picture.Let’s do the top horizontal symbols first:
1. Study the 4 parts of the picture that are under
the symbols on the top or above of the big square.2. Click the squares on Dracula’s picture that
corresponds to the picture under the horizontal symbols above the big squares.
The squares on the picture are now blank.
3. Move-click the picture to the big square and look
for a place where all 4 symbols seen above the big square could be seen inside
the blank squares. Drop the picture on that selected area.4. Note the colors of the squares and enter those
colors at top left horizontal frame of colors: (l-r) green, white, blue, blue
Right vertical symbols: Click back Dracula’s picture
to remove blank squares.1. Study the 4 parts of the picture that are under
the symbols on the right of the big square.2. Click the squares on Dracula’s picture that
corresponds to the picture under the vertical symbols on right side the big
squares. The squares on the picture are now blank.
3. Move-click/hold the picture to the big square and
look for a place where all 4 symbols seen right of the big square could be
seen inside the blank squares. Drop the picture on that selected area.4. Note the colors of the squares and enter those
colors at bottom left vertical frame of colors: (t-b) green, white, red, white .Open! The gate rises.
Enter the crypt.
Coffin 1: Look at the cover
of the coffin by the stairs.Click on Moana and also on 12176 that are written on it.
Open the coffin and see that the vampire woman has
red hair.Coffin 2: Open the next coffin on
the left. Nothing of interest.Coffin 3: Look at the cover
of the coffin on the left.Click on Illona and also on 8954 that are written on it.
Open the coffin and see that the vampire woman has
blonde (white) hair.Dracula’s coffin: Look at
Dracula’s coffin with the dragon symbol on the cover.
Use the axe on Dracula’s coffin.
Coffin 5: Check the bird
drained of blood beside the right coffin.Open the coffin and see Harker’s body.
Take Harker’s glasses from his hand.
Take the book Myths and Legends from the First
Order of Knights from the side of the coffin. Learn about the Pelor
shield.Take Harker’s journal from his feet. Learn
how he was turned into a vampire by a black-haired initiator and about Pelor,
the shield of the Sun.Liberate Harker by combining the stake and hammer
in inventory. Use the combined stake and hammer on Harker.Exit the crypt and forward to the door at right.
Great hall: Enter the door
at right of the storeroom.Fiat lux: Go to the left
side of the hall.Look at the white painting on the floor depicting
Genesis and text of celestial beams – Fiat lux – Let there be light.Large Tapestry of Knights:
Look close at the end tapestry on the wall.It shows Dracula as a knight with several knights in
the background. Check his shield.Look close at the hand of the left knight and see a
pink ribbon. Remember the past of Dracula as mentioned in his diary. This must
be the knight that is betrothed to Dracula’s love. Check his charred shield.Irina portrait: Pull the
cord of the curtain on the left. Take the cord that fell on the floor.Look at the portrait of a beautiful woman. Look close at her hand and then use the
Harker’s glasses. Something pink has been scratched from her hands. It must be the
knight’s pink ribbon token.This must be Irina, Dracula’s love. The one that is
mentioned in Dracula’s book and the one he wants to bring back to life through
Mina.Go left twice and see the 3 portraits on the other
side.Illona: Read the name plate
at the base of the portrait on the left. Illona has blond hair.Dracula: Look at the
painting of Dracula.Moana: Read the nameplate
at the base of the portrait on the right. Moana has red hair.Jada: Open the door beside
the portrait of Moana.Meet Jada. Learn about Mina and Dracula. She spent
5777 nights with Dracula.She must be the woman that is mentioned by Igor that
is black haired beast that will prevent from getting to Mina and Dracula. She
is also the one mentioned by Harker that is the black haired initiator to his being a vampire.Locked door: Check the main door
at end of hall.Armory: Go to the right. Go
close to the cage on the right of center locked door.Look close at the sword lock. It has squares for
numbered code.Armory code: Go back to the
stables past the storeroom.After giving the jam to Igor – he owes you. Talk to
Igor.Igor: Learn that the numbers on
the coffin are the number of nights the women stayed with Dracula.The code to the coffin is: 3 times the night with a
white moon plus 2 times the night with a red moon plus 5 times the night with
a black moon.Illona is blonde and has 8954 on her coffin. 8954 x
3 = 26862Moana had red hair and has 12176 on her coffin.
12176 x 2 = 24352Jada has black haired and spent 5777 nights with
Dracula. 5777 x 5 = 2888526862 + 24352 + 28885 = 80099
Go back to the armory and enter 80099 on the sword
lock. The cage
opens. There, perfect!Pick up the coat of mail and the crossbow
without bow string at left part of the cage.Pelor shield: Remember the
mentions of the Pelor shield in Harker’s journal and the description of it in
Myths and Legend book.Crossing the 2 moons and aiming the arrows so
that the golden darts target the neighbouring silver and that silver, in his
turn, points towards a nearby bronze.Identify Pelor shield: Click on the shields. See the 3 shields in close up.
Based on the description from the Myths and Legend
book and the shape of the favored knight’s shield on the tapestry, work on the middle one.Crossing the 2 moons – Click the 2 moons to
face each other and the 2 ends overlap.aiming the arrows so that the golden darts target
the neighbouring silver and that silver, in his turn, points towards a nearby
bronze. – Click the outside ring that goes clockwise 12 times. Click the
middle ring that turns counterclockwise with the darts 3 times. I found it!
The Pelor shield is in inventory.
Jada: Click on Jada’s door.
He says he needs something to attract the beast.Click the bowl of blood on the floor in front of the
door of Jada’s room.Watch as Jada picks up the blood and what Van
Helsing did to her. That is quite a curse.Jada’s bedroom: Enter the
room.Look around. Use spacebar to see all the hotspots.
Take the pot of grease on the floor on the
left. Look at the hanged tortured man.Use the axe on Dracula’s coffin at the foreground.
Take the key inside the coffin.Take the book, The Vermis Mysteris (Mysteries
of the Worm). Read it in documents and learn that elemental forces… that
comes from the centre of earth or from the skies can cause harm to this black
ones.Use the axe on the other coffin. Look at the picture
of Jada Dahmer before she became a vampire.Use the arrow for crossbow on the mandolin leaning
on the bed and get mandolin string. In inventory combine mandolin
string and crossbow to get a complete crossbow.Exit the room.
Ritual room: Use the key
from Dracula’s coffin on the locked door and enter.See Dracula and a floating Mina. Dracula is reciting
the ritual. The green clouds of spirits are blocking the way.Short circuit the clouds:
Check everything in the room.Look at the bookcase with a metal top.
Click on the railing on the floor right of the
bookcase. It shows that the bookcase is movable but the mechanism is jammed. Use
the pot of grease on the railing. There. Perfect!Push the bookcase to the right and close to a puddle
of water.Go close to the left statue of a knight. Look at
statue, it is made of metal.Place coat of mail on the puddle close to the right foot of the statue.
Watch as the ligntning passe from above to the cord.In inventory, combine the 2 curtain cords. Use the
combined cords on the left foot of the statue. Van Helsing spread the
cord to the open space.Go right and use the fur coat close to the laid out cord.
This caused the green clouds to part.In inventory, combine the complete crossbow and arrow for a crossbow
to get crossbow ready to fire.With the crossbow ready to fire highlighted, go
forward behind the green clouds.Watch the final confrontation.
Duchess Orlowski has a visitor.
This document may not be
distributed without express written permission of the author and the content
may not be altered in any way.
For Questions or Comments
on this Walkthrough,
Please write to:
MaGtRo
Copyright © 5/2008MaGtRo