Black Dahlia – Cheats
BLACK
DAHLIA
The Ultimate
Walkthrough by Crash
INTRODUCTION
This is another big hits from Take 2 Interactive after Ripper
in 1996. The story is about the murder case in the mid 40’s
before and after the WWII. The torso killer is lurking around the
city of Cleveland, the NAZI followers are breaking loose, and
you’re the only person that could solve this mystery. All the
puzzles range from medium hard and very difficult, but the good
news is all the puzzles are very logical and blend nicely in the
game. So you won’t find any helpless ‘click’ and ‘search’ action.
Just focus on the story, gather the clues, listen to all
conversations CAREFULLY and you’ll find the answer. You’ll start
the case with only a case file to investigate and messy office.
Solve the puzzle before the killer GETS YOU !!!!
I’ve added special section in each part that called Author’s
note. This section explaining the background story of each part
and the progress you’ve made so far.
Recent Updates :
This page has become smaller so you could download the file more
faster.
Special Note :
Special thanks goes to Joan
Hansen for her big help on Winslow safe puzzle
(CD 3), Folded Invitation puzzle (CD 4), and Pressure lever
puzzle (CD 5).
Valium’s information on Louie’s
phone number.
FINSTER’S CASE
Main goal : Discover
what has been covered by Pensky
Q : Where is the key to the locked
drawer on the bookshelf ?
A : Open your desk’s right
drawer. Move around the notebook (click and drag your mouse),
take the revolver, and move its holder. Inside the secret
compartment on the holder, you’ll find the small key. Use it to
unlock the drawer. Inside you’ll find a scrap note and a message
to Dr. Strauss.
Q : Where are the runes that the
letter mentions ?
A : Ooooh, this is tricky.
Flip the light switch beside the door (you won’t see the rune if
you don’t turn the light on). Look up to the lamp on the ceiling.
Take the bag of runes on it.
Q : Where can I get the info about
the case ?
A : Talk to Sullivan about
it, he’ll direct you to see Hank Finster and Detective Merylo.
Finster will tell you about the Messenger and the Foreman. Notice
that emblem above him : Finsterlau, this maybe important. Find
out about the Foreman in Mc Ginty’s bar.
Q : Who is the guy on the corner ?
A : He is Dick Winslow, an
undercover FBI agent. He will tell you about the Black List, a
secret list that contains the list of German people’s name in US.
Q : Where can I get the Black List
that Dick mentions ?
A : Sullivan have that list.
Ask from him.
Q : Where can I find Prof. Strauss ?
A : You’ll find his phone
number on the ‘Black List’ from Mr. Sullivan. Learn the notes on
the scrap paper from the locked drawer to crack the phone code on
the Black List (the agent is not that stupid you know !!!). Here
is the way to do it : add the number represents the second
alphabet by 1, subtract the number represents the third alphabet
by 1, then subtract the pair numbers. For example : CLV 51-22-40
(this is Strauss’ number from the list) –> C = 2, L = 5+1 =
6, V = 8-1 =7, then you’ve to subtract the pair numbers ( 5-1 =
4, 2-2 = 0, 4-0 = 4) –> the phone number is 267-404.
Q : How can I contact Dr. Strauss ?
A : Not at this moment. After
you meet Detective Merylo (you’ll find a Finster stationery
inside the mug shot book on the table), come back to your office
and you’ll find a message from Helen Strauss, his daughter. It
will open another place called the Museum. End of disc one.
Author’s note : The story
become more challenging now. What first appear like a simple
case, now becoming broad. What is the connection between the
Torso Killer and this Nazi stuff ???
THE MESSENGER
Main Goal : Discover
who the messenger is.
Q : Who can help me to translate the
parchment from the bag of runes ?
A : Ask Helen Strauss to help
you, show the runes to her and after a while (after you visit the
Mission later on the game) go back to her again. She’ll help you
partially (you have to solve the runes by yourself ….). I guess
it’s better than nothing.
Q : What is the meaning of the symbol
on the invitation and the Finster stationery ?
A : Show them both to Helen
Strauss. She’ll show a book about it. From it you’ll learn that
Finster’s family, the Finsterlau, is the Sergeant of
Arms of the Knight of the Trinity.
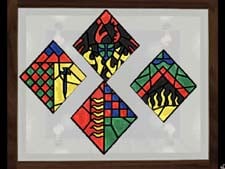
Q : How can I solve the Stained Glass
puzzle ?
A : Ask Helen about the book
of flags. Inside this book look for the emblem/flag of : Notorious
Tyrant and Sorcerer, Sergeant of Arms (Knight of the Trinity),
Scribe (Knight of the Trinity), and Herald of the Order of
the Trinity. Arrange the stained glass according these
pictures, see this final picture to help you. Then click on the
infra red lamp just slightly above it to read the writings on the
glass. Note : you have to
arrange the stained glass carefully, don’t leave any gaps between
the fragments or you couldn’t see the writings on it. The
position of the flag is not very important. The flags themselves
will tell you who the Herald, Scribe, Sergeant of Arm, and the
Leader are.
Q : Where can I find the info about
the Foreman and the Messenger ?
A : Return to Mc Ginty’s bar.
This time you’ll see George Hanson, the Foreman, is
sitting on the north corner. He’ll tell you about the Messenger,
he is someone by the name of Louie. After spending your time
somewhere else, go back to George and he’ll tell you that he also
heard about Louie often use the nickname Herald while
talking on the telephone.
Q : How can I contact Louie, the
Messenger ?
A : Look at the mug shot book
in Detective Merylo’s office. Find the name that close to Louie :
Louis or Louie Fielding. Go back again to Mc Ginty’s bar and go
to the phone booth at the far end corner. Browse the writings
carefully and you’ll find the name : Lou Fielding with his
phone number. That’s the Messenger phone number. Note : If you’re having trouble the
phone number, do exactly the same way with the phone list from
COI. So the number will be 267-259 not 401-259.
Q : What is Louie true name, the
person on the telephone doesn’t recognize Lou Fielding ?
A : Go to the museum. Look at
the Stained Glass puzzle again and notice the writing on Herald’s
emblem is Fischterwald. So Lou Fielding true name is : Louis/Louie
Fischterwald. Use this name when you called Lou Fielding.
You’ll find out about the Raven club.
Q : Where is Louie ?
A : I know, I know, you won’t
find him in Raven club (at least not yet !!). Try to talk through
the microphone beside the door. Tell the guard that Hank finster
has sent you. He’ll suggest you to find Louie in the Mission.
Look under the desk and get the Holy card. You’ll read about
Mission’s address. Go there.
Q : How could I get the photo that
Ernie has shown me ?
A : Try to trick Ernie by
asking him to check a package inside the office. When he left,
check out the black briefcase under the counter, move the right
folder and you’ll find an important photograph (you have to move
the left folders first and free some space for the right folders
to move). Notice that Louie has checked out from the Mission
(from the registration book on the counter), so you could meet
him at the Raven Club now.
Q : How can I make Louie to talk ?
A : Use the photo to
threaten him. Show the photo first to Detective Merylo and then
use the information to attack Louie at the Raven Club. Show the
photo to him.
Q : How can I catch that sniper ?
A : No you couldn’t. The
only way is to kill that guy. There are 2 ways to do that. First,
if you go to the left : shoot the pipe (above and to the left,
near the leaking gas) so you could blind him for a while, then
shoot the sniper.If you go to the right, pick up the bottle and
throw it away to make a diversion. As soon as he comes out, shoot
the man. Either way, you have to spend at least 2 bullets. Then
watch the gruesome ending of day one. What a sick man this torso
killer !!!
Author’s note : It seems
that Louie has talked too much. The Torso Killer has been
watching your move closely. How can he knows that you talk with
Louie ? What a shame, the only witness know about the Torso
Killer has been brutally murdered.
JOSEPH MUHLHAVEN
Main goal : Try to meet
Joseph
Q : What should I respond to
Detective Merylo ?
A : You could choose
anything. You could act as an COI agent by not telling anything
to Merylo, or you could be friendly by telling him what you know.
Don’t worry, there’s no multiple endings on this game. Browse the
newspaper on the desk and read about the torso killer.
Q : What should I do in Louie’s loft
?
A : Pay close attention
to those writings on the wall (especially to the one above the
dresser) !! They may have an important clues for you. There are 2
things that important for you right now : "The Carving"
on the wooden board near the stove in the middle of the room and
"The Lockbox" under the floor board near the
body mark (you have to move forward one step first before you
could see this mark). Click on the small brush to clear the
wooden board so you can read the carving.
Q : How can I open the lockbox ?
A : This is a tricky one
but quite simple. Follow this instruction and look at this picture to help you (the picture is
only one move away from the final position).

- Push the left lamp (2) to the right
- Push the small window (1)
- Push the chimney (7) down
- Slide up the board (4) under the small window
- Push the mill (9) away from you till it reach the end and
a board will move - Slide the board (8) to the left
- Slide down the board (4)
- Pull up the chimney (7)
- Push the left lamp (2) back to its original position
- Pull the mill (9) all the way down until the small window
(1) appear again - Pull the door (3) until its open
- Push the door (3) to the left
- Slide the small long board (5) to the left
- Push the small square board with symbol (6) up
Q : Where can I find info about
Joseph ?
A : Look at the matches
in your inventory. Hotel Cleveland is your next destination.
Q : How can I find out Joseph’s room
number, that front desk man doesn’t want to tell it a single bit
even if I try to bribe and threaten him ?
A : Try different tactic.
Notice how he responds on that phone call. Phone him with the
phone number on the backside of the matchbook (Click on the edge
of the matchbook in your inventory). The number is GB5637 or
425637.Watch the scene.
Q : How can I get into Joseph’s room
?
A : Push the food tray to
the door. Get the knife under the napkin on the food tray. Click
the small window above the door. You’ll automatically use the
knife to pry it open.
Q : Where is the key to open the
wardrobe ?
A : The key is a signet
ring with a symbol on it. This ring is hidden inside the lockbox
from Louie’s loft. Use the ring with the keyhole. Inside you’ll
find Raven Room invitation and bunch of letters.While you take
the room key from inside the clay pot some thugs will appear.
They will leave the photo inside the clay pot. Take that photo
also.
Q : Who are those thugs ?
A : Ask Dick Winslow and
Sullivan about the blackmailer. After you tell Sullivan about the
photo from Hotel Cleveland, he’ll tell you about a place called
Flanagan. You’ll meet Muhlhaven there after a while.You’ll also
been introduced with Von Hess, another important figure for this
case.
Q : How can I
look into Pensky’s file ?
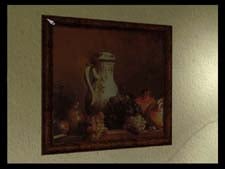
A : Dick Winslow
has the Pensky’s case file. In this file, you could find
his address. Dick hide this file in his secret safe
behind this picture beside the private room’s door. Click
on top left corner to open the picture.
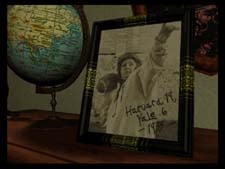 |
Q : How can I open the safe ? A : The combination is written down on his favourite picture. The football team on his cabinet (beside the globe) at the corner. The number is : 19 (right) – 6 (left) – 33 (right). Use the regular sequence for opening the wallsafe, that is turn three times to reach the first number, twice to reach the second number, and once for the third number. Click to the right side of the red arrow to move right and left side of the arrow to move left. |
Inside you’ll find the case file and Winslow’s security pass.
From the case file you’ll know that Pensky has been held in a
mental hospital in Sunnyvale. Pensky will ask you to find 3
mystical artifacts : The Fang of Wolves, The Wing of
Raven, and The Wisdom of Dragon
Q : Where can I find The Fang of
Wolves ?
A : It’s hidden in a
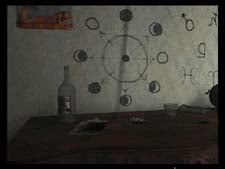
cabinet with special lock inside Louie’s loft. Use the lockbox
key from inside the lockbox with the cabinet keyhole. To open the
cabinet you’ll have to learn the symbol above the dresser. The
sequence start at the 12 o’clock position.
White moon represents "pull out",
black moon represents "push in", and the
cresent represents "turn left or turn right"
(it depends on the position of the cresent). The answer
is : Push in, Left, Pull out, Right, Right, Push in,
Left, Pull out. Inside you’ll find The Fang of
Wolves.
Q : How can I get into the Raven Room
?
A : From Muhlhaven in
Flanagan you know that only autorized member can enter the Raven
Room. You got to have your Raven Room invitation signed and
sealed before you could get into the Raven Room. You have to find
the Scribe for the signature and for the seal, you got to find
someone that has it. Muhlhaven is the Scribe, so ask him to sign
the invitation by showing it to him. From Pensky you know that
Dr. Strauss has the seal. Go to the museum and ask Helen for the
seal.
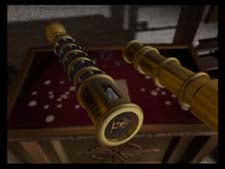 |
Q : How can I set the seal ? A : First you have to rearrange the seal first. The seal has 2 picture that overlapping to each other. You have to rearrange the picture according the purple symbol on the document next to it. The hand of the seal contain five rings. Let’s say it 1 to 5 from top to bottom, and these rings can be moved to the right (R) and to the left (L). Here is the sequence to set it : 4R 1R 5R 1R 2R 1R 3R 5L 1R 2L 3L 1L 4L. The picture should be like this. |
Q : Where is The Wing of Raven ?
A : You’ll find it inside
the book called : "A Pictorical History" on the second
row from bottom of the left bookshelf in your office. Go back to
Raven Room for moving to CD 4.
Author’s note : It seems
that the Raven Room has lots of secret behind it. Is it truly the
headquarters of this Brotherhood of Thule ?? What’s the
connection of Joseph Muhlhaven with the Torso Killer ??
THE MYSTICAL DREAM
Main Goal : Construct
The Black Dahlia Case
Q : How can I get pass that bouncer
who guarding the private room ?
A : Make a diversion.
Take the dish on the table. Go to the food elevator at the back
room. Use the dishes inside the food elevator on the left. Then
move the glasses on the tray from the trolley into the elevator.
You’ll get pass the bouncer.
Q : It’s so dark in here. Where is
the light switch ?
A :Look above the table
on the center of the room. Pull the switch.
Q : How can I solve this circular
table puzzle ?
A : This is one of the most
difficult puzzles in the game. The clues are separated in 4
things : the writings on the middle of the lid (click on the
yellow button in the middle), Helen’s note, the parchment, and
one of the picture on the wall. First read the writings on the lid. It said "EACH GIVE TO HIM IS NOW DEVOTED".
Then look for this writing in Helen’s note.
In front of the sentence you can see number (22). Now read the
picture on the back wall that begins with "Knight of
Thule Awake !!!". The first sentence said that "The old order shall be restored".
Now this is the connection between those clues. Examine carefully
each of the lids. You could barely see that there is another
symbol carved under each of the new symbol (the old order symbol
!!). Now, look at your parchment. See the
line 22 and write down the symbol again 2 by 2. The left symbol
in each pairs resemble the old order and the right symbol
represents the new order (like the ones that’re written on the
lid now). Follow the order (marked by 2 green line above them in
my hints picture) from left to right to open the lids. Remember,
you have to check that the old symbol and the new symbol should
be in the right pairs.


Q :What should I do with Mrs.
Casandra Rollias ?
A : Ask her to hypnotize
you. She hold lots of clues for you later on.
Q : How can I solve this
dream-archway puzzle ?
A :Move around and listen
to all those messages. They’re the keys for this puzzle. Here are
the words, look at the highlighted words for clues.
- The bird and the fish are the base of all
- When the bird is away
from the sun she’s
with the moon - The key are creatures
of the sun - The fish are
creatures of the moon
though she’s avoid her company - The crown and bird
sit on his right and left - The sun loves a bird
but only when she’s alone - No twin can stand if separated
- The star follows the key
- If west is right and east is the
left, you know on which site the sun will rise and which the moon will set - The key follows the shield
when the moon is far away - By night it refers to the moon
and fish, by day that
shield surrounded itself with the sun and key - The comet has seen up
after the moon has
present - A lonely fish loves a crown
though lonely crown prefers the
key - The serpent will
chase the comet tail if not chased
itself by the star
So the answer should be :
|
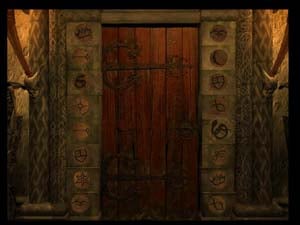 |
Q : How can I solve the Sun-Planet
puzzle ?
A :"The truth
lies with the death". All the clues are scattered along
the victim of the torso killer. Ask Casandra about the planets
and the symbols, she’ll show you the astrology book. Look at this
picture carefully, especially
the name of the planets and those numbers. Ask Sullivan about Von
Hess and tell him how the torso case is related with Thule
organization. Talk to Detective Merylo about the torso killer
evidence. Browse through it one by one and notice that the clue
#18 is missing. Merylo will explain how the big boys from FBI has
taken it. Ask Dick Winslow about it. He promises to return the
evidence as soon as possible. Go back to Merylo later on and
examine the evidence #18. Notice how in each paper (The total of
8 from first victim to the last one), there is a number revealed.
These numbers are the order for the sun-planet puzzle. Go back
again to Psychic parlour and link these numbers to the planet
list. The answer is : 15-65-260-175-111-369-34-4 or Saturn, Mars,
Mercury, Venus, The Sun, Moon, Jupiter, and finally Earth. Look
at their symbol and go back again to the dream land. Hop from one
planet into another according to the order, and finally hop into
the silver planet.

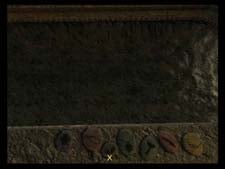 |
Q : What about this pond and the stones, do they mean anything ? A : Try to put the stones one by one into the pond and examine carefully each videoclip. One of the clip shows the secret compartment inside Sartini’s house (the first victim). Later on you should find the killer’s personal belongings and put the stone that connect to it in the pond, and you’ll see the killer’s secret. |
Q : I couldn’t find any clues inside
Sartini’s house. Did I do wrong ?
A :You have to watch the
videoclip in the pond first. There is a photograph behind one of
the blind beside the bed (the right one). You couldn’t see it
unless you turn off the light. The light switch is just beside
the door. Pull the blind and you’ll get the picture. The hidden
compartment just next to that window. Click on the loose board
close to the floor. Inside you’ll find Pensky’s letter, Sartini’s
notes, and some moneys.
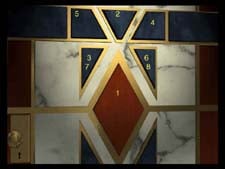
| Q : How can I open the door in Raven room ? A : The sequence is hidden on the invitation that Merylo has given you earlier.This folded invitation puzzle (the picture is submitted by Joan Hansen) is one of the toughest puzzle in the game (it is almost impossible to solve it, so take my advice : use the cheat codes). Anyway the answer is by following this order : |
 |

Q : What now ? I couldn’t find
anything interesting inside the Raven Room.
A : Look at the special
lock on the back wardrobe (to its right side). Somehow, this
action will trigger the next scene in the sewer (Kingston). Go
there and you’ll meet the Torso Killer. Chase him into the sewer.
Prepare for actions and LOTS of challenging puzzle in CD 5.
Author’s note : Von Hess
has been captured because of sneaking in the Raven Room. Why he
has to sneak to get into that room ? Isn’t he also a German
follower ? Something is not right here ……. Who is this man
with the cane ? Jim Pearson now follow the killer into his hidden
chamber …..
THE LAST VICTIM
Main Goals : Discover
the mystery of the Torso Killer
Q : I’m lost, I couldn’t follow him.
Is there any clue ?
A : See what happens when
the killer open the sewer gate. He hurts his hand. That blood
track will help you to chase him. Follow this map carefully :
North, East, East, East, East, North, North, North (You’ll see an
open gate here), North, and finally North. On the East wall
you’ll see lots of gauge and valve. If you examine it, you’ll see
a blood mark. Hmmm… this is the secret hideout entrance of the
Torso Killer.
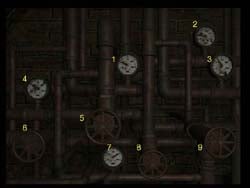
Q : How can I solve the pressure
gauge puzzle ?
A : There is many way to
solve it. The main goal is to keep all the pressure on the same
level (it is 30). Use the valve to control the pressure level.
Look at this picture to help you :
To solve it look at this clues : wheel 6 will control meter 2,
wheel 5 will control meter 3 and 4 in opposites direction, wheel
8 will control 1 and 4 in opposite direction, and wheel 9 will
control meter 2,3 and 4. Here is one of the solution (in 9 moves)
:
- Turn wheel 9 to the right until meter 4 reads 30
- Turn wheel 8 to the right until meter 1 reads 30
- Turn wheel 5 to the left until meter 3 reads 30
- Turn wheel 9 to the right again until meter 4 reads 30
- Turn wheel 5 to the left until meter 3 reads 30
- Turn wheel 6 to the left until meter 2 reads 30
- Turn wheel 9 to the right again until 4 reads 30
- Turn wheel 6 to the left until meter 2 reads 30
- Turn wheel 5 to the left until meter 3 reads 30
Q : How can I open the big stone door
?
A : You need a special key to
open it. It’s Von Hess medallion. Ask Dick Winslow about the
medallion.
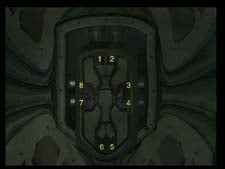
Q : How can I solve this pressure
lock puzzle ?
A : This is another ‘super’
tough puzzle. The main goal is to pull all the metal bar locks
out so you can enter the door. Here is the answer : #5, #4, #2, #3, #7, #5, and #2.
The door will open after that.
Q : How can I enter that stone door ?
A : You can’t. Instead, just
look on your top left wall and climb there. You’ll see the Torso
Killer opens his wardrobe in Raven Room. Hmm…. those candle
stick should be the key. Go there through the world map.
Q : How can I open the wardrobe ?
A : Use that left candle
stick. Match the keyhole with the form on the bottom of the
candlestick by moving the candle part. Look at this picture to
help you.
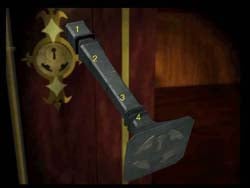
There are 4 parts on the candledstick.
Each part will move certain identations. This part can be
moved to the right and to the left (down). Here is the
solution : move 4 down (left) twice and 2 right twice.
Q : What should I do with the
talisman ?
A : It will let you to
spy on the killer’s move. Go back to the pond in your dream with
the help of Mrs. Cassandra. This time there should be a new stone
appear beside the pond (the 2nd from the left). Click on that new
stone. The clip will tell you how to enter the secret passage way
inside Raven Room.
Q : Where is the door to the secret
lab in Raven Room ?
A : Go to the bookshelf
to your right. Pull the right most book on the second shelf. This
will lead you to the secret lab and find ……THE LAST VICTIM.
Oh no !!! It can’t be him. It’s the Torso Killer himself (or ….
he just another victim ??). Dick Winslow will show up and talk
like a ##&&@@@ ….. Suddenly a cop bring a news that
World War II has begun. The case is closed for a while, go to CD
6.
Author’s note : Now the
case is becoming more unclear. Who has murdered the Torso Killer
(or …. the old man with the cane is not the Torso killer ??)??
The war has made the case remains a mystery for while. Jim
Pearson has a new job in Europe now. After the war breaks, he
finally found a new lead to track down the unsolved mystery of
the Torso Killer. Another serial killings with same M.O. and
type. What is the killer doing here in Europe ??
NEW LEAD
Main Goals : Track down
the new lead in Europe (through lots of catacomb)
Q : How can I solve this planet
puzzle ?
A :What you have to do is
arrange all the button until all has bright color on top and dark
color at the bottom. Then push the sun button at the middle. Oh
well, look up this picture. This is one of the possible solution
:
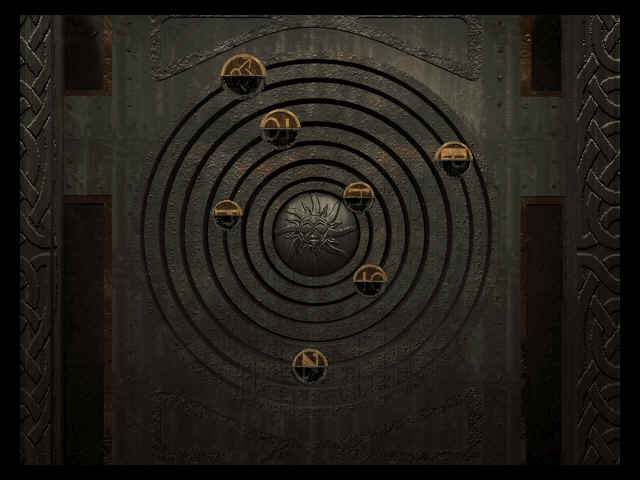
The clue on how to do it :
- Let’s say we name the circle from A to G (from outside to
inside) - Control A and C simultaneously until they’re in position
- Control G untill B in position
- Control D, F, and G until all of them in position
- Last move, control E and D until D, E, and G in position
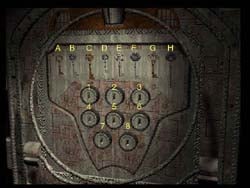
Q : How can I
solve this Multiple Key puzzle ?
A : This is a
simple puzzle. Just match up the keys with the keyholes.
The only problem is : one key can fit into several
keyholes. Look at this picture to help you. The answer is
: A-3, B-6, C-4, D-1, E-8, F-5, G-7, H-2.
Q : How can I solve this Gear puzzle
?
A : Another simple
puzzle. Let’s say that the lever is numbered 1 to 7 from left to
right. This is the answer : pull down lever 1,4,6, and 7. Then
keep on pushing the red button until the safe open (8 times).
Q : How can I solve this (Arrrggghh
…..not again) Pressure Lever puzzle ?
A : I couldn’t believe it
!!! 3 pressure lever puzzle in one game. Oh well, look at this
picture to solve it. The order is :
- E – F – C – B – A – D – G – H – I – F – E (Step
1) - E – D – E
- E – B – C – F – I – H – G – D – A – B – E
- E – B – A – D – G – H – E
- Repeat step 1
- E – B – A – D – E
- E – B – E
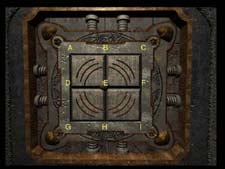
Q : How can I get out from this
cellar in Austria ?
A : Go to door on the top
of the stair. Look through the peephole. Hmm …. there are
guards outside. Turn around and look carefully until the
character said that he look something strange in the corner. Go
down the stair and go to the left corner. You’ll see a rope and
the crank. To use the crank : pull down the right lever and pull
up the left lever. After the rope has moved, then pull back the
left lever to its original position (down). Now go to the back
wall of this cellar (where the well is located). Climb down the
bucket into the catacomb. Insert back CD 5.
Author’s note : That
stupid soldier has ruined the case again. Why must they take back
again that Black Dahlia ? That evil gem must be destroyed once
and for all. They must be going here somewhere …. Starting from
this point, Jim could meet his ultimate price to pay : DEATH. So
save often ….
Q : What should I do first ?
A :Go to the main hall
(cave). Follow this direction (assuming you know how to use the
compas on the lower right corner of the screen): N, NE, NE, N, NE, NE, NW, W, SW, W, W.
Q : How can I solve the Pillars
puzzle in the Main room with many exit ways ?
A :There are 4 pillars
around the altar. Each pillars resemble the Highest Order in the
Brotherhood of Thule : Herald, Scribe, Sergeant of Arm, and
Landulph. You need special sequence for each pillar to open the
secret door.
Q : Where is the sequence for Herald
?
A :The sequence is in
Herald’s sarcophagus. To open it, you need to find a special
artifact first. It is the key. Enter the archway where you came
from. Follow this direction : E, NE, E,
N (you’ll arrive in front of an altar). Check out the
wooden box on the right. Get the artifact. Now go on with this
direction : S, W, NW, NW, W
(you’ll arrived at the Herald Tomb). Click on the sarchopagus
lock. Use the artifact. Then click on the word to copy it to your
notebook.
Q : Where is the sequence for Scribe
?
A : It’s inside the
Scribe’s sarcophagus in Scribe’s crypt. Go back again to Main
Hall (SE, SE, SW, W, W). Take
the second archway from the left side of the main altar. Follow
this direction : SW, S, SE, SE, S, SE,
S, S, SW (or you could just memorize this : take left
path at the first intersection, then right at all the rest).
Q : How can I solve this Stone Pieces
puzzle ?
A : Take the stone pieces
from inside the stone box. Put it on the statue’s laps. Then
assemble the pieces into a form. Look at this picture below for
the answer. Click on the word to write it down in your notebook.
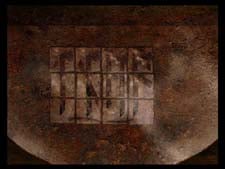
Q : Where is the sequence of Sergeant
of Arm ?
A : It’s inside his
sarcophagus in Sergeant of Arm’s crypt. Follow this direction : NE, N, NW, NW, NW, NW, NW, NW, SW, SW, W, NW,
W, SW (or you could just memorize this : take left
path at every intersection).
Q : How can I solve this Slider
puzzle (oh no … not this one again !!!) ?
A : There’s no exact way
to solve it. Just remember this, you have to put every blocks
inside the frame. To simplify youw quest, use the corner hole to
put the small square block for a while. Put all the vertical
blocks in the middle. Arrange the rest and finally take out those
small square blocks again. Look at this final picture to help you
(it’s only one of the many possible solutions).
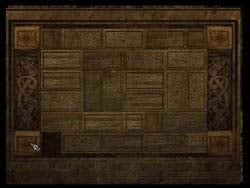
Q : Where is the sequence for
Landulph ?
A : Again, it’s inside
his sarcophagus in Landulph’s crypt. Follow this direction : NE, NE, NE, NW, NW, N, NW, NW, W
(or just simply : take all the left path at every intersections).
Q : How to get over this Leap of
Death ?
A : Let’s call the stair
block from left to right as 1, 2, and 3. Choose this step
sequence : 1, 3, 1, 2, 3, 1, 3. Take note of the ancient writings
and get back again through this sequence : 1, 3, 1, 2, 3, 1, 3
(or just reverse of the climb up steps).
Q : I’ve got all the sequences, now
what ?
A :Go back again into the
Main Cave (follow this direction : SE,
SE, E, NE, NE, SE, S, SE, SE, SE, E (or simply just
take the left path at every intersections. I guess left is the
key word in this maze !!!). Let’s name the pillars surrounding
the altar with Scribe, Landulp, Sergeant of Arm, and Herald
(starting from top left corner and following the clock
direction). Arrange all the rings from top to bottom in each
pillars according of the writings you’ve found earlier. Look at
this pictures to help you : Scribe, Sergeant of Arm, and Landulph.


Q : The Herald’s sequence doesn’t
match. Did I do wrong ?
A : This is the trick.
Remember, you write it down from a mirror. So read from right to
left for Herald’s sequence.

Q : What should I do inside this
crypt ? There’s only a statue with an empty hand here ?
A : Assembly the runes
and put it in its hand.
Q : How can I assembly these runes ?
A :This is the toughest
puzzle in the game (if you don’t know the cheat codes !!). This
formation is formed according all the writings you’ve got during
your adventure (there are 24 letters). Open your notebook to read
the words. Anyway here is the answer :
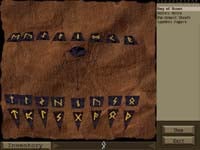
Put everything in its position in the gem. Then put the gem
inside its hand. The statue’s eye will glow red.
Q : Where is the exit way from here ?
A :Go down to the base of
the sarcophagus. On the left side, you should see a binocular on
the sarcophagus wall. Beside the binocular, there is a tile. Push
this tile until it looks grey, then push it again just one more
time. Do exactly the same thing to the tiles on the other side of
the sarcophagus (there’re 2 of them). Go back to the binocular
and look into it. You should see a point that glow red. This
point is just on the left side from your position now. Move to
the left and click on the left most small tile(in front of the
sarcophagus wal). Meet Von Hess. Insert CD 7.
Author’s Note : Von Hess
will be killed by Dick Winslow in this sequence. Finally, Dick
will show his true nature. He’s the one who killed Dr. Eistanstad
(the one that Jim thought was the Torso Killer. So who is the
real Torso Killer ? Is it Dick ? or ……
View this guide raw, exactly as the archive holds it
Parts of this guide
One guide by Crash, in 3 parts. They read in order, and the part you are on is marked.