Secret Files: Tunguska Walkthrough by Bert Jamin
Secret Files: Tunguska
Walkthrough by Bert Jamin
© September 2006 Bert Jamin (www.gamesover.com)
This walkthrough may not be sold and may not be used for any commercial
purposes. Neither is it permitted to publish this walkthrough in any way without
the written permission of the author Bert Jamin ().
Feel free to place this walkthrough on your web site or on your home page, on
condition that no part of this walkthrough is changed and that the name of the
author (Bert Jamin), the URL of the owner of this site (www.gamesover.com)
and his E-mail address
are mentioned unchanged. For the most up to date walkthroughs always visit www.gamesover.com.
If you have any suggestions to improve this walkthrough, let me know by sending
me an email: .
Important: BUGs
report
The game has a major bug. Some gamers don’t see things in the game that should
be seen. For instance some gamers don’t see the book in the drawer on Vladimir’s
bed. Other gamers don’t see the hotspot in the game to pick up the trap with the
rat in the Russian hospital. Because of this bug it’s impossible to finish the
game! If this happens to you too, download the patch to solve this problem at:
http://www.adventurecompanygames.com/tac/support/pc/patches/tunguska.php
The patch also
brings you a better ending of the game. So… no matter what download the patch!
Even if you don’t have problems with not working hot spots!!!
Berlin
As soon as you enter your dad’s
room, you’ll notice that an entry is made in your diary. No need to say that you
have to read each and every new entry in your diary whenever such a new entry is
made. You can read your diary by clicking on the diary icon at the bottom right
at the screen. So read your diary!
Examine the desk with the blinking
monitor. Examine the map on the wall. Examine the files cabinet at your right side. Walk towards the coin
show case next to the window. Examine the showcase. Look at the empty
compartment to find out that one coin seems to be missing. Try to take one of
the coins. Read the note at the
right side of the show case. Zoom out.
Examine the radiator beneath the
window. Try to open the radiator’s vent at the right side on top of the
radiator. Examine the certificate above the sofa. Examine the picture next to the
certificate. Examine the photo on the floor in front of the
radiator. Pick up the photo. Close the diary by clicking on the little cross right on top.
Take the white porcelain bowl from
the table. Examine the porcelain bowl to find out that the inside is somewhat
porous. Walk around the table. Use the telephone to call the police. Hmmm…
as helpful as always! Take the piece of rock from the cloth next to the
telephone. Examine the rock to find out that something is embedded in the stone.
It has a red-violet glow.
Examine the machine at your back.
Walk towards the machine and take the flask from the machine. Put the piece of
rock in the flask. Examine the flask with stone. Open the door to go to the hall. Try to open the door at
the left side. Read the nameplate at the right side of the door. It says the
name Max Gruber. Examine the plant. Take a piece of the plant. Put it in your porcelain bowl.
Enter your dad’s office once more.
Walk towards the radiator beneath the window. Use the porcelain bowl with the
radiator vent to fill it with water. Go back to the hall. Read the notes on the
bulletin board. Try to open the fuse box next to the bulletin board. Walk
through the door at the right side of the hall.
Read the list that is hanging on
the wall next to the brochure stand. Read the escape plan that is hanging on the
wall. Zoom out. Look at the Tyrannosaurus. Walk to the rear area.
Examine the statue. Open the secret door at the base of the statue. When Eddy
has gone, pick up the key from the hidden room. Examine the diagram on the right
wall. Examine the Triceratops. Exit this part of the museum. Walk up the stairs.
Open the fuse box with the key you
just found. Use the fuses to turn down the music in Max Gruber’s room. Ask Max
about everything you can. Enter your dad’s office one more time. Ask the
detective about everything you can. Hmmm… strange detective! When Max has
gone, examine the two statues next to the stairs of the museum. Notice the words
“Both of them are watching over the museum’s entrance”. Pick up one of
the
yellow glass shards from the ground at the right side of the stairs of the
museum. Examine the exhibition banner above the entrance of the museum. Grab your motorcycle to drive to your dad’s apartment. Not only someone
has broken in to your dad’s apartment but you also happen to run into someone’s
fist!
After coming to your senses next
morning your head feels like to explode. Examine the files at the left side of
the door. Pick up the portable cassette player from the floor at the left side
of the opened closet. Open the cassette player to get yourself some batteries.
Examine the opened closet. Examine the fish tank. Not only some fishes are
swimming around but also a key! There is a grate on top of the aquarium. Alas it
is too small to get your hands through.
Take the red-brown book from the
drawer on the bed. Open the book in your inventory. It seems to be some kind of
book casket. Examine the bed. Examine the desk with the computer. Take the piece
of pizza from the plate. Take the salt shaker. Take the pencil from the desk. Examine the cassette tape
recorder. Read the notes attached to the wall. Use the keyboard to see that the
computer is password protected. You don’t know the password yet, so zoom out.
Exit the apartment.
Walk towards the rusty bike in the
alley. Take the air pump from the bike. Examine the rusty bucket beneath the
rain pipe. It is filled with water. Take the handle from the bucket. Search the
garbage bin to find a rubber glove and an old bicycle spoke. Examine the broken
lattice beneath the window. Walk towards the garage. Search the wooden crate
next to the Wartburg to find double-sided tape and a tube of glue. Examine the
cigarette butts next to the sewer grate. Unlock the motorcycle seat with your key
ring. Open the seat to get your cell phone and your sunglasses. Combine the
yellow shard with the sunglasses.
Grab your motorcycle and drive to
the museum. Talk to the sleeping girl on the bench. Talk to her about
everything you can. When the conversation is over, take the flat tube from the
back wheel of the bicycle. Grab your motorcycle and drive back tot dad’s
apartment. Pump some air in the flat tube with the air pump. Put it in the
rusty bucket beneath the rain pipe. Combine the glue with the rubber glove.
Combine the sticky rubber glove with the tube. Drive back to the museum.
Put the patched tube in the back
wheel of the bike. Talk to the girl on the bench once more. Tell her about the bike. When the
conversation is over, combine the batteries with the camera. Close your diary.
Give the camera to the girl. She gives you a little magnet in return. Drive back
to your dad’s apartment. Enter the apartment.
Use the magnet with the fish tank
to get the key that is swimming around. Open the book casket with the little
key. Examine the yellow note. Read your dad’s address book. Examine the left
bottom carpet edge. Look what’s beneath the edge. Notice the small gap in the
floor. Use the spoke to get a cassette from the gap. Walk towards the desk with
the computer. Examine the desk and put the cassette in the cassette tape
recorder. Use the recorder to here dad’s message. It seems to be a secret code.
This must be a reminder for the computer’s password.
The first and last of the car can
only mean the first and the last number of the license plate of the old Wartburg
you have seen in the garage. But what the hack could he mean with a fourth of
the openings to the underworld? And what to think about the guardians to my
work!? Zoom out and exit the room. Notice that the first and the last number on
the car’s license plate are 2 and 3. Now remember the cigarette butts next to
the sewer grate! Could this sewer grate be the entrance to the underworld???
Well… let’s give it a try! Count the holes around the sewer grate to find out
that there are 16 of them. A fourth of them is…4. So the first three numbers
of the password could be 2, 3 and 4.
Now we only have to find out what good old
dad meant with “the guardians of my work”! Now remember the two statues next to
the stairs of the museum which happens to be dad’s work right? Also remember the
words “Both of them are watching over the museum’s entrance” you heard
when you examined the two statues. So the complete
password could be 2, 3, 4 and 2!
Let’s go inside the apartment to
find out if we really have been that clever! Walk towards the desk with the
computer. Use the keyboard and click on 2, 3, 4 and 2… BINGO!!! Study the
monitor. One of the things you’ll read is an email of a guy called Oleg. Study
your dad’s address book once more to find out this guy’s address. Zoom out and exit the
apartment. Grab your motorcycle and drive to Oleg’s house.
Pick up the empty blue plastic
bag. Examine the telephone booth. Attach the handle to the plastic bag. Walk down the path at the left side
of the house. Take the broomstick that is standing against the wall. Examine the
garden hose at the other end of the garden. Peek through the window slit. Look
at the feeding dish that is standing on the floor of the kitchen. Zoom out
Walk back to the street.
Walk towards the front door of Oleg’s house. Examine the cat flap. Ring the doorbell. Hey… mister
Nice Guy! Put the pizza onto the feeding dish next to the door. Walk back to the
garden of the house. Peek through the window slit once more. Look at Oleg. Zoom
out and walk back to the street. Attach the double-sided tape to the cell phone.
Attach the broomstick to the reinforced plastic bag. Walk towards the front
door. Attach the very sticky cell phone to the cat. Add some salt to the pizza
on the feeding dish. And off it goes to drink lots and lots of water! While
peeking through the window slit once more look at the cat and look at Oleg.
Zoom out and head back to the
street. Enter the yellow phone boot to dial the number of your cell phone. Let’s
find out how the cat reacts to the vibrations of your cell phone! Use the
brailer to retrieve your cell phone that is stuck up on the right most branch of the
tree. Grab your motorcycle and drive to the museum.
Enter the museum. Go up the
stairs. Knock on Max’ door. Ask him about everything you can. Open the fridge
next to the door. Examine the totem next to the fridge. Use the spoke on the
totem. Throw the cement bag in the porcelain bowl with water. Put the diadem in the putty
in porcelain bowl. Put the red glass bead in the diadem. Put the green shard
in the diadem. Put the acid bottle in the flask with stone. Put the amethyst in
the diadem. Examine the diadem. Exit the room.
Go to the hall at the right side.
Look at the escape plan on the wall once more. Zoom out. Walk to the opposite
wall. Place the diadem over the lamp. Study the escape plan once more. Zoom
out. Talk to Max and ask him about everything you can.
When you are back in his room,
examine the relief disk. Take the coin from the disk. Zoom out. If you like you
can examine the three vases, the shield and the mask in the room. Exit the room.
Enter daddy’s office. Walk to the left. Remember you have seen the coin show
case at the left side of the office. Walk to the coin showcase. Examine it and
put the coin in the empty compartment. Read the note at the right side. You have
to re-order the coins so that there are no same coins in a row. I know that
there are many ways to solve this puzzle. I give you one of the many solutions.
Please don’t email me to tell me that you found another solution!
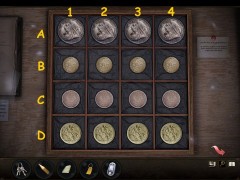
Label the compartments as this…
Move B1 to A1, C2 to A3, D4 to A4.
Move D1 to B1, C4 to B2, C2 to B3.
Move D1 to C1, D3 to C3, D3 to C4.
Moscow, Military train station
Examine the Volkswagen. Search the
pile of rubble behind the Volkswagen to find a nut and an unidentifiable thing.
Search the bag of the sewer worker to get his bread box. Examine the bread box
to get bread and butter and a rubber band. Attach the rubber
band to the unidentifiable thing. Attach the nut to the slingshot. Read the red
advertisement on the wall. Pick up the bricks from the pavement. Talk to the
sewer worker. Ask him about everything you can.
Place the bricks under the rear
axle of the Volkswagen. Try to pick up the car jack. Use the bread and butter on
the rusty car jack. Take the car jack. Talk to the sewer worker once more. Go to
the side entrance to the station.
Talk to sergeant Yushin. Ask him
about everything you can. Examine his newspaper. Examine the cigarette butts on
the ground. Pick up a pebble from the ground near the Russian stop sign. Talk to
the sergeant once more. Ask him about the cigarette. Use the loaded slingshot to
shoot the lamp above the sergeant. Pick up the newspaper he dropped. Read the
newspaper. Use the pencil on the newspaper to modify the lottery number.
Head back to the sewer worker.
Give him the newspaper. Take the barrier. Pick up the hose. Climb down the
canal. Pick up the box of matches from the ground. Examine the garbage heap.
Examine the sewage. Examine the pipe next to the door. Try to open the door. Use the car jack to pry
the door open. Enter the opened door.
Examine the barrels. Examine the
distributor. Examine the red painted base plate. Examine the ascent. Try to fix
the ascent with the iron bars. Head back to sergeant Yushin. Talk to him once
more. Give him the iron bars. Head back to the ascent in the sewer room. Attach
the bent iron bars to the ascent. Go up the ascent.
Examine the no smoking sign. Look
through the opening beneath the first toilet door. Click on one of his legs to
talk to the train driver. Ask him about everything you can. Zoom out. Walk
around the corner to enter the locker room. Try to steal some coins from the
dish. Use your box of matches to light a cigarette. Put the smoking cigarette on
the dish.
Try to operate the vending
machine. Examine the samovar. Examine the no smoking sign next to the door. Open the right
locker. Search the locker. Examine the two photo’s on the inside of the locker
door. Take the uniform, the envelope, the radio and the stocking. Examine the
two photo’s inside the locker. Zoom out. Examine the envelope. Examine the radio
to find out it’s number. Examine the stocking. Try to open the left locker.
Walk to the passage to the right to head back to the toilet room. Go down the canal. Examine the
distributor. Walk to the right to exit the sewer room. Attach the stocking to
the pipe next to the door. Use to barrier tape to tighten up the stocking. Go
back inside the sewer room. Climb up the ascent.
Attach the hose to the faucet.
Pick up the hose and place it in the urinal at the left side of the floor. Turn
on the faucet. Go down the canal. Open the valve on the pipe at the right side
of the distributor. When the trick is done, walk to the right to exit the sewer
room. Take the stocking from the pipe. Examine the stocking.
Enter the sewer room and climb up
the ascent once more. Turn off the faucet. Look through the opening beneath the
first toilet door one more time. Give the stocking to the train driver. Zoom
out. Go around the corner to re-enter the locker room. Open the door to go
outside. Talk to the two men in black guarding another door.
Walk towards the soldier in front
of the train. Talk to the soldier and ask him about everything you can. Examine
the tank at the back side of the train. Head back all the way to sergeant Yushin.
Talk to him and ask him about the FSB agents. Walk to the left to exit. Go down
the canal. Use your radio on yourself for some action. This is number 15,
calling number 48. Talk to the central about the two FSB agents.
Enter the sewer room and go up the
ascent. Look through the opening beneath the
first toilet door one more time and talk to the train driver once more. Enter the locker room and open the door to go outside. Notice that the
two men in black are gone. Enter the room they have been guarding. Search poor
Solotov to get his dog tags. Examine his dog tags. Examine the ashtray on the table. Examine the
battery. Examine the stretcher. Exit the room.
Re-enter the locker room. Try to
open the left locker. Punch in the code of Solotov’s dog tags, 31545.
Search the opened locker. Examine the permit. Open the door to go outside. Walk
towards the soldier in front of the train. Show him your permit to enter the
train.
Russia, Train
Try to take one of the rifles.
Take the dried fruit from the table. Take the bottle of orange juice. Try to
search the soldier. Take the light bulb from above the soldier. Examine the map
on the wall. Enter the kitchen door to the left. Examine the box of eggs. Take
the jar of honey. Examine the green schedule and the white menu on the right
wall. Exit the kitchen. Enter the door to your left to enter the
working wagon.
Talk to the assistant. Take two slices of white bread from the basket on the desk.
Try to take a third slice of bread. Read the notes on the black
board. Try to talk to the scientist. Try to operate the incinerator. Open the door at the back of the wagon.
Take the 100 watt bulb next to the closed door. Press the button of the intercom
next to the door. Walk back to the wagon with the sleeping soldier. Place the
100 watt bulb in the socket above the soldier. Press the light switch next to
the kitchen door. Exit the kitchen.
Search the soldier’s bag to get a
bottle of castor oil. Search
the bag once more. Enter
the kitchen once more. Put the dried fruit in the pot on the little oven. Add
the bottle of orange juice to the pot, the honey, the castor oil and the slice
of bread. Exit the kitchen. Re-enter the working wagon. Give the white bread
with laxative jam to the scientist. Talk to him and ask him about everything you
can. I don’t know why… but suddenly he takes off in a hurry ;o)
Go back into the kitchen. Fill the
empty bottle with water from the faucet. Go back into the working wagon. Talk to
the assistant once more and ask him about everything you can. Use the bottle of
water on the power outlet on the floor. Take a glass with the green stuff from
the floor beneath the desk. Take another glass from the desk. Examine the analysis equipment on
the desk. Open both of the glasses in your inventory. Combine both of the plant
samples. Put the combined samples in one of the glasses. Place the filled glass
on the small desk. One thing is sure… for some reason the experiment has failed!
Try to open the drawer of the
desk. Examine the huge ant in the glass jar on the red book. Examine the opened
book. Examine the orange documents. Examine the file folders. Read the note at
the bottom of the monitor.
Try to take the piece of bone from
the cage. Examine the plan on the door of the cage. Take the dog leash. Walk to
the right. Search the ice chest to get a juicy steak. Put it in the empty sample
glass. Walk to the left. Place the meat in jar in the right cage. Take the piece
of bone from the left cage.
Walk to the right. Take the tube
and the hose of the vacuum cleaner. Try to open the flap of the vacuum cleaner.
Use the piece of bone to get it opened. Examine the inside of the opened flap to
get the vacuum cleaner bag. Search the bag to get the animal hair. Combine the tube with the dog
leash.
Walk to the left a little. Smash
the hatch above you with the leash with pipe. Try to climb through the opened
hatch. Use the leash with pipe on the hatch. Climb up to the hatch. Notice the two little pipes on the
roof of the train. Put the animal hair in the right pipe. Place the hose on the
two pipes. Take the leash with pipe. Attach it to the two pipes. Enter the
opened window. Phew… that was close!
Take the flower vase from the socket.
Examine the books in the book case. Examine the portrait of Lenin. Examine the
desk once more. Pick the lock of the drawer with the barrette. Open the drawer. Take the statue
from the drawer. Zoom out. Take the skull from the skeleton. Place the statue on
the socket where the vase has been standing. Turn it to the left once.
Notice that there are four of
these little statues in the room. Turn them all so that they are all facing the same
way good old Lenin is looking. Yep… to the
left. This opens a secret compartment behind Lenin’s portrait. Enter the secret
compartment which turns out to be a torture room.
Examine the painting. Examine the flap at the left wall. Examine the torture
chair. Take the book from the chair. Exit the torture room. Place the book on the
empty spot of the right book case. Re-enter the torture room. Notice that the
flap in the wall is opened. Place the skull in the niche. Examine the safe. You
have to click the lamps in a correct order to turn all the lamps off. Here is
the correct order.
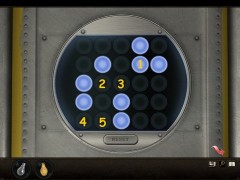
The correct order
When you open the safe of course
you take what’s inside. However there is a minor problem. Before you finish
reading the documents a bomb goes off. The train derails and you’ll loose
conscience and wake up later in the hospital…
Russia, Hospital
Talk to Oleg. Take the textile
bag. Examine the hospital. Search the shrub at the left side of the gate to get
some red berries. Take some of the red
berries. Examine the red berries. Put the red berries in the textile bag.
Examine the dirty bag. Hand the dirty bag over to Oleg. Examine the intercom
next to the gate. Press the button of the intercom. Examine the ambulance behind the
gate to get it’s phone number. Click with the cell phone on yourself. Try to call Nina. Call the
ambulance.
Take the surgery pliers from the
container. Search the container. Examine the key shaped shadow on the ground.
Examine the lamp to find out that a key is hidden in the lamp. Use the surgery
pliers to get the key out of the lamp. Unlock the door with the key. Open the
door. Examine the
bottles on the shelf. Examine the wheelchair. Examine the dictation machine on
the bed. Examine the opened file drawer. Take the handheld fan from the file
cabinet.
Take a bottle of anesthetic from
the shelves at the right side of the room. Open the door at the back wall of the
room. Examine the bloody swabs on the floor. Examine the bloody sheet. Examine
the bucket. Take the bottle of ammonia gas from the shelf at the left wall. Take the
stethoscope from the right surgery table. Take the
syringe and the scalpel from the sink. Examine the X-Ray images on the right
wall. Try to exit
through the door to the right.
Use the stethoscope on that door.
Once you know what’s behind the door you can safely enter it. Try to close the
door close to you to the right. Look at the wedge under this safety door. Leave
it alone for now but remember this wedged door! Try to open the center door.
Examine the TV. Well… there is nothing to do here without being seen by the guard who is
watching TV. So open the brown door to the left and walk all the way outside.
Use the stethoscope on the rain
pipe. Use the bottle of ammonia gas on the rain pipe. Use the handheld fan on
the rain pipe. Once you have woken Nina the two of you can interact with each
other! Notice the little image of Nina which appeared at the bottom at the right
side of the screen. Click on the image of Nina to switch over to her.
Examine the broken chair. Try to
take the chair leg. Pick up the small stone from the floor next to the rat hole.
Examine the crack in the wall. Examine the crocheted place mat on the mattress. Take the crocheted place mat from the mattress. Examine the mattress. Take the
bowl. Use the crocheted place mat on the crack in the wall. Combine the small
stone with the thread. Put the tied-up stone down the drain. Switch over to Max.
Put the scalpel in the rain
pipe. Switch over to Nina.
Use the scalpel on the chair leg.
Use the scalpel on the mattress. Throw the chair leg down the drain. Throw the
foam down the drain. Switch over to Max.
Put the syringe in the chair leg.
Put the blowgun in the bottle of anesthetic. Walk to the left. Examine the ambulance.
Examine the
satellite dish. Use the surgery pliers to… adjust the satellite dish. Now
remember the wedge under the safety door. Re-enter the asylum. Head back to the
room where the guard has been watching TV. Take the wedge from under the door to
close it once and for all. Now that TV-watching guy starts making a hell of a
noise outside! Use the poisoned blowgun on the peephole of the safety door. Walk
towards the TV. Use the foam on the dish next to the TV. Examine the pinboard.
Take a tack from the pinboard. Exit the room through the brown door to the left.
Walk outside and towards the rain pipe. Send the cheesy foam and the chair leg
up to Nina. Switch over to Nina.
Combine the cheesy foam with the
fiber. Combine the bowl with the chair leg. Put the cheesy foam in the rat trap.
Place the rat trap with bait on the floor in front of the rat hole. Take the rat
trap. Send the rat down the drain. Switch over to Max.
Enter the door and walk to the
main hall with the TV. Go up the stairs to the right. Combine the anesthetic
with the tack. Place the rat on the guard. Put the poisoned tack on the chair.
Go up the stairs once more. Search the guard to find the key of Nina’s prison
door. Use the key to open the door…
Russia, Tunguska
Search the jeep. Take the green
first aid kid. Take the sachet of ketchup. Examine the garbage. Zoom out.
Examine the first aid kit which turns out to be a real Russian first aid!
Examine the reindeer. Examine the water basin. Examine the huge barrel. Enter
the entry of the tent. Talk to the man on the bed, Evenk. Take the cup from the log
next to the bed.
Examine the fireplace. Examine the
snippets of parchment in the fireplace. Take the grate from the fireplace. Try
to pick up the snippets of parchment from the fireplace. Try
to take the nutcracker from the wooden cabinet. Take the wooden spoon from the
wooden cabinet. Take the scissors from the pole at the right side. Examine the
tassels hanging down from the ceiling to get a twine. Exit the tent to the left.
Take the spade from the backside
of the jeep. Walk to the right. Examine the big crate. Walk a little further to
the right. Examine the tree. Use the
spade on the tree to chop some of the bark from the tree. Pick up the bark. Use
your cup to get some resin from the tree. Use the spade on the crate. Pick up
the destroyed crate. Walk to the left towards the reindeer.
Put the bark in the water basin.
Pull the plug out of the barrel. Take some water from the water basin with the
cup. Walk to the right and walk past the tree. Pick up the pointed stone. Use
the spade on the gentian. Place the grate over the smoking hole in the ground.
Place the cup on the grate. Take back the cup and the grate.
Sharpen your scissors with the pointed
stone. Walk back to the drinking reindeer. Use the scissors to get some of it’s
hair. Combine the twine with the reindeer hair. Combine the wisp of hair with the wooden
spoon. Enter the tent once more.
Dip the brush in the cup. Use the
brush with resin on the snippets of parchment in the fireplace. Give the recipe
to the old man. Place the vial in the nutcracker. Put the gentian in the
nutcracker. Take the vial from the nutcracker.
Add a few drops of vodka to the
vial. Add the sachet of ketchup to the vial. Exit the tent. Dip the vial in the
water basin. Re-enter the tent. Put the debris from a crate in the fireplace.
Place the grate over the fireplace. Place the vial on the grate. Set the
fireplace in fire with your matches. Take the vial and give it to the old man.
Enter the house. Examine the
projector. Take the rag from the broken cabinet. Examine the chimney. Take the
aluminum foil from the bottom left part of the chimney. You have to look very
closely to find it! Examine the inside of the chimney. Zoom out and exit the house.
Examine the swamp at the right
side of the house. Walk to the left side of the house. Examine the generator.
Examine the coil of the generator. Take the oil lamp from the right pole of the
little barn. Examine the
tanker. Pick up the hose in
front of the tanker. Walk the path up. Walk the other path the way up. Examine the research station.
Examine the island down the river. Walk back on
the path to the right.
Examine the truck wreck. Examine
the wheel rim to get two nuts. Examine the tank at the bottom of the truck. Attach the hose to
the tank. Use the bottle of vodka with the tank. Walk the path to the right.
Fill the generator with the bottle filled with diesel fuel. Use the nuts with the coil
of the generator to magnetize them. Walk back to the house.
Before you enter the house, clean
the right outside window with the rag. Enter the house. Combine the rag with the
oil lamp. Examine the chimney once more. Clean the inside wall of the chimney
with the saturated rag. Light the oil lamp with the box of matches. Read the
numbers on the back wall of the chimney. It reads 71/2 – 3 – 101/2 – 6. Zoom
out.
Look at the compass at the right
side of the chimney. Place one nut at the left metal peg, west side. Place the
other nut at the bottom peg, south side. Press the center button of the pointer.
Take back both of the nuts.
Place one of the nuts on the right
metal peg, east side. Press the center button of the pointer. Take back the nut.
Place one of the nuts on the upper
metal peg, north side. Place the other nut on the left metal peg, west side.
Press the center button of the pointer. Take back both of the nuts.
Place one of the nuts on the
bottom peg, south side. Press the center button of the pointer.
If you have done
this correctly, a secret compartment above the fireplace opens. Search the
opened compartment to get a film reel. Place the film reel on the projector. Operate the
projector. Darn… the light bulb is burnt out. Pick up the glass shard from the
floor behind your back. Combine it with the aluminum foil. Place it in the
projector. Finally operate the projector. Phew… that was close again!
Cuba, Asylum
Examine the painter’s easel. Talk
to the gate keeper. Ask him about everything you can. Enter the asylum through
the brown opened front door. Examine the dancing nurse behind the counter. Ask
her about everything you can. Examine the poster on the wall. Take a newspaper
from the magazine stand. Read the newspaper.
Walk down the passage. Take the
glasses from the table. Examine the record player. Try to switch it off. Examine
the painting behind the record player. Examine the stuffed animals.
Examine the teddy bear. Try to take the teddy bear. Read the list on the wall
next to the stuffed animals. Examine the white canvas. Talk to the patient. Ask
him about everything you can. Examine the house of cards. Try to take a card
from the house of cards. Exit the room.
Try to walk the passage to the
left. Exit the asylum. Walk through the gate with the Ernesto Che Guervara
portrait. Read the two notes next to the left door. Examine the speakers high up
on the wall. Examine the container. Take some logs from the stack of wood. Talk
to the worker sitting on a chair. Ask him about everything you can. Examine the
jackhammer. Try to pick it up.
Enter the opened door to the
kitchen. Look at the dirty dishes on the table. Take the meat fork. Take an
union hanging down from the pole. Take the sausage tongs hanging on the left
side of the right rack. Take a soup ladle from the rack. Examine the stove. Take
the weights form the table with the copper scale. Put the two logs in the
stove. Add the newspaper to the logs. Use the glasses to set them on fire. Exit
the kitchen.
Talk to the worker. Re-enter the
kitchen. Take the charred log out of the stove with the sausage tongs. Head back
to the gate keeper. Talk to him once more and ask him about everything you can.
Give him the charred log. Ask him about the portrait of Sabrina. Enter the asylum. Enter the room with the house of
cards building patient. Place the weights on the record player. Head back to the
gate keeper. Talk to him and ask him about the portrait of the dancing nurse
Sabrina. Just wait sixty minutes to receive the painting.
Enter the asylum once more. Show
the wrapped portrait to the nurse. Exit the asylum. Walk back to the kitchen.
Enter the kitchen. Put the plastic bag in the stove. Hmmm… I wonder what
this has done to the card house! Take another charred log
out of the stove with your sausage tongs. Exit the kitchen. Try to talk to the worker
once more.
Head back to the room with the
house of cards building patient. Try to pick up a card from the floor. Take the teddy bear. Put the portrait of Sabrina
on the copier. Exit the room. Give the copied pictures to the nurse.
Go through the opened gate.
Examine the head at the back wall of the corridor. Examine the two green doors
at the left side of the corridor. Try to open the brown door to the left. Enter
the green door to the right. Examine the blood stains on the floor. Examine the
tiles that fell out of the left wall. Examine the scratches on the wall above
the tiles. Examine the bed to find an article in the local paper. Zoom out.
Examine the bed once more. Examine the surveillance camera at the ceiling. Head
back to the dancing nurse.
Talk to the nurse and tell her
about Perez’s cell. Ask her about the surveillance camera. Exit the asylum. Walk
through the gate once more. You’ll see Ramon dumping something into the
container and how he goes inside again. Examine the door frame next to that
door. Try to open the door. Great… it only opens from the inside. Stab the
portrait of Sabrina with the meat fork. Stick the skewered portrait on the door
frame.
Open the door. Try to open the
safe. Examine the VCR. Examine the surveillance monitors. Try to open the door
to the left. Examine the picture
next to the door. Yep… it has the correct code for the safe. It tells you that
there is a one legged pirate with a cat on his shoulder, a parrot on the cat and
a spider in the upper corner. Could this mean that the correct code is: pirate,
cat, parrot and spider? Of course not… as you have seen earlier the code
exists of digits. Now think Nina… think!!! Think about how many legs each and every creature has. A
one legged pirate (1), a cat (4), a parrot (2) and a spider (8)! Examine the
safe once more and punch in the code 1428. Put the video tape in the VCR.
Examine the cave. Talk to Perez
and ask him about everything you can. Go down the stairs to the left. Walk
through the gate. Take the skewered portrait from the door frame. Walk back to
the beach. Give the portrait of Sabrina to Perez. Also give him the charred log.
Ireland, Pub
Examine the traffic sign. Examine
the parked motorcycle. Take the
flag hanging outside the pub. Examine the board in front of the pub. Cross the
road and take the sign. Enter the pub. Look at the chimney. Talk to the
barkeeper and ask him about everything you can. Talk to the sleeping guest. Take the tumbler from the table
with the sleeping guest. Try to take the key that is hanging on the pole of the
bar. Exit the pub.
Go down the wooden stairs across
the street. Pick up the stone from the ground. Take a fish from the bucket next
to the fisherman. Examine the empty bottles. Talk to the fisherman and ask him
about everything you can. Examine the seawater. Put the flag in the seawater. Fill
the tumbler with seawater. Examine the boat. Walk up the stairs and enter the pub.
Put the fish on the sign. Place
the fish on sign in the chimney. Try to take the fish on baking sheet out of
the chimney. Ouch! Use the wet flag to take it. Give the fried fish on sign to
the sleeping guest. Talk to the sleeping guest. Talk to the barkeeper and ask him about everything you
can once more.
Exit the pub.
Place the wet flag over the
traffic sign. Re-enter the pub. Wait a little while… Exit the pub and search the crate on the road to get a lemon. Don’t forget to remove the wet flag from
the traffic sign to avoid any further accidents! Re-enter the pub. Give the
lemon to the barkeeper. Try to take that damned key from the pole once more! Place the
tumbler filled with seawater in the chimney. Take the tumbler out of the
chimney. Examine the tumbler. Put the salt in the barkeeper’s tumbler. Poor
guy… Take the key from the pole. Try to take the barkeeper’s tumbler.
Head back to the fisherman. Fill the
tumbler with seawater once more. Open the door of the storage room of the pub with the
key. Enter the storage room. Grab a bottle of whiskey. Examine the bench vice.
Take the torch from the buttress. Walk to the right and examine the barrels.
Exit the storage room. Give the bottle of whiskey to the fisherman. Step in the
boat to set course to the Island with the castle.
View this guide raw, exactly as the archive holds it