Secret Files: Tunguska Walkthrough by MaGtRo
Secret Files: Tunguska
by Deep Silver
Walkthrough by MaGtRo October 2006
Gameplay: The game I played
came in a DVD-ROM disk. It is a point and click mouse controlled game. At the
start frame, a configure selection is present. Here you can change resolution,
display and software cursor settings. The Main Menu has New Game, Load Game,
Options, Credits and Quit. The Options menu has selections for music, sound,
shadow, subtitles, video quality and game help settings.
The inventory bar is at the bottom of the screen. The
gameplay controls are found right of the inventory bar. The computer accesses the
gameplay menu. The diary has the important events that have been done and
the magnifying glass for gameplay help in identifying active spots and exits. The game help can also be activated by the
space bar if that option was selected at the Options menu. A picture can also be
seen at lower right sometime during the game. Clicking on
a picture changes the main character to that depicted character.
Note:
If you turned on the hints under options, use the magnifying glass
(search scene) at bottom right of screen to see active items and exits in that
gameplay screen. Double click on the
exits will change the screen faster to the next scene. Left mouse click is for
pickup or use and right mouse click is for identification.
This walkthrough is just one sequence of gameplay.
Some events in a location can be done in any order.
On June 30, 1908, an
object streaking through the sky was observed. A few minutes later, several
explosions were heard in the mountains of central Siberia. On March 27, 2006,
Vladimir Kalenkov working in his office notices the door opening. He exits and
sees footprints on the floor. He follows it to the window. Someone invisible
attacks him.
Berlin
Museum
of Natural History
Vladimir Kalenkov’s
office: Nina Kalenkov arrives at the museum and finds her
father’s office ajar. The office was ransacked.
Read ‘Chaos’ in the diary.
Look around the office: map, file cabinet,
certificate and radiator. Check the broken coin
glass case. See that one is missing. Read the clue-note at top right. Go to the window and
pickup from the floor in front of the radiator, the cutup photo of her father taken in 1958.
Read the ‘Torn photo’ in the diary.
Go to the table. Check and pick up the porcelain bowl (mortar)
on the left. Find out that it is porous. Take the piece of rock with red-violet glow on the right of
the phone. Use the phone to call
the police. They cannot do anything as of yet.
Go to the machine right of door and see that you cannot use
it. Take the flask on top of the machine. In inventory combine the piece
of rock with the flask to get flask with stone.
Hallway:
Exit the office. Hear loud music coming from the other office. Look at the name
plate and read Max Gruber. The door is blocked and she can’t be
heard.
Check the plant at the corner and get a piece of Aloe. In
inventory combine Aloe and the porcelain bowl. She will squeeze the aloe on the
porous bowl to get porcelain bowl coated with aloe oil.
Look at daddy’s office nameplate right of door.
Check the fuse box right of the nameplate. It is locked.
Museum display:
Exit right to go to the main museum area. Look at the plan on the post on the
left.
Read the paper left of the brochure stand and see the different office
numbers assigned to staff. Max Gruber is in #4.
See a lamp on the brick wall on the right – it brings
a little illumination in the darkness.
Go to right of the T-Rex display and look around. Note
that the barrier rope is broken.
Look close at the base of the T-Rex display and see a
secret door. Click to see Eddie crouched in fear. Listen to his description of
the black robed guys. He ran off.
Take the key he left
behind. Go back to the office by exiting to the stairs.
Max Gruber: Use the key on
the fuse box. Now that you know the office number of Max Gruber, click on the
fuse box to turn off the power there. Oops!
Talk to Max. Go back to daddy’s office.
Office:
Nina meets Detective Kanski and gets kicked out of the office.
Outside the museum:
Max offers his help and tells Nina to check at Vladimir’s house to see if he’s
there.
Check the 2 statues flanking the steps and the banner above. Pick up the
yellow shard on the ground right of the stairs and under the scaffolding.
Click on the motorbike to ride to Vladimir’s House.
Vladimir’s House
Bedroom:
Watch as an intruder knocks Nina unconscious. Nina wakes up to a
ransacked room.
Read the ‘Ambush’ in the diary.
Look around the room.
Note that there are some expedition journals on the book shelves missing.
Pick
up the cassette player from the floor left of the closet. Right click the
cassette player in inventory and get batteries.
Go to the bottom left
corner of the carpet and see that there’s a gap on the floor board. We can’t
access the gap yet.
Check the desk and take
the pizza, salt shaker and pencil. Check the notes and the
shortwave radio. Try to access the computer and see that it needs a password.
Check the closet and
bed. Take the book atop the drawer on the bed. Right click the book in
inventory and see that it is a book casket that needs a key.
Look close at the fish
tank and see a shiny object – key. The grate above the fish tank prevents
getting the key.
Outside:
Look around. Check the lattice below the window and see that it is broken like
somebody climbed on it.
Check the trash can to
get a rubber glove and a bicycle spoke. Try to pick up the bucket
full of water by drain pipe to get handle. Check the old bicycle to get
an air pump.
Click on the gray seat
of the motorcycle and note that the storage compartment is locked. Use the set
of keys on the gray seat. Open it to get cell phone and sunglasses.
Check the crate inside
the garage to get double sided tape and glue for porcelain and
plastic. Check the cigarette butts by the manhole cover. Check the manhole
cover. Go back inside.
Bedroom:
Take the spoke from inventory and move the cursor on the gap on the floor until
the word ‘gap’ is seen at top of the screen. Click to get a cassette.
Cassette clue –
Look close at desk and place the cassette on the cassette tape recorder at top
left.Listen to the clue by
Vladimir – The first and last on the car, a fourth of the openings in the
entrance to the underworld and finally the guardians of my work.Go outside and look at
the license plate of the car – 2 8 3. The first and last numbers are 2 3.Count the holes of the
manhole cover (entrance to the underworld) – 16 holes. A fourth of 16 is 4.Guardians of my work –
the 2 statues flanking the museum steps.
Read the ‘Embassy’ in the diary.
Computer – Go to
the computer and click on 2 3 4 2.Check the mails. There
is one sent by Vladimir to Oleg. He writes about Tunguska and a possible cause
of his wife’s death.Ride the motorcycle.
Museum
of Natural History
Lisa:
Talk to the little girl sleeping on the bench. Learn about the reason why she
slept there. The strange men in black robes have no face. The camera that was broken
took pictures of these men. Her bike has a flat tire. Nina will fix both tire and
camera.
Read the ‘Lisa’ in the diary.
Fix the flat tire –
Click on bike tire to get the tube. Use the air pump on tube and see
that there’s a leak.To find the leak, go back to Vladimir’s house. Use
the inflated tube on the bucket full of water. Nina marks the place of the
leak.In inventory, combine
the rubber glove with glue. Use the glued rubber glove on the inflated tube to
get patched tube.Go back to the museum.
Use the patched tube on the bike.Talk to Lisa about her
bike. She finally gives the camera.Camera –
Combine the batteries with the camera. That fixed the camera.Give the camera to
Lisa and she gives a hamster magnet.
Read the ‘Photos’ in the diary. 2 pictures are entered
in the diary. Look at the diary and see a picture of an amulet.
Vladimir’s House
Bedroom:
Use the magnet on the fish tank and get the key. Use
the key on the book casket to get a note and Vladimir’s address book.
Read the address book
and find out that Oleg Kambursky lived nearby. Read the note and learn about a
diadem. Ride the motorcycle.
Oleg
Kambursky’s House
Front door:
Ring the doorbell and talk to Oleg. He denies knowing Vladimir. Take note of the cat
flap and feeding dish.
Read the ‘Oleg’ in the diary.
Back of house:
Go to the path on the left. Take the broomstick leaning on the right wall. Look
on the window and see Oleg frantic on the phone but can’t be heard. There is a
water dish on the floor.
Eavesdrop on Oleg’s
phone calls – Go to the front door and see the cat. Let’s make the cat an
eavesdropping tool.Place the pizza on the food dish. The cat eats the
pizza with tuna.In inventory, use the
cell phone with the double sided tape. Use the taped cell phone on the cat.Get the cat inside to the water dish – Use the salt shaker on
the pizza. The cat gets thirsty and goes inside the house.Go to the back of the
house, look through the window and see that the cat is drinking water. Hopefully the phone call is
recorded. Later Oleg leaves.Get the cat to go back outside – Go to the yellow phone booth at the street. Use the phone
and Nina will call her cell phone.The cat runs out of the
house and up the tree. The cell phone is stuck up the tree.Get the cell phone
back from tree – In inventory, combine the handle with the plastic bag to get
reinforced plastic bag.Then combine the
broomstick with the reinforced plastic bag with handle to get brailer. Use brailer on cell phone up the tree.Automatically listen to what was recorded by the cell
phone. Something about Tunguska and take care of the ‘matter’.
Read the ‘Bugging operating’ in the diary.
Try to go to the Museum
to talk to Max but Nina decides to sleep for a while. See the Man at the
penthouse.
Museum
of Natural History
Max’ office:
Enter museum and go up to Max office. Talk to Max about Oleg, diadem, Eddy
and Tunguska.
He gives the diadem and he will look in the archives about
Tunguska.
Diadem – Review the note again about the
diadem.It was originally robbed from a princess. It has
emerald on the left, ruby in the middle and amethyst on the right. The note
written by Vladimir states the diadem will illuminate the princess and she will
realize that money is not the greatest treasure.It has emerald on the left, ruby in the middle and
amethyst on the right – Look around.Check the
totem pole and see that the red eye looks like following Nina around. Use the
spoke on totem pole to get red glass bead.Check the fridge beside
the totem pole to get acid bottle and cement bag.Use the acid bottle on
the flask with stone to get amethyst.In inventory, use the
yellow shard with the dark blue sunglasses to get green shard.Go to daddy’s office and look at right vent of the radiator. Use the
porcelain bowl that was coated with aloe oil on the right vent of the radiator
to get bowl with water.Use the cement bag on
the bowl with water and get putty in porcelain bowl.Use putty on the diadem.
Use the red glass bead, amethyst and green shimmer on the diadem. The diadem now
has jewels.Exit office and go to main museum.
The diadem will illuminate the princess – At
the main museum, see that the brick wall beside the triceratops has a lamp.
Right click the lamp to hear what Nina says.Use the diadem on the lamp. See multicolor lights beam
to the plan. Look close at plan to
see a room marked 8.Max returns. Talk to him
and find out that the items from room 8 are in his office.
Check the relief disk at
center of wall. Take the coin on the disk. That coin looks familiar.
Read the ‘Catastrophe’ and ‘Strange discovery’ in the diary.
Daddy’s office:
Go to the broken coin cabinet.
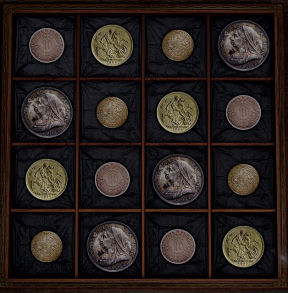
Coin puzzle –
Read again the note at top right. It states the prince said to the princess whether
vertical, horizontal or in both diagonal make sure there is never a repeat
within the line. So no coin should be duplicated horizontally, vertically or 4 coin
diagonally.One possible solution:
Nina finds Vladimir’s
secret files. Learn about the failed expedition and Perez. There’s a blank paper
from an Irish Society
at the back of the files. Nina goes to Max for help. Nina and Max are confronted
by Detective Kanski. Oleg rescues them.
At Vladimir’s house, Oleg explains
about an Irish biologist expedition member, FSP and that a
new expedition to Tunguska with cooperative or non cooperative researchers is
happening.
Moscow,
Military Train Station
Leaving Max behind, Nina
and Oleg fly to Moscow. Nina is interrogated by shady Sergej.
At the Military train
station, the planted guard is seen taken away. Now, Nina has to find a way to
board the train herself.
Read the ‘Personal documents’, ‘Between escape and hunt’ and ‘Failed help’, in
the diary.
Sewer Worker:
Talk to the sewer worker. He is working because of an increase in soldiers in
the area. Find out that there are cages in the train. He thinks he’s lucky because of a chance
to win the lottery. His lottery ticket number is 856549.
Look around the area.
Read the cell phone ad-poster on the wall. Pick up the brick on
the sidewalk behind the worker. Check the lunchbox to get bread box. Look
at the bread box in inventory to get rubber band and bread and butter.
Slingshot – Go to
the rubble behind the van-car. Get rusted nut and an iron
unidentifiable thing. Combine the unidentifiable thing and rubber band in
inventory to get slingshot-catapult. Combine the nut with the slingshot
to get loaded slingshot.Jack – Look at
the van-car. Check the rusty jack under and middle of the van. Hmm… Place the
brick behind the rear wheel rim. Try to pick up the rusty jack. Ugh!
Check the bread-butter in inventory. Use the bread-butter on jack to get jack.
That’s a lot of butter.
Side entrance to
station: Go to the side entrance to station. Look around.
Check the watchtower, the gate and take note of the cigarette butts in front of
the guard house. Pick up pebble at ground close to the fence.
Get the sewer worker out of the way – See a
guard Sergeant Yushin reading a newspaper. Click on the newspaper to see the lottery number is
printed. The sewer worker is one number off the winning numbers.Use the loaded slingshot
on the lamp of the guard house.Try to pick up the newspaper. Talk to Yushin and learn that the FSB took the other ‘guard’. After talking to him
about smoking, he gives a cigarette.Ask for the newspaper. Use the pencil on
newspaper and Nina doctors the winning lottery number.Go back to the sewer worker. Give the doctored
newspaper to the sewer worker. Off he goes to fish.
Sewer: Pick up the green hose and the barrier. The
barrier breaks down to 2 iron bars and a barrier tape.
Canal passage:
Go down the sewer. Look around at hole on ceiling, garbage heap, pipe by door
and sewage water. Pick up the matches between the garbage heap and the
sewage water.
Open the safety door – Open the door and see that it is
wedged against something. Use jack on door and it will open. Go inside.Fix the ladder – Look around and see wheel,
distributor, toxic barrel and sprayed red base plate.Look at the ‘ascent’ ladder and see it is missing 2
rungs. Use the 2 iron bars and note that they are too long.Go back to Sgt. Yushin, the guard. Give him the 2 bars
and Nina will flatter him to get 2 bent iron bars.Go back down to the underworld and use the bent iron
bars on the ladder (ascent).
Toilet: Look around. Look
under the toilet on the right. Click the pants and talk to the train driver. He
lost the train keys. Hehehehe.
Changing room: Go left and listen to the
guard and the female soldier.
Get the female soldier
out of the way – The female soldier is dying
for a smoke.Light the cigarette using the matches to get lit
cigarette. Place the lit cigarette on the coin dish. Watch the reprimand.Locker 1 – Open the locker on the right. Take
the stocking, 2 way radio with 15 on the back and the envelope.Check the envelope in inventory. It is the deployment
orders. It seems like they are in high security alert. There are terrorist
threatening the train. There are special guests aboard. Hear that the train is ready to depart. Click on the Russian Military uniform and be a
soldier now.Check the other locker and see that it needs a pass
code.
Retrieve the train driver keys – Go back to the
toilet.Connect the
hose to the faucet. Take the other end and place it on the urinal on the left.Turn on the faucet. Go down the canal manhole.
Look in the distributor and see that the key is there.
Go out to the passage. Use the stocking on the pipe
right of door. Use the barrier tape to hold it in place.Go back inside and turn the wheel. Go back out and
take the stocking with key.Go back up to the toilet and give the stocking with
key to the train driver.
Loading Dock: Exit through the
door at the changing room. See 2 men
in black guarding a door. Try to talk to them.
Soldier by train – Go out the building and talk to the
soldier by the train. He needs a permit to let you on board. Talk to him completely.To call the driver, he talks to the paging system
operator. Learn the number of the paging system operator – 48. The
train is waiting only for the 2 FSB men and the train driver.Get the FSB men away from the guarded door – Go back down the canal and
automatically change clothes. Go up to Sgt. Yushin guarding the gate. Learn the names of the 2 FSB – Fetisov and Radukov.Go back up to the changing room and automatically
change to a uniform.Use the radio to call the paging system operator. Use #15 as your call number (from back of the radio) and call #48 the
paging system operator.
Listen.Get Permit – Go out to the loading dock. Enter
the door formerly guarded by the men in black.See Solotov tortured by electric shock. Look around
the room. Click on Solotov to get his dog tag.Go back to the changing room and click on the locked
locker at the foreground.Look at dog tag and see that it has number 31545. Click on 3 1 5 4 5 and the locker opens. Take the
permit.
Soldier by train – Talk to the soldier and then give
him the permit. Once inside the train, the train departs the station.
Russia, Train
Krasnoyarsk
Read the ‘Involuntary trip’ in the diary.
Soldier’s car: Learn all
about the castor oil conversation with the now sleeping soldier. Look around.
Check the map, rifles, window, light switch and the soldier. He uses a medicine
bag as a pillow. Take the dried fruits and bottle of orange juice
from the table.
Dr. Lesniak’s car: Enter the
door at the end of the car. Look
around at the different items in the room. Take 2 sliced white
breads from center table.
Talk to Alexei, the assistant doing
some experiment completely. Learn about Dr. Lesniak’s bad mood. The doctor has a
yen for bread and jam. He needs it get in a good mood.
Make jam – Exit back to the other car. Enter
the galley on the left.Take the honey from the foreground. Place
honey, dried fruits and orange juice in pot to make jam. Also get an
empty bottle in inventory.Use a bread on the mixture in the pot to get bread
with jam.
Go back to Dr. Lesniak’s car and give him the bread
with jam. Talk to him completely and learn that Professor Sidorkin has the list
of the scientists on board. He is in the car.
Read the ‘Sidorkin’s list’ in the diary.
Talk to Alexei and learn about the research and also
about the research station.
Read the ‘Research station in Tunguska’ in the diary.
Prof. Sidorkin’s car: Exit
through the door at the back. Check the compartment on the left and see that is
locked. Use the intercom beside the door. Prof. Sidorkin will not talk to anyone
unless Dr. Lesniak’s experiment gets a breakthrough. The metal storage car door is padlocked. Look
at and take the 100 watt light bulb on the wall.
Dr. Lesniak’s car: Time to
investigate this car.
Get the castor oil – Go back to the Soldier’s
car. Take the 25 watt bulb above the soldier. Replace it with the 100 watt
light bulb. Turn on the switch. Nina automatically hides in the galley. Go back and
take the castor oil from the bag.Get
Dr. Lesniak and assistant out of the car – Go to the
galley and add the castor oil in the pot of jam. Use the bread on the laxative
jam to get white bread with laxative jam. Use the empty bottle on the
faucet to get bottle with water.Go back to Dr. Lesniak. Give him the white bread
with laxative jam. Wait.Pour the water in bottle on the power strip on the
floor right of the car. The fuses blows and Alexei will check it.Make a successful experiment – Since the aim of the
experiment is to find out when the burning is halted, let’s make one.Take the
glass jar with plants from the analysis table. Pick another jar with
plants (untreated) from the floor.In inventory, open both jars and get 2 sets of
plants. Combine the 2 plants and place it in a glass jar. Place the
mixed plants in a jar on the analysis table. Well, that got the scientists
excited.
Prof. Sidorkin’s car: Nina
automatically goes to Prof. Sidorkin’s compartment and gets a close-up of his desk.
Read the "acute
threats to the Tunguska project" and learn about the men in black robes that
Eddy has seen. Look at all the items at the desk. Ooops! Caught!
Read the ‘Attacks by sect members’ in the diary.
Max at the museum: Max sees
Kanski in front of the museum. In his office, Max receives information from his
Irish friend. He learns about Ken Morangie and he is involved in plant
fertilizers. He also lives like a hermit in an island. The blank paper has a note
from Ken to Vladimir.
Read the ‘Trail to Ireland’ in the diary.
Storage car: Nina is locked
at the storage car with a caged dog. The dog stays on the left side of the cage
with the bone. Take the dog leash.
Go right of the storage car. Take a juicy steak
from the cooler. Take the hose and tube from the vacuum cleaner at
end of car.
Escape – Combine the tube and the leash to
get leash with pipe.Go to the cage side of the car. Combine the meat and
the jar to get meat in jar. Place meat in jar inside the right cage.
The dog moves over and his attention is kept on the unattainable meat. Take
the bone.Go back to the vacuum cleaner. Use the bone on the
flap at side of vacuum cleaner. Take the vacuum bag. Examine the vacuum
bag to get barrette (hairclip) and animal hair.Go under the hatch in the roof. Use the leash with
pipe twice on the hatch. Climb up.Get back inside the train through the window – Pick up the
leash with pipe. Examine the 2 tubes sticking up from the roof of the
train. Nina goes there.Use the animal hair in one of the tubes to block the
sieve inside. Use the vacuum hose on the pipes to block it. The hair burns and
stinks the room
and Sidorkin opens the window. Use the leash with pipe on the tubes. Click on the
window and Nina climbs through the window just in time.
Prof. Sidorkin’s car: Now it’s
really the time to look for the scientist list. Look around.
Find the safe – Look close at the desk. Use
the barrette-hairclip on drawer’s lock. Take the statue.Examine the bookcase and see books on pirates.
Note 3 other statues similar to the one from the desk.Take the vase from the pedestal by the door.
Place the statue on the pedestal and hear it click in place.The statues can be turned around but to what position.
Check the picture of Lenin – he is facing left.Turn all the statues to face left. There you go –
the door to interrogation room is opened.Take the book from the interrogation chair. Go back
out and place the book in the book shelf space to join the other pirate books. Something
is heard.Go back inside the torture room. See that the flap
on the wall is now opened but empty.Go to the office and take the skull
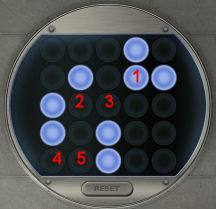
off the skeleton in the corner. Place the skull inside the niche. The safe is found.Open the safe – The object of the puzzle is
to turn off the lit circles. Clicking on a lit circle affects other
circles. Find out the pattern.Click on the circle in the order seen in picture
below:
Nina reads the documents found inside the safe.
Daddy’s name is not in the list. The Tunguska project was born after the
Kalenkov Report. They found out that animal behavior can be controlled by
radiation. The train was derailed by those men in black robes. Nina is
unconscious.
Read the ‘The Kalenkov report’ in the diary.
Russia, Military Hospital as Max
Max was informed by Oleg about what happened to Nina. Max is brought to the
Military Hospital where Nina was taken. It is up to Max to get her out of there.
Read the ‘The liberation’ in the diary.
Outside the gate: Max and
Oleg confer about what happened.
Get inside the gate – Try the gate intercom. See what
happens.Take the textile bag from the bench in the shelter. Pick some berries
from shrubs right side of the shelter.Use berries on bag and click the dirty bag on Oleg.
Look at the ambulance and note the phone number on the side – 03112.
Use the cell phone on Max to call the ambulance.
Courtyard: Watch as Max sneaks to the side of the
hospital.
Get in the hospital – Check the garbage bin on the right. Take the
forceps-surgery pliers hanging right of the bin.Look down at the shadow on the ground – the shape is familiar and is close.
Look at the lamp on the wall. It’s a key.Use the surgery pliers on the lamp to get key. Use key on door.
Cellar – Records room: Check the dictation machine on
the table. Learn about mental and behavioral problems of patients.
Read the ‘Mysterious illness’ in the diary.
Check the file cabinet on the left and learn about what happened to Manuel
Perez. He was discharged to the care of a Dr. Nicole Charleroi in Cuba after 30
years in the hospital. There is nothing about Nina here.
Read the ‘Trail to Cuba’ in the diary.
Take the handheld fan on top of the filing cabinet and the anesthetic
on the shelf by the door.
Go through door to the morgue.
Morgue: Look around. Take the syringe and
scalpel on the sink. Take the stethoscope from the empty table and
ammonia from the shelf by the door.
Go to the door on the right and hear someone talking. Use the stethoscope on the door to hear
what is being said. Learn that Nina is held in a room at top of hospital. Learn
also about the
satellite’s idiosyncrasies – that’s a clue… Go through the door and see the guard watching soccer on TV.
Courtyard:
Wake up Nina – Go back outside through the cellar. At the courtyard look
at the pipe left of door. It goes to the top.Use the stethoscope on pipe and hear snoring, daddy… Ah, that’s Nina.
Use the ammonia gas on the pipe. Then use the handheld fan to blow it up to
where Nina is snoring.
Nina wakes up.
Take care of the satellite – The guard mentions that the wind messes up
the satellite.Go left and see the satellite dish. Move the dish and go back to the foyer of
the hospital. The man adjusted it again.Go back to the satellite and use the surgery pliers on satellite. Go back to
the pipe by door.
Exchange of items:
As Nina: Click on Nina’s picture at bottom right. Look
around and check everything. Take the crocheted place mat from mattress,
small stone beside the rat hole and the bowl. Check the rat hole, chair
leg and the sharp edge on the crack on the wall. Use the place mat on the sharp
edge of the crack on the wall to get thread. Use thread with small stone
to get tied up stone. There’s still a thread that broke off. Use the tied
up stone on the drain. Now items can be brought up and down to/from Max.
As Max: Click on Max’ picture at bottom right. Click
scalpel on pipe.
As Nina: Use the scalpel on chair leg and on the
mattress. Place foam from mattress and chair leg down the drain.
As Max: Go back to the foyer of the hospital.
Take care of the guard – Take the wedge holding the metal safety door
open. Someone is upset!Combine syringe and chair leg to get blowgun. Use anesthetic with blowgun
to get poisoned blowgun.Use the poisoned blowgun on the peephole of the door.
Free Nina: The elevator is locked. Go to the TV area.
As Max – Take a tack from the pin board. Look at the dish with
watery cheese soup. Use the foam on the dish to get cheesy foam.Climb up the stairs and see a guard sitting by the
steps.
View this guide raw, exactly as the archive holds it