Secret Files: Tunguska
Go to the pipe and click the cheesy foam and chair leg on pipe.
As Nina – Combine cheesy foam with thread to get tied up foam.
Combine chair leg with bowl to get rattrap.Combine tied up foam with
rattrap to make ultimate rattrap.Place ultimate rattrap on rat hole. Take rattrap
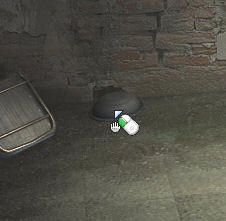
and rat. Place the cursor at bottom part of the bowl to pick up rattrap. Place rat on drain.
As Max – Go back to the guard by Nina’s door. Use tack with anesthetics
to get poisoned tack.Click the rat on guard. There they go. Use poisoned tack on guard’s chair. Ouch!
Search the guard to get bunch of keys. Use keys on door. Together again.
Russia,
Tunguska
Airport:
After the niceties, the airport is in locked up. Nina sets off on the jeep to
visit her daddy’s old camp.
Read the ‘Coming to terms with the past’ in the diary.
Evenk,
the sick man
Search for Daddy’s
camp: Nina is beside a hut and a reindeer. Take the
spade from back of jeep. Look inside the jeep and take the first aid
kit and ketchup. Examine the first aid kit to find guess what – vodka.
Hut – See a sick
man. He gasps medicine… parchment… burnt… Look at the fire pit (fireplace)
and check the snippets of parchments. It’s too fragile.
Take the cup from
stump, wooden spoon on table, scissors from post and grate
from fireplace. Check the tassels hanging from the ceiling to get twine.
Examine the statue on the table and it looks like a nutcracker. Examine the
scissor and it looks blunt.
Parchment:
It looks like we need to get the parchment before we can help the sick man.
Get water – Go
outside to the reindeer by the jeep. Check the reindeer, water basin and the
water barrel.Go right and use the
spade on the crate to get debris from crate.Examine the tree and see
a bark peeling off. Use spade on tree and pick up bark from ground.Go back to the reindeer.
Place the bark on the water basin. Pull the plug off the side of the barrel.Use cup on water basin
to get cup with water.Make paste – Go
back to tree and see resin on the trunk of tree. Use the cup with water
to collect resin and get cup with resin and water.Go right of tree to see
a hot vent. Place the grate over the hole. Place the cup with resin
and water on the grate to get melted resin in cup.Check the tomato plant
and gentian.Make a brush –
Pick up the sharp rock. In inventory, combine sharp rock and scissor to get
sharp scissor.Go back to the drinking reindeer
and use scissor on reindeer to get reindeer hair.In inventory, combine
reindeer hair and twine and then wooden spoon. Voila! A brush!Parchment – Go to the fire pit. Use
the brush on melted resin cup to get brush with resin. Use it on
parchment.5 parts of the Source of Life
2 parts of the Root of Tears
1 part of the Blood of
Night3 drops of Intoxication
To be taken shortly
before it unites with the wind.Source of Life is water.
Root of Tears is the root of Gentian since it is a member of the onion family
(leek). Blood of night is tomato since it is a member of the nightshade family.
Intoxication is vodka.Medicine – Give
the parchment to the sick man. He gives a vial.Go outside to the water
basin and click the vial on it.Go right of tree to the
Gentian. Use the spade on gentian. The tomato plant is dead. Take the
grate.Go back to the hut.
Place the vial on nutcracker. Use the gentian on the nutcracker and it squeezes
the roots to pour into the vial.Take the vial and
click it on the tomato ketchup.Then click the vial on
vodka.To be taken shortly before it unites with the wind
–Place the debris from
crate and grate on fire pit.Use the matches on the debris. Place the vial with the
ingredients on the grate.When Nina finishes explaining ‘evaporates’, give the vial to the sick man.
Evenk hesitantly gives
directions to where daddy camped.
Daddy’s camp
Read the ‘The forbidden zone’ in the diary.
Cabin:
Look around and then enter the cabin. Pick up the shard at right
foreground. Take the rag at bottom drawer. Look at the projector, window,
compass and fireplace. Inside the fireplace, take the aluminum foil at
bottom left. Exit and use the rag to clean the window.
Generator:
Go to the back and see a water tank and generator. Check the coil part of the
generator. Take the hose from the
tanker and the kerosene oil lamp hanging on the wall.
Forest:
Go to the right and see a river and a truck wreck. Check the wheel rim to get
2 nuts.
Get diesel fuel –
Use the hose on the tank under the truck wreck. Use the vodka on the hose to get
bottle with diesel fuel. Hic!
Path:
Take the path and see the research station, runway and the river below. Go back
to the generator.
Generator:
Use the bottle of diesel fuel on generator. Go back to the house.
Cabin:
Fireplace –
Click the rag on the kerosene lamp to get saturated rag.Look inside the fireplace, click lamp on back wall and
use the saturated rag on the soot covered back wall. Read 7 1/2, 3, 10 1/2, 6.Compass – The
compass is pointing south. The directions from the fireplace looks like a code
for this compass.Move the compass hand by using a
magnet.Make a magnet – Go back
to the generator and click the 2 nuts on the coil part of the generator to
get magnetized nuts.7 1/2 – Place magnetized nuts at south and west. Press center button to hear a click. Remove
nuts.3 – Place magnetized
nut at east. Press center button to hear a click. Remove nut.10 1/2 – Place magnetized nuts at north and west. Press center button to hear a click. Remove
nuts.6 – Place magnetized
nut at south. Press center button and a secret compartment above the fireplace
opens.Take the film reel
and documents in the secret compartment.
Read the ‘Under one’s
own steam’ in the diary.
Film – The glass
window is already cleaned. Use the film reel on the projector.The bulb burnt out. In
inventory combine glass shard and aluminum foil to make shard in aluminum
foil.Use the shard in
aluminum foil on the projector. Click the projector.Watch an incident that happened to Manuel Perez during
the last 1977 expedition.
An explosion is heard.
Nina sees that half of the research center is destroyed. Nina meets 2 of the
black robes. They mind communicated but were interrupted by soldiers. Nina runs
to the jeep and escapes with the help of Max and Oleg. Oleg knows more than he
says, eh.
Max is dropped off at Dublin. Nina and Oleg
continues on to Cuba.
Read the ‘Lichterscheinung’,
‘Weird encounter’ and ‘New goals’ in the diary.
Cuba,
Asylum
Sanatorium under the
Palms: Talk to the gatekeeper about everything. Note his
painting.
Nurse:
Go to the entrance and talk to the dancing nurse, Sabrina. Learn about Massino
Gartuso, Nicole Charleroi and Sabrina’s political ambitions. So that’s the guy at the
penthouse.
Read the ‘Strange
investment’ in the diary.
Take a newspaper
from the magazine stand. Go to the passage at bottom screen.
Copier room:
The music is loud. Take the glasses by the phonograph. Talk
to the patient building a house of cards. He expects the earthquake to topple
his cards. Earthquake comes every afternoon. The cards are blocking access to the
teddy bear and the copier.
Worker:
Go to the inner courtyard-gate and talk to the worker completely. He will start
working when black comes out of the chimney.
Check the door scratches
on the left. Read the 2 paper hanging beside the locked door. So those black
robes are seen here too.
Take logs from the pile by the dirty laundry
container.
Kitchen:
Enter the door to the right. Take the meat fork from left table, hanging
onion (no use seen), sausage tongs from right shelf, soup ladle, and
brass weights from table right of stove.
Make smoke – Use
logs, then newspaper and then glasses on the open stove.
Go outside and talk to
the worker. He will work when the smoke is black.
Help the nurse’s political career:
Painting of the nurse – Talk to the gatekeeper about painting nurse Sabrina. He wants black paint and to
make the nurse move slowly.Go to the Copier room inside the sanatorium. Place the
brass weight on the record that is playing. That slows the music down and
Sabrina’s movements.Go to the kitchen. Use tongs on the fire to get charred log.
Go to the gatekeeper and
give the coal-charred log. Then ask about painting the nurse. Get wrapped portrait.Political leaflets – Go to the dancing nurse
and show her the portrait. The portrait is removed from the bag.Go to the kitchen and
place the bag in the stove. Hear a scream. Go outside, see black smoke from
chimney. The worker is back drilling and making an earthquake.Go back to the copier
room. Take the teddy bear (no use seen). Use the portrait on the copier to get
copied pictures.Give the copied pictures
to nurse Sabrina.Time for a tit for tat.
Perez’ cell:
Go to the passage on the left of the nurse. Enter the cell on the right. Look around at the
blood, the tiles and grooves. The shape looks familiar. Check the mattress to
see the newspaper about Nicole Charleroi. Check the surveillance camera.
Read ‘Change of
leadership’ in the diary.
Nurse:
Talk to Sabrina about Perez. Ramon says he knows that Perez is gone and that he will be doing the beds
now. The camera monitors are in the control room and Ramon has the keys.
Control room:
Go to the courtyard where the worker is drilling.
Get in the control
room – See Ramon place dirty laundry in the container and goes back to the
locked door.In inventory, combine the
meat fork and the portrait to get skewered portrait. Use the skewered
portrait on the wall beside the door.Wait and see Ramon go out and back in. Enter the room.
Safe – Look
around and note the monitors, VCR and the painting of the pirate on the left
wall.Click on safe to start
safe puzzle.The only clue here that has numbers is the painting. The painting has a one
legged pirate, with a 4 legged cat, a 2 legged parrot and an 8 legged spider.Click on 1 4 2 8 to open
the safe.Take the videotape and
use it on the VCR. Find out the person that took Perez.
Caught by Ramon, Nina
learns where Perez is hidden.
Read ‘Human experiments’
in the diary.
Small cave in beach:
Talk to Perez. He needs to communicate.
Go back to the
sanatorium by clicking on the left of the cave. Take the skewered portrait back. Go to the kitchen and use tongs
on fire to get charred logs.
Go back to the beach by clicking left of the main
road. Give Perez, the charred logs and the portrait. Perez draws a
symbol.
Read ‘Strange symbol’ in
the diary.
Ireland, Pub
Max is standing by a pub in Ireland. Take the flag
from the pub’s wall. Go across the road. Read and take the tin sign for boat
sightseeing of the island. Morangie lives in an island.
Fisherman: Go down the stairs
and talk to the fisherman. He will loan you the boat for a bottle of whiskey.
The locked door behind is the cellar of the pub. Ask and get a fish. Use
the flag on the water to get wet flag. Pick up the stone. Go up to
the pub.
Old Stevie’s Pub: Talk to the
barkeep. See if you can get the cellar key hanging on the post of the bar. Try
talking to the sleeping guest. Take the tumbler from the table of the
guest.
Get the key and distract Stevie – He said that
the guest Klaus likes to talk when he’s awake.In inventory, combine the fish and the tin sign. Place
the fish on baking sheet in fireplace.Use the wet flag to take it from the fireplace and
give it to Klaus. He will wake up and ask for lemon.Talk to the barkeep about the lemon.
Remember he mentions that the produce delivery men
pass by here daily. Go outside and place the flag over the speed-traffic sign.Go to the fisherman across the road and use tumbler in
the sea.Go back inside the pub and hear a screech of brakes.
Go outside and see a crate at the center of the road. Take the lemon from
the crate.Take the flag off the traffic sign. Go back inside and
give the lemon to the barkeep.Go to the fireplace and place the tumbler with sea
water on the fireplace hearth. Take tumbler back and look at it in inventory and see
salt.Place salt on the barkeep’s tumbler on the bar. Take
the key from post.

Cellar: Go across the road
and down the stairs. Use the key on the cellar door. Look around and see a bench
vice. Take whiskey from shelf and the torch on post. Go to right screen and see nailed down board and barrels. Give the whiskey to the
fisherman. Click on boat.
Ireland, Castle
Courtyard: Talk to Lord Ken
Morangie who is down the well. He wants you to find the door that opens to the
bottom of the well. Look around and see the chimney top that looks like a helmet
on the roof at right. Be King Arthur and draw the sword. Close the
shutter at left but ends up taking it. There are 3 entries to the castle
here: the one above, the middle and the one on the right.
Castle hall: Enter the middle
entryway. Take a closer look at the picture of Lord Morangie. Take note of the chair
at center of room and check the fireplace.
Go up the stairs and take the oil lamp. See a
lever that controls the chandelier. Take the spearheads from the
showcase. Read the history of Lord William from one of the books at left shelf.
He was entombed without a funeral pyre and only with his robe and amulet.
Go back to the courtyard and go through the top
entryway.
Bedroom: Enter the first right passage.
Look at the commode-drawer beside the bed and get a gold coin. Look at
the pictures. Open the curtain on the right wall and see a passageway. Enter and
see that it is blocked by grilled gate. Go back up.
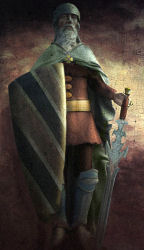
Lord William Morangie’s statue – Look at the
statue and note that it is missing items seen from his picture at the hall.Open the first gate – Place the sword on the
statue. A sound is heard. Go to the passageway and see the first gate is raised.Open the second gate – Place the shutter on the
statue as the shield. Another gate is raised. Go down and see a raised
drawbridge and niche on the wall.
Make a ring for Lord William
– Exit to the hallway. Take the wire hanging from
the right candle holder.Enter the second foreground
right passage. Look at the maiden, torture rack and fireplace. Take the
pliers from left table and iron chain beside the door.Exit to the courtyard and enter the
right doorway. See Lord William Morangie’s tomb. Use the torch on the torch on
the wall to get burning torch.Go back to the torture room and use the burning torch
on the fireplace.Combine the pliers with the gold coin
and then place it in the fireplace.Use the pliers with red-hot gold coin
on the iron maiden to get pliers with red-hot gold ring.Go back to the courtyard and to the mainland by the
bottom exit. Use the tumbler on
the sea. Use the pliers with red-hot gold coin on the tumbler to get ring
and pliers.Get a helmet – Enter the pub’s cellar. Go to right screen.
Use the pliers on the board of the barrels to get long board.Use the spearheads on the bench vice. Use the board on
the vice to get a board that can be carried.Go up to the pub and take the rain gutter from
outside the pub.Row back to the castle.
Enter the
middle entryway to the Castle hall. Place the board on the footstool. Place the stone at end of the
board.Go upstairs and pull the lever holding the chandelier. There you go. Go
outside and pickup the chimney cover.Make leg guards – Go to the torture room. Place the rain
gutter on the torture rack. Use the rack and take the separated rain gutter.Lower the drawbridge – Go back to the statue in
the bedroom. Place the chimney cover-helmet on the statue. A mechanism is
triggered.Open the third gate – Use the separated rain
gutter-leg guards on the statue. A mechanism is triggered.Open the fourth gate – Use the ring on the
statue. A mechanism is triggered.Get the amulet – Go down the secret passageway and look at the niche.
Take the key.Go back to the crypt. Click oil lamp on the coffin.
Use burning torch on the coffin. Max gives Lord William his funeral pyre.A hole on the top of the coffin is exposed. Use the
key on opening. Take the amulet.Combine amulet and wire and then iron chain to get
amulet in chain. Go back to the bedroom and statue.Open the well door -Use the amulet in chain on
the statue. A mechanism is triggered.
Well door: Go down to the end
of passageway and open the circular well door. Meet Lord Ken Morangie.
Talk to him and learn what Ken told Vladimir.
Max talks to Nina in Cuba. They will meet in Berlin.
Max arrives there but no Nina. Max gets a call from Detective Kanski to meet at
the museum.
Max finds Kanski murdered. He wears a strange amulet.
Meanwhile, Nina is pressured by Oleg to follow daddy’s
travel to the Himalayas and find the Dzopa tribe.
Read the ‘Research report’, ‘Murder’ and Betrayed and
forgotten’ in the diary.
China, Himalayan Cave
Nina is to check the cave while Oleg watches the
entrance.
Read the message in inventory about Vladimir’s
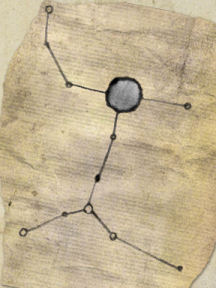
expedition to the Himalayas. Take note of the drawing at the last page.
Cavern: Look at the 3 holes
on the wall. Take the skull on a peg.
Waterfall: Go to the next
cavern. Check the relief on the wall. Look down the precipice. See the waterfall
and a body on the ledge below.
Use the peg on the rock. It covers the hole where the
water falls to and the water rises. Take the floating bag of the dead man.
Check the bag in inventory and get a bone key.
Go back outside and use the bone key on the bottom
hole. It connects.
Go back to the passage and enter the opening on the
relief wall.
Another world: Look around.
Look close at the head stone to see a puzzle.
White disks puzzle – Move the white disk to different
black circle to form a shape.Recall the last page of the message in inventory. Make
that shape for this puzzle.
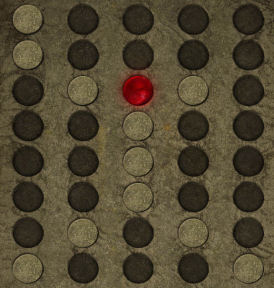
The mouth of the head of stone opens to reveal a stone
disk. Look close and when you pull back, Oleg sneaks in and shows his true
colors.
Nina is transported in the plane to somewhere. Sergej is also
in on the plot.
Antarctica, Station
Nina is in a bathtub. Sergej and Oleg want to drown
Nina but there’s no water.
Sergej and Oleg check the water pump machine and find
out that a piece is missing. Sabotage!
Read the ‘Another betrayal’ in the diary.
Shower room: Nina wakes
up in the bathtub. Check the camera above the tub. Take the plunger from
right of room and some toilet paper from the sink wall on the left.
Maintenance room: Check the
drill right of door and the bench vice on the counter. Check the open
cabinet-armoire and get tapper, piece of something and silicon.
Take the metal plate beside the vice and the master key right of
the locked door. Check the incubator on the left wall. There’s an egg in there.
Open the locked door – Use the master key on the
lock and see that the lock is iced over. The key needs to be heated.Place the metal plate on the drill. Place toilet paper
over metal plate.Use the drill and the paper will burn.
Use the piece of something on the vice to get a
bent piece of something.Combine bent piece of something with the key to get
piece of metal and key. Use that on the flame.Use the piece of metal and hot key on the
locked door. Exit to the ramp area.
Ramp: Look at the keypad that
needs numbers, door on the other side and the metal spikes. See the elevator platform
down below of the elevator shaft at right end of the ramp and an elevator shaft on the left.
Control room: Enter the lit
room on the left. See Oleg, Sergej and Nicole. Oleg has taken care of the
saboteur.
Read the ‘In the lion’s den’ in the diary.
Look at the TV screen, VHS and the levers on the
control panel. Check the locker-armoire on the left and get explosive.
Exit the room and go to the stairs at right.
Entrance: Check the water
pump machine on the left. This is what was sabotaged. It is missing something.
Check the elevator platform on the right. It is not stable.
See spilled salt but it is not enough. Take the fishing rod. Nina is not
dressed to go outside.
Ramp: Climb up stairs to the
ramp. Use the fishing rod on the platform below of the right elevator shaft.
Fish and get winter clothes which Nina automatically wears. Fish again and get
laundry ball.
Go back down and exit the station.
Outside the entrance: Check
the research station, the snow crawler on the left and the forest of antennae on
the right. Pick up the bucket.
Penguin: Go left of screen.
Check the penguin. It looks like it is sitting-hatching something.
Get to the saboteur – Check the sign on the right. Take the sign.
Look down the precipice and see the dead saboteur.Look at the hole left by the sign. Insert the
explosive in the hole.Go down the crevasse and check the dead man. Take the
amulet (looks familiar), lighter and diary.Read the diary in inventory. Learn about the events
done by Nicole.
Whaling ship: Exit back to
outside of
the research station and then go right outside of the station area. See a
whaling ship. Check the hole in ice and the harpoon. Look at the barrel of whale
oil. Hmmm…
Open the hole in the ice – Dip the laundry ball in the
barrel to get laundry ball in whale oil. Look at the jacket hanging above
the barrel to get flask with cork. Go back inside.Climb upstairs to the
ramp. Drop the laundry ball in whale oil down to the not too stable platform at
right elevator shaft.
See it break.Go down and see
that more salt spilled out. Use bucket on salt to get bucket with salt.Use bucket with salt on the hole in ice. This will
take sometime, go back inside.
Maintenance room: Go up to
the ramp and enter the bottom middle room.
Remember the penguin is sitting on something. Let’s
work on the penguin.Get egg from incubator – Use the plunger on the
glass of the incubator.Use the amulet (diamond) on the glass. Take the
strange egg.Move the penguin – Go to the now open hole in
the ice at the whaling ship area.In inventory, combine the fishing pole and the lighter
to get fishing rod with bait.Fish! Get a fish.
Go to penguin at the other side of the station. Click
the fish on penguin. It moves away.It would not let you take what it sat on. Click the
strange egg on that something to get a metal egg.
Entrance: Go to the water
pump and place the metal egg on the niche middle of the machine. The water pump
comes on.
Camera and VHS – Now that the
water is on, let’s see what the camera has in store. Climb up stairs to the
ramp. Go to the center maintenance room and then room right of the maintenance
room.Turn on the faucet to fill the tub. Need to plug the
bath tub.Go next door. Use the flask on the drill, click drill
and get the cork.Use the cork on bathtub. Turn on the faucet. Exit to
let it ice over.Go back to the entrance and take the metal egg
from the water pump. No need to do the baddies a favor,Go back to the shower room and the water is frozen.
Click on camera to climb up and reach up to get a VHS tape.Control room: Use the
videotape on the VCR. Watch.
Read the ‘The lion appears’ in the diary. Be sure to
take note of the keypad stand!
Ramp: Go outside to the ramp
and enter the number seen on the picture on the keypad stand – 2 5 1 3.
Help is coming – Go forward to the radar room. Look around and
take the beacon and matches from the crate. Look at the radar and
see a plane is coming.Go to the Whaling ship outside. Click the
beacon on harpoon and find out that the beacon’s wick is wet. Use the beacon on
the whale oil barrel. Use the beacon with whale oil on harpoon.
Watch. The black robes. Nina is upset to say the
least. After the tantrum, Max gives the cell phone to Nina and they will
work together in the control room to do what they have to do.
Read the ‘The fog lifts’ in the diary.
Control room: Max fiddles
with the control panel and then they’ll go down to see what can be done to stop
the baddies. The door closes him in while Nina is outside. Nina continues on her purpose. Take the newly risen
elevator.
Radiator room: Look around.
See a camera, smooth valve and radiator beside the door.
Go down and click on the side door. Learn that that
is where the nefarious plotters and machine are congregated.
Use the sign on the icicle to get icicle. Enter
the door at the end.
Biohazard room: Look around
and see water seeping on the left side wall.
Plan to destroy station – Take the wrench
seen at bottom of barrel on the shelf.Read the 2 signs on the barrel. It’s ‘explosive and do
not bring in contact with water.Read the danger sign left of the barrel – contact with
water will trigger chemical reaction. The sign is riveted. Water, eh – okay.Place the icicle on the chain hanging from ceiling.
Move the end of the chain to the pipe on the wall beside the door.Pick up the nut that was dislodged.
Let’s see if we can heat up the pipes enough to melt
the icicle to push the barrel when we’re out of here.Get
the radiator going – Check the radiator and learn that it
is cold.Try to turn the valve at bottom right. Nope. Use the
tapper on the valve to thread it. Use the nut on the valve now.Use the wrench on the threaded valve with nut – too
weak.Use wrench with sign in inventory to get extended
wrench. Use the extended wrench on the threaded valve with nut. The valve is
now open.Check the radiator. It’s gurgling but still cold – not
enough water in the pipes.How to tell Max to get water to the radiator – Click on
camera and hope that Max might be watching the monitors.Go back to the biohazard room. Look at the danger
sign. The sign is riveted to the post and can’t be removed.Use the silicon on the danger sign. Take the mold
made by the silicon. Read what it says. ‘No Water’ symbol can be seen halfway
clearly.Go back to the camera. Use the mold on the camera for
Max to see. Max finds the water control.How to tell Max to heat the radiator – Check the radiator. Enough water but still not heating
up.Use the lighter on the camera for Max to see. Max
heats the pipes.
Oh No! Oleg catches Nina and takes her to the machine
room. Meet Massino Gartuso. He explains his purpose to take over people’s minor
decisions.
End puzzle – Look around and see the machine
rotating at the center. The camera is above Nina and the crane is above the
camera.Oleg watches Nina carefully. Divert his attention
by giving him the metal egg for the water pump that he’s been looking for.
Massimo orders Oleg to warm the building up.Throw the cell phone on the machine.
Take the camera and click it on the crane.
Max catches on.
Watch what happens.
Nina meets a black robe.
Watch for Secret Files 2.
This document may not be
distributed without express written permission of the author and the content
may not be altered in any way.
For Questions or Comments
on this Walkthrough, please write to:MaGtRo
Copyright © 10/2006MaGtRo
View this guide raw, exactly as the archive holds it