The St Christopher’s School Lockdown Walkthrough
Headmaster’s Office
In inventory use the masking tape with the Pedro magnet. Combine this with the always there magnet to get combined magnets.
Look at the left painting again & use the combined magnets on the screw.
Either Roger or Martin will meanwhile discover something you might like to have a look at & hand you a classified disc.
Pick up the armillary sphere again & use the screws on the holes. The sphere opens & you get a cassette & a key.
(GLITCH: DON’T look at the cassette without saving the game 1st. There’s no way of exiting the close-up.)
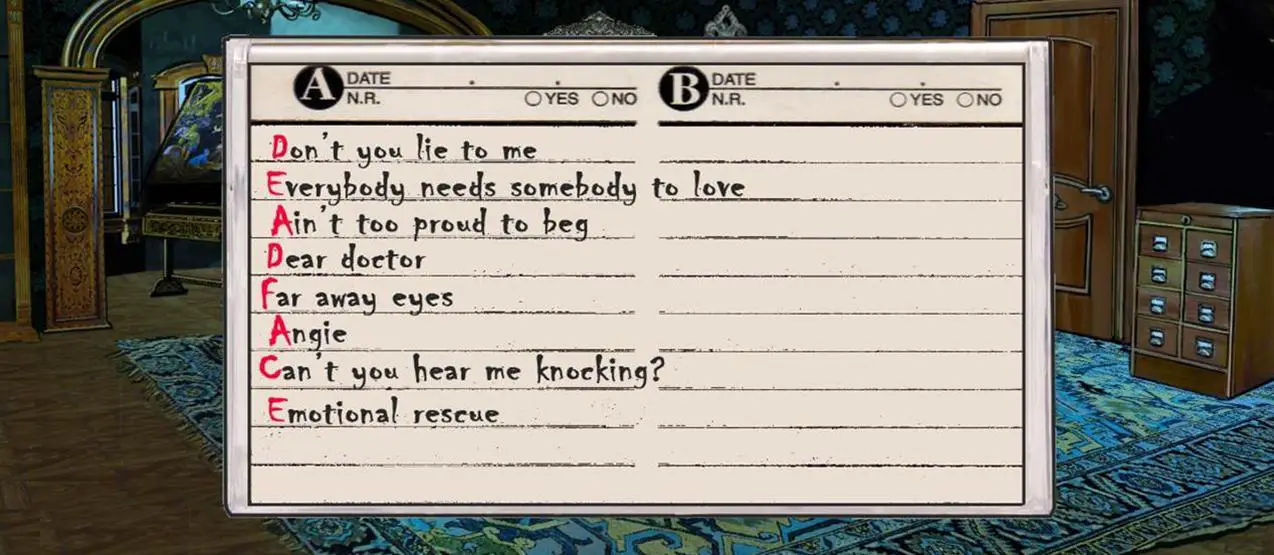
Here’s a picture of the close-up of the cassette:
Use the key on the filing cabinet lock.
Interact with drawer A – C to find 2 letters. Both are from Archibald Carrington.
If you’re with Roger, you will read a letter about his scholarship & automatically hand it over. He leaves the office upset.
If you’re with Martin, you will read a letter about his father’s plan to send him to military school & he’ll snatch it away. He leaves the office angry.
In both cases you will be left with the other letter in inventory. Interact with it to read. (GLITCH: DON’T look at it as you can’t exit the close-up.)
Interact with the drawer J – L to see another letter about one of the students. It refers to disturbing behaviour exhibited by someone from/connected to a highly respected family
Interact with the right cupboard to find a poz dispenser. Then interact with the left cupboard to find a small key.
Interact with the harpsichord to find it locked. Use the key on it. Interact with it again to see a close-up of part of the keyboard.
Click on the keys corresponding to the musical notes: D E A D F A C E as seen on the cassette. (N.B you don’t need to see the cassette in close-up to trigger the puzzle.)
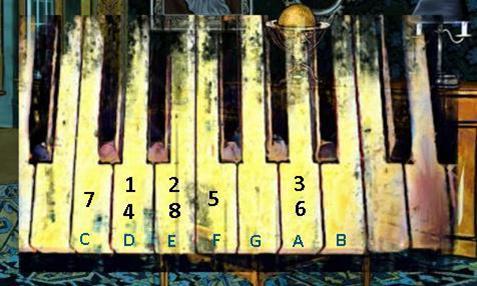
Hear something heavy sliding nearby. Interact with the closet door again & enter the secret room.
MORTY’S MAN CAVE
Interact with the leather jacket to find another strange coin.
Take the jacket stand.
Look at the jukebox to see a close-up.
Look at the coin slot & see printed below INSERT 35. Use the strange coins that add up to 30 on the coin slot.
Interact with the helmet case. There doesn’t seem to be any way of opening it.
Use either the jacket stand or the hammer on it to smash the glass. Try to take one of the helmets to get a 3rd strange coin with a value of 5.
Look at the jukebox & use the strange coin on the slot.
Pick up the documents. Read the letter from Edna. Exit the close-up of the letter to see some photographs. You now have incriminating letters.
Take the letters from the top shelf to see the painting sale letter regarding Damon Ribaldi’s art.
Taylor calls you to ask if you’ve found anything.
You can choose to LIE or BE HONEST.
You call Jono.
ACHIEVEMENT: Give peace a chance (Went with Roger to find blackmail on Mortimer)
ACHIEVEMENT: Anarchy in the U.K. (Went with Martin to find blackmail on Mortimer.)
(N.B Criteria needed to achieve Anarchy in the U.K. is marked [1] – [9] in the walkthrough. Thanks Laney Berry.)
___________________________________________________________________________________________________
LIE TO TAYLOR:
This leaves you free to blackmail Morty yourself.
BLACKMAIL MORTY – PART 1
Morty’s Man Cave
If you have the numbers book from the reception desk, you will automatically enter Morty’s number into your phone.
Interact with your phone & call Morty. He’s not threatened by your evidence so you need to try & identify the red-head.
Foyer
Look at the poster & see that the woman in the picture resembles the woman in the photographs. (N.B is that her portrait in the hall outside the library?)
Interact with your phone & call Morty again. This time he agrees to pay but he can’t pay you immediately.
Maybe you’ll have more luck with Mrs Carrington but you don’t have her phone number. Look at the poster again to see that her new book is called “Forlorn Frontiers and Other Mishaps”.
BE HONEST WITH TAYLOR:
This leaves you free to try & steal the painting.
STEAL THE PAINTING – PART 1
Student Lounge
Talk to Drake & Roger. You hand over the letters & photos.
Talk to Drake & Roger again. Roger tells you that the woman in the photos is Martin’s mum.
Regarding the painting, Martin still owes you a favour! Maybe he’s still on the roof.
Roof
Talk to Hash & Martin.
Ask Martin about the famous painting. He tells you it’s in the library but you can’t get in without an I.D.
___________________________________________________________________________________________________
GETTING INTO THE LIBRARY
Student Lounge
Look at the computer & use the classified disc on it. See from a note attached to it that the disc was found on Brody Burton’s desk. ”The contents are disturbing”.
Look at the book you picked up from the nurse’s office, the first one in the Bakerloo Line Quartet by Holden Burke.
See the title, Baker Street, & the list of names of people who took it out.
Before Martin it was Emily then Brody.
Exit the close-up to see a barcode on the back.
Hallway (library)
Interact with the card reader to get a close-up. Try to use the book with the barcode scanner. You need to insert a keycard before returning a book.
Pick up the empty bag of chips. Look at it to see a barcode covered with smudged greasy fingerprints.
Gym/Stage
Use the book on Kevin, Shilling & Emily. She lends you the 2nd book in the series.
Look at it in inventory to see the title, Regent’s Park, & that the last person to take it out was Helen.
Exit the close-up to see the barcode on the back.
Use the book on Helen. You learn that if there’s any smudge on the barcode you have to type it in manually to return a book.
Backstage
Talk to Brody about the classified disc. It doesn’t matter which response you give. Talk to her again & she lends you her key card.
Hallway (library)
Interact with the card reader & use the keycard on it. The keycard doesn’t work.
Backstage
Talk to Brody. There is a way to fix the card but she can’t remember it.
Foyer
Talk to Stephen about the card not working.
Foyer (upper)
Use the key card on the varnish by the ladder.
Alternatively you can use the masking tape in inventory with the key card.
Hallway (library)
Interact with the card reader. The reader accepts the card, but the door won’t unlock until Brody has returned her overdue book.
Neither of the other 2 books will be accepted by the barcode scanner as Brody didn’t borrow them.
Backstage
Talk to Brody. She doesn’t have the overdue book with her but gives you the 4th book in the series.
Look at it in inventory to see the title, Piccadilly Circus.
Exit the close-up to see the barcode on the back.
Hallway (library)
Kevin rings you. He tells you that the Bakerloo Quartet was titled after consecutive stops on the Bakerloo Line.
Interact with the card reader & try Brody’s book in the barcode scanner. It’s not due back for a couple of days so you decide to keep it until you’ve opened the library door.
Gym/Stage
Talk to Shilling to see if he might have a map of the London Underground. He trades you a tube map for the Captain Centollo key ring. (N.B alternatively you can break the 4th wall here by Googling the map!)
Look at the tube map to see that the stop between Regent’s Park & Piccadilly Circus is Oxford Circus.
You can now work out from the titles & the barcodes of the:
1st book: Baker Street: BURK1985BAK4362
2nd book: Regent’s Park: BURK1985REG4363
4rd book: Piccadilly Circus: BURK1985PIC4365
the code for the 3rd book Oxford Circus.
Hallway (library)
Interact with the card reader & use the keycard on it.
Use the knife on one of the books to damage the barcode.
Use either this book or the empty bag of chips with the barcode scanner. As the reader can’t identify the barcode, enter the code of the overdue book BURK1985OXF4364
The door unlocks.
___________________________________________________________________________________________________
BLACKMAIL MORTY – PART 2
Library
FIX YOUR MOOD
Interact with the catalogue drawers to see an index card with the name of the book, “Forlorn Frontiers and Other Mishaps” by Edna Carrington. Its location in the library can be read in the top left corner. Exit the close-up.
Interact with shelf E in bookcase VI to get the book.
Interact with the book in inventory to see a business contact number at the bottom which is entered into your phone.
Interact with your phone to talk to Edna Carrington.
Drake, Kevin & Taylor enter the library.
STEAL THE PAINTING – PART 2
Library
FIX YOUR MOOD
Look at the control panel to see that the paintings are connected to an alarm system.
Interact with the catalogue drawers to see an index card with the name of a book about young British artists. Its location in the library can be read in the top left corner. Exit the close-up.
Interact with shelf F in bookcase IV to get the young brit’s art book.
Interact with the book in inventory & from the descriptions identify which painting in the library is the work of Damon Ribaldi.
Upper left: The painting has a signature. Damon avoids signing his work.
Upper middle: Scribbles. Damon uses a real, representational approach.
Upper right: the painting is a “Direct portrayal of the human form”. Damon avoids direct portrayal of the human form.
Lower right: Abstract. Damon avoids abstract.
Lower middle: Contains all of the colours. Damon doesn’t use purple.
Lower left: Haunting solitary footstep is etched into the emptiness. Damon captures the vestiges of human life in all of its minutiae. He likes to exaggerate negative space.
The lower left painting fits the description of Damon Ribaldi’s work. See that it’s connected to the orange light.
Interact with the control panel. You need only to concentrate on directing the orange light beam to the orange painting, by adjusting the mirrors, to disable its alarm. Adjust the mirrors to direct the other coloured light beams out of the path of the orange beam.
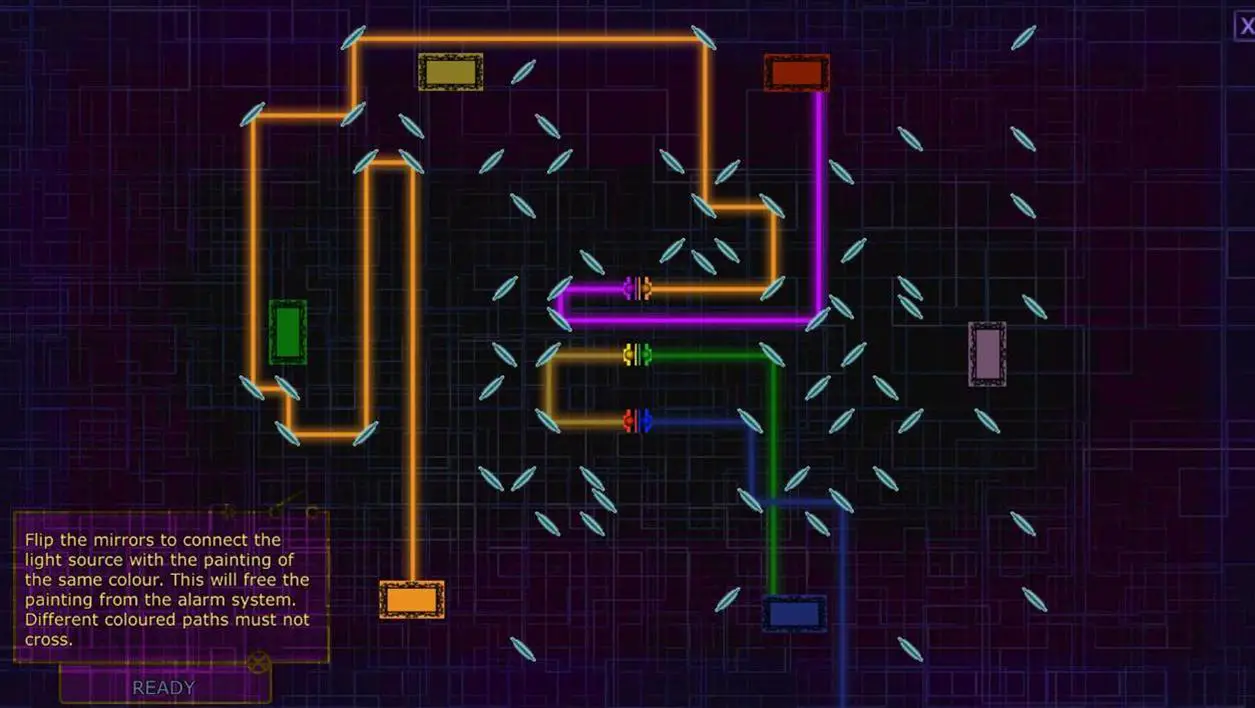
Click on the orange painting & then again to choose YES to take it
The painting’s title is “The more you take, the more you leave behind!” as mentioned in the painting sale letter.
Drake, Kevin & Taylor enter the library.
___________________________________________________________________________________________________
ESCAPE
Boiler Room
Pick up the journal.
Interact with it in inventory to see the 3 disturbing pages.
Hear knocking on the other side of the service tunnel hatch & Roger’s voice.
Rooftop
You tell Roger everything. You glimpse flashbacks as you explain your way of life & how you came to be at the concert.
Hallway (library)
Roger tells you that St Christopher’s used to have a secret society back in the day. ‘The brothership of the bong’ which funded the building of the secret passage.
To access the secret passage find & interact with the tiles (there are 4), that upset the symmetry of the pattern.
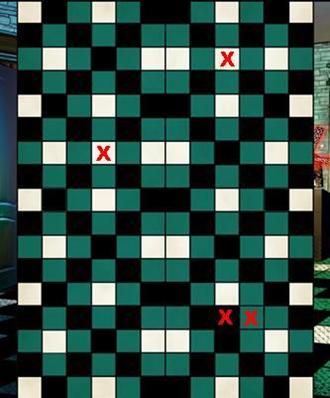
See Kayleigh try to open the trap door……. & Roger’s reaction.
THE END
ACHIEVEMENT: Another Brick in the Wall (Finished the entire game)
For a few more details pertinent to the story:
Read the additional pages of the journal in BONUS in the Main Menu.
ACHIEVEMENT: Madness (Read the journal and all of its horrific contents)
Read the additional articles, particularly the one about Drake, in CLASSIFIED.
RE: ACHIEVEMENT: Voodoo Child (Won all dolls in the game.)
(N.B I found that this achievement didn’t register after acquiring 4 dolls. There are 4 spaces for the Voodoo Collection in the locker but 5 spaces on the screen when you challenge someone to a game. I couldn’t find a 5th doll – the BARRY doll? )