The St Christopher’s School Lockdown Walkthrough
THE ST CHRISTOPHER’S SCHOOL LOCKDOWN
by
Classroom Graffiti Productions
Walkthrough by chrissie November 2018
LAUNCH MENU: NEW GAME / LOAD / SETTINGS / BONUS / EXIT.
Settings: Adjust music & sound effects. Change resolution.
INTERFACE This is a point & click game played using the left mouse button. The keyboard is used in some of the puzzles.
Clicking on an item or person displays a choice of actions that can be performed represented by: a magnifying glass to look; a gear to interact; a hand to pick up, take or use; an ear to eavesdrop/listen & a mouth to talk.
Pressing the TAB key shows all hotspots.
During dialogue either click on a choice of response if available or click on the screen to progress/end the dialogue.
Click on the ‘escape’ sign to enter/exit an area.
INVENTORY: Move the cursor to the top of the screen to access during the game. Items can be looked at with the magnifying glass, interacted with using the gear icon & picked up/used with the hand icon. Items can be combined by dragging one onto another with the hand icon & separated using the gear icon.
Click on the INSIGNIA in the bottom left-hand corner of the screen during the game to access the game locker:
IN-GAME MENU: SAVE / LOAD / SETTINGS / MAIN MENU / EXIT.
Saving: There are 20 save slots which can be over-written. Saves are labelled with the location & date.
ALUMNI BOOK: Not used.
VOODOO COLLECTION: You can acquire up to 4 (or 5?) dolls which are used to compete in a game called Voodoo Wars. See the details about each doll & the rules of the game.
MAP: When this feature becomes available, you can click on the globe & then a location to move directly there. Areas are added as you access them.
TO-DO LIST: Shows the current objectives.
MOOD FIX: Click on the fish bowl to adjust your mood.
ABOUT THIS GAME
The game can be very slow to launch & load. Some transitions & responses within the game are very slow also.
Be VERY patient & wait as trying to hurry the game can cause it to crash. Save often!
Dialogue is only voiced in key parts.
There are 15 ACHIEVEMENTS to be gained in the Steam version of the game. Unfortunately only 13 of them seem to register.
ABOUT THIS WALKTHROUGH
It is based on the version of the game with update 1.0.8
This is just one way of playing the game and may not necessarily include all there is to find. Some details may vary on different playthroughs.
It’s not clarified, but talk to everyone & look at everything. Sometimes talking or looking more than once can reveal additional info.
*Accumulative items, actions &/or dialogue choices that contribute towards an achievement are marked with an asterisk & a number.
___________________________________________________________________________________________________
INTRO
See protagonist Kayleigh crashed-out in a camper van. She’s gradually being awoken by a guy called Brian nagging her to wake up!
Exit the van.
DAY 1
“I knew who I was this morning, but I’ve changed a few times since then.”
Lewis Carroll, Alice in Wonderland
FIND OUT WHERE YOU ARE
Car park
Outside there’s no sign of Brian & you note that this is not where the van was parked last night before you fell asleep.
See police on the other side of the railings. Listen to their conversation.
Enter the van. Pick up the clothes to get a pile of clothes in inventory, & then look at them to see that you have a school uniform. Interact with the pile of clothes to change into them.
Find yourself outside the van.
Enter the van, pick up the hanger then exit the van again.
Try to enter through the back entrance. It’s currently locked but you can hear people chattering inside.
Interact with the gate but that’s locked too.
Side of School
Try to enter through the door.
See that one of the windows is slightly open. (You might be able to enter through the window or it may be stuck.)
Look at the blue flame car & the red fiesta. Look at the old car which is a 1982 sedan. See that the boot is partially open. Use the hand icon to rummage through it. You see an empty bottle of weed-killer.
School Front
Try the front door.
Look at, and then pick up the protest signs to get a wooden stick.
Side of School
*Use the wooden stick on the blue flame car. [1]
ACHIEVEMENT: Rebel Yell (Hit the car with your trusty stick)
School Front
Look at the Frankenstein mask & try to take it. In inventory interact with the hanger to make a wire hook. Combine this with the wooden stick to get an upgraded stick. Use the upgraded stick on the Frankenstein mask to get a rubber mask. Combine the rubber mask with the upgraded stick to get a portable mask.
Gate
(To the south). Click on the sign to see that you’re in the grounds of St Christopher’s School. You see the police on the other side of the gate & wonder why the school is surrounded. Click on the police to listen to their conversation.
For fun, use the portable mask on the policemen. (N.B I couldn’t find any other use for the mask!)
FIX YOUR MOOD
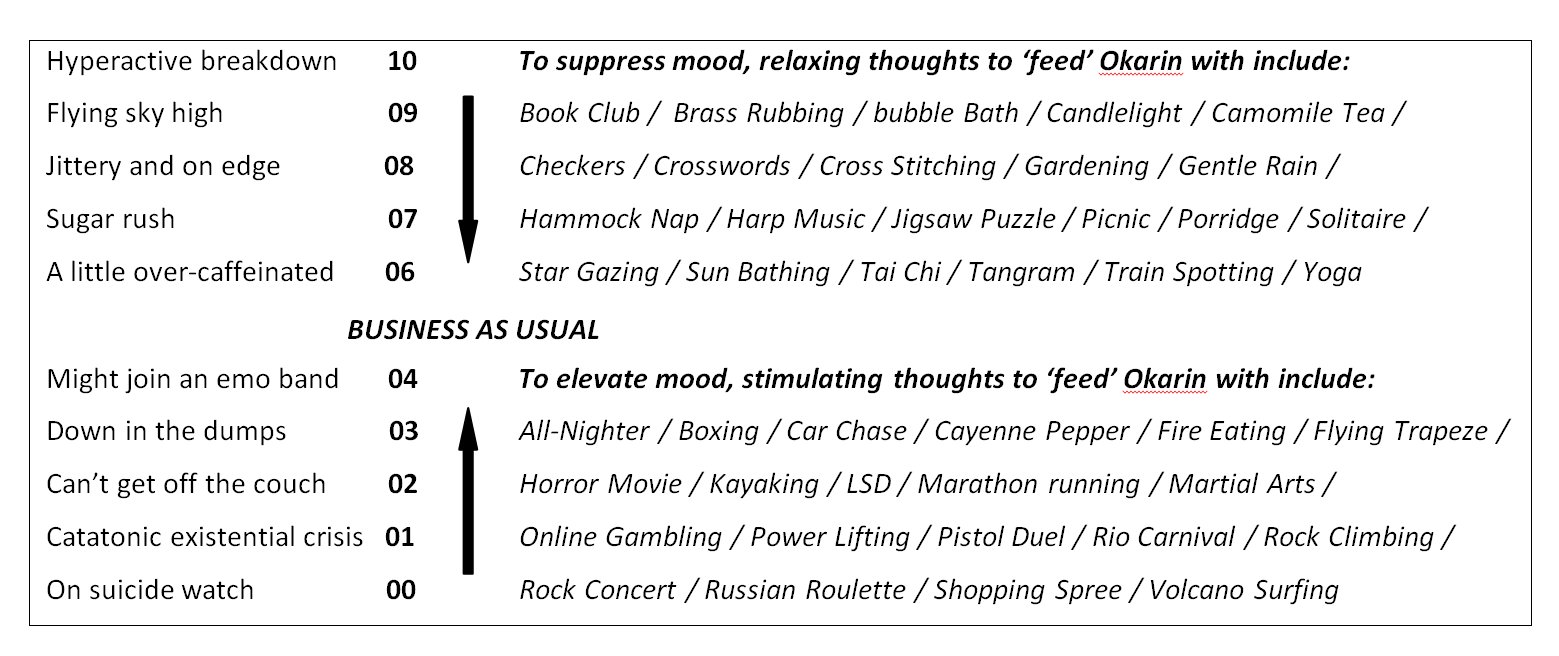
While you’re at the gate you may get an alert e.g. MIGHT JOIN AN EMO BAND on a gadget that appears in the top right corner of the screen. The sight of the police has lowered your mood.
On the gadget click on HELP.
Read through the MOOD FACTS to learn about your mood fluctuations.
Click on MOOD FIX to read how you meditate to control your mood when you do not have any medication.
Click on MOOD EFFECTS to read the physical effects of these mood swings.
At the bottom of the gadget a number will indicate at what level your mood is at e.g. MOOD: 04
If you choose to ACT instructions will appear on the screen.
Click on START, then click & drag the lily pads labelled with the relevant thoughts onto Okarin your koi fish to encourage him towards the centre of the stream.
Retry if necessary until your mood is BUSINESS AS USUAL.
EXPLORE THE SCHOOL
Side of School
There doesn’t seem to be any other way into the school so try to enter through the window again.
(N.B Depending on what order you do things in you may find it possible to enter through the back entrance)
If the window’s stuck, interact with the portable mask in inventory to separate the rubber mask from the upgraded stick.
You can use the upgraded stick on the red fiesta to carve the letter K on it if you want.
Use the upgraded stick on the window.
Hallway
Check out the art & sculptures. Look at & try to take Moose Ahoy’s hook.
Nurses Office
Interact with the nurse’s office. The door is locked.
Cafeteria
(The entrance is at the bottom of the screen)
Look around.
Look at & interact with the *HUASO HAT (1) to try it on.
Student Lounge
Look around.
Look at & interact with the *AUSSIE HAT (2) to try it on.
Art Room
Look around. Try to take the rope.
Foyer
Look around.
Look at the reception desk for a close-up. Look at & pick-up the numbers book.
Hallway (library)
Check out the sculptures & the portraits. Chilean exchange student Sancho Guerrero created the windmill piece. (The guy sleeping in the cafeteria.)
Look at the lockers numbered A 1 – 6 to see through a layer of red paint “Feminism is Cancer”.
Library
Try to enter. The door can only be opened with a keycard.
Interact with the card reader to get a closer look.
Sports Hallway
Look around.
Look at & speak to the hipster girl. (Anemone)
Look at & talk to the solemn youth. (Stephen).
Look at & listen to the role-players. (They include Pauline & Harold)
Talk to the roleplayers. Talk to the roleplayers again & ask about yesterday. A skirmish with tear gas is mentioned.
Stalls/Gym
Look around.
Look at the hedgehog sign. The mascot of the school is a blue & gold hedgehog.
Look at & listen to the red-headed boy (Martin) talking on his phone. Look at him again & then again. He winks at you.
Gym/Stage
You wonder why all of these kids are in school on a Saturday.
You realise you need to call Brian & remember that you tossed your phone out into the car park.
Look at & listen to the serious-looking guys to get confirmation that you’re in the midst of a school protest.
Exit to the car park by clicking on the sign above the doors.
Car Park
You meet Helen. She offers to look for your phone.
You find yourself back in the building.
Gym/Stage
You can now identify the two serious-looking guys as Roger & Drake.
Roger addresses the students from the stage. You learn how the protest got underway & glimpse some flashbacks as Roger relates the events of the night before. (Briefly see him gagged).
Drake then takes over to lay down some rules.
You can now move around the school quickly using the MAP in your locker. Locations will be added as you access them.
GET STUDENT 1.D.
You talk to Drake.
Talk to Roger. Ask about the protest. Respond with *”They deserve a brick or two to the head” [2]
Ask about the priceless paintings to learn that those by former student Damon Ribaldi are pretty expensive.
Talk to the enterprising young man in the ‘off licence’. Shilling could help you with a Student I.D. Card if he knew who sent you.
Look at the Shilling Shop Sign & then look again to read the small note.
Look at & interact with the *PERUVIAN HAT (3).
Backstage
Look at & interact with the knight’s *HELMET (4). Look at the bi-plane. Look at & interact with the *AVIATOR’S HAT (5) near the costumes at the back.
Talk to the guitar-playing guy (Kevin).
Stalls /Gym
Look at & talk to the guy on the laptop (Clive). He thinks he knows you from somewhere. Choose any response.
Look at & talk to the Goth girl (Taylor). She describes Drake as being a total control freak. When you ask her about the I.D. she tells you to talk to Shilling.
Look at & listen to the red-headed boy (Martin).
Sports Hallway
Talk to the hipster girl about how long the protest will last. See that she’s wearing sunglasses.
Talk to the roleplayers. They’re too busy playing. You learn that the name of Harold’s character is Ragnarok, the merchant of death.
Talk to the solemn youth (Stephen) about the Student I.D. He gives you a password which now makes sense of what Shilling meant.
Gym / Stage
Talk to the enterprising young man & tell him “Gavroche sent me”. Shilling wants you to win a doll from Anemone by playing a game of Voodoo Wars with her. He gives you a description of her & voodoo doll *BRUSHGUY (1).
Sports Hallway
Click on the INSIGNIA bottom left of the screen to open up your locker. Click on the Voodoo Collection to see BRUSHGUY.
Read his bio & about the spells you can use.
Move the cursor over the minions to read their names.
Click on the RULES & then the headings: COMBAT / MINIONS / PINS / DOLLS / SPELLS.
Talk to the hipster girl (Anemone). Play Voodoo Wars. Talk to Anemone to replay if you lose. Win OSCAR MILDE (2). (This is the only time it’s necessary to play Voodoo Wars. Future games are optional).
Gym/Stage
Talk to Shilling. He lets you keep the doll & gives you the fake I.D.
Talk to Drake to show him the I.D. He notes your phone number & tells you that Helen is looking for you.
Changing Room
Talk to Helen. She gives you your phone.
Pick up the tweezers from the sink unit. Take some tissue from the dispenser to get paper towel.
DRY OUT THE PHONE
In inventory use the paper towel on the phone. Use the tweezers on the phone to remove the back of the case & have an
open phone. Use the last bit of paper towel to wipe off all of the water you can see.
You still need to get the last drop of water out & see the interior of the open phone.
Alternatively, you can use the phone with the bag of rice in the cafeteria to absorb the water, & then interact with the phone in inventory to see the interior of the phone without using the tweezers.
Read the instructions.
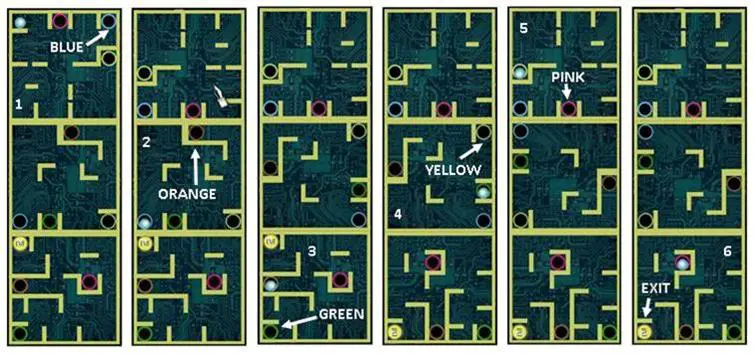
The aim is to guide the ball from the top section to the EXIT in the bottom section.
Click on each section containing the ball by rotating it left or right, using the corresponding mouse buttons. Manoeuvre the ball into one of the holes. (Take care not to accidentally click on either of the other two sections!)
1 TOP SECTION: Guide the ball to the BLUE-rimmed hole: R – L – R – L – L – L – L – R.
It emerges from the blue-rimmed hole in the middle section.
2 MIDDLE SECTION: From the blue-rimmed hole, guide the ball to the ORANGE-rimmed hole: R – R – L – L – R – L – R – R – R.
It emerges from the orange-rimmed hole in the bottom section.
3 BOTTOM SECTION: From the orange-rimmed hole, guide the ball to the GREEN-rimmed hole: R – L – L – L – R – R – L.
It emerges from the green-rimmed hole in the middle section.
4 MIDDLE SECTION: From the green-rimmed hole, guide the ball to the YELLOW-rimmed hole: L – L – L – R.
It emerges from the yellow-rimmed hole in the top section.
5 TOP SECTION: From the yellow-rimmed hole, guide the ball to the PINK-rimmed hole: R – R – L – L – R – R – R – R – L – R.
It emerges from the pink-rimmed hole in the bottom section.
6 BOTTOM SECTION: From the pink-rimmed hole, guide the ball to the EXIT: L – R – L – R – R – L – L.
You call Brian. Jono answers. You owe him money & you’re running out of time.
You call Uncle Vincenzo & hear an answer-phone message. You’ll have to try again later.
Gym/Stage
Drake gives you an assignment. He wants you to walk around, listen to the students, & weave their words into a manifesto to be sent to the media. Kevin has already written part of a first draft.
Backstage
Talk to Brody.
She gives you a recording device.
In inventory interact with the device & click on ‘?’ to read the instructions.
See the draft of the manifesto in the left section with blanks in some of the sentences. (Use the arrows at the bottom to scroll up/down.) There are 8 blanks.
The recorder is context sensitive. It will automatically appear after a conversation with a selection of 3 phrases/words of interest shown in the top section.
From these, click on one phrase to be entered into the section on the right.
(If you think you’ve picked the wrong one, the other phrases can be added again by listening/talking to the student(s) again).
Click & drag the phrases that best fit into the blanks in the manifesto.
COMPLETE THE MANIFESTO
Gym/Stage
Talk & listen to Kevin & Shilling.
Note Shilling’s favourite children’s day-time telly show.
Changing Room
Listen to the ‘denim group’ (Kiera, Rachel & Sandra)
Note that Stephen is able to hack into the school’s database.
Backstage
Talk to Brody.
Stalls/Gym
Talk to Stephen.
Listen to Clive talking to Martin.
Glean from the conversation that a member of Martin’s family, Imogen, is in a TV show.
Talk to Martin. When he asks what you think when talking about the protest, respond with *”Yeah, I wish they’d let us do something more radical”. [3]
Sports Hallway
Talk & listen to the role-players. (Pauline, Harold & Anthony)
Art Room
Talk & listen to the potheads (Gerald & Scott)
Note that Martin is supplying pot. Learn what his father’s job role is.
Student Lounge
Talk & listen to Helen & Drake. The machine doesn’t respond to their conversation.
Note that Helen addresses Drake as Elliot.
Cafeteria
Talk & listen to Taylor & Cressida.
Glean that a new P.E. uniform has been introduced by Jenkins who’s also referred to as Morty &Mortimer.
Once you’ve filled in all of the blanks, interact with the device in inventory. Click on PRINT to get the completed manifesto.
THE COMPLETED MANIFESTO
We marched all night, not me for rest, so
We now present our manifesto
Do we have your full attention?
Or will you throw us in detention? (Stephen – stalls/gym)
We do no fear you, either way
And here is what we have to say
Our first demand is plain to see
Our school tuition should be free (Clive – stalls/gym)
The current fees are fucking shite
We’re begging you to set this right
These greedy fat cats getting rich (Potheads – art room)
Are giving us the right to bitch (Kevin & Shilling – gym/stage)
As for our second demand
We ask you for a helping hand
To make us try our very best
Let final tests be self-assessed (Denim group – changing room)
We’d take our futures in our hands (Brody – backstage)
If we could grade our own exams
The third demand within this song
School weekends should be four days long
There are more life lessons out of school (Taylor & Cressida – cafeteria)
Then we could learn under your rule
We’re worried we’re not strong enough
And the school of hard knocks makes you tough
And finally our last demand
Buck down and let us take a stand
We will not take a second more
Of prejudice against the poor (Role-players – sports hallway)
Old-fashioned social class disputes
Have no place in our institutes
We’ll rise above it, make the grade
We’ll show you we aint gonna quit
This song is like a hate grenade
And we don’t have to take your shit
Student Lounge
Talk to the radical think tank (Drake, Taylor, Martin, Kevin & Roger).
Hallway (library)
Now seems to be a good time to ring your Uncle Vincenzo. You tell him that you borrowed money from the wrong people & go on to tell him about the idea that you & Brian had.
FLASHBACK 1: THE WILD WEB CAFE
Kayleigh & Brian arrive on a street corner in Soho. Kayleigh is ‘dressed up to the nines’ ready to attend a charity benefit event.
You need to get enough money to pay Jono back tonight. Brian gives you ten pounds which should be enough for a 1 hour pass.
Look at Brian to learn that he’s Kayleigh’s brother.
Look at the van. It looks like a tradesman’s van. Look at the van again to see a sign in the back window for “The Flush Busters”.
Interact with the phone booth. Take the posters to put into your inventory: naughty poster, french maid poster,
buddha poster, finger poster, chakras, english A-levels, christian au pair poster & glamour model announcement.
Exit the phone booth.
Enter the Wild Web Cafe. (Recognise some people Kayleigh hasn’t met yet).
Talk to Donovan to buy a pass. He tells you that all of the computers are being used. The two free ones are waiting to be fixed.
Kebabs are half-price with every purchase.
Talk to the patrons:
The boy (Drake), using the printer, assumes you’re a student at St Christopher’s. If you confirm this he gives you a free drink ticket & tells you that the concert begins in a couple of hours.
The blue-haired girl (Cressida) is chatting to her boyfriend in Vienna & will be ages.
The chav girl (Kiera) is talking to someone on her phone while surfing. Ask her about the picture. It was taken of her while she was drunk & has been uploaded by her ex boyfriend Greg. She’s not leaving the computer until the picture has been taken down. You learn of a classified web page dedicated to the gossip at St Christopher’s School.
The toddler (charming child!) is eating a kebab but tells you that there’s nothing tasty on it. Talk to him again. He tells you that he’s with his babysitter & points to Kiera.
The guy (Hornby) in the corner booth is looking at pictures of glamour girl Pinky Bustierre & has no intention of leaving just yet.
Luigi, sat at the left computer desk, is playing euchre. He’s on a winning streak today & it’s unlikely that he’ll be done soon.
Look at him & see from the logo on the back of his work suit that he works for a plumbing company. The logo matches the one on the van outside.
TO FREE-UP A COMPUTER
There are 3 ways but you can choose you to free-up all 3 computers if you want!
METHOD 1:
Exit the cafe, look at the van again to see a phone number. Interact with the phone booth & click on the telephone to call the plumbing company. Exit the phone booth & enter the Wild Web Cafe to find Luigi gone.
METHOD 2:
Look at each of the posters from the phone booth in inventory. Interact with the glamour model announcement to see on the back that Pinky Bustierre is one of the girls who will be signing autographs all day. Give this poster to Hornby.
METHOD 3:
Try to interact with the condiments (in the bottom right-hand corner). Talk to Donovan & buy a kebab. You’re left with eight pounds.
Interact with the condiments again. Look at the ketchup bottle to see that the label is a little loose.
Pick up the ketchup & hot sauce. In inventory interact with the ketchup to remove the label.
Combine the label with the hot sauce to get hot sauce with label.
*Give the hot sauce with label to the the toddler. [4] See what happens!
Interact with the free computer.
INTERNET RESEARCH:
(You can skip this puzzle at any time by exiting the computer, ‘knowing who your target is’, clicking on the wrong answer & choosing to ring Brian).
Otherwise click on the pictures on the homepage to read the information in each of the 3 sections. Use the left arrow at the top of the computer screen to return to the home page.
The aim is to work out who the richest man is, the ailment he suffers from, his make of car & his preferred holiday destination.
Start by identifying the ailments, makes of car, holiday destinations & names of the 6 richest men.
Ailments: Asthma, diabetes, ulcer, psoriasis, haemorrhoids & panic attacks.
Makes of Car: BMW, Ferrari Cabriolet, Bentley, Porsche, Saab & Maserati.
Holiday Destinations: Santorini, St Remy, Lake Como, Bahamas, Mustique , Bali
Names: Frances Bertram, Salvador Potestry, Rodney Blaire , Freddy McDowell, Bartholomew Klane & Manuel Estevez.
Make a note of what you know about each man from the information in the articles. (1)
Then by cross-referencing & a process of elimination you can work out the ailments, makes of car & holiday destinations pertinent to each man. (2) & (3)
(N.B I couldn’t glean from the information the position of all of the men in the rich list).
IS WEALTH KILLING YOUR HEALTH?
(1) Francis Bertram suffers from asthma.
(2) The 2nd richest man has diabetes. He’s crazy about ice-cream but doesn’t eat anything white. He can eat chocolate ice-cream.
(2) The man who has a villa in Santorini has an ulcer.
Other complaints include psoriasis and haemorrhoids the latter attributed to sitting for long hours.
(3) The richest man has panic attacks.
WHEELS OF FORTUNE
(1) Salvador Potestry drives a BMW
(1) Rodney Blaire drives a Ferrari Cabriolet & spends time in St Remy.
(1) Frederick McDowell drives a Bentley. He has a special air cushion to help with his private health condition. (Deduce that he suffers from haemorrhoids)
(1) Bartholomew Klane drives a Porsche.
(3) The 4th richest man drives a Saab.
(2) The man who has a Maserati suffers from asthma.
A LITTLE PLACE UNDER THE SUN
(2) The man who likes to visit Lake Como loves Italian ice-cream but can’t eat Gelato. (Deduce that this is the 2nd richest man who loves ice-cream but doesn’t eat anything white due to diabetes).
(1) Salvador Potestry has a home in the Bahamas.
(1) Rodney Blaire has a villa in St Remy & suffers from psoriasis.
(1) Freddy McDowell has a house in Mustique.
(1) Francis Bertram goes to Bali.
(1) Manuel Estevez goes to Santorini.
|
Frances Bertram |
Rodney Blaire |
Manuel Estevez |
Bartholomew Klane |
Frederick McDowell |
Salvador Potestry |
|
|
AILMENT |
ASTHMA (1)
|
PSORIASIS (1)
|
ULCER (2) |
DIABETES (2)
|
HAEMORRHOIDS (1)
|
PANIC ATTACKS (2)
|
|
CAR |
MASERATI (2)
|
FERRARI CABRIOLET (1)
|
SAAB (2) |
PORSCHE (1)
|
BENTLEY (1)
|
BMW (1)
|
|
HOLIDAY DESTINATION |
BALI (1)
|
ST REMY (1) |
SANTORINI (1)
|
LAKE COMO (1)
|
MUSTIQUE (1)
|
BAHAMAS (1)
|
|
PLACE ON RICH LIST |
1ST 2ND 3RD 4TH 5TH 6TH |
1ST 2ND 3RD 4TH 5TH 6TH |
1ST 2ND 3RD 4TH (3) 5TH 6TH |
1ST 2ND (2) 3RD 4TH 5TH 6TH |
1ST 2ND 3RD 4TH 5TH 6TH |
1ST (3) 2ND 3RD 4TH 5TH 6TH |
Exit the computer. You can either decide that you’ve done enough to know who your target is or keep researching.
The richest man in these articles drives a…. BMW
The health problem he suffers from is….Panic Attacks
He has a second home in….The Bahamas
His name is….Salvador Potestry
You can now choose to leave it at that if you want.
SAVE GAME
If you choose to find out more about Sal you’ll be confronted with a search engine page from Whazoo.
Click on the headings to read the snippets of information & gossip on each of the websites. Pay particular attention to the works of Salvador Potestry & any details mentioned pertaining to those.
Exit the computer & automatically be outside the cafe.
Interact with the phone booth & then with the phone to ring Brian……..
BACK IN THE PRESENT
Hallway (library)
……your phone call is interrupted by Taylor.
Stalls/Gym
Listen to Stephen & the conversation that he, Martin & Cressida are having about Roger.
SAVE GAME
Gym/Stage
It’s time for the ‘Extracurricular Evening Entertainment Extravaganza’ hosted by Kevin.