The Lost Crown
Day Four: The treasure
revealed
Carrion Woods: Exit the cottage and the town proper.
Go through the beach, the Saxton caverns, Fenland Eye and the fens. Pass through the station and go to Raven Lane. Enter the Carrion Woods.
Go left until the middle crossroad (2 clicks upon entering the wood). See and
take a pinecone at the base of a tree. Check the Carrion Woods map for
directions.Go left and see millstone #2. Take the path going to the bottom of the screen.
Mine: Enter the mine.
Look close at the barrel at left. Take the plunger from between the
barrels.Go right and see a box connected to a cable. Take sweaty gelignite
from the box below the makeshift table.Read the scroll written by T.G. concerning knockers right of the table.
Go back and enter the mine. Go to the end and see that it is blocked by boulders. A cable is already laid
out between the boulders.Place the sweaty gelignite on the boulder. Go back to the box on the makeshift
table outside the main mine passage.Look close at box and use the plunger on the box. Automatically the plunger
goes down and explodes the gelignite.Go back to the mine. Go forward and read the book on top of a boulder. It was
the last words written by Alistair Farleigh after hiding in the mine from a
man wearing a hat and black cape on April 1924. Now we know the identity of the
Northfield skeleton. Click on his name.
Outside the Secret Kingdom:
Decorative stone at hanging bridge: Go forward until the
decorative stone on the wall. Look at the decorative stone. Use the recorder
on the stone tablet. Listen to cassette and hear 3 tones. Take note of the
fiery brazier with a dragon.
Open the stone wall: Go forward until another hanging
bridge.
Go right after the arch and see a wall blocking passage. There’s a tile on the
wall.Turn back and go left after the arch. Look close and
see the wood pipe broken in one part allowing water to fall and not reach the
waterwheel at right. Use the pinecone on the broken part. See the waterwheel
turn.Go back to the right after the arched entryway.
Press the tile on the wall now that it is activated by the waterwheel. The
stone wall goes down.
Secret Kingdom:
4 Seasons room: Go
forward through the hallway. See another tile on the wall. Oops, the wall goes
up. Press it again to lower the stone wall.Go forward and be at the bottom of the waterwheel
activated earlier.Waterwheel – Go forward to the waterwheel.
Look close at the waterwheel. In between the spokes, see a picture of a fish
and spring.Seasons door – Go back to the right on the walkway; look at
the closed door in front of the wheel. It has the old symbol of All Seasons.Go back outside at right again and press that tile on the wall that
raises the stone wall. Go back to the seasons door and see that it is lowered
and opened.Seasons wheel – Enter and go forward.
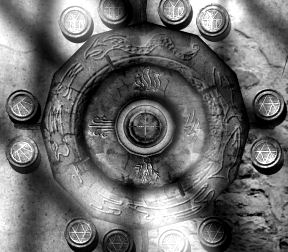
See a 4 seasons wheel with season disks on each
side and 2
rings. The disks are winter on top, spring at right, summer at left and fall
at the bottom.The outer ring has the dragon, fish, hare and bird.
The inner ring has the elements:
fire, water, earth and wind.Turn the rings to show the clue seen behind the
waterwheel: Spring, fish and water.Turn the inner ring first to position water with
spring at right.Then turn the outer ring to position fish with
spring and water as shown by the waterwheel or dragon above the fire as noted
on the brazier by the decorative stone at the hanging bridge.Take disk #1 from the center that opened.
Exit the room and back to the walkway.
Clockwork passage: Continue
through the arch left of the waterwheel.Look at the skeleton under the fallen column. Take
disk #2.Waterwheel Passage:
Go left at the hallway on top.Look close at the white area between broken column
base. Take disk #3.Wind stone wheel: Go
forward through the archway. See that this is the feasting room.Look around. See a 3 crowns tapestry at the end.
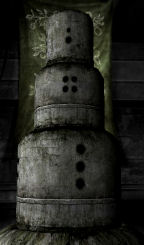
Wind sound puzzle: Look
close at the 3 stacked round cylinders with holes on the left.Hear the wind pass through the holes to make sounds.
Listen to the recording of the decorative stone
taken by the first hanging bridge.Turn the wheels to reproduce the sounds from the
recording.Turn to get 2 on top, 4 in a square in the middle
and 3 at the bottom. Take disk #4.
Exit the room to the end.
Seer Pools room: Go right
at the hallway.See a room with 9 stands. Each stands shows an event
in Nigel’s adventure in Saxton.Black mist emanates from the center of the floor.
Stand 1 below the entrance and stand 9 at the other
side of the entrance are unchangeable.Stand 1 shows Nigel’s arrival at the SedgeMarsh
depot. Stand 9 shows Nigel entering the Secret Kingdom.The object of the puzzle is to show the next event
in Nigel’s life at Saxton.Going clockwise from bottom of entrance:
Stand 1 (unchangeable) – SedgeMarsh depot.
Stand 2 – Nigel talking to Nanny Noah at Saxton
Shores.Stand 3 – The opened chest at Smugglers cave.
Stand 4 – Ager’s (Karswell’s) house at Raven Lane.
Stand 5 – Northfield church.
Stand 6 – Saxton museum surveillance room at night.
Stand 7 – With Prof. Hardacre at the Pinnacle.
Stand 8 – The Gypsy caravan at the May Day Fayre.
Stand 9 (unchangeable) – Nigel at start of Secret
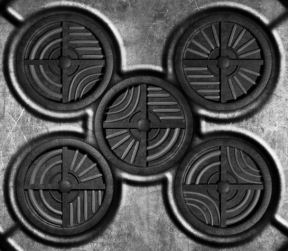
Kingdom.Disk pattern: The mist at center
of room disappears. Go to the center
of the floor.Use the 4 disks located from all around the secret
kingdom on the round indentations. They will
be inserted automatically at the correct place.The object of the puzzle is to arrange the pattern
of the 4 outside disks to match the adjacent pattern seen on the center disk.
Click the center disk to reset the puzzle.Click on all 4 outside disk once and then click the
bottom left disk again (5th click). The floor opens and a pedestal comes up.
Tomb hall: Go to the center of
the floor and the pedestal lowers to the columned tomb hall.Go forward and see the tomb with swirling light
above it.Click on the tomb. Open the tomb. Look close inside.
When the light shines to see Ganwulf’s skull, take
the crown. Ganwulf speaks.Automatically be at the entrance to the secret
kingdom. Exit the mine.
Night Four: To share a
secret.
Carrion Woods:
Exit the woods by avoiding the black mists emanating
from the stone cairns.Go left from millstone 2, above millstone 1, right
at lower path, bottom right at intersection (pinecones) and right to exit the
woods.
Go back to Saxton town and then to Harbour cottage.
Harbour Cottage:
Bedroom: Go to the bedroom.
Place new evidences on the table.Use the rusty key on the chest at the foot of the
bed. Place the crown inside.Exit the bedroom and see the cabinet door
open. Exit the cottage.
The Bear: Enter the Bear
and go to the back room.
Hear who won the Saxton Snappers Competition. Talk
to Rhys.Talk to Lucy completely. Lucy shows that she got the
crystal ball.
Harbour Cottage: Automatically be in
the cottage.
Bedroom: See that the room
has been ransacked, the chest opened and the crown gone. Someone has stolen
it.Living room: Watch the
crystal ball and ask questions.See the culprit running, being chased at the
Pinnacle and getting attacked with a sickle.The next morning, Nigel is alone, disoriented in the cottage.
Take the newspaper and letter.
Day Five: A shadow
across the landA new set of things to do is seen on the notepad.
Read the newspaper and the poisoned letter. EG, who
is EG? Ah, yes… Read about the newspaper to learn about bad things that has
happened overnight in
Saxton. The animals and birds are gone.
The Pinnacle: Exit the
cottage. Go right and hear barking.
Go to the Pinnacle. Go to beach, Saxton cave and
right to the Pinnacle.Go to the right and see police tapes. Go right and
talk to Nanny Noah. She refuses to know Nigel.Talk to the policeman. Talk to Alex, the detective.
Hat, glasses and plaid coat… See what happened to
Prof. Hardacre.
Saxton Town:
Talk to
stationmaster at the depot, Prof. Oogle at the museum and Bob Tawny at the
smithy. See a replacement for Cairan is here. Nigel is ignored by the
townspeople.Northfield Skeleton: Use the
phone booth and use Crime Line phone number on the phone.Report that the Northfield skeleton is Alistair
Farleigh. Alistair’s soul is free.
Seat by Harbour cottage: Go
left of Harbour cottage and talk to Lucy. Leave Lucy.
The Bear: Go right and see what
happened to EG – Gruel. Jemima…
The Pinnacle: Automatically be
at the Pinnacle.
Boots and footprints: Go
right until the crime scene. Look close at evidence A – the boots. Use the
camera on the close up of the sole of the boots.Go left and then bottom right. Go to life bell and
look on the sand. See footprints. Use the picture of the boot sole on the
footprint.Go left by the lobster trap and look close on the
prints in the sand. Use the picture of the boot sole on the prints on the
sand. A match, a perfect match.See Hardacre’s ghost pointing to something. Look
close at the small cave left of where the ghost was standing. Take the
crown.
Seat by Harbour cottage:
Automatically be facing Lucy. Talk to Lucy again completely. She agrees to
help tonight.
Harbour Cottage: Automatically enter
the cottage.
Cellar: Go down the hallway
and enter the stagnant water area at the cellar.Safe: Go to the safe.
Open the safe by pressing 3418 and then the
windmill. Look close inside and place the crown inside.Help Christina: The light bulb goes
out and see a light by the stairs. Take the paper on the water under the stairs. Read
Christina’s letter to her mother. She believes that Edward is trying to
kill her. She has a hidden diary. Take note of the places where Edward’s mechanism is
heard.Secret hiding place: Go upstairs
and see that the place has changed.Find Christina’s hiding place by clicking on windmills (Molina)
seen around the house in the order stated in Christina’s letter.1. Look close and click the windmill on the newel at
top of stairs at the balcony.2. Look close and click the windmill at top left of
the door frame of the living room to hallway entryway.3. Look close and click the windmill on the newel at
bottom of stairs at the living room.4. Look close and click the windmill at top left of
the door frame of the bathroom entryway.Hear a swinging door.
Go to the kitchen and see that the closet at top
left is opened. Look inside and read 4 pages of Christina’s diary.Nigel talks to Christina. Christina and Edward are now
free.
Living Room: Hear a knocking.
Let Lucy inside the house.
Phone: The phone rings.
Answer the phone. Hadden wants to talk to Lucy.Lucy talks to Hadden. He said – to pull you back
when the time is ready.Séance: Go to the place where Hardacre came through the cottage.
Go to bedroom. The cabinet is active. See Hardacre
all over the room.See Hardacre go to the safe at the cellar. Nigel
follows.Light comes out of the safe. The crown floats. It
is me that you want. Nigel is pulled in the light.Ganwulf talks again. Nigel is in the Tomb hall.
See all the Saxton population here. Click on each of
them.Go to tomb. Place the crown back on Ganwulf’s head.
It felt… eternal. Forever.
This
document may not be distributed without express written permission of the
author and the content may not be altered in any way.For
Questions or Comments on this Walkthrough,
Please write to:
MaGtRo
Copyright © 3/2008
MaGtRo