The Lost Crown
Day Three: Deception
Collect the
equipment from the window sill. Some are missing.See a
picture taken during the night. One of the Agers came out of the cabinet.Go downstairs and automatically get the newspaper
and the second poison pen letter. Read the newspaper and the letter. Someone
was at the museum last night. I wonder who the culprit is.Go to the
bathroom and pick up the EMF meter from the bathtub. Go to the kitchen and
take the recorder from the left drawer.
Quayside:
Exit the cottage. Talk to Nanny Noah at the seat beside the cottage. She
mentions that she saw Lucy going to the coastal path.
Martello
Towers: Go to the beach and Fenland Eye to get to Martello
Tower. See Lucy at top of the tower. Go to the other side of the tower. Click on tower to eavesdrop.
Harbour
Wall: Go back to Harbour wall. See Nanny Noah feeding
the ducks. Talk to her completely.
If hungry,
have breakfast at Lighthouse tower.
Celtic
Corner: Time to check what that symbol seen in the Tree of
Crows painting mean. Go to Celtic Corner.
Mr. Tibbs is
gone.Enter any
picture that can be inserted on the contest box at end of counter.Go to the
bookcase at right. Look at a book of symbols from the center of the shelf.Click the
picture of the symbol from the Tree of Crows on the book. Nigel identifies the
Tree of Crows symbol
as Town or Village.Exit the
store.
Coast
Path: Go to top path until the end and see beautiful
flowers. Take a flower picture.
Harbour
Wall: Go back to Harbour wall. See Nanny Noah feeding
the ducks. Talk to her completely.
Show her the
picture of the flower taken at the meadows.She wants
Nigel to test the Treasure Hunt for tomorrow’s May Day celebration.She
identifies the bloom as Pasque flower. She gives clue 1.
Treasure
Hunt:
Read Clue
1: Sounds like a train and the picture of the
Station Staff.Go to Train
Station and take the Saxton Local Map from the chair. Talk to
stationmaster. I wonder who stole Mr. Gruel’s book.Go to the
picture of the Staff right of the door. Take clue 2.Clue 2:
Sounds like the butterfly collection in the old town hall which is now the
museum.Go to the
museum. Talk to Prof. Oogle. Mines under the Carrion Woods?Go to the
butterfly display. Click on the left side of the butterfly display and get
clue 3 and wire.Telescope
– Hear EMF reading. Nigel gets a strong reading close at the telescope and
Nigel wants to do another pilfering.Look at the
camera on left wall. Hmm… Take a picture of the telescope stand while
standing under the camera so that Nigel is not under surveillance.Use the wire
on the camera. Use the room photo on the wire. Hehehehe!Take the
telescope. Look at telescope in inventory. It is jammed.Bob
Tawny: Go to Bob at Coast path.Talk to Bob
about fixing the telescope and other topics. If you have any food, give it to
Cairan. Fattening the pig, eh.Clue 3:
Read clue 3. It describes the old Saxon lighthouse.Go to the
Coast path and lighthouse.Now, we see
Lucy as mentioned by Nanny Noah. Talk to Lucy. She gives a walkie talkie.Take clue
4 on top of the barrel.Clue 4:
Sounds like a snake.Go to Celtic
Corner and look at the snake candle holder on the counter. Take clue 5.Clue 5:
Ah, it sounds like the siren at the tidal chamber of Saxton
Caverns.Go to the
Saxton caverns left of the steps of Harbour wall. Enter cave and see clue 6
flying by.Use the
camcorder at dark area, go forward for a while, left at sea monster, right and forward
until the Tidal Chamber.Talk to
Emily, the siren. Show me you are here. At can I help you in some way, see an
active spot at bottom left. Place the picture of the Pasque flower on rock.
Emily is released.Take a
picture of Emily’s symbol seen.Now Emily
and Gurney are released. They are the ones mentioned on the poisoned letter.Exit the
cavern. Take clue 6 from the rock. Nanny Noah wants Nigel to visit this afternoon.
The
Pinnacles: See Prof. Hardacre going left.
Follow him
by going to Saxton Shores, the cave and through Fenland Eye. At the rocky
area, go to bottom screen.Talk to
Hardacre completely. Hardacre is looking through a theodolite. There’s a life
bell here and it needs a crank handle.Look around
the Pinnacles:Go right and
then go to bottom right by lamps. Look in crab box and see rotten fish. Find a
picture of Nigel at right corner of the box.Go right,
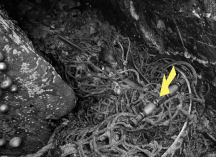
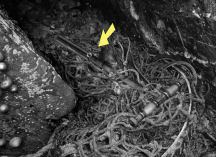
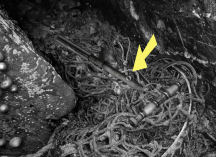
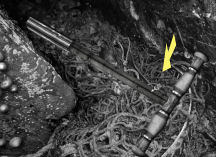
forward and see an anchor at top right. Check the corner there and expose the
crank handle. Click on the rod midway down the item. Click again between the
middle and the handle twice. You cannot exit the puzzle until you get
the crank and have clicked on all the active spots on it. Get a crank handle.
Go back and
then take the top path. Continue the path and see the life bell. Look close at
the metal close to the base. Insert the crank handle and automatically turn
it. Listen to the bell. Hear echoes that reverberate on the boulders.Go top left
and then top right. The sound affected Nigel and he gets a vision of an
Anglo Saxon, maybe Ganwulf. You might need to repeat the ringing of the bell and
going to this area to get this scene.Go left and
talk to Hardacre.Go left
twice and down to Hardacre’s equipments.Theodolite: Look through
the theodolite.Click on a
number at the bottom to move the theodolite.See a memorial at -135 and the
entrance to Saxton Caverns is at -180.+135 shows a figure at the Old Net
Store. Lucy is looking for something on the ground at the door of the Net
Store. Hahahahahahah! Go right from Hardacre.Nigel gets a
call from Lucy on the walkie talkie. Right click the walkie talkie in
inventory
to talk to Lucy.
Old Net Store: Automatically be at the Old Net Store.
Talk to Lucy
by the door.Go back to
the path and look at the rock by the cliff side across the steps going down.Lower
floor of the building: Look around. Check the junk and the window.Go back and
talk to Lucy completely. She borrows the camcorder.Go back to
the lower level of the building.Black Mist: Lucy enters
the building with the help of a rock.The window
closes and Nigel is in the dark. Lucy guides
Nigel through the junk.Go L F R F.
Hear a noise. Black mist comes out of the floor.Go L L F
to get to door. Black mist comes out by the door and escape is not possible.Go R R F R
F. Don’t move.Lucy says
Something’s coming. Tell Lucy to run to other side of balcony.Nigel turns
around. Go R R F L F L F F. Click on chain at left. Then click on handle to open
window to get light in.
Ramp:
Look at the barrel with oil cans at right. Pick up Mr. Tibbs collar.Go down the
ramp. See the door rattle and hear a cat crying.Slide the
lever of the door. Enter the room. The door closes shut.Nightmare
room: See the tortured cats.Look at the
pictures on the wall. They are pictures of Lucy and Nigel in different places
and time.Take the
key from behind the top left photo.Go left and
look at the books in the bookcase.Look close
at the Ager Brothers painting on the wall. The one on the right, William is
breaking up.Look close
at desk drawers. Use the key from the photo on the keyhole.The door’s
lever is slid to close the door. Trapped. Swarm of flies attacks Nigel.Go to the
door and try to get out. Use the walkie talkie. Lucy comes.Lucy takes
pictures of the photos for evidence.Check the 2
journals in the drawer. A secret to hide.Take
Frederick Ager’s journal from the bookcase. Read the journal. It talks
about a place in Grindle’s embrace that hides the crown.Look at the
painting again and see that Thomas is breaking up. Two more to go.Talk to
Lucy. Lucy comes
clean about Alex Spitmoor.
The Ark:
Automatically be at Nanny Noah’s. Talk to Nanny Noah and have a rest and tea.
Nanny Noah
gives a May Day raffle 142 ticket.Nanny reads
the tea leaves of Nigel’s.
Harbour
Cottage:
On the way
to the cottage, talk to Bob Tawny up the ladder. Molina was a smuggler.Enter the
cottage. At the bedroom, leave evidences and the Saxton map on the table.Go to bed
and again see the scissors.Wake up at
3 AM by the phone ringing.
Night Three: Nocturnal SurveillanceGo down and
answer the phone. The environmeter detects activity. Click the monitor to
enter the password.Bedroom:
See Molina come out of the cabinet.
Balcony: See bats or hear words said on the beams.Words at
the beams:See a cross
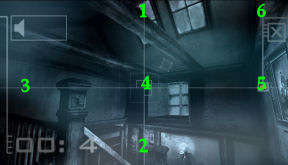
hair on the screen.Move the
cursor-square and click in places to pick up words.The places
are: top center, top right, middle right, center, middle left and bottom
center.Once they
are located. Click on each word to form a sentence.If correct, Nigel
repeats the sentence. Evil which lives within the walls.
Hallway:
See Molina go through the ghost door at end of the hallway or a wheelchair.Bathroom:
Click on the orbs seen floating. There are 5 of them. Then see Christina with
no hair by the sink.Exit the
environmeter by clicking on ‘quit’ on any monitor.Go towards
the hallway to check where Molina went. Get a walkie talkie call from Lucy.
Talk to Lucy.Lucy mans
the environmeter.Bathroom:
See and hear a crying of Christina.Kitchen:
Read Molina’s journal. He mentions what Christina believes and stated. He
repeated those words on the beam’s paranormal phenomena: Evil which lives within the walls.Hallway:
Hear a growling sounds. See the black mist in the kitchen and the Agers at the
hallway.Bedroom:
See the cabinet open and orb activity. The cabinet rattles.Balcony:
Lucy calls Nigel to go down and look at the balcony monitor.A shadow of
a man hanging on the beams is seen. Nigel climbs up to the balcony.Use the
camcorder on the balcony and see the rope. Take a picture and see the rope
shadow on the beam.Use the
recorder on the balcony. Nigel listens to the cassette of the balcony. Molina
says 3418.Bedroom:
Leave the equipment on the window sill and the evidences on the table.Go to bed.
See the
nightmare room again and the door at the end of the hallway. Nigel is now
added to the Ager brothers painting.Nigel
experiences an out of body. Go down to the hallway. Click on the wall and see
Nigel gets overwhelmed by the black mist and sound.
May 1, Monday
Day 4: May DayWake up.
Pick up the equipments from the window sill. Take a look at the photo taken
that night. The Agers were there. Some of the equipments are missing.Go
downstairs and automatically pick up the newspaper and poisoned letter 3. Read
the letter and the newspaper.Bathroom:
Take the recorder from the top shelf.Hallway:
See that the wall is destroyed. Enter through the opening.Look at the
water.Power box:
Go to the power box and click to get light.Safe:
Go to the safe at right.Enter the
numbers said by Molina – 3418. Press the center square with a windmill.Take a
picture of Christina. Use the videocam on the picture and then take a picture.
See a symbol on Christina’s picture.Take the EMF
meter. Read Molina’s journal. It was Molina’s last entry before he committed
suicide. The stagnant water caused Christina’s illness.Look under
the stairs and click on the sealed archway.Exit the
cottage.
Beach:
Go to the beach below the Harbour wall. See the May Day Fayre.
Bob
Tawny’s Hog Roast: Oh No! Cairan! Talk to Bob
completely.Punch and
Judy Show: Go left from the Hog Roast. Check the show.Ghost
Train: Talk to Lucy. Have a ride on the ghost train.
Talk to her after the ride again.Lucky
Dip: Go left and see a barrel behind the caravan. Click on the
barrel until you get a silver spoon.Mystic
Morgan: Enter the caravan. Give the
silver spoon to the Mystic. Learn Nigel’s fortune. Watch the crystal ball.Exit the
caravan. Hear that
the winning ticket is 142.Raffle:
Go left to Prof. Oogle. Nigel won the raffle.Talk to
Oogle after getting the prize. As long as the telescope makes its way back to
the museum…Check the
lighthouse painting won on the raffle. The lighthouse sees from
Northfield to Ulcombe Town.Nanny
Noah: Talk to Nanny Noah.Go back to
Bob Tawny and ask about the telescope.
Celtic
Corner: Go to Coast Path and enter Celtic Corner.
Talk to
Rhys. Go to the bookcase and check the symbol books in the middle of the
shelf.Use the
picture of the Siren symbol on the page. It is a symbol of an eye.Use the
picture of Christina symbol on the page. It is the great Fen. Exit the
store.
Lighthouse: Go behind the store and forward to the
lighthouse.
Use the
telescope at bottom right of the water and see the town.Use the
telescope at bottom left of the water and see Ulcombe church.
Ulcombe:
Exit the lighthouse area and go left across the meadows.
Memorial:
Check the memorial with a eulogy.Tower:
Go left to get to the church.Click on the
clock of the tower. Go to the tower and see that it is locked.Go left and
forward between the tower and building. Go through
the archway.Church:
See birds on top of the archway of the church entrance.Enter the
church and go down the first aisle.Nancy and
Timmy:Nancy
Brewer: Talk to the girl listening to a gramophone.Timmy, the
brother found a key to the tower and hid it. She and
Timmy are waiting for Dad to come home from the war.Timmy:
Exit the church and then go right until the shed. Find and
talk to Timmy in the shed.Mr.
Russet: Go left and talk to Mr. Russet.Riddle:
Go forward, pass the church door and be at the archway and drainpipe.Look at the
Celtic symbol on the retaining wall. See that it
is old language. Read the first line.Go back and ask Mr.
Russet’s help about the stone riddle. He wants to be read the riddle.Go back to
the riddle. Look close and then use the notepad to copy the riddle.Go back to
Mr. Russet. Read him the lines and listen to the translation.He will not
give the answer. The riddle translation is in inventory.Timmy:
Go back to Timmy. Timmy and Nigel try to solve the riddle together.When it is
Nigel’s turn, take the translation paper in inventory and give it to Timmy.Select
Swallow. Timmy gives the tower key.Nancy:
Go back to Nancy inside the church.Talk to her
completely. She asks help to go home and be with Dad. Learn that happened to
them was caused by a man in black when the cliffs gave away.Tower:
Go to tower. Use the tower key on the door.Climb the
ladder to be at top of tower. Use the
telescope on the sky and see a man at the Memorial.Memorial:
Exit the tower. Go to the Memorial and look at the eulogy.The ghost
man was Nancy and Timmy’s father. Use the notebook on the eulogy to copy what
the father wrote.Nancy and
Timmy: Go back to the shed at the back of the church.Click the
eulogy copy on Nancy. Nancy reads the eulogy to Timmy. Rest now.Tower:
Go back to the tower.Read the
books on the floor. Check the machine on the table.Go down the
stairs and see a door with a button lock. Take the
wheel by the barrel.Go back to
Mr. Russet at the side of the church and ask for help about the machine. It is
a steam machine that he made for the organ. The organ has a curse. Ask about
the metal door. It is the crypt.Go to the
shed. Enter the shed.Take
Nathaniel Ager’s journal. Read the journal and learn about the organ.
Nathaniel’s organ playing
shakes the earth. Take the
oil can.Go back to
the tower.Steam
machine: Look close at the steam machine on the table.Look close
at the tank on the left. Use oil can on the tank.Press the
button on the machine. See fire, steam and the pump start up.Cellar:
Go down the stairs. See that the
crypt door is now powered by the steam machine upstairs.Crypt door:
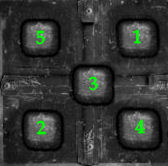
Look at the door. It has a 5-button lock.Press
buttons and listen to the sound.If the
button is pressed at the correct order, it makes a higher click sound.If the
button is pressed when in the wrong order, it makes a lower thud like sound.The top
right has a click sound. Now find the next button that produces the second
click sound.Then start
from top right, the second and look for the third. Always start the sequence
from the first correct ones to find the next one.Click on top
right, bottom left, middle, bottom right and top left.
Ulcombe
crypts: Enter the crypt.See that the
passage close to the entrance has candelabras. Use that as marker in the dark. There are no matches to use. Use the
camcorder to see the passageway.Go forward
and eek! Look at the walls on each side on every step. Occasionally get hit by
stone.Check the
cells on the left. Turn the corner and look inside the next cell. Take the
piece of broken candle stand from the floor.Go forward
to the other corner. Open the coffin ahead using the broken candle stand.Read the
book. The Dance of Death tells about the waning crescent moon, the moon like
sharpened scythe and the darkling moon.Continue
forward on the passageway on the right.Triptych
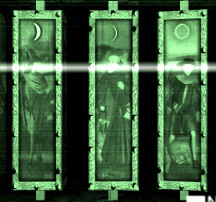
– See an ornate door on the right and a triptych across the door.The panels
of the triptych depict pictures with moon on top.Each panel
can be rotated. Turn the
panels to show the moons described in the book Dance of Death.Left is the
waning crescent moon, the middle is like a scythe and the right is the
darkling moon.
Ager
Tomb: The ornate door opens.Enter and
see the way to the skeleton on the slab is blocked by the black mist.We can not
pass through. We contained Thomas at the Northfield church. We can do this to
Nathaniel. Go back out.Exit the
crypt. Go right and forward.Check the
paintings on the wall. Turn the corner, forward and left. Forward until the
door.Church:
Go back inside the church. See that steam now flows through the pipes.Play
Nathaniel’s music in the organ:Power the
organ:Go to side
passage of the organ. Go forward to the end.Look close
and then place the wheel found at the tower cellar on the knob of the pipe.Turn the
wheel to steam power the organ. The organ now works. Go back out
to the organ.Gramophone: Go down the
first aisle to the gramophone.Turn the handle. Look close
at the gramophone and read the record.Use the recorder on the gramophone. It was conducted
by Nathaniel. Listen to the music recorded and hear a different music.Turn the
handle and take a picture of the gramophone.Nathaniel’s music: Go
further down the aisle.Read the book on the table. Learn that Nathaniel’s
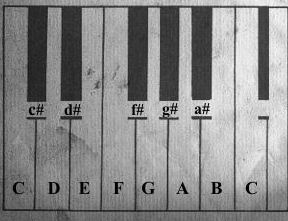
best known work starts with F#. Also note the organ keys guide.Look at
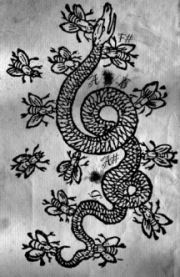
Nathaniel’s journal. See that the snake has notes. There are notations from top to bottom. F# A ? B A# ? D.Listen to
the recording of the music and hear 7 notes. The journal shows 5 notes plus 2
erased. Play the cassette and determine the 2 missing notes.
Go to the
organ and play the notes.Play F# – A
– G – B – A# – C – D.The music
reverberates through the church, outside and the crypt. The place is free. Free of its dead.
Nathaniel is exorcised.
Crypt:
Go back to the tower and the crypt.Use the camcorder in the dark part of the crypt.
Go right at first intersection. Go left and enter
the Agers tomb at left.Go forward and see Nathaniel’s skeleton.
Take a picture of the crypt symbol on the
wall.Exit the tomb, crypt and tower.
Mr. Tibbs: Go forward and see
Mr. Tibbs. We need him to follow Nigel.Go back inside the church. Go to the middle aisle
and look close on the floor between the pews.See a rat trap. Use the broken candle stand on the
trap. Take the Stilton cheese. Rats with very sophisticated taste.Go back to Mr. Tibbs. Click the cheese on Mr. Tibbs.
Go towards the town at right.When Mr. Tibbs stops, click the cheese on him again
to get him going.
Celtic Corner:
Automatically enter the store and talk to Rhys.
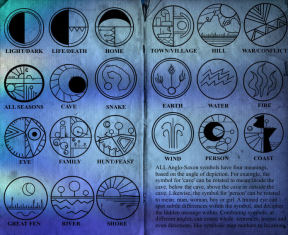
Book of symbols: Look at
the middle book at top shelf of the bookcase.Use the
picture of the tomb symbol on the page. It is a symbol of mountains.Read the description at bottom right of page. It
states that the symbols when turned can have different meanings. Also they can
form a sentence when the symbols are combined and can give directions.
Harbour
Cottage: Go back to Harbour cottage.
Bedroom: Place evidences
collected on the table.Symbols: After getting 4
symbols and have identified them using the Book of Symbols, it is time to see if it
can direct to the next destination.Open the Saxton local map found on the table. Use the
4 pictures with symbols on the local map.Place: The town or village symbol at top left. The eye at
top right. The great fen at bottom right. The hill at bottom left.Turn each symbol and note the directions stated.
With all the evidences and clues gathered through conversations and books, use
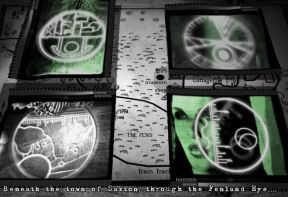
the symbol to describe the direction to the place where the crown is located.Turn the symbols: Beneath the
town, through the Eye, through the Fens, beneath the hill.The treasure is beneath the Carrion Woods. Prof.
Oogle mentioned that there are mines there and that the mystery skeleton was
found there too.