The Egyptian Prophecy: The Fate of Ramses
The Second Door (Labyrinth)
We
are shown Maya’s "ka" ("ethereal double") on our left.Note that both you and she have a labyrinth
in front, but hers is the mirror image of yours.Thus, you must be careful not to let either
of you step into the empty spaces in the labyrinth, or step off the labyrinth altogether,
or you will fall off into the sky and fail the test.[Note: Even if you fall out, there is
no need to worry because the puzzle will simply start over.]I think the following is the simplest
possible solution to this puzzle.
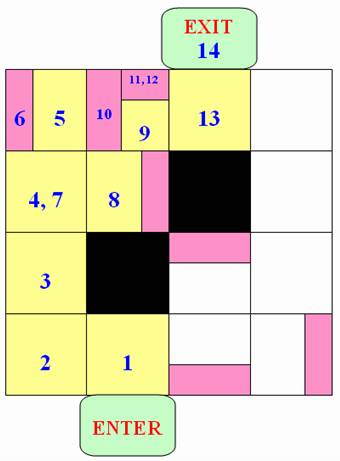
Note that the
different colors in the above diagram indicate the following:
1.The
black tiles are the dangerous
empty spaces within the labyrinth.
2.The
portion of a tile shown in pink
represents the wall on that side of the tile.
3.The yellow tiles indicate
the tiles used in this solution to cross the labyrinth.
Step-by-Step directions:
1.Enter the labyrinth.Turn left and
2.Step forward.Turn right and
3.Take three steps forward.
4.Click once on the (double
cursor on the) wall on your LEFT. Turn left and
5.Step forward (to return to the
tile you had come from, in Step 3).Turn
left and
6.Step forward.Turn left and
7.Step forward.
8.Click once on the wall
on your LEFT.
9.Click twice on the wall
now on your RIGHT.Turn right and
10. Step
forward.Turn left and
11.Step out of the labyrinth.
Go through the door
in front of you and proceed to the next trial.
The Third Door (The Five Guards)
You
must determine which of the five guards has the heart of Feathers.Imagine as if the five guards before you were
numbered as follows.
12345
Note
that Guard No. 2 is the smallest of the five.Thus, this is the "small guard" that the riddle tells us has the "HEART OF STONE."The clues also tell us:
1.The heart of GOLD is
to the RIGHT of the heart of STONE.
2.The LAPIS-LAZULI heart
is between the hearts of STONE
and GOLD.
3.The PAPYRUS heart is
to the right of the heart of GOLD.
Thus,
the hearts of gold, lapis-lazuli, and papyrus are all to the right of the small
guard with the heart of stone.This
takes care of all three guards to the right of the one with the heart of stone,
leaving only one guard unaccounted for: Guard No. 1, the one to the LEFT
of the one with the heart of stone.Hence,
Guard No. 1 is the one with the Heart of Feathers.
[Additional Note:Since there are only three guards to the right of the small guard, Guard No.
4 has the heart of Gold – because, as the clues tell us, the Lapis-Lazuli
heart comes between the hearts of
stone and gold, and the Papyrus heart is to the right of the heart of gold.Thus, Guard No. 3 has the Lapis-Lazuli heart, and Guard No. 5
has the Papyrus heart.]
So click on Guard No. 1 and proceed to the
next (and final) trial.
The Fourth Door ("May the heavens guide
thy steps")
There
are four mats, each with a different drawing, in front of you.Look at the sky ("heavens") above
the door in front of you, to see a cluster of bright stars.Use your Wedjat-Eye of Clairvoyance on
this cluster, and you will be shown an image matching the drawing on one of the
mats in front of you.Step on that mat,
and look up at the stars again, to see another image.Note: The particular order of these
images is randomly generated by the
computer.A maximum of six images
will be shown (unless you step on the wrong mat, in which case a set of another
six will probably be shown).So continue
to follow these images in the sky until you are told that you have passed the
trial.
Step
towards the door in front of you.A
cutscene and then, a dialog will follow.Give the Mysterious Knife to Osiris.Another dialog follows.Exhaust all topics of the conversation.Osiris will then give you a Soporific Incense
("Kyphi").Look down on your
left at the burnt drawing of a snake in the mat.Bring out the Dried Snake from your
inventory and place it on this drawing.A
magical stairway will appear above the dried snake.Click on the stairway, and a cutscene will
take you to the second portion of this chapter.
Memphis:
Talk
to the little girl.Talk to her again, and
she will give you back the Sacred Recipient.Go to the basket-weaver by the pool.Talk to the other man with him, a guard with
a stammering problem.He will give you some
salt if you cure him.So use your Transfer
Handkerchief to transfer the affliction from the guard to the
basket-weaver.The guard is cured and gives
you the Salt.Talk to the
basket-weaver…
I must
say that I found this quite appalling.It’s
true that the basket-weaver was not very polite.But then, he sat in the midday heat, weaving
those "bloody baskets," even though he was overqualified for such a
task.Still, he did help Maya finish
that drawing on the coping, which she needed to meet Isis; and he even gave her
those water-lily seeds, without which she could not have completed either Ptah or Isis’s
trials.And she repaid him by giving him
the other man’s affliction — and all for just a bowl of salt!So talk about unfair indeed. L
Go
out of the courtyard and to the chapel guard.Use the Cobra of Hypnosis on him.Enter the gate, and approach the High Priest inside the chapel.A dialog follows.Give the Sacred Recipient and the Salt,
one by one, to the High Priest.A
cutscene will follow.Talk to the High
Priest again.Leave the chapel, go past
the guard and approach the boatman on your right.Click on him and a cutscene will take you to
the next chapter.
Chapter
8: Pi-Ramses
Take
two steps forward, turn left and approach Djer, who is standing in the entrance
to the Priests’ Courtyard.A dialog
follows.Enter the Courtyard, go to
Paser in his house, and place the Figurine of Paser on him.A cutscene and then, a dialog follow.Exhaust all topics of the conversation.Talk to Tuya, exhausting all topics again.
Turn
right and step over to the floor lamp behind Paser’s headboard.Put the Soporific Incense on the flame.Some dialogs follow.Leave Paser’s house, to have a vision.Go to your right, to find Djer standing in
the doorway.Approach him.A dialog follows.Exhaust all topics.Step out of the Priests’ Courtyard.
Follow Djer’s
instructions (step forward, then to your right, and then to your right again)
to enter the Storehouse Courtyard.Approach
the High Priest, and a dialog follows.Click
on the High Priest, and he will teach you the Rain Spell.Exhaust all topics and take advantage of the
opportunity to practice countering three of the spells Tuya is likely to use
against you:
1.COBRA OF HYPNOSIS – use the Purification Vase.
2.MAGICAL NET – use the Banner for Controlling the Wind.
3.LOTUS TRANSFORMATION SPELL – use the Wedjat-Eye of Clairvoyance.
Continue
the training for as long as you like.Then,
suspend the training, turn off the last spell and step out of the Storehouse
Courtyard.Approach the Dreamer standing
in the Temple entrance
on your right.A dialog follows.Allow him to test you, and interpret the
parts of his dream as follows.
1."The beginning of your dream indicates
that in three summers, the harvest
will be particularly good."
2."You will lose your parents."
3."You will have the support of the gods,
and because of that, you will rise
above common folk."
4."You will live an honest life."
5."You will gain authority over
people."
As
the Dreamer steps aside, try to go past him.Another dialog will follow as he gives you a Magic Coffer.Go past him and enter the Temple, to find three workers inside.You must reach the other end of the hall
without attracting anyone’s attention.
Take a moment to
study the patterns of the workers’ movement.The worker on your left is dozing on and off.The two workers on your right are busy
working at their respective pillars, but each moves after a while to get
something from his stuff further on your right.You must wait for all three workers to look away from the central path
before making your move, i.e., for the worker on your left to doze off, for
the one in the front (right) to lean over his stuff and for the one
in the back (right) to walk over to his stuff.As soon as the three do this, all at the
same time, take three QUICK
steps forward.Maya’s comment will
indicate that you made it.Turn left and
approach Tuya standing in front of the Naos, to begin the final chapter.
Chapter
9:Pi-Ramses
A
dialog follows and Tuya will immediately start casting spells on you.In all, she will cast six spells.While I am quite certain that the last
spell will call for the "attendants
of the cords," I cannot predict the order of the five spells before it
because the computer will randomly generate that order.Rest assured, however, that no single spell
will be repeated and all six will come from the list below.
Note also that
you will get very little time to choose and then cast a counter-spell
after Tuya has finished casting her
spell on you.So instead of giving you a
list of long phrases to remember, I have given some "catch phrases"
from the spells she will use.As soon as
you hear those words, check the list below for the correct counter-spell.That way you can bring out and cast that
spell as soon as Tuya finishes casting hers.[Note:Don’t worry if you
run out of time, however, because the puzzle will simply start over.]
1."I AM THE LOTUS …" – use the Wedjat-Eye of
Clairvoyance.
2."STAY, MAYA …"
– use the Purification
Vase.
3."MAY THE
SHADOW OF YOUR KA…" – use the Magical Net.
4."COME YE, COME
YE…" – use the Cobra of Hypnosis.
5."I OBEY MAGIC:
BURN…" – use the Rain Spell.
6."ATTENDANTS
OF THE CORDS…" – use the Banner for Controlling the Wind.
Tuya
will turn into a snake and flee to the Naos (straight in front of you).Right-click (to turn off the last spell) and go
after her (take five steps forward, going around the sarcophagus in the
center of the chamber before the Naos).A dialog will lead to a second confrontation, but don’t worry – this one
is not timed.
The Snake Puzzle
General Information:If you would like to solve
this puzzle on your own,
Note the following about the Snake:
·
It will usually "fortify"
a square (turn it red) before moving into it.
·
It may move into an unfortified (neither red nor blue) square
sometimes, either to gain some tactical advantage or to avoid being attacked.
·
I have played this puzzle dozens
of times now and I never saw it move into a blue (Maya’s fortified)
square.
Mind the following in making your moves:
·
Be sure to FORTIFY a
square (right-click to turn it blue) before moving into it.
·
Do NOT step into any red
squares because that means instant death.
·
Avoid stepping into any one of the five squares around the
snake’s head without first fortifying it, because the snake can immediately
attack you there.
·
Build a solid defense
before you go on the offensive.
·
Try to attack the snake close
to its tail, so it won’t be able to attack you right back.
·
Remember:It will take 4
attacks for you
to defeat the snake, but it will take the
snake only one to finish you
off.
Step by Step Directions:(See diagram below.)
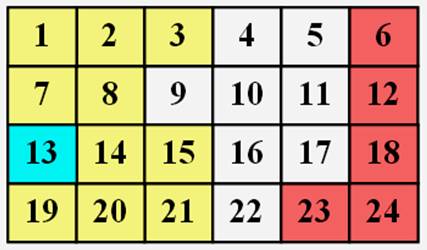
Blue Tile = Your/Maya’s starting
point.
Red Tiles = the five squares initially
occupied by the Snake.
Yellow Tiles = the only
squares you need to use in this particular solution.
1.FORTIFY (right-click on) squares 19,
20, 14, 8, and 7.
2.Move into (click on) square 8.
3.FORTIFY squares 13,
1, and 2.
4.Move into square 2.
5.FORTIFY square 3.
6.Move into square 1, then 2, then 7.
7.Neutralize (right-click on the red) square 14.
8.FORTIFY square 14, and then MOVE into it.
9.ATTACK (right-click on) the snake twice
in square 21.
10.Neutralize
square 15, and then ATTACK (the part of) the snake in it.
11.Move
into square 15.
12.Neutralize
square 8 and then, launch your
final ATTACK
on (the part of) the snake in it.
A
cutscene follows, as the Closed Magic Coffer is deposited in your
inventory.Turn around and take three
steps forward (going either way around the sarcophagus again) to leave the
chamber.Take two more steps forward, to
hear Maya’s comment.Take four steps
forward then, to hear another comment from her.Turn right and go out of the temple.Go right, turn left and approach Djer.A dialog will follow.Exhaust all
topics of the conversation.Enter the
Priests’ Courtyard and go to Paser in his house.Click on the figurine, now lying below his
right hand.Use the Mysterious Knife
on the figurine and then,
Sit back and enjoy
the ending…
* * * * * * * * * * * * * * * * * * * * * * * * * * * * * *
* * * * *
View this guide raw, exactly as the archive holds it