The Egyptian Prophecy: The Fate of Ramses
The Egyptian Prophecy
(A Walkthrough by
ZSZUBAIRIE)
Copyright © 2008. All rights reserved.
Please,
note that this walkthrough is copyrighted.
Hence,
any attempt to reproduce anything from this walkthrough
will
be severely punished to the maximum extent of the law.
Kindly address all your comments and questions to
The Walkthrough
GENERALLY:
This
is a very easy and pleasant point-and-click game.It is also what I would call a
"fair" game.I have played a lot
of games where the developers introduce puzzles with "counter-intuitive"
solutions.They don’t seem to realize
that the use of such "techniques" might make the puzzle hard, but
only because the "solutions" would never work in real life.Thus, instead of being fascinated by the
developers’ ingenuity, the gamers are only aggravated by the trickery.I am happy to tell you that The Egyptian
Prophecy is not such a game.
With
that, let’s begin the game!
* *
* * * * * * * * * * * * * * * * * * * * * * * * * * * * * * * * *
Chapter
1: Pi-Ramses
As
the opening cutscene ends, take a step forward and listen to Maya’s
comment.At that point, turn left and
step forward.The camera will
automatically pan to your left.Speak to
Djer, the supervisor of the construction.When he asks for proof of your identity, bring out Pharaoh’s Seal
from your inventory and click on him to show him the seal.At the end of the conversation, turn right
and go out of the temple.
You
will see a door to your right.That door
leads to the Storehouse Courtyard.Ignore it for now and step to your right.You will find another door on your left.This is the Courtyard of the Priests’ Houses.Go in that courtyard.Take two steps to your right to approach the
FIFTH door (right of the large white urn on the ground).Look up to see a fine etching in the slab
above the door.This is Paser’s house.
Enter
the house and go through the second door.You will see Paser lying on the floor against the wall in front of
you.Go and talk to him, exhausting all the
topics and sub-topics to gain the fullest possible account of the
situation.Leave the house and step out
of the Priests’ Courtyard.Approach the two
brick-layers working on your left.You
will be able to speak only to the one who is standing.We will call him the Dreamer (because that is
what the heroine calls him later in the game).Talk to him.Show him Pharaoh’s
Seal and he will agree to answer your questions.Exhaust all topics of conversation.
Go through the
door on your right to arrive in what we will call the Temple Courtyard.Enter the temple through the door on your
right.Maya will comment.Take a step to your left, and the camera will
automatically pan down to the floor."What’s this?"Pick up
the "Piece of a Cartouche" from the left of the base of the
floor lamp.
Turn
right and take three steps.Turn right
again and take FIVE steps.Turn right
yet again and approach Djer.Talk to him
and he will give you a Second Piece of a Cartouche.We need to put these two pieces together
now.So step out of the temple again, through
the door on your right, and approach the Dreamer on your right.Give him the two pieces of the cartouche, one
by one, and he will return them to you glued together as the Mysterious
Cartouche.
Go to Paser.Ask him about the Mysterious Cartouche
and then, show it to him, but he will not be able to identify it. Go through the door on your right to enter
Paser’s workshop.Approach the corner of
the room left of the door in front of you.Look down on your left and pick up the Torch (from the raised
stone platform left of the floor lamp in that corner).
Go
back to the Temple
Courtyard through the
door on the Dreamer’s right.Enter the
temple through that entrance.Turn left
and take three steps.Turn right and
take two steps.Turn left and take three
steps.Click on the brown cabinet-like
door in front of you and Maya will tell you that "it’s the naos," and
that you are in the heart of the temple.
Note
the empty cartouche-socket left of the cabinet.Click on the three other cartouches on either side of the cabinet to
learn about the gods they depict.Approach the wall on your left and click.There seems to be a secret passage behind
that wall.Step back to the cabinet and
place the Mysterious Cartouche in the empty socket.Bring out the Torch from your
inventory, light it on the floor lamp left of the cabinet, and enter the secret
passage.
The
camera will automatically pan around to the door as it closes behind you.Turn back around, step forward and pick up
the Cartouche of Amun-Re from the floor.Turn left and step towards that wall.Look down and remove the broken piece of the floor.Pick up the Foundation Deposits.A cutscene follows.
The Cartouche Puzzle
Return
to the locked door.Close up on the
hieroglyphs etched in the wall left of the door.The inventory menu will pop up with the book
icon ("Documentary Database") flashing.Click on that icon to read about "The
Cartouche of Ramses II."More
importantly, however, note the two cartouches shown on your right.It is the cartouche on the right (shown
below) of the two that we must reproduce.But first, we must activate the puzzle.So bring out Pharaoh’s Seal and click on the oval symbol around
which the tiny white dots are floating.The
puzzle begins, indicated by the dots now floating around both the heads and the
bases of the two snakes on either side of the cartouche in the middle.These dots mark the controls for rearranging
the various parts of the cartouche itself.Use the four controls to produce the following image.
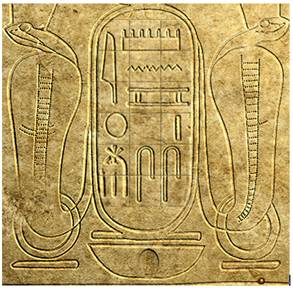
Note:I don’t think that the computer randomly
generates the starting positions of the movable parts of the cartouche.If that is true, then the following is the
simplest possible solution I could find to this puzzle.
Click
ONCE at the BASE of the Left snake.
Click
ONCE on the HEAD of the Left snake.
Click
THREE times at the BASE of the Left snake.
The
door opens.Go upstairs and out of the naos.A cutscene will show the Torch going
out, but don’t worry about that because we don’t need it now.Leave the temple and go to Paser.Talk to him, exhausting all topics.Show him the Foundation Deposits, and
exhaust all topics of conversation again.He will give you the Purification Vase.[Note: you can click on Paser again and talk
to him about how "The Temple is cursed."If you then exhaust that line of
conversation, Paser will tell you exactly what you must do next.]
Return
to the naos.Use the Purification
Vase on the mysterious cartouche you had placed earlier, to now destroy
it.Then, place the Cartouche of
Amun-Re in the empty socket to reseal the crypt.Return to Paser and talk to him.At the end of the conversation, he will give
you a Black Stone and fall unconscious.Go to his workshop on your right.Approach the small brown wooden statue, under the wall cabinet, on your
left.Close up on the statue and place
the Black Stone in the triangular slot at the base of the statue.Pick up the Quarry Documents.
Leave
Paser’s house and the Priest’s Courtyard.Step forward and use the temple entrance on your right to enter the
temple.Go and talk to Djer, exhausting
all topics, to tell him about your accomplishment and also to gain some
information.Then, use the door on your
right to step out of the temple again.Approach the boatman sitting in front of a door on your left.Click on him, and the cutscene that follows
will take you to the next chapter.
Chapter
2: Aswan
Take
four steps forward.Turn right and take
another step.Now look to your left to
find a man holding his head as he sits on a rock in front of a house.This is Ouni.Talk to him.Give him the Quarry
Documents.Another dialog will
follow.
Take
one step left of Ouni, turn around and look down on the ground to your right.Pick up a Dolerite Ball.Bring it back out of your inventory and click
on the rock (right of the dolerite balls), to see it break against the rock.Pick up the Damaged Dolerite Ball and
return to Ouni.Talk to him again, and
exhaust all topics.
Turn
right and enter Ouni’s house.Go through
the next three doors to arrive in what we will call the Kitchen area.Tuya is sitting against the wall on your
left.Approach her, and a cutscene will
follow.Exhaust all topics.Tuya will give you the Transfer
Handkerchief (thus teaching you the Transfer spell).
Go back outside
the house, bring out the Transfer Handkerchief and click on Ouni.The handkerchief in the upper-left corner of
the screen will turn red, indicating that it has absorbed the ailment.But we are not done yet.We must now transfer that ailment on to
another living creature in order to complete the transference.Click on the donkey standing just left of
Ouni.(Poor thing!)Ouni will announce that he is cured.
Return
to Tuya inside the house and talk to her again.Before the end of the conversation, she will give you the Cobra of
Hypnosis (thus teaching you the Hypnosis spell).
This
is a good time to explore the house and note a few things that will come in
really handy in the up-coming timed sequence!So go to the first room that you enter when you first step into the
house.As you enter the room, step to
your right, along the wall.Turn right
towards that wall, look down and click on "A bitter apple."
Go to the door on
your right and enter the second room.Just as you enter, click on the little pile of yellow powder on a small
brown crate to your right, to note "A
bit of ocher."
There are two
doors in front of you.The one to your
right takes you to the kitchen.Go to the
door on your left.Look down on your
left and close up on the papers (left of the pink jar on the ground, right of
the cup holding the fire).Click to flip
through the "pages," and note the three remedies: (1) Remedy to kill a worm; (2) Remedy for the interior of the body, when
in pain; and (3) Remedy to cure a
man who has been bitten by a snake.
The door now on
your right leads to a small store room, but we don’t need to go there just yet.Instead, go through the second door on your right (the one that leads to the kitchen
area).Cross the little dark corridor
and go through the third door to arrive in the kitchen area.Just as you enter, look down on the left and click
to note "A jar."
Approach
Tuya in the kitchen and look down on her left.Click on the clump of tiny white balls to note "Some gum."Then, click to note "A knife" left of the gum.
Turn
right and approach the door left of the large grayish tree.Click to note "Some terebinth" in the basket hanging from the wall left of
this door.Then, go through the door, to
find yourself in the Store Room.Look
down on your left to see a reddish brown basket in front of a stack of
jars.Click on the basket, and a cutscene
will begin the timed sequence!
Step
out of the store room to find that Tuya is gone, meaning you must prepare the
remedy yourself.Recall that the remedy
for snake bites that we had found in the second room called for the following
ingredients:
1. Dried Donkey Droppings
2. Gum
3. Ocher
4. Dried Terebinth
5. Piece of a Broken
Jar
6. Bitter Apple Seeds
As you step out of the store room (and Maya
finishes her comment about Tuya), pick up the Dried Leaves of Terebinth from the basket hanging on your
right (left of the store room door).Go
to where Tuya was sitting earlier and pick up the Gum and the Knife.
Go
to the door leading outside the kitchen and look down at the jar on your
right.Use the Damaged Dolerite Ball
to break the jar, and pick up the Fragment
of a Jar.Go through the door
out of the kitchen area and then the one leading to the second room.Pick up the Ocher from the brown crate on your left.
Go
to the first room and approach the Bitter Apple on your right.Use the Knife to cut it, and pick up
the Bitter Apple Seeds
inside.
Step
out of the house.Maya will look to her
right and wail that Ouni is also gone.Look to your extreme LEFT and step forward."Hmmm… What’s this?"Pick up the Dried Donkey Droppings from the ground.
Go
back in the house and return to the kitchen area where Tuya had been sitting
earlier.Close up on the mortar and the pestle.Pick up the Pestle, and put the above-listed
six ingredients of the remedy into the mortar, one by one.Bring out the Pestle from your
inventory and click on the mortar.A
cutscene follows."Just in
time…"
Step
out of the close up and go back into the Store Room.Look down on your left at the basket that had
had the snake in it, and pick up The Dolerite Papyrus.Go out of the house, and a cutscene/dialog
will follow.During the dialog, Ouni will
also give you a Dried Snake to help you protect yourself from future snakebites.Exhaust all topics of the conversation.Then, step left of Ouni, turn left and take
four steps forward to return to the boatman.Click on him and a cutscene will take us to the next chapter.
Chapter
3: Memphis
Approach
the guard at the gate on your left.Talk
to him, trying all topics, but he will not let you see the High Priest.We need to find out his name so we can
hypnotize him.Turn around and enter the
other gate in front of you.
Step
to the right of the pool.Turn left and
take two steps along the pool.The
camera will pan down to the pebbles on the ground, and Maya will point out that
they might be useful.So pick up a few Pebbles.Step forward and approach the basket-weaver on
your left.Talk to him, exhausting all
topics.But he will not tell you anything
but how to get to the High Priest’s chapel.Try to pick up the white object in the basket down in front of you, but the
man will not let you do so.Bring out the
Pebbles from your inventory and throw them in the pool, just left of the
man.As he turns to look, pick up the
white object ("Ostracon") from the basket.Talk to the man again.Give him the Ostracon and he will tell
you the name of the guard.
Go
to the right of the man.Take two steps forward
along the pool.Take a step to your left
and approach the rope on the ground on your right.Pick up the rope ("String").Return to the pool.Take three steps forward.Click on the bird sitting on the wall in
front of you — it is a falcon holding a shiny object.Pick up some Pebbles from the ground
on your right, bring them back out of the inventory and throw them at the
falcon.A cutscene follows.Pick up the object dropped by the bird — it is
a piece of copper.Maya will automatically
attach it to the "string" to make a Grappling Hook.
Go
back out to the guard standing at the other gate.[Feel free to use the "Wedjat-Eye of
Clairvoyance" spell on him, just for fun.]Use the Cobra of Hypnosis spell on him.Talk to him.He will still ask you for a pass, but he will now let you pass if you
show him any object in the LEFT part
of your inventory. Go through
the gate and into the chapel.
Approach the
High Priest on your right.A dialog will
follow.Give the Dolerite Papyrus
to the priest.Exhaust all topics.Give him the Foundation Deposits.Open the cabinet on your right.Use the Wedjat-Eye spell on the
close-up icon.Use the Knife to
remove the broken piece of stone.Pick
up the Dried Scorpion, bring it out of the inventory and give it to the
High Priest.He will give you the Banner
for Controlling the Wind (thus teaching you the Wind spell).Step to the altar on your left and pick up
the Key from its top.Return to
the cabinet on your right, and use the Key on the coffer down on your
right to start a puzzle.
The Coffer Puzzle
We must set the
six disks so that all the green buttons on the right side of the coffer will
pop up.In the following picture, I have
numbered these disks 1 through 6, Right to Left, i.e., in the order that the key ("the
white shadow" in the puzzle) enters the disks.Note: in the following directions, I
have asked you to click only on the TOP
directional arrow (the one that moves clockwise).I set up the solution this way because I
thought that most gamers might find it easier to work with just one arrow throughout the
puzzle.But feel free to try something
else.For example, note that you can click
on either the Top or the Bottom arrow any time I have asked
you to click twice on the Top arrow; and that you can click only once on the Bottom arrow any time that
I have asked you to click three times on the Top arrow.
With
all this in mind, let’s unlock the coffer!
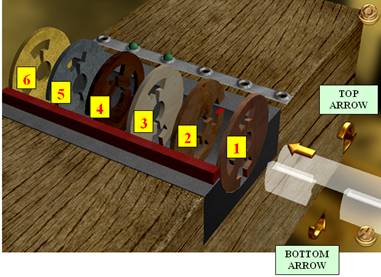
1.Click 3 times on the
Top arrow BEFORE moving the key into the first disk.
2.Push the key into the SECOND disk and click
twice on the Top arrow.
3.Push the key into the SIXTH disk and click twice
on the Top arrow, to set Disk 6.
4.Pull the key back into the FIFTH disk and click once
on the Top arrow.
5.Pull the key back into the SECOND disk and click 3
times on the Top arrow.
6.Pull the key all the way OUT OF THE COFFER and
click once on the Top arrow.
7.Push the key into the FIFTH disk and click 3
times on the Top arrow, to set Disk 5.
8.Pull the key back into the FOURTH disk and click
twice on the Top arrow, to set Disk 4.
9.Pull the key back into the THIRD disk and click once
on the Top arrow, to set Disks 1 & 3.
10.Pull
the key back into the SECOND
disk and click 3 times on the Top arrow, to set Disk 2.
The
coffer will open.Pick up the Kyphi.Talk to the priest.Give him the Kyphi, to find that it is
not enough.We need some fragrant rush.Go to the basket-weaver by the pool in the
other courtyard and talk to him.Exhaust
the conversation.
Look at the
pool, just left of the basket-weaver.Note
the dark brown speck on a water-lily pad closest to the edge of the pool in
front of you.Click on the gear icon appearing
on that pad to learn that there is something shining on it.Use the Grappling Hook from your
inventory on that shiny object on the lily pad, to bring the pad closer to you.[Note:Be sure to place the triangular tip (i.e., "<") of your
cursor on the lily pad, completely covering
the brown object on the pad, in order to succeed in moving the lily pad in the
very first try.]A cutscene
follows.Pick up the Gouge from
the lily pad.Give the Gouge to
the basket-weaver.He will give you some
Fragrant Rush and also some Water Lily Seeds as a gift.
Return
to the chapel and give the Fragrant Rush to the High Priest.A cutscene will follow, taking you to the
next chapter.
Chapter
4: World of Ptah
Take
two steps forward and click on the rock down on your right, to learn that it is
used as an anvil.Return to your
starting point, which looks like a cave entrance.Before going in, however, turn right, step
forward and pick up the Pincers from the ground in front of you. Go back to the cave entrance and enter, to find
yourself in what we will call the "room."
Try
to step out of the exits on your left and right, one by one, to find yourself
returning to the same spot with the anvil rock.The place is enchanted.Return to
the room and approach the statue in the center.Click on its right hand (the one on your
left), to learn that a piece of the key it is holding is missing.Click on the jar at the statue’s feet, to
learn that the head of Thot on the canopic jar is stuck.Use your Pincers to loosen Thot’s
head.
Click
once on Thot’s head.Step out of
the room through any one of the three
exits.A cutscene will follow.Maya informs us that the turning of Thot’s
head has opened a passage into another part of the first hall.Approach the dwarf on your left.Talk to him, exhausting all topics of the
conversation.The menu at the bottom of
the screen will pop up, with the Book icon (i.e., the "Documentary
Database") flashing.Click on that
icon to learn about the Sistrum.
Return
to the room.Click once on Thot’s
head.Step out of the room, take a step
forward and pick up the Bronze Strip down on your right.Then, take a step to your right and pick up
the Handle.Go through the
cave-like entrance on your right to return to the room.
Click
once on Thot’s head again.Step
out of the room and note the two objects on your left: a long rope and some
kind of a conic object on the ground.Step to your left and pick up the Mallet.Use your Knife to cut a Length of Rope.Return to the room.
Click
once on Thot’s head.Step out of
the room and approach the anvil on your right.Bring out the Bronze Strip and click on the lava on your left to
heat the strip.Place the heated strip
on the anvil and use the Mallet to "fashion" it.Attach the Handle to the strip and
pick up the Mute Sistrum.Return
to the room.
Click
once on Thot’s head.Step out of
the room.Approach and talk to the dwarf
on your left.Attach the Length of
Rope from your inventory to the rope dangling above and to the left of the
dwarf’s head.Click on the dwarf, and a
dialog will follow.He will give you the
rods (which will be automatically attached to the Mute Sistrum,
completing the instrument) and also tell you how to invoke Ptah.
Return
to the room and click three times on Thot’s head.Step out of the room and approach the
anvil.A cutscene will follow.Feel free to exhaust all topics of the
conversation, but Ptah will give you only the information concerning the
immediate tasks.
THE
FIRST PASSAGE
Return to the Room
and click once on Thot’s head.Step outside and talk to the dwarf, to get an Empty Mold from him.Return to the Room and click three
times on Thot’s head.Step outside and
approach the anvil.Fill the Empty
Mold with lava from your left. Place
the contents of the mold on the anvil.Pick
up the Lava Object (after it has turned from a bright red to a dark gray).Return to the Room and attach the Lava
Object to the key in the statue’s hand.A golden scepter appears in a wall alcove on your left.Go and click on the scepter.Step out of the Room to find yourself in
another room, almost identical to the
first one.
THE
SECOND PASSAGE
Approach
the statue.Place the Damaged
Dolerite Ball on the white slab down in front of the statue.A compartment opens at the base of the
statue, and the inventory menu also pops up with the Book icon
("Documentary Database") flashing.Read the book to learn "The Rite of the Four Balls."Pick up the four balls from the compartment.Note the four alcoves (depicting different
pictures) in the wall around the room.Place
the balls in the alcoves, as follows.
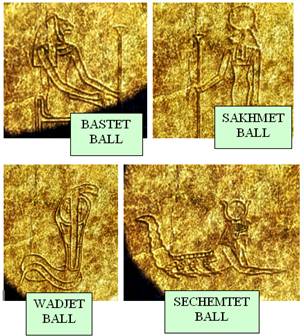
Step
outside to find yourself in yet another but almost identical room.
THE
THIRD PASSAGE
Approach
the statue in the center of the room and click on it.
Question: "What
did Ptah accomplish with his heart and tongue?"
Answer: "He
created… the world."
A kind of music
will begin, which you must now replicate.Use the Purification Vase on the bowl down at the statue’s feet.Pick up the Bowl of Lava.
Note
that there are four alcoves in this room as well, with water dripping in three
of them.After finishing your
conversation with the statue, turn around to face the entrance you had used to
come into this room.Go to the alcove LEFT
of this entrance, to find a small pool of water inside but no water is actually dripping.Step to the alcove on your RIGHT, bring
out the Water Lily Seeds from your inventory and place them inside the
alcove.A Water Lily Pad will appear.Leave the pad there and go over to the alcove
on your right.Bring out the Sistrum
from your inventory and place it inside the alcove.Step to the alcove on your right, bring out the
Bowl of Lava from your inventory and place it inside the alcove.Step out of the room to enter the one with the
dolerite tools.
THE
MAGICAL DOLERITE-BALL PUZZLE
Note
the three objects in the center of the room: Cube, Ball, and (upside-down) Pyramid.(See Picture Below)Starting from the pillar in front of you and
going LEFT, note the following symbols on the pillars around the
room:a square, a circle, a triangle,
and another square.(See Picture
Below)The object of the puzzle is to
place the Ball on the pillar
with the Circle because you
can pick up the ball only when you do so.
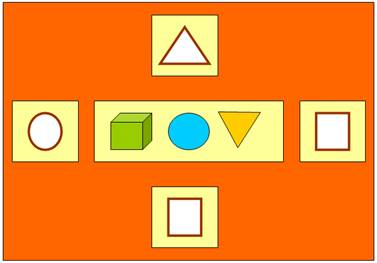
As Maya finishes
her comment about the magical wind, bring out the Banner for Controlling the
Wind.[Note: you have to
bring it out only once and it will stay active through the rest of the
puzzle.]
1.Click
on the Ball in the center of the room, to move it to the pillar across the
room.
2.Go left and click on the Cube, to move it to the center of the
centerpiece.
3.Go left and click on the Cube again, to move it to the pillar
across the room.
4.Go RIGHT and click on the Pyramid, to move it to the pillar
across the room.
5.Go left and click on the Ball, to bring it back to the center of
the room.
6.Go
left and click on the Ball, to move it to the pillar across the room.
Now
"turn off" the Wind spell, go across the room and pick up the Magical
Ball of Dolerite from the top of the pillar.A cutscene follows.Step out of the room, to find yourself back
in the hall with the anvil.Approach the
anvil, and a dialog will follow.Exhaust
all topics of the conversation.Ptah
will give you the Bee of the Magical Wax (thus teaching you the Magical Wax
spell).Drop the Magical ball of
dolerite into the lava on your left, to return to the High Priest in the
temple.A dialog follows.Step out of the temple and approach the
boatman on your right.Click on him, to
proceed to the next chapter.
Chapter
5: Aswan
A
dialog follows.Exhaust all topics of
the conversation.Go to Ouni’s
house.You will find Tuya sitting in the
far left corner of the second room (where you had found the formula for curing
the snake bite earlier).Approach her
and a dialog will follow.Exhaust the
conversation.Give the Dried Scorpion
to Tuya and another dialog will follow.
Turn
around and approach the far right corner of the room.Pick up the Blank Sheets of Papyrus
from the rolls of papyrus on your right (left of the large pink jar).Close up on your left and place the Blank Sheets
of Papyrus to the right of the pen ("Calamus").Pick up the Calamus, bring it back out
of the inventory and dip it in the white bottle filled with red ink on your left.Since the calamus icon stays active, simply
click on the blank sheet of papyrus you had just placed, to copy the healing
formula.Right-click, to turn off the
calamus icon.Pick up the Healing
Formula.
Return
to Tuya and give her the Healing Formula.She will give you an Unfired Figurine.Pick up the Lighter lying on the rolls
of papyrus left of Tuya.Go to the door
on your right and proceed to the kitchen.As you enter, approach the gray tree in front of you.The camera will automatically pan down to your
right."Hmmm…What’s
this?"Pick up the Twigs.Turn left and step to the left of the
kiln.Turn right and place the Twigs
in the hole at the base of the kiln.Use
the Lighter to light up these twigs.Place the Unfired Figurine at the top of the kiln.Wait for the figurine to turn dark; and then,
pick up the Figurine of Paser.
Return
to Tuya and show her the figurine.Feel
free to exhaust the conversation, even though the topics have already been
covered.Go out of the house, to find Ouni
standing there.Exhaust the topics of
the conversation.
Turn
left and take three steps.Cutscene
follows.Take three steps towards the
fire in the distance and pick up the Jar of Water down from your
right.Approach the fire now on your
left.Click on the fire, to learn that
it is some kind of a magical fire feeding on itself.Use the Jar of Water on the fire, but
nothing happens.We need a rug or a mat
to smother it.
Take
a step to your left and pick up the Stick down from your right.Turn left and take seven steps forward, going
past Ouni to arrive at his house.Enter
the house.After Maya’s comment, go to
the second room where Tuya was sitting a while ago.She is not there anymore.Go to the door left of where she had been
sitting.Pick up the Mat from the
ground on your right.Leave the house
and go down the path (on your left) to the quarry.
Approach
the fire and use the Mat to smother it.Close up.Click on the mat to
move it aside.Use the Stick to
move a knife out of the ashes.[You will
also get your stick back, as the Charred Stick.]Pick up the Mysterious Knife.Step out of the close up and go to Ouni (on
your right).A dialog will follow as you
approach him.Go left of Ouni and try to
leave the quarry.A cutscene follows.Turn left and take two steps forward; turn
left again and take two more steps to reach the boatman.Click on him, to proceed to the next chapter.
Chapter
6
Memphis:
Approach
and talk to the guard standing at the gate on your left.Turn around and go through the other gate (the
one facing the guard).Step to the right
of the pool, turn left and take a step forward.The camera will automatically pan down to your right.Pick up the Long Stick.Approach and talk to the basket-weaver by the
pool on your left.Take a step to your
right, turn left and take two steps forward.
Note
the little girl standing on your left.Approach her, and a dialog will follow.Exhaust all topics of the conversation.Take a step to your left to return to the pool; then, take a step to
your right along the pool.Maya will
point out the "nilometer" on your right.Step towards it, turn right and close up on
the rubbed-out drawing on the top edge ("coping") of the nilometer.Feel free to click on the drawing, to gain
some more information.Then, place the Blank
Sheets of Papyrus on the drawing and use the Charred Stick on the
papyrus, to make a Tracing of the Design to be completed.
Step
out of the close up and go back to the basket-weaver by the pool.Talk to him, exhausting all topics of the
conversation.Give him the Tracing of
the Design to be completed.He needs
an egg to complete the drawing for you.Turn right and note the blue plate lying on the ground left of a
tree.Step forward and pick up that Plate.
Turn
right and take four steps to reach the wall left of the entrance gate.Place the Plate on the ground in front
of you.Use the Long Stick on the
nest in the wall above the plate.Pick
up the plate with the Smashed Egg.Return to the man by the pool and give him the Smashed Egg.He will ask for a calamus.Give him your Inked Calamus.A cutscene follows, as the man gives you the Finished
Drawing.
Go
to the nilometer, close up on the coping and place the Finished Drawing
on the rubbed-out drawing.Pick up the Sacred
Recipient.Go over to the little
girl now and give her the Sacred Recipient.A cutscene will take you to the second part
of the chapter, in the
World of Isis:
A
dialog follows.Exhaust all topics.Isis will
give you the Magical Net (thus teaching you the Magic-Net spell).Turn around and step forward, to reach the
opposite end of this island.Isis will now appear in the water on your left,
indicating that you have reached the correct place.Place the last of your Water Lily Seeds
in the water down and left of Isis.A water lily pad will appear.You may now cross the water.Step forward and a cutscene will show Maya getting
on the lily pad.Take another step, to reach
the other bank.
The Altar Puzzle
Approach
the altar in front of you.Isis will appear in the water on your right.Note the three stones on the altar on your
right.(See picture below).Each stone depicts the god of an
"element."Pick up one of
these stones and Isis will explain the objective
and rules of the puzzle.Note that the
bottom line is that Nut must not be left
alone with either Shu or Geb on an
altar.Thus, the solution is
as follows.
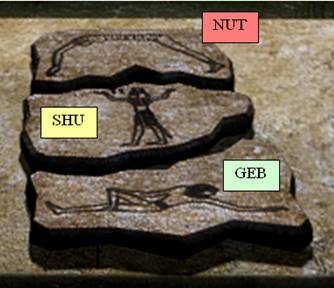
1.Pick
up Nut, turn left and take
three steps to reach the altar on the other bank.
2.Place Nut on that
altar and return to the first altar.
3.Pick up either Shu or Geb and take it to the second
altar.
4.Place that god on that altar, pick up Nut and return to the first altar.
5.Place Nut on the first
altar and take the other god (Geb
or Shu) to the second altar.
6.Place that god on that altar and return to the first altar.
7.Take Nut to the second
altar and place it on that altar.
Note the green
grass-like bridge that forms on your left, as Isis
congratulates you on successfully completing the altar puzzle.
The Puzzle of the Five Islets
Approach and
cross the green bridge.Isis appears in the water on your right. Go and ask her how you can reach the other
bank (the first question), and she will explain the objective and rules of this
puzzle.
Imagine
as if the five islets in front of you were numbered 1-5, as follows:
12345
Thus,
the black bird (Horus) is flying in front of Islet 1 and the tortoise
(Set) is swimming in front of Islet 4.The object of the puzzle is to bring both the black bird and the
tortoise in front of Islet 3.Here is how to do it.
1.Go to Islet 4 and wait.The tortoise will move to the front of Islet
2.
2.Go to Islet 2 and wait,
for the tortoise to now move to the front of Islet 5.
3.Go to Islet 5 and wait
again, for the tortoise to finally move to the front of Islet 3.
4.Go to Islet 1 and the
black bird will also move to Islet 3.
Isis will congratulate you on reconciling Set and Horus.Go to the tortoise, step forward, and a cutscene
will take you across the channel.Take
two steps to your right, towards a pile of white rocks on the ground.Pick up some of these Rocks.Take two steps to your left, to return to
your starting point on this island.Step
to your right, towards what looks like a huge set of scales.Click on the rope in the water on your left. "The gourd filled with water is too
heavy.A counterweight is needed."Click on the basket hanging on your right. "A
counterweight is needed."Put
the Rocks in that basket, and click on the rope in the water on your
left again.A cutscene will take you to
the next chapter.
Chapter
7
Book of the Dead:
A
monologue follows.Step forward to face
the first trial on your way to Osiris.
The First Door (Name of the Guardian)
You
must guess the name of the guardian sitting in the first door.Note the drawing of a bee on the altar in
front of you.Use your Bee of the
Magical Wax on this drawing.A cloud
will appear.You can now press the six
buttons, under the drawing of the bee, on the altar.Imagine as if these buttons were numbered
1-6, as follows.
123456
1.Press
the FIRST button
("Neg"), to replicate the guard’s feet in the cloud in front of you.
2.Press the SIXTH button
("a"), to replicate the midsection of the guard.
3.Press the FOURTH button
("ou"), to replicate the guard’s head.
Maya
will announce the guard’s name ("Negaou") and he will disappear from
the first door.Go around the altar, through
the door, and forward to proceed to the second trial.
View this guide raw, exactly as the archive holds it