The Egyptian Prophecy: The Fate of Ramses
The
Egyptian Prophecy: The Fate of Ramses
by Kheops Studios
Walkthrough by MaGtRo April
2004
GamePlay: This point and click game installs
from 3 CDs. CD3 is needed in the drive for gameplay. After installation there is
a choice of Player 1-5. The main menu consists of new game, resume game, load
game, options (video acceleration, color, speed. volume and subtitles),
documentary database, credits, Victory Diary (seen at end of game) and exit.
This walkthrough is played with version 1.0.0.
Right click of mouse
opens the inventory bar that has the items picked up on the left wing and the
spells on the right. At the center, the lens (examine objects or spells), box
(goals), scroll (documentary database) and exit are located. Right click again
to remove the inventory bar to facilitate action on gameplay.
There are unlimited
save spaces. Pressing the spacebar skips the intro and cutscenes. During
gameplay, right click of mouse skips dialogue.
Be sure to —
Exhaust all dialogues. The timed puzzles allow a restart of the puzzle when
unsuccessful.
High Priest
Khaemouaset, son of Ramses writes that the Pharaoh, Ramses II at his sixtieth
year asks Amun Re to prolong his life. Amun Re will give him up to his 80th year
if he raises a giant Obelisk to the glory of Amun Re before the season of Shemu
or else he will die. Only Paser, the great architect is capable of raising the
Obelisk. Pharaoh sends Maya, a young magician to conduct an investigation of
some strange accidents that are occurring on the worksite. The monument will be
put up within the walls of the Temple of Pi-Ramses.
Chapter 1 Pi-Ramses
Locate
Paser
Temple: In inventory, Pharaoh’s seal
and Wadjet-eye of clairvoyance are already found. Turn left, forward, left and
talk to Djer, supervisor of construction. Show him the pharaoh’s seal. Paser’s
house is the one with the decorated lintel.
Turn right and exit
through the entryway. In the left part of the courtyard is the boatman that
takes Maya through her travels on the Nile. To far right, the brick makers are
working. Go through the entryway beside the brick makers and enter the door with
decorated lintel and a water jug.
Paser’s
house: Look around and then go through the second door.
Talk to a very sick Paser and exhaust all dialogues. Go to the next room, the
workshop and look at the small statue of Imhotep, father of architects on the
workbench. Go to right end of the workbench and pick up the torch.
Exit the courtyard.
Talk to the brick maker and exhaust all dialogue. Show him the pharaoh’s seal
also. The brick maker tells of his dreams. Go through the entryway to the right
and right again to enter the temple.
Fix the
cartouche
Temple: Turn left and go to the far column
and pick up a piece of cartouche. Go forward to the next room, turn right
to the next room and forward to the naos, the heart of the temple. Click on the
space on the left frame – there’s a cartouche missing. Study the other 3
cartouches. Turn left to the wall and click on it to sense a secret passage
behind the wall.
Go out of the room,
forward to end and talk again to Djer, the foreman. He gives you the second
piece of cartouche he found. Talk to him again and exhaust all dialogues.
Turn right and exit the temple.
Brick
maker: Give the 2 pieces of cartouche to the brick maker
and he gives the glued mysterious cartouche.
Secret
Chamber
Temple: Go back to the naos by going through
the entryway on the right and right to temple. Turn left, go to next room and
right to next room. Turn left to the naos. Insert the mysterious cartouche on
the empty space on left frame of the naos. This opens the secret passage. Click
on mysterious cartouche and see that it can not be removed. Light the
torch on the fire stand to get flaming torch. Enter the secret passage.
Secret
Room: Maya is locked in. Pick up the Amun Re
cartouche on the floor at opposite wall. Turn left and move the loose tile
on the floor by wall. Pick up the foundation deposits. A vision of broken
obelisk, drought, Paser and the Pharaoh dying occurs.
Go to the left of the
sealed entryway and look close at the etched hieroglyphs.
Hieroglyph
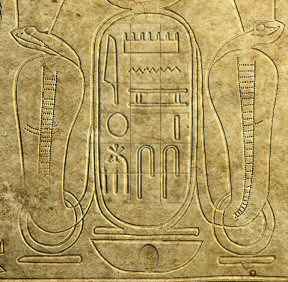
puzzle – The object of the puzzle is to arrange the slider puzzle to show
the cartouche of Ramses II. Open inventory and select the scroll (documentary
database) and see the right cartouche that is the finished product of the
puzzle.
1. Use the Pharaoh
seal on the oval at bottom of puzzle to activate the puzzle.
2. The bottom left
base moves the left column down. The right bottom base moves the middle and
right columns down. The top right cobra eye moves the 3 columns right and the
top left cobra eye moves the 3 columns to the left.
3. Pull back out of
the puzzle to reset the puzzle. Right click to remove the inventory bar.
4. One possible
solution: Click bottom right 5xs to get left and right
columns to match. Click top left eye once to move the middle column to the
left. Click bottom left base 4xs to position left column. Click bottom right
once. The door opens.
Paser: Go back to Paser. On the way the
torch goes out – that’s okay, we don’t need it anymore. Show Paser the
foundation deposits. Talk to him completely 2xs. You need to remove the
mysterious cartouche that opened the secret room. Paser gives you the
Purification vase spell to cleanse the temple. You must replace the
mysterious cartouche with the Amun Re cartouche.
Naos: Use the purification vase on the
mysterious cartouche. It disappears. Place the Amun Re cartouche on the space
and the secret passage is closed.
Paser: Talk to Paser. He wants Maya to bring
the documents for raising of the Obelisk to his assistant Ouni at Aswan Quarry.
Paser gives a black stone to use at the statue of Imhotep. Paser loses
consciousness. Go to next room, look close at statue on the workbench and use
the black stone on the statue. Take Quarry documents.
Go out of the
courtyard, turn right and talk to boat man by exit. Time to go to Aswan
Quarry.
Chapter 2 Aswan
Yard: Go forward, turn right and go across
the yard area. By the left house of the 2 houses there, look down and take the
‘What’s this’ dried donkey droppings. The things we do in adventure
games! Turn left and talk to Ouni, the man sitting in front of the house. Give
him the quarry documents. The tools are not solid enough.
Go forward once behind
sneezing Ouni to the canopy. Look down, turn around and take the only active
dolerite ball. Then take it again from inventory and click it on the
granite stone beside the black balls. Pick up the damaged dolerite ball.
Talk to Ouni again.
The dolerite papyrus is missing in his house. He gives permission for you to
look for it and meet Tuya, his wife the great healer.
Search
for the missing dolerite papyrus
Ouni’s
house: Turn right and enter the house. The first room has
a bitter apple in a basket. Go to next room, a see a bit of
ochre by the standing fire lamp. At one end of the worktable are
remedy recipes. Note the snake bite remedy. Go to next room and the room after
that.
Tuya’s test:
Meet Tuya at the courtyard. Tuya needs proof that Maya can do
the remedy for Paser. Maya has to do the transfer spell, a linen
handkerchief that can transfer an illness from a man to another man or animal.
Go out and click the handkerchief on sneezing Ouni and then click on the donkey
on the left. Go back to Tuya.
Talk to Tuya again.
She gives a cobra of hypnosis for the hypnotize spell. She gives
permission to look for the dolerite papyrus.
To the left of Tuya,
there is some gum and a knife. By the door is a
jar. Go to the door right of the oven. Left of the closed door is
some terebinth. Now you know where all the ingredients for snake
bite remedy are.
Storeroom: Enter the room and open the
basket on the floor on the left. Maya is bitten by the cobra. There is a papyrus
at the bottom of the basket. Go outside and see that Tuya is gone.
Snake Bite remedy
preparation (Timed puzzle):
Remedy preparation –
Dried donkey droppings, gum, ocher, dried terebinth, piece of a broken jar and
bitter apple seeds. Pulverize and drink.
Terebinth
Knife &
Gum
Jar piece
Ochre
Bitter
Apple
Collect the
ingredients. You already have the dried donkey droppings.
Take some
terebinth from left of the storeroom door.
Go to where Tuya was
sitting and take gum and knife.
Go to the door and
use the dolerite ball in inventory on jar. Right click to place the ball in
inventory. Right click again to close inventory. Take piece of jar.
Go to workroom and
take ochre from base of standing fire lamp.
Go to front room and
use knife on bitter apple. Right click to place the knife in inventory.
Right click again to close inventory. Take bitter apple seeds.
Go back to where
Tuya was sitting. Place all the ingredients in the mortar. Take the pestle and
then use it on the ingredient full mortar. Watch Maya drink the remedy.
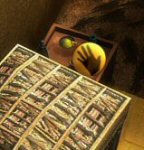
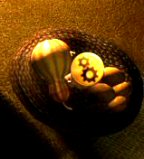
Take the dolerite
papyrus from the cobra basket. Go outside and talk to Ouni. Ouni reads the
papyrus and says that the God of Forge, Ptah alone can help us. You need to talk
to Khaemouaset in Memphis. Ouni gives dried snake for protection from
further snake bites. Talk to the sitting boat man at entrance to this place.
Chapter 3 Memphis
Talk to the Guard in
front of the chapel. No one passes here! Oh yeah! We need his name.
Find the
name of the guard
Meet the basket
weaver at the pond: Turn around and go through the entryway. Take the right
side of the pond. Take the pebbles from the ground midway of the length
of the pond. Talk to the ornery basket weaver. He keeps shooing you off. Look
down and see something in the basket by your foot. Hmmm.
Still close to the
basket weaver, pan left and use the pebbles on the hotspot left of the pond
step. Fish, eh! Immediately take the item from the basket by your foot. It is an
ostracon. Talk to basket weaver again. Give him the ostracon and he tells
you the name of the guard is Pamose.
Seek help
from Khaemouaset
Enter the
Chapel: Go back to the guard and use the snake hypnosis
spell. Talk to guard again and then show him anything, I mean anything from your
inventory.
Turn right and click
close to the standing lamp. Khaemouaset, High Priest of Ptah comes near. Give
him the dolerite papyrus. Talk to Khaemouaset using all dialogues.
Harmful presence in
Ptah’s temple: Turn right and open cabinet. Use the Wadjet
eye of clairvoyance on the crack. Use knife on crack and take the dried
scorpion. Khaemouaset gives you the banner for controlling the
wind.
Prove worthy by
opening the coffer:
Take the key
from the central table. Use key on coffer on the floor beside the open
cabinet.
Open the
Coffer:
6. Gold. 5.
Silver. 4. Ebony. 3. Ivory. 2. Juniper wood. 1. Copper.
1. Turn rod only –
counterclockwise (bottom turn arrow) once.
2. Insert rod to #2
Juniper wood wheel ONLY. Turn #2 juniper 2xs any direction.
3. Insert rod to #6
Gold wheel. Turn #6 Gold wheel until the green button appears. It is done.
4. Pull rod to #5
Silver wheel. Turn #5 silver wheel clockwise (top turn arrow) once.
5. Pull rod to #1
Copper wheel. Turn #1 copper wheel clockwise (top turn arrow) once.
6. Insert rod to #2
Juniper wheel. Turn #2 Juniper wheel counterclockwise (bottom turn arrow)
once.
7. Insert rod to #5
Silver wheel. Turn #5 Silver wheel until the green button appears. It is
done.
8. Pull rod to #4
Ebony wheel. Turn #4 Ebony wheel until the green button appears. It is
done.
9. Pull rod to #3
Ivory wheel. Turn #3 Ivory wheel until the green button appears. It is
done.
10. Pull rod to #2
Juniper wood wheel. Turn #2 Juniper wood wheel until the green button appears.
It is done.
11. Pull rod to #1
Copper wheel. Turn #1 Copper wheel until the green button appears. It is
done.
The coffer opens.
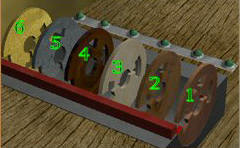
Take the Kyphi –
perfume. Give the perfume to Khaemouaset. The perfume is incomplete.
Khaemouaset needs fragrant rush.
Find some
fragrant rush
Gouge
the for basket weaver: Go to the
pond area across the chapel. Talk to the basket weaver about fragrant rush. He
wants you get his gouge which he threw at a fish and is now on top of a lily pad
at center of pond.
(This part can be done
the first time you arrive here at the pond). Go to water reservoir entrance
across the pond. Take the rope. Go to bird on top of right wall close to
entrance. Take pebbles from ground in front of bird or there are pebbles
by the trees across the pond. Throw the pebbles on bird. Take the piece of
copper the bird dislodged. The rope and hook are combined automatically to
make a grappling hook.
While standing close
to the constantly shooing basket weaver, pan left move cursor to closest lily
pad. Use the grappling hook on lily pad. Maya pulls the lily pad. Pick up the
gouge and give it to the basket weaver. He gives you the fragrant
rush as well as water lily seeds.
Ceremony in
Chapel: Go back to the chapel and give the fragrant rush
to Khaemouaset. Khaemouaset does the ceremony and you are now at……
Chapter 4 World of Ptah
Call
Ptah
First section of
lava floor: Go forward to the raised stone. Look down at
the active site of the lava lake and then turn right to see the anvil rock. Turn
left and click close to the far wall. Take the pincers on lava floor.
Turn around and enter the cave.
Sakhmet’s
hall: Look close at Sakhmet’s statue at center of
room. Note that a piece of Sakhmet’s key of life she is holding is missing. Pan
down at canoptic jar with head of Thot. Use the pincer on canoptic jar to
unstuck the head of the jar. Click the jar to turn the head to the right. Go
outside and see that you are not at a different area. Go back inside the hall
and see that ALL the entrance leads to the same area of lava floor. Exit the
hall.
Dwarf section of
lava floor: Talk to dwarf. To see Ptah, you have to have a
sistrum and then to extol him with singing. You have to make a sistrum. Look
behind and above the dwarf and see a rope too short for the dwarf.
Third section of
lava floor: Enter the cave again, turn the canoptic
head to the back and then exit the room again. Look around and pick up bronze
strip and handle.
Fourth
section: Go back to the cave and turn the jar to the left.
Exit the cave to the fourth section of the lava floor. Take the mallet by
the rope. Use the knife to cut the rope by the wall.
Make a
sistrum: Enter cave, turn the jar to face
front and exit the room. Go to anvil rock. Heat the bronze strip on lava
pool. Place the heated bronze strip on anvil rock. Use mallet on heated bronze
strip. Place the handle on U-shaped bronze strip. Now, we need metal rods
to make the sistrum musical.
Dwarf section of
lava floor: Enter cave, turn jar head to the right and
exit the room. Talk to dwarf about bronze rods. He wants help about his rope.
Click the rope from inventory to rope behind the dwarf. Talk to dwarf again, he
gives the rods for the sistrum and tells you how to invoke Ptah.
First section of
lava floor: Enter cave, turn the jar to face front and
exit the room. Stand by anvil rock and watch Maya invoke Ptah.
Ptah
comes: Talk to Ptah completely. Bring
me a ball of magical dolerite. Go to Hall of Sakhmet and open passage 3
times. To open the first passage, a metal worker has the die for
key. The magical ball is light, airy elusive but above the circle it
corresponds, it becomes hard.
Get
magical dolerite ball
First
passage: Enter Sakhmet’s hall and turn the jar head to the
right. Exit the hall and talk to the dwarf about the key. He gives the empty
mold. Enter Sakhmet’s hall and turn the jar head to front. Exit the hall and
talk to Ptah about finding the key. Life will open the way to
you. Place the empty mold on lava pool and the place it on the
anvil rock. Take the cooled lava object.
Go back to Sakhmet’s
hall. Click the lava object on Sakhmet’s key. Something
moved. Turn left and look close at alcove. Click on staff to
lower it. Go outside to check it out.
Second
Passage: Enter an identical Sakhmet’s hall. Go around the hall and
look at 4 alcoves with drawings, lit by lamps. Use the eye to see the 4
goddesses defending Osiris. Go back to Sakhmet’s statue. Look down at the base
and see a square area. The slab in front of the base could collapse. Place the
damaged dolerite ball on slab. This opens the square base. Take the 4
Goddesses balls.
Facing Sakhmet’s
statue, place the Bastet ball at bottom left alcove, Sakhmet ball at top left
alcove, Wadjet ball at top right alcove and Sechemtet ball at bottom right
alcove. Something outside moved. Exit.
Third
Passage: Enter another identical Sakhmet’s hall. Talk to
Sakhmet.
Answer the
question: What did Ptah accomplish with his heart
and tongue? He created… the world.
Music
reproduction puzzle – Now, Sakhmet makes music that you must reproduce to
open the room to the dolerite tools. There are 3 different sounds mixed
together: a wop-wop sound, metallic sound and hissing sound. Move to stop the
music and look around the room.
See 3 alcoves with
dripping water. Each of the water drips at different speed. Now we need to
produce the 3 sounds based on the speed and item placed to make music when the
water drips on it.
Facing Sakhmet’s
statue, place water lily seeds on lower left alcove. This produces a water
lily leaf that produces the wop wop fast and lower sound.
Place the sistrum at
top left alcove and this produces a metallic sound.
Face Sakhmet’s
statue and see a dish by her feet. Use the purification vase on the dish to
get a bowl of lava.
Place the bowl of
lava at top right alcove to produce the hissing sound.
The door to the
dolerite tools is now opened.
Dolerite Tools
Room: See an altar with a square, round and triangle
dolerites at the center of the lava pool. On each side of the room is a stand
that has geometric shapes on them.
Magical ball
recovery puzzle – The object of the puzzle as Ptah stated is to place the
round dolerite over the stand with the circle to make the light, airy ball
hard. Since it is light, wind can move the object on the altar.
1. Standing in front
of the square stand with the exit behind, use the banner spell on the ball at
center of altar. It will float above the triangle post.
2. Standing in front
of the circle stand use the banner spell on square dolerite to move it to the
center of altar.
3. Standing by
triangle stand, use banner spell on square dolerite to move it to square stand
by exit.
4. Standing in front
of circle stand, use banner spell on triangle dolerite to move it to square
stand on opposite wall.
5. Standing in front
of triangle stand, use banner spell on round dolerite to move it to altar.
6. Standing in
front of square stand with triangle dolerite above it, use banner spell on
round dolerite to move it to circle stand. Take the magical dolerite
ball.
Now you can return to
Ptah. Exit the room and come out to the lava floor. Talk to Ptah. He will have
dolerite balls made available to the workers to make the obelisk. Return the
ball to where it came from in order to get back to Maya’s world. Ptah gives a
bee of magic wax.
Drop the magical
dolerite ball at lava pool. Talk to Khaemouaset. Exit the chapel and talk to the
boatman.
Chapter 5 Aswan
Talk to Ouni. Go to
Ouni’s house and talk to Tuya.
Make
Paser’s remedy:
After she asks, give
Tuya the dried scorpion taken from Ptah’s chapel.
Paser’s remedy
preparation – Copy the healing formula using red ink on a blank papyrus.
Go to other end of
worktable.
Take a blank
papyrus from the rolls, left of the large vase holding scrolls on the
worktable.
Look close at
formula. Place the blank papyrus on empty space below the formula.
Take the
calamus and dip it in red ink.
Click the calamus
with ink on the blank papyrus.
Take healing
formula.
Give the healing
formula to Tuya. Tuya places the formula inside an unfired figurine.
Now, you need to
fire the figurine.
Take the
lighter beside Tuya.
Go to the kiln at
the open air room where Tuya was before.
Pick up the
twigs at the base of the tree. Place the twigs at base of kiln.
Use lighter on
twigs. Place figurine on top of kiln. Take fired Paser figurine.
Go to where Tuya was,
enter through the door on the left and take the mat. Go outside and talk
to Ouni. The floods of the Nile still have not come. An evil fire is burning
beside the obelisk. Turn left and go to the quarry through the open area between
the houses and the rocks.
Quarry –
Evil Fire by the obelisk
Go forward and pick up
the jar of water. Go to the pile of lumber at left end of the ditch. Pick
up the stick from the ground.
Go to the fire. Place
the mat over the fire. Look close and see a strange object buried in the hot
ground. Click on right side of mat to take the mat off the cinders. Use the
stick to take the mysterious knife with immense power – must belong to a God. The stick becomes charred
stick.
Turn around and talk
to sniffing Ouni about the floods of the Nile. Exit the quarry and see a
cutscene with the Gods. Nice to have all your earthshaking decisions solved by
the Gods. Talk to the boatman at entrance to the village.
Chapter 6 Memphis
Talk to the guard and
he says that Khaemouaset is not here. Turn around and go to the pond area.
Take the right side of
the pond and pick up the long stick by first tree. Take the plate
by the jugs at the last tree. Talk to the basket weaver.
Go to the water
reservoir entrance and talk to the young girl. To restore the floods,
bring back the recipient of Isis to the young girl.
Restore
the drawing on the coping
Go to the nilometer
(the round structure). Look close at the top of the structure (coping) and see a
bas-relief.
Place blank papyrus
over the bas-relief. Use the charred stick on blank papyrus. Take the tracing
of the design to be completed.
Talk to the basket
weaver. Give the tracing of the design to be completed and give it to the
irritating, constantly shooing basket weaver.
He needs an egg as
binder. Turn around and go to the left wall of the gate.
Look at the nest below
the bird. Place the plate on the ground. Use the stick on the nest. Take the
smashed egg.
Give the smashed egg
to basket weaver. Give the calamus to him also. The finished drawing is
in inventory.
Give the finished
drawing to the mysterious young girl. Now we need to set the drawing on the
coping.
Go to the nilometer
and place the finished drawing over the bas-relief on the coping.
Click on the sparkle
seen. Take the sacred recipient of Isis. Give the scared recipient to the
girl goddess. Watch the cutscene.
World of Isis
Talk to Isis. Pass
through the Gates of Death. Only Osiris can help restore the floods. Isis gives
a magic net.
Turn right and go to
the end of this isle where the water lilies are blooming. Drop water lily seeds
on the water. Click on other side.
First
Test: Go to the altar.
Object of the puzzle
is to move the 3 god stones from this altar to the altar at next island. You
can carry one god stone only at a time. Nut must not be left alone with Geb
and Shu should not be alone with Nut.
Solution:
1. Take Nut, the top
stone. Turn left and leave Nut at next island’s altar.
2. Come back to
first island and take Shu, middle stone.
3. Go to next
island. Leave Shu and take Nut.
4. Go to first
island. Leave Nut and take Geb.
5. Go to next
island. Leave Geb. Take nothing.
6. Go to first
island. Take Nut.
7. Go to next island
and complete the puzzle by leaving Nut with the other Gods.
Go to the island at
left before the bridge and take some rocks (there are some more rocks at
another island later). Cross the bridge.
Second
Test: Talk to Isis on the rightmost island.
Object of the puzzle
is to guide Horus, the falcon and Set, here depicted as the tortoise to the
middle island of 5 islands.
Solution:
1. Counting the
island from L-R, as 1-5. Leave the 5th island you are standing on while
talking to non-stop wing flapping Isis.
2. Go to fourth
island where the tortoise is nearby. The tortoise moves to second island.
3. Go to first
island on the left and move the hovering falcon to the middle island.
4. Go to second
island to move the tortoise to the fifth island.
5. Go to fifth
island to move tortoise to the middle island. The hawk and the tortoise are
now by the middle island.
Cross the middle
island, over the tortoise to the next island.
Next
Island: Isis is not around. Go to the water collection set
up on the left of the island. In front of it is a ditch to carry water to an
empty reservoir at other end of the island. If you have not picked up rocks from
the other island, there are rocks at top right of the island.
Check the rope dipped
in the water – the gourd filled with water is heavy. Place rocks on the
counterweight hanging basket. Click the gourd rope and watch Maya pour water on
ditch to fill the reservoir. The water formed into a gate.
Chapter 7 Book of the Dead
First guardian
- Guess the name of the guardian of the first door.
Object of the puzzle
is to make a depiction of the guardian of the first door as seen within the
first door.
The altar has 6
tablets that you can cycle through different parts of the depiction. Cycle
through to select the parts similar to the guardian.
Solution:
1. Activate the
stone puzzle by using the bee of the magical wax on etched bee.
2. Back out to reset
the puzzle. The 6 stones are L-R: neg eb ess ou et a.
3. From L-R: Press
#1 stone once, #6 stone once and press #4 stone once – Negaou.
Second Guardian
(The Double Test): To get to the second guardian,
cross a labyrinth.
Object of the puzzle
is to cross the labyrinth while guiding your Ka counterpart and reach the exit
at top of maze at the same time.
The Ka’s maze is the
mirror image of your maze. The maze has blocked slabs that can stop you or the
Ka while the other takes other steps. Check the description of The Double Test
by clicking on the question mark icon. You and the Ka must reach the top exit
at the same time.
Solution:
Number the slabs 1-
4 across starting at row closest to start area going 4 rows up to 13-16.
Step on 2 – 1
– 5.
Step on 9 – 13
– 9 – 5 – 1 while Ka is blocked at the mirror maze.
Step on 2 – 3 –
7.
Forward-click twice
on the void to move the Ka at the mirror maze while you are blocked.
Step on 8 while Ka
is blocked at mirror maze.
Step on 4 – 3
– 7.
Step on 8 – 12 – 16
while Ka is blocked at mirror maze.
Step on 15 and out
to the mat.
Third
Guardian:
The small guard
hath a heart of stone.
The transparent
guard is to the right of the small guard.
The papyrus heart
is to the right of the heart of gold.
The heart of gold
is to the right of the heart of stone.
The lapis lazuli
heart is between the stone one and the golden one.
Find the guard
with the heart of feathers and thou shalt pass.
The object of the
puzzle is to find the guard with the feather heart.
Based on the clues
given, the gold, lapis lazuli and papyrus guards are to the right of the small
stone guard. Since the small stone guard is the second from the left, the
guard with the feather heart is the first one.
Click on the first
guard on extreme left.
Final
Trial: See 4 mats with depictions of the Constellation of
4 Gods.
Step on any the 2
front mats.
Look up at the
constellation formed in the sky and look at the dots on the God constellations
depicted on the mats.
Step on the map
constellation that matches the sky constellation.
Remember that the 2
even stars constellation is the Horus depiction and the 2 uneven stars
constellation is the bull depiction.
Osiris: Go forward and talk to Osiris
twice. The enemy gave himself away. Give the mysterious knife to Osiris. Set the
Red is the enemy. Follow Osiris’ instruction. Salty beverage, hmmm. Osiris gives
Maya the kyphi, spellbinding incense (soporific incense).
Turn left and place
the dried snake on the burned area. Climb the steps to the young girl goddess at
Memphis.
Memphis
Talk to the young girl
goddess twice. She gives the sacred recipient back to Maya.
Stammering man and
salt: Talk to the basket weaver and then talk to the
stammering man. The stammering man wants to be cured in exchange for salt. Use
the transfer handkerchief spell on stammering man and then click on basket
weaver. Maya is given salt. Talk to basket weaver. <no comment>
Chapel: Go to the chapel to see Khaemouaset.
Here we go again – the guard would not let you through. Hypnotize him again with
the cobra of hypnosis.
Talk to Khaemouaset.
Give the sacred recipient and salt to Khaemouaset. Watch the meeting of 2 Gods –
Ptah and Set. Talk to Khaemouaset again.
Go to boatman to take
Maya back to Pi-Ramses.
Chapter 8 Pi-Ramses
Go forward and left to
talk to Djer. Enter Paser’s house. Use the figurine on him Eek! You released
evil forces. A guard and Tuya arrest Maya. Tuya is a traitor!!
Escape: Place the soporific incense on
the standing lamp above Paser’s mat.
Exit the house and
Maya gets a vision of the disaster if Maya fails. Go to the exit and talk to
Djer.
Practice the
spells: Exit, turn right and right again through the
entryway. Talk to Khaemouaset. Tuya is the tool of Set. He gives a rain
spell.
Practice the spells in
preparation for the upcoming battle with Tuya. See graph below at Chapter 9.
Go to the right
entrance to the temple. Talk to the dreamer-brick maker to enter the temple.
Tuya is in the naos and wants to be alone. Take the dream test.
Dream Test –
These are the answers to the Dream test.
1. The beginning of
your dream indicates that in 3 summers, the harvest will be particularly
good.
2. You will lose
your parents.
3. You will have the
support of the gods and because of that, you will rise above common folk.
4. You will live an
honest life.
5. You will gain
authority over people.
Talk to the
dreamer-brick maker again. He gives you a magic coffer he found. He heard
a voice to whom to give it to. The coffer is to pick up the ferment of
uncleanliness from the sacred stone. Be careful walking through the temple to go
to the naos.
To get through the
temple undetected:
Move one step into the
temple and wait.
Wait for the sitting
guard on the left to turn his head to the center aisle and down – he falls
asleep. At the same time, the guard on the right should be picking up something
from his right and will be in the act of moving back to face the column. Also at
the same time, the guard by the top right column should move away.
Then click, to go
forward.
Chapter 9 Duels at Pi-Ramses
Go forward to the naos
and see Tuya waiting for you.
Spell Duel with
Tuya
Tuya immediately
starts the duel. Listen to what spell she uses. Take the spell to counteract it
from inventory and use it on Tuya. The life force of each combatant is seen on
either side of the screen. If you lose, there is always an automatic restart –
so don’t worry.
Spells | Counter |
Burn – I obey magic, burn | Rain spell |
Hypnosis – May the fire of | Purification jar |
Dead souls – Come ye dead | Cobra of hypnosis |
Ka – May the shadow of your | Magic net |
Lotus transformation – I | Wadjet eye of |
Magic Net – Attendants of | Banner for |
When successful in
defeating Tuya, Tuya changes into a snake. Follow the snake to the naos.
Duel with Tuya the
snake:
Click the ? icon to
read the rules of the game.
Maya or Tuya can move
or cast a spell. Maya can move and cast a spell on all directions. The snake can
move only on each side but not backwards. The snake can cast spell on all
directions.
Each square can be
bewitched: Blue for Maya and red for the snake. The opponents square can be
neutralized and immune to spells for one turn.
Maya dies on red
square but the snake loses only a segment of its body when it lands on a blue
square – so it has more chances of progressing in the game but Maya has only one
chance.
Left click to move and
right click to cast a spell. Click on lower top icon to restart puzzle.
My strategy
was: Constantly have one square separating Maya and
the snake. Make a lot of blue squares. Move close and try to cut of segments of
the snake body while on the snake’s side or diagonal to hit the head. Good luck
and happy snake cutting!
Step by step
solution by John W. Thank you!!
L means click the left Start at 1C. Instructions | ||||
| R2C | L2C | R3D | R3B | R2B |
| R1B | R3D (hits snake) | L1B | R2A | R2C |
| R1C | R1A | L2A | R3B | R3B (hits snake) |
| L1B | R2B | R2C | L2C | R3B (hits snake) |
| R3B | R3C | R3C | L3C | R2B |
| R3B | L3B | R2A | R2A (hits snake – coup de grace) | |
After defeating Tuya,
the snake and placing her in the now magic closed coffer, go to Paser
through the main temple. Hear hubbub and see that the temple is deserted. Exit
on the side entryway. Talk to Djer standing by Paser’s courtyard. The workers
went to the river to see the obelisk. The guards left.
Paser’s
house: Use the Wadjet eye of clairvoyance on the figurine.
Use the mysterious knife of Set on the figurine. It has the dried scorpion.
Paser is cured. Keep Paser updated.
The Obelisk was
erected in time. Ramses II was given life. Maya became one of the greatest
magician Egypt has ever known.
This
document may not be distributed without express written permission of the
author and the content may not be altered in any way.
For
Questions or Comments on this Walkthrough, please write to: MaGtRo
Copyright ©
4/2004 MaGtRo
View this guide raw, exactly as the archive holds it