Chapter 5 – Invite the
4 Heroes to Help Save the World
Coneman the Barabrain
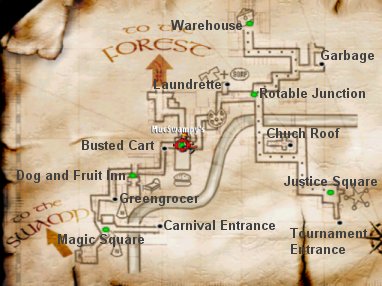
- Go to the busted cart and give the invitation to Coneman under the
cart. After taking him out from under the cart, Coneman, the Nordic
warrior complains about his very bad back. He wants you to fix it
before he can help with saving the world.
Tournament Entrance
- Talk to Grandulf. He needs help with the fireworks display before
the tournament begins. Meet him at the door tonight and he will show
you the ropes. Go back to the bedroom at the Inn and go to sleep.
Wake up and return to the tournament entrance and meet Grandulf.
Fireworks – Grandulf
explains that there are 4 buttons for firing and that the right
fireworks should be fired at the right moment. There is a special
monitor to do so. The Fairy godmother appears to explain further
about the change in keyboard control. Press the correct key when
the corresponding ball passes the lit green square on the right
of the console.
Keyboard
key
Color
of Balls
Fireworks
Action
key (Ctrl)
Red
Rocket
Use
Item (Alt)
Blue
Banger
Left
Arrow
Yellow
Roman
Candle
Right
Arrow
Green
Catherine
Wheel
After a successful fireworks
display, Grandulf says you can comeback anytime at night as
long as you stay away from the guards. The tournament is now open.
Go back inside and walk forward
the tents. The opening is close to the wall. Go to the tent at the
center. Crouch to get in and see the Princess you saw at the swamp.
Try to wake the princess up and she thinks you are Johnny, her dreamboat.
Look around and see a poster of a Johnny Lightnin X, with black hair,
purple robe and wearing shades. Go back to the bedroom in the Inn
to wake up in daylight.
Carnival: Go to the road off
Magic Square that had the closed gate before. The carnival will open
only after the tournament is declared open and is accessible only
during the day. Enter the Carnival and meet the 2 demons you have
met in the 2 previous episode of Simon the Sorcerer. They are now
into stealing money through crooked games in the carnival.
Acupuncturists
- Enter the center enclosure. Look at the sign in front of the caravan
about backaches. Enter the caravan and meet the 2 demons. Talk to
them about acupuncture and backaches. They do not do house – street
calls. They charged 10 groats.
Seaside Shooting
- Play the game for 5 groats. Use the chakara, hitting 10-14 ducks
will entitle to a free game, hitting 15-19 targets will win 3x the
game fee, another source of money and to hit all 20 ducks will win
a teddy bear. Hit 20 ducks. The free game is not true and will still
be deducted from your money. To help in the shooting, place an X on
the monitor where the chakara will hit and use that as target for
the ducks. Wait for the next set of targets to come out because sometimes
the same targets pop up. Move the right and left arrows only after
you have centered it on the target. The ducks appear in 2 (I think!)
sets of sequences and if you can remember the sequence, you can anticipate
where to shoot. Good luck! Receive the moth eaten teddy bear,
formerly owned by a dog.
Invadertron
- There are 2 of these machines. Just like the classic space invaders,
hit all the flying targets to gain the high score. The prize is a
pair of shades and more groats, another source of money.
Wonder Wheel
- Spin the wheel to land on either win or lose area. The game is rigged.
Test your Strength
- Talk to the dwarf prince. Since he lost his clan to the dragon,
he needs a purpose in life. He needs a symbol to unite dwarves around
the world. Give him Hammor, the hammer he gave you. But before he
sets out to do so he needs to prove to himself that he can beat the
“Test your strength” game. Talk to the demon to convince him
to allow the dwarf prince to play. The demon will eventually let the
prince play. Go behind the demon, talk to him and he will turn
his back to the dwarf prince. The dwarf will change the mallet
he was told to use to Hammor and wins the game. The prize is a black
T-shirt which you will get from the prince.
Bonzo’s Ball
Bonanza! – The object of the game is to shoot the ball through
the clown’s teeth. Something’s definitely crooked here! The ball looks
like it is too big to enter the mouth. The prize is to be a Coneman
action figure.
Aqua Derby
- The object of the game is to have your horse win the race by shooting
water through open circles. Hold down the Ctrl key while shooting
water into an open circle, wait until your horse move and do the other
two holes or until the horse reaches the end. The opening of the circles
occur in counterclockwise sequence. Billy the Kid is the opponent
in this race. Win a bucket of green plastic toy soldiers with real
plastic weapons.
Voodoo Circle
- Enter the lane between Wonder Wheel and Test your Strength. Enter
the enclosure on the right and see a circle of skulls. Use action
key on cobra lever at left of the circle to go to a lower level. Talk
to the voodoo demon selling magic amulet about making voodoo dolls.
What are needed are a doll and some children’s teeth. Hit cobra lever
again to go back up to the circle of skulls.
Go to the opening on the hedge
across the entry to the voodoo enclosure, just to the right of the
cobra lever. Crouch straight forward and right to the end. Come
out to the enclosure for the Wonder Wheel. Look up at the magnet attached
to the back of the wheel. Take the magnet. Exit to the outside
lane and enter the enclosure at the opposite side of the Voodoo place.
Cotton Candy
stand – Go down the steps. Buy cotton candy floss for 3
groats.
Flea Circus
- See fleas perform. Use the teddy bear on fleas and get teddy
bear infested with fleas.
Go back to Wonder
Wheel and play the game and win a peashooter (leguminous
vegetable projector).
Talk to kid that is following
you. He wants a red gobstopper and you promise to get one for him.
Exit the carnival. All the prizes at the different arcade stalls should
be won.
Dog and Fruit Inn: Game Room – Use the flea infested teddy bear formerly owned
by a dog on pool table and the cat will jump out of the table. Get
the red and yellow pool balls.
Beer Garden
- Give the cotton candy floss to the wig trader. She will give her wig in trade. Go back to the carnival.
Carnival: Bonzo’s Ball Bonanza! – Play the game but this time use the
yellow pool ball. You are given 3 large yellow balls to use. Remember
to place the yellow pool ball in the hand box and to press Alt when
ready to shoot the yellow pool ball. If you miss the first few tries,
the yellow pool ball returns to the inventory and you can play again.
Get a Coneman action figure as prize.
Kid – Give
the red pool ball to the kid that wants a red gobstopper and he will
give you his pre-chewed gum. He chews the red ball and loses teeth in the process.
Voodoo Circle
- Use the cobra lever and enter the voodoo demon tent. Automatically,
give the teeth to the voodoo demons and they eat it as snack. They
then do an incantation on the Coneman doll you gave to them. You get
a Coneman action figure voodoo-ified and full of needles.
Acupuncturist
- Give the needle filled Coneman doll to the acupuncturists. Watch
as Coneman’s back is fixed and he decides to forego his revenge on
that puny boy later and save the world first.
To fix the back
of Coneman (recap):
1. Win the Teddy
bear from Seaside Shooting at the Carnival.
2. Get the fleas
from the flea circus using the teddy bear.
3. Get the yellow
and red pool balls at the pool table at the Inn by removing
the cat with the flea infested teddy bear.
4. Win the Coneman
action figure at the Bonzo’s Ball Bonanza! in the carnival
using the yellow pool ball.
5. Give the red
pool ball to the kid in the carnival and get teeth.
6. Give the teeth
and Coneman doll to voodoo demons at the voodoo circle in
the carnival and get Coneman voodoo doll.
7. Give the Coneman
voodoo doll to the acupuncturist at the Carnival.
Launderette – Place
the blonde wig from the wig trader and the black t-shirt won by the
dwarf prince in the washing machine. Start the machine and later get
a dyed black wig.
Bedroom – Go back up
to the bedroom and sleep. At nighttime, go back to the princess via
Tournament entrance.
Tournament entrance
- Enter the entrance, forward and enter the tent area through an opening
by the wall. Crouch to enter her tent. Go to the poster of Johnny
X and look at it. Use magic spell book. Use the left arrow key (Polmar
– red) and right arrow key (Gazza – blue) keys and press Ctrl to change
your robe to purple. Wear the black wig and the shades. Wake the princess
up and she will say that she will give you, Johnny a kiss. Use frog
on princess. She wakes up screaming and will shoot you with her bow
and arrow. Watch the escape and Grandulf is hit instead of you. Outside
the tournament entrance, the frog changes to Prince Brave aka Valiant.
He accepts Calypso’s invitation. 2 down 2 to go.
Change your robe back to red.
Go back to the inn and sleep to wake up at daylight.
How to change
the frog back to Prince Valiant (recap):
1. At carnival,
buy cotton candy floss, win an Invadertron game to get shades
and get black T-shirt from the dwarf prince, who won the Strength
Contest.
2. At the Beer Garden
in the Inn, trade the cotton candy floss for a wig with the
wig trader.
3. In Launderette,
wash the wig and the T-shirt together to get a black wig.
4. Wake up princess,
wearing black wig, shades and purple colored robe.
5. Get the princess
to kiss the frog.
Forest: Woodworms by Reservoir Hut – Give the woodworms the bucket
of green plastic toy soldiers with real plastic weapons won from Aqua
Derby. The woodworm liberation army eats the tree up. Watch Simon
handle terrorists. He picks up Jar Nin’s necklace.
Church’s Memorial Room
- Go to the memorial room at the church. Upon entering, turn to Simon’s
left, forward midway the aisle, turn to the memorial wall and see
Nin Jar’s memorial. Simon will say ” So Nin Jar’s ashes are there”.
This drawing/plaque where the ashes are can be seen early in the game.
Place in Jar Nin’s plaque
- Call the rainbird and see the place on the plaque appear in the
map. Fly straight from the rope bridge of the forest and left of Poliganis
to the formerly empty land. Land. Go forward to the ashes at the center
of the slab. Use vacuum cleaner on it to get vacuum cleaner full
of ashes. Go back to Inn.
Dog and Fruit Inn: Left Hallway by bedroom – Combine Jar Nin’s necklace and the
empty soul jar to get jar with necklace. Go close to the mirror
and use the jar with necklace. When successful, the jar turns green
to get jar with Nin Jar’s soul in it.
Private room – Give the ashes and soul of Jar Nin to Calypso.
The ninja will come to the Inn when the joining is completed.
How to get Jar
Nin’s ashes and soul (recap):
1. In the carnival,
win the Aqua Derby to get toy soldiers and weapons.
2. Give toy soldiers
and weapons to woodworms at the tree in the forest where Jar
Nin died and get necklace.
3. In the Memorial
Room at the Church, look at the plaque of where the ashes
of Jar Nin are placed.
4. Collect the ashes
using vacuum cleaner in the place in the plaque.
5. Place the necklace
in the soul bottle and collect the soul of Jar Nin at the
hallway outside the bedroom.
6. Give the soul
and ashes to Calypso.
Tell the Barman about the ghost
and listen to another person’s plan destroyed by you. Go back to Calypso’s
Private Room and talk to all the heroes there.
Church Tower:
Time to help Goldilocks. On the way to the church take note of the
rickety bridge and the 2 ton weight limit assigned to it. Take note
also of the water flow of the river.
How to steal the cheese
truck – Go the gate in the back of the church and see a hedgehog
kid floating in the air holding 3 balloons. Aim the peashooter on
the balloon. Shoot at 2 balloons and leave the last yellow balloon
intact until the cheese wagon passes by. You can move about and
the boy will still be there. When the cheese wagon is underneath
shoot the last balloon to drop the hedgehog kid in the open topped
cheese truck. It looks like that the kid falls outside the truck
but he is in the truck if you do not see him on the road when the
truck moves away. Follow the cheese truck to the warehouse. Watch
as the cheese inspector finds the hedgehog kid inside the truck
and no cheese. The hedgehog kid enters the Cheese Bros. warehouse
and eats all the cheese. Mr. Cheese and the cheese inspector are
out of a job and the scam is stopped. Ride the wagon and fairy godmother
explains how to drive the truck.
Drive the truck directly underneath
the stolen lead on the church rooftop. Enter the bell tower, climb
the bell rope to the roof and push the lead on to the truck. Drive
through the rickety bridge and the bridge collapses. Look at the water
flow of the river now and compare the flow of the river before the
truck dammed the river.
Forest:
Call the rainbird and fly over the forest and town. Note the inflow
to the river around the reservoir comes from 2 sources, one is the
river that comes in by the church in town that is now dammed up by
the cheese truck. This river flows out to the swamp and to another
branch that joins by the waterfall by the volcano in the forest to
another source out of the world. The river flows out around the forest
and the reservoir. There is a gate that holds back the river to the
outside world just across Acre Gap and dams the water to fill the
reservoir. The reservoir surrounds the Mysterious Isle. These river
and reservoir system can be studied on the map also. Alight at the
beach.
It’s a Beach – Take
a look around. The water level is very low. Go to the left side of
the beach close to the reservoir and see that the Mysterious Isle
has a pier with a boat tied to it – somebody is there. Look down and
see a phone booth in the water. Walk around the shore and Pointless
bridge and still not find a way to get to the Mysterious isle. We
need to lower the water table more to get there.
Dragon by the waterfall
–
How to get the key from
the dragon’s stomach – Combine the stick with chewing gum to
make chewing gum on the end of the pole. Combine magnet to
it to make magnet stuck to pole with chewing gum. Use it
on dragon. After Simon’s procedure on the dragon he says, “needs
lubrication”. Combine butter to magnet on a pole to make lubricated
pole magnet. Now use it on dragon to get dwarven keys from
the inside of a dragon. “Eat your heart out Mr. Herriot!”
Reservoir Control Hut
- Go to Reservoir Control Hut. We have to release more water from
the reservoir by opening the dam gate. Go up the ladder to the roof
and look at the stuck trap door. Go down. Use the dwarven keys on
locked door. It might help to raise the gamma control here, to be
able to see better. Pick up the petrol on the right side by
the wall and look at the pulley system. Go to the other side of the
wood wheel to see if we can raise the gate. Push the spoke and realized
that you cannot raise the gate. (Go to the corner by the wheel. Glitch
on this part shows a ladder that leads to the roof of the hut at the
corner but is really the ladder outside to go to the roof). Look up
to the trap door on the right side of the pulley system. Use chakara
to unstuck the trap door by aiming at the latch at the bottom side
of the trap door. Simon will say “Got it!”. Go back up to the roof
and trap door and open the trap door. Yikes! Shortcut to enter hut.
Pour gasoline on rope of the pulley mechanism. Now that you have sunlight
from the trapdoor, use mirror to light it. The rope holding the gate
is cut and now the water is released. You can go directly to Mysterious
Isle by phone booth or by the beach.
It’s a Beach or Mysterious
Isle – Look at the water table now and see that it is much lower.
The phone booth by Mysterious isle is accessible. Walk towards the
boat that is now hanging. Climb the rope that attached the boat to
the pier. Go to the ruins of a church. See Melissa look down at the
lowered water table. Enter and surprise Melissa. Give her the invitation
automatically. Time to go meet everybody.
Dog and Fruit Inn: Calypso’s Private Room – Go back to Calypso at the Private
Room. They are planning the assault on Sordid’s fortress by sneak
attack. They think that Simon will not be of help. A knock is heard
and Runt enters with 2 guards. He placed a magic barrier around the
room. He disabled Coneman and blast Calypso also. Runt is filled with
evil glee about catching Simon, who he wants for himself and Calypso,
as well as the world’s 4 greatest heroes. When Runt leaves, Melissa
thinks that they should just wait it out but Simon thinks otherwise.
Talk to all the heroes and exhaust ALL dialogue. Coneman will eventually
get mad because of Simon’s “witty repartees” and beats him up dead.
Simon comes out alive by the front door of the Inn using the lifepad.
Go back in the Inn and find out you cannot get through the barrier.
Beer Garden
- Notice the open roof to the private room of Calypso. Talk to the
boy on the tire swing. Fairy godmother appears to explain how to use
the swing. Press the action key to start. Press the forward keys when
the swing starts to go forward (when the swing is at the very back
close to you) and the back keys when the swing starts to go backwards
(when the Simon’s feet are up and the swing is far from you). Timing
is necessary. Press the corresponding key when the swing is at the
end of the motion forward or backwards. Pick up the length of rope
with the tire attached. Tie the rope to the picnic table. Watch the
talk with Calypso. I thought
this is the funniest part of the game and cracked me up – Sorry about
the editorial! We have to save the
4 heroes taken by Runt to the fortress. The fortress is at the east
and the entrance is through a rocky tunnel in the mountain. Call the
rainbird and Sordid’s fortress appears in the map. Fly east of Poliganis.
Sordid’s fortress –
See the camps of the invasion army surrounding the fortress entrance.
There is an orc guarding the gate. He needs an identification card
before he can let you in. Only gobbos, orcs, metal things and trolls
n’ stuff are allowed in. The covered bridge is closed by a gate.
To get in the fortress
the first time – Change the color of your robe to black by using
the spell book and selecting all colors. Enter the tunnel and carefully
walk only on the dark areas. After passing 2 orc guards, you will
hear a gobbos sing and march towards you. Crouch (Z) and quickly
enter the lighted recess (practice to find a place to hear them
come, go back to the recess, crouch and enter). When the goblins
march towards the opening of the cave (when they are not on the
screen anymore), quickly go out, stand up, turn left and navigate
the dark areas to the end of the hallway.
Look in the mailbox by the
bridge. Pick up the mail which is an order for a crate of ‘usual’
from Sordid to the Green Grocer in Poliganis. Go back out of the
fortress and do not worry about being caught this time. Call the rainbird
and fly to Poliganis.
Green Grocer – It is
still close. Use the order on the door of the greengrocer. Simon will
insert it in the mail slot. Listen to the frightened grocers. A crate
is dropped from above. Look on crate and see it marked with Sordid’s
address. It’s full of cauliflowers. Now to find the hedgehog kid.
Go to warehouse. Cheese Bros. Warehouse –
Talk to the hedgehog kid and you will pick him up. Go back
to the Green Grocers. Green Grocer – Use
the hedgehog kid on crate of cauliflower. He also hates cauliflower
but will eat it if cheese covered. He is very full and feels like
throwing up. Use the chakara on him to get him to cover the cauliflower
with cheese. Then he eats it leaving an empty crate. Enter the empty
crate now.
Chapter 6 – Save the Universe
After being hauled as groceries,
Simon climbs out of the box and finds himself inside Sordid Fortress.
Colored Fireballs –
The object of this puzzle is to get up the ramp and evade or neutralize
the fireballs. In some instances evading the fireball can be done
by dodging out of the path or by crouching. Remember what the fairy
godmother said – If you get stuck in a magic place, think of the colors
you see. The best way is to change the color of the robe into the
color of the released fireball. After changing to the color of the
released fireball, sprint up the ramp as fast as you can until the
next fireball is released. The colored fireballs will be neutralized
when it hits the same color of your robe. Change color of robe again
and sprint until the top.
Keyboard
Arrow Keys
Color
Combination
Color
Produced
Left
arrow
–
Red
Up arrow
–
Yellow
Right
arrow
–
Blue
Left
+ Up
Red
+ Yellow
Orange
Left
+ Right
Red
+ Blue
Purple
Up +
Right
Yellow
+ Blue
Green
Left
+ Up + Right
Red
+ Yellow + Blue
White
Climb the ladder and enter
Runt’s laboratory.
Runt’s Laboratory –
You are stuck to the floor. Runt explains their diabolical plans.
They found the location of the nexus, the control center of the universe.
Sordid is there making preparation for the invasion. Runt will follow
soon after he does some adjustment needed to the matrix. They do not
need the Magical Boots. Melissa and Coneman are imprisoned in a force
field. The prisons are controlled by 2 buttons that are in front of
you, one that releases the force field and the other changes them
into something small.
How to release Melissa
and Coneman – Combine peashooter and magnifying lens. Simon
said that using the Shift button will zoom in. Zoom and look straight
on console with 2 buttons in front of you. Target and shoot at the
right release button.
Use the voodoo doll with pins
to wake Coneman up. Coneman goes for Runt but Runt changes him to
a duck. Calypso arrives but accidentally pokes himself with his light
saber and dies. Now, Runt is out to get you with his light saber.
When he first attacks you, Runt said that his magic is absorbed by
your robe.
How to fight Runt’s colored
light saber – Again, remember Fairy godmother’s advice – If
you get stuck in a magic place, think of the colors you see. Change
to the different colors of the saber blast shot at you by Runt.
Then run to similar colored button on the wall. When the colored
blast hits you, press the button to transfer Runt’s magic to the
buttons. Do all the buttons. Once all the colored buttons are glowing,
Runt’s magic is gone and there will be power build up.
Runt falls into the bottomless
pit. Coneman’s magic transformation was delayed and he, as duck flies
over the pit. His transformation back to human happened in an unlucky
time and also falls in the pit. Melissa wakes up and together enters
the Nexus gate, opened by the power build up.
Nexus – There is a giant
Swampy head above an entryway. Calypso’s ghost appears using power
from beyond. He states that the head is a representation of the builders
of the nexus.
Go to Swampy’s head. Look at
the head and Simon recommends that you sing the Swampling Song. Select
the words to the Swampling song: Swampling stew. Swampling stew. To
your bog your swamp be true. Swampy be true. Swampling stew. Swampy’s
eyes light up and an entryway opens up.
Magic red bridge – Cross
the bridge and be stopped by a Swampy guard. He explains that the
bridge can only be crossed from the other side. No running or jogging
allowed on the bridge. The bridge is just for people leaving the control
center not going to it.
How to cross magic bridge
with Swampy guard – The guard said no running or jogging, so
press and hold Shift key to walk forward. Since the bridge is only
for going out and not entering, when the guard comes out of the
guard tower, immediately turn back towards the entry door and walk
like you are going out of the control center. Be sure to walk straight
in the middle of the path and not veer off to the edge. Walk and
not hesitate when the guard is outside the tower. Once on the magic
red path, count 16 – 17 steps and then turned back to the start
point, guard comes out and looks around. Wait until he looks towards
the entry door and as soon as he turns to look away, turn back and
continue the walk. Continue doing this until the other end. The
guard comes out 4-5 times until you reach the end of the bridge.
Once across and see
a black starry universe, a major glitch happens. It will crash to
the desktop. As soon as I saw that starry universe again after replaying,
I immediately pressed the spacebar and saved the game. After opening
or loading the game, a red blank screen is seen but still have the
3 boxes on the top right. I opened the inventory and chose to call
the rainbird and a graphic scene replaced the red screen and went
on from there.
Nexus Computer Room –
Go to the right and see Sordid lying on a bed, looking like he is
in a coma. Go to the left side and see Swampy lying on another bed,
breathing but out of it. Look at the computer and Calypso’s ghost
will appear (Whoo, hooo, oooo!) Calypso explains that Swampy’s and
Sordid’s soul and body are separated. Sordid’s soul entered the Nexus
computer and took Swampy’s with him. The Ancients are the creator
of life, universe and everything. Swampy is slang for the Ancients.
The Nexus computer is the one that controls the universe and if the
power supply is pulled out, it will be the end of everything. Calypso
knows so much because he is in “Spirit Guide” persona. Simon has to
stop Sordid’s vile plan by entering the nexus computer. His soul needs
to be separated from his body. Calypso performed Simon’s separation
of soul and body. If something happened to either the soul or body,
the joining back will have a slim chance of happening. Enter the computer.
Inside the Nexus Computer
– Find yourself inside the computer.
Path to get to
Sordid and Swampy inside the Nexus Computer:
1. Upon arriving
in the computer, turn around and go to 3 green transporters.
2. Take the right
transporter.
3. Arrive at a passage
that has giant multicolored wires at the left.
4. Climb passage
to blue ramp.
5. Go down the other
strip.
6. Turn right at
lighted arched passage.
7. Walk down the
dimly lit green passage.
8. Out to bright
green passage beside the big multicolored wires on the left.
9. Turn right on
crossroad.
10. Turn right again.
11. Enter passage
with 1995 U.K. written above it and see 3 green transporters.
12. Take the right
transporter and see Swampy and Sordid.
It is best that as soon as
you reach the passage going into the transporter that will get you
to Sordid and Swampy, retrace your steps going back to the transporter
room with 3 pads as a practice and to know the path to be taken.
Swampy is glad to see you and
ask that you help him. Sordid talks about his plan to use Swampy to
change the automatic control of the Nexus to manual, so that he can
rule the universe. Swampy’s ancestors 100,000 generations back were
the creators of the Nexus. Swampy being the last of his line can run
the machine. Swampy presses a button and removes the automatic control.
He pulls a lever to change it to manual. Oh Gee! He did the memory
erase and deleted the Nexus!! Sordid escapes.
You have 2 minutes to get Swampy
out and escape or escape by yourself. Swampy urges you to go and leave
him because his leg is tied to a ball and chain. You can use the vacuum
cleaner on Swampy but there would not be enough time to get back out.
Decision time! Go to the portal by yourself or with Swampy and go
through the maze again. The lights flicker on and off. Sordid flies
to get outside the computer ahead of you. He knows the path so you
can follow him if lost. You have to beat Sordid to the computer room
and leave him trapped in the Nexus.
Return Path to Nexus Control
Room* – The object of the return path is to reach the transporter
room with 3 pads. The only variant from the path above is when you
reach the blue ramp and go down, you will get to a room with a single
transporter pad and with FBI OMNI written on the wall.
Return Path to
Nexus Control Room:
1. Right and forward.
2. Left and forward
to middle ramp.
3. Left on middle
ramp and forward.
4. Walk the enclosed
passage going up with 3 ramps.
5. Walk the arched
ramp.
6. Left to go to
blue pad.
7. Down the other
ramp.
8. Enter and stand
on single transporter pad in a room with FBI OMNI on the wall.
9. Go out and climb
red edge strip to Red pillar with C1557 on it.
10. Go around to
the right and climb up the strip.
11. Walk the enclosed
passage with 4 ramps.
12. Climb another
ramp.
13. Left to transporter
room with 3 pads.
14. Take the middle
transporter and come out to the Nexus computer room.
Be sure that before you continue
the game, you have the CD ROM with Auto Notification checked or on
in the Device Manager of the computer you are playing on.
Last puzzle – Your body and Swampy’s
are still in their beds but Sordid’s is gone. The computer is going
haywire. There is no keyboard. You have a CD in inventory and no place
to insert it. Since there is no eject button for the CD ROM drive
of the Nexus computer, eject your CD drive, the one you are playing
on. You will get an eject auto notification. In some replays,
I did not get one. Click OK. If the game frame disappears, just click
it back up from the toolbar at the bottom of the desktop. The CD Rom
drive of the Nexus computer in the game opens and Simon inserts the
CD aka Seedy aka Magical Boots. The Nexus computer is now working.
The computer asks “Where would you like
to go today?” Simon types “Home”. He realizes he needs Calypso for
the joining of his body with his soul. While shouting for Calypso,
a body comes out of the Nexus computer. It is another Simon the Sorcerer
trapped in the Nexus for a long time. The new Simon says that any
good that exists, an equal and opposite incarnation that is evil is.
Those never meet but then, they did.
“Got control of the universe
have we. Right then, let’s have some fun” says the Other Simon the
Sorcerer.
The End
Watch the ending credits
and see the outtakes from the making of the game. 🙂
*Thanks to Michael Barnes.
This
document may not be distributed without express written permission
of the author and the content may not be altered in any way.
For
Questions or Comments on this Walkthrough,
Please write to: MaGtRo