By Adventure Soft
Publishing
Walkthrough by
MaGtRo May, 2002
Game Play: The game is by
keyboard manipulation and the mouse can be used only in the Spell book.
Read the manual for more complete explanations. The Start Menu has the
Start game, Install/Reinstall, Uninstall, Setup and Exit. The setup menu
shows the video, sound and keyboard options. The default keyboard controls
are: Movement – direction arrows, Action – Ctrl or enter, Use item – Alt,
Examine – X, Crouch – Z, Lookaround – Tab, Walk/run – Shift, Sprint – Caps
Lock, Cycle inventory – C and Open spell book/inventory – Spacebar. When
the spacebar is pressed the display shows 3 boxes on the right (G –
groat Simon is carrying, Eye icon – what Simon is looking at and
Hand icon – what Simon is carrying at the moment). To get the main menu
for the game during the opening sequence press ESC and not the space bar.
A selection will appear and choose to load game from this selection or a
possible glitch might happen. The Spell book is on the left of the screen
and has the Disk options (load, save or quit), Inventory and Game
options (Graphic – color, resolution, dithering and gamma control; Sound –
adjusts various sound options and other options (subtitles). To combine
objects, place one item in the hand icon and then double click the mouse
on the combining item in inventory. Pressing Esc returns to the main
screen of the options selected. Pressing any keyboard control presently
used toggles it back to the default – walk/run or if the spacebar is
toggled back to the game. There are lifepads scattered around whenever a
dangerous action might cause Simon to die and restores him to life. The
map is shown when Simon rides a Rainbird and it will land on a glowing
area that Simon looks at. There are telephone booths also scattered about
for rapid transport to another place shown by a zone map. Some of the
booths are broken shown by red dots and when seen in the game have a red x
taped on it. Rainbirds do not fly at nights and only in open space.
Reinstalling DirectX 8.1 from the official Microsoft site might help with
glitches in the game.
A short outline of the previous 2
Simon adventures is explained. The present adventure starts with Runt
showing his latest accomplishment (a new body for Sordid) to Sordid who is
in Simon’s body. Sordid transfers to the new body. Runt and Sordid hunt
for the Ancient One. The next scene shows a scantily clad woman dragging
Simon’s body to the top of a temple pyramid. Calypso, the Head priest and
another priest are also present. Simon’s body is placed in the hole. His
soul (in a bottle carried by Calypso) is joined to his body. It takes 7
days and nights for the joining to happen. If successful, Simon will still
have to prove himself if he is worthy of the gift. Calypso and the woman
go back to Poliganis.
Chapter 1 – To Complete the
Joining of Simon’s Body and Soul
Inside the Temple of
Life
Chamber of Rebirth – Simon
wakes up in the Chamber of Rebirth. Go to the lever on the right pillar by
the door. The fairy Godmother hired by Calypso from the Godmother agency
appears. She will guide you through the game manipulations. Look at lever
until it is shown under the eye icon on the top right, then press the
action key (ctrl). The door opens.
Hallway – Turn to
hallway on top of screen and go to the right. A life pad with an Ankh icon
on it is seen and is explained by the fairy godmother (something dangerous
is about to happen). Go back down to the hallway until the end, turn left
and forward to the next corner. On the right is wall panel with a face in
the center and gems in 3 corners of its frame. Get (Ctrl) the blue,
green and yellow gems. The fairy godmother appears to
explain about inventory and spell book. Double clicking the left mouse
button also can be done as “use item” button. Go forward until the next
corner, left, forward pass a sarcophagus and forward to the opening at the
end of the hall. Enter.
Chamber of Wisdom – As
soon as you enter, a Golem drops from the ceiling. He prevents you from
getting the object on a stand at the center of the room. A red ray shoots
out from a head on one wall passing the red gem on the golem’s head. There
are 3 more heads similar to that one around the room. Look at them and
note that they have a space in their mouths for something. Across the door
you entered in is a locked door with a keyhole in the left frame of the
door
How to neutralize the
golem: Look at the color on the golem’s head and
their sequence. Hmm. Place the gems in the heads’ mouth around the room
in the same order as that of the golem’s head. Since the red gem
is already in place, place (Alt) the green gem (in hand in
inventory) to the right head. Go pass the locked door, then
yellow gem and then blue gem. Different colored rays join
at one point. Move towards the door and then forward to entice the golem
to catch you until the golem’s head hit the center of the joining of the
rays of light. The golem falls down and
disappears.
Get (Ctrl) the key on the
center stand. Use (Alt) the key on the keyhole and the door will open.
Enter and see another life pad.
Hallway – The fairy
godmother appears to explain about run and sprint controls. Sprint down
the hallway and a boulder will drop from the ceiling and will flatten you
if you are not fast enough.
How to escape the
boulder: Sprint (Caps lock and arrow keys)
forward to the end of the hallway, turn left, sprint
forward and turn left to an open dimly lit doorway just
before the end of the hall. Toggle/press Caps lock to go back to
walk/run. Walk forward.
Chamber of no walkway/lava
pit – Fairy godmother appears to explain about lookaround controls
(Tab). Lookaround and down at the pit at the center of the chamber. See a
lighted path crisscrossing through to the other side. Position Simon in
front of the lighted path and walk forward. Simon will stop
whenever the path ends. Then turn left, forward, right, forward,
left, right and forward to the other side. Enter the doorway,
forward, right and forward to the next corner.
The fairy godmother appears and
explains about crouch/crawl (Z) control and leaves after warning of “Don’t
let the eye see you”. Another life pad is seen at the corner. Go to the
door and the door opens. Bats fly out. Enter.
The Eye Room – The chamber
has a giant Eye on a head mural at the far wall. The Eye roams around and
will zap you dead if it sees you.
How to evade the
Eye: Crawl (Z), turn a little to the right,
forward to hide behind the pillar. Turn a little to the right and
see a lever on the wall. Crawl right to the wall, turn
left and crawl forward keeping by the wall until hidden
behind a fallen pillar. Turn right and toggle crawl (press Z) to stand
up. Pull lever (Ctrl) and immediately crouch down. The door at
the far corner opens. Turn around to center of chamber and crawl
forward to pillar base in front of the Eye. With the pillar base
in front of you, turn a little to the left and see the opening at
the left corner of the chamber, crawl towards the opening and
hide behind debris at the left of the Eye. Turn around and see
the open doorway. Enter and toggle crouch.
Go forward until closed door,
look at door for Simon to say “it looks final” (in my game, if I didn’t
have him say this, the game goes to the main menu) and press action
(Ctrl).
Outside of
Temple
Forward to outside of temple.
Notice that Simon’s body flickers from solid to transparent. Move forward
and turn right at path and forward to an open raised temple stand with the
sitting High Priest.
High Priest – Talk to the
High Priest. He explains about the process of rejoining of the body and
soul that was separated, not dead. To be complete or solid, a sacred peach
has to be eaten. The peach tree absorbs excess life force to make a peach.
The peach has to be ripe and dropped from the tree – not picked before its
time. If the peach is picked before its time, untimely death of a person
will occur. The sacrificed person’s life force will fill the space left by
the peach. The explanation about the peach triggers the peach tree to show
a peach hanging down from the tree.
The High Priest gives the
letter from Calypso. Calypso wants you to meet him in Poliganis and
explains about the scantily clad woman that helped him. He sends 20
groats. After you have eaten the peach, he wants you to meet the woman at
the North Gate of Poliganis. The High priest gives the 20 groats
and directions to Poliganis.
Peach Tree – Go down the
steps, forward and left to the sacred tree. See the hanging peach that you
cannot reach. Go back down, left and see steps to the top of the
pyramid.
Top of pyramid – Climb the
pyramid. Talk to the bell keeper. The ringing of the soul bell guides the
souls of the dead to the peach tree. Choker cola keeps him awake. Go the
left side of the telescope. Pick the telescope up and get magnifying
lens and the telescope tube. Go down and left to “Souvenirs”
sign.
Tomb Trader – Enter the
open entryway. Talk to the seller at the store and buy a Choker
Cola for 5 groats. Go to the grounds. See a vandalized telephone booth
at the far left corner of the temple grounds (it will be fixed later).
Temple Housing – Enter the
open doorway at left of the telephone booth. Go forward to the end of the
compound and see a big hut/barn. Enter the big door. Turn left, forward
and find a contraption with a ramp. At the side is a lever and inside the
contraption is a sign that says “Cow here”. Pull the lever and see the
treadmill move. Exit the barn property.
Judas in Pool of
Punishment – Turn right, forward pass the cart and see Judas, a priest
standing at the center of the pool. Walk close to him and end up standing
in the pool also. Automatically talk to Judas. He is miserable and is
punished because of a very grievous sin that he confessed. He picked a
peach with his chakara before it was ripe. Take note where Judas stood to
pick the peach with the chakara . Exhaust all dialogue with him. He
explains how to use the chakara and tells where the chakara is hidden – in
Judas’ cabin, under Nun Magazine hidden under the bed. Ask to take the
chakara off his hands. Exit the pool, turn right and forward to the hut
close to the wall and small pond.
How to get the
Chakara: Open the door (will not open until Judas
tells you where the chakara is). Stand on the left side of the bed close
to the wall, crouch, lookaround down and get (Ctrl) the Nun’s
magazine and will automatically get the chakara/yoyo also.
Fairy godmother appears to explain how to use the chakara and tells you
to steal the peach. Exit to the Temple grounds and go to the Peach
tree.
Peach Tree –
How to get the
Peach: Stand to the right side of the tree, turn
to face it (like Judas). Go as close to the hanging peach. Look up to
it. Place the chakara in the “in hand” box by selecting it in inventory.
Press Alt to equip the chakara, look/aim at the peach and press Action
(Ctrl) key to do the act. The peach falls on the ground. Toggle Alt.
Press Ctrl to pick up the peach. Eat the peach and see a cut scene that
shows a ninja die when a tree falls on him. The woodworms cut the tree
down. Now, Simon is solid again. Go down and see the high
priest.
High Priest – Talk to him
about having eaten a peach and is ready to leave. You can not bring
yourself to confess. Exit the temple after informing the Priest Guard that
you have eaten a peach.
Chapter 2 – To Get to
Poliganis
To get to Poliganis, the High
priest said to follow the sign posts until the North Bridge. Let us the
check the places around the route also. Go past the sign post, towards
Lake Wotthayhe.
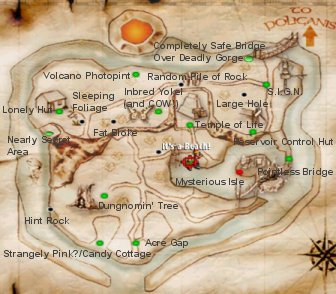
It’s a Beach – At the
beach by Lake Wotthayhe, there is telephone booth. If you enter the phone
booth, you will access the map, click on any green area and will be
transported there. The black spots are important places close by. At the
beach area, there is a dock with boxes, diving ramp and a changing room.
There is also a Rainbird landing pad on the ground. Go back towards the
sign post to walk (as described below) or you can go via the phone booth
straight to Completely Safe Bridge Over A Deadly Gorge and work your way
down.
Warning Sign – Go forward
to the sign post. Take the road to Poliganis and forward until the warning
sign – “Beware of the woodworm – warning about incredible dangers to
woodworm attacks “. Pick up the warning sign eaten by the
woodworm.
Forward to next sign post, turn
right, forward, climb the mountain until the big tree at the cross road.
There are 4 possible paths here – 2 on each side. Let us check some of the
places. Take the lower left ramp.
Fat Bloke – Go forward and
enter the gate on the left. Go behind the fat bloke with hat and pick his
back pocket to get the butterfly book. Face and talk to him. Ask
the Entomologist what is in it for you. He will pay for butterflies
collected. He gives you his net and specimen jar and says
that the bigger and brighter the butterflies, the more expensive it is.
Exit the field. Turn left and go forward.
Sleeping Foliage – The
purple flowers on the right of the road snores. There is a rainbird
landing pad close by. The path goes through a tunnel under the mountain.
Let us check those places later. Turn around and pass the sleeping
foliage, turn left and pass to a gated opening.
Lonely Hut – Go forward
and see the hut, outhouse and telephone booth. The hut is locked and there
are cola cans scattered outside. There is a road to the upper right that
will lead back to the crossroad by the tree.
Butterfly Meadow – Go in
the gated opening across the road by the crossroad tree.
How to catch
butterflies: Place the net on hand, press Alt to
equip yourself and Ctrl to swing it when a butterfly is seen. Swing the
net and see the path the net takes. Then when a butterfly is seen, wait
for the butterfly to be close to where the swing path of the net is
before pressing Ctrl. Walk back and forth in the meadow close to the
gate to look for butterflies.
When you catch a butterfly, go
back to the Fat Bloke. Talk to him and he will pay you for the
butterflies. A yellow and red Peacock is 10 groats, bright brown
Viceroy is 2 groats, Painted Lady for 20 groats and blue Adonis is 4
groats. He wants you to catch a Purple Emperor. Go back to the meadow and
try to catch a Purple Emperor. Look at the book and read that the most
expensive butterfly is the Purple Emperor worth at least 250 groats (might
be a trigger for the appearance of Purple Emperor). Finally, catch the
Purple Emperor and go back to the entomologist. He will try to
cheat you on the price but since you read the price book, you get 250
groats for the butterfly. Go back to the crossroad.
Inbred Yokel (and COW!) –
Continue to the upper right path on the crossroad by the tree. Enter a
gated opening to the right and meet the yokel and Daisy. There is also a
phone booth here. Talk to the yokel twice. He is waiting for a witch to
come along to give him magic beans in exchange for Daisy, a fine milking
cow. He said if you see a witch to get him some beans and Daisy will be
yours. There is another exit that goes to the butterfly meadow. Exit back
to the main road.
Volcano Photopoint – Go
forward and then enter a gated opening on the left. There is a phone booth
here also. Close to the fence under the volcano, lookaround up and see a
rainbird flying. Lookaround down shows the water flowing from the
waterfall to the left. Exit and turn left.
Go forward; pass a clearing to
the Waterfalls on the left, the Random Pile of Rocks on the right and a
clearing to the right. A sound is heard when you enter the enclosed/walled
road. Go back to the clearing now on the left side. Forward and left to an
open gate.
Large Hole – Enter and
forward to the hole at the middle of the enclosed clearing. See a treasure
hunter stuck down the hole. Exhaust the dialogue. He is looking for the
Treasure of Fred the Pirate. He is carrying a metal detector.
To use the chakara to help
him: Place the chakara on hand. Press Alt to equip
it, look down and aim for the inner left hand (by thumb) of the treasure
hunter and then Ctrl to use it. You bring up the metal detector.
The fairy godmother appears to explain how to use the metal detector. Go
back out the area and turn right.
Random Pile of Rocks – Go
back out to the main road and turn left back towards the Random Pile of
Rocks.
To get the
treasure: Place the metal detector in hand
and press Alt. The metal detector starts to ding and the sound gets
faster at the center of Random Pile of Rocks. When Simon finds the area,
lookaround/tab down and you will see a hexagon. Place the warning sign
on hand, check if the hexagon is in the eye icon box and use/press Alt
the makeshift shovel/warning sign. The sign breaks, leaving a
stick. The chest recovered is full of tarnished washers.
In inventory, place the washer in hand and then double click the Choker
cola to get shiny washers and empty can of Choker Cola. Go
back to the path by the Large Hole.
Tilled Field – Pass the
opening to the Large Hole; go forward until a tilled brown field with some
stacked hay is found. Use the metal detector by placing the metal detector
in hand and press Alt. Use the metal detector around the field and find
some 22 groats dropped by somebody. The metal detector pings the
closer you get to metal and eventually Simon will automatically put it
away when the treasure is found. Go back out of the tilled field, turn
right and forward.
Reservoir Control Hut –
See a telephone booth and a hut with a dwarfish warning sign in front of
it. Climb up and see a locked door. Climb up the ladder and see a stuck
trap door. There is also a rope that is attached from a wooden contraption
down into the hut. Go back down and down the hillside. See the ninja that
died under a fallen tree when you picked the pear back at the temple. Walk
forward and see a cave that can not be entered at the side of the
mountain. Go straight to the road.
S.I.G.N. – A telephone
booth and a golem post is seen at the crossroad. The road to the left goes
to the road by the Random Pile of Rocks. The golem post is Signal
Integrated Golem Narrative – it directs travelers to
where they want to go. He takes water and mineral through his roots but
has a craving for sweet, sweet liquor – Whiskey. He asks for a drink.
Sorry! Turn left and up the road to the bridge.
Completely Safe Bridge Over A
Deadly Gorge – There is a rainbird landing pad and across the way, a
phone booth. Go to the start of the bridge. The bridge is gone. Talk to
the man on the other side. He, the Count wants to cross because of the
competition in Acre Gap. He wants the Gnome Firing Trophy and will help
you cross the gorge if you can get it for him. The competition ends at
sunset.
Time to use the phone booth.
Enter and select using the mouse, Lonely Hut from the map. Turn around and
exit through the gated opening (not the road) to get to the sleeping
foliage. Turn right, go forward, down the tunnel and outside to the
clearing by the river.
Dungnomin’ Tree – Walk
around and notice bull’s-eye on trees. Look up at the suspended walkways
and see gnomes crossing. There must be a gnome village close by.
Walk by the fence on the right
and see 3 colored geometric shaped box on the ground. One of them states
“Chase Me”. Down below is a pink clearing of the Strangely Pink?
destination on the map.
Candies – You have 7
seconds to sprint from candies to the next candies and run over them until
you reach the Strangely Pink? area. Gain another 7 seconds every time you
sprint over candies.
The path: Use the
sprint mode (Caps Lock) and be sure to run OVER the candies.
|
1. Stand on the left
side of the candies facing towards the trees diagonal to the fence
on your back. Step on the 3 starting candies. |
2. Towards the trees where
you can see blue candies on the ground |
3. Straight to red and
yellow candies on the ground. |
4. Turn around to the left
(~170 degrees) and run over 2 candies. |
5. To the fence corner with
2 candies. |
6. Towards one candy close
to the tunnel entrance. |
7. Turn to the left and
sprint straight to 2 candies by the hint rock. |
8. Forward to one candy by
the shore. |
9. Turn slightly left
towards the phone booth and sprint over to the pink
candy. |
10. Turn left towards the
Strangely Pink? area and sprint over the last set of candies.
Whew!!!! A candy cottage
appears. |
Strangely Pink?/Candy
Cottage – Enter the yummy door. A message on the witch’s answering
machine states not to take anything out of the house that you didn’t come
in with. Look at the oven and cauldron. Go to the corner table and read
the spell book. The recipe for making Magic Beans is mix a handful of
kidney beans, some water, sugar, vegetable extract and the sweat of a
frog. Go around to the other side of the room to a spinning wheel. Touch
the needle, prick your finger and falls under a sleeping beauty spell.
You can hear somebody pass
through thorn bushes, come in and finds a damsel in distress and kisses
her awake. Oops! It’s you being kissed awake by the Hero – Prince Valiant.
He wants a needle because he tore his clothes going through the thorn
bushes. Simon gives him the needle he pricked himself with and Prince
Valiant leaves the cottage. Exit the house and see Prince Valiant turned
to a frog. The witch was serious about not taking anything out of her
house – the needle you gave changed him. Look at Prince Valiant’s clothes
on the walkway and pick up the needle still coated with sleeping
potion. The Strangely Pink? place in the map changes to Candy Cottage.
Turn right to Hint Rock.
Hint Rock – Go forward
until the big Hint rock that nearly blocks the path. Turn to the shallow
water on the river, turn right and wade to the green clearing surrounded
by the mountains.
Nearly secret area – There
is another telephone booth here. Go forward to a cave under the mountain
and hear somebody hammering. Talk to the pile of rocks. The Prince of
dwarves asks a favor – he wants someone to light his dynamite for him
since he lost his tinderbox. The fuse on the dynamite is pushed in between
the pile of rocks.
To light the
fuse: Place the magnifying glass on hand and
then use it on the dynamite. The sun rays pass the lens and lights the
fuse of the dynamite.
The rock pile explodes and the
dwarf prince comes out. He is very hungry. He wants fish, boiled
preferably. He will give you Hammor, his hammer if you feed him. He tells
you to help yourself to his supply inside the cave. Enter the cave and
pick up a stick of dynamite. Talk to the Dwarf prince about
everything. He needs a hero to help rescue his people enslaved by
Sodinell, the dragon when the dwarves accidentally mined to his lair. Use
the phone booth. The hint rock disappears from the map and the nearly
secret area appears on it. Select It’s a Beach as destination.
It’s a Beach – Climb the
diving board ladder. As soon as you reach the top, turn around and see the
sun rays.
To catch a
fish: In inventory, place dynamite in hand. With
the mouse, double click on magnifying lens to make lit
dynamite. Place lit dynamite in hand and then double click specimen
jar combining them into specimen jar with lit dynamite. Go to the
end of the diving board and use specimen jar with lit dynamite. No alive
fish is seen anywhere. It explodes in the water and fish floats dead. Go
down to the water and pick up boiled fish cooked by dynamite.
Use the phone booth to go back to
the dwarf prince at Nearly Secret Area.
Nearly Secret Area – Give
the Prince the boiled fish. He is grateful enough to extend a welcome to
his underground home. He gives you the hammer, Hammor. When the
hammer is raised, thunder is heard (Thor?). Use the phone booth to
Pointless Bridge or walk back pass the Candy Cottage to the very end.
Pointless Bridge – Exit
the phone booth and go forward close to the reservoir with the 2 trees
behind and right of you. Use the metal detector. Find 20 groats.
Check out the bridge behind the phone booth. Look at Mysterious Isle just
across the water between the bridge and the mainland. Go back to the
phone booth and select Acre Gap or walk back towards Candy Cottage and
turn right at the Gap between the hillocks.
Acre Gap – Go forward and
see a phone booth. Read the sign on the left post about the 5th Annual
Gnome Firing Contest. Go forward through the lane to the competition area.
Enter the white tent and talk to the nasty Lord Fnar in a Robin Hood
outfit. Enter the next brown tent and talk to the man with the hat,
Fragmaster. Go to the firing area and watch the competition. Lord
Fwahnah/Fnar (too long a name to write down) is leading with a score of 9
and the Fragmaster has a score of 8.
Go to the big red tent. Look at
the Annual Gnome First Prize Trophy. Try picking it up and an alarm is
sounded. Talk to the man writing on the desk. Join the competition and pay
the 50 groats registration fee. He explains the rules. He gives you a
bowl for the free Chili in the tent. You have to supply your own
gnome and you can catch one from the village close by. You are allowed to
fire anyway you want (Simon says like a dynamite powered telescope tube),
just don’t pass the white line. To win, you must hit the bull’s-eye or as
close to it by the end of the day. Gnomes are attracted to shiny objects.
Go to the big pot of chili and help yourself. Simon eats the chili but
spits out the kidney beans. Go to the phone booth outside and
select Temple of Life.
Temple of Life – Go to the
Tomb Trader and return the empty can of Choker Cola and get 1 groat
refund. Buy another can of Choker Cola. Climb the pyramid to the
bell keeper. Place the poisoned needle on hand. Use (Alt) the poisoned
needle on bell keeper. He drops to sleep and falls in the hole. Pick up
the bell. Go back to the phone booth and select Candy
Cottage.
Candy Cottage – Enter the
cottage. Place the frog in the oven to get a sweaty frog. Go up the
ramp and place the sweaty frog (Simon squeezes the sweat out of the frog
to the cauldron), choker cola and kidney beans in the cauldron. Poof! The
magic beans are in inventory. Exit the house, use the phone booth
to go to the Inbred Yokel.
Inbred Yokel (and COW!) –
Give the magic beans to the yokel. He throws it on the ground and grows a
bean plant. The Yokel tells Daisy to go to the temple. Go to the phone
booth and select Temple.
Temple of Life – Go to the
barn at the Temple Housing area. Go to the weird contraption and find
Daisy inside the machine. Press the lever in the contraption. Daisy gets
milked and the machine processed it to produce butter that goes out the
slot by the lever. Pick butter up. Go back to the phone booth and
select Dungnomin’ Tree.
Dungnomin’ Tree – Walk to
the biggest tree and look at the door. Crouch (Z) before you open door.
Crawl forward to the heart of the tree and see little goblin houses. Go to
the mushroom house on the right and talk to the goblin. All the goblins
hide.
To catch a
goblin: Place washer cleaned with cola on hand.
Use (Alt) sparkling clean washer on mushroom house to entice the shiny
object loving goblin. A goblin walks out of the house and starts picking
up the scattered washers. Place the bell on hand from the temple. Use
(Alt) bell on goblin. If you look in the bell now, the goblin will
bite you and escape. Place the hammer, Hammor on hand and use (Alt) it
on the bell with the goblin inside. The vibrating gnome is now in
inventory. Crouch (Z) and exit. Go to the phone booth and select Acre
Gap.
Acre Gap – Time to win the
trophy.
Assembling the Firing
equipment: Place the goblin in the telescope but
would not go in. We need to grease him up to fit inside. Use (double
click) butter on gnome in hand to get greasy gnome. Place
telescope in hand. Use (double click) dynamite on telescope to get a
telescope with a stick of dynamite in one end (small hole). Use
(double click) greased goblin on telescope with a stick of dynamite in
one end in hand to get a telescope tube with a stick of
dynamite in one end and a vibrating buttered gnome in the other.
Go to the firing area and you
will be introduced as the next contestant. Light up the dynamite by using
(double click) the magnifying glass on telescope tube with a stick of
dynamite in one end and a vibrating buttered gnome in the other. Watch
Simon win by default and be given the trophy. All the tents
disappear. Go to the phone booth and select Completely Safe Bridge Over A
Deadly Gorge.
Completely Safe Bridge Over A
Deadly Gorge – Talk to the Count. He talks you to throwing the trophy
to him across the gorge. As for helping you cross, he shoots a rope to one
of the pillars framing the life pad. Look at the thin piece of string
spanning a large ravine. Guess, we have to tight rope across. Here goes!
To tight
rope: Get (Alt) pole/stick and then use (Ctrl) the
rope when Simon bends to look at the rope. Keep Simon in balance using
the right and left keys. In the first part of the puzzle, Simon faces
you, so that his movements will be in reverse of the keys. If he tilts
to the right, we have to bring him to the left and the default keys will
be the same direction as to where he tilts. So in the first part of the
puzzle use the left keys when he tilts to the left and the right keys
when he tilts to the right. It might be helpful to some gamers to turn
the keyboard around during this part and use the usual key set up. The
movement on the rope is like walking, left, right, left, right, etc.
Wait for Simon’s head to tilt to one side before bringing him back to
center. Partway, the view changes to have Simon facing as you are and
the left and right keys will work in the regular directions. Now, if
Simon tilts to the right, use the left key to bring him back to the
center and the right key when he tilts to the
left.
Glad that is over with! Walk down
the tunnel to get to Poliganis.
Chapter 3 – To Find
Swampy
POLIGANIS
Upon entering the North Gate of
Poliganis, meet Melissa Leg, the scantily clad friend of Calypso. She
brings you to the Inn where Calypso has a private room at the local
tavern. She has the fuel for the wardrobe that can send you back to your
time. In return, she wants you to find your Swampling friend for her and
would not give the reason why. The Swampling disappeared and no one knows
where. In the private room at the Inn, Calypso, gives you the map
to the restaurant from a MucSwampling Lost Treasure Hunt meal deal. Exit
the room, forward, right of screen, right of screen, left up the stairs
and exit to the Inn.

Dog and Fruit Inn:
Bar – Turn to the bar and see a whiskey on the
bar shelf. Remember the S.I.G.N. at the forest wanted a drink. Talk to the
bartender that wouldn’t sell you alcohol without an ID and learn about the
ninja ghost that scared the customers in the toilet and upstairs corridor.
Talk to the Salesman and he gives you a vacuum cleaner pamphlet.
Place the pamphlet on hand and press Alt to read the pamphlet – The
Vaculux 2000 is so powerful it can suck the feathers off a duck, molten
lava or things small as insects. Try using the chakara on the bottle of
whiskey and the bartender keeps catching it. Exit the bar via the door by
the jukebox on the left of the bar. Climb the stairs and out of the inn.
Notice the lady streetwalker that you can not interact with. Turn right
and walk forward.
Walking
around: Busted
Cart – Look at muscleman and
the jack holding the cart up. Use hammer on jack. Pick up jack.
Walk forward until MucSwampy’s.
Mucswampy’s – Read the signs
and try to open the door. It is boarded up good and
tight. Pizza Lord is closed.
Laundromat – One washing machine is not
broken.
Church of St. Troy: Turn
right at Rotable Junction and go to the Church of St.
Troy. Grounds – At the left side of the
church is a tree that has fruits. Use (Alt) hammer on tree and pick up
horse chestnut. At the right side of the church is the Bell
Tower. Bell Tower – Enter and pull (Ctrl) the
bell rope. Press Ctrl again and hold to get Simon to climb the bell rope.
Go out the window into the roof and look around. Go back down the bell
rope and exit. Walk to the back of the church and see another door that
goes to the Memorial Room. Across the crypt door is the gate to the
street. Exit and continue walking until you see a cheese wagon.
Mr. Cheese Wagon – Follow
the big open topped cheese wagon and step in front of it. Talk to Mr.
Cheese and eventually he will give you a wedge of cheese. Follow
him to see where he goes. He stops at the Cheesy Bros. in the Warehouse
area. Watch the cheese wagon man get money for not delivering his cheese
to the Cheesy Bros. because there is too much cheese already. Follow Mr.
Cheese drive around town from Warehouse area to the Justice Square where
he turns around and goes back to the Cheesy Bros. to get more
money.
Justice
Square: Allotment – Take the lane off the
square at the right side and see vegetable gardens and a green shed. In
front of the green shed is a pot of varnish.
Pond – Look at the duck swimming in the pond and
get 2 groats from the pond, another source of money. There is a
female in stocks and she looks familiar. Remember Goldilocks from Simon
the Sorcerer 2. She has half of a treasure map won in a seedy tavern in
her bra. After showing your full map to her, she will split the treasure
with you for the full map. She wants to be freed and can get you into
MucSwampy’s. The keys are in the sheriff’s office.
Sheriff’s office – Enter the office and see the sheriff snoring.
The keys are in the metal locker behind him. Walk carefully so as not to
wake him. Traverse carefully one step at a time pass the empty cans of
Choker Cola and the file cabinet on the left to the metal locker on wall.
Open the metal locker but it squeaks. Use butter on the locker hinges and
open the locker door. Pick up the keys. If you wake the Sheriff up,
he will just send you out of the office until he finally sends you to lock
yourself in the cell, which of course you leave open. Go back out and free
Goldilocks. She will meet you at MucSwampy’s. Use the phone booth to go
MucSwampy’s.
MucSwampy’s – Meet
Goldilocks coming out of MucSwampy’s. Enter the now accessible restaurant.
Look at the sachets of vinegar on the counter. Enter the red door behind
the counter. Go pass the kitchen and enter the door marked “private”. Go
to the desk and crouch. Press the red button marked “sekret”. A secret
door open. Take the lift down. Look at the papers on the table in the
swamp room and see “housing development in the swamp” pamphlets and
housing plans. Swampy is now an activist and has gone to the swamp to stop
the housing development. Exit back to the restaurant proper.
A very fat wizard in green orders
swampy burger with no sesame seeds in the bun, worm fries and swamp
shakes. Simon picks the sesame seeds out. Exit the restaurant. Let
us continue to check the town.
Warehouse Area
– Adventure Soft Warehouse – Enter the
fenced warehouse on the right before the circle. Look in the boxes of
Feebles Files outside the building. Get Feebles File CD aka
ashtray. Cheesy Bros. Warehouse – Enter and
see boxes and boxes of cheese. Follow the map to Back Alley.
Back alley – Enter
the opening on the wood fence and see several dumpsters. Pick up the
cat inside the overturned dumpster at the end of the alley. The
alley to the north is blocked by a dog in wheels. To
see the dumpster – position Simon to stand by the right corner of the
dumpster close to the dog. Open dumpster and see a trainer/shoe in
there. Use the trainer on dog and automatically trap the dog in the
dumpster. Get a shoelace in inventory. Go forward and turn
right.
Manhole – Remove the
manhole cover and go down. Walk to the door and knock. They want you to
knock the password to be allowed in. Fairy godmother appears to tell you
how to enter the password. Press action key and then press action keys
again to start the password sequence. What password? Go back up and talk
to the kids at the end of the alley. They will tell you the password for
the secret room if you give them a new game that involves the use of a
ball. Look up the wall and see an open window. Find a phone booth and go
to Magic Square.
Magic Square: Wizard Guild
– Notice that every time you try to enter Eight Wander, it turns to
the golden ornate door of the Wizard Guild. Enter and talk to the Wizard.
He says that you need someone to sponsor you as apprentice.
South Gate – There are 3 roads going out of the
Wizard Square, one to go back to town, one to a closed gate and one to the
South Gate. Talk to the 2 orcs at the South Gate and find out that you
need to have proper papers to leave. The Big Wiz, Sordid is looking for
the magical boots. Go back to Dog and Fruit Inn.
Dog and Fruit
Inn: Enter the bar. The door at the other end of the
room goes to a corridor, then Games Room, Beer Garden and upstairs to the
bedrooms.
Games
Room – The Jukebox takes a groat for each song. Standing at the far
side of fireplace, look at fireplace and see it is smoking a lot. Look at
the ornate glass window above the target. The orc does not want you to
open the window. Talk to the orc and he challenges you to a Dart game – 3
darts and the higher score wins 5 groats, a source of money if you
win. Fairy godmother appears to explain how to play the dart game. The
bibbling circles is the target, look at throwing hand to control the dart.
The higher the tip of the dart is positioned, the faster and stronger the
dart will be shot. The lower the tip of the dart is positioned, the
slower and lower the result will be. The target circles can be moved by
the direction keys. Press the action key (Ctrl) starts the hand movement
and the release of the key releases the dart.
Beer Garden – Pick up
the BBQ tongs and look at the lit grill.
Upstairs – Climb the stairs. Go forward the corridor and then
turn to the left hallway.
Left hallway – Pick up the nice thick blanket from the
drawer at the end of the hallway. To the right is Room 4 your bedroom that
is still locked.
Wooden Fire Door – Walk to the other end of the hallway and
then turn right. To keep the door open and to be able to go out without
being shutout – Position Simon by the right side of the wall close to the
hinges of the door, look at the door and then use the wedge of cheese on
door.
Step down outside at the back of
the Inn. Turn to right and go forward to the storage area under the Inn.
Open the crate-like entry to the cellar.
Cellar – Move the crates to get to the far corner to shut off the
pipe that brings beer to the bar. The beer barrels can be rolled and the
crates pushed. Move Simon in the direction you want the barrels
moved.
To move the barrels
and crates: Start by moving the barrel closest to
the stairs and by Simon’s right to the far end. Go forward to the space
cleared by the barrel with the stairs on your right. Move the crate that
is in between the barrels. Go back to the aisle where you started at and
move the crate towards the stairs. Move the barrel in front of you so
that it hits the first crate you moved. Now there is space to move to
the tap connected to a beer barrel at the far corner of the cellar.
Close the tap and go back up to the bar.
Bar – Talk to the depressed salesman and he will order another
beer. Thinking that he is out of beer, the barman will check the beer
source at the cellar and leaves. Use (place chakara on hand, press Alt and
then action key) the chakara to get the whiskey bottle of full of sweet
liquor (remember S.I.G.N.). The barman comes back and thinks that the
ghost turned the tap off.
Calypso’s Private room – Talk to Calypso about the border control
patrol. Sordid has got his orcs at the gate. Porkins, the fat wizard in
green that you met at MucSwampy’s is an expert forger. He frequents the
Eight Wander Club. An exclusive club that allows only bona fide member of
the guild through the magic portal. Calypso sends you to the Guild and to
tell them you are his apprentice and then take the test to become a
genuine wizard. (To get to be Calypso’s apprentice, the secret room at
MucSwampy’s must be seen, talked to the Orcs at the South Gate and talked
to the Wizard Guild wizard). Go to the Wizard Guild.
Wizard Guild at Magic
Square – Talk to Wizard. Based on Role playing games, you get a magic
rating of 1 and you have to get your own familiar, a sprite that can be
found at the forest out of town. The sprites come out only at
night.
Dog and Fruit
Inn: Calypso’s Private room – Talk to Calypso, he
booked a room upstairs where you can sleep and he recommends using a net
to catch the sprite. Find a key to your room in inventory. Go
upstairs to Room 4.
Room 4
bedroom – Lie down and find out that the pillow is filled with
polyester that you are allergic to. Simon discards the filling and gets an
empty pillowcase. You can not sleep without a nice floppy pillow.
Open the window. Go (Ctrl) to the flat roof outside. Look at the chimney
at the northeast corner of the roof that leads down to the games room. Use
(Alt) the blanket on the chimney. The games room becomes smoky and the orc
opens the window. Go back to the Games room.
Games
Room – Play a game with the orc. Shoot the dart out of the window and
forfeit the game. Go to the alley outside to get the
dart. Alley outside the inn – Once outside, turn
left, forward and left to the alley beside the inn. Pick up the
dart at the corner of the building across the games room window.
Bar –
Talk to the barman about having your room cleaned. Evette, the French maid
will clean your room with the new vacuum cleaner. You can not go to your
room because a barrier is placed to block the stairs.
Left Hallway – Go out of the
Inn through the front door and enter again through the cheese wedged door
in the back. Go to the hallway by your bedroom and pick up the vacuum
cleaner. Go to the phone booth.
Justice Square – Go to the
pond. Look at the pond to get more groats. Move to the side of the
pond closest to the stock. Place vacuum cleaner at hand. Look at duck and
immediately, use (Alt) the vacuum cleaner. You get feathers in
inventory. Combine (place one of the item in hand and the double click the
other item) feathers and pillow case to get a floppy pillow. Go
back to the Inn.
Dog and Fruit
Inn: Bar – Ask the barman for your keys
back. Go to your bedroom. Bedroom – Use pillow on
bed. Use bed. Try to sleep but snoring keeps you awake. Go out and knock
on room 5. Go back to your bedroom, open window and walk to open window of
room 5. Try to wake snorer up. Use jack on snoring man to turn him on his
side and stops snoring. Go back to your bedroom and sleep. You wake up and
it is now night time. Exit the Inn and go to Pizza Lord via walk or phone
booth to MucSwampy’s and then walk.
Pizza Lord – Talk to
Pizza man that takes order. He sells his Pizza for 10,000 groats but free
if not delivered in one minute. He delivers anywhere using the
pizzerina – a special flute type thing that summons Pizza.
Time to catch a familiar. Go to
the gate to the forest. Exit gate and go to the forest.
Forest – Use the phone
booth by the bridge. Select S.I.G.N. site.
S.I.G.N. – Give him whiskey and he becomes an aggressive drunk. Ask
him for directions now.
Butterfly meadow – Use the phone booth to go to the Inbred Yokel
area. Take the left lane to the butterfly meadow. Use net to catch a
sprite. The sprite burns through the net and a man holding a sprite in a
metal lantern tells you to use a container that doesn’t burn through. Hmm
– net with hole (idea!!!). Go back to phone booth and select Lonely
Hut.
Lonely
Hut – Talk to role players. They will not give you their sprite and
can not join the game. You can have the sprite when they stop playing.
They want a pizza. One of the players says with no anchovies. Go outside
and use the pizzerina to order pizza. Order the whole works and especially
ask for additional cheese to cover the anchovies. If you order pizza with
anchovies and one of the player sees it he will ask for a reorder since
anchovies will make him sick. Watch the pizza delivery boy rush and get
detained by asking directions from the drunken S.I.G.N. post. The whole
works pizza with extra cheese arrived later than one minute and you get it
free. The players eat it and the one player gets sick and they call it a
night. You get the sprite. Go back to the Wizard Guild.
Wizard Guild – You are
given the TEST after showing the sprite. The Test fizzled out and you
passed by default. You are given a Wizard handbook and your
specialty is Fashion Magic. Look at the wizard handbook and the fairy
godmother will appear to teach you how to cast spells. The magic spells
are based on the 3 primary colors – red (Polmar), yellow (Tragicke) and
blue (Gazza). The colors can be combined. To cast a spell, place the book
in hand, press use object (Alt) and then use the different arrow keys:
left for red, up arrow for yellow and right key for blue. Press the action
key and the spell will be cast or press the down arrow to cancel the
spell. If you get stuck in a magic place, think of the colors you see.
Exit. Eight Wander is closed at night. Go back to Inn to sleep and wake up
at daylight.
Eight Wander – Enter and
talk to the face on the wall of the bar. Porkins left for the yellow room.
This is a runaround. Go the colored circles at the platform. Instead of
stepping on the yellow circle to light it to go to the yellow room, just
come back to the white room. Light up all the colors to make white in the
platform and enter the meshed elevator. You will come back to the white
room again and see Porkins. Talk to Porkins about trying to get to the
swamp. A street urchin stole his magic quill and he can not do any forgery
without it. The street urchins are headed by Billy the Kid and they
escaped him down a sewer grill. To exit the club, turn off all the lights
on the platform by walking over them and then ride the elevator. Go to
Back Alley.
Back Alley:
Street Urchins – Use the net with hole on the open window
at the far end of the alley where the kids are. Talk to kids and show them
how to play basketball. The door code is D-D-DDD-DDDD-DD (Let’s Go!). Go
down to the manhole.
Manhole – Go to the door. Knock (Ctrl) on door. Simon will
say “Guess I better knock”. Wait 1-2 seconds. Then use the action keys
(Ctrl) to knock the code. Talk to the kids. The two kids will not let you
play until you have your own conker. Exit.
Manhole – Play the game for the magic quill rather than money. Just
keep on hitting his conker and eventually win and get the quill. Go
back to Porkins.
Magic
Square: Eight Wander – Give the quill to
Porkins and get documents for the border guards.
South Gate – Show the documents to guards. They accept it but are
not allowed to open the gate. They will give you a rainbird horn to
call rainbirds, in return for some inventory that you do not need anymore.
The fairy godmother appears to explain how to call a rainbird. Blow horn
and they will come. They can fly only in places without cover or outside
but not at night. They will not land in evil places. Use the arrow keys to
control the direction they fly. If you see a good landing spot use the
Ctrl keys to land. The landing spots light up when close to it.
Go to rainbird pad close to the
guards and blow horn. The next scene is riding on the rainbird and seeing
the landscape below. Fly to the swamp and see rainbow color lights
emanating from the ground when you pass through it. Press Ctrl to land in
the Swamp.
SWAMP
You might want to raise the
brightness and gamma control under options to see better. Read poster
about the luxury development poster. Enter the open gate and see a
crocodile swimming around the swamp. On the left side is quicksand. In the
passage between the quicksand and crocodile is an incidental man trying to
chop a tree down.
Man with the Axe –
Above him is a beehive. Somehow we have to get the axe. Look at the
conveniently placed vine on the cliff right behind the man. Climb the
vine. Walk to the right of the ledge and see the beehive. Use the chakara
on the beehive. The beehive falls and bees attack the man. Go down and
pick up the axe. Go to the beehive and use vacuum cleaner to
collect bees to get Hoover full of bees. Climb the vine again and
use the axe to chop the vine. The vine falls off to the ground. The axe
breaks off and get handle and axe head.
Quicksand – Go to the
right of the ledge until the sign. Turn around and see a girl in pink
behind the cliff across the way. Look at the warning sign. Enter the small
passage with the life pad. Meet the creature that wants you to follow him.
Walk where the creature hopped to by following the angle and the distance
he did and stopping at the location where he landed. You can save the game
at each stop. Go to the tree area and pick up the ropey vine.
Crocodile – Go as close to
the crocodile by the croc landing pad and see him with his mouth open. Use
the handle of the axe on crocodile’s open mouth. Use the vine on the
crocodile. Ride the crocodile to go directly across from where you are to
the big island.
Big Island: Park the
crocodile by the croc landing pad. To the left is the Druid’s area,
across is the Tar pit, a bridge to get to the lawyer talking to the Swampy
and the talking tree and another bridge to go to the man-eating plant.
Druid’s
Compound – Look at the tower protected by electric shocks (lightning
magic), a greenhouse with dubious maple-like leaved plants, a dock and the
house. Talk to the Druid. He gives a plant book to identify plants
with. He will give some of his homemade gin if you collect 3 plants
necessary for the preparation of the gin – Purple Stinkwort, Bogella
and Smelly Woodruff. Talk to him again and he said that his mouth is
beginning to get numb. Enter the house and pick up the mortar and
pestle from top of the stove and the stick leaning on the side
of the stove. Go to plant garden and look at the plants, identify Lady’s
Delight, Maiden’s finger, Fairy’s whisper, Virgin’s surprise, Blertweed
and blue Deadly Fish herb – from fruit when mashed up and
administered orally will provide relief from bee sting and produces fruit
only in direct sunlight.
Tar
pit – From the Druid’s compound walk by the shore on the left side and
see the tar pit. Use the bell on sticky tar to get bell with swamp
tar. Then, place stick from druid house and use it on tar pit to get
stick with tar. In inventory, combine stick with tar and axe head
to make glued axe. Cross the bridge to the lawyer.
Lawyer – Listen a while to Swampy talk to lawyer. The lawyer is
trying to get Swampy to sign the contract. Talk to A. Snidebottom
representing CosyGlow Homes. He frequently uses an insect repellant, made
from a juice of a flower because he is allergic to bees. Swampy threatens
the development with a big biological bomb that will fill the swamp with
stew. The lawyer wants you to talk Swampy to leave before the construction
crew arrives. He will eventually stop rambling.
Talking
Tree – Wake the tree up with the glued axe. Talk to the tree. Try
chopping the tree but can not do it because of guilt listening to the tree
beg.
Inlet to the right of the Big
Island – Ride the crocodile to the right side of the entrance you came
in. Enter the inlet. Waterfall – Behind the
waterfall is a red flower identified by the book as Bogella. Pick
it up. Ride inside the cavern. Landing with Big
Rock – Park the crocodile. Look at the bird table. Place tar from bell
and then sesame seed on the bird table. Pick up the bird that gets
trapped. Look at the dodecahedron of pure stone. Ride the croc again to
the other end of the swamp close to the tree with broken beehive where a
crying lady is.
Princess and Hamster –
There is a small tunnel that goes under the rock in the island. Talk to
the princess, the lady in pink seen from the vine ledge. She talks about
Sir Squeaksalot, the hamster inside a plastic ball that is stuck up the
tree. Use the chakara on the hamster (does not appear on the eye box) but
it falls in the water. Ooops!
Ride croc to the shore line of
the big island between the Druid compound and the croc landing pad sign.
The hamster will be thrown to the shore. Park the croc. Pick up the
hamster inside a plastic ball. Oh dear, it’s dead! Go to the Druid
Compound and use the hamster on the lightning magic/ladder icon of the
tower – Whew! That resuscitated the hamster. Go back to the island where
the princess is.
Go to the back of the rock. Climb
the lowest ledge up to the rock top by holding down the Shift key and then
the forward arrow. Look down at the hole and use the book to identify the
plant as the Purple Stinkwort, a beauty aid. Go back to the other side of
the rock. Use the hamster on the small tunnel under the rock. He picks up
the Purple Stinkwort. The hamster will not get the plant unless you
have identified it with the book. Talk to the princess and automatically
give her the hamster. As a reward she gives you her sealskin
earmuffs, which she uses to not listen to her tutors. Go back to the
big island and take the bridge to the Man-eating plant.
Big Island:
Man-eating Plant – Cross the
bridge and identify the giant plant from the book as Audreyus Maximus, a
plant that prefers birds. Simon says we need to distract it. Walk to the
reeds on the left side as close as possible to the reeds before the plant
eats you. Use the bird on man-eater. Walk around the man-eater to get to
the cave behind it. With the reeds and the fence on your left, walk around
the man-eater towards the reed infested wall. There is a clearing before
the cave. All the steps taken by Simon is critical to get there, time is
not the factor but the direct path to the cave. Be sure that you do not
waste a step. Enter the passage and use the book to see what plant is in
the cavern. Pick up the Smelly Woodruff. Exit through the other
opening.
Talking
Tree – Use the ear muff and automatically chop the tree. Walk on tree
to get to Swampy.
Swampy – Swampy is holding the detonator for the Swamp bomb behind
him. Swampy does not believe you are his friend. He wants you to be an
honorary Swampling and to do so first, you must drink a whole bowl of
swamp stew. Second, sing the Swampy song everyday. Try as you might you
can not drink the swamp stew. Remember what the Druid said about his mouth
getting numb. Go to the Druid. Druid – Give the
druid the 3 plants and he will let you take a swig off from his liquor
jug. Now you are drunk. Sprint (Caps lock) to Swampy. If you revive before
drinking the stew, go back to the druid to have another swig of the potent
gin. Swampy: – While drunk, drink the stew and falls
unconscious. Upon awakening, Swampy tells you the Swampling song.
Swampy wants you to get the lawyer to sign a contract that states
that the ‘undersigning personidge’ must ‘be leavings the Swamps alonses’.
Landing with Big Rock –
Ride the croc to the Landing with the Big rock and the bird table. Talk to
the dodecahedron of pure stone and end up singing the Swampling song –
Swampling stew, swampling stew, to your bog your swamp be true. Swampy be
true. Swampling stew. The big rock moves and you can enter Swampy’s
hideout. Get the oven gloves and turkey baster from the
table with the plans for the Swamp bomb.
Druids
Compound: Tower – Use the oven gloves on the
ladder of the tower and climb up to the top and see a reflector that
reflects light to the ground. Move the reflector using the directional
arrows and the druid will get upset. Focus the light on the blue patch of
plant at the plant garden area. Go down. Garden
– Pick up the Deadly Fish herb fruit that provide relief from bee
sting. Use the mortar and pestle on the deadly fish fruit to get pestle
and mortar containing mulched plant leaves.
How to get the lawyer to
sign the contract – Talk to the lawyer about the contract and get
nowhere. Go to the broken beehive across the swamp and use turkey baster
to get honey. Go back to the lawyer and use honey in the turkey
baster on him. He is now splattered with honey. Use the Hoover
(vacuum cleaner) with bees on lawyer. He gets bitten by bees and
falls dying. He will do anything for you to help him and will sign the
contract. Use turkey baster on pestle and mortar containing mulched
plant leaves to get turkey baster filled with plant juice. Use it
on lawyer. Watch as he tries to renege on his promise and Simon’s
threats. He signs the contract.
Swampy – Show Swampy the
signed contract. He is very happy and will go with you. Melissa Leg
arrives and knocks Swampy cold. She then kisses you and changes to Runt.
He lifts you up magically and disappears with Swampy. Simon drops on the
detonator and the bomb explodes.
Chapter 4 – To Get the
Seedy
Calypso updates his journal. He
talks about the prophecy of Nostramadus that should be happening now and
misinterpretations of the prophecy. Simon drops from above, landing on the
table. Calypso knows about Runt aka Melissa. He explains about the
prophecy and that Sordid is trying to open the doorway to the nexus. The
nexus is the control center for the Universe. What Sordid needs the
Swampling for, Calypso does not know. Sordid needs the magical boots to
control the nexus. Calypso shows Simon what the magical boots look like
and Simon recognizes it as a CD. Calypso wants Simon to get the “Seedy”
from the Dragon’s horde. The dragon is Sordinell, the same one that the
dwarf prince talked about. Calypso wants Simon to enlist the help of the
dwarves and to go to the forest.
Dog and Fruit
Inn: Bar – Talk to barman about the ninja
ghost he heard just a few minutes ago upstairs in the corridor. At the end
of the bar, pick up the empty pint glass.
Games
Room – Look at the pool table. Something jammed in the coin slot. Use
the tong on the pool table and get a gold coin. Use the pool table
again and use 1 groat but find it blocked. Look again and find a rat in
there that bit you. Use cat found in the overturned dumpster – garbage on
pool table. The cat would not come out after the fight.
Beer
Garden – Talk to Wig Trader and she wants a wig or wig equivalent to
trade for what she is wearing. Find about God, Harry Wigsner and the
wigologists. Notice the picnic table and that the glass roof to Calypso’s
Private room is gone after you dropped through it.
Bar –
Ask the barman about the pool table and he says that the white ball and
cue are stolen. There are only 2 balls in there anyhow and won’t be fixed
until the repairman comes.
Around the Town:
All other places are closed except the Inn and the
Church. Bell Tower – Pull (Ctrl) bell rope and
use (Ctrl-hold again) the rope to keep climbing up. Look out the window
and see Goldilocks. Go through window and talk to Goldilocks. She is
stealing lead off the roof. She wants you to take it out of here and to
stash the loot before anybody notices – 2 tons of lead. Then meet in the
pub later. Time to go to the forest.
Forest

You can ride the rainbird to move
from town to forest and back. Landing sites in Poliganis are The Inn,
Rotable Junction, South Gate and Justice Square. Landing sites in the
forest are Rope bridge, Lonely Hut, Temple and Dungnomin’ Tree.

Nearly secret area – The
cave in Nearly secret area is blocked and the dwarf is not
there. Dungnomin’ Tree – There are a lot of
missing person poster around. Best to keep away from the gnome
village.
Sleeping foliage – Now
that you have the plant book, identify the sleeping foliage to be Dopius
Calandra, plant that induces deep sleep for several hours. Pick some
Dopius Calandra.
Reservoir Control Hut and
Fallen Tree – The hut is still locked. Go down the hill to the tree
where ninja died. There is a valuable item wedged tight under the tree.
The woodworms that are in the tree want weapons for their insurrection
before they help you get the valuable item under the tree.
Large Hole – The treasure
hunter wants to catch a mole that he trains to find gold. They also bring
sustenance to him. The mole can be trained to find anything by rubbing the
thing he wants to find on them. Look around the area and see a lot of mole
holes. Catch a mole by waiting for a mole to pop
up and be in the eye window and use the gold coin on
hand. Train the mole to hunt for the CD by using
mole on Feeble File CD labeled ashtray in inventory and get mole
trained to sniff CD’s.
Clan BattleBeard Camp –
This is formerly the Volcano Photopoint. Watch as a dwarf climb on
catapult after drinking spirit and yelling. See him get catapulted and
eaten by Sodinell, the dragon. Talk to dwarf by the brewing area. Clan
BattleBeard is called by the Prince of Dwarves to kill the Dragon
Sodinell. The spirit that the dwarves drink before being catapulted is
BeserkerBrau, a dwarf spirit that eats through metal. When asked about the
keys to the building, the dwarf said Axegrinder just went up and he
usually has them. Ask for some spirit but the dwarf said no. Use Dopius
Calandra plant on the dwarf spirit to add extra flavoring. A dwarf comes
out of the tent, drink brew, get catapulted and eaten by the dragon. The
dragon drops to the ground after eating the dwarf that drank the sleeping
foliage plant. Ask for the brew again by using the pint glass on brew pot
– to get pint glass full of highly acidic Dwarf Spirits.
Waterfalls – Go outside
the camp into the waterfalls area. Look at the sleeping dragon. Use the
metal detector on dragon and hears metal in stomach.
Dragon Lair – Fly a
rainbird and land inside volcano. Notice the coins dropping from a spout
on the side of the volcano. Use the trained mole on the treasure. The mole
pulls out a locked chest. The chest has a padlock with no keyhole on it.
Use the dwarf spirit on the padlock to get Thick glass case with CD
inside. Look at gong and use hammer on gong. It broke! Use bell on
gong stand. Use hammer on bell and the sound breaks the glass case. Pick
up CD. Ride the rainbird to go to Calypso at the Inn.
Poliganis
Dog and Fruit
Inn: Private Room – Talk to Calypso. Simon,
King of Fools must defeat Sordid with the help of the Lady of Steel, the
real Melissa Leg; Hero of Light, Coneman the Barabrain; Jar Nin, the King
of East and Prince Brave, Prince Valiant. To get their help Calypso said
to give them Invitation to help save the world at Sordid’s
Fortress, RSVP and they will come.
Ask about the King of East. The
ninja, Jar Nin must have his body and soul rejoined at the Temple. To
collect his soul in the bottle, the bottle must have something of
value to him. If successful, the bottle will glow green. Simon explains
about his stealing the bell, so Calypso has to bring Jar Nin to the temple
himself. Jar Nin’s nose was burned in a smoking competition. As for Prince
Brave, his transformation is a standard witch curse situation and can be
reversed by being kissed by a princess. Princess Austin is now of age and
a tournament for her betrothal and to find a suitor is arranged. Grandulf,
the wizard is doing the opening fireworks display. He would want something
in return for his aid to gain access to the princess.
Chapter 5 – Invite the 4
Heroes to Help Save the World

Coneman the Barabrain – Go
to the busted cart and give the invitation to Coneman under the cart.
After taking him out from under the cart, Coneman, the Nordic warrior
complains about his very bad back. He wants you to fix it before he can
help with saving the world.
Tournament Entrance – Talk
to Grandulf. He needs help with the fireworks display before the
tournament begins. Meet him at the door tonight and he will show you the
ropes. Go back to the bedroom at the Inn and go to sleep. Wake up and
return to the tournament entrance and meet Grandulf.
Fireworks – Grandulf
explains that there are 4 buttons for firing and that the right
fireworks should be fired at the right moment. There is a special
monitor to do so. The Fairy godmother appears to explain further about
the change in keyboard control. Press the correct key when the
corresponding ball passes the lit green square on the right of the
console.
After a successful fireworks
display, Grandulf says you can comeback anytime at night as long as
you stay away from the guards. The tournament is now open.
Go back inside and walk forward
the tents. The opening is close to the wall. Go to the tent at the center.
Crouch to get in and see the Princess you saw at the swamp. Try to wake
the princess up and she thinks you are Johnny, her dreamboat. Look around
and see a poster of a Johnny Lightnin X, with black hair, purple robe and
wearing shades. Go back to the bedroom in the Inn to wake up in
daylight.
Carnival: Go to the
road off Magic Square that had the closed gate before. The carnival will
open only after the tournament is declared open and is accessible only
during the day. Enter the Carnival and meet the 2 demons you have met in
the 2 previous episode of Simon the Sorcerer. They are now into stealing
money through crooked games in the carnival.
Acupuncturists – Enter the center enclosure. Look at the sign in
front of the caravan about backaches. Enter the caravan and meet the 2
demons. Talk to them about acupuncture and backaches. They do not do house
– street calls. They charged 10 groats.
Seaside
Shooting – Play the game for 5 groats. Use the chakara, hitting 10-14
ducks will entitle to a free game, hitting 15-19 targets will win 3x the
game fee, another source of money and to hit all 20 ducks will win a teddy
bear. Hit 20 ducks. The free game is not true and will still be deducted
from your money. To help in the shooting, place an X on the monitor where
the chakara will hit and use that as target for the ducks. Wait for the
next set of targets to come out because sometimes the same targets pop up.
Move the right and left arrows only after you have centered it on the
target. The ducks appear in 2 (I think!) sets of sequences and if you can
remember the sequence, you can anticipate where to shoot. Good luck!
Receive the moth eaten teddy bear, formerly owned by a
dog.
Invadertron – There are 2 of these machines. Just like the classic
space invaders, hit all the flying targets to gain the high score. The
prize is a pair of shades and more groats, another source of
money.
Wonder
Wheel – Spin the wheel to land on either win or lose area. The game is
rigged.
Test
your Strength – Talk to the dwarf prince. Since he lost his clan to
the dragon, he needs a purpose in life. He needs a symbol to unite dwarves
around the world. Give him Hammor, the hammer he gave you. But before he
sets out to do so he needs to prove to himself that he can beat the “Test
your strength” game. Talk to the demon to convince him to allow the
dwarf prince to play. The demon will eventually let the prince play. Go
behind the demon, talk to him and he will turn his back to the
dwarf prince. The dwarf will change the mallet he was told to use to
Hammor and wins the game. The prize is a black T-shirt which you
will get from the prince.
Bonzo’s
Ball Bonanza! – The object of the game is to shoot the ball through
the clown’s teeth. Something’s definitely crooked here! The ball looks
like it is too big to enter the mouth. The prize is to be a Coneman action
figure.
Aqua
Derby – The object of the game is to have your horse win the race by
shooting water through open circles. Hold down the Ctrl key while shooting
water into an open circle, wait until your horse move and do the other two
holes or until the horse reaches the end. The opening of the circles occur
in counterclockwise sequence. Billy the Kid is the opponent in this race.
Win a bucket of green plastic toy soldiers with real plastic
weapons.
Voodoo
Circle – Enter the lane between Wonder Wheel and Test your Strength.
Enter the enclosure on the right and see a circle of skulls. Use action
key on cobra lever at left of the circle to go to a lower level. Talk to
the voodoo demon selling magic amulet about making voodoo dolls. What are
needed are a doll and some children’s teeth. Hit cobra lever again to go
back up to the circle of skulls.
Go to the opening on the hedge
across the entry to the voodoo enclosure, just to the right of the cobra
lever. Crouch straight forward and right to the end. Come out to the
enclosure for the Wonder Wheel. Look up at the magnet attached to the back
of the wheel. Take the magnet. Exit to the outside lane and enter
the enclosure at the opposite side of the Voodoo place.
Cotton
Candy stand – Go down the steps. Buy cotton candy floss for 3
groats.
Flea
Circus – See fleas perform. Use the teddy bear on fleas and get
teddy bear infested with fleas.
Go back to
Wonder Wheel and play the game and win a peashooter
(leguminous vegetable projector).
Talk to kid that is following
you. He wants a red gobstopper and you promise to get one for him. Exit
the carnival. All the prizes at the different arcade stalls should be
won.
Dog and Fruit
Inn: Game Room – Use the flea infested teddy
bear formerly owned by a dog on pool table and the cat will jump out of
the table. Get the red and yellow pool
balls.
Beer
Garden – Give the cotton candy floss to the wig trader. She will give
her wig in trade. Go back to the carnival.
Carnival: Bonzo’s Ball
Bonanza! – Play the game but this time use the yellow pool ball. You
are given 3 large yellow balls to use. Remember to place the yellow pool
ball in the hand box and to press Alt when ready to shoot the yellow pool
ball. If you miss the first few tries, the yellow pool ball returns to the
inventory and you can play again. Get a Coneman action figure as
prize.
Kid
– Give the red pool ball to the kid that wants a red gobstopper and he
will give you his pre-chewed gum. He chews the red ball and loses
teeth in the process.
Voodoo
Circle – Use the cobra lever and enter the voodoo demon tent.
Automatically, give the teeth to the voodoo demons and they eat it as
snack. They then do an incantation on the Coneman doll you gave to them.
You get a Coneman action figure voodoo-ified and full of
needles.
Acupuncturist – Give the needle filled Coneman doll to the
acupuncturists. Watch as Coneman’s back is fixed and he decides to forego
his revenge on that puny boy later and save the world first.
Launderette – Place the
blonde wig from the wig trader and the black t-shirt won by the dwarf
prince in the washing machine. Start the machine and later get a dyed
black wig.
Bedroom – Go back up to
the bedroom and sleep. At nighttime, go back to the princess via
Tournament entrance.
Tournament entrance –
Enter the entrance, forward and enter the tent area through an opening by
the wall. Crouch to enter her tent. Go to the poster of Johnny X and look
at it. Use magic spell book. Use the left arrow key (Polmar – red) and
right arrow key (Gazza – blue) keys and press Ctrl to change your robe to
purple. Wear the black wig and the shades. Wake the princess up and she
will say that she will give you, Johnny a kiss. Use frog on princess. She
wakes up screaming and will shoot you with her bow and arrow. Watch the
escape and Grandulf is hit instead of you. Outside the tournament
entrance, the frog changes to Prince Brave aka Valiant. He accepts
Calypso’s invitation. 2 down 2 to go.
Change your robe back to red. Go
back to the inn and sleep to wake up at daylight.
Forest:
Woodworms by Reservoir Hut – Give the woodworms the bucket of green
plastic toy soldiers with real plastic weapons won from Aqua Derby. The
woodworm liberation army eats the tree up. Watch Simon handle terrorists.
He picks up Jar Nin’s necklace.
Church’s Memorial Room –
Go to the memorial room at the church. Upon entering, turn to Simon’s
left, forward midway the aisle, turn to the memorial wall and see Nin
Jar’s memorial. Simon will say ” So Nin Jar’s ashes are there”. This
drawing/plaque where the ashes are can be seen early in the
game.
Place in Jar Nin’s plaque
– Call the rainbird and see the place on the plaque appear in the map. Fly
straight from the rope bridge of the forest and left of Poliganis to the
formerly empty land. Land. Go forward to the ashes at the center of the
slab. Use vacuum cleaner on it to get vacuum cleaner full of ashes.
Go back to Inn.
Dog and Fruit
Inn: Left Hallway by bedroom – Combine Jar
Nin’s necklace and the empty soul jar to get jar with necklace. Go
close to the mirror and use the jar with necklace. When successful, the
jar turns green to get jar with Nin Jar’s soul in
it.
Private room – Give the ashes and soul of Jar
Nin to Calypso. The ninja will come to the Inn when the joining is
completed.
Tell the Barman about the ghost
and listen to another person’s plan destroyed by you. Go back to Calypso’s
Private Room and talk to all the heroes there.
Church
Tower: Time to help Goldilocks. On the way to the
church take note of the rickety bridge and the 2 ton weight limit assigned
to it. Take note also of the water flow of the river.
How to steal the cheese
truck – Go the gate in the back of the church and see a hedgehog kid
floating in the air holding 3 balloons. Aim the peashooter on the
balloon. Shoot at 2 balloons and leave the last yellow balloon intact
until the cheese wagon passes by. You can move about and the boy will
still be there. When the cheese wagon is underneath shoot the last
balloon to drop the hedgehog kid in the open topped cheese truck. It
looks like that the kid falls outside the truck but he is in the truck
if you do not see him on the road when the truck moves away. Follow the
cheese truck to the warehouse. Watch as the cheese inspector finds the
hedgehog kid inside the truck and no cheese. The hedgehog kid enters the
Cheese Bros. warehouse and eats all the cheese. Mr. Cheese and the
cheese inspector are out of a job and the scam is stopped. Ride the
wagon and fairy godmother explains how to drive the truck.
Drive the truck directly
underneath the stolen lead on the church rooftop. Enter the bell tower,
climb the bell rope to the roof and push the lead on to the truck. Drive
through the rickety bridge and the bridge collapses. Look at the water
flow of the river now and compare the flow of the river before the truck
dammed the river.
Forest:
Call the rainbird and fly over the forest and town. Note the inflow to the
river around the reservoir comes from 2 sources, one is the river that
comes in by the church in town that is now dammed up by the cheese truck.
This river flows out to the swamp and to another branch that joins by the
waterfall by the volcano in the forest to another source out of the world.
The river flows out around the forest and the reservoir. There is a gate
that holds back the river to the outside world just across Acre Gap and
dams the water to fill the reservoir. The reservoir surrounds the
Mysterious Isle. These river and reservoir system can be studied on the
map also. Alight at the beach.
It’s a Beach – Take a look
around. The water level is very low. Go to the left side of the beach
close to the reservoir and see that the Mysterious Isle has a pier with a
boat tied to it – somebody is there. Look down and see a phone booth in
the water. Walk around the shore and Pointless bridge and still not find a
way to get to the Mysterious isle. We need to lower the water table more
to get there.
Dragon by the waterfall
–
How to get the key from the
dragon’s stomach – Combine the stick with chewing gum to make
chewing gum on the end of the pole. Combine magnet to it to make
magnet stuck to pole with chewing gum. Use it on dragon. After
Simon’s procedure on the dragon he says, “needs lubrication”. Combine
butter to magnet on a pole to make lubricated pole magnet. Now
use it on dragon to get dwarven keys from the inside of a dragon.
“Eat your heart out Mr. Herriot!”
Reservoir Control Hut – Go
to Reservoir Control Hut. We have to release more water from the reservoir
by opening the dam gate. Go up the ladder to the roof and look at the
stuck trap door. Go down. Use the dwarven keys on locked door. It might
help to raise the gamma control here, to be able to see better. Pick up
the petrol on the right side by the wall and look at the pulley
system. Go to the other side of the wood wheel to see if we can raise the
gate. Push the spoke and realized that you cannot raise the gate. (Go to
the corner by the wheel. Glitch on this part shows a ladder that leads to
the roof of the hut at the corner but is really the ladder outside to go
to the roof). Look up to the trap door on the right side of the pulley
system. Use chakara to unstuck the trap door by aiming at the latch at the
bottom side of the trap door. Simon will say “Got it!”. Go back up to the
roof and trap door and open the trap door. Yikes! Shortcut to enter hut.
Pour gasoline on rope of the pulley mechanism. Now that you have sunlight
from the trapdoor, use mirror to light it. The rope holding the gate is
cut and now the water is released. You can go directly to Mysterious Isle
by phone booth or by the beach.
It’s a Beach or Mysterious
Isle – Look at the water table now and see that it is much lower. The
phone booth by Mysterious isle is accessible. Walk towards the boat that
is now hanging. Climb the rope that attached the boat to the pier. Go to
the ruins of a church. See Melissa look down at the lowered water table.
Enter and surprise Melissa. Give her the invitation automatically. Time to
go meet everybody.
Dog and Fruit
Inn: Calypso’s Private Room – Go back to
Calypso at the Private Room. They are planning the assault on Sordid’s
fortress by sneak attack. They think that Simon will not be of help. A
knock is heard and Runt enters with 2 guards. He placed a magic barrier
around the room. He disabled Coneman and blast Calypso also. Runt is
filled with evil glee about catching Simon, who he wants for himself and
Calypso, as well as the world’s 4 greatest heroes. When Runt leaves,
Melissa thinks that they should just wait it out but Simon thinks
otherwise. Talk to all the heroes and exhaust ALL dialogue. Coneman will
eventually get mad because of Simon’s “witty repartees” and beats him up
dead. Simon comes out alive by the front door of the Inn using the
lifepad. Go back in the Inn and find out you cannot get through the
barrier.
Beer
Garden – Notice the open roof to the private room of Calypso. Talk to
the boy on the tire swing. Fairy godmother appears to explain how to use
the swing. Press the action key to start. Press the forward keys when the
swing starts to go forward (when the swing is at the very back close to
you) and the back keys when the swing starts to go backwards (when the
Simon’s feet are up and the swing is far from you). Timing is necessary.
Press the corresponding key when the swing is at the end of the motion
forward or backwards. Pick up the length of rope with the tire
attached. Tie the rope to the picnic table. Watch the talk with Calypso.
I thought this is the funniest part of the game and cracked
me up – Sorry about the editorial! We have to save the 4 heroes
taken by Runt to the fortress. The fortress is at the east and the
entrance is through a rocky tunnel in the mountain. Call the rainbird and
Sordid’s fortress appears in the map. Fly east of Poliganis.
Sordid’s fortress – See
the camps of the invasion army surrounding the fortress entrance. There is
an orc guarding the gate. He needs an identification card before he can
let you in. Only gobbos, orcs, metal things and trolls n’ stuff are
allowed in. The covered bridge is closed by a gate.
To get in the fortress the
first time – Change the color of your robe to black by using the
spell book and selecting all colors. Enter the tunnel and carefully walk
only on the dark areas. After passing 2 orc guards, you will hear a
gobbos sing and march towards you. Crouch (Z) and quickly enter the
lighted recess (practice to find a place to hear them come, go back to
the recess, crouch and enter). When the goblins march towards the
opening of the cave (when they are not on the screen anymore), quickly
go out, stand up, turn left and navigate the dark areas to the end of
the hallway.
Look in the mailbox by the
bridge. Pick up the mail which is an order for a crate of ‘usual’ from
Sordid to the Green Grocer in Poliganis. Go back out of the fortress
and do not worry about being caught this time. Call the rainbird and fly
to Poliganis.
Green Grocer – It is still
close. Use the order on the door of the greengrocer. Simon will insert it
in the mail slot. Listen to the frightened grocers. A crate is dropped
from above. Look on crate and see it marked with Sordid’s address. It’s
full of cauliflowers. Now to find the hedgehog kid. Go to
warehouse. Cheese Bros. Warehouse – Talk to the
hedgehog kid and you will pick him up. Go back to the Green
Grocers. Green Grocer – Use the hedgehog kid on
crate of cauliflower. He also hates cauliflower but will eat it if cheese
covered. He is very full and feels like throwing up. Use the chakara on
him to get him to cover the cauliflower with cheese. Then he eats it
leaving an empty crate. Enter the empty crate now.
Chapter 6 – Save the
Universe
After being hauled as groceries,
Simon climbs out of the box and finds himself inside Sordid Fortress.
Colored Fireballs – The
object of this puzzle is to get up the ramp and evade or neutralize the
fireballs. In some instances evading the fireball can be done by dodging
out of the path or by crouching. Remember what the fairy godmother said –
If you get stuck in a magic place, think of the colors you see. The best
way is to change the color of the robe into the color of the released
fireball. After changing to the color of the released fireball, sprint up
the ramp as fast as you can until the next fireball is released. The
colored fireballs will be neutralized when it hits the same color of your
robe. Change color of robe again and sprint until the top.
Climb the ladder and enter Runt’s
laboratory.
Runt’s Laboratory – You
are stuck to the floor. Runt explains their diabolical plans. They found
the location of the nexus, the control center of the universe. Sordid is
there making preparation for the invasion. Runt will follow soon after he
does some adjustment needed to the matrix. They do not need the Magical
Boots. Melissa and Coneman are imprisoned in a force field. The prisons
are controlled by 2 buttons that are in front of you, one that releases
the force field and the other changes them into something
small.
How to release Melissa and
Coneman – Combine peashooter and magnifying lens. Simon said that
using the Shift button will zoom in. Zoom and look straight on console
with 2 buttons in front of you. Target and shoot at the right release
button.
Use the voodoo doll with pins to
wake Coneman up. Coneman goes for Runt but Runt changes him to a duck.
Calypso arrives but accidentally pokes himself with his light saber and
dies. Now, Runt is out to get you with his light saber. When he first
attacks you, Runt said that his magic is absorbed by your robe.
How to fight Runt’s colored
light saber – Again, remember Fairy godmother’s advice – If you get
stuck in a magic place, think of the colors you see. Change to the
different colors of the saber blast shot at you by Runt. Then run to
similar colored button on the wall. When the colored blast hits you,
press the button to transfer Runt’s magic to the buttons. Do all the
buttons. Once all the colored buttons are glowing, Runt’s magic is gone
and there will be power build up.
Runt falls into the bottomless
pit. Coneman’s magic transformation was delayed and he, as duck flies over
the pit. His transformation back to human happened in an unlucky time and
also falls in the pit. Melissa wakes up and together enters the Nexus
gate, opened by the power build up.
Nexus – There is a giant
Swampy head above an entryway. Calypso’s ghost appears using power from
beyond. He states that the head is a representation of the builders of the
nexus.
Go to Swampy’s head. Look at the
head and Simon recommends that you sing the Swampling Song. Select the
words to the Swampling song: Swampling stew. Swampling stew. To your bog
your swamp be true. Swampy be true. Swampling stew. Swampy’s eyes light up
and an entryway opens up.
Magic red bridge – Cross
the bridge and be stopped by a Swampy guard. He explains that the bridge
can only be crossed from the other side. No running or jogging allowed on
the bridge. The bridge is just for people leaving the control center not
going to it.
How to cross magic bridge
with Swampy guard – The guard said no running or jogging, so press
and hold Shift key to walk forward. Since the bridge is only for going
out and not entering, when the guard comes out of the guard tower,
immediately turn back towards the entry door and walk like you are going
out of the control center. Be sure to walk straight in the middle of the
path and not veer off to the edge. Walk and not hesitate when the guard
is outside the tower. Once on the magic red path, count 16 – 17 steps
and then turned back to the start point, guard comes out and looks
around. Wait until he looks towards the entry door and as soon as he
turns to look away, turn back and continue the walk. Continue doing this
until the other end. The guard comes out 4-5 times until you reach the
end of the bridge.
Once across and see a
black starry universe, a major glitch happens. It will crash to the
desktop. As soon as I saw that starry universe again after replaying, I
immediately pressed the spacebar and saved the game. After opening or
loading the game, a red blank screen is seen but still have the 3 boxes on
the top right. I opened the inventory and chose to call the rainbird and a
graphic scene replaced the red screen and went on from there. I was
informed that if you keep at the middle of the bridge to the next ramp,
this will not happen.
Nexus Computer Room – Go
to the right and see Sordid lying on a bed, looking like he is in a coma.
Go to the left side and see Swampy lying on another bed, breathing but out
of it. Look at the computer and Calypso’s ghost will appear (Whoo, hooo,
oooo!) Calypso explains that Swampy’s and Sordid’s soul and body are
separated. Sordid’s soul entered the Nexus computer and took Swampy’s with
him. The Ancients are the creator of life, universe and everything. Swampy
is slang for the Ancients. The Nexus computer is the one that controls the
universe and if the power supply is pulled out, it will be the end of
everything. Calypso knows so much because he is in “Spirit Guide” persona.
Simon has to stop Sordid’s vile plan by entering the nexus computer. His
soul needs to be separated from his body. Calypso performed Simon’s
separation of soul and body. If something happened to either the soul or
body, the joining back will have a slim chance of happening. Enter the
computer.
Inside the Nexus Computer
– Find yourself inside the computer.
It is best that as soon as you
reach the passage going into the transporter that will get you to Sordid
and Swampy, retrace your steps going back to the transporter room with 3
pads as a practice and to know the path to be taken.
Swampy is glad to see you and ask
that you help him. Sordid talks about his plan to use Swampy to change the
automatic control of the Nexus to manual, so that he can rule the
universe. Swampy’s ancestors 100,000 generations back were the creators of
the Nexus. Swampy being the last of his line can run the machine. Swampy
presses a button and removes the automatic control. He pulls a lever to
change it to manual. Oh Gee! He did the memory erase and deleted the
Nexus!! Sordid escapes.
You have 2 minutes to get Swampy
out and escape or escape by yourself. Swampy urges you to go and leave him
because his leg is tied to a ball and chain. You can use the vacuum
cleaner on Swampy but there would not be enough time to get back out.
Decision time! Go to the portal by yourself or with Swampy and go through
the maze again. The lights flicker on and off. Sordid flies to get outside
the computer ahead of you. He knows the path so you can follow him if
lost. You have to beat Sordid to the computer room and leave him trapped
in the Nexus.
Return Path to Nexus Control
Room* – The object of the return path is to reach the transporter room
with 3 pads. The only variant from the path above is when you reach the
blue ramp and go down, you will get to a room with a single transporter
pad and with FBI OMNI written on the wall.
Be sure that before you continue the
game, you have the CD ROM with Auto Notification checked or on in the
Device Manager of the computer you are playing on.
Last puzzle – Your body and Swampy’s
are still in their beds but Sordid’s is gone. The computer is going
haywire. There is no keyboard. You have a CD in inventory and no place to
insert it. Since there is no eject button for the CD ROM drive of the
Nexus computer, eject your CD drive, the one you are playing on. You
will get an eject auto notification. In some replays, I did not get one.
Click OK. If the game frame disappears, just click it back up from the
toolbar at the bottom of the desktop. The CD Rom drive of the Nexus
computer in the game opens and Simon inserts the CD aka Seedy aka Magical
Boots. The Nexus computer is now working.
The computer asks “Where would you like to
go today?” Simon types “Home”. He realizes he needs Calypso for the
joining of his body with his soul. While shouting for Calypso, a body
comes out of the Nexus computer. It is another Simon the Sorcerer trapped
in the Nexus for a long time. The new Simon says that any good that
exists, an equal and opposite incarnation that is evil is. Those never
meet but then, they did.
“Got control of the universe
have we. Right then, let’s have some fun” says the Other Simon the
Sorcerer.
The End
Watch the ending credits
and see the outtakes from the making of the game. 🙂
*Thanks to Michael
Barnes.
This
document may not be distributed without express written permission of
the author and the content may not be altered in any way.
For
Questions or Comments on this Walkthrough, Please write to:
MaGtRo
Copyright © 5/2002 MaGtRo
|