Just Adventure original
Simon the Sorcerer 3D Walkthrough
Chapter 3 – To Find Swampy
POLIGANIS
Upon entering the North Gate
of Poliganis, meet Melissa Leg, the scantily clad friend of Calypso.
She brings you to the Inn where Calypso has a private room at the
local tavern. She has the fuel for the wardrobe that can send you
back to your time. In return, she wants you to find your Swampling
friend for her and would not give the reason why. The Swampling disappeared
and no one knows where. In the private room at the Inn, Calypso, gives
you the map to the restaurant from a MucSwampling Lost Treasure
Hunt meal deal. Exit the room, forward, right of screen, right of
screen, left up the stairs and exit to the Inn.
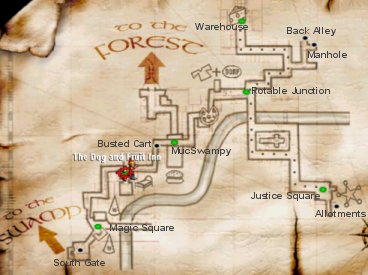
Dog and Fruit Inn:
Bar – Turn to the bar and see a whiskey on the bar shelf. Remember
the S.I.G.N. at the forest wanted a drink. Talk to the bartender that
wouldn’t sell you alcohol without an ID and learn about the ninja
ghost that scared the customers in the toilet and upstairs corridor.
Talk to the Salesman and he gives you a vacuum cleaner pamphlet.
Place the pamphlet on hand and press Alt to read the pamphlet – The
Vaculux 2000 is so powerful it can suck the feathers off a duck, molten
lava or things small as insects. Try using the chakara on the bottle
of whiskey and the bartender keeps catching it. Exit the bar via the
door by the jukebox on the left of the bar. Climb the stairs and out
of the inn. Notice the lady streetwalker that you can not interact
with. Turn right and walk forward.
Walking around:
Busted Cart – Look at muscleman and the jack holding the cart
up. Use hammer on jack. Pick up jack. Walk forward until MucSwampy’s.
Mucswampy’s
- Read the signs and try to open the door. It is boarded up good and
tight. Pizza Lord is closed.
Laundromat – One washing machine is not broken.
Church of St. Troy:
Turn right at Rotable Junction and go to the Church of St. Troy.
Grounds – At the left side of the church is a tree that has
fruits. Use (Alt) hammer on tree and pick up horse chestnut.
At the right side of the church is the Bell Tower.
Bell Tower – Enter and pull (Ctrl) the bell rope. Press Ctrl
again and hold to get Simon to climb the bell rope. Go out the window
into the roof and look around. Go back down the bell rope and exit.
Walk to the back of the church and see another door that goes to the
Memorial Room. Across the crypt door is the gate to the street.
Exit and continue walking until you see a cheese wagon.
Mr. Cheese Wagon – Follow
the big open topped cheese wagon and step in front of it. Talk to
Mr. Cheese and eventually he will give you a wedge of cheese.
Follow him to see where he goes. He stops at the Cheesy Bros. in the
Warehouse area. Watch the cheese wagon man get money for not delivering
his cheese to the Cheesy Bros. because there is too much cheese already.
Follow Mr. Cheese drive around town from Warehouse area to the Justice
Square where he turns around and goes back to the Cheesy Bros. to
get more money.
Justice Square:
Allotment – Take the lane off the square at the right side and
see vegetable gardens and a green shed. In front of the green shed
is a pot of varnish.
Pond – Look at the duck swimming in the pond and get 2 groats
from the pond, another source of money. There is a female in stocks
and she looks familiar. Remember Goldilocks from Simon the Sorcerer
2. She has half of a treasure map won in a seedy tavern in her bra.
After showing your full map to her, she will split the treasure with
you for the full map. She wants to be freed and can get you into MucSwampy’s.
The keys are in the sheriff’s office.
Sheriff’s office
- Enter the office and see the sheriff snoring. The keys are in the
metal locker behind him. Walk carefully so as not to wake him. Traverse
carefully one step at a time pass the empty cans of Choker Cola and
the file cabinet on the left to the metal locker on wall. Open the
metal locker but it squeaks. Use butter on the locker hinges and open
the locker door. Pick up the keys. If you wake the Sheriff
up, he will just send you out of the office until he finally sends
you to lock yourself in the cell, which of course you leave open.
Go back out and free Goldilocks. She will meet you at MucSwampy’s.
Use the phone booth to go MucSwampy’s.
MucSwampy’s – Meet Goldilocks
coming out of MucSwampy’s. Enter the now accessible restaurant. Look
at the sachets of vinegar on the counter. Enter the red door behind
the counter. Go pass the kitchen and enter the door marked “private”.
Go to the desk and crouch. Press the red button marked “sekret”. A
secret door open. Take the lift down. Look at the papers on the table
in the swamp room and see “housing development in the swamp” pamphlets
and housing plans. Swampy is now an activist and has gone to the swamp
to stop the housing development. Exit back to the restaurant proper.
A very fat wizard in green
orders swampy burger with no sesame seeds in the bun, worm fries and
swamp shakes. Simon picks the sesame seeds out. Exit the restaurant.
Let us continue to check the town.
Warehouse Area –
Adventure Soft Warehouse – Enter the fenced warehouse on the
right before the circle. Look in the boxes of Feebles Files outside
the building. Get Feebles File CD aka ashtray.
Cheesy Bros. Warehouse – Enter and see boxes and boxes of cheese.
Follow the map to Back Alley.
Back alley – Enter
the opening on the wood fence and see several dumpsters. Pick up the
cat inside the overturned dumpster at the end of the alley.
The alley to the north is blocked by a dog in wheels.
To see the dumpster – position Simon to stand by the right
corner of the dumpster close to the dog. Open dumpster and see a trainer/shoe
in there. Use the trainer on dog and automatically trap the dog in
the dumpster. Get a shoelace in inventory. Go forward and turn
right.
Manhole – Remove the
manhole cover and go down. Walk to the door and knock. They want you
to knock the password to be allowed in. Fairy godmother appears to
tell you how to enter the password. Press action key and then press
action keys again to start the password sequence. What password? Go
back up and talk to the kids at the end of the alley. They will tell
you the password for the secret room if you give them a new game that
involves the use of a ball. Look up the wall and see an open window.
Find a phone booth and go to Magic Square.
Magic Square:
Wizard Guild – Notice that every time you try to enter Eight
Wander, it turns to the golden ornate door of the Wizard Guild. Enter
and talk to the Wizard. He says that you need someone to sponsor you
as apprentice. South Gate – There are 3
roads going out of the Wizard Square, one to go back to town, one
to a closed gate and one to the South Gate. Talk to the 2 orcs at
the South Gate and find out that you need to have proper papers to
leave. The Big Wiz, Sordid is looking for the magical boots. Go back
to Dog and Fruit Inn.
Dog and Fruit Inn:
Enter the bar. The door at the other end of the room goes to a corridor,
then Games Room, Beer Garden and upstairs to the bedrooms.
Games Room
- The Jukebox takes a groat for each song. Standing at the far side
of fireplace, look at fireplace and see it is smoking a lot. Look
at the ornate glass window above the target. The orc does not want
you to open the window. Talk to the orc and he challenges you to a
Dart game – 3 darts and the higher score wins 5 groats, a source
of money if you win. Fairy godmother appears to explain how to play
the dart game. The bibbling circles is the target, look at throwing
hand to control the dart. The higher the tip of the dart is positioned,
the faster and stronger the dart will be shot. The lower the tip of
the dart is positioned, the slower and lower the result will
be. The target circles can be moved by the direction keys. Press the
action key (Ctrl) starts the hand movement and the release of the
key releases the dart.
Beer Garden – Pick
up the BBQ tongs and look at the lit grill.
Upstairs
- Climb the stairs. Go forward the corridor and then turn to
the left hallway.
Left hallway – Pick up the nice thick blanket from the
drawer at the end of the hallway. To the right is Room 4 your bedroom
that is still locked.
Wooden Fire Door – Walk to the other end of the hallway
and then turn right. To keep the door open and to be able to go out
without being shutout – Position Simon by the right side of the wall
close to the hinges of the door, look at the door and then use the
wedge of cheese on door.
Step down outside at the back
of the Inn. Turn to right and go forward to the storage area under
the Inn. Open the crate-like entry to the cellar.
Cellar – Move the crates to get to the far corner to shut off
the pipe that brings beer to the bar. The beer barrels can be rolled
and the crates pushed. Move Simon in the direction you want the barrels
moved.
To move the barrels
and crates: Start by moving the barrel closest
to the stairs and by Simon’s right to the far end. Go forward to
the space cleared by the barrel with the stairs on your right. Move
the crate that is in between the barrels. Go back to the aisle where
you started at and move the crate towards the stairs. Move the barrel
in front of you so that it hits the first crate you moved. Now there
is space to move to the tap connected to a beer barrel at the far
corner of the cellar. Close the tap and go back up to the bar.
Bar
- Talk to the depressed salesman and he will order another beer. Thinking
that he is out of beer, the barman will check the beer source at the
cellar and leaves. Use (place chakara on hand, press Alt and then
action key) the chakara to get the whiskey bottle of full of sweet
liquor (remember S.I.G.N.). The barman comes back and thinks that
the ghost turned the tap off.
Calypso’s Private
room – Talk to Calypso about the border control patrol. Sordid
has got his orcs at the gate. Porkins, the fat wizard in green that
you met at MucSwampy’s is an expert forger. He frequents the Eight
Wander Club. An exclusive club that allows only bona fide member of
the guild through the magic portal. Calypso sends you to the Guild
and to tell them you are his apprentice and then take the test to
become a genuine wizard. (To get to be Calypso’s apprentice, the secret
room at MucSwampy’s must be seen, talked to the Orcs at the South
Gate and talked to the Wizard Guild wizard). Go to the Wizard Guild.
Wizard Guild at Magic Square
- Talk to Wizard. Based on Role playing games, you get a magic rating
of 1 and you have to get your own familiar, a sprite that can be found
at the forest out of town. The sprites come out only at night.
Dog and Fruit Inn:
Calypso’s Private room – Talk to Calypso, he booked a room upstairs
where you can sleep and he recommends using a net to catch the sprite.
Find a key to your room in inventory. Go upstairs to Room 4.
Room 4 bedroom
- Lie down and find out that the pillow is filled with polyester that
you are allergic to. Simon discards the filling and gets an empty
pillowcase. You can not sleep without a nice floppy pillow.
Open the window. Go (Ctrl) to the flat roof outside. Look at the chimney
at the northeast corner of the roof that leads down to the games room.
Use (Alt) the blanket on the chimney. The games room becomes smoky
and the orc opens the window. Go back to the Games room.
Games Room
- Play a game with the orc. Shoot the dart out of the window and forfeit
the game. Go to the alley outside to get the dart.
Alley outside the inn – Once outside, turn left, forward and left
to the alley beside the inn. Pick up the dart at the corner
of the building across the games room window.
Bar
- Talk to the barman about having your room cleaned. Evette, the French
maid will clean your room with the new vacuum cleaner. You can not
go to your room because a barrier is placed to block the stairs.
Left
Hallway – Go out of the Inn through the front door and enter again
through the cheese wedged door in the back. Go to the hallway by your
bedroom and pick up the vacuum cleaner. Go to the phone booth.
Justice Square – Go
to the pond. Look at the pond to get more groats. Move to the
side of the pond closest to the stock. Place vacuum cleaner at hand.
Look at duck and immediately, use (Alt) the vacuum cleaner. You get
feathers in inventory. Combine (place one of the item in hand
and the double click the other item) feathers and pillow case to get
a floppy pillow. Go back to the Inn.
Dog and Fruit Inn:
Bar – Ask the barman for your keys back. Go to your bedroom.
Bedroom – Use pillow on bed. Use bed. Try to sleep but snoring
keeps you awake. Go out and knock on room 5. Go back to your bedroom,
open window and walk to open window of room 5. Try to wake snorer
up. Use jack on snoring man to turn him on his side and stops snoring.
Go back to your bedroom and sleep. You wake up and it is now night
time. Exit the Inn and go to Pizza Lord via walk or phone booth to
MucSwampy’s and then walk.
Pizza Lord – Talk
to Pizza man that takes order. He sells his Pizza for 10,000 groats
but free if not delivered in one minute. He delivers anywhere using
the pizzerina – a special flute type thing that summons Pizza.
Time to catch a familiar. Go
to the gate to the forest. Exit gate and go to the forest.
Forest – Use the phone
booth by the bridge. Select S.I.G.N. site.
S.I.G.N.
- Give him whiskey and he becomes an aggressive drunk. Ask him for
directions now.
Butterfly meadow
- Use the phone booth to go to the Inbred Yokel area. Take the left
lane to the butterfly meadow. Use net to catch a sprite. The sprite
burns through the net and a man holding a sprite in a metal lantern
tells you to use a container that doesn’t burn through. Hmm – net
with hole (idea!!!). Go back to phone booth and select Lonely Hut.
Lonely Hut
- Talk to role players. They will not give you their sprite and can
not join the game. You can have the sprite when they stop playing.
They want a pizza. One of the players says with no anchovies. Go outside
and use the pizzerina to order pizza. Order the whole works and especially
ask for additional cheese to cover the anchovies. If you order pizza
with anchovies and one of the player sees it he will ask for a reorder
since anchovies will make him sick. Watch the pizza delivery boy rush
and get detained by asking directions from the drunken S.I.G.N. post.
The whole works pizza with extra cheese arrived later than one minute
and you get it free. The players eat it and the one player gets sick
and they call it a night. You get the sprite. Go back to the
Wizard Guild.
Wizard Guild – You are
given the TEST after showing the sprite. The Test fizzled out and
you passed by default. You are given a Wizard handbook and
your specialty is Fashion Magic. Look at the wizard handbook and the
fairy godmother will appear to teach you how to cast spells. The magic
spells are based on the 3 primary colors – red (Polmar), yellow (Tragicke)
and blue (Gazza). The colors can be combined. To cast a spell, place
the book in hand, press use object (Alt) and then use the different
arrow keys: left for red, up arrow for yellow and right key for blue.
Press the action key and the spell will be cast or press the down
arrow to cancel the spell. If you get stuck in a magic place, think
of the colors you see. Exit. Eight Wander is closed at night. Go back
to Inn to sleep and wake up at daylight.
Eight Wander – Enter
and talk to the face on the wall of the bar. Porkins left for the
yellow room. This is a runaround. Go the colored circles at the platform.
Instead of stepping on the yellow circle to light it to go to the
yellow room, just come back to the white room. Light up all the colors
to make white in the platform and enter the meshed elevator. You will
come back to the white room again and see Porkins. Talk to Porkins
about trying to get to the swamp. A street urchin stole his magic
quill and he can not do any forgery without it. The street urchins
are headed by Billy the Kid and they escaped him down a sewer grill.
To exit the club, turn off all the lights on the platform by walking
over them and then ride the elevator. Go to Back Alley.
Back Alley:
Street Urchins – Use the net with hole on the open
window at the far end of the alley where the kids are. Talk to kids
and show them how to play basketball. The door code is D-D-DDD-DDDD-DD
(Let’s Go!). Go down to the manhole.
Manhole
- Go to the door. Knock (Ctrl) on door. Simon will say “Guess
I better knock”. Wait 1-2 seconds. Then use the action keys (Ctrl)
to knock the code. Talk to the kids. The two kids will not let you
play until you have your own conker. Exit.
| How to make a conker: |
| 1. Have the horse chestnut from tree at the Church ground. |
| 2. Use (double click) dart on chestnut (on hand) to poke holes on the chestnut. The inventory description said – baking, varnishing and soaking in vinegar. |
| 3. Go to Beer Garden at Inn and place (Alt) holed chestnut on the hot grill to bake the chestnut. |
| 4. Go to the green shed at Allotments by Justice Square and use the varnish on the chestnut to make the skin tougher. |
| 5. Use vinegar at MucSwampy’s on the chestnut to toughen the core of the conker. |
| 6. Now combine the conker and the shoelace/string. The conker is made. |
Manhole
- Play the game for the magic quill rather than money. Just keep on
hitting his conker and eventually win and get the quill. Go
back to Porkins.
Magic Square:
Eight Wander – Give the quill to Porkins and get documents
for the border guards. South Gate – Show
the documents to guards. They accept it but are not allowed to open
the gate. They will give you a rainbird horn to call rainbirds,
in return for some inventory that you do not need anymore. The fairy
godmother appears to explain how to call a rainbird. Blow horn and
they will come. They can fly only in places without cover or outside
but not at night. They will not land in evil places. Use the arrow
keys to control the direction they fly. If you see a good landing
spot use the Ctrl keys to land. The landing spots light up when close
to it.
Go to rainbird pad close to
the guards and blow horn. The next scene is riding on the rainbird
and seeing the landscape below. Fly to the swamp and see rainbow color
lights emanating from the ground when you pass through it. Press Ctrl
to land in the Swamp.
SWAMP
You might want to raise the
brightness and gamma control under options to see better. Read poster
about the luxury development poster. Enter the open gate and see a
crocodile swimming around the swamp. On the left side is quicksand.
In the passage between the quicksand and crocodile is an incidental
man trying to chop a tree down.
Man with the Axe –
Above him is a beehive. Somehow we have to get the axe. Look at the
conveniently placed vine on the cliff right behind the man. Climb
the vine. Walk to the right of the ledge and see the beehive. Use
the chakara on the beehive. The beehive falls and bees attack the
man. Go down and pick up the axe. Go to the beehive and use
vacuum cleaner to collect bees to get Hoover full of bees.
Climb the vine again and use the axe to chop the vine. The vine falls
off to the ground. The axe breaks off and get handle and axe
head.
Quicksand – Go to the
right of the ledge until the sign. Turn around and see a girl in pink
behind the cliff across the way. Look at the warning sign. Enter the
small passage with the life pad. Meet the creature that wants you
to follow him. Walk where the creature hopped to by following the
angle and the distance he did and stopping at the location where he
landed. You can save the game at each stop. Go to the tree area and
pick up the ropey vine.
Crocodile – Go as close
to the crocodile by the croc landing pad and see him with his mouth
open. Use the handle of the axe on crocodile’s open mouth. Use the
vine on the crocodile. Ride the crocodile to go directly across from
where you are to the big island.
Big Island: Park the
crocodile by the croc landing pad. To the left is the Druid’s
area, across is the Tar pit, a bridge to get to the lawyer talking
to the Swampy and the talking tree and another bridge to go to the
man-eating plant.
Druid’s Compound
- Look at the tower protected by electric shocks (lightning magic),
a greenhouse with dubious maple-like leaved plants, a dock and the
house. Talk to the Druid. He gives a plant book to identify
plants with. He will give some of his homemade gin if you collect
3 plants necessary for the preparation of the gin – Purple Stinkwort,
Bogella and Smelly Woodruff. Talk to him again and he said that his
mouth is beginning to get numb. Enter the house and pick up the mortar
and pestle from top of the stove and the stick leaning
on the side of the stove. Go to plant garden and look at the plants,
identify Lady’s Delight, Maiden’s finger, Fairy’s whisper, Virgin’s
surprise, Blertweed and blue Deadly Fish herb – from fruit when
mashed up and administered orally will provide relief from bee sting
and produces fruit only in direct sunlight.
Tar pit
- From the Druid’s compound walk by the shore on the left side and
see the tar pit. Use the bell on sticky tar to get bell with swamp
tar. Then, place stick from druid house and use it on tar pit
to get stick with tar. In inventory, combine stick with tar
and axe head to make glued axe. Cross the bridge to the lawyer.
Lawyer
- Listen a while to Swampy talk to lawyer. The lawyer is trying to
get Swampy to sign the contract. Talk to A. Snidebottom representing
CosyGlow Homes. He frequently uses an insect repellant, made from
a juice of a flower because he is allergic to bees. Swampy threatens
the development with a big biological bomb that will fill the swamp
with stew. The lawyer wants you to talk Swampy to leave before the
construction crew arrives. He will eventually stop rambling.
Talking Tree
- Wake the tree up with the glued axe. Talk to the tree. Try chopping
the tree but can not do it because of guilt listening to the tree
beg.
Inlet to the right of the
Big Island – Ride the crocodile to the right side of the entrance
you came in. Enter the inlet. Waterfall –
Behind the waterfall is a red flower identified by the book as Bogella.
Pick it up. Ride inside the cavern. Landing
with Big Rock – Park the crocodile. Look at the bird table. Place
tar from bell and then sesame seed on the bird table. Pick up the
bird that gets trapped. Look at the dodecahedron of pure stone.
Ride the croc again to the other end of the swamp close to the tree
with broken beehive where a crying lady is.
Princess and Hamster
- There is a small tunnel that goes under the rock in the island.
Talk to the princess, the lady in pink seen from the vine ledge. She
talks about Sir Squeaksalot, the hamster inside a plastic ball that
is stuck up the tree. Use the chakara on the hamster (does not appear
on the eye box) but it falls in the water. Ooops!
Ride croc to the shore line
of the big island between the Druid compound and the croc landing
pad sign. The hamster will be thrown to the shore. Park the croc.
Pick up the hamster inside a plastic ball. Oh dear, it’s dead!
Go to the Druid Compound and use the hamster on the lightning magic/ladder
icon of the tower – Whew! That resuscitated the hamster. Go back to
the island where the princess is.
Go to the back of the rock.
Climb the lowest ledge up to the rock top by holding down the Shift
key and then the forward arrow. Look down at the hole and use the
book to identify the plant as the Purple Stinkwort, a beauty aid.
Go back to the other side of the rock. Use the hamster on the small
tunnel under the rock. He picks up the Purple Stinkwort. The
hamster will not get the plant unless you have identified it with
the book. Talk to the princess and automatically give her the hamster.
As a reward she gives you her sealskin earmuffs, which she
uses to not listen to her tutors. Go back to the big island and take
the bridge to the Man-eating plant.
Big Island:
Man-eating Plant – Cross the bridge and identify the giant plant
from the book as Audreyus Maximus, a plant that prefers birds. Simon
says we need to distract it. Walk to the reeds on the left side as
close as possible to the reeds before the plant eats you. Use the
bird on man-eater. Walk around the man-eater to get to the cave behind
it. With the reeds and the fence on your left, walk around the man-eater
towards the reed infested wall. There is a clearing before the cave.
All the steps taken by Simon is critical to get there, time is not
the factor but the direct path to the cave. Be sure that you do not
waste a step. Enter the passage and use the book to see what plant
is in the cavern. Pick up the Smelly Woodruff. Exit through
the other opening.
| Where the 3 plants are (recap): |
| Bogella – behind the waterfall in the inlet to the right of the swamp. |
| Purple Stinkwort – in the tunnel under the rock where the princess is. |
| Smelly Woodruff – in a cave behind the man-eating plant. |
Talking Tree
- Use the ear muff and automatically chop the tree. Walk on tree to
get to Swampy.
Swampy
- Swampy is holding the detonator for the Swamp bomb behind him. Swampy
does not believe you are his friend. He wants you to be an honorary
Swampling and to do so first, you must drink a whole bowl of swamp
stew. Second, sing the Swampy song everyday. Try as you might you
can not drink the swamp stew. Remember what the Druid said about his
mouth getting numb. Go to the Druid. Druid
- Give the druid the 3 plants and he will let you take a swig off
from his liquor jug. Now you are drunk. Sprint (Caps lock) to Swampy.
If you revive before drinking the stew, go back to the druid to have
another swig of the potent gin. Swampy: – While
drunk, drink the stew and falls unconscious. Upon awakening, Swampy
tells you the Swampling song. Swampy wants you to get the lawyer
to sign a contract that states that the ‘undersigning personidge’
must ‘be leavings the Swamps alonses’.
Landing with Big Rock
- Ride the croc to the Landing with the Big rock and the bird table.
Talk to the dodecahedron of pure stone and end up singing the Swampling
song – Swampling stew, swampling stew, to your bog your swamp be true.
Swampy be true. Swampling stew. The big rock moves and you can enter
Swampy’s hideout. Get the oven gloves and turkey baster
from the table with the plans for the Swamp bomb.
Druids Compound:
Tower – Use the oven gloves on the ladder of the tower and
climb up to the top and see a reflector that reflects light to the
ground. Move the reflector using the directional arrows and the druid
will get upset. Focus the light on the blue patch of plant at the
plant garden area. Go down. Garden – Pick
up the Deadly Fish herb fruit that provide relief from bee
sting. Use the mortar and pestle on the deadly fish fruit to get pestle
and mortar containing mulched plant leaves.
How to get the lawyer
to sign the contract – Talk to the lawyer about the contract
and get nowhere. Go to the broken beehive across the swamp and use
turkey baster to get honey. Go back to the lawyer and use
honey in the turkey baster on him. He is now splattered with
honey. Use the Hoover (vacuum cleaner) with bees on lawyer.
He gets bitten by bees and falls dying. He will do anything for
you to help him and will sign the contract. Use turkey baster on
pestle and mortar containing mulched plant leaves to get turkey
baster filled with plant juice. Use it on lawyer. Watch as he
tries to renege on his promise and Simon’s threats. He signs the
contract.
Swampy – Show Swampy
the signed contract. He is very happy and will go with you. Melissa
Leg arrives and knocks Swampy cold. She then kisses you and changes
to Runt. He lifts you up magically and disappears with Swampy. Simon
drops on the detonator and the bomb explodes.
Chapter 4 – To Get the
Seedy
Calypso updates his journal.
He talks about the prophecy of Nostramadus that should be happening
now and misinterpretations of the prophecy. Simon drops from above,
landing on the table. Calypso knows about Runt aka Melissa. He explains
about the prophecy and that Sordid is trying to open the doorway to
the nexus. The nexus is the control center for the Universe. What
Sordid needs the Swampling for, Calypso does not know. Sordid needs
the magical boots to control the nexus. Calypso shows Simon what the
magical boots look like and Simon recognizes it as a CD. Calypso wants
Simon to get the “Seedy” from the Dragon’s horde. The dragon is Sordinell,
the same one that the dwarf prince talked about. Calypso wants Simon
to enlist the help of the dwarves and to go to the forest.
Dog and Fruit Inn:
Bar – Talk to barman about the ninja ghost he heard just a
few minutes ago upstairs in the corridor. At the end of the bar, pick
up the empty pint glass.
Games Room – Look at the pool table. Something jammed in the coin
slot. Use the tong on the pool table and get a gold coin. Use
the pool table again and use 1 groat but find it blocked. Look again
and find a rat in there that bit you. Use cat found in the overturned
dumpster – garbage on pool table. The cat would not come out after
the fight.
Beer
Garden – Talk to Wig Trader and she wants a wig or wig equivalent
to trade for what she is wearing. Find about God, Harry Wigsner and
the wigologists. Notice the picnic table and that the glass roof to
Calypso’s Private room is gone after you dropped through it.
Bar
– Ask the barman about the pool table and he says that the white ball
and cue are stolen. There are only 2 balls in there anyhow and won’t
be fixed until the repairman comes.
Around the Town:
All other places are closed except the Inn and the Church.
Bell Tower – Pull (Ctrl) bell rope and use (Ctrl-hold again) the
rope to keep climbing up. Look out the window and see Goldilocks.
Go through window and talk to Goldilocks. She is stealing lead off
the roof. She wants you to take it out of here and to stash the loot
before anybody notices – 2 tons of lead. Then meet in the pub later.
Time to go to the forest.
Forest
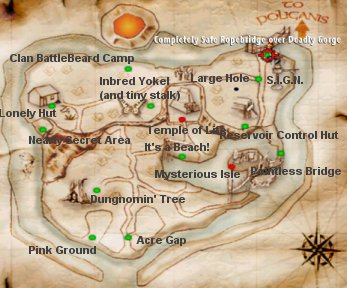
You can ride the rainbird to
move from town to forest and back. Landing sites in Poliganis are
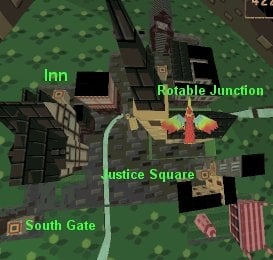
The Inn, Rotable Junction, South Gate and Justice Square. Landing
sites in the forest are Rope bridge, Lonely Hut, Temple and Dungnomin’
Tree.
Nearly secret area –
The cave in Nearly secret area is blocked and the dwarf is not there.
Dungnomin’ Tree – There are a lot of missing person poster
around. Best to keep away from the gnome village.
Sleeping foliage – Now
that you have the plant book, identify the sleeping foliage to be
Dopius Calandra, plant that induces deep sleep for several hours.
Pick some Dopius Calandra.
Reservoir Control Hut and
Fallen Tree – The hut is still locked. Go down the hill to the
tree where ninja died. There is a valuable item wedged tight under
the tree. The woodworms that are in the tree want weapons for their
insurrection before they help you get the valuable item under the
tree.
Large Hole – The treasure
hunter wants to catch a mole that he trains to find gold. They also
bring sustenance to him. The mole can be trained to find anything
by rubbing the thing he wants to find on them. Look around the area
and see a lot of mole holes. Catch a mole
by waiting for a mole to pop up and be in the eye window and use the
gold coin on hand. Train the mole to hunt for
the CD by using mole on Feeble File CD labeled ashtray in inventory
and get mole trained to sniff CD’s.
Clan BattleBeard Camp
– This is formerly the Volcano Photopoint. Watch as a dwarf climb
on catapult after drinking spirit and yelling. See him get catapulted
and eaten by Sodinell, the dragon. Talk to dwarf by the brewing area.
Clan BattleBeard is called by the Prince of Dwarves to kill the Dragon
Sodinell. The spirit that the dwarves drink before being catapulted
is BeserkerBrau, a dwarf spirit that eats through metal. When asked
about the keys to the building, the dwarf said Axegrinder just went
up and he usually has them. Ask for some spirit but the dwarf said
no. Use Dopius Calandra plant on the dwarf spirit to add extra flavoring.
A dwarf comes out of the tent, drink brew, get catapulted and eaten
by the dragon. The dragon drops to the ground after eating the dwarf
that drank the sleeping foliage plant. Ask for the brew again by using
the pint glass on brew pot – to get pint glass full of highly acidic
Dwarf Spirits.
Waterfalls – Go outside
the camp into the waterfalls area. Look at the sleeping dragon. Use
the metal detector on dragon and hears metal in stomach.
Dragon Lair – Fly a
rainbird and land inside volcano. Notice the coins dropping from a
spout on the side of the volcano. Use the trained mole on the treasure.
The mole pulls out a locked chest. The chest has a padlock with no
keyhole on it. Use the dwarf spirit on the padlock to get Thick
glass case with CD inside. Look at gong and use hammer on gong.
It broke! Use bell on gong stand. Use hammer on bell and the sound
breaks the glass case. Pick up CD. Ride the rainbird to go
to Calypso at the Inn.
Poliganis
Dog and Fruit Inn:
Private Room – Talk to Calypso. Simon, King of Fools must defeat
Sordid with the help of the Lady of Steel, the real Melissa Leg; Hero
of Light, Coneman the Barabrain; Jar Nin, the King of East and Prince
Brave, Prince Valiant. To get their help Calypso said to give them
Invitation to help save the world at Sordid’s Fortress, RSVP
and they will come.
Ask about the King of East.
The ninja, Jar Nin must have his body and soul rejoined at the Temple.
To collect his soul in the bottle, the bottle must have something
of value to him. If successful, the bottle will glow green. Simon
explains about his stealing the bell, so Calypso has to bring Jar
Nin to the temple himself. Jar Nin’s nose was burned in a smoking
competition. As for Prince Brave, his transformation is a standard
witch curse situation and can be reversed by being kissed by a princess.
Princess Austin is now of age and a tournament for her betrothal and
to find a suitor is arranged. Grandulf, the wizard is doing the opening
fireworks display. He would want something in return for his aid to
gain access to the princess.
View this guide raw, exactly as the archive holds it