Just Adventure original
Secret Files: Tunguska Walkthrough by Peter Olafson
Max arrives in the castle’s
inner courtyard to find Morangie trapped in the central well — “locked
in” by nameless visitors. Ropes and ladders aren’t the
answer You’ll need to extract the lord of the manor by opening
a hatch down on his level and Morangie has no idea how to bring that
off. Getting him out is one big puzzle that involves everything in
the castle and a few items on the mainland as well.
Three passages lead away
from the well: the right one to a crypt, the upper right one to a
study with an upper level and the upper exit to a hallway that leads
in turn to bedroom and a torture chamber.
The bedroom should excite
your interest. Beyond the curtain on the room’s right side is
a secret passage leading down to four closed portcullises (only two
initially visible) and a raised bridge.
The mechanism for raising
the portcullises, lowering the bridge and unlocking the door at the
passage’s end is back in the bedroom. On the left side of the
room is a statue. Examine it and the diary grows a new hint: In its
current state, the statue is not “worthy of a true Irish lord.”
How should it look? If
you’ve already poked around the castle, you may have found a
lordly model. Return to the well, use the exit at the upper right
and, in the study, check out the portrait of William Morangie above
the desk. You’ll see he has a sword, shield, helmet, greaves
(leg armor) and an amulet.
Also, hard to detect, a
ring on his sword hand.
The statue in the bedroom
has none of these things.
Perhaps you should play
dress-up? Equipping the statue with these six items opens a path into
the bowels of the castle, via the secret passage, and unlocks the
round door to the trapped lord at its end. These items can be acquired
in just about any order — exception: the amulet can be collected
only after Max has placed three items on the statue — and each presents
a somewhat different challenge.
Sword:
The only challenge here is having your damn eyes open! It’s
stuck in the stone to the left of the well. Just pull it out.
Shield:
Not everything has to be exactly as pictured in the portrait. In fact,
the shield, helmet, greaves and ring are all doppelgangers. Only the
sword and the amulet are real. And the shield is just the moldy shutter
in the upper left corner of the courtyard.
Greaves:
This one is difficult to find: You’ve got to trek back the pub
exterior after reaching the island — moving off the lower edge of
the courtyard screen — and notice the one item that’s different
from your pre-boat trip visits. (Other differences: Everyone’s
gone — Foley the fisherman and his pail of fish , the bartender and
Klaus — and the fire’s gone out!)
A rain gutter to the left
of the pub door has fallen down. Right-click on it in inventory to
establish it consists of two stuck-together pieces. You just have
to find a way to pull them apart — and what’s a torture chamber
with a rack for if not for pulling apart stuck-together bits of rain
gutter? Use the gutter on the rack and it’s done. (Do remember
to pick up the pieces.)
Helmet:
Not hard to find. It’s right on the well screen. Right-click
on the chimney cover in the upper-right corner just below the parapet.
“It almost looks as though the chimney has a helmet on,”
Max opines.
To remove it, you’ll
have to assemble a mechanism.
The chimney’s above
the fireplace in the study. Climbing the inside and popping its top
is not an option, but an attentive player can’t help but notice
the interesting juxtaposition of objects down in the study proper.
The lever on the left wall on the upper level raises and lowers the
chandelier. And the hassock in the room below and the chandelier are
so aligned with the fireplace that a chandelier descending onto one
end of a seesaw might send an object on the other rocketing up the
chimney.
No seesaws or rockets of
any description can be found at Castle Morangie. But, as with the
greaves, you’re not limited to the castle.
However, for this visit
to the mainland, you’ll need some tools … and not all the
tools immediately look like tools. From the torture chamber, take
the tongs (here called “pliers”) from the table at the
left. And take the spearheads from the display case on the upper floor
of the study.
You’ll have to retreat
to the pub’s cellar to find a suitable plank. At the far right,
you’ll find a long board supporting the rack of whiskey barrels.
Use the pliers to liberate it.
This fits just fine into
Max’s inventory, but he’ll immediately run into trouble
if he tries to leave the cellar. The long plank is too long. Evidently
it never occurs to Max to carry it through the door short-way first.
You’ll leave it beside the door when you leave the cellar and
will have to cut it down to size to take it with you. (A second potential
problem: If for some reason you’ve already grasped the coin
with the pliers — see the “Ring” section below — you’ll
leave to first complete construction of the gold ring.)
That’s what the spearheads
are about. Use them on the vice below the whiskey bottles to create
a makeshift saw edge and then the plank on the vice and it’ll
be whittled down to a manageable length. This’ll fit nicely
over the hassock in the castle parlor.
But don’t return
to the castle just yet. What object gets the honor of knocking loose
the makeshift helmet? Halfway between the cellar door and the stairs
up to the pub, you’ll find a large flat stone. Take it. (In
fact, you can grab this at any point.)
In the castle study, use
the plank on the hassock and the stone on the seesaw. Upstairs, throw
the lever on the left wall and you’ll be treated to quick in-game
scenes of the chandelier smashing down on the seesaw and the helmet-like
chimney cover landing just to the right of the well.
Amulet:
This one requires patience — it can’t be claimed until you
recover the small key from the niche in the secret passage — and
a bit of research. There’s a clue to the item’s location
and the means of retrieval and you’ll have to find it in order
to take the amulet. (Otherwise, Max will balk at grave robbing.)
Inspect the books above
the spearheads display case in the upper level of the study to learn
that the castle is haunted. A William Morangie of the 13th and early
14th centuries was interred in defiance of custom — he was denied
the traditional funeral pyre — and buried in a simple robe with his
family amulet. Now he’s said to walk the castle after midnight
in search of intruders.
So the amulet’s in
Morangie’s sarcophagus in the castle’s crypt. And there
seems no way into it. If you explore the crypt — down the passage
to the right of the central well — you’ll find the heavy stone
lid won’t budge
What did the book say?
Morangie was denied a funeral pyre. It’s too late for a proper
pyre, but you can still give Morangie a fiery send-off.
On the upper level of the
study, just to the left of the top of the stairs, is an oil lamp.
Take it and, down in the crypt, pour the oil into the groove that
runs around the top of the sarcophagus. (If you can’t do this,
you haven’t checked out the haunted-castles book.) Use the torch
on the groove. After the fire burns itself out, something seems to
escape from a newly-revealed hole at its left end: Morangie’s
spirit evidently, for Max suddenly feels cold.
The hole isn’t declared
as a keyhole, but a key is what’s required. You can’t
find it until you’ve placed three of the six items on the statue.
(Sword, shield and greaves are the easiest three.)
Once you’ve done
so, enter the secret passage behind the curtain on the right side
of the bedroom. You’ll now find that the first two portcullises
have been raised and that the central bridge has been lowered. This
allows you access to the niche in the wall above the bridge.
Within, a small key. Insert
the key from the secret-passage niche in this new hole and the lid
rolls back to reveal William Morangie’s remains and the amulet.
Take it.
Ring:
Potentially, this could give you even more trouble than the amulet.
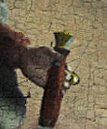
It’s difficult to identify the presence of the ring in the study
painting. Only the most careful observer will note the golden bump
protruding above Morangie’s sword hand.
You’ll have to play
blacksmith and fashion the ring using the gold coin found in the nightstand
(“commode”) to the left of the bed.
That means relighting the
forge and that’s slightly tricky. The only fire in the castle
is the lit torch in the crypt and that torch isn’t going anywhere.
You’ll have to import fire from crypt to forge using the unlit
torch from the pillar in the pub’s cellar.
Once the forge is lit,
use the pliers on the coin and pliers + coin on the forge. It’ll
turn red hot and Max automatically removes the combo before the coin
starts to melt.
The thing is, it’s
still just a coin — not a ring. Use it on the Iron Maiden to the
left of the entrance to punch a hole in the middle and dip it into
the tumbler to preserve the ring’s shape. (If you neglected
to refill the tumbler after the salt episode, you can simply dip the
ring into the sea back on the mainland. The water in the secret passage
— or whatever that is down there — is out of reach.)
Your problems aren’t
quite over. Five items can simply be dropped on the statue. Not the
amulet. Max says there’s no way to make it stay in place.
Perhaps a chain? There’s
one hanging just to the left of the door in the torture chamber.
Yeah, that’s half
the story. But amulet and chain do not play friendly. You’ll
need a middleman to connect them — that bit of wire hanging off the
right of the two candle holders in the hall leading to the bedroom
and torture chamber. Use the amulet on the wire and then the amulet
+ wire on the chain. Now you can hang the amulet on the statue.
With all six items in
place, Max can open the round door at the bottom of the secret passage
and free Morangie. And here’s where the connection between the
Cuba and Ireland segments kicks in.
If you’ve haven’t
finished the Cuba segment, the Ireland segment ends here — it’ll
pick up again later — and control switches to Nina.
If you have completed the
Cuba segment — Nina obtaining a diagram from Manuel Perez — Max
and Ken Morangie move to the upper level of Morangie’s study
and Morangie discloses that he has seen the symbol before: It was
engraved on the metal fragment Vladimir and Perez studied. (That’s
why Vladimir believed it had been “worked.”) Vladimir
at first wasn’t sure the symbol was a symbol because the fragment
was so badly damaged.
But he was persuaded by
a report in the archives of Moscow’s Academy of Science: In
1947, an English scientist named Evans had discovered disc-shaped
objects with the same properties and symbols as the Tunguska fragment.
When Vladimir failed to
uncover the location of these finds in the archives, he contacted
Morangie to bid on the late Evans’ records. Morangie succeeded
and sent Vladimir an encoded copy of Evans’s journals. (This
was the handoff mentioned in the invisible-ink letter.) You’ll
see these in the next segment.
Next thing you know, Max
is on the phone to Nina asking if her father visited the Himalayas
— this is where Evans found the disks — and offering that what Vladimir
found there might explain his disappearance. He’s sending the
records he’s received from Morangie to Nina’s cell and
they’re to meet back in Berlin.
Odds & ends:
On the starting screen, Max can also examine his rented motorcycle
and the menu board to the left of the pub door. Down at the dock,
the bottles to the right of the fisherman. In the pub cellar, the
whiskey barrels to the far right. In the hallway leading to the castle
bedroom and torture chamber, the candle holder on the left. In the
castle bedroom, the left window, the pictures in the upper left and
upper right corners and the bed. (Max says he could get any woman
with a bed like this. Yeah, that’s what women are looking for
in men these days: four-poster beds.) In the torture chamber, the
cage to the right. In the study, the chair and the clock. (So why
is the chair out in the middle of the room?) In the secret passage,
the raised bridge. In the close-up view of the door at end of the
secret passage, the rubble to the left.
– Max can try to use the
sea (sans tumbler), the pub fireplace (sans fish dinner) and the rack
(sans rain gutters), use the sign on the fireplace (sans fish), use
the uncooked fish on the bartender, sleeping patron Klaus and the
fireplace (sans sign), use Klaus’s empty tumbler on the fireplace,
use the salt on the bartender’s tumbler when the bartender is
present, use the shutter/shield, oil lamp and coin (sans pliers) on
the lit forge, and use the sword on the sarcophagus.

– Did you notice the little sign to the left of the pub door? It’s
non-interactive and the printing is too small to read with definitive
accuracy. But it appears to read, “Hunger keep out.”
– Given that Morangie can’t
tell Max how to reach the hatch into the well-bottom, he must have
meant that he was pushed down the well rather than “locked in”
as claimed. (That’s also consistent with Morangie having sprained
his ankle.) But the freed Morangie doesn’t say one more word
about how he came to be imprisoned. And why is he dressed like Sgt.
Pepper?
Berlin
Cut scene. Max arrives
at Vladimir’s place first. Nina’s not here. He does get
a voicemail message , but it’s from Kanski, all of people. The
detective thinks he’s being followed, says he’ll try to
lose his pursuers and meet Max at the museum, and closes by stating
his belief that Max is in danger.
What follows will probably
prove confusing.
A final shot of the dark
tower. “We’ve managed to track them down,” says
the caller. (This caller sounds a lot like Oleg!) “We know where
the hideout is!”
Who’s this “them”
— and what hideout? The Black Robes? If so, this is the first indication
anyone’s been trying to track them down or that they have a
“hideout.”
When you realize it’s
Oleg talking, you’ll realize “hideout” is just the
wrong word. The caller evidently means the hiding place for one of
the metal discs Evans discovered and, actually, his report of success
is premature. (Nina won’t find a hidden room in the Himalayas
until the next segment.)
In any case, the well-dressed
man orders the caller to go to this location immediately and to “take
care” of Max and Nina. And he indicates he’ll tell Dr.
Charlesroi to prepare for the final phase of her experiment. (This
link to Charlesroi pretty much identifies the well-dressed man as
tycoon Massimo Gartuso. Who else could it be?)
Meanwhile, Max arrives
at the museum to find Kanski dead and wearing an amulet like the one
worn by the Black Robe captured on film at the beginning of the game.
(So what exactly is Kanski’s deal? We’ll get better context
for that in the game’s final segment, so I’ll save it
for the final “Odds & ends” section.)
Max is suddenly worried
he’s in over his head and leaves the museum. A dark car stops
to collect him — the same one that followed Nina back at the beginning
of the game — and Max gets in without objection.
This sets up the scene
at Vladimir’s place. Oleg scapegoats Max, tries to persuade
Nina he’s “playing some kind of evil game” and,
playing the “save your father” card, pushes her to leave
for the Himalayas. And they do.
The Himalayas
Nina can’t do anything
with the three holes in the wall at her starting position just yet,
so send her down the tunnel to the left to a large room with a waterfall.
At the bottom of the falls,
you’ll see a body and a pack. Nina can’t get down there,
but the pack will float up to her level if she can close off the flow
of water using the large rock on the upper edge of the precipice.
Return to the starting
point and take the yak’s skull from the post beside the path.
With the skull comes the wooden peg on which it rested and that turns
out to be an ideal pry bar. Use the peg on the rock. It falls down,
more or less closing off the opening below the falls and the pack
obligingly surfaces at the edge of the newly formed pool.
Right-click on the pack
in inventory to extract a bone that looks as though it might have
been a key in a previous life. This can be inserted in the lowest
of the three holes in the upper wall back at the starting location
and this in turn opens up an entrance in the upper wall of the waterfall
room.
Enter to find a giant face
like the one on the Black Robe amulet sculpted in the upper wall,
cave paintings that show the fall of a “huge unshapely object”
in a Tunguska-like setting and human figures fleeing from same, symbols
similar to the one Perez drew for Nina in Cuba and, beneath the head,
a puzzle.
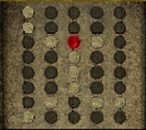
Right-click on the puzzle
to start. You’re supposed to move 11 pieces about on this 5
x 8 grid to recreate a picture — but what picture? Perez’s?
No. The picture is concealed
in your inventory. Which new item have you had no occasion to put
to use so far? Evans’s journal. Open it up with a right-click.
The five pages of text are an account of his 1947-49 expedition, his
search for a mysterious Dzopa tribe and, eventually, his rescue by
Tibetan monks. The sixth page is blank and you may not even notice
you can turn the page again to a diagram.
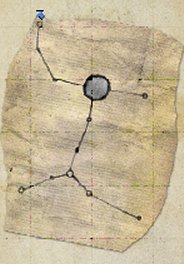
The large circle here corresponds
to the immovable red stone in the puzzle. You just have to adjust
the light-colored stones to (almost) the positions seen below. (The
piece at the extreme lower right still needs to be dropped down one
space. I brake for screenshots.)
Once the puzzle is
complete, the usual secret compartment opens above. It contains one
of the stone discs Evans found. Take it. Oleg appears, congratulates
and then punches out Nina — hey, what did I tell you about Oleg way
back when? — loads her aboard his plane and brings her to Sergej.
Your erstwhile allies are your enemies.
Odds & ends:
At the starting location, Nina can also examine Oleg and try to use
the exit. In the waterfall room, she can examine the falls and the
relief carved in the upper wall. In the puzzle room, the chasm to
the right.
Somewhere Out
in the Cold
The scene is an icy restroom.
Oleg and Sergej are under instructions to kill the still-unconscious
Nina — evidently, Oleg has a punch like Popeye — and they mean to
drown her in this tub.
But they can’t turn
the water on. A piece has been removed from the pump system.
“Sabotage?”
asks Oleg.
Apparently. We’ll
find the saboteur in a bit. In any case, good news for Nina, who comes
to in their absence and steps out of the tub.
Listen to her, difficult
though that may be. She doesn’t know where she is. And she’s
freezing her ass off. Let’s make it our first order of business
to get her some cold-weather clothing. This widens her horizons. She
can then leave the station, sort out her whereabouts and explore two
(eventually, three) outdoor screens.
That’ll take some
work. Nina is effectively locked in. Leave the tub room, take the
key beside the door at the left end of this workshop and try it. You’ll
discover the lock is iced-over. (A little puzzling, since Oleg and
Sergej must have just used this same door.)
Mercifully, you do have
a way of generating heat: the electric drill at the right side of
the room. Take the metal sheet to the right of the vice, use it on
the drill and then activate the drill. Sparks. Can we get those sparks
onto the lock?
Sure. The most combustible
substance you’ll find in these two rooms is the toilet paper
to the right of the tub-room door. Use the metal sheet on the drill,
the TP on the metal sheet and activate the drill. Fire!
Nina’s as sensitive
about holding metal objects in a flame as she was about holding resin
in steam back in Tunguska and requires some kind of key-holder. Right-click
on the alleged “armoire” above the workbench and liberate
a tube of silicone, a thread-cutter (here called a “tapper”)
and a “piece of something” that recalls the slingshot
found at the train station in Moscow. (The first two come into play
in the second of the station’s three segments.)
The “piece of something”
will not interact with the key in this condition, but a little squeeze
in the vice (or vise) turns something into something else. Use the
key on this key-holder, then the combo on the fire and then the orange-hot
key on the iced-over lock. (Before you scoot, note the camera above
the tub in the tub room and egg in the incubator at the left side
of the workshop. You’ll deal with these later.)
On the other side of the
door, you’ll find yourself on a curved platform with an inaccessible
door across a gap (note the keypad) and exits and inaccessible elevators
at either end. (The lefthand lift won’t come into play until
after Max’s arrival.)
Focus on the freight on
the right-hand elevator below. You can’t raise the elevator
to your level and if you drop down the stairs at the right to the
exit level, you’ll find the contents out of reach from below
as well.
However, on the lower level,
you’ll also get a better sense of the contents. Just below the
broken elevator switch, you’ll see a pile of salt — currently
un-take-ably small.
And said dropping-down
gives you the means to extract a couple of items. Against the wall
between the elevator and the station exit is a fishing rod. Take it,
climb back up to the curved platform and use the rod on the elevator
platform. Winter clothing! Nina instantly put this on.
Do it again? Yeah, the
game lets you! This time you come up with a “laundry ball”
— a bundle of terrycloth bedding. (This’ll eventually help
you collect the salt.)
Completion of one objective
leads quickly to completion of another: Dressed for success, Nina
can go outside and quickly identify her location (albeit in a speculative
tone) as Antarctica. She can also explore left and right, but to no
real purpose at this time.
To restore a sense of purpose,
climb back to the curved platform and use the left exit. You’ll
find yourself in a control room and privy to a cut-scene with Oleg,
Sergej and our first glimpses of Dr. Charlesroi and a strange rotating
machine.
Sergej reveals the saboteur
has been found and met with an unfortunate accident. He asks after
the water situation and before Oleg can answer Charlesroi shuts him
down. Gartuso is expected and she wants to have everything ready to
go. (A fair question: What’s the rush? Gartuso’s been
in a big hurry all along, but it’s not like the experiment relies
on some planetary conjunction!)
Nina then gives you a new
agenda: “mess up their plans, but big.”
Of course, that’s
a rather broad mission statement, so let’s extract specifics
from the exchange we’ve just witnessed. What did Sergej mean
about the saboteur’s accident? And can you fix the water system
yourself? (Oleg hasn’t found the missing piece.)
You’ve now seen all
that’s currently available to see of the facility’s interior,
so it’s time to venture out onto the tundra. To the left of
the entrance, you’ll find a penguin sitting resolutely on what
must be an egg and a deep crevasse. A right-click on the pit establishes
there’s a body down there.
Sergej’s saboteur?
Must be. He seems to have been abandoned down there to die.
Nina has no way down to
check the body, but she can take the warning sign at the edge of the
precipice. This seems a rather strange response until you realize
the sign leaves behind an inconspicuous hole and thus raises the issue
of what might go in that hole and what effect it might achieve.
What about a modest explosive
charge? Something similar to a grenade can be found in the locker
just to the left of the interior side of the control-room door. Drop
this down the sign hole. The avalanche this sets off creates a slope
that becomes Nina’s path down to the dead man. A right-click
on the body liberates three items: an amulet like the one found on
Kanski, a cigarette lighter (sans fuel) and some pages extracted from
Charlesroi’s journal.
The extract ends where
the game begins, but it does provides a useful thread for events as
seen from The Other Side. The first page reveals what’s going
here. More than 50 years earlier, another researcher — is this the
British scientist Evans? — laid out his theory:
“Take the waves
of our radio transmitters. They are on the streets, in our homes,
they are everywhere. But we don’t see or feel them. Once we
turn on a radio and set it to the right frequency, we suddenly hear
that there are news reports or music. It will be possible to send
thoughts into the human brain the same way. We just have to find the
right frequency.”
Mind control.
On page 2 is the first
reference to an “energy emitter” — that must be the big
machine Nina saw from the control room — and page 3 refers to Charlesroi’s
modest successes in experiments with animals. But on the following
page, the project seems to be dead in the water: The emitter can’t
create radiation fields sustained enough to influence the subjects’
brainwaves.
And this is where the Tunguska
fragment eventually creeps in. According to information bought by
Gartuso from a former KGB agent, the fragment still in Russian hands
allows generation of stable radiation fields. Charlesroi sets out
to acquire a fragment, takes an interest in Perez (whose condition
she connects with Russian experiments on the fragment) and then in
Vladimir. Gartuso was convinced Nina’s father had one of the
artifacts.
But Gartuso’s people
didn’t kidnap Vladimir. “The old scientist has disappeared
without a trace. Someone appears to have kidnapped him right in front
of our noses.” She doesn’t know who, but speculates
it’s someone working toward the same goal. (i.e. The Russians.
That explains Nina’s visit to Siberia.)
Finally, Nina’s been
used by Gartuso all along. You’ve known this since the Himalayas
segment, but Charlesroi doesn’t offer Gartuso’s rationale
for this decision or elaborate on exactly how extensively she’s
been used. (For instance: Was Oleg telling the truth? Is Max just
another part of the conspiracy?)
While interesting, none
of this grand-scheme stuff pushes us along our path. Back to the mundane:
We still have to get the pump system up and running.
It sure would help if you
knew exactly what’s missing from the machine just inside the
base entrance, but this is nowhere hinted. But it does stand to reason
the object might be near the dead saboteur — that he deposited it
somewhere for safekeeping before he was done in. And that assumption
turns out to be on the mark: The penguin near the abyss is sitting
atop the missing part. You’ll have to distract it from its motherly
duties and offer a reasonable substitute.
What do penguins like?
Fish. You have a fishing rod — it survived its bundle-lifting duties
— but no place to use it.
However, if you head right
from the station entrance, you’ll find an ice-locked whaler
and, just to the left, what was once a hole in the ice. It’s
frozen over again but you can safely assume the ice is far less thick
here and that you could break through again with the proper item.
You don’t have the
proper item. The sign won’t beat, the lighter won’t heat
and the journal won’t burn.
But the salt you found
beside the freight elevator might work. There wasn’t enough
of it for Nina to collect, so the answer here is to find something
that will increase the flow from the broken bag … like dropping
something heavy onto the bag from the curved platform above.
I hate to sound like a
broken record, but you don’t have anything heavy, either. But
those terrycloth bedclothes you’ve been lugging around since
our first encounter with the elevator would become immensely heavy
if immersed in a liquid.
That may seem a Catch-22.
It feels as though we’re trying to get through to the very water
that might weigh them down. But there is another liquid available.
The barrel on the forward deck of the whaling vessel contains whale
oil. Dunk the bedclothes in here to make the bundle super-heavy and
then retreat to the curved platform and drop the bundle on the elevator
platform.
Smash. The remaining cable
snaps and platform crashes down onto the boards below. At the same
time, the pile of salt grows large enough to become take-able …
… if you have the right
container. Nina can’t just carry the salt in her hands. But
this is an easy one: Just outside the station entrance is a bucket
very like the one outside Vladimir’s place back in Berlin. Use
the bucket on the salt and the salt bucket on the would-be hole.
And nothing happens. Salt
melts ice slowly. Nina will have to retreat into the facility interior
— not the simply the exterior side of the entrance or the penguin/crevasse
end of the tundra — and then return for the hole to appear. Try to
use the rod on the hole …
… and, again, nothing
happens. Oy. Nina suggests bait.
C’mon now. We’ve
now seen virtually everything there is to see and that includes nothing
that looks remotely like bait. What’s actually required is a
shiny lure and the cigarette lighter from the saboteur’s body
will do the job. Rod + lighter @ ice hole = one skinny fish. Plus
you get the lighter back. (This’ll come into play again in the
station’s second segment.)
(While you’re out
here, also have a look at the frozen jacket hanging on the left side
of the whaler’s forward cabin. A right -click liberates a corked
flask. Boy, that cork’s really in there!)
Drop the fish on the penguin.
The distraction works. The penguin gets busy (in the digestive sense)
with the skinny fish. But Nina can’t keep the metallic egg —
if you try, she does take it, but returns it when the penguin gets
all squawky — and for some reason the cat-taping, doberman-frustrating,
reindeer-rug desiring Nina this time cares what a critter wants. You’re
going to have to come up with an egg substitute.
Now, you’ve seen
an actual egg. At the left end of the workshop is an incubator with
a single egg inside. It’s electronically locked and you’re
not permitted to try out a keycode here — meaning there is none.
You’ll have to break in and a casual break in — just smashing
the glass or using the red gem on the amulet to cut it — would destroy
the contents. You need to find a way to hold the glass in place —
say, the plunger to the left of the basins at the right end of the
tub room. Use the plunger and then the amulet on the incubator and
Nina automatically reaches in to take the egg. Back on the penguin
screen, simply use the real egg on the metal one and, back inside,
the metal egg on the pump. The red lights go green. The place starts
to warm up.
And why have you done this,
exactly? Conceptually, because once Nina was out of danger (i.e. out
of the tub) what was good for the goose presumably became good for
the gander … and because, as intimidated earlier, the camera above
the tub might be of more than passing interest! In any case, simple
curiosity should send you hustling back to the one spot you have good-faith
reason to believe this might have an impact: the tub room. (The tub’s
the only thing that can be turned on until Nina “thanks”
Max at the end.)
Turn the tap and the water
flows … and drains right out of the tub. The tub needs a plug.
There’s no way to
reason this out. It’s one of those odd items that turn up in
a location with no special relevance: the seriously-stuck cork in
the flask from the frozen jacket.
You’d think the vice
back in the workshop might prove helpful here. It doesn’t, but
this puts you in the ballpark: Use the flask on the electric drill
and then activate the drill. The cork appears in inventory. (Alas,
the flask is empty and never does find a use.) Use the cork on the
tub drain. Turn on the tap and the tub fills.
Again, to what purpose?
So you freeze it. Drop back downstairs, pull the egg from the pump
and by the time you get back to the tub, ice has formed over the top.
This permits Nina to step up and extract a video cassette (here called
a “strap” for some reason) from the camera.
This can be played on the
VCRs in the control room. The tape’s not particularly interesting
in and of itself. It shows a glimpse of the tub room and then a short
sequence that must have been recorded in a different camera: Charlesroi
and a “really elegantly dressed guy” (who can only be
Gartuso) out on the curved walkway. (Where, just FYI, there is no
evidence of a camera.)
But playing it kicks off
events down below. Gartuso shows up in the experiment chamber The
demonstration of Charlesroi’s mind-control device is about to
proceed. And Nina now commits to creating “a huge ka-boom”
but says she needs help. The ka-boom must wait a bit, but Nina can
now set about enlisting help.
How? If you search the
station, you’ll find nothing has changed. The elevator down
to the experiment chamber and the door across the gap are still inaccessible.
Were you paying attention
at the end of the cut-scene? Then you noticed the new diary entry.
Have a look. You probably already know more about what’s going
on than is mentioned in the text here, but the key is the close-up
shot from the video-tape exchange: It shows the keypad across the
gap from the inaccessible door and the keycode: 2513.
Pretty sneaky.
Out on the curved platform,
plug this sequence into the keypad. A bridge extends and Nina can
enter a rather low-tech control room on the far side. Look at the
the central radar to see potential help is close at hand. Nina assumes
the plane is friendly (which is kind of a leap, given that the station
isn’t) and wants to get the pilot’s attention. The beacon
and matches in the crate against the rear wall are the means.
Naturally, there is a new
problem: Use the matches on the beacon to learn the fuse is wet.
The solution is an unlikely
one: Get the fuse even wetter. Coat it in whale oil from the barrel
on the whaler’s foredeck. (Whale oil is flammable — it was
originally used in oil lamps — but you have to wonder how well its
flammability would hold up after a century or so of exposure to sub-zero
weather.)
Problem #2: You now discover
that trying to light the beacon with the matches is no longer satisfactory.
Nina says it wouldn’t make much sense to simply put the beacon
on the floor (irrespective of whether the location has a literal floor
or not.).
In other words, you’re
to send it airborne. The solution is right here: Use the beacon on
the harpoon on the bow and the game goes on automatic for an eternity:
The plane picks up the beacon, lands and disgorges Max … and a trio
of Black Robes. (Here you get your one glimpse of what’s under
the robe: They’re human — albeit in a vaguely Sith-ian way.)
Max embarks on The Big Explanation. Some of it you know. Here’s
the new portion:
– The Black Robes want
to help our heroes. They did kidnap Vladimir but for his own good
and despite the head-holding and falling to floor we witnessed in
the intro, he’s OK.
– Despite what Nina heard
from Oleg, Max wasn’t working against Nina. He was also “kidnapped”
by the Black Robes upon his return from Ireland — actually, we saw
that abduction and it appeared a bit more voluntary than a kidnapping
— and its members explained everything. (They were in the car that
followed Nina back at the beginning of the game and met Max outside
the museum.)
– In his research into
the Tunguska disaster, Vladimir learned something that mustn’t
be made public: The Black Robes believe they are the offspring of
extraterrestrials.
– The Tunguska explosion
was a spaceship. It blew up when trying to extract the Black Robe
survivors from Earth.
– Vladimir’s research
was stopped by the Russian military.
– Perez fell victim to
a military experiment involving the fragment. (This was hinted in
the extract from Charlesroi’s journal.)
– Gartuso has been buying
up shares in all the telecommunications companies and will soon control
the worldwide mobile network. Implication: He’s planning to
use mobile phones to spread the mind control signals. (See, this is
why I still don’t own a cell phone.)
– The Black Robes will
destroy Gartuso’s transmitter. Nina and Max must stop the mind-control
experiment.
Max then returns Nina’s
cell phone (found by him in the caves in Himalayas) and follows her
to the control room. Presumably Max here activates the previously-unseen
elevator at the left end of the curved platform, which leads down
to the experiment chamber. Nina leaves. The door closes before Max
can follow. You won’t control him here but he’ll automatically
help Nina when she performs certain actions.
View this guide raw, exactly as the archive holds it