Salammbo: Battle for Carthage – by Druillet
Salammbo
Battle For Carthage
by Druillet
Walkthrough by MaGtRo June, 2003
GamePlay:
This mouse driven game comes in 2 CD disk. CD1 is the game installer and CD2 is
the one used to play the game. After selecting a player’s number and starting a
new game, the introduction is viewed. The cursor stays at the center of the
screen and changes to a pointing hand (direction), grasping claw (take) and gear
for action to be done. The cursor changes to an item that is picked up.
Right click of mouse also shows the Inventory slots, Main Menu,
Character, Logbook and Map. Main Menu has the Save game, Load game, Options,
Resume game and Exit. The Options menu offers the color, resolution, subtitles,
hinting and sound controls.
The inventory bar shows the picked items in slots. The scroll
bottom of the inventory is at the right side of the slots. When an inventory is
picked and an action is available, the inventory is seen inside the action gear
cursor. The character button shows Spendius (that’s YOU!) and will be able to
change his clothes or feed him from items in inventory. The Logbook is a comic
strip that describes what has happened previously and is useful for information.
The Map shows where you are during gameplay. Right click to toggle close the
inventory bar or to place back the inventory item.
A quick save can be done by pressing F5 during gameplay. In the
Load game screen, the top slot is the quick save, automatic save done by the
program and the manual saves done by you. To manually save, select a free slot and the
click on save button. A quick load can be done by pressing F9 during gameplay.
Pressing the spacebar skips the cinematic. Press ESC to skip the credits.
When talking to a character, a set of dialogues is seen on the screen. The
dialogues can be repeated by talking to the character again. Select the logical
dialogues required to reach your goal.
Spendius is captured by the Carthaginians. The grand priestess
of Tanith is resplendently beautiful Salammbo. Spendius is mistreated and thrown
into a dungeon.
Escape
Dungeon: Look up at the ceiling and see a way
out of here. To get up there, the only available things around are the bones.
Pickup the solid bones, bones and large tibia together in
one click and very solid bones. At the center of the clear area of the
floor, drop the
very solid bones, then the solid bones and lastly bones. Click on opening on the
ceiling to get out of this place.
Guard Room: Go forward to the open room and
take the rope. Exit the room, turn to the right and go forward to the
sleeping guard. Hit him with the tibia from inventory. Take the keys from
the guard’s belt. Turn to the middle room, use key to open the door and take the
stool.
Go and open the last door on the left with the keys. Find a man
on a rack. It seems he’s beyond help. To the right is a barred window, a means
of escape. Place the stool below the window. Remove the rope that is attached to
the rack. Click the rope from inventory on the winch. The cursor now has the end
of the rope. Click the rope on the window and then turn the winch handle to pull
the bars off. Exit through the window.
Courtyard: There’s guard ahead,
turn left and go forward. Meet Salammbo, daughter of Hamilcar and Grand
Priestess of Tanith who warns you about the soldiers. Talk to Salammbo
completely. She was
brought to that place by a dream from the Goddess, obey her and she will help
you escape Carthage. She want you to go to Matho, a mercenary chief camped
outside the city. Tell him to ask her father for her hand in marriage. To prove
her love for Matho, give Matho a statuette in her image. Ask her all the
questions available and in the end accept her proposal. You will get her statuette.
Carriage and mounts are at the courtyard, escort of Hannon the treasure who will
pay the mercenaries. You can hide in the bags. Turn around and click on the pile
of bags or the animals.
Comic strip – Spendius escapes and
arrives at the
Mercenary camp. He drops and breaks the statuette.
In Search of Protection
Hannon’s Camp: In inventory is the
broken statuette. Turn to the right and see the camp. Be careful because the
guards can see you in chains and will be tortured when caught. Turn to the back
of the tent and see a water trough and a mount. On the other side of the tent is
a guard – so don’t go there. Turn left again and see a protruding rock. Go
forward pass
the protruding rock, forward until the stone road, turn right and go forward
2xs.
Matho’s tent: Talk honestly to
the mercenary guard. Tell him you’re Spendius and that you have a gift from a
woman. Give Matho the broken statuette. Matho wants you to repair the statuette.
Ask to be free of the chains. Matho tells you to look for Autharite, chief of
the Gauls that has blacksmithing tools. Turn right and take the map from
the table. The map icon will now be lit at the inventory bar. Exit Matho’s tent,
turn around, go forward left of Matho’s tent. Cross the road where stand mounts
and a guard who warns about mountain travel.
Autharite’s tent: Go forward and enter
the Gaul’s camp. Turn right and enter the tent. No one is around. Click on the
tools on top of the chest. Autharite hears the noise and comes in. Talk to him
and eventually play a game of cottabe.
Cottabe: Each player takes a turn throwing a helmet at
center of shield. Do a quick save here and can later do a quick load, if you
lose. Look down and take a helmet. Watch the swinging shield and wait while
the shield is just a split second before getting to the center and then click.
Play to win 5 out of the 6 helmets while Autharite gets 6 out of 6. This
satisfies Autharite’s ego. If you lose miserably, he sends you to the
Carthaginians; if you win, his ego gets hurt and you must let him win the next
time.
Spendius chains are removed. Talk to Autharite about protection
and learn about his plans of turning against their employers, the Carthaginians.
Leave the tent, go R, F, R and forward to the artisan’s tent.
Artisan’s tent: Talk to the artisan,
learn about mercenaries’ payment and then show him the broken statuette. He
gives you a pot of fish glue to fix the statuette. Click the pot of glue
on the broken statuette and then take the repaired statuette. Go back to
Matho’s tent across the road.
Matho’s tent: Give Matho the
repaired statuette and then talk to him. He refuses protection but allows you
free movement at the camp. Exit the tent.
Numidian Camp: Outside the tent, turn
around and go right of Matho’s tent. Go forward 3xs, turn left and talk to the
mercenary watching the wine seller’s tent. Ask for wine and he will say that
what his drinking is too strong for you. It’s the wine for war elephants made up
of pepper and other secret ingredients.
Turn right, go forward, R, F and see Narr’Havas, chief of the
Numidian cavalry. Talk to Narr’Havas and learn about his men getting restless.
He too refuses to take you and says there’s no where for you to go. He gives you
a dagger for protection anyway. Go to the left of his tent, turn left
again and forward back to the Wine seller’s tent.
Incite trouble between
Mercenaries and Carthaginians
Spendius should
get rid of the Carthaginians since no help from the mercenaries can be obtained.
They want their money. Best to steal the payroll and let the mercenaries take
care of the Carthaginians.
Wine seller’s tent at the
Numidians’ camp: See that the mercenary is now sound asleep. Take the wineskin/bottle
and see that it is empty in inventory. Let us make more of the knock out war
elephants’ wine.
Elephant’s wine – Look on the table and see 5 colored
bottles, bowl and a jug of water. We know one ingredient for it – pepper and
that we need 4 measures of them as seen in the 4 hollows of the bowl. Which one? I did this by trial and error. Click the colored bottle on the bowl
to get a measure of the powder. Right click the bottle on the table to put it
down. When all the powders are in the bowl, click the jug of water on the
bowl. If wrong, the bowl is emptied. If correct, you get a purple bubbling
concoction. Correct mixture: one click of black (pepper), one click of red
(pimento), 2 clicks of blue (incense) and the jug of water. Click the empty
wineskin/bottle on the purple concoction to get bottle of elephants’ wine.
Hannon’s camp: Go back to the Carthaginians’ camp. Turn around from the wine seller’s table, forward, right,
forward 3xs. Turn left and go back to the road. Go F 2xs, L and F 3xs. Now
you’re back were you started when you first arrived here at the camp. Place the
elephants’ wine on the trough. The mount drinks it and runs off. The soldier
runs to catch it. The next steps are timed and the path taken should be done
carefully.
Steal the payroll
–
Turn right, forward
behind the tent and forward to the left of the lit tent.Take dagger from
inventory and click the dagger on the rope that is tied to the opening of the
tent.Click dagger on shadow
of man counting money and enter tent.Turn left, take money,
turn left and exit tent.
Comic strip: Without the Carthaginian translator, Spendius
mistranslate Hannon’s explanation to the soldiers about the stolen payroll
inciting anger among the mercenaries. Spendius throws a rock at Hannon starting a riot.
Road: Autharite confronts you
about your role in the riot. Admit your part and then make an agreement with
Autharite. Give him Hannon’s treasure.
Comic strip – Autharite orders Spendius
to bury the money. Salammbo’s father, Hamilcar arrives at the council of the
Mercenary chiefs. Spendius is part of the council.
Mercenary Chiefs Council: Click on
Matho or Hamilcar to
start the dialogue. Hamilcar wants justice.
Choose dialogues:
Nothing strange for
the men to have gotten carried away. They’ve about run out of patience.Hannon’s flight
stopped the payments. When will they begin again?We shouldn’t have to
hold an inquiry.It’s not the
mercenaries’ responsibility to investigate this. The treasure was under the
guard of Carthage when it was stolen.That would be
unfortunate, but everyone should be responsible for his actions.Hamilcar departs and
the other chiefs’ resume the discussion.
Click on Matho to start the dialogue.
Choose dialogues:
You’re invincible!
Remember your victories against Rome.Destroy the city and
Salammbo will be yours. Harden your heart, for you have no other choice.Carthage takes
advantages of its allies. They will revolt as soon as they see that the city
is having difficulties.Let’s put together an
expedition to go get the Zaimph!I’ll go alone to
Carthage and bring back the Zaimph.
Comic strip:
Matho gives Spendius a message for Salammbo.
Collecting Tools Necessary to get into
Carthage:
Numidian Camp: Go to the Numidian camp. Take the path right of
Matho’s tent and
talk to Narr’Havas. He gives you a bow that can kill sentinels from afar
silently.
Gaul’s Camp: Go to Autharite at the camp left of Matho’s camp. Talk to Autharite. He gives iron bar and crampons for climbing. Exit the
tent and turn right. Go forward until the flesh eaters/Pariah village.
Pariahs’ village: Talk to the
flesh eater guard. They do not like the Carthaginians. To enter the village, say
that you have the bow to kill pigs. Agree to kill 3 pigs when the village elder
talks to you.
Pig shooting – Turn right or left to see men and pigs
running in the shadow. Be careful not to hit any of the men or you will be the
next dinner. I used the hill to the left as the backdrop of my target
practice. After getting the bow from inventory, I aimed the cursor low on the
lit part of the rock. Waited for the pig’s hide to shine and clicked. After
killing 3 pigs, the feast begins. (Cheat is F8).
Talk to the village elder. Find out about the waterworks, the
installation behind the city. He gives direction for a place where the crampons
can be used. The guards can be distracted by the flesh eater’s feast. Turn
around, forward once, turn left, forward 2xs and see the giant ivy climbing the
wall of the waterworks. Use the crampons on the woody trunk of the ivy.
Cinematic.
Getting Inside the
Temple of Tanith
Atop the waterworks: See the guards
with their backs turned. Take the bow and shoot the closest one. Go forward to
where the guard dropped his shield. Click on the shield to turn it around and
then take the leather strap. Turn around and look at the manhole cover.
Use the iron bar to pry open the manhole cover. Enter the manhole.
Inside the waterworks: Turn to left,
forward and look at the rusted part at bottom left of the grill. Place the
leather strap on the rusted grill. Place the iron bar on strap and then click/pry the rusty grill off.
Go forward until the lit stairs.
Comic strip – Spendius enters the city.
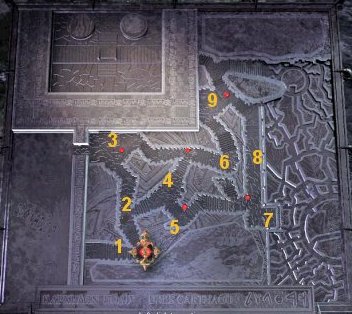
1. Start
2. Senator Bostar’s residence and slaves
3. Pig/cloth
4.
Shopkeeper and genie
5. Ladder
6. Slave of Treasurer Hannon
7. Starlight Tavern
8. King of the Birds
9. Rotunda to the gates of the Sacred Precinct and Senate
red
circle – map stand
Carthage streets:
Start (1) – Look close at the
metal map of the city on a stand. There’s several of these map stand all over
the streets of Carthage. The Temple of Tanith is the round one on the
right and the Temple of Moloch is the one of the left. The ‘you are here’ is the
ornate red marker.
Senator Bostar’s residence and slaves
(2) – Go forward once and meet some slaves. Talk to the slave. Find
out that Senator Bostar is going to the Temple of Moloch. Turn right and go
forward 3xs.
Pig/cloth (3) – Take the cloth by the pig eating by the gates. Turn right and check the map
stand to see where you are in the city. Climb the stairs 3xs and check the map
stand on the left. Turn around and go forward to the street across the map
stand.
Shopkeeper (4) – Talk to the shopkeeper. Find out about his offering to the domestic genie on top of his
house and his sleeping wife. He mentions the Starlight Tavern to quench your thirst.
Turn around and go to the steps across the shopkeeper.
Ladder (5). Pick up the ladder.
Turn around and go back to the shopkeeper’s home/shop
Genie (4) – He’s gone. Click on the
animal skull door knocker. Ooops, you woke the shopkeeper’s wife and got some
goodies thrown at you. Pick up the cage. Place the ladder on ground to
the right of the door. Climb the ladder to the domestic genie. Pick up the
blue incense bottle, the red pimento bottle, the bag of grain
and the black pepper bottle. Go down and then go back to the map marker
street right of the shopkeeper’s house. Turn right and climb the steps.
Slave of Treasurer Hannon (6) – You
get
stopped by a slave looking for his master, Senator Hannon (remember him, the
treasurer). Talk to the slave. He needs to tell Hannon of the Senate meeting.
Rotunda to the gates of the Sacred Precinct and Senate (9)
– Continue up the steps and find yourself by 2
gates guarded by stern sentries. Talk to the guards at both entryways and find
out that the lit stairs is the entry to the Sacred Precinct (where you really
want to go to), where the Temple of Tanith and Temple of Moloch are situated. The
other sealed guarded gate is the Senate. One of the guards wants meat. Take the
left path from the rotunda.
Starlight Tavern (7) – Go forward by the water until the Starlight
Tavern. Talk to Night Breeze, priestess of Tanith and seller of her charms
by the bar. She’s meeting Senator Hannon and that the Zaimph drapes the Goddess.
Look around the cubicles surrounding the bar. The leftmost cubicle is open for
inspection. Hmmm.
King of the Birds (8) – Go back to the path by the water and see birds on the ground.
Talk to the mystical man, King of the Birds. He knows you and approves of what
you are to do. He will give you the secret on how to charm the guard in front of
the Zaimph if you prove that you are friends with the birds. Give him the bag of
grain and then the cage thrown by the shopkeeper’s wife. He gives you the
Princess bird in the cage to help get to the Zaimph.
He recites riddles to help you find
and get the Zaimph:
As each pair of demons howls in unison, the door of terror will
open up for you.
Pass in front of the treasures, follow darkened corridors and
find the path leading to the gardens.
In the sacred groves, a female bird sings and the bicephalous
bird, a male is caught in the trap.
Near the slumbering monster grow three sleep inducing flowers to
be picked, ground and then thrown in the fire.
Put she who watches to sleep, charm the guardian and close your
hand over the sacred veil.
Starlight Tavern (7) – Go back to the Tavern, behind the King of the birds. Talk to the
shopkeeper and the bartender at the bar. Find about the latest news, opposing
views about Hamilcar and Hannon and that Hannon is in the last cubicle behind
the bar. Find out about the defense of the city and food and water support from
a siege.
Go behind the shopkeeper and see entwined lovers. Play cottabe
if you want (you don’t need to) with the helmet at the foot of the stand beside them.
Turn left and talk to the
drinking guard by the last cubicle where Hannon is. Turn around and see sausages
with bells as alarm system against thieves.
With the bartender turned away from the sausages, use the cloth
on the bells and then take the sausages. Who was that that wanted meat
and will pay some money for them?
Get Money (9) – Go back to the sentry by the senate door. Click/sell the
sausages to the sentries and get a purse of money.
Senator Hannon( 7) – Go back to the
tavern and buy some wine from the bartender using the purse. On the bowl
in front of the bartender mix up a batch of elephants’ wine. Add one red pimento,
one black pepper and 2 of the blue incense. Then add the wine from the
bottle/wineskin you just bought. Click the wineskin on the bubbly purple
concoction to get bottle of elephants’ wine.
Now, take care of the guard by the
Hannon’s cubicle. Ask the guard to share a drink and then click the wineskin on
his cup. Now that his zonked, let’s work on the Hannon. Pour the very potent
elephant’s wine on the cup by the cubicle of Hannon. Enter the cubicle. UGH!
Take the Senatorial Insignia from the post by the balcony rail. Hear the
bartender say ‘closing time’
Wear the senatorial insignia by opening the inventory bar, click
on ‘your character’ and click the senatorial insignia on Spendius. Exit and see that the Tavern is empty except for the sleeping
guard.
Rotunda to the gates of the Sacred Precinct and Senate (9)
– Now go to the lit Secret Precinct stairs. The guards
thinking that you are Hannon lets you pass. I wonder how they mistook skinny Spendius for humongous Hannon.
Sacred Precinct:
Go forward until the middle of the passage, turn right and climb
the steps. Now remember you are a Senator – be haughty appropriate to your
station. Scold the guard about being advised too late. Go around the idol, down
the steps and go pass the dragon. Turn right to the door guarded by the dragon
and enter.
Comic strip – Spendius listens to Hamilcar relate about his
meeting with the mercenaries. The Senate votes for war against Hamilcar’s
advisements. Spendius stays behind after the senators leave and enters a hidden
corridor. His retreat is closed behind him.
Search for the Zaimph
Door to Treasury: Go forward to the door with rosettes.
Remember the words of the King of Birds.
As each pair of demons howls in unison, the door of terror
will open up for you. Each rosette turns and makes a sound. It is a sound
memory puzzle. Turn the pair of rosettes of similar sounds. When done correctly the door
slides open. Enter.
Treasury:
Pass in front of the treasures, follow darkened corridors and
find the path leading to the gardens. Take the keys and tinderbox beside the
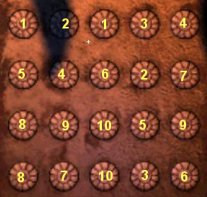
skewered priestess of Tanith. Look at the central post and note the 9 circles,
two of which has inscriptions. Wonder what they mean? Go around through the left
side and pick up the hammer from the ledge of the central post. Note the
hoop above the ledge – it is an oil lamp. Go around to the other side of the
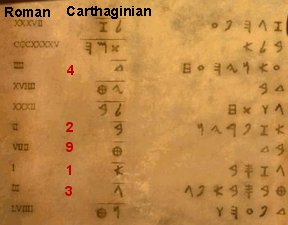
central post and see scrolls in slots. Read the scrolls. The only one that can
be partly deciphered is the one at bottom right. The column on the left are
Roman Numerals and the middle column are Carthaginian numbers. From this scroll
you can decipher the Carthaginian numerals.
Go to the side of the post in front of
the entrance that has the circles. The bottom right inscription is #1 and the
top left is #9. So the arrangement of the number start from bottom right, going
left, up one row to next row. So now we know what numbers are on the blank
circle. From left to right: Top row is 9 8 7, middle row is 6 5 4 and bottom row
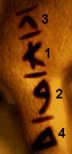
is 3 2 1. But what code to enter. Remember this is the Treasury and Hannon is
the treasurer. What was written on his arm? The code!
Remember – the Carthaginian reads from
bottom up. Use the hammer on the circle that denotes 4 (middle row, right
column), 2 (bottom row, middle column), 1 (bottom row, right
column), 3 (bottom row, left column).That
opened 6 triangle s on the wall. Find precious and heavy vases on 4 of the
triangle. Take the precious vase from the triangle on the far left side closest
to the statue at the other side of the room. Take the scroll left in the opening. Put back the vase and pick
up the papyrus. Now you also have another map. Go back to the oil lamp
above the ledge where you got the hammer. Light it with the tinderbox. Click the
papyrus on the oil lamp to get burning paper. Then go
behind the altar in front of the giant idol. Standing between the statue and the
altar, light the oil lamp on the altar. The idol turns with you on it to end up
in another passage.
Flagstones:
Have you noticed that all the doors you passed through closes leaving you
trapped. Oh well! Onward, no backward! Go forward until the fork of the path.
Now which way? Look down and note that the stones are arranged in a point. Let’s
follow where it points then. Take the left path and end up upstairs of a
circular building.
Garden of Tanith: The building has 2 exits at each side.
Across on a shelf are a bowl and a chest.
In the sacred groves, a female bird sings and the bicephalous
bird, a male is caught in the trap. Exit the right side and see a bird perch. Place Princess bird on the
perch. Click on Princess Bird to make her sing and the 2-headed bird alights on
a leaf above her. If you try to cage the bicephalous bird, it flies away. Let’s see. Place some
glue on the leaf the bird lands on then. Click on Princess Bird to make her sing
and then click the cage on the glued 2-headed bird.Near the slumbering monster grow three sleep inducing flowers
to be picked, ground and then thrown in the fire. Go around the
right side of the garden to see some
monkeys play. At the other (left) side of the garden and to the left of the
building where the singing
watcher is, lies a sleeping monster. Pick up the flowers to his left – the red
dream flower, blue night flower and white forgetting flower.Go back to the round building and place the flowers on the bowl.
Open the chest and pick up pestle and
mask. Use the pestle
on the flowers. Take the bowl with the flower powder.Put she who watches to sleep. Go to the singing
watcher at the other building. Talk to her. You will not be able to walk to the
next passage. Place mask on ‘your character’. Place the flower powder on the
burning coals behind her. Pass the sleeping beauty to go to the steps at the
other side of the building.
Charm
the guardian and close your hand over the sacred veil. Go through the door
of the Temple of Tanith, then left and see the snake guardian
blocking the steps to the statue of Tanith and the Zaimph. Another snake guards
the steps on the other side. Place the bicephalous
bird on the wood protruding from the wall above the snake. Then click on the
bird for it to sing. It sings the same song the watcher sang. The snakes on both
steps go through a hole. Climb the steps and realize that the veil is behind a
force field. If you get it now – game over.
Turn off the force field around the
Zaimph: Go down the steps
and go in front of the steps base. See slots at the
base of the ramp. Look down to the right of the slots and pick up picture squares.
What order do we place the squares? Base on the song sang by the
priestess/watcher and sang by the bicephalous bird; insert the picture squares in proper sequence that follows the song.
Check the comic strip to find out the lyrics to the song.
Sometimes thin and bent like a galley with no masts –
Galleyshe glides over a black sea. – Sea
Sometimes shiny and round,
– Crescent of Tanithshe skims the peaks of mountains,
– Mountainslike a shepherd – Shepherd
among the stars. –
Stars
Remember that the Carthaginian writes
from right to left. So, place picture squares from left to right: star, shepherd, mountains, sea, galley.
At the bottom slot, place the Crescent of Tanith.
The force field is turned off. Take
the Zaimph from the statue of Tanith.
Getting out alive:
Eek! An alarm is sounded. How can you leave
unharmed. The Carthaginians revere the Zaimph. Open your character and wear the
Zaimph. They will not harm the veil – you, that’s another matter.
Go down and enter the circular area at the center of the room.
Talk to Salammbo. Be truthful but still to no avail. Turn to the right and try to
go through the main door now open. The guards appear but won’t harm Spendius
because of fear of harming the veil. Turn back to the door but a monkey stops
your passage. Take the glowing fruit behind the monkey and give the fruit
to the monkey. It runs away with its booty. Go out the door.
Comic strip – Spendius,
protected by the veil leaves the city riding a war elephant.
Now the mercenaries believe more in their chances of victory and a war council
is held.
Destroy the Waterworks
War Council: The war chiefs
discuss their plans. Narr’Havas, the Numidian is to get supplies from the back country,
Autharite, the Gaul is to keep the Carthaginian army inside the city and Matho to show the
Zaimph to the coastal cities to get their backing and war engines. Spendius’
responsibility is to destroy
the waterworks.
Pariah village:
Go to the Pariahs’ Village to talk to the one who knows about the waterworks and
gave you help before. Talk to the
old man and find out that the waterworks is now well guarded. The source of
water is the mountain. Check the map by using the scroll arrow to see the
expanded area including the backcountry.
Road: Go to the road and
talk to the guard taking care of the mounts. Insist on getting a mount and he will
loan one to the bringer of the Zaimph. Now see the map with you on the road and 2
cursors where you can go. Click on the pointing cursor and go to Solitude
Mountain.
Solitude Mountain: Leaving
your mount, go forward, pass a pool and around the mountain to a small pass at
the other side of the mountain. See a glyph on the wall. Go back to your
mount and ride to the Hatchet Mountain Pass.
Hatchet Mountain Pass: Go
forward 3xs and see 3 beehives on the left side of the path. Careful, you will be
attacked by a swarm of bees. Turn left and climb the zigzag path to a rock
ledge. See a skeleton on the turn going up. Take the skull.
Go down and forward to rock
shelves with cactus. Using your dagger cut some cacti that are growing
on rock shelves between the split paths. Get your character to eat it and find
it edible. Take either path and go forward until
the end. Turn to the left and see an entrance. Try to go through the entrance and a dragon
arrives to mangle you. Immediately click fast to go back (6 clicks) where you
came from and go up the rocky ledge by the beehive.
Rocky ledge:
See the dragon waiting for you down the path. Pick up a
rock on the floor of the ledge and throw it on the beehive. Hah! The dragon
is chased by the bees. Go down and use
the empty pot on the green goo the dragon left behind and get a pot filled
with saliva. The things we do to play a game! Now that the dragon is gone, go
to the entrance that he guards.
Ruined Temple: Before you enter the cave, go
to the place where the dragon came out of and see piles of bones. Aren’t you
glad that you were not one of those? Enter the cave and find a temple ruin that is guarded by a pair of monkeys and a pair of dragons
similar to the animals at the Garden of Tanith.
Open the secret door to the sacred
couple: Enter the ruins and go behind the central
pillar. Look at the slots and cards also reminiscent of the puzzle done in front
of the statue of Tanith. Look at the inscription below
the cards. He who maps out the city precinct will continue on his way towards
the sacred couple. Two of the cards have a button at one corner. Open the map at
the inventory/bottom bar and see that the walls of the city has 4 towers: from
bottom to top – Serpent Tower, Dragon Tower, Bull Tower and Star tower that goes to
the secret precinct that has the Temple of Moloch and Temple of Tanith. Arrange
the cards to reproduce the towers of the city wall and the Temples. From
bottom going up: serpent, dragon, bull and star. Then place on top left, the
disk of Moloch and top right is crescent of Tanith.
Room of Moloch and Tanith:
A grating
sound is heard. Turn around and enter through the revealed opening. Not again,
the door closed behind us. Wait, pull the lever on the wall and the door opens
again. Turn around and move forward to the domed room. See the statue of Moloch
on the left, the statue of Tanith on the right and a central table. Go to the
side of the table facing Tanith and see a rolling pin held by 2 hands.
Wrap the papyrus onto the pin. It reads: Place the tomb of thought on the
engraved disk, then pour in saliva from the killer. Look deep into Tanith’s
eyes; seize the motionless hour where the water goddess, in the celestial home
of the killer, passed in front of Moloch, a red and torrid fire. Go to the other
side of the table facing Moloch and can now see the drawing on the tiles on top
the table. Let’s follow the new riddle.
Place the tomb of thought on the
engraved disk – Place the skull taken from the skeleton on the
ledge on the disk of Moloch (middle row, right column).then pour in saliva
from the killer – Place the saliva of the dragon on the skull. The tile
goes down and the Red eye of Moloch opens. Go to the statue of Moloch and use
dagger to pry off the Eye of Moloch. Turn around and see that one of the
horns around the edge of the table is skewed. Click on it to open a compartment.
Take the demon key.Look deep into Tanith’s eyes;
– Go to the opposite statue, click on the eye of Tanith’s statue and see the
crescent moon of Tanith and red disk of Moloch chase each
other.Seize the motionless hour
where the water goddess, in the celestial home of the killer, passed in front of
Moloch, a red and torrid fire – Stop the movement of the crescent moon (Tanith) when it
is in front of the red disk (Moloch) when both are in the constellation of the
dragon. Control the speed of the cycle by holding the mouse button and sliding
the slider left or right. When you think the moon and disk is correctly
positioned, release the mouse button. (Cheat is F8). When correctly done,
the scene will turn white and the other door opens.
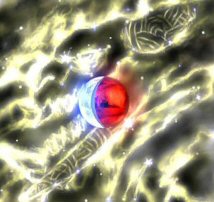
Destroy the waterworks: Enter the new passage, go
forward, turn right before the rock slide at end of hall and see the waterworks.
While standing by the opening, throw the eye
of Moloch in the water. It explodes! As soon as mouse control is taken
back, immediately turn around and go inside the passage or else you die!
Comic strip – Spendius was
successful in cutting off the water to Carthage.