Rhem
Link stand puzzles:
1.
Study the big power link circle at the back wall. The top left wire is
connected to the middle link stand on the left, the bottom left wire is
attached to right link stand on the left side, the bottom wire is attached to
the leftmost link stand, the bottom right wire is connected to the left stand
by the right side and the top right wire is attached to the rightmost link
stand.
2.
The link-colored buttons stands seen throughout roaming Rhem that show colored
ovals and the symbols with them are: purple oval with zigzag pattern, blue
oval with db pattern, green oval with 3 pointed pyramid pattern, orange oval
with M pattern, yellow oval with U-jug shaped pattern and red oval with l
pattern.
3. By
the clue of the picture on the left screen of a beach ball, enter the patterns
on the stands based on the color of the beach ball carried by the younger boy
in the picture shown at the 4 way tower secret room.
4.
The partitions on the big power circle on the wall are the segments of the
beach ball with orange on top. The ovals seen on the outside link stands are
the segments of the beach ball. Taking into consideration the position of the
link stands and their connection to the big power circle, (Left – Right) enter
the symbols on the link stands: purple – zigzag, green – three pointed
pyramid, blue – db, (on the other side) yellow – U or jug shaped and red –
small l.
5.
Then press the right button by the small power circle at the panel close to
the door and see the arrow rotate on the big power circle. If correctly done,
the blue button on the panel will flash.
6.
Press blue button, see a letter piece and the small building by the entry to
this area. This puzzle opens that building.

Exit the building, go to the gondola building, down
the manhole and out to the path. Turn right, forward and through the
door.
Lever to open door to round
building: Turn around and close
the door you entered in. Enter the revealed passage. Go forward until the stand
by the water. Pull down the lever under the icon similar to the one by the
locked door seen on the left of screen. Go back to the opened doorway and go
through the door directed by the arrow.
Go forward to the building with the same icon as
the lever and push the button on the right. Enter and see the small round
building pictured after completion of the links stand puzzle. The building has
the picture of the large power circle. Open the small door and take a piece
of the Kales’ master letter.
Radar Valley Area
Exit the area, pass the pipes walkway, down the
ladder, forward and out. CD3. Forward, take the elevator up, out and forward up
to red brick by the 4 way tower. Forward, turn around to send walkway to the
other side, up, pass through metal door, pipes walkway, down, revolving door and
back to the elevator tower. Bring elevator down, go up, out, forward until the
control panel shed.
Enter the Control Panel shed. Use the panel across
the door to rotate the bridge to have access to the walkway rotation panel. Go
back out to the walkway rotation panel in the far building and rotate the bridge
to connect 6 and 3 o’clock positions (North and west exits). Go back to the
control panel shed and rotate the bridge again to connect the building and the
cliff. Go back and cross the bridge. CD2.
West top level exit:
Climb the ladder, forward, enter the
walkway building and go out the other door to the top west exit (based on map).
Go forward and left to the 3 control panels area.
I Control Panel: Look at panel on
the left with I at the bottom. Pull lever to the bottom and draw the 3 pair of
wedges see. Compare them to the wedges noted at building I with 9 lights window
and the numbers (of lights) associated with them. Then remember that the first
wedge pattern-number shown is the 3rd or bottom number, and the last is the
first pattern-number. Every time you pull the lever, a different set is shown.
Remember the set of numbers just done. Do not pull that lever anymore because
that last number is now programmed to another panel somewhere else.


1
2
3
4
5
6
7
8
9
If you have not turned on the panel of the radar
antenna outside the water pipes building, do so now. (Go to the
manhole building, go down, forward to water pipes building, exit through the
other door and walk to the end of the path and see a destroyed bridge and the
radar antenna panel. To turn it on, press the right button.)
Lower West
Exit: Go back inside the walkway
building and take the ladder down to the bottom West exit. Exit (CD1) and go
forward until the bridge. Note the cord coming from above (control panel at Top
West exit) going to the open doorway. Follow that cord.
Radar Antennae Valley:
Enter an area that has radar antennae
attached to panels scattered throughout the water filled crater. There are 12 of
them here. The bridge to the right goes to the broken bridge seen at the end of
the path from the water pumps control building and the 13th radar antenna panel
(which should be turned on, if not go back there and turn it
on). Go around to all 12 panels and press the blue button on the right to
show power to the panel. There are 6 to the left of the main building, 5 on the
right side of the building and one inside the building accessed through an open
doorway at back right wall of the building. The cord that we were following goes
inside the central building.
Building:
Go to the left side of building, right and turn right to building. Enter the
building and see a locked door on the left. There is a I on the left panel and
on the right is a 3 buttoned panel. Enter the numbers taken from the set of 3
pairs of wedges on the west side of the walkway building. This set of number
changes every time the lever of the puzzle is pulled. Press the left panel,
enter and see a depiction of another piece of the letter on a stand outside the
window.
Go out of the room and press the red button by the
door on the left wall. Enter and see that the cord we followed from out of the
area is attached to the door of the room with the window showing the letter
piece. Turn right, go forward, left and see a lever. Turn right, see a blue wall
panel with square screen at the end of the hall and a drawing on the right wall.
Go forward, turn right, enter the next room and see a circular screen with a
central button and 4 squares below it. Note that all the 13 radar antennae show
as lights all over the screen.
Radar Valley puzzle:
1.
All 13 radar panels should be turned on and seen in the circular panel in the
building.
2.
Pull the lever in the other room to move the grid in front of the lit circular
panel.
3.
Find the pair of icons for each of the radar panels using the clue chart taken
from the secret 4-way tower,
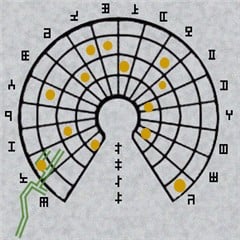
4. Go around the different panels outside and enter the
derived pair of icons on each one. Note the green lines on the chart are the
pathway from outside towards the building. The lower left light is the first
one seen at left of the area. You also have to program the 13th radar panel by
the broken bridge outside the water pump area – exit the area,
walkway building, top level west exit, manhole cover to lower level, water
pump building and path to the end.
5. Go back to the radar building, pull the lever to remove
the grid and then press the button of the circular panel. The radar sites are
read and if done correctly, 4 numbers are seen on the 4 squares – 8829. If not
go around and check if the icons entered are correct.
6. Go to the blue panel and enter 8829*. Press the blue
button and get the third piece of Kales’ letter.
* If the screen freezes here: 1. Save
game after entering the correct numbers. 2. Quit Game.
3. Open the saved games at the RhemE folder. 4. Open the saved
game at frozen point. It is a text file. 5. Look for “Ma2”: 0 6.
Change the 0 to 1 to make “Ma2”:1 7. Close the folder and
start the game again. 8. Open the corrected saved game and a piece of Kales’
letter is now in inventory.
Exit the area and go to the revolving bridge area and the
door with 2 icons.
Raised Platform
Building
To
get to raised platform building:
1. Go
to the Door with icons. From Radar valley, to West bottom exit at
walkway building, up to North top exit, (CD3) pass revolving bridge, down to
door with 2 icons and to the control panel shed.
2. In
the control panel shed, use the left panel and close the door with 2 icons.
3. Go
back around (very long trek) to get to the other side of the closed door with
icons. From here, to tower elevator, down to square building,
pipes hallway, red brick building, 4 way tower, (CD2) left and forward
to the North bottom level of the walkway building. Go up and outside the North
top level of the walkway. CD3. Go to the closed door with 2 icons and
now see a ladder.
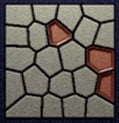
4. Go
up the ladder and see the mosaic pattern at the end of the open arched
pathway. Press the brown areas seen in the other mosaic door by the manhole
cover. Turn right and press green button.
5.
Note that this is the area seen at the balcony by the lowered platform and the
purple button stand accessed under the stairs close to the North bottom exit
at the walkway building. Go to the end and see the building across the lowered
platform. Pull down the lever and raise the lowered platform.
6. Go
down and go back to the walkway building. (CD2) Go down and exit the North
bottom exit.
7. Go
forward, under the stairs, round the path and up to the balcony.
Raised Platform building:
Cross the now raised platform to the
other side. Turn left, forward, go to the right opening, look down on the right
side and see a rail car. Forward and enter the room with pictures.
Room
with pictures and numbers: See
pictures of: red buttons stand – 4576, purple stand – 5637, green stand
– 9438 and blue stand – 7984. At the center is the 2
brothers picture that Kales talked about in his letter at the secret tower room.
They are carrying a yellow and red flower.
Front room bottom
level: Exit the room, left, left,
enter the other passage and down the stairs. The first room below shows the last
piece of letter behind a grilled door. At right wall is a picture of a grilled
door and a panel with 4 circle surrounding a square button. Hmm. Go out and see
that the Back room bottom level is blocked by a grilled
door.
Rail car
track: Go back out to the walkway
building, enter North lower level exit, go up and out of East top level exit. Go
out where the rail car you came in was. Follow the tracks to go to the end and
see that the tracks end here. Turn around, forward and take a close study of the
panel on the left. Use this to calculate the numbers to enter on each of the
color stands.
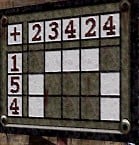
Button correlations to numbers on pictures of colored
buttons stands:
1.
Note that the white squares are positioned similar to the squares of the
buttons stand.
2.
Adjust the numbers taken from below the pictures of the stands by adding a
vertical number and intersecting a white square to a horizontal number to get
one of the 4 numbers in a set. The intersected white square is the square to
be entered for that number. Do this for all the numbers to get the buttons
numbers to be pressed.
Picture number
Vertical number
Horizontal number
Square-Button number (L-R)
3
1
2
5
4
1
3
3
5
1
4
4
6
4
2
1
7
5
2
2
8
4
4
7
9
5
4
6
Entering the Numbers on the Buttons Stands:
Go
around the area and enter the button number adjustments on each of the
stands (underlined in walkthrough) shown in the picture room. When
correctly done – See a diagram with an icon and note the position of the
circle to the square:
Red buttons
stand – Before the walled entrance to the 4-way tower, by the cliffs and
across the destroyed building islet. Enter the adjusted 4576 as buttons (L-R)
3421.
Green
buttons stand – By pathway to the square building pass the 4 way tower.
Enter the adjusted 9438 as buttons (L-R) 6357.
Blue buttons
stand – Go out South bottom level exit of walkway building to cliff side.
Enter the adjusted 7984 as buttons (L-R) 2673.
Purple
buttons stand – Down the stairs by the balcony to the raised platform
going to the building with the pictures. Enter the adjusted 5637 as buttons
(L-R) 4152.
Go back
to the raised platform building and down to the lower level.
Lower
level: Go back to the front room
lower level of the raised platform building and enter the icons on the diagram
as shown on the pictures above. Click on the red button to turn it on and then
cycle the icons to select the correct ones. Then press the button
again.
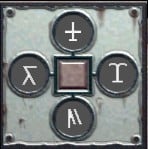
Turn right and see that the grilled door is now
open. Enter, see a key panel and grilled door panel on the right and a lever and
grilled door panel on the left. Pull lever. Go back to the front room and see
that the grilled door is now open.
Last letter piece puzzles:
1. To
the left is the panel with stars and numbers squares – Remember the door with
stars and numbers seen on the telescope. Enter 5 pointed star – 6, 4
pointed star – 1 and 6 pointed star – 7. Turn around to the
other panel.
2.
The right panel shows 4 colored squares and number squares beside them –
Recall the picture of the 2 boys in the secret room above the 4 way tower (see
picture at Links puzzle above) and the one taken from the fax machine. Enter
yellow – 5 (yellow flowers), pink – 3 (pink flowers),
blue/purple – 8 (younger boy’s shirt) and green – 2 (older boy’s
shirt).
3.
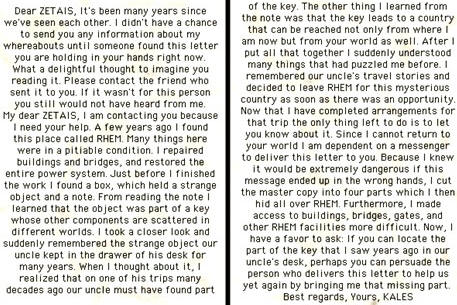
Turn to the middle box under the letter piece diagram and open it. Get the
last piece of Kales’ letter. You now have 4 pieces of the letter in
inventory.
End Sequence
Secret room on 4 way
tower: Go back to the secret room
above the 4 way tower. CD3. Go to the alcove at the end of the hall. Open the
cabinet on the right, place the 4 pieces of the letter, close panel door and see
a completed letter come out. Take the letter and the letter will be seen in
inventory. Press the bottom button and the key panel should open. Take the key.
It will then be in inventory.
Lower level back room at raised platform
building: CD2. Go back to the lower level
back room at the raised platform building. Use key on the key slot and turn the
key. The grilled door to the rail car opens. Enter the rail car and press button
to leave RHEM.
THE END
This document
may not be distributed without express written permission of the author and the
content may not be altered in any way.
For Questions
or Comments on this Walkthrough,
Please write to: MaGtRo
Copyright ©
9/2002 MaGtRo