Rhem

by
Knut Mueller
Walkthrough by MaGtRo July 2005
Gameplay:
RHEM 2 is a point and click game. The main menu has the new game, load, credits,
options and quit. The information bar on the gameplay screen is accessed when
the cursor is moved to the bottom of the screen.
The box on the left is the
inventory; the compass is at center and the wheel on the right access gameplay
menu. When inventory items are clicked, the cursor changes to that item and can
be clicked on active spots.
The points of the
compass is highlighted to show the direction that is viewed: top lit arrow
– the player looks to North, right lit arrow – the player looks to West, bottom
lit arrow – the player looks to South and left lit arrow – the player looks to
East.
The gameplay
menu has save, load, return, quit, options and new game. The options menu has
the transition control. The bottom of the menu screen has a back or return arrow.
There are 10 saved game
slots and the saved games can be deleted to make room for new ones.
Zetais gives you an item
that you need to take for your travel at RHEM 2. Click new game, travel on a
rail car through a tunnel and down one level to a cavern. Look in inventory and
see that Zetais has given you the first piece of a key.
Railcar:
Turn right and take the code card with 3 red stripes. Turn around and use
the code card on the slot at right of door.
NOTE: You can explore
this world anyway you want to. This walkthrough is described by sections and as
far as I can make it to have the least walking around. Make drawings of the
clues you see, note the color of pipes and explore.
Why
are we here?
|
|
0. Railcar 1. Arrival building A. B. C. D. E. 2. Manhole 3. Water Cavern entrance F. 4. Hydroelectric – Water Pipes G. H. |
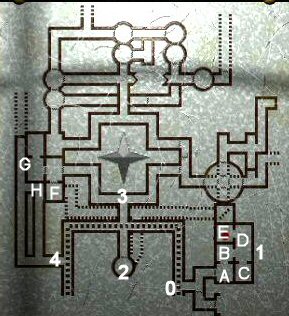
Arrival building:
Go forward 2xs, left and climb the metal ladder. Go forward
and note the power cable strung from the building to a generator at the ground
level on the left beside the left rail car. Pan left and see another railway above the rail car.
Enter the arrival building.
Monitor room:
Click on the red button and listen to Kales, Zetais’ brother and the reason you
are here. You were given the first piece of a 3-piece key by Zetais. The
complete key when the 3 parts are combined is a 7-point star. The second piece
of the key was hidden by Kales together with a message. The third piece is lost
and you must find it within the caves. The completed key is to open the entryway
to a hidden part of the cave. At the hidden part of the cave is a secret
artifact that you need to take a picture of for Zetais. Now, you know why you
are here adventuring…
Turn right from monitor
and see a picture that shows the railcar can be lifted on an elevator to a
higher level. No power on red button. Turn around and see a picture of a disk that
is inserted on a monitor. Note the wallpaper in all this rooms.
Thermometer room-9
square puzzle room:
See a non-activated 9-square puzzle. Turn left and look out the window and see
the ground – rail area and the thermometer beside it. Note the thermometer’s
units are 1:1.5 ratios to each other – 10 of
unit to 15 of the
![]()
unit. Turn around, go to the next room and then right to another room.
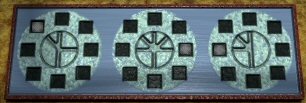
Camera room:
See a window with hanging camera that shows a passage outside the building.
Beside the window is the picture of the 3 keys that you need. On the other walls
are the camera mount and another non-activated 3-square puzzle left of the
entryway.
Look at the table and look close at the ruler. Note that the ruler has
2 units that are 1:3.5 ratio to each other – 1 of the
unit and 3.5 of
the
. Look close at the pictures of the moon. Move the cursor to
the edge of the pictures until it changes to a hand cursor. Click to look at the
back of the pictures: the moon at top left – ro and the moon at top right – gwa.
There’s a locked cabinet above the table.
Moon & house picture
room: Go to next room. See a picture of 3 houses with 4
windows in each house. Look close at the moon
pictures on the tack board. Look at the back of the pictures for the word
connected with that moon: Top middle – pa, bottom middle – nek, bottom right –
jok, center – lim, bottom left – su, no moon – mi and middle right – tu. There’s
no middle left moon picture.
Clock room – Go to the
other room and see a clock that shows 5 colored squares when the
red button is pushed. On the left is a closed rollup window. Note that the pipes
of the clock and this window connect to the 9-square puzzle outside. The other
side has another closed rollup window.
Time to look for clues.
Exit the building and go down to the railcar.
Manhole:
Follow the rail tracks to an opening on the right and a manhole on the left. See
a manhole with 12 outside buttons and a central blue button. To the right is
picture similar to the 3 house – 4 windows each at the arrival building. Note
the numbers of the center squares: 2, 5 (top) and 3, 9 (bottom).
Water-walkway cavern: Turn right, forward and
enter the opening on the wall. The path splits right and left.
Moon room & Roll up door:
Turn left and go forward until you see a roll up door. Turn left and see another
3 sets of 4 squares like the one outside – the numbers on the right squares: 8,
12 (top) and 4, 10 (bottom). Pull down the lever and see that the opposite roll
up door closes when this one opens. Turn left and see the moon picture. Press
the red button and hear a roll up window open. Note the rabbit looking slot
right of the door.
We will check this area
later. Exit and go back to the entryway to this cavern. Go forward on the rail
track, right to the metal door at the end.
Hydroelectric-Water pipes area:
Window: Press the red button to
enter. Go forward and look down at the water. Turn right and go forward to the
window on the right wall. Press the red button and see the numbers 5 3 9 written
on it. To save time later – Be sure to press the button again to close the
window.
Moon Picture Clues: Turn right, forward,
left, forward and see a closed roll up window on the left. Go forward to the
black squares at the end of the path. This is the roll up window opened by the
red button under the moon picture in the moon room.
Moon picture clues:
Click on each square to see a moon and the corresponding number at the bottom.
The placement of the squares correlates to the moon pictures seen at the
Arrival building.
Moon placement on picture and squares Word found in the back of the pictures Number that corresponds to the moon
placementsno moon mi 0 center lim 1 top left ro 2 bottom middle nek 3 top right gwa 4 bottom left su 5 middle left ? 6 bottom right jok 7 top middle pa 8 middle right tu 9
Turn right, forward 2xs
and left. Press button to exit.
Go back to the manhole
area by going left on the rail tracks and enter the opening in the cavern wall
across the manhole. The path splits to left and right.
Rotating Passages, Pegs and Locked Doors
|
|
1. Rotating passage – lower level.
2. Hall going to side 3. Chest 4. Wall box 5. Lava pit thermometer 6. Screened door |
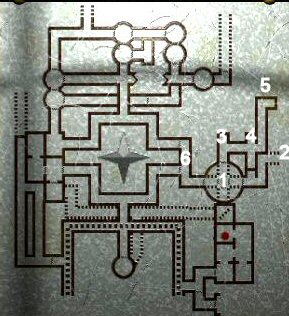
Water-walkway cavern:
Rotating passage
area:
Take the other path and go forward
until you’re inside the building. Look left and see a screened door that has a
tube picture with a mostly hidden red outline. Turn around and go forward to the rotating passage.
Rotating passage – lower
level: There is a ladder that is blocked from above. Press the
red round button to bring down the square button that turns the rotating
passage. Press the square button to turn the turntable and to have a path to the other side.
To save time later – Press the round button to bring the square button up again.
Go forward to the very
end and see another 3 sets of 4 squares like the one outside – the numbers on
the right squares: 6, 11 (top) and 1, 7 (bottom). Let’s check this area now.
Side room 1:
Turn left and enter the farthest side room. The blue door is locked. Any locked
door should be opened by adventurers, right? On one wall is a round panel with
drawings of lined circles with arrows. Graphic seen later in the walkthrough. On the
other wall is panel that will open the door – note that the tubes that comes out
of the panels are 2 above and 3 below. Exit the room and enter the middle side
room.
Middle side room 2:
Turn right and see the tubes that are connected to the panel for the locked door
at the other room. They are connected to pegged boards. One has a hanging
letter E. Hmm…
Side room 3:
This room also has that panel to open the locked door and the pegged boards.
It’s time to look for the clues to those pegs.
Exit and turn right.
Turn right to look through the window and see another path on the other side of
this area. Go forward until just before the rotating passage and turn right to
see one of those closed rollup windows.
Rotating passage – lower
level: You are now on this side of the rotating passage and if
you still have not raised the square button on the other side – do so now. Then
push on the red button to turn the passage until you see the ladder. Climb up.
Rotating passage – upper
level: Turn left and see a red button – press the button,
the red light turns green and a roll up closing sound is heard. Wonder what opened! Look
down and see 4 openings on the floor; two of which is barred and one is blocked.
Turn right and go forward
to the red button at end of the hallway. Press the red button and see that the
screened door from below moves up.
Turn around and press
the red button (formerly at the lower level) until the metal cover is on
the far opening at other side of the room. Look down, open the metal cover and see
a torn note with: 4. 10:00, 5. 2:00 and
6. 5:00. Go back to the red square button and press it until the opening is on
the left opening. Go down the ladder.
Hidden
area of the rotating passage area:
Chest:
Turn around. This is the area seen through the window by the side rooms with
locked doors. Go forward to the chest.
Open the chest:
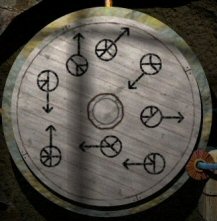
The 3 glyphs are similar to the glyphs on the round panel at side room 1. Each
glyph is surrounded by squares.Find the corresponding
glyphs on the round panel at side room 1 and note where the arrow points at.Press central glyph on
the chest until the square corresponding to the arrow on the round panel is
lit up.
Press left glyph to
light up the square at NW position, the middle glyph to East position and right to
West position.Click on handle to
open the chest. Look close at each number. Turn the number by moving the
cursor to the side and see pegs on each back. Take note of each number’s peg’s
position. Graphics s seen later in the walkthrough.
Turn right from chest
and go forward once. Turn right and see a tube picture like the one on the screened
door. Press red button to turn the red light to green – hear a sound of a roll
up closing. This is the same wall as the roll up window at the rotating passage
hallway. Back up and turn around.
Wall box:
See red metal box with a word on it and above are numbers.
Open the wall box:
The word ‘gwalimwessu’ is written on the box. Based on the moon picture clues
correlated at the hydroelectric-water pipes area: gwa – 4, lim – 1, wes – must
be 6 (the one picture not seen) and su – 5.Enter 4 1 6 5 by
clicking on the
top area arrows. Press red button.The box opens. Take a
blue piece.
Turn right, forward and
see the window that looks to the locked door passage. Turn around and go to the
end of the hallway.
Lava pit thermometer:
Look through the window to the lava pit and see a temperature probe hanging from
a beam over the lava hole. The graphics on the right shows the unit on top is the
unit seen on the thermometer at the
Arrival building and the bottom unit is the
unit seen on the ruler.
Go back to the chest
area. On the way, see a woman in red shirt walk by the window. You are not alone!
Face the rotating passage and press the red button to show a path to the other
side. Go forward and climb up the ladder on the right.
First formula room:
See a formula on a card at an opened roll up window. If this is closed, go back
to the top level of the rotating passage and press the button on the wall. Turn
around and look at 2 red buttons on the wall similar to that of the Arrival
building. Press the 2 red buttons, the right one will open the roll up window at
the clock room as clued in by the sound and the left button had a beep sound. Go
down the metal ladder.
Hallway:
Go left and down the other metal ladder. Go forward and see through another
window to a closed cabinet. Turn right and note the colors of the dots and their
position on the body shaped indentation on a metal door.
Go back to the rotating
passage – chest area. Turn around and press the red button to turn the rotating
passage to show the ladder. Climb up. Press the red button to turn the opening of the floor to the far
side. Climb down to the lower level of the
rotating passage.
Rotating passage area – lower level:
Roll up window:
Go forward and turn left. See the roll up window is now open. See a drawing
similar to that of the picture across the metal wall box on the other side. Flip
the lever up to the hook and this will raise the insert of the drawing on the
other side.
Open the locked door
in Side room 1: Go down the hallway to the middle side room
2.Middle side room 2:
1. Learn the
placement of the peg board in relation to the control panel on the other side
of the wall.Study the position of
the small blue pipes that comes out of the peg boards and enter the wall. The pipes that enter
the wall are the position of the squares on control panel on the other side of
the wall.Going from right
to left of the peg board: the tube on far right goes to square 1 on the
other side (which reads left to right) of the wall, then to square 4, square 2,
square 5 and square 3.2. Learn the number
that correlates to each of the peg boards based on the numbers seen on the
chest.Study the placement of
the 2 pegs on each board and deduce the number based on the holes in the back
of the numbers in the chest. Note that the placement of peg holes in numbers 2 and 8
are the same. In the deduction, take into account that you are looking at the
mirror image of the holes on the numbers to that of the pegs position.
0 1 2 4 5 6 7 8 9
From right to left Number based on pegs 3 9 8 or 2 6 8 or 2 Position of pipes that goes to other side
of wall1 4 2 5 3 Side room 1: Go to the room at end of hallway.
Face the control panel and enter
the numbers in the order from left to right (By trial and error on the 8 or 2
numbers): 3 8 2 9 6. Turn right
to the door and click door knob. Door opens.
Power-Generator Room: Turn around
to entryway and see that the gauge shows power is
at 0% and a b=4 note.
Turn left and study the chart. It shows that the pit should be at a
temperature of 412 deg of
units for the coils (hanging overhead on a beam) to get full power.
Turn left and look out the window.
The window across the area is the one at the hidden passage. See the temperature
probe hanging over the lava pit. The coil is on one side of the beam. Study the chart on
the side and note that the coil reading is in
units as seen in the
ruler. Exit the room and go down to side room 3 down the hall.
Open the locked door in Side room 3: Same procedure as
that of side room 1.1. Learn the
placement of the peg board in relation to the control panel on the other side
of the wall.Follow the small pipes that
come out of the peg boards to the control panel on the other side of the
room.Going from left
to right of the peg board: the tube on far left goes to square 3 on the
other side of the wall, then to square 2, square 5, square 1 and square 4.2. Learn the number
that correlates to each of the peg boards based on the numbers seen on the
chest.Study the placement of
the 2 pegs on each board and deduce the number based on the holes in the back
of the numbers in the chest. Note that the placement of pegs in number 2 and 8
are the same. In the deduction, take into account that you are looking at the
mirror image of the holes on the numbers to that of the pegs position.
From left to right Number based on pegs 4 1 0 7 5 Position pipes goes to control panel 3 2 5 1 4 Face the control panel
and enter the numbers in the order from left to right: 7 1 4 5 0. Turn
right to the door and click door knob. Door opens.
Beam control room:
See another formula on the chalk board on the left and view generator room through the
window on the right. Look close at middle window. See that this is the control
panel to move the temperature probe and the power coil on the beam outside. If you
clicked on the arrows, be sure to leave the temperature probe over the lava pit.
To get to 100% power: The aim is to
find the depth of the pit that has a temperature of 412 deg of
units
and to heat the coil to that temperature.1. Go to the hidden passage window to get a temperature of 412
units in the lava pit.Go to top level of the rotating passage
and turn the opening to the left side
on the floor. Go down the ladder, go to chest, turn right and forward to the lava
thermometer window.We need to get to the depth of the lava pit that has 412
units but
the units shown on the lava thermometer is in
and
units.
Based on the thermometer at arrival building, 1
unit equals 1.5 of
units. That is 412
units = 618
units.
Lower the temperature probe into the lava pit by clicking on the down
button. Click-hold the down arrow until a temperature of 618 is obtained on the
topunit. Note that 618 is equivalent to 106
units.
Once the correct temperature is
measured, raise the temperature probe up and out of the lava pit by clicking
on the very top up arrow.2. Lower the coils to harness the 412 deg temperature.
Go back to beam control room at rotating passage hallway. Go to the control panel
and move the temperature probe away from the lava pit using the left arrow. Move
the coil over the lava pit.Go to generator room. Go to the control panel.
We need the
unit equivalent of 412
units. The ruler
showed that 1 of theunit = 3.5 of the
unit. We now know that 412
units = 618
units = 106
units. So, 106
units x 3.5 = 371
units.
Click-hold the down arrow on the
control panel until 371units is reached.
3. Turn on the generator.
Turn right to the generator. Look
close and click on the yellow line inside the green framed black square to
connect the pipe. Hear the sound of power on. Turn right and see that the dial
is now on 100% power. Whoopee! Take note of the yellow pipe that goes through
this power box. We will look out where it passes through the area in our
travels later.
Screened door: Time to check on all the buttons pressed
and the roll up windows we opened. Turn and go through the rotating
the passage to get to the other side, forward and see that the screened door
is up when we raised it using the red button outside the top level of the
rotating passage. Go in and turn left. See and take note of a familiar body picture
with red and green squares on the arm. We will tackle the stairs here later.
Exit, turn right, forward, left and out to the rail tracks. Go left back and
up to the Arrival building.
Search for the second fragment of the key
Arrival Building:
Clock room: Go the clock
room. See that the roll up window we opened by pressing the button on the
other side of the wall (First formula room) is now opened. Note: 1. 8:00, 2.
7:00 and 3. 1:00. The other button we pushed on the other side of the wall
connects to the brown pipe below. Follow where that brown pipe leads to.
Houses – The brown pipe passed through and lit 3 windows on the picture.
Since this window configuration is similar to the 3 sets of 4 squares we saw
around. The lit windows are the ones numbered 10, 2 and 11.
|
||||||
| Seen by the roll up door | Seen by rail tracks – manhole | Seen at end of rotating passage |
Camera room: Enter the room on the right to
continue following the brown pipe. The brown pipe goes to the 3 square puzzle
by the entryway. Enter the number of the lit windows of the houses picture –
10, 2 and 11. Now, follow the pipe from here to the red button of the
key picture at the other room.
Key picture: Press the red button. Take the key
and look at the missing wes picture from the opened cabinet. Go back to the camera room.
Camera room: There’s the black haired, red shirted
woman again. Wonder who that guy is? Use the key on the locked cabinet and then
click on handle. Take note of the second formula. Look close at the drawing
with 9 squares with colors and numbers. It looks familiar.
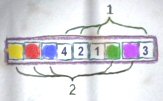
9 squares puzzle:
1. Study the picture and note that (L-R) the numbers in the squares are
marked 1 and the colors are marked 2.
2. The sequence to press must be the one with the numbers. So we know 1-4
positions.
But what is the sequence of the colors – yellow, red, blue, green and purple?3. Go to the clock room and press the red button
by the big round plate. Note the sequence of the
colors shown. This is a random appearance of colors. Do not click the red
button again or if you do take note of the new sequence. The puzzle next
door is now programmed.4. The sequence of the colors shown will
be the sequence of the last 5 squares
in the 9-square puzzle. Example: in my game it was clockwise – green, blue,
purple, red and yellow.5. Go to the 9-square puzzle room. Press the buttons in the sequence
shown by the picture from the cabinet and then the sequence shown by the clock
next door.L-R: 6th button, 5th button, 9th button, 4th button followed by the
color sequence seen at the clock next door.If done correctly, hear a sound of a roll up window opening. Go next door
to clock room and see that the roll window is now open. Take the other blue
piece and study the map. The red dot shows where you are.
Go out of the building and go to the opening of
the Water-walkway cavern across the
manhole.
To gain access to other rooms:
Moon room: From the rail track, turn right to cave wall,
turn left and go to the roll up door. If the door is closed, pull down the lever and see that the
opposite roll up door closes when this one opens. Turn left and see the moon
picture. Place the 2 blue
pieces on the rabbit looking slot right of the door.
Hallway: Go down the ladder. Turn
left and walk to the end. See the now familiar body shaped indentation with colored
dots. Note the color and placements of the dots on the body shaped indentation. This door is the other side
of the door seen with similar indentation on the hallway accessed by the lower
ladder across the chest area. Be sure to pull up the lever to unlatch the
door. Now let’s find a way to open this metal door.
Go back up to the moon room. Exit
through the roll up door. Be sure to – turn
around and pull the lever to close this door. This way, the other door is
rolled up-open. Exit the cavern and go to the rail track outside.
Manhole: Go forward to the manhole and look close.
Open the manhole: Recall the time notations written on
the 2 pieces of paper: one found under the metal door on the floor of the top
level rotating passage and the other one on the rolled up window in the clock
room.Press buttons at clock positions: 8:00, 7:00, 1:00, 10:00, 2:00 and 5:00.
Press the center button.The manhole opens. Climb down the stairs.
Underground room: Go forward, press red button and enter
the door. This is the room we saw at the window when we unlatched the door
with the colored dots on the body shaped indentation.
Colored dots puzzle: Open the cabinet and see the
familiar body shape of the indented circle.1. Press the squares to show the colors seen on the clues seen at: latched
door on passage under the moon room, the other side of that latched door
accessed via the lower ladder across the passage to the chest and the picture
on the wall at the screened door -room.Blue on the head, green on right upper arm, red on left arm, green at
center, 2 greens on right leg and blue – red on left leg.
2. Turn left to the door. Press the red button to close the door. Click to
slide the tube and make a complete connection.3. Turn around and press the red
button to slide the door on the right. This opens the passage from under the
moon room to the passage going to the chest via the ladder behind the rotating
passage.
Exit through the door and out the
manhole. Now we can reach the moon room through another path other than the
roll up door. Go to the upper level rotating passage. Turn the opening to the
left and climb down to the chest area. Press the button to make a passage to
the other side. Go forward and down the ladder. Go forward to the end and see
that the metal door is now open. Go forward until the end and up the ladder to the moon room.
Moon room: Press the red button on the wall across the doorway. A roll up sound is
heard. There’s also a familiar tube picture except it is hiding a white
circle.
Roll up door room 2: Go to next room. Turn left and press
the red button. Hear another roll up sound. Another of the tube picture with a
hint of red circle is seen here. Turn right and raise the red window. See a
mirror image of -1 +5 -5. If you don’t see any number, the window on the wall
of the hydroelectric area was not lowered.
Blue door: Turn right and see the blue metal door. The
panel on the left needs 3 numbers.Calculate to get the number to enter on the door based on the number seen
on the window at the hydroelectric area and the number just now seen on the
other side of that same window.
5 3 9 -1 +5 -5 — — — 4 8 4 Enter 4 8 4 on the panel on the left of door. The door opens.
Kales’ room: Turn right and look through the window to
see another room that goes out to the water area. Turn the knob on the left to
get power to the monitor. Turn left and press the button. Listen to Kales. He
describes the missing artifact – it is a disk with an engraved symbol. He
wants you to take a picture of the disk. He also mentions the stranger we have
seen around.
Turn left and press the red button. Take the second piece of the key.
|
|
1. Moon Room 2. Roll up door room 2 3. Kales’ room 4. Diagram room 5. Elevator A 6. Elevator B 7. Angle puzzle 8. Elevator C 9. 3 key pieces door |
Search for the third piece of the key
Tube circles – angles search:
Time to check the tube pictures and
see what they show. Exit the room and be sure that the button is green on the
tube picture here at the roll up door room 2.
135 deg. angle: Turn left and go to the moon room,
check if the button is green on the tube picture here at the moon room. Turn
around and go down the ladder. Go forward, climb the ladder and go to the
chest area. Turn right, forward and right to the red rimmed blue circle. This
is the picture that is shown when you raised the lever on the roll up window
by the lower level rotating passage at the other side of the wall. Take note
of the angle made by the lines – 135 degrees.
45 deg angle: Go back to the chest area and turn
the passage. Climb up to top level of the rotating passage. Turn the opening
to the far one and climb down. Turn the passage and go forward. Go forward to
the area formerly closed by the screened door. Turn right and up the ladder.
Press the red button on right wall to lower the screen door that is on the
other side of the wall. Go down the ladder and turn right to the screen door.
Raise the lever. Go up the ladder again and press the button to raise the
screened door back up. Let’s see what picture is shown. Climb down
and go forward to the rotating passage. Go to top level of the rotating
passage. Turn right and forward to the screened door. See that this one red
rimmed blue circle has a 45 degree angle.
270 deg. angle: Go down to lower level and turn the
passage. Go forward and left to exit the water cavern. Go to the rail track,
turn right and forward to the Hydroelectric -water pipes area behind the metal
door. Go forward, right, forward, right, forward and right to the window.
Raise the lever to see the circle in the tube picture at the roll up room
2. Exit this area and go back to the rotating passage at the water cavern.
Turn the rotating passage and climb up to the top level, then turn the passage
to the left opening, climb down, turn passage, forward to ladder, down and
walk far to the other ladder. Climb up the ladder and go to the room left of
the moon room. Look at left wall and see the 270 angled picture. One more to
go.
225 deg. angle: Exit the room and another long trip
by going down the ladder off the moon room. Go forward until the other ladder,
forward to chest, turn the passage, climb up, turn the passage to far opening,
climb down and turn passage. Go forward, right, forward to the other room
(formerly screened door) and climb ladder. Turn around and see a room at the
other end of the cavern. Let’s go there. Go forward pass a right exit to the
elevator area and enter the room. This is the room seen through the window off
Kales’ room. Turn left and raise the lever to see the picture in the rollup-
moon room on the other side of the wall. Exit, forward back to the room across
the cavern, go down the ladder, right, forward, right and forward to the roll
up door. Pull the lever, enter and turn right. This picture showed a 225
degree angle. Let’s rest for a bit. All that running around tired me.
Fun time with
elevators:
Go back to the other side of the
wall by exiting the Moon room, forward to the other side to the screened room,
climb ladder, turn around, forward to the other room, pass a right exit to the
elevator area and enter the room. Turn right and study the diagrams on the
right.
Diagrams:
The diagram on the right showed that elevator A is a platform with a wall
between 2 sides and that the entire platform with the wall can be raised or
lowered to 2 levels leaving an empty area either above or below it. While
elevator B + C is also a platform with a wall between 2 sides and that the
platform can be raised or lowered to 2 levels but the wall still separates the
2 sides.

Elevator A: Go
forward to elevator A and enter. See that there is no wall here that separates
the platform. The elevator must be below us. Exit through the door on the
right.
Elevator B: Go
forward and left on the ‘No person allowed’ sign. Enter the elevator. If the
elevator is closed, press the up arrow. Go down and out to see a panel with a
big red circular puzzle.
Red circles puzzle:
The circle is familiar; we just saw 4 of them. Enter the angles seen on the 4
red rimmed blue circles we saw based on the position of the red circles in
those 4 pictures.
![]() |
![]() |
![]() |
|
| Seen at Moon room | Seen at chest area | Seen at Blue door room | Seen at screened door |
| 225 for top | 135 for right | 270 for below | 45 for left |
Press the central blue button and a
tok-ding is heard.
Turn right and close the door of
elevator B. Since elevator B is an elevator that retains the wall partition,
be sure to press the elevator up arrow. Turn right, forward and right to
elevator C.
Elevator C: Press
the arrow, enter the elevator, go up and exit.
Other side of elevator B:
Go forward and enter the other door of elevator B. If it is closed, go down
and press elevator B’s up arrow without entering the elevator. Press the down
arrow. Exit and go forward passing a closed side door to elevator A.
Other side of elevator A:
Enter the other door of elevator A. Press the up arrow and exit. Go forward to
elevator B.
Elevator B: Bring
up the elevator, enter and press down arrow. Go to elevator C.
Elevator C: Press
the down arrow BUT do not enter. Go back to elevator B.
Elevator B: Go up
and exit on top level.
Now, go forward to the main path
outside this area and turn right to the room with the diagram. Exit the room
and enter elevator A.
Elevator A: Go
down and exit through the right door.
Go forward and press the button.
This door will open after doing the red circles puzzle. Go left and forward to
the other door of elevator C.
Other door of elevator C:
Since we lowered the other side of the elevator C, the door will now open.
Press the up button and exit. That was some exercise!
3 key pieces door:
Go to the door. Take note of the a=5 note and the wood cabinet left of door.
The cabinet has the slots for the 3 pieces of the key we are collecting. Note
that the yellow pipes seen coming out of the power gauge in the generator room
passes through here. Press the red button and enter. Go down, turn around
through 2 metal ladders
and forward to another locked door.
XYZ door: The
code to enter needs numbers for x, y, z.
XYZ puzzle: Based
on the 2 notes seen, a=5 and b=4, calculate x, y and z using the 3 formulae
seen at the closed cabinet at the arrival building, the room accessed by a
ladder by the chest area and the chalkboard at the beam control room.
by the chest area closed cabinet at the arrival building chalkboard at the beam control
roomz=2 y=7 x =9
Press the lettered buttons to enter x =9, y=7 and z=2. Press the red button on the right of the puzzle.
Turn right and press the button. Take the third key piece.
Go back up to the door above and open the wood cabinet on the left of the door.
Place the 3 pieces of the key in the slots of the same shape and close the wood
door. Go back down, press red button of the gold door and
enter.
Search for the first blue fragment at hidden
part of the cave
Tower:
See a tower with 4
levels. Each level has 2 ramps each: one leading out on front side and one in
the back. There’s a building at the back of the tower connected by blue and pink
cables. Look around and check the doors on the ramps at different levels. Climb
to the top 4th level. The front (south compass point arrow) has a closed door at
the end.
4th Level (North) back ramp area: Go
to the back (north) ramp of the 4th level and press button to enter. Enter and see 3 areas to explore: left to balls-lights
setup on the wall, ahead is the door to 3 rooms of switches and right to an
elevator.
Balls -lights setup – Note
the blue pipe that leads out of the
balls-lights setup. Note the path of the balls – from top to the different holes
makes 3 lines. The colored balls are red, green and blue. You will see several
lines and colored numbers on plaques around the area. Take note of those lines
and colored numbers. We will come back here later.Switches room –
Enter and see a room with switches on both sides and a green door. Press the
button and the green door goes down. There are 2 more rooms with switches on either side
of the room. The end room has a box that has a placement for an item.Elevator – Enter the elevator and press button. Go down to level
3. Turn left and forward to metal ramp door. Unlatch the door. Go back to red
button of elevator, press button and back to 4th level.Forward and exit through the ramp door on the left.
3rd level (South) front ramp door: Go back
inside tower, go
down to 3rd level and go south. Enter the 3rd level ramp door. Go forward, climb
down the ladder and left to a blue domed room.
Blue domed room (2nd level North):
Look around and see lines and dots on the wall.
It’s dark in here. There are 4 exits from this room. One is the ladder from 3rd level you came
down.
Lines-dots room – Note that the blue pipe from the ball-lights
at 4th level comes
down to the number panel on the left wall. Exit and go to the 4
square panel door on the left.4 squares panel door – We need clues to get for this 4 squares
puzzle. Exit the room
via the 2nd ramp door across from this door. Unlatch the door and go back to
press the red button to open the door. Go back to the 4th level back-north ramp
door. Enter the elevator on the right hall and go down to 3rd level. Exit the
3rd level ramp door and go back down to the 2nd level back-north door. Enter
blue domed room, right to ladder room and climb up. Note the 4 panel clue under
the lowered elevator.
5,3
1,8
7,6
4,2
Go back to the 4 square door panel
and press the pads in the sequence shown at the clues. Press red button and
enter.Climb ladder to 2 rooms that are
under the switches room on the 4th level. If a green door blocks entry to
the rear room, go back up to the 4th level north ramp and enter through the
wooden door. Press the button to raise the green door.See a panel with ? squares – this is a
clue for a puzzle at a 3rd level’s railcar stop room. Study the directions of the gold
pipes on both walls in both rooms. These pipes are the clues for the switches on
the room above.Go back down and out of the blue domed room.
Take note of the 2 plaques: 3 right bearing lines with red 23, blue 5 and green
19 plaque and the 3 left bearing lines with red 13, blue 16 and green 4. Exit
the blue domed room.
3rd level back (north) ramp door: Climb up and go to the
north third level exit. Press button of the ramp door, enter and turn right
to the grill. Click on grill and take key. Turn left, forward to enter
the tram and then right to see a diagram on the wall of the circular path of the
railcar. Explore the different rooms in the area. Note the inner doors go to the
crystal cave with black water. There are 3 ramps each of which leads to big
crystal and a numbered (1, 2 and 3) stand. One ramp has a boarded door.
Remember the different puzzle rooms on the left of the tram. We will come back here later, meantime
exit and go down to 1st level of the tower.
1st level: Go down to the 1st level of the tower. The
back-north ramp is blocked by an inner metal door. The wood cabinet across the
stairwell is locked. Turn right and see a monitor at railing on the right. Go to
the south ramp at end and note the Xed light bulb above the metal hatch. Turn
around and see green pipe going to red button right of the entryway. Press the red button to unlock the
wood cabinet.
Wood cabinet – Click on blue knob to open the cabinet. There are 6 switches.
The 2 bottom right switches are attached to each other. Turn off the lit bulb by clicking
on the 2 attached bottom right switches – it removed power from bulb.
Lowest level of tower: Go back to metal
hatch and click on handle. Go down
ladder and turn around. Note the plaque with lines, red 2, blue 24 and green 17.
The left exit goes to a
railcar and the right exit goes to a ladder. Climb the ladder.
Tower circuit room:
Study the pipes going into the circuit panel which is the back of the switches
of the wood cabinet on the other side of the wall (1st tower level). Turn left
and see flesh colored pipes that go to the metal hatch we opened. The greenish
pipes are the ones that go to the monitor and wood cabinet.
Turn back to the circuit and look down – see the main power source. Turn right
and see blue and pink pipes going to the circuit panel. These are the ones from
the building behind the tower.
Turn the railing monitor on or
make green pipe connections – The railing monitor is powered by the greenish
pipes. Study the connections to lead from the greenish pipes to the power box below. Once you know the connections, go back to
the other side wood cabinet and flip the switches to form a complete circuit for
the green pipes. To go back to the other side – go down ladder, right, forward,
right, forward, left, climb ladder and back to wood cabinet.
Study the path that will form a complete circuit of the
2 pipes from the power box and 2 green pipe connections.Then go to the wood cabinet
at first tower level and flip the switches to copy the MIRROR image of
the connection at the back.Flip switches at: Top left -lean to the right, top middle – right, top
right – left, bottom left – left and bottom middle/right – lean to left.Railing monitor clues – Go to monitor on the railing. Press-HOLD the red button. Take note of the
numbers and their position on the 9 square grid. You will need it later.Make pink pipes connections
– Same way as the green
connection – study the panel in the circuit room to make a complete path for
the pink pipes. This is done to save time and get power to the next place we
are going to. Remember that pink and blue cables go to the building outside
the tower.
Study the path that will form a complete circuit from
the 2 power box pipes and 2 red pipes.Then go to the wood cabinet
at first tower level and flip the switches to copy the MIRROR image of
the connection at the back.Flip switches at: Top left -lean to the left, top middle – right, top
right – right, bottom left – left and bottom middle/right – lean to
left.
Go down the metal hatch to the lowest level of the tower,
left and ride the
railcar.
Railcar Stops:
Railcar stop 1 – Ships Gallery:
Press the up arrow button to drive forward and exit to right. See a locked
cabinet and the grid similar to the monitor at 1st level at the tower. We will
do this later. Turn right and see another plaque with lines, red 8, blue 20 and
green 12. Climb up the ladder and see the blue cable from the tower is connected
to yellow and the pink is connected to green. Look down through the window and
see a tilted blue dumbbell shape below the tower.
Climb down and turn around. See a
closed metal door on the left and the 7circles panel that can open it. Go to the
other ladder and look up. See that the button to open the grill blocking access
above is on green pipe. We saw that the pink pipe from tower is connected here
to green. So we already activated this button – if not go back and activate the
pink pipes connection at 1st tower level. Climb up and enter the ships gallery.
Ships gallery – Look around at the different ships
pictured on the wall. At the center walls of the room, there are 4 monitors: 3
have connector bars that can be changed while the 4th is not activated. Note
that 4th monitor is connected by pink pipes.
Check the pipe going through the portraits. The are yellow
pipes are connected to the blue cable at the tower. Go down and see that the panel for
the locked door is also connected by yellow pipes. Go back to the circuit room
at the tower via the down arrow red button of the railcar. Exit, forward, left,
up the ladder and study the blue connections.
Make blue pipe connections – Same way as the green and red
connection – study the panel in the circuit room to make a complete path for
the blue pipes.
Study the path that will form a complete circuit from
the 2 power box pipes and 2 blue pipes.Then go to the wood cabinet
at first tower level and flip the switches to copy the MIRROR image of
the connection at the back.Flip switches at: Top left -lean to the left, top middle – left, top
right – no change, bottom left – right and bottom middle/right – lean to
left.
Go back to Ships gallery at railcar stop 1. Look at the 6th picture, see and
take note of the 7 blinking lights on the ship. Go back down to the lower level
and face the 7 circle door control panel.
7 circle door panel – This panel is powered by the blue
tower cable. Enter the colors as seen on the 6th ship picture at the gallery.
From left to right: yellow, dark pink, cyan, cyan, red, purple and green. The
metal doors open automatically.
Ships gallery’s 4 monitor circuits
– Turn left and enter
to stand on the lift. Turn right and see a monitor with yellow pipes. Press the green button
stand to go to top
level. Turn left and study each wall starting from the power connections. Each
wall is connected to a monitor on the ships gallery on the other side of the
wall. The connector bars on the monitors complete the circuit running through
the walls and the 3 monitors. Complete connection will power the 4th monitor.From the wall that has the
switches, follow the pink pipes and then the yellow pipes. See the possible
connection shapes that you can adjust the connector bars on the monitors at
ships galleries. Be sure that you flipped the connection to contact the pink
pipes on the 4th wall with the switches.From first monitor by stairs to the 3rd monitor before the screened room:
The circuit study of each monitor
with the deduced red line connections: From left of power switches:Remember these are MIRROR images. Monitor connector bars arranged:
Go back to ships gallery and click on either buttons of each monitor to
make the mirror image pattern to that of the deduced circuit connections on the other
side of the wall.Click on the button of the 4th monitor. If the circuit connections are done
correctly and the switches on the other side of the wall are connected to the
pink pipes, see and take note of the numbered diagram.Go back to the other side of the wall via down the stairs, enter the metal
door, up on the lift and now flip the switches to the yellow pipes. Go down
the lift and turn right to the monitor. Press the button to see the other half of the
numbered
diagram seen on the 4th monitor at the ships gallery.
Exit and go back to the railcar. Press the up arrow, curve to the left, pass
railcar stop 2, press up arrow and exit at railcar stop 3.
Railcar stop 3 – Decorated hall: Exit, right,
forward and left. Look at the panel at left wall. Press arrows to see the
different shapes. We
will see them later in the game in another puzzle.
Enter through the double doors, see something decorated other than
pipes and metal. Look around and note the gold and purple pipes that run through
the building. The gold pipes hang across over the hallway from a window on one
side of the hall to a 4 circled panel at other side of the hall. You can also
check the other rooms using the key picked up from the 3rd level grill in inventory to open the doors.
Green pipes power room to
activate gold pipes – Face the 1st door down the hall with the pink double
doors on your left. Use the key taken from the grill at 3rd level tower back
ramp on door.Note green pipes that run through
the room. Turn around and close the door to complete the connection. Push down
the lever on wall left of door. Turn left and open the cellar door.Climb down, right and note the
different letters on the wall – this is a clue to a later puzzle at the end of
the maze.Go forward, up the ladder and see
another of the numbered plaques – red 14, blue 1 and green 21. Note that this
room has gold pipes. Pull down the lever to activate the gold pipes’ power.
Exit down and out through the door to the decorated hallway.Riveted metal squares
– Use the key to open the green
door next to the green pipes room. Press the buttons above a metal squares and
take note of the colors. Study the rivets on each metal panel under the
buttons: the inner square has different numbers of rivets from the outer squares. Red
button: 9 inner rivets and 4 outer rivets, blue button: 4 inner rivets and 8
outer rivets, green button: 9 inner rivets and 6 outer rivets. Exit and go back
to the railcar.
Railcar stop 2 – 4 huts area:
Open the 4 huts doors –
Press the down arrow of railcar and exit at next stop. Turn right, right and
see the control panel to activate the door.Sequentially press the triangular
buttons based on the numbers seen on the combined diagram of the clues seen on
the 2 monitors at railcar stop 1 – ships gallery.
Look around the 4 huts room and note
that the huts are accessible by a series of walkways and ladders. Each hut has
red buttons on all doors. The gold cable is attached to the back of the first
bottom right hut. There’s a blue beam that runs around on the edge of the
ceiling. There are 2
metal doors: one on the far left and one at far back wall. There’s a stand beside
the top right hut. There’s a metal panel on the metal towers that shows the
paths of each hut. The lever on the right of this panel is not activated.
Access the metal door at far left wall
– Open the metal
hut rotation panel that shows the paths inside the huts. By studying the layout of
the pathways and ladder in the room, turn the huts to gain access to the metal
door on left wall.1. Click-turn the top left to horizontal position to access the door. Turn
the top right to a back slash () position to access the left hut. Turn bottom
left hut to vertical position and the bottom right to forward slash (/) to
gain access to ladder by right wall.2. To save time, turn right and open the panel on the wall to power the
far left wall
door button at the top left hut.3. Now that the layout is arranged, walk the path. Go through the bottom
right hut, down the ladder at right, to bottom left hut, down the ladder
at right, to top right hut, down the ladder and forward to top left
hut.4. Facing the metal door at far left wall, turn around and press the button
on the left to open the metal door – activated by step 2 above.Enter the room and see the plaque
with red 6, blue 15, green 10 and lines on
left wall.Letter clues – Climb the ladder and look out the
window. See that it is the decorated hallway at railcar stop 3 and across the
hall is the
4 circles panel.Press the top button to see the
formation of letter on the 4 circles across the hallway. Press the bottom
button to cycle the circle on the right to different clock positions.
Clock position of the circle (bottom
button):Letters formed (top button): Clock position of the circle (bottom
button):Letters formed (top button): 1:00 C 7:00 reversed Z 2:00 reversed N 8:00 reversed C 3:00 U 9:00 X with line above 4:00 upside down U 10:00 X with line at right side 5:00 X with line at left side 11:00 N 6:00 X with line below 12:00 Z Turn to right wall and pull lever to activate the metal door on back wall
of the 4 huts room. Exit and go back to the hut rotation panel.Power the lever beside the hut rotation panel
– The lever on the right of the panel is attached to a gold cable that goes to
the back of the bottom right hut. To reach that side of the hut – Open the
metal hut rotation panel that shows the paths of the huts. Click-turn the top
right to forward slash (/). Turn bottom left to vertical position and turn
bottom right hut to forward slash (/). Top left hut is not used.Walk the path until the back side of the first hut. Press the left red
button that is attached to the gold cable. Go back to the hut rotation panel.
Lower the lever at right side of the panel. Hear a sound.Open panel and see a map of the room. Note the different points of
interest and the green lines we already activated. Close the door and press the lever again.
Access the metal door at back wall
– Open the metal hut
rotation panel door that shows the paths of the huts. Click-turn the top left
to vertical position to access the metal door. Top right hut is not used. Turn
bottom left hut to horizontal position and the bottom right to back slash ().
Close the door and be sure to pull down the lever. This raises the panel to
top of the tower. Walk the huts to the back wall ladder. Climb up and enter
the door to the tram.Access the stand by the top right hut
– Press the button
to move the tram forward to the top of the hut rotation tower. Turn right and
open the raised hut rotation panel. Click-turn the top left to vertical
position. Turn the top right to back slash () position. Turn bottom left hut
to horizontal position and the bottom right to forward slash (/). Press the
tram button to go back. Walk the huts until the stand at top right hut.Press the button on stand and take the
first blue fragment.Back to entrance – Go back to the tram at top left
hut. Ride the tram. Turn right and open the raised hut rotation panel.
Click-turn the top left to vertical position. Turn bottom left hut to
horizontal position and the bottom right to back slash () position. Press the
tram button to go back. Walk the huts until the main door and then exit the
room.
The
second blue fragment
Railcar stop 3 – Decorated hall: Ride the railcar to
the stop 3 – decorated hall. Before entering through the pink double doors turn
right, forward and open the metal window on the wall. Look out and see a lit green
half circle with a point glyph under the walkway at the 4 huts room. Turn right and see a locked metal door.
Activate the metal door – Note that green pipes power
the control panel for the metal door. Enter through the pink double doors. Go
forward to the stairs and turn to either side. Look at the 4 3-bulbs
lamps. Note the position of the lit and unlit bulbs as well as the
configuration of the wood that holds them to the wall.Turn to face the pink double doors and enter the
2 doors on the left.
Use the key and click on handle to open the door. Note that green pipes connect the panels. See 4 circled panel on the side walls. Click on circle
to light up or unlit the 3 top circles to correspond to the lamps outside. Click
the button to correspond to the shaped wood at base of the lamp. The shapes
are unique to each puzzle so the 4 puzzles are not interchangeable. Do this to both puzzles in this room and to the
room next door.
Left wall of left room Right wall of left room Left wall of right room Right wall of right room Exit through the double doors. Go back to the closed metal door on the left
wall. Press the red button and enter the room. Pull down the levers on both
sides of the room.Foyer – Exit the room and go through the opening across the double door. Turn left
to the sliding window. Press button and take a mathematical
disk fragment.
Railcar stop 2 – 4 huts area:
Exit to the car and go back to Railcar stop 2 – 4 huts area. Exit and turn left.
Press button and take another mathematical disk fragment. Exit and ride
the railcar.
Railcar stop 1 – Ships Gallery:
To get to right side rail stop
– Exit the railcar at stop 1 and go forward to the 9 squares panel. Click on the
squares sequentially following the clues seen on the monitor by the railing at
first tower level.

Turn left, press red
button and the box opens. Flip the switch to change the path of the railcar to
the right.Enter the railcar and go forward to
right rails until the blockage on the rail
tracks. Turn
left and open the roll up window. See numbers in a circle. Go back to stop
1-ships gallery and open the box on left wall. Flip the switch to change the
path of the railcar to the left again. Enter the railcar again and go forward to
last stop on the left rail tracks.
Railcar stop 4 – Squares puzzle: See a familiar circle – we just saw this
clue. Press the circle parts sequentially as shown by the clue at the window at
right rail track. Press red button and the door on the right opens.

Square within a square color puzzle
to activate the riveted metal panels at decorated hall – Face a square
within a square picture. The squares have lines that go to either the inner or
the outer squares. The end of the lines has an up and down arrow. Turn right
and see a circle above a switch. When the switch is turned, the color of the
light above it changes. On the left wall see a colored diagram that has
numbered squares for the inner or outer colored squares.The clue here is from the riveted metal
squares at railcar stop 3-decorated hall. The total numbers of rivets on the metal box under the red, blue and
green buttons are the numbers to enter.On right wall, flip the switch to red. Turn left to squares and
enter 4 for
the left outer square and 9 for the right inner square. Verify the
numbers at bottom of the left side panel.On right wall, flip the switch to green. Turn left to squares and
enter 6 for the left outer square and 9 for the right inner square. Verify the numbers at the second
from bottom right side of panel on the
left wall.On right wall, flip the switch to light blue. Turn left to squares and
enter 8 for the left outer square and 4 for the right inner square. Verify the numbers at the second
from top at left side of panel on the left wall.We have now activated the riveted
metal panels at decorated hall. We need more information for that puzzle.
Tram circular drive
at 3rd level back (north) tower:
Ride the railcar and proceed to
railcars top 1. Exit and turn right. Climb up to tower area and go to 3rd level back (north) ramp door.
Tram stop 1 – Entry:
Go forward and be on the tram with a door ahead. Turn right and see a map of
the circular path of the tram. There are 3 inner stops through doors
that lead to ramps with numbered stand in the crystal cave with black water. Go through door
and see right stop with stand #3. Go back to tram and go forward.
Tram stop 2:
See 3 panels that need more info. Go back to tram.
Tram stop 3 – Shaped puzzle:
See 4 panels on the walls. 3 of the panels have the 8 pointed circle, 4 pointed
square and a cross.
Get the code for the squares –
One panel does not have a shape above it. Press the button once and see a cross
shape. Press twice and see 2 curved lines: one on top right and other at bottom
left. Press 3 times and see 2 curved lines: one at top left and another at
bottom right.
Tram stop 4 – Mathematical disk puzzles:
Go back to tram and go forward. On left wall is a simulation panel, middle wall
has a cabinet and on right wall is the panel that shows the glyphs seen at left wall
before the double doors at decorated hall earlier.
Simulation – Note the pipes
entering at top left and another from below. Press a square once, twice and
thrice to see the 3 shapes we saw at railcar stop 3.The object of the simulation is to
make a unbroken connection between the 2 pipes: one on top left and one at
bottom right. Press button. When correctly done, the bulb at left will turn
yellow.
1 3 3 2 3 2 1 1 2 Number of
clicks on light brown squares.Click the blue
squares to connect the brown squares.This panel is similar
to the ? panel at the 4 square room at the 2nd floor blue domed room. Now we
know the numbers that corresponds to the ? on that clue panel.Mathematical disk – Turn right and open cabinet. Place the 2
mathematical disk fragments
taken from decorated hallway’s foyer area and 4 huts’ area on the circle.Study the chart and note
that the 3 shapes we saw at tram stop 2 room is at bottom left of
the map. At top left is a 9-square setup similar to the brown part of the simulation clue
at left wall and the ? panel at the blue domed room.Follow the lines
backwards from shapes at bottom right to top right’s circle mathematical process.
These processes in turn are result of another set of diamond math process at bottom
left which takes their number from the top left squares we are familiar with.
Using the number of clicks of
the brown squares at the simulation chart, calculate the numbers for the
diamonds.After calculations, follow
the diamond lines down to bottom left diamonds.
1 x 3 x 3 = 9 + + + 2 x 3 x 2 = 12 + + + 1 x 1 x 2 = 2 = = = 4
7
7
Top left square math
processesUsing the
numbers of the top left square math processes, calculate the numbers for
the circles.After
calculations, follow the circle lines up to top right circles.
12 – 4 = 8 + + 9 – 7 = 2 + + 7 – 2 = 5 = = 28
13
Bottom left diamond math
processesUsing the number
of clicks of the bottom left diamond math processes, calculate the
numbers for the big circles.After
calculations, follow the big circle lines to bottom right shapes.
28 – 8 – 13 = 7 – 5 – 2 = 3 =
8
Top right circle math
processesFollow the big circle lines
down to the 3 shapes seen in railcar stop 3.4 pointed square = 7
8 pointed circle = 3
cross = 8
Tram stop 3 – Shaped puzzle: Ride the tram to stop
3. Enter the data taken
from the mathematical disk on their respective panels: 4 pointed square = 7,
8 pointed circle = 3 and cross = 8. Enter the door to the glass maze.Thanks to Knut for the maze help.
Glass maze – Turn right and
make a copy of the map of the maze. To reset the maze – press the button on
the opposite wall to get the maze touched doors back to the starting
positions.
The graphic above shows the start
of the maze at I.
The cardinal directions are based on the manual’s compass directions: The points of the
compass is highlighted to show the direction that is viewed: top lit arrow
– the player looks to North, right lit arrow – the player looks to West, bottom
lit arrow – the player looks to South and left lit arrow – the player looks to
East. The red circles are the door buttons.Hint – Make a copy of the map and
label it like the graphic. Turn it around as you follow-walk the directions below.At I, go forward to H. Press button
and door opens. Go to G, K, O.At O, turn left-east, press button
and door closes. Go back to K and then J.At J, turn around-east, press
button and door closes. Go to N, R, S (with colored numbers and dented grill),
T (with grill that leads to ladder), U (with arrow), Q (with brown door), P,
L, K and O.At O, turn left-east, press button
and door opens. Go forward to P.At P, turn left-north, press button
and door closes. Go back to P, O, K, G and H.At H, turn around-west, press
button and door closes. Go to L, K, G and F.At F, note the lines at left of
door and purple button. Go to A (with barred window).At A, turn left-east, press button
and door opens. Go forward to B and see symbols on the door and colored
numbers on the wall – red nine, blue 22 and green 3. Go back to A, F, G, K, L,
H and C.At C, turn left-west, study the
code with yellow squares and then turn around-east.Door at Room C:
Open door D – Based on the
clue seen on opposite wall, press the square buttons in sequence.Press top red button. Press the
squares in sequence shown by clue: bottom, bottom, top, bottom, middle,
top and top square. Press bottom red button. Door opens. Enter room D.Room D:
Open the box on left wall –
Turn right and see an octagon with different dot configurations for each
wedge. The blue pipe connected to a closed compartment goes around to the
opposite wall.Turn left and see a cylinder with a
geometric shape. Pull down the lever on the right once to get the octagon seen
on the right wall. Pulling the lever more will show other configurations.Press the red button to see a
series of lights for each wedge of the octagon. Take note of the
sequence.Turn left and see the different dot
configurations seen on the picture on the opposite wall.Correlate the sequence of the 8
lights from the middle wall to the different dot configurations on the other
wall.Press the buttons of dots in the
sequence correlated. If correctly done, hear an opening sound. Turn around and
take the safety device from the opened compartment.
Go back to C, H, L, K, G, F and A.
In A, turn around-south, press
button and door closes. Go to B.In B, press the button at center of
door. Go to C, H, L, K, G, F, J, N, R, S, T and U.In U, press button and door closes.
Go to T, S, R, N, J, F, G, K, O and P.In P, turn left-north, press door
and door opens (don’t go in). Go to O.In O, turn around-east, press
button and door closes. Go back to K, L, P, Q and M.Room M:
There are 4 squares at middle wall and the 2 side walls have each 2 cylinders
with lines.Activate door E – Note the 4 squares with gold pipes
leading out of each square. Follow each pipe to see which of the lined
cylinders are positioned from top to bottom. Right wall: Top cylinder is
connected to top square and bottom cylinder is second from bottom square. Left
wall: Top cylinder is second from top square and the bottom cylinder is lowest
square.Arrange the lines to copy the lines
seen left of the door at room F.
Right wall -Top cylinder – turn once to arrow pointing
left, bottom cylinder – turn once to arrow pointing left.Left wall – Bottom cylinder – turn twice to arrow pointing right. Top
cylinder – no change (vertical line)Go back to room F by going to Q, P,
L, K, G and F.In F, if the lines are done
correctly in room M, press the purple button and the door opens. Go to E.In E, turn right and forward to the
circular hole on the wall. See a series of laser barred openings.Force fielded-letter openings:
Each side hall has 3 force fielded openings. Enter the inner hall and note the letters at
the side of the openings.Room E
Z
X
N
L
H
U
C
Circular cover
Beside the H opening,
see a red button that when pressed moves the dial to 7 position of a clock
face. At the end of the sequence, the circular cover at the other room opens. Make note of the sequence
since it is randomly generated.After noting the
sequence of clock positions of the dial, correlate the clock position to the
letters seen at the 4 huts area clue.Then adjust those
letters to the letters seen on the opposite wall accessed at the
cellar-underground after completion of ‘green pipes power room to activate
gold pipes puzzle’ at the railcar stop 3 – decorated hall.Then exit the inner hall through the first correlated letter.
Enter the inner hall through the second correlated letter opening and exit through the
third letter opening, etc…
Clock position of the dial Letters formed from 4 huts area Opposite letters at decorated hall 1:00 C L 2:00 reversed N N 3:00 U U 9:00 X with line above X 10:00 X with line at right side Z 11:00 N H 12:00 Z C When correctly done, the circular
covering remains open to allow the pick up of the second blue fragment. If
done incorrectly – circular covering does not stay open, press the red button
again to get a new sequence of clock positions.Exit and go back to room E. Go to
F, J, N, R, S and T.In T, turn right-south and open the
grill to go to V.Cab ride: Go forward, up the ladder and turn
left. Press the button and a cab moves closer. Enter the cab, press the
green button and travel through the tunnel. Do not exit, turn around in the cab
and press the other green button to go back the tunnel. See the F9 sign on the
side of the opening. Turn around again and press the button to go to the end of
the tunnel.Exit the cab and turn right. See the
pipe that goes to the hydroelectric area and a ladder on the left.Balcony: Go down the ladder on the left and
turn right to see a letter and number panel. Click the arrows to enter F9. Turn
left and press button. The bottom part of the ladder swings open.Go forward and
see that you are now on a balcony at the back part of the elevator area. Press the red button
and it turns green. Hear a clink sound and this will open the closed door
between back entrances of elevators A and B.Look down and see a red concave shape.
Go back to the ladder. Press button
to close the ladder-gate. Climb up, turn right and climb the ladder to the pipe.
Climb in and slide down – Weeee!Go
back to the Tower:Exit the hydroelectric area, forward
and left to the water-walkway cavern. Turn right, forward, enter building and
left to the former screen door. Climb up, turn around, exit and turn right to the elevator area.Elevator area reprise:
Enter elevator B and go down. Exit, turn around, close the door and press red button
to bring elevator B up. Turn right and go to elevator C. Press button, enter and go up. Exit
and go forward to the back of elevator B. Enter elevator B and go down. Exit to
the ramp. We just opened the door on the right by pressing the balcony button to
green but we need more data.Go forward to elevator A. Go up
elevator A, exit and go to elevator B.
Press button, enter elevator B and go down. Go to elevator C and press button to bring it
down. Do not enter elevator C but go back to elevator B. Go up elevator B, exit
and go forward to the water-walkway cavern. Turn right and enter the room on the
right. Exit to go to elevator A. Go down elevator A and exit on the right. Go forward to
the door. Press button and forward to elevator C. Enter elevator C, go up, exit and
forward-enter the door. Climb down the 2 ladders and forward to the tower area.
Tower AgainWe left a lot of unfinished places to
explore and things to do here at the tower.Power to the
Crystal Cave:3rd level back (north) ramp door:
Open the 1st level tower door –
Enter and see the flashing button. Do not touch it yet. Go forward and see that
the tram is not here. Look down and see a ladder. Go down the ladder and turn
right. Go to the window. Press the button and see the door inside the 1st level
north ramp door is opened. Go back up and note the metal door by the ladder.
Exit through the door.Go forward, to exit door, turn around
and press the flashing button to call the tram. Exit the area to go back to the
tower.1st level back (north) ramp door:
Go down to 1st level north ramp and enter. See that the metal door is now gone.
Go forward and ride the rail car. Turn left and pull the metal hook to go
forward. Exit to the left and climb up the ladder.Crystal cave:
Push the metal hatch and exit to the crystal cave. This must be the ramp that
was boarded shut at the tram’s circular path at the 3rd level. Look around and see the other 3 inner ramps across the black water. There’s a console on the
railing. When the buttons are pushed, see a series of lights move across the screen
and the lines below changes. We will do this later. Turn right to go back to the
metal hatch. Close the hatch and see a diagram with 12 wedges and
geometric shapes. A piece is torn off. Take note of the diagram. It is
one of the clues for another puzzle later. Open the metal hatch and go down.
Ride the railcar to the other end. Exit to the left.Second 12 wedges clue:
Turn right, forward, left and push red button to open the metal door. This is
the area accessed earlier at the 3rd level. Climb the ladder, look up to view
the bottom of the tram above and see another of
the 12 wedges with a power sign at the center, similar to the one on the metal
hatch by the crystal cave. Climb down, go back to the railcar and exit through
the door.3rd level back (north) ramp door:
Circular map – Enter the tram.
Turn right and note the 12 wedges of the route and the 3 inner ramps to the
crystal cave. Note the triangle in a square by one of the wedges.Crystals cave puzzles:
Power to the crystal cave puzzle
– Go forward to tram first stop and exit to the left. Three walls have a setup
for entering a shape and numbers for each of the crystals at ramps in the cave.Based on the 3 12 wedges clues just
seen, correlate the shape needed and the numbers to enter.Shapes – Study the different
shapes available by pressing the left button. The shapes seen on the clue from
the metal cover plus the tram diagram shows only 6 shapes. The wedges in between
the ones with the shapes have the combination of the shapes on either side. So
the triangle inside the square of the tram diagram is situated between the
square and the triangle of the metal cover diagram.Numbers – The numbers from the
ladder clue can be correlated to the shapes by positioning the power symbol
similar to that of the metal cover clue.Crystal ramps 1, 2 and 3 – Using the tram diagram that shows the inner ramps and the boarded up door
position learned driving around the tram circuit, you can identify which one is
the shape and numbers for the setups.Enter the shape and then the number.
Pictures are rotated to allow for
easier correlation.Solution:
Enter the shape and numbers on the setup. Crystal 1 = hourglass in hexagon (X in
hexagon), 8.2. Crystal 2 = square, 2.4. Crystal 3 = triangle, 1.9.Press the button right of the
opening. When done correctly, the bottom light turns green and the horizontal
lines on the left turn vertical showing that the pipes are now connected. Also,
a thunk sound is heard.Crystal activations – Go back to the tram and go forward. Exit to the right and enter the inner
Crystal cave. See the crystals of different colors are now powered around the
black water.Press the number on the panel in
front of the crystal and see circle(s) appear at points of an inverted Y. Wait a few
seconds after each press of the number. Listen for the sound of the crystals
tuned – humming sound. Go back to the tram and ride to the other inner doors
to do the other 2 crystals.Solution: Crystal 1
– Blue (cyan), top and bottom right circles on inverted Y. Crystal 2 – Red,
circles on all points of the inverted Y. Crystal 3 = Green, circle at bottom
left of inverted Y.Exit the cave.
Crystal codes – Go to 1st level
north ramp door. Ride the railcar to the end by pulling on the hook. Turn left
and climb the ladder to the boarded up ramp. Look close at the console on the
railing.See that there are now vertical lines
at the center. Press the red buttons continuously until a crystal is between the
lines. Take note of the shape formed by and position of perimeter lines around
the spokes. These data usage will be later on
Go back to the tram and ride to exit
at
1st level ramp door. .Blue Domed Room
puzzles4th Level (North) back ramp area: Go
to 4th level north door. Go forward and enter the wood door. There are 3 rooms
after the wood door with switches on both side walls.Power to blue domed room –
Based on the clues of the gold pipes seen earlier at the room below (above 2nd
level) accessed by the 4 squares panel door, move the switches to get a flow of
power from the main box at the last room to exit the first room.First room left-north switch – left.
First room right-south switch – right.Second room left-north switch – left.
Second room right-south switch – left.Third room left-north switch – left.
Third room right-south switch – left.Open the cabinet door under the red
button on the power setup at middle wall.Insert the safety device taken from
Room D at the glass maze. Press red button. If done correctly, a thunk sound
is heard.Balls -lights setup – Go to
the balls-lights setup across the elevator. Note the blue pipe leading off it to
the floor below.The plaques with lines and colored
numbers seen all over the area are the codes for the gamer’s choice on this set
up.Press the red button and take note of
the path of the ball and the color lit up when the ball goes into the hole. This
is then correlated to the corresponding line of a plaque. The gamer’s number is then the corresponding colored number on the plaque. The number will be used in a later puzzle.The path of the ball is made up 3
lines passing the dark brown wood of the setup.
Below is a list of the
lines and colored numbers on the plaques in the area. L =left and R = right. For example: LLR means
the drawing on the plaque and the ball’s path are made up of 3 lines that looks like
this –
/
/
3 lines path LLL LLR LRL LRR RLL RLR RRL RRR red # 13 9 6 14 11 2 23 8 blue # 16 22 15 1 18 24 5 20 green # 14 3 10 21 7 17 19 12 Press the button. Follow the path of
the ball. Note the color of the light.Look at chart above and see what number was selected
based on the path and color of the ball. Do not press the button anymore. This will be your
number for a later puzzle.Exit and go to level 2 north ramp.
Blue domed room (2nd level North):
Go down to the 2nd level-north door and enter. See that the blue domed room
is now lit. Go forward and stand at the center of the room. Look up and take
note of the lines on each of the 8 wedges. Look down at the lines-dots on the
wall of the room and note which ones correlate to the lined wedges at the
ceiling.Exit and go to 3rd level north ramp
door.3rd level back (north) ramp door:
Ride the tram to the second stop. Turn left, forward and enter through the metal
door to the glass maze. Forward from room K to H, go right to C and face the
door to D.Get number for the lines-dots of
the blue domed room – Enter the code to open door D: Press top red button. Press the
squares in sequence: bottom, bottom, top, bottom, middle,
top and top square. Press bottom red button. Door opens. Enter room D.Pull down the lever to look for the
pattern seen on the blue domed ceiling.Press the red button and note the
sequence of lights. These are the sequence of the lines-dots that correlates to
the wedges of the pattern.Go back to blue dome room at 2nd
level north ramp by turning around, forward to C, left to H, left K and out to
the tram. Ride out of the area.
Blue domed room (2nd level North):
Enter the room on the left of the
entrance opening. There are 3 boxes on the walls.See the lines dots puzzle is to the
right and connected by gold pipes – same ones that brought power to the blue
dome lights. The one to the left has blue pipes and is connected to the
balls-lights setup at the 4th level rooms.Lines-dots puzzle – The
lines-dots here are the same ones on the wall of the blue domed room outside.The object of the puzzle is to push the
lines-dots buttons in sequence 1-8.The wedge pattern on the ceiling is
correlated with the lines-dots on the wall of the blue domed roof. The line-dots
are numbered by the lights in room D at the glass maze.Press the lines-dots in the deduced
order.
Turn around to the number panel on
the other wall.Number panel – Enter the
gamers chosen number deduced from the correlated lights-balls
puzzle at 4th floor north level room and the plaques around the area.When both puzzles are done correctly,
press the red button at middle wall. The box opens. Take the third blue
fragment.
If it doesn’t work, go back and select a new number from the lights balls puzzle
at 4th floor north room.Fourth and last
blue fragmentBack to the elevator area:
Go back out of the tower area via 2nd level walkway out to elevator C. Go down
elevator C and go forward to elevator A. Go up elevator A, exit and go around to
the other side of elevator A (enter room, left, forward, left back to elevator
area and left to elevator A). Go down elevator A, exit, forward and left at the
door that was close earlier. It should now be opened when the red button was
pressed to green at the balcony accessed by ladder after riding the cab by the
glass maze.Turn the tumbler entrance to 4th
level south tower door – Using the crystal data taken from the inner ramp at
the circular tram ride at 3rd level north tower door; press the buttons to get
color, perimeter lines on spokes and the circles on inverted Ys.
Turn to the exit, move forward 2xs
and turn around. Press the button to turn the tumbler’s entrance to the right.Exit the room.
Back to the tower: Go to elevator A to the right. Go up
elevator A, exit and go to the other side of elevator A via the room at the
water-walkways area. Enter the front side of elevator A and go down. Exit to the
right and go forward until elevator C. Go up elevator C, exit and go forward
until the tower.4th Level (south) front ramp area: Press
the button and see that the tumbler’s entrance is facing here now. Go forward
and look through the crack on the wall to see the black water of the crystal
cave. Click on the box and take the fourth-last blue fragment. Go out of the
passage and down to the 1st level.1st level (south) ramp:
Go down the metal hatch and ride the railcar to railcar stop 3 – decorated hall.The
Disk!Railcar stop 3 – Decorated hall:
Exit railcar, right and forward through the double doors.Riveted metal panels – 2nd door on the left:
Enter the 2nd (green) door on the left. This is the clues for the square within
a square puzzle
earlier one stop down. The pipes here are lavender colored.Colored lit shapes puzzle to bring
power to the bridges – There are 3
closed panels. When pressed, the button on the left is red, middle is blue and
right is green. When the panels are opened, see a circle depicted. Click on a
segment of the circle and it will change shape.The object of the puzzle is to make
the colored shapes seen in 3 places around the area: Blue at the bottom of tower
seen through the window at the ships gallery, green shape seen below the bridge
at the 4 huts area seen through the window at the foyer of the decorated hall
and red shape seen looking down the balcony by the ladder after the cab ride
from the glass maze.
Click segments of the circle to make
the shapes of the appropriate color: Red – click on bottom right segment, Blue –
top left and bottom right and Green – click on top right and top left segment.Exit the room and follow the lavender
pipes to the large double doors to the end. Go through the double doors and use
the now powered lever at right to swing the bridge to your side.Blue disk room:
Walk to the room at right. Turn around and place the 4 blue disk fragments on
the left and right panels at side of the door. This then powers the right lever on the bridge. Go outside and pull lever at right. Walk to the room on
the right.Artifact room: Go
forward and enter the room with a wooden floor. To the left is a metal door,
ahead is a ladder to go down and to the right is a door with the Disk that Zetais needed. The disk is held by clamps.Ladder: Go down the
ladder and turn around. Pull the handle of the folding door and see that the
opening is barred. There’s a keyhole on the left. Climb up.Disk room: Press
the right button to raise the disk door. Turn left and see the map of the
decorated hall, swing bridge and the Artifact area. Go down the ladder and see a
closed metal door. Go back out and to the metal door.Metal door:
The metal door has light blue pipes leading inside from the inoperative button
left of the disk door. Use the key on door. The light blue pipes leads to a 9
square puzzle. Click on it anyway you want and then go out and press the button
left of the disk door.Trap room: Oooops!
You fall down through the wood floor. You are trapped! You are at the other side
of the barred door. The woman in red opens the folding door and speaks to you in
an alien language. She takes the railcar code card and gives you a gold
coin. She then opens the door to the right. Climb up and press the door
button to exit. Turn to the exit door and see the woman in red by the swing
bridge. Exit the area by swinging the bridge using the left levers to go back to
the railcar outside the decorated hall.Back to Elevator A:
Ride the railcar back to the tower. You can go back to elevator A by exiting
through the 2nd level exit and back to elevator C or via the drain pipe by
cab off room V of the Glass maze.Coin slot – At elevator A using the
elevator C route, go down elevator C, forward to elevator A. Go up elevator A,
exit, forward and insert the gold coin on slot right of opening.Go down elevator A again and exit
using the opposite door from the buttons. Press the now green button and look
through the pulsating glass. See the pattern needed for the 9 square panel at the
metal door room by the Artifact room.Go back to decorated hall via the
railcar below the 1st level at the tower – Enter the elevator, exit to the
right, forward to elevator C. Go up to elevator C, forward until the tower and
railcar below the metal hatch at 1st level.Artifact Room at Railcar stop 3 – Decorated hall:
Go forward to Artifact room via the swing bridge.To power the hinge of the disk –
Enter the metal door room on the left.Click on the 9 squares to form the
pattern seen through the pulsating glass.
Exit the room and press the button
left of the disk door to power the hinges.Take the disk.
Go back to the camera room at the
Arrival building via elevator C (or via the drain pipe off the glass maze – I
just like sliding down that drain pipe), then elevator A and out of the
water-walkway area. Go up to the Arrival building and to the camera room.Camera room at Arrival building:
Place the disk on the circle on the wall. Automatically take the picture. Take
the photograph of the disk and the disk off the wall.Monitor room: Go to
the monitor room by the main exit door. Insert the photograph in the slot.
Listen to Kales. Take the photograph. Turn right and press the button of
the railcar lift. See the railcar get elevated.Code card: Exit the
building, forward and left of ramp. Enter the through the door and place the
disk on the circle. Take the code card. Listen to the woman in red.Exit and go to the railcar. Insert
the code card on slot, enter, press button and ride out of RHEM 2.Zetais takes the photograph and hopes
that you can join him in the next adventure.
This document may not be distributed without express written permission of
the author and the content may not be altered in any way.
For
Questions or Comments on this Walkthrough,
Please write to:MaGtRo
Copyright
© 7/2005MaGtRo
Other guides for Rhem