Rhem
RHEM
By Knut
Mueller
Walkthrough by
MaGtRo September, 2002
Game
play: Rhem is a first person point and
click game. It is non linear and depends on observations of the environment for
clues. Look around, note the different paths based on map, places not yet
explored, look up and down on ramps, where pipes or cords go and characteristics
of the environment. Only 2 items can be picked up and kept. I would recommend
that if you have space in the computer to download the whole game in your hard
drive to skip the CD changes in game play. Follow the procedure on how to in the
read me file. To access the Options menu on top, press the space bar.
You are in a rail car that passes
through a desert landscape, a water landscape, a grassy landscape; all separated
by tunnels and finally reach Rhem, a walled area surrounded by water. Gate
opens, the rail car continues inside the complex and stops. Turn left and exit
the rail car. What is this place and what are you doing here? Let us
explore and find out. The appearance of
the letter at the bottom bar of the screen (hidden inventory) is an error in the
game. The letter should appear only after obtaining all 4 parts of the master
copy of the letter and printing it in the secret 4 way tower.
Arrival Valley
Round walkway
building: Go forward until a round
building (red lines in map). Press the red button to enter. Go to the other end
of the corridor. Top level North Exit – There is
a door with another red button. Go forward until the path ends. There is a
revolving walkway across the gap. This will be worked on in another area of
the game. Turn around, go back to the
round building and go down the metal ladder. Turn around, go forward, note other
doors on both sides (before the door on the right side, a metal pipe protrudes
from the wall) and then go out the door.
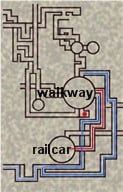
Areas that can not be accessed
yet: Go forward (blue lines in
map), see stairs and go under the steps (clear line under blue line) through a
tunnel. Forward, climb stairs, forward turn around and go under the stairs.
Enter the tunnel, left, forward, up and go to the balcony on the right. See a
lowered platform and another building across – another place to check. Remember
this place!! Turn around, right down the stairs and see a purple buttons stand
by the cliff side.
Go back and climb the stairs we went
under in. Forward until you reach an open doorway. Go forward through open
doorway and see a red buttons square stand. Go to end, see a depiction of a
floating bridge when water is low and when water is raised and a round tower
beyond the lowered bridge. The bridge is down because there is not enough water
to bring it up. We should raise the water level then to get to another
area.
Stranded:
Go back to the open doorway, turn left and go forward. When you make the next
turn, a man standing by the walkway above close to the rail car you came in
talks to you. He is stranded here for a long time and can not wait to leave. He
departs and takes the rail car leaving you stranded. Uh Oh!!
Round walkway
building: Continue forward until
another lower level door of the round walkway building is reached. Go forward by
the fence and turn left. Look through the lens and see inside the building. Go
back to the door and see a red button on the side panel with a cross underneath.
This is used to call the lower ramp to the door in case it is facing another
exit. The man must have moved it since it was facing the other exit to the right
you came out of. Press the button on the door, enter and note that the metal
pipe seen before is the lens to look inside. Climb up the ladder, turn around,
forward once and turn around again. Go forward on the corridor and enter the
door.
Getting Around
Rhem:
Tower by walkway
building: Close the door and see
the map of the immediate area.
The brown panel is the control for moving
the walkway to the 4 doors on the upper level and the 4 doors at the lower
level. The path with a line at the center shows the direction of the top and
bottom level walkways and the path with no line at the center shows the other
end of the top level walkway. Note that you are at the South, bottom of panel.
Press the black button and change the position of the walkway to connect south
(where you are now) and left (west based on map). This will enable you to go
around to other areas of Arrival Valley. Close panel door and turn
right.
The 7 buttons square panel will give the codes to
similar colored buttons panels seen while walking outside. Get the codes for
the different colors by pressing the buttons and getting a set of numbers with
only one color. A sound is heard when correctly done. From left to right
numbered 1-7: Green buttons code – 1745, Purple buttons code – 7534, Blue
buttons code – 2361, Red buttons code – 5216. Turn around and look at the
opposite panel.
The rotating bridge panel shows how to turn a
rotating bridge. Press the red button to see a bridge. Press the blue button
and the bridge turns. Exit and enter the walkway building. The walkway
has been moved and the exits are now different.
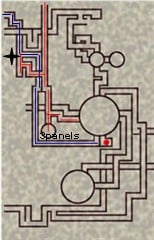
Red line goes up to well
pump field.
Blue line goes left to Water
pipes building.
The star is where the manhole
that connects the top and
bottom level is
located.
West top level
walkway: Go forward on the
corridor until the other end. Open door, go forward and left at the
intersection.
3 control
panels’ site – There are 3 panels here: The left panel shows an I
below the screen. When the vertical red button is pulled down, different pairs
of wedges are seen. The middle panel shows water distribution by pressing the
top button and either of the 2 below it (4:0, 3:1). The third button shows
nothing. The right panel is a blue buttons panel. Press L-R buttons 2361. A
green elongated oval and a 3 pointed pyramid are
seen.
Manhole
building: Turn right, go forward
until the first intersection to a building and turn left. Press L-R buttons 5216
on red buttons panel and see a purple elongated oval
and a zigzag pattern. Move back and turn right, forward and enter the door with
mosaic pattern. Place the cursor on the hand pattern and rotate to the right to
unlock the manhole cover. This goes down to the lower level and to the path to
the water pipes building. Do not go down yet – turn back, go back to the main
path outside and turn left at intersection.
Raising the water level to
tower area:
Well pump
field: This goes out to the
right side of a field of pipes ending in 4 well pumps.
Reading the
gauges-vertical pumps first time – Go forward, turn left, forward, right,
forward, right and see a gauge with the well vertical pipe on the right. Note
the double spiral at the center of the gauge. Press and hold the button until
the line stops – note the number. Also note the position of the well pump and
the horizontal pipe that goes out of it with respect to the other well pumps. Do
the same to the other well pumps. From central walkway: Bottom right well D – 7,
bottom left well C – 2, top left well B – 3 and top right well A – 4.
Reading the
vertical pumps second time – Go back to the entrance of the well pump field
and then forward instead of exiting to the right. See a telescope stand. Look
down at the base of the stand and see a spiral that ends on the left. Look
through the telescope and note down the number where the line passes the
vertical well pump (not the gauge). Do this for all 4 well pumps. L-R: well D –
1, well C – 5, well B – 6 and well A – 9. Exit the field.
Go back to the manhole cover building.
Go down the ladder and go forward. On the way to the round water pipes building
is a red buttons square panel. Press (L-R) buttons
5216 and see a blue elongated oval and a connected
db. Enter the round water pipes control building.
Water pipes control
building: This is where the water
flow received from the well pumps field is controlled. Climb up the ramp and see
4 closed panels. When open, note 3 different spirals and number squares beside
it. Go down, left, forward and see a control panel with 0 and 1 close to the
door. The square panel below it has 2 lines and when pressed produces a
discordant sound. Turn around, climb the platform by the wall and then climb the
ladder.
Water pipes control building
annex: Turn right and enter the
door. Turn left, forward, right and pull down lever on wall to open the door on
the left. Enter door. Look at picture of pipe distribution. Turn right,
forward and press red square at right wall. This will open the door with a 5
pointed, 4 pointed and 6 pointed stars.
Go out on left starred doorway, turn
left, forward and read the green buttons square stand. Press button from L-R
1745 and light orange elongated oval and an elaborate
M are seen.
Reading the
vertical pumps third time -Turn around and enter the well pump field from
the left side. Go forward until the end, right and forward. Use the telescope
like before. Look through the telescope and note down the number where the line
passes the vertical well pump. Do this for all 4 well pumps. Well A – 0, well D
– 3, well C – 5 and well B – 8. Look down on the base of the stand and see a
spiral that ends on the right.
Exit the field and back to the Water
pipes control annex. On the way, see 2 directional arrows with 3 marked circles
on them. Note the pattern of the circles. Go back to the annex and enter the
doorway. Press the red panel to close the door with 3 stars.
Open the hidden door:
1. Turn left, right, forward, left, right and go to the
panel to the left of the closed door. Follow the top pattern-arrow right (NW,
SE, W) shown by the directional arrows outside to open left door. Press the
red button to turn the line into position and then press the green button to
enter the first circle – see a red button lit up to show that it has been
entered. Repeat the procedure until the 3 circles of the pattern has been
entered.
2. Enter, left, forward, right, forward pass the entrance,
right and pull down the lever. This closes the door on the left.
3. Go back to the other side where the arrow panel pattern
is. Now open the door to the right by copying the bottom pattern from the
directional arrow outside (SW, S, E). Use red button to position line and
green button to enter the pattern.
4. Enter right door. Go to the other room with the pipe
distribution picture. See that the door went up and an opening on floor is
seen.
5. Go down. Turn left 2x and look at picture of the
arrangement of the pipes – last pipe (right side) going in goes out as the
second pipe (left side). Remember that the water from the well pumps go in the
building into the reservoir on the left.
6. Turn right and turn the wheel valve to get the sound of
flowing water.
Go back up, go to the next room, open
the left door using the directional arrow pattern – NW, SE, W and back to the
main water pipes control building.
Entering the
water pump numbers – Open the panels and enter the numbers in by pressing
the spirals. The arrangement has to be adjusted based on the picture seen under
the annex – the last pipe coming from the right becoming the second after the
control box.
Left – Right | Panel 1, well C | Panel 2, well B | Panel 3, well D | Panel 4, well A |
left ended spiral | 5 | 6 | 1 | 9 |
double spiral | 2 | 3 | 7 | 4 |
right ended spiral | 5 | 8 | 3 | 0 |
Go down the platform and go to the
control panel by the door. Press the white panel with 2 lines drawn on it and it
changes to a water flowing picture.
Outside Water pump control
building: Exit the door on your
left. Go forward and check the purple buttons stand on the right. Press (L-R)
code 7534. A graph with the shaded square x=3, y=3 and #1 are seen. Turn left
and go to the end. See a destroyed bridge at the end and a panel with 2 yellow
buttons that shows different icons and a light green panel at side path.
Press the button on the right to turn the radar antenna on. Remember the
path going here because you will come back later.
South Lower level
exit: Go back to water pipes
control building. Exit the building through the other door and go back to the
walkway building using the lower level. We will check the manhole- mosaic door
later. On the way, by the cliff side and across the railing is a blue buttons
square panel. Press the blue buttons code 2361
and see a graph with the shaded square x=3, y=3 and # 4. Enter the walkway
building and turn back to the west top level exit.
Mosaic door-manhole building:
Go back to the mosaic-manhole building.
Close the mosaic door and go back to walkway building. Go down the ladder and
out through the south bottom level exit. Go forward to the manhole ladder. From
the bottom level climb the steps, open manhole cover and it opens to a short
hallway. At the end is a similar mosaic pattern. Move cursor around it and see
that 3 areas turn brown. Remember the brown pieces’ location – they are clues to
enter another area. Climb back down and continue to the lower level walkway to
the right.
East lower level
exit: Go back to the walkway
building and the tower control building at the top level. Using the brown panel,
turn the walkway to the right (east) and down (south). Exit, forward and go down
the ladder. Exit the building, forward until the open doorway and go left before
open doorway -we will come back here later.
Lowered platform
balcony: Go forward, under the
stairs, forward and go down the stairs. Check the purple buttons stand and press buttons (L-R) 7534. See
a graph with the shaded square x=1, y=1 and #3. Go way back to the open doorway
by the intersection close to the lower level east exit as mentioned
above.
Go through open doorway, note the
destroyed building islet on the left across the water, forward and see a
red buttons stand on the right before second
bridge. Enter red button code (L-R) 5216 and see a graph with the shaded square
x=1, y=1 and #6. Go forward, through the open doorway and see the floating
bridge is now raised.
Summary of places not accessed yet:
1. Floating bridge in front of round tower at South area.
(where you are now).
2. Turned rotating bridge on North side of walkway
building.
3. West bottom level exit.
4. Lowered platform at balcony accessed via under the
stairs at east side.
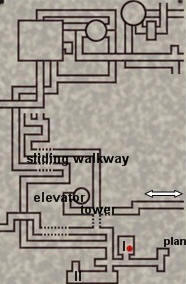
4 Way Tower,
Hydroelectric Plant and Water Reservoir Area
4 way
Tower: Go forward through the
tower tunnel. CD3. The tunnel has a crossroad to all 4 directions.
Red brick
building: Turn right, forward,
enter other doorway and see a gap in the path filled with water. Look down and
press top button on panel at right – walkway slides in. Forward and climb
stairs. At the First room, see pipes sticking out of wall. At the Second room,
see water gushing out. Go back and on the right side of stairs going down see
two large pipes coming out of the two rooms above and meeting into one pipe that
enters the building to the left. Moving the flow from one of those pipes to the
other will make the first room upstairs have water and stop the flow on the
second room. Turn around after the walkway and press the button again to hide
the walkway – this will slide out this walkway on a water gap in adjacent
room at other side of the wall (see bars on map). Go back to 4 way
tower.
Elevator:
Turn right in tower – enter elevator, turn around, close door press green button
and find out that it does not work. Go back to tower and turn right.
To hydroelectric
plants: Outside just after the tower, look right and
see electrical wires run to elevator building. We need electricity to go to the
elevator then. Go forward, turn right, see ladder going down to water and stairs
and path to the cliff – must find a way to get there. Turn around and continue
forward pass through open doorway. Go forward and then left over the bridge.
Hydroelectric plant
I: Enter, turn around and close door. Go
left and see map of this area on wall.
Wedge shape patterns:
Turn left and press the square button
to open window to the turbine room.
1. Press any one button on top of window and see a light
turns on in the chamber below.
2. Go to the closed door and press the green button on
round screen on right of door. See 2 wedges at 10 – 2 o’clock position.
3. Do this procedure with 2, 3…to all 9 buttons
depressed and see different pair of wedges shown at the round screen by the
door.
4. Note the patterns of the wedges and the numbers
associated with it. (See pictures below).
5. Go back to close the window by pressing the square
button again – you cannot exit the room without doing so. Exit the room, turn
left and enter the door.
Small room by Plant
I: Turn to right and turn the
revolving silver cylinder. Note the markings on both sides. On one side it shows
narrow shaded bars on the first, second and third positions. The other picture
shows two towers that have floating bridge with or without a passage through
midway the tower. These are clues for the water reservoir puzzle.
Destroyed building
islet: Go out the door on the left
and see that you are by the destroyed building islet seen when you first entered
from the Arrival area. Go forward and turn right. Press L-R 7534 on purple
buttons stand to see red elongated oval and a lower
case l.
Turn around, cross the bridge, turn right and pick the plan on the ground. It is
the plan for water flow in Hydroelectric plant II. Note that the water enters
from bottom, flows through various controlled flow pipes, through the generators
and out.
Go out of the islet, pass the small
room, out to the bridge and see a blue stand at end of path. Press L-R buttons
2361 and see yellow oval and U that looks like
a jug.
Hydroelectric plant II: Enter
door marked II. Go to left end, look down and see colored pipes coming out of
circular structures. Study the layout of the colored pipes. Go to the right end
and go down ladder.
Get 100% electricity:
1. Turn right, go outside using the metal door and see a
control panel that brings water in. When lever is pulled down, the bottom blue
bar shows a blocked flow and the right bar goes to the left on the circle
above.
2. Go back inside, go down and open circular lid at center
of all 3 sets of pipes. The lines are the connections for continued and
controlled flow of water. Arrange the connections to get 100% continuous flow
from control panel, through all colored pipes, through the 2 power boxes and
out.
3. From the large light brown pipe bottom left from the
control panel outside – to blue pipe (yellow pipe goes to pink pipe looks like
no water flow connection) – purple pipe to generator by wall – out of
generator via purple pipe – to green pipe (which goes to other generator at
middle connection) – out from dark brown pipe from generator by walkway – to
light brown pipe – and out.
4. Go back to the outside control panel and pull down the
lever to get 100 % electrical flow.
Connection by metal door | Middle Connection | Connection by buttons |
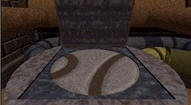
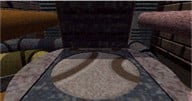
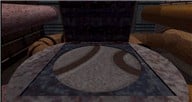
Go back in and check the green buttons
stand by Connection at far end of room. Press buttons (L-R) 1745 and see a graph
with the shaded square x=3, y=3 and#2. Exit building, go forward and turn left
before the open doorway.
Enter the code 1745 on green stand at end of path and see a graph with the
shaded square x=3, y=1 and #5. Go back to the tower elevator now that we have
electricity.
Elevator and tower’s secret
room: Enter, close door and press
green button. Open door and enter tower.
5 alcoves with clues shown:
Left bottom alcove shows a filled main reservoir
connected to 3 small empty reservoirs. In the middle is a circular connector
with 4x written on it. At the bottom of the picture are the labels of the
reservoirs – broad blue bar is the main reservoir, first narrow blue bar is
reservoir 1, second – reservoir 2 and third bar is reservoir 3. This picture
is a clue for reservoir puzzle.
Right bottom alcove shows a picture of 2 young
boys. Note the colors and numbers of the flowers, shirts and ball. This is a
clue to 2 puzzles in 2 different areas.
Right top alcove shows 2 sets of numbers on the
wall. Press the red button on the fax machine to turn it on, enter a set of
numbers and then press green button to get paper. 275371 gives a chart of
icons with some icons numbered. This is clue for icon door puzzle. 446188
shows the silhouette of the boys’ picture with another diagram. This is a clue
for one of the last puzzles to get the last piece of the letter.
Grid clues
shown by buttons stand –
1. Note that the setup of the numbers
panel resemble the grid seen on some of the 7 buttons stands around the areas.
2. The numbers that were shown in order
on those stands and the shaded square locations (x, y) are: 1 – 3,3; 2 – 3,3;
3 – 1,1; 4 – 3,3; 5 – 3,1 and 6 – 1,1. Transposing those shaded square on the
numbered panel it will give 991931.
3. Press red button, enter 991931,
press green button and get a chart of icons. This is the clue for the radar
valley puzzle.
Left top alcove shows a simulation panel. Press
button to show geometric shapes. Press right squares to change the shapes.
These are clues to geometric shapes puzzle.
Go to the alcove at the end of the corridor. Press
the top red button and read the message of Kales. He wants you to find the 4
parts of the main copy of the letter hidden in different areas of Rhem and
enter it on the right side panel. He wants you to give it to his brother
Zetais in the outside world. He will then tell you how to get out of Rhem.
This is the aim of the game – Search for the 4 parts of the main copy of
the letter in order to leave Rhem. The door on the right is where the 4
parts of the letter are placed to be printed out. There is a key icon on the
left.
Lower the water around the Tower
again:
Exit the tower and go back to the path
going to plants I and II. Go right after the open doorway on the wall, forward,
pass the green buttons stand and take right path. Just before entering the open
doorway, look right and see a water pipe releasing water behind the elevator
building. This water flow must be stopped to go down the ladder to the water
seen earlier by the 4-way tower.
Other side of Red brick building:
Enter the open doorway and go
forward to the other side. There is a sliding walkway seen. If there is a gap in
the path, go back to the red building by the 4 way tower and press the button on
the control box to slide the walkway to come out at this side of the building.
The 2 water gaps are separated by the wall – see map. Go forward until the big
square building. The right path goes to a tower which is not accessible yet. Go
back and enter the square large building.
Square water flow control
plant: Go up the metal ladder on
the left and see a map. Note that there are 5 entry points to this building.
Look up and around to see 2 large pipes ending at the control panel below. Go to
control panel on right side of other door. Look up and see that the screen
showing the right pipe is connected to main flow. Look down, pull down the lever
and look up at the screen again – the left pipe is now connected. This will
turn off the flow on the second room and turn on the water flow on the first
room in the red brick building by the 4-way tower adjacent to the one outside.
Stop water flow:
Go out the door and forward to a post with a
wheel valve. Press the red button and see water flowing through the pipes, turn
the wheel valve, press button again and see the water flow blocked – this will
stop the water flow seen behind the elevator building.
Water Reservoir
Area:
Go back to the ladder going down the
water close to the 4 way tower. See that the water has receded and that the
bridges to the tower are down. Go down using the metal ladder (previously under
water), go forward, up the stairs and see the elevator building across. Turn
left, pass the cliff, (we are outside the map now) and enter the water reservoir
valley.
Water
Reservoir: Walk above the main
reservoir and pass through a floating bridge shown by the metal arch above it.
There are 3 side reservoir towers at each corner connected to the main
reservoir. Go forward, down to the lower level and see a familiar blue square
and bars box. Press the bar and see that the main reservoir contains 6400 units.
Turn left, through open doorway and see reservoir tower 2 with 1200 written on
it. Look at control panel on right. Press bar and see it is empty. Go back and
turn right and see a red button connected to a big pump with an arrow pointing
up. Go forward and see a circular connector to all 4 reservoirs, a panel on the
left and lever below it.
Water reservoir puzzle – Based on the drawing on
the small room by plant I, there is a floating bridge on each of the tower.
The water must be raised to the appropriate level to pass through. There are
only 4 chances to pull the lever to add water from the main reservoir to the
other 3 (clue from 4 way tower secret room).
1. Turn the connector to join main reservoir and #1 at top
left and bottom left. Look at white cylinder on control panel and see that #1
is empty. Slide lever once to position 1. Read main reservoir panel
outside and get a reading of 4800. The main reservoir released 1600 units to
#1 (this is 1/4 of the main reservoir units which is originally 6400 less 4800
= 1600). Look at white cylinder to see water in reservoir 1.
2. Turn the connector to join reservoir 1 to 3, top left
and top right. Slide lever to position 2. Look at white cylinder and see that
one half of reservoir 1 went to reservoir 3, each with 800
units.
3. Turn the connector to join main reservoir to reservoir
2, bottom right and bottom left. Slide lever to position 3. Main reservoir
having 4800 units now releases 1/4 or 1200 units to reservoir
2.
4. Turn connector to join main reservoir and reservoir 1
again. Look at white cylinder and see that it will only take 1/3 of the 1/4
usually released by the main reservoir. Slide lever for the last time. Giving
reservoir 1, 1/12 of main reservoir contents (3600) an additional 300 units –
for a total of 1100 units at reservoir 1.
5. Go back out and up to the arched floating bridge above
the main reservoir and see that water has receded revealing a panel of yellow
(9), pink (1) and blue (5).
5. Go to main reservoir panel and see that it has 3300
units. Go to reservoir 2 tower and check the panel to see that it has 1200
units. Climb up tower and enter the round entrance to go through the other
side. Do this to the other towers (see reservoir 3 has written 800 and
reservoir 1 has written 1100). Proceed to the control panel at main reservoir
tower.
6. The main reservoir control panel has the broad blue bar
on top and pink, blue and yellow buttons below. Press the bar on top to turn
the panel on. Enter – pink – 1, blue – 5 and yellow – 9. Press top bar.
Climb the metal ladder and go through passage. Open the box and get one
part of Kales’ main copy of the letter.
7. Go back to the big pump by the circular connections
setup. Push the red button to return all water to the main reservoir and raise
the floating bridge.
Go back to the square building and go out to the other door.
Turn the wheel valve to allow water to the 4 way tower area again.
Way to new area via the Square water flow
plant:
Red brick
building: Go back to the red brick
building by the 4-way tower. Go forward and look down to press top button on
control box to move the floating walkway to this side of the building. Turn
around, down and press the button to hide the walkway again (you can bring it
back if you want to later, if needed). Go forward and up the stairs to the other
building. See that the first room has water flowing now and that there is a door
revealed when the water flow is stopped in the second room. If the water still
flows, go back to the water control flow building (big square in map) and pull
the lever to move the pipe to the left.
Secret passages in square
building: Enter the metal door,
forward through pipes ramp, down the ladder, go left, forward, right and forward
until the revolving door. Press red button. Be sure to turn around and close
the door to turn the passageway 180 degrees. Go forward out through door and
outside to the tower that we can not open by the square building. Look around
and realize that you came out of the other door of the square building (third
entry to square building).
Elevator
Tower: Press the cross icon button
to lower the elevator and then the top button to open the door. Enter, close the
door by pressing the lowest button and press the top button to go up. Exit and
be sure to turn around and close the elevator door and press the curved arrow
button to turn the elevator to the other side.
Go forward, pass the open doorway,
forward and look around. Realize that this is the overhead path behind the back
of the water control building and there is a path that goes to the side of the
square building not yet explored. Go forward and left to a telescope.
Look through lens. Move it around to see an open doorway by the cliff and the
door with the stars with numbers written on them. This is the door by the water
pipes control annex – if the door was left open when you where last there, the
stars on the door will not be seen. The 6 pointed star -7, 5 pointed star – 6
and the 4 pointed star -1.
Go back to main path, turn left,
forward, pass through the wall and realize that you are on the other side of the
manhole building and the path to the well pump field. Go down the steps, turn
left, forward, left, down the steps and right.
Door with Icons and Revolving
Bridge Area:
Door with
icons: Go forward until
another building. Turn right, look up and see the second floor of this building
and then enter the open doorway. See a camera on the left wall pointed to the
door. The closed door has 2 icons on it.
Control panels
shed: Go back out and enter the
shed with metal door. Close the door and see the map of the area. Inside the
building, see a simulation panel that can be turned on by the button by the
door, a circular screen with a red and green button at the center and on the
left is another circular screen. Turn on the left screen by pressing the red
button. See and draw the icons next door. By entering the correct numbers, the
door will open.
Simulation Panel – Press the button by the door to
turn on the panel.
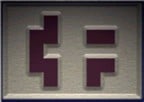
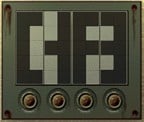
1. Simulate the icons seen on the door. The clear part on
the simulation is the dark lines of the door icons.
2. Then compare the parts of the icons to the clue chart
seen in the secret room in the 4-way tower.
3. The left icon is similar to 8 and 5 of the clue chart
while the right icon is 2 and 7 of the clue chart.
4. Go
to the opposite panel that shows the door with icons. Press red button to show
door, enter from L – R: 8527. Press green button and the door
opens.
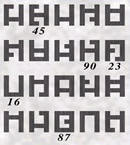
Revolving bridge by North Exit:
Go to the now opened door with icons at
adjacent building. Go forward, enter the building, turn left on the other side
by open doorway and enter the other opened doorway. Go down, around and up to
the other side.
1.
Cross the revolving bridge and go to the panel. Remember that this is where
the top level north exit (based on map) leads to when we first entered the
walkway building.
2.
Open the panel and turn the bridge to connect where you are (north exit) to
the east exit – the walkway should be at 9 and at 6 o’clock
positions (based on map).
3.
Turn around and go back to the room. See 2 panels on the wall: a bridge
control on top and a power control at the bottom. Press the circle on top
panel and the bottom panel will change from 0 to 1.
4. Go
back to the control panels shed. On the panel across the door, press the red
button to see the revolving bridge we just left. Press the green button to
rotate the bridge and connect the building to the landing on the
cliff.
5. Go
back to bridge building and this time go forward instead of going to the left
and down the stairs.
6.
Cross the bridge. CD2. Go up the ladder and forward until the door to the
walkway building.
Link (Icons on Buttons) Stands Area
North lower level exit: Enter,
down the ladder and exit the North lower level. Now the long trek, go back to
the big square water flow control building (CD3), right before square building
and up the tower elevator – go forward to the 4 way tower, turn
left, forward, turn right after open doorway, forward and turn right to the path
just before the big square building.
Tower
elevator: Climb up to the tower
elevator and press button – it should open now since you turned the elevator to
this side by pressing the curved arrow earlier at the opposite side of the
tower. Press the down button. Exit and follow the path to the side entry of the
big square building (fourth exit). CD1
Passage at square building:
If the revolving door was turned around
earlier this entry is accessible. Enter, forward, up the ladder, forward through
the pipes walkway, down the ladder, and out through the doorway. See a small
round building on left side, a stand by the water on the right and 2 doors on
either side that are not accessible right now. Go up the ladder.
Grilled door
enclosure: Enter the open doorway,
turn right, turn left and enter the enclosure on the left. See that there is a
floating bridge that is down on the right side. Go down the ladder, turn left
and turn the wheel to release the bridge from the restraining bar. Go back to
the ladder and see at right aisle, a closed grilled door blocking passage to the
other side. Go up ladder, turn left and enter gondola on the right. Press button
to turn it on and then press up arrow. Exit and look around.
Pentagonal
building: Check the panel in front
of building. It shows 4 circles on 4 sides and square for the door. Press the
square buttons and see the circles lights up.
Ramp
enclosure: Turn right, up the
raised walkway and enter the enclosure.
1.
The path forward is not accessible, turn left, look down at the water on both
sides of the walkway, turn left and see a metal ladder going down the water.
2.
Enter the open doorway on right, press blue button to lower ramp, go forward
until the next raised ramp on the other side.
3.
Climb up, forward and down the ladder. Turn right and pull gold knobbed lever
to turn the pump on. Turn left and see a square with geometric figures. This
is the top right circle on the panel in front of the door. Go back up the
ladder and down the ramp.
4.
Turn around and lower the ramp you just passed through by pressing the blue
button on the right wall. Go forward, turn right, immediately turn left and go
down the metal ladder now that the water has been drained. Look at diagram of
a ladder under the gondola.
5. Go
out of this enclosure, forward, right, forward to the end, left, up the
stairs, forward, left and go to the grilled door
enclosure.
Grilled door
enclosure:
1.
After releasing the bar on the floating bridge earlier and raising the water
level by turning the water pump by the ramp enclosure, see that the water is
raised here while the water was drained in the ramp enclosure.
2. Go
forward on the now raised bridge and see a well with a blue with yellow bars
bottle below. Need to get that bottle then.
3.
Turn left, open the lid of the box and pull the lever to unlock the grilled
door seen earlier which is now underwater.
3. Go
back to the ramp enclosure, right, forward to end, turn around, raise the ramp
using the blue button, forward, down and pull gold knobbed lever to lower the
water at grilled door enclosure to gain access to the grilled door.
4. Go
back to grilled door enclosure, go down the ladder, open the grilled door and
turn the pink tap at bottom of well.
5.
Add water again to float the bottle to the top now that the well can get
filled up with water by going back to ramp enclosure and pulling the lever of
the pump again.
6. Go
back to grilled door enclosure, forward over the floating bridge and pick up
bottle from well. Whew!! Pull cork and see the code to the 4 geometric shapes
on the outside wall of the hexagonal building.
To read
Codes: Compare the code in bottle to the simulation seen in
the 4 way tower secret room. Form a shape by combining the shapes beside the
white or black squares on the right of the simulation and placing them in the
same order as shown in the code in the bottle.
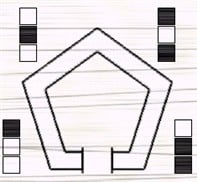
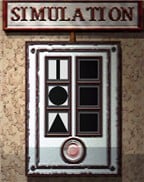
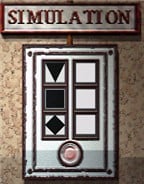
To enter the Codes:
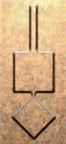 | 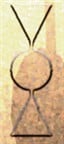 | 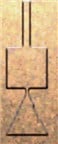 | 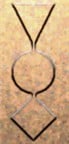 | |||
| Bottom left | Bottom right | Top right | Top left |
Bottom left geometric shapes – Go back to the main
area, down the ladder, turn left to the end and enter the shapes on the
screen. Click on screen to cycle the shapes to the correct one. Top black –
line, middle white – square and bottom white – tilted square. Turn left
and see a beach ball on the water close to a well by the passage to the top
left geometric shape screen.
Bottom right
geometric shapes – Turn around, forward, left, forward and right to go up
to building with gondola. Based on the drawing seen from the ramp enclosure
there is a ladder under the gondola. Enter building, turn green lever on panel
in front of gondola to lock the car in place. Enter gondola, if the power is
not on – press the red button, then press the down arrow, exit the car and
pull up the green lever to unhook the car. The gondola should
leave without any passengers. Go to where the gondola was and look down.
Open the manhole cover, go down, left and left outside (right goes to the
inaccessible right door at the start of this area). Enter the shapes beside
the: top white – inverted triangle, middle black – circle and bottom black –
upright triangle. Go back to gondola building – we will come back here later.
Top right geometric shapes – Exit gondola building
and turn right to go to the ramp enclosure. Turn right inside enclosure, turn
around and raise the ramp. Go down the ladder and left. Enter the shapes
beside the top black square – line, middle white square – square and bottom
black square – upright triangle.
Top left geometric shapes – Go back to the ramp
enclosure and lower the ramp. Go forward, right to the other ramp, press
button to raise this ramp. Go back to the other passageway-lowered ramp and
left to go to the other side of the now raised ramp. Go down to the exposed
ladder. Go forward, up the ladder, see the beach ball (seen earlier) and left
to the screen. Enter the shape formed by top white square – inverted triangle,
middle black – circle and bottom white – tilted square.
Go
back to the panel in front of the hexagonal building. Press the square and if
all the geometric shapes are correctly entered on all 4 panels, the 4 yellow
lights will turn green and the door will be unlocked. Enter the hexagonal
building.
Hexagonal building:
See 2 circles: right is a small replica of
the power circle on the back wall and when the right button is pressed gets
power from the link stands. Press the left button to show a picture of the beach
ball. There are 3 power link stand on the left wall and 2 on the right
wall.