Rhem
To gain access to other rooms:
Moon room: From the rail track, turn right to cave wall,
turn left and go to the roll up door. If the door is closed, pull down the lever and see that the
opposite roll up door closes when this one opens. Turn left and see the moon
picture. Place the 2 blue
pieces on the rabbit looking slot right of the door.
Hallway: Go down the ladder. Turn
left and walk to the end. See the now familiar body shaped indentation with colored
dots. Note the color and placements of the dots on the body shaped indentation. This door is the other side
of the door seen with similar indentation on the hallway accessed by the lower
ladder across the chest area. Be sure to pull up the lever to unlatch the
door. Now let’s find a way to open this metal door.
Go back up to the moon room. Exit
through the roll up door. Be sure to – turn
around and pull the lever to close this door. This way, the other door is
rolled up-open. Exit the cavern and go to the rail track outside.
Manhole: Go forward to the manhole and look close.
Open the manhole: Recall the time notations written on
the 2 pieces of paper: one found under the metal door on the floor of the top
level rotating passage and the other one on the rolled up window in the clock
room.Press buttons at clock positions: 8:00, 7:00, 1:00, 10:00, 2:00 and 5:00.
Press the center button.The manhole opens. Climb down the stairs.
Underground room: Go forward, press red button and enter
the door. This is the room we saw at the window when we unlatched the door
with the colored dots on the body shaped indentation.
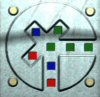
Colored dots puzzle: Open the cabinet and see the
familiar body shape of the indented circle.1. Press the squares to show the colors seen on the clues seen at: latched
door on passage under the moon room, the other side of that latched door
accessed via the lower ladder across the passage to the chest and the picture
on the wall at the screened door -room.Blue on the head, green on right upper arm, red on left arm, green at
center, 2 greens on right leg and blue – red on left leg.
2. Turn left to the door. Press the red button to close the door. Click to
slide the tube and make a complete connection.3. Turn around and press the red
button to slide the door on the right. This opens the passage from under the
moon room to the passage going to the chest via the ladder behind the rotating
passage.
Exit through the door and out the
manhole. Now we can reach the moon room through another path other than the
roll up door. Go to the upper level rotating passage. Turn the opening to the
left and climb down to the chest area. Press the button to make a passage to
the other side. Go forward and down the ladder. Go forward to the end and see
that the metal door is now open. Go forward until the end and up the ladder to the moon room.
Moon room: Press the red button on the wall across the doorway. A roll up sound is
heard. There’s also a familiar tube picture except it is hiding a white
circle.
Roll up door room 2: Go to next room. Turn left and press
the red button. Hear another roll up sound. Another of the tube picture with a
hint of red circle is seen here. Turn right and raise the red window. See a
mirror image of -1 +5 -5. If you don’t see any number, the window on the wall
of the hydroelectric area was not lowered.
Blue door: Turn right and see the blue metal door. The
panel on the left needs 3 numbers.Calculate to get the number to enter on the door based on the number seen
on the window at the hydroelectric area and the number just now seen on the
other side of that same window.
5 3 9 -1 +5 -5 — — — 4 8 4 Enter 4 8 4 on the panel on the left of door. The door opens.
Kales’ room: Turn right and look through the window to
see another room that goes out to the water area. Turn the knob on the left to
get power to the monitor. Turn left and press the button. Listen to Kales. He
describes the missing artifact – it is a disk with an engraved symbol. He
wants you to take a picture of the disk. He also mentions the stranger we have
seen around.
Turn left and press the red button. Take the second piece of the key.
|
|
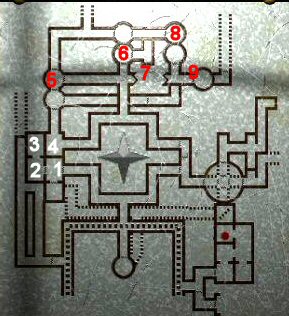
1. Moon Room 2. Roll up door room 2 3. Kales’ room 4. Diagram room 5. Elevator A 6. Elevator B 7. Angle puzzle 8. Elevator C 9. 3 key pieces door |
Search for the third piece of the key
Tube circles – angles search:
Time to check the tube pictures and
see what they show. Exit the room and be sure that the button is green on the
tube picture here at the roll up door room 2.
135 deg. angle: Turn left and go to the moon room,
check if the button is green on the tube picture here at the moon room. Turn
around and go down the ladder. Go forward, climb the ladder and go to the
chest area. Turn right, forward and right to the red rimmed blue circle. This
is the picture that is shown when you raised the lever on the roll up window
by the lower level rotating passage at the other side of the wall. Take note
of the angle made by the lines – 135 degrees.
45 deg angle: Go back to the chest area and turn
the passage. Climb up to top level of the rotating passage. Turn the opening
to the far one and climb down. Turn the passage and go forward. Go forward to
the area formerly closed by the screened door. Turn right and up the ladder.
Press the red button on right wall to lower the screen door that is on the
other side of the wall. Go down the ladder and turn right to the screen door.
Raise the lever. Go up the ladder again and press the button to raise the
screened door back up. Let’s see what picture is shown. Climb down
and go forward to the rotating passage. Go to top level of the rotating
passage. Turn right and forward to the screened door. See that this one red
rimmed blue circle has a 45 degree angle.
270 deg. angle: Go down to lower level and turn the
passage. Go forward and left to exit the water cavern. Go to the rail track,
turn right and forward to the Hydroelectric -water pipes area behind the metal
door. Go forward, right, forward, right, forward and right to the window.
Raise the lever to see the circle in the tube picture at the roll up room
2. Exit this area and go back to the rotating passage at the water cavern.
Turn the rotating passage and climb up to the top level, then turn the passage
to the left opening, climb down, turn passage, forward to ladder, down and
walk far to the other ladder. Climb up the ladder and go to the room left of
the moon room. Look at left wall and see the 270 angled picture. One more to
go.
225 deg. angle: Exit the room and another long trip
by going down the ladder off the moon room. Go forward until the other ladder,
forward to chest, turn the passage, climb up, turn the passage to far opening,
climb down and turn passage. Go forward, right, forward to the other room
(formerly screened door) and climb ladder. Turn around and see a room at the
other end of the cavern. Let’s go there. Go forward pass a right exit to the
elevator area and enter the room. This is the room seen through the window off
Kales’ room. Turn left and raise the lever to see the picture in the rollup-
moon room on the other side of the wall. Exit, forward back to the room across
the cavern, go down the ladder, right, forward, right and forward to the roll
up door. Pull the lever, enter and turn right. This picture showed a 225
degree angle. Let’s rest for a bit. All that running around tired me.
Fun time with
elevators:
Go back to the other side of the
wall by exiting the Moon room, forward to the other side to the screened room,
climb ladder, turn around, forward to the other room, pass a right exit to the
elevator area and enter the room. Turn right and study the diagrams on the
right.
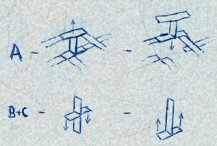
Diagrams:
The diagram on the right showed that elevator A is a platform with a wall
between 2 sides and that the entire platform with the wall can be raised or
lowered to 2 levels leaving an empty area either above or below it. While
elevator B + C is also a platform with a wall between 2 sides and that the
platform can be raised or lowered to 2 levels but the wall still separates the
2 sides.
Elevator A: Go
forward to elevator A and enter. See that there is no wall here that separates
the platform. The elevator must be below us. Exit through the door on the
right.
Elevator B: Go
forward and left on the ‘No person allowed’ sign. Enter the elevator. If the
elevator is closed, press the up arrow. Go down and out to see a panel with a
big red circular puzzle.
Red circles puzzle:
The circle is familiar; we just saw 4 of them. Enter the angles seen on the 4
red rimmed blue circles we saw based on the position of the red circles in
those 4 pictures.
 |
 |
 |
 |
| Seen at Moon room | Seen at chest area | Seen at Blue door room | Seen at screened door |
| 225 for top | 135 for right | 270 for below | 45 for left |
Press the central blue button and a
tok-ding is heard.
Turn right and close the door of
elevator B. Since elevator B is an elevator that retains the wall partition,
be sure to press the elevator up arrow. Turn right, forward and right to
elevator C.
Elevator C: Press
the arrow, enter the elevator, go up and exit.
Other side of elevator B:
Go forward and enter the other door of elevator B. If it is closed, go down
and press elevator B’s up arrow without entering the elevator. Press the down
arrow. Exit and go forward passing a closed side door to elevator A.
Other side of elevator A:
Enter the other door of elevator A. Press the up arrow and exit. Go forward to
elevator B.
Elevator B: Bring
up the elevator, enter and press down arrow. Go to elevator C.
Elevator C: Press
the down arrow BUT do not enter. Go back to elevator B.
Elevator B: Go up
and exit on top level.
Now, go forward to the main path
outside this area and turn right to the room with the diagram. Exit the room
and enter elevator A.
Elevator A: Go
down and exit through the right door.
Go forward and press the button.
This door will open after doing the red circles puzzle. Go left and forward to
the other door of elevator C.
Other door of elevator C:
Since we lowered the other side of the elevator C, the door will now open.
Press the up button and exit. That was some exercise!
3 key pieces door:
Go to the door. Take note of the a=5 note and the wood cabinet left of door.
The cabinet has the slots for the 3 pieces of the key we are collecting. Note
that the yellow pipes seen coming out of the power gauge in the generator room
passes through here. Press the red button and enter. Go down, turn around
through 2 metal ladders
and forward to another locked door.
XYZ door: The
code to enter needs numbers for x, y, z.
XYZ puzzle: Based
on the 2 notes seen, a=5 and b=4, calculate x, y and z using the 3 formulae
seen at the closed cabinet at the arrival building, the room accessed by a
ladder by the chest area and the chalkboard at the beam control room.
by the chest area closed cabinet at the arrival building chalkboard at the beam control
roomz=2 y=7 x =9
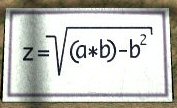
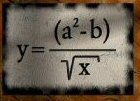
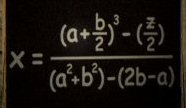
Press the lettered buttons to enter x =9, y=7 and z=2. Press the red button on the right of the puzzle.
Turn right and press the button. Take the third key piece.
Go back up to the door above and open the wood cabinet on the left of the door.
Place the 3 pieces of the key in the slots of the same shape and close the wood
door. Go back down, press red button of the gold door and
enter.
Search for the first blue fragment at hidden
part of the cave
Tower:
See a tower with 4
levels. Each level has 2 ramps each: one leading out on front side and one in
the back. There’s a building at the back of the tower connected by blue and pink
cables. Look around and check the doors on the ramps at different levels. Climb
to the top 4th level. The front (south compass point arrow) has a closed door at
the end.
4th Level (North) back ramp area: Go
to the back (north) ramp of the 4th level and press button to enter. Enter and see 3 areas to explore: left to balls-lights
setup on the wall, ahead is the door to 3 rooms of switches and right to an
elevator.
Balls -lights setup – Note
the blue pipe that leads out of the
balls-lights setup. Note the path of the balls – from top to the different holes
makes 3 lines. The colored balls are red, green and blue. You will see several
lines and colored numbers on plaques around the area. Take note of those lines
and colored numbers. We will come back here later.Switches room –
Enter and see a room with switches on both sides and a green door. Press the
button and the green door goes down. There are 2 more rooms with switches on either side
of the room. The end room has a box that has a placement for an item.Elevator – Enter the elevator and press button. Go down to level
3. Turn left and forward to metal ramp door. Unlatch the door. Go back to red
button of elevator, press button and back to 4th level.Forward and exit through the ramp door on the left.
3rd level (South) front ramp door: Go back
inside tower, go
down to 3rd level and go south. Enter the 3rd level ramp door. Go forward, climb
down the ladder and left to a blue domed room.
Blue domed room (2nd level North):
Look around and see lines and dots on the wall.
It’s dark in here. There are 4 exits from this room. One is the ladder from 3rd level you came
down.
Lines-dots room – Note that the blue pipe from the ball-lights
at 4th level comes
down to the number panel on the left wall. Exit and go to the 4
square panel door on the left.4 squares panel door – We need clues to get for this 4 squares
puzzle. Exit the room
via the 2nd ramp door across from this door. Unlatch the door and go back to
press the red button to open the door. Go back to the 4th level back-north ramp
door. Enter the elevator on the right hall and go down to 3rd level. Exit the
3rd level ramp door and go back down to the 2nd level back-north door. Enter
blue domed room, right to ladder room and climb up. Note the 4 panel clue under
the lowered elevator.
5,3
1,8
7,6
4,2
Go back to the 4 square door panel
and press the pads in the sequence shown at the clues. Press red button and
enter.Climb ladder to 2 rooms that are
under the switches room on the 4th level. If a green door blocks entry to
the rear room, go back up to the 4th level north ramp and enter through the
wooden door. Press the button to raise the green door.See a panel with ? squares – this is a
clue for a puzzle at a 3rd level’s railcar stop room. Study the directions of the gold
pipes on both walls in both rooms. These pipes are the clues for the switches on
the room above.Go back down and out of the blue domed room.
Take note of the 2 plaques: 3 right bearing lines with red 23, blue 5 and green
19 plaque and the 3 left bearing lines with red 13, blue 16 and green 4. Exit
the blue domed room.
3rd level back (north) ramp door: Climb up and go to the
north third level exit. Press button of the ramp door, enter and turn right
to the grill. Click on grill and take key. Turn left, forward to enter
the tram and then right to see a diagram on the wall of the circular path of the
railcar. Explore the different rooms in the area. Note the inner doors go to the
crystal cave with black water. There are 3 ramps each of which leads to big
crystal and a numbered (1, 2 and 3) stand. One ramp has a boarded door.
Remember the different puzzle rooms on the left of the tram. We will come back here later, meantime
exit and go down to 1st level of the tower.
1st level: Go down to the 1st level of the tower. The
back-north ramp is blocked by an inner metal door. The wood cabinet across the
stairwell is locked. Turn right and see a monitor at railing on the right. Go to
the south ramp at end and note the Xed light bulb above the metal hatch. Turn
around and see green pipe going to red button right of the entryway. Press the red button to unlock the
wood cabinet.
Wood cabinet – Click on blue knob to open the cabinet. There are 6 switches.
The 2 bottom right switches are attached to each other. Turn off the lit bulb by clicking
on the 2 attached bottom right switches – it removed power from bulb.
Lowest level of tower: Go back to metal
hatch and click on handle. Go down
ladder and turn around. Note the plaque with lines, red 2, blue 24 and green 17.
The left exit goes to a
railcar and the right exit goes to a ladder. Climb the ladder.
Tower circuit room:
Study the pipes going into the circuit panel which is the back of the switches
of the wood cabinet on the other side of the wall (1st tower level). Turn left
and see flesh colored pipes that go to the metal hatch we opened. The greenish
pipes are the ones that go to the monitor and wood cabinet.
Turn back to the circuit and look down – see the main power source. Turn right
and see blue and pink pipes going to the circuit panel. These are the ones from
the building behind the tower.
Turn the railing monitor on or
make green pipe connections – The railing monitor is powered by the greenish
pipes. Study the connections to lead from the greenish pipes to the power box below. Once you know the connections, go back to
the other side wood cabinet and flip the switches to form a complete circuit for
the green pipes. To go back to the other side – go down ladder, right, forward,
right, forward, left, climb ladder and back to wood cabinet.
Study the path that will form a complete circuit of the
2 pipes from the power box and 2 green pipe connections.Then go to the wood cabinet
at first tower level and flip the switches to copy the MIRROR image of
the connection at the back.Flip switches at: Top left -lean to the right, top middle – right, top
right – left, bottom left – left and bottom middle/right – lean to left.Railing monitor clues – Go to monitor on the railing. Press-HOLD the red button. Take note of the
numbers and their position on the 9 square grid. You will need it later.Make pink pipes connections
– Same way as the green
connection – study the panel in the circuit room to make a complete path for
the pink pipes. This is done to save time and get power to the next place we
are going to. Remember that pink and blue cables go to the building outside
the tower.
Study the path that will form a complete circuit from
the 2 power box pipes and 2 red pipes.Then go to the wood cabinet
at first tower level and flip the switches to copy the MIRROR image of
the connection at the back.Flip switches at: Top left -lean to the left, top middle – right, top
right – right, bottom left – left and bottom middle/right – lean to
left.
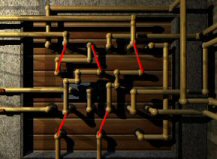
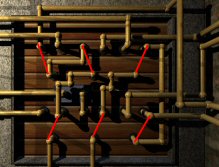
Go down the metal hatch to the lowest level of the tower,
left and ride the
railcar.