Nancy Drew: The Phantom of Venice
Nancy
Drew:
Danger
by Design
(A Walkthrough by Zurreen
Zubairie)
Copyright
© 2008. All rights reserved.
(Please,
note that this walkthrough is copyrighted. Hence, any attempt to
reproduce anything from this walkthrough will be severely
punished to the maximum extent of the law.)
The Walkthrough
This is Nancy Drew’s Case 14. It is actually a very easy
game and I would encourage you to try to solve as many puzzles as you can on
your own. For this reason, I have tried to write the following walkthrough so
that you can find the answer to a question without “accidentally
discovering” the answer to another that you might have preferred to find
yourself.
Although Nancy Drew games are supposed to be for mystery
fans aged 10 and up, they are actually a lot of fun for any age group. Unlike
many games these days, however, the Nancy Drew games provide clean fun.
What’s more, some of the puzzles can be quite challenging. The only complaint
that I have with these games is that you cannot skip any cutscene or dialog. This
is especially annoying when you are trying out the different options in a conversation
to see if you can discover some new information. Thankfully, though, in most
of the Nancy Drew games – and certainly in this one – you tend to get all the
critical information you need, no matter what option you select. In other
words, you will not get stuck because you made the “wrong” choice in
a given conversation!
Please note
that this is a non-linear game. In other words, you can do the tasks in any
order you like. There are some tasks that have to be done before others, of
course. For example, you might be able to call someone only after the game
indicates the need to do so. But you will not be penalized for taking your
time to complete any task. In this connection, please note the day changes in
this game. This change has nothing to do with the tasks you complete. Rather,
there seems to be a clock running in the background, even though you will not see
it until the day is about to change. Please also note that you will be notified
of the change only when you try to go from one location to another on the map.
Nancy will tell us that it is getting late and will rush back to her
apartment. You will then get a screen saying “Day 1,” “Day
2,” etc. Just click on the screen to begin that day. If you were in the
middle of an errand and the day ends, don’t worry about it. As I indicated,
you will not be penalized for taking your time to finish a task, even if
someone has told you to get it done right away. You can always finish the next
day.
Well, that is all I can think of in terms of a general
guide to the game. Following is a more detailed step-by-step walkthrough.
Please, feel free to address any comments or questions about this walkthrough
to .
* * * * * * * * * * * * * * * * * * * * * * * * * * * * * *
* * * * * * * * * *
This game begins a little
differently than the thirteen Nancy Drew games before it. We still don’t get
to see Nancy, but we do get a glimpse of her room. The opening leaves us facing
her desk. Feel free to refer to the “Dossier” (the brown book
standing in the upper-left portion of the desk), which lists all the Nancy Drew
games before this one. Click on any case you like to see its synopsis. The book
on “How to be a Detective” (in the lower-left portion of the desk) tells
you all about playing this game. Finally, the “Case File” in the
center of the desk gives a synopsis of the present case. In fact, you can refer
to this “Case File” even during the game. Just look it up in your
inventory after the game begins.
When you are ready to play the
game, click on the airplane ticket which is lying on your right. You will be
asked if you would like to start the game. Answer “Yes.” You will
then be asked if you would like to play as a Junior or Senior Detective.
Choose as you wish. Note: the following walkthrough is written for the
Senior Detectives. But that should not be a problem for those playing as
Junior Detectives, of course, because the game provides them with more clues
and easier puzzles anyway.
* *
* * * * * * * * * * * * * * * * * * * * * * * * * * * * * * * * * * * * *
ABBESSES (Minette’s House of Design)
The opening cutscene takes us
into what we will call the “office area.” It continues with a dialog
between Nancy and Heather. Pick up the Metro pass (“Carte Blanche – Paris
Metro”), to continue the conversation. After talking to Heather, turn
left and go through the brown door (with the glass pane at top) to enter
Minette’s studio. Go to your left to talk to Minette. You can ask to see if
she will answer a few questions, but she won’t. We must now make some herbal
tea for her.
The Herbal Tea
Turn around and go left of the
brown door to what we will call the Tea Center. As you approach it, Nancy will
point out the different objects we will need: the herbs at the top shelf; the
pot of boiling water on the stove; the teapot on your left; the sink on the
right (to throw away the mixture if you make a mistake); and the card of instructions
for making the tea in front of you. After she finishes pointing out
everything, pick up and read the instructions card. As you flip through the
pages, Nancy will ask Minette two questions. Based on the answers Minette
gives and on our own observations of her, we will need the following herbs to
make the tea.
Since Minette is “right-handed”
today, we must add herbs from the Gaviforme family to the pot of boiling
water on the stove:
Jar 4 – CALLICULA
Jar 5 – FENNELLERY
Jar 8 – HOG BONE
Jar 15 – YELLOW BUTTONS
Since she is “not humming,” we must
add the herbs with a potency of 7 or higher (excluding the ones that we have
already added above):
Jar 2 – BOOJUM
Jar 6 – GIBBERING
Jar 9 – MACROPHYLLA
Jar 11 – PHYRIGIA
Jar 12 – PIPSWEET
Finally, since she said that her favorite
color is “red,” we must add the following herbs which grow in marshy
areas:
Jar 3 – BRELAND
Jar 14 – VARVAINE
After you have
put all the herbs in the pot of boiling water, click on the teapot on your
left. Nancy will tell Minette that she is done. Step out of the close up and
go out of the brown door on your right. If you have made the tea correctly, Minette
will call and a dialog will follow. Click on the bag she gives you and finish the
conversation. Then, turn right and look at the “stuff” she
mentioned. We must now buy four items from Pont Neuf that have some
things in common with the items displayed here in the center of the room.
Step back out in the office
area and talk to Heather, on your left. She will tell you about how Minette
“has this thing about curves” and how Minette claims that working in
a “quasi-round environment” makes her more productive. [These are
clues to the objects we must buy for Minette: something round or curved.]
Finish the conversation, turn around and approach your own desk.
Close up on the
computer first. Look up the “To Do List,” in the upper-left
portion of the monitor, to see the errands you must run for Minette. Feel free
to click on “E-mail” in the top center of the screen and read
the six messages there, one by one. Feel free to click on the game, “Jane’s
Game Portal,” in the upper-right portion of the monitor. We need to
type in a login and password, but that information is actually readily
available if you check out Sunny’s notes in the top drawer on your left. But
we don’t need to play the game yet. So leave it alone for now. But do
check out Sunny’s notes in the drawer. The printed page (on “Skard
2-DV8”) taped to the last page of the notes tells us how to fix the plotter,
one of the errands we must do.
Fixing the
Plotter
Approach the plotter on your
right. Click on the red magnifying-glass icon. A dialog will follow. Click
on the red magnifying-glass icon again to close up on the plotter. Click on
the hand icon and you will see the three adjustable settings (V, H,
I) and the Print button. Press the Print button to print a
test page. After the cutscene, you will be shown the defective print. Click
on the blue hand icon, to return to the settings. Click once on
the middle (H) setting, to raise the horizontal pitch, as shown below.
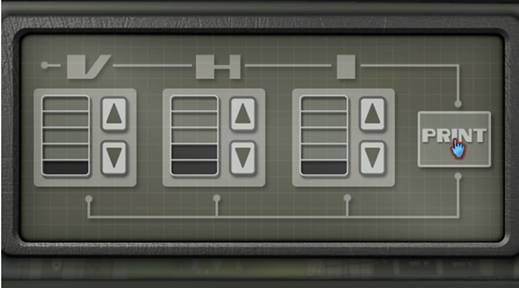
Click on the Print button to print
another test page and learn that the plotter has been fixed.
Step out of the close up to
hear the phone ring. Step further out of the close up and pick up the phone on
your left. It is a call from a Lynn Manrique about a letter concerning a
Noisette Tornade. Proceed as you wish. After the phone conversation, turn
around and talk to Heather about Dieter von Schwesterkrank (we will call him
Dieter from now on). Feel free to check out the magazine on the table on your
right to read the four-page article on Hugo Butterly.
We are now ready
to go run our other errands. So approach the blue door on your right. A
cutscene and dialog will follow. Pick up the letter from the floor. Open it as
Heather tells you to do so. Another cutscene and dialog will follow. Conduct
the conversation as you wish. Step out of the blue door. A map will be
presented to you. Click on “Rue du Bac” to go to Dieter’s
studio for your first outside errand.
RUE DU BAC (Dieter’s studio)
Step forward and talk to
Dieter. Conduct the conversation as you wish. As it turns out, we will have
to make the four prints ourselves to complete this errand for Minette. Dieter
tells us to refer to the binder on a bookshelf for instructions. There is only
one bookshelf in the room, the one with the aquarium on your right. So close
up on the aquarium and pick up the binder (which is propped up against the side
of the bookshelf on your right). Flip through the pages to read the
instructions. A dialog will follow. Turn around and approach the door with
the red light at its top. Dieter will warn you not to spill any chemicals
while working inside. Enter the Dark Room (which is really a bathroom that has
been converted into a dark room). Turn right to face the actual developing
area.
Developing the
Prints
This is actually a very tricky
puzzle. The instructions dictated that we turn off the lights before doing any
real developing work. But you will soon discover that working in the dark is
the tricky part. You have to remove the paper from the enlarger and put it in
three trays, one by one. The hand icon can be misleading; and if you don’t
click exactly where you are supposed to, you will spill the chemicals from the
trays and it’s Game-Over. You can go back to an earlier save or use the
“Second Chance” option in the main menu, of course. But that just means
you will have to start the puzzle all over again! In short, it can all be quite
tricky indeed. Well, one tricky deed deserves another, right? So here is my
tricky solution to this tricky puzzle.
The
Tricky Solution
Before you
turn off the lights, take a sheet of POST-IT sticky paper. Cut out a
strip of paper from the top (the actual sticky portion of the paper). Cut this
strip into four pieces. Each piece should be small enough to cover
the hand icon that appears only over the negatives right now. Stick these
pieces directly on your monitor over the switch at the base of the
enlarger and in the center of each of the three trays (as shown by the little
round yellow circles in the picture below). Now you know exactly where to click
your cursor (the hand icon) even in the dark!
Note: Do be sure to use the POST-IT stick notes for this purpose or
something very much like it. Using anything else might leave a sticky residue
on your monitor, of course, and it can be a pain to clean up afterwards.
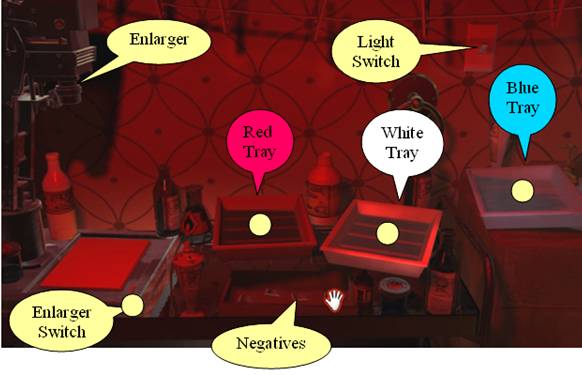
Having done all this
“preparatory” work, follow the steps below.
1. Pick up a negative from the tray at the bottom and put it in the
top-left portion of the enlarger on your left.
2. Turn off the Light Switch on your right.
3. Turn on the Enlarger Switch in the lower-left portion of your
screen. We need to wait 2-9 seconds. Remember the old trick: it takes one
second to say “one thousand one.” Keep your cursor in the same
place as you count the seconds by saying “one thousand one, one thousand
two,” etc. Give it 5 seconds
because you don’t want to go under or above the time limit in case you might be
counting too fast or too slowly. [Note: Don’t be distracted if Dieter makes a
comment in the background, possibly at the beginning of your work.]
4. Click on the “Enlarger Switch” again to pick up the
paper.
5. Put the paper in the Red Tray. We need to wait 7-12 seconds
for this one. Again, keep the cursor in the same place as you count the
seconds as before: “one thousand one, one thousand two,” etc. Give
it 10 seconds.
6. Pick up the paper and put it in the White Tray. We should wait
“no more than 5 seconds” this time. Give it 3 seconds.
7. Pick up the paper and put it in the Blue Tray. We must now wait
8-15 seconds. Give it 12 seconds.
8. Pick up the paper. Nancy should announce that it is done, the
lights should come on and Nancy should be holding a picture.
Click on the hand icon on the picture to step
out of the close up. You should see the picture now hanging on the line above
the trays. The space in the tray from where you had first picked up the
negative should still be empty. Pick up a different negative and put it
in the enlarger (step 1). [Note that doing so will put the first negative back
in its original position in the tray holding all the negatives.] Repeat the
above steps 2-8 to develop the second picture. Develop the last two pictures
in the same way. As the last picture comes out, Nancy will indicate that we
are done and the game will bring you out of the dark room automatically.
Turn left and talk to Dieter
now. Proceed as you wish. Then step out of the studio and go to the park at
Pont Neuf.
PONT NEUF (the flea market)
Note that there are only three
merchants in the park: two women and a man. Feel free to haggle with them if
you like, but be sure to save your game before you start haggling because you
get only one chance to make an offer and if you offer too little, the merchant
will stick with his or her highest price. As you examine the items offered by
the merchants, keep in mind that Minette likes round and curved objects (as
Heather had told us and as you yourself might have noticed in Minette’s
studio). Following is a list of items you need to purchase, the merchants that
offer them, and the lowest price at which you can get them.
Malika (the veiled lady on your left as you enter the park):
·
Green Rings for 4 euros
Monique (the young lady on the other end as you turn right from Malika):
·
Traffic Cone for 1 euro
·
Lava Lamp for 15 euros
M. Marchand(the male vendor
in the very center of the park):
- Film Canister
for 21 euros
As you try to
step out of the close up after purchasing the canister, the merchant will offer
you a chance to make money by painting some pictures for him. Feel free to
take him up on that offer. You will get 15 euros for the first painting, that
of a woman. After paying you for it, the merchant will ask you if you would
like to do another painting. If you decide to continue, you will then get a
choice of two paintings: that of the woman (for 15 euros again) or a flower
vase (which is more complicated and thus gets you 30 euros). While all this
painting work is rather straightforward, the following hints might be helpful.
- Be sure to place the TIP of the
brush in the area you are trying to color. This would be especially helpful
in painting the tiny parts of the painting.
- Do NOT try to step out of the
close up even though you might think you have finished the painting,
because if you have to step out of the close up, that means you
have made a mistake. (The merchant will scold you for ruining the
painting and you will just have to start over again.) If you have really done
the work correctly, a dialog will automatically follow: Nancy will ask the merchant if the work is okay, he will compliment her and pay her for
the job.
After you have purchased the above items
for Minette and done the painting work, if any, for M. Marchand, leave the park
and go to the hotel.
HOTEL DE VILLE (Cafe Kiki)
Step forward and talk to Jean
Michel Traquenard (we will call him Jean Mi from now on). During the
conversation, he will insist that you order some food, i.e., at his
expense. Pick up the menu and order anything you like. You can order only one
item, of course. If you would like to try out the other items (for example, to
see what the French names stand for in English), save your game before you
order and then replay this portion of the game trying the items, one by one! Then
continue the conversation with Jean Mi. Be sure to ask him about Hugo Butterly
and he will give you that man’s phone number. You don’t have to jot down the
number yourself, however, because it will appear automatically at the bottom of
the screen (i.e., in your directory) whenever you pick up a phone. When
you finish your conversation with Jean Mi, the game will bring you back to the
map automatically. Go and check out J.J. Ling, the lady with whom you are
supposed to be staying during this trip.
PLACE MONGE (J.J.’s place)
Step forward and talk to J. J.
Feel free to tell her that you don’t believe her story about her own lost
luggage. Be sure to ask her about the envelope at the end of the
conversation. Pick up the envelope. After the conversation, check out the
“Top Story” in the newspaper lying on the dining table on your left.
Go to the phone on the table to the right of J. J. Read the article on
“Zu” in the magazine lying next to the phone. Pick up the phone and
you will see Butterly’s phone number at the bottom of the screen. Call him by clicking
the numbers on the phone dial.
After your conversation with
Butterly, turn right to leave the apartment. Feel free to check out the blue
recycle bin on your right on your way out. Go to Minette’s place.
ABBESSES: in the office area
Enter to hear the phone
ringing. Step forward and answer the phone on your left. After that
conversation, turn around and talk to Heather. Nancy will give her the
envelope from J.J. Turn to the work table on your left.
The Rutherford Designs
Close up on the
work table. Click on the red magnifying glass to close up further and a dialog
will follow. Click on the red magnifying glass again to get a close up of the
top of the work table. Read the instructions sheet on your left. Then open
the black portfolio on your right and flip through the pages for more
information.
As you get to
your first “order,” close up on the card in the top-left portion of
your screen to see Ms. Rutherford’s own instructions. Click on the drawing on
your right to remove the plastic sheet and display the items necessary to
complete the first order. You must place these items on the drawing on your
right to design the outfit.
If you have
correctly finished the order, you will hear Heather’s compliment. Complete the
other two orders in the same way, i.e., read Ms. Rutherford’s
instructions in the card in the top-left portion of the screen; then click on
the right page to remove the plastic cover and display the items necessary to
complete the order; and then place these items on the drawing on your right
according to Minette and Ms. Rutherford’s instructions. The following picture
shows the three successfully completed ensembles.
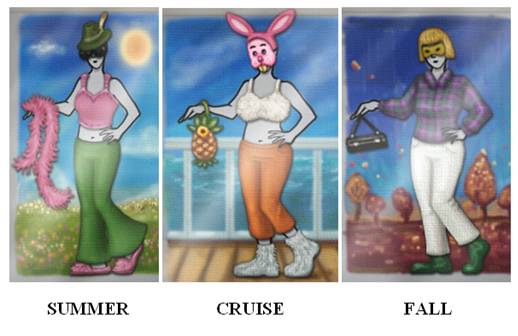
As you finish the third design, a dialog
will follow. Step out of the close ups and approach the door to Minette’s
studio on your left. Heather will warn you that Minette is too busy playing
some online game to talk to you. Go in and try to talk to Minette anyway. As
she shushes you away, come out and talk to Heather. She will suggest that you
try to beat the highest score for Minette. [Note: I don’t know if telling
Heather how good or bad you are at playing computer games will affect the
difficulty level of the game you must now play. But the game is not too difficult
and you just need to score more than 1000 points.]
Jane’s Game Portal
Return to your desk and close
up on the computer. Click on “Jane’s Game Portal” on the
right of the screen. Feel free to refer to Sunny’s doodles in the drawer on
your left for clues on what the Login and Password might be. Then type the
following on your keyboard, pressing “Enter” after each entry.
LOGIN: CAROL
PASSWORD: RUDE
As you get into the program,
click on “Model Match” to start the game. Note that the High Score
is 1000 (the score you need to beat) and that the stop watch begins at 120
seconds (the total time allowed for each round). The object of the game is
simple: match three or more identical pictures to score points. In
fact, you will be able to use the full 120 seconds even after you have gone
over the 1000 threshold. If you have scored less than 1000 by the end of the
round, click on “Back” to start over. If you have scored more
than 1000, Nancy will exclaim. Click on “Back” or “Quit”
to step out of the game. A dialog and cutscene will follow. Go into Minette’s
studio and talk to her. She will take the four items you had purchased for her
and tell you to leave. Step out of the studio. Another dialog and cutscene
will follow. We must now go and fetch J.J. from her place.
PLACE MONGE (Cookie time!)
Step forward and talk to J.J.
She will ask you to play a game of Hangman. Feel free to do so. If you don’t
know how to play the game, just ask J.J. and she will explain the rules to you.
Now give her the message from Minette. She will agree to go, but only if you make
the cookies for her. As she leaves, step forward into the kitchen and open the
tall white cupboard in front of you. Pick up the jar of molasses (“mélasse“) from your left. Check out
the books on your right. Hmmm…
Next, go to Pont Neuf and buy the following items from the
merchants.
Sprig of Mint from Malika (on your left) for 50 euros.
French-English Dictionary from Monique (now on your right) for 23 euros.
Common Cooking Substitutions bookfrom Marchand(in the center of the park) for 1 euro.
Return to Place Monge. Go to the back of the kitchen, turn
around and step to your right to reach the cooking counter. Nancy will tell us
that we must first chop up the mint. So bring out the mint from your
inventory and put it on the cutting board on your left. Nancy will chop it up
for you. Bring out the jar of molasses and place it just left of the sugar
(“sucre”). Pick up the recipe
card from the stand just above the mixing bowl and read it. Note that the
recipe calls for 1/2 cup of brown sugar. Refer to your book (“Common Cooking
Substitutions“) to learn that the substitute for 1/2 cup of brown
sugar is 1/2 cup of white sugar plus a teaspoon of molasses. We are now
ready to make some cookies!
Note: Be sure to refer to the book before
you start adding the ingredients to the mixing bowl. There seems to be some
kind of a bug here in the game. So if you refer to the book after you have
already added some ingredients, the cookies won’t come out right (apparently
because the ingredients added before reading the book are lost and the game
proceeds as if they had never been added).
Making the Cookies
Feel free to use your French-English
dictionary to translate the French terms. Then add the following to the mixing
bowl.
3 cubes of Butter (“beurre”)
1 cup White Sugar (“sucre”)
1/2 cup White Sugar +
1 teaspoon Molasses (substitute for brown sugar)
3 Eggs
1 teaspoon Vanilla (“vanille”)
2+1/4 cups all-purpose flour (“farine”)
1/2 teaspoon Baking Soda (“bicarbonate
de soude,” to the left
of salt)
1/4 teaspoon salt (“sel”)
1 sprig of fresh, finely chopped Mint
1 cup Semisweet Chocolate Chips (packet
of “morceauxduchocolat,” on your left)
After adding these ingredients to the
mixing bowl, click on the baking sheet (left of the mixing bowl) and a cutscene
will follow. If you have added everything correctly, this cutscene will show the
cookies flatten out and Nancy will note how their edges have turned up. Step
out of the close up and you will hear the phone ring. Answer the phone (on
your right) to find that it is J.J., asking about the cookies. Nancy will tell her about the edges of the cookies curling up. Bingo! Go to Minette’s place
now.
ABBESSES (the mysterious call)
Enter to hear the phone ring. Go
left and answer it. A man will ask for Minette. Feel free to try or not try to
get Minette for him. If you do try, you will find the door is locked and she will
not come out. You might even hear her busy with J.J. inside. If you return to
the phone quickly enough, Nancy will be able to talk to the guy one more time before
he hangs up. Otherwise, he will have already hung up.
Turn right to your computer. Pick up
and read the pink note hanging down from the shelf left of the computer. It is
a note from Heather asking you to pick up a stuffed parrot from Pont Neuf.
So go to the park now.
PONT NEUF (Dieter)
As you enter the park, step forward
and close up on the cross in front of you. Nancy will translate the French
inscription. Note the dates: 1940-5. Step out of the close ups. You
will not be able to go right. You can try Malika on your left, but she does
not have the stuffed parrot. Go right of her and you will note that you cannot
approach Monique. So go right again towards Marchand in the center of the park,
to find that you cannot talk to him either (at least just now). But you will
now be able to see Dieter sitting on a bench in the distance. Try to approach
him. A cutscene will follow. Pick up the two objects that Dieter has left
behind: a miniature clock (with the “3” circled) and an obituary on
Noisette Tornade. Read the obituary; and then, return to Marchand and buy the stuffed
parrot from him for 1 euro. Now go to Dieter’s place.
RUE DU BAC (the secret passage)
As you enter, Nancy will note that someone is in the dark room. Go there and knock on the door. A
dialog will follow. Turn around and step towards the bookcase. Instead of
closing up on it, however, step just to the right of it – towards the panel
with the hole in it. Attach the clock you had picked up in the park to this
hole, to start a timed puzzle.
The Clock
Puzzle
The puzzle is timed, but don’t
worry. You will have more than enough time to solve it. As we noted earlier,
the “3” in the clock we found in the park was circled. This is a
clue to the fact that we must set each of the nine clocks in the panel at 3-o’clock.
This can be tricky, however, because setting the time in one clock changes the settings
in other clocks. Thus, we need to be careful in choosing the clocks we set so that
we can set all the clocks at 3:00 before we run out of the
allotted time. Set the clocks in the following order.
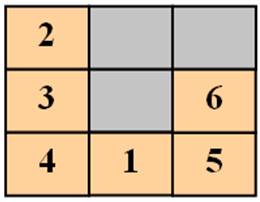
Note that you need to set only the clocks shown
in the orange boxes in the above diagram. By the time you finish setting these
clocks in the indicated order, the clocks shown in the gray boxes will be
automatically set at the correct time as well.
As you finish, a cutscene and a
dialog will follow. Step inside the passageway. Close up on the spider on
your right. Step out of the close up and proceed forward in the passageway.
You will find a wall safe at the end of the passage. Open the cover. Nancy will translate the French inscription. Recall the dates we noted on the cross at Pont
Neuf: 1940-5. The “-5” stands for 1945, of course. So click in 1945
and the safe will open.
Pick up and open the red diary
inside. Pick up the grid from the left page. Click on both the picture and
the code below, one by one, on the right page. Turn the page. Pick up and
read the folded letter on your right. Step out of the close up and return to
Dieter’s studio. He is still in the dark room and will not talk to you any
further. Go to Minette’s place.
Note: Depending
on how long you took (e.g., playing the Model Match game, doing the
paintings for Marchand, preparing the cookies, etc.), the Day might change at
this point. When that happens, Nancy will return to Place Monge for the
evening and the game will pause on a screen saying “Day 2.” Just
click on that screen and Nancy will come out into J.J.’s living area. Feel free
to check out that day’s “Top Story” in the newspaper on the dining
table in front of you. If you would like to see the Top Stories from the day
before, check out the blue recycle bin on your left where all the old
newspapers will be deposited as the days go by. Then step out of the apartment
and go where you were trying to go before the day changed.
ABBESSES (Cockroaches & Dodo box)
Enter.
A cutscene and a dialog will follow. At the end of the conversation, you will
find yourself in Minette’s studio. Nancy will comment. Pick up the box in
front of you.
The Cockroaches
You must catch nine bugs in
all. As soon as you catch one, it will be deposited in one of the empty spaces
in the box. I am afraid no walkthrough can help you catch the bugs. It all
depends on how quickly you can click your mouse button at the right spot at the
right time. So the best that I can do is to give you an idea of where to find
the bugs. Don’t worry. Sooner or later, you will get all of them!
Generally, you will find the bugs on
the floor. As you can see from the more detailed directions below, you will
find most of the bugs if you go left along the room from the starting
position at the door. Others you will find when you reach the door and then start
going right along the room. In other words, you will have to go clockwise
and counter-clockwise along the room to catch all the bugs. While the
following hints should give you a pretty good idea as to where to find these
bugs, please note that the appearance of the bugs seems to be randomly
generated by the computer. Thus, you might have to visit some of the areas I
have indicated a few times before the bugs in those areas appear there. Keep
in mind also that it might be hard to see the bug itself sometimes. If that is
the case, just keep your ear out for the buzzing in the background and your
eye out for the blue hand icon on the floor. Click on the blue hand
icon as soon as you see it to catch the bug!
BUG # 1: Step out of the close up on the box of chocolates and you will
see the bug go from left to right. Thus, you do get a few chances to catch it
if you keep trying to click on the blue hand icon along the floor. Don’t worry
if you miss it though. We’ll get him next time.
BUG # 2: Click on the straight left arrow (ß) to step towards the
display of the red dress and the bug should be hovering around in front of the
box to the right of the red dress display. Click on the blue hand-icon and you
will get a close up of the floor just behind the display. Pick up the letter
on the floor just left of the display. Indeed, you have to pick up that
letter before the game will allow you to step out of the close up behind the
display. As you pick up the letter, you will get a close up of its contents. Click
on the yellow stick-note in the top-right corner of the letter. Nancy will comment. Feel free to read the top portion of the letter. Then click on the down
arrow to read the rest. Click on the letter again to deposit it in your
inventory.
Step out of the close up. You might get
another chance to catch the bug, if you missed the first time. But don’t worry
if you miss again. We’ll try again later. For now, step out from behind the
display and close up on the red dress. Click on it to hear Nancy’s comment.
BUG # 3: Step out of the close up on the dress and step to your right. Click
on the blue hand icon on the computer desk (on your left) to close up on that
desk. Pick up the piece of paper lying right of the computer. Again,
you have to pick it up to step out of that close up on the desk.
Again, picking up the piece of paper will give you a close up of its contents.
Nancy will comment. Step out of the close up on the piece of paper and you might
get another chance to catch the bug there, if you haven’t caught him already.
BUG # 4: Step out of the close up and continue to go to your right. You
may not see the bug in this area the first time you visit it. When you do see the
bug, it will be moving across the floor from left (from the sewing machine) to
your right.
BUG # 5: Continue to go right along the room. Again, you may not see the
bug in this area the first time you visit it. When you do see the bug, it will
be going from right to left, heading under the red sofa set in front of you.
BUG # 6: Step to the right again and you will find this bug going from the
tea center to your right. (If you miss this bug going clockwise along the
room, you might get another chance to catch it when you reverse
direction, at which time you will find it going from the bottom center of your
screen to under the tea center).
Note: We just went clockwise
around the room. We must now go counter-clockwise to find the rest of
the bugs. So go to the door, turn around and you might get another chance to
catch the first bug, if you missed it the first time. Now go right
along the room.
BUG # 7: As you approach the coffee table, you might get another chance to
catch Bug # 5 (now hovering around in front of the large picture frame resting
on two stacks of bricks on your right). Pick up the magazine on the coffee
table. Feel free to read the article on Minette. Turn the page on your right,
to hear Nancy’s comment. Step out of the close ups on the article and the
coffee table. Step forward. Again, you may not see the bug in this area (Bug
# 7) the first time you visit it. When you do see it, it will be going left to
right, heading under the red armchair.
BUG # 8: You will find this bug on the floor under the three large stone
disks on your right. Close up on the stone disks to hear Nancy’s comment.
Then step out of the close up and move forward to complete this round of the
room.
BUG # 9: When you see this bug, you will find it on the floor in front of
you, heading under the red dress display.
Once again, you might have to make a
few rounds (clockwise and counter-clockwise) around the room before you catch
all the bugs. When you catch the last bug, the close up of the box will show
all nine bugs and Nancy will comment.
Go to the door and try to step out.
A cutscene and a dialog will follow. Step out of the room to find it empty. Check
out the dodo box on the table to the right of the blue door. You
must now solve a three-part puzzle to open it.
The Dodo Box
puzzles
The object of each part of the puzzle
is to move your horse from the starting position to the finishing position
before the two predators catch you. Use the controls in the lower-left portion
of the puzzle to move your horse. The round button in the center resets the
puzzle. Clicking on any of the four “arrowheads” around the round button
will move the horse in that arrowhead’s direction. Note that if the horse
cannot move in a direction, you will not be able to click on that arrowhead. The
following picture shows the solution to this puzzle.
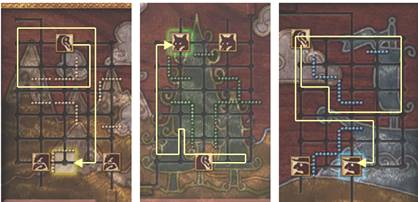
NOTE: In
the second (middle) puzzle, you will step up and down along the same tile left
of the barrier (to bring the predator down to follow you) before you step
further left and dash up and in to the finishing position.
After you solve the last puzzle, you
will get a close up of the dodo box. Press the egg-shaped button at the bottom
of the box cover to open the box. Pick up and read each of the four notes
inside. Nancy will comment on one of them.
Go to your desk and pick up the
phone. Dial the Zippy Calling Card number. After three rings, you will now
get a different “address book” at the bottom of the screen. Dial the
phone number for Lynn Manrique and talk to her. After the conversation, leave
Minette’s place.
PONT NEUF
Enter the park, open your inventory
and click on the box of chocolates to let the cockroaches go free, as Minette
had told you to do. Now go and see Jean Mi.
HOTEL DE VILLE (The Parfaits)
Ask Jean
Mi about J.J. A dialog will follow. Proceed as follows to get the most
information. Ask Jean Mi if J.J. has done modeling for any other designers
in Paris. When Jean Mi refers to J.J.’s having been tricked, pretend to
know what he is talking about by clicking on the choice: “Yes.
Terrible thing, being tricked like that.” After finishing this topic,
talk to Jean Mi about the cropped picture you saw in the magazine in Minette’s
studio. Jean Mi will agree to show you the uncropped picture, but only if you
will help him by making parfaits for the owner of the café. You have to
agree, of course, but how you express this agreement does make a difference. Even
if you know what a parfait is, I suggest that you ask, “What’s a
parfait?” Jean Mi’s response is not important, but the owner of the
café will then be more helpful and “introduce” you to the workings of
the “parfait station.”
The Parfaits
After
the owner finishes his “introduction,” Nancy will point out the
ingredients necessary to make the parfaits. (See picture below)
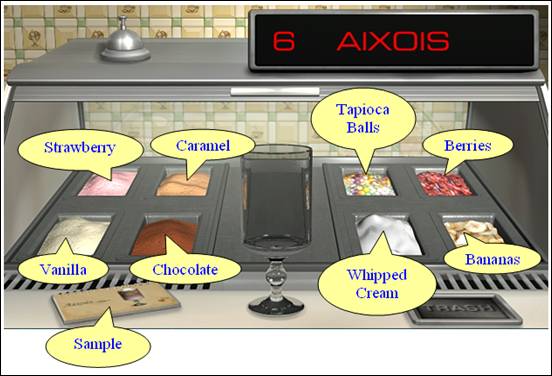
Note: Be sure to refer to what
I have called the “Sample” (see the above picture) before you ring
the bell “announcing” that the order is ready. That way, you can
catch any mistakes you might have made and just throw away the contents into
the “Trash.” Otherwise, the owner will catch the mistake for
you and you will have to prepare an additional order as penalty!
Prepare the orders as follows.
View this guide raw, exactly as the archive holds it