Nancy Drew: The Phantom of Venice – Part 18
Nancy Drew 18: The Phantom of Venice
by Her Interactive
Walkthrough by MaGtRo July 2008
Gameplay: This point and click game comes in
2 CDs.
Nancy will show you the desk in her bedroom. This is
where you can access the ‘How to be a Detective Book’ that shows the game
manipulations. The Scrapbook has past Nancy Drew Games information. The Case
Files is where the information about the present mystery case is explained.
Pick up the Italian Dictionary! Once you are ready to play the game, click
on the plane ticket to go to the new case location.
You will then select to play either Junior or Senior
detective.
The main screen has pictures at the bottom of the
page. The bag at left is the inventory link. The journal shows Nancy’s notes
about the present case. The checklist shows what needs to be done or was done in
the case to progress in the game. The gear icon shows the options. Here the
voice, effects and music volume can be adjusted. Also, the bottom background can
be changed. Closed captioning and screen size selection are also in this page.
The Load folder has the list of the saved games that can be replayed. The
diskette is used to save the game. The rightmost icon closes the game.
Senior and junior modes of gameplay are the same
except for the Task list that is open for the junior mode only.
Nancy walks through a dark well tunnel. The door slams
shuts and water begins pouring out of pipes. Nancy recalls the start of her trip
to Venice.
Meet the other people at Ca’ Nascosta
Nancy’s room: Nancy wakes up inside an ornately decorated red room.
Look around the room.Helena: Go forward after
rising from the bed. Look at the picture on the dresser. This is Helena, the
roommate.Check the postcards and the notes on the back that are
on the table. Her parents and a friend are in Germany. She has friends named
Killian in Chicago IL.The phone is by Helena’s bed. Go outside the balcony
and see the waterways of Venice.Look at the left side of the balcony door and see
Nancy’s bed. Check the bathroom by the Nancy’s wardrobe. Going to the bathroom
often might earn you a Lavatorio Star at end of the game.Dress for the day: Open the
wardrobe. Open each drawer and select the outfit you want Nancy to wear: from
top of her head to the shoes of choice. Changing your outfit frequently might
earn you a Fashionista Star at end of the game.Check the makeup bag on top of the drawer. See the
outfit your wearing at top left of the screen. See also that the purse has 200
Euros.Check the book: An Interactive Guide to Venice on top
of the desk left of the door. Learn the history of Venice, major sights to see,
the famous gelato, Commedia dell’Arte, Carnevale and learn some Common Italian
words and phrases. Press the red button to hear the words pronounced.Exit the room.
Great room:
Turn left and talk to man working on restoring the walls.Colin Baxter: Learn all about
tesserae. He’s English and studied at Oxford University. He shows his tiles.
After a while pull back to stop the tile show.See an Etruscan bronze statuette on his workbench. He
mentions a package for Nancy outside.Balcony: Turn around from
Colin and go up to the balconyMargherita Faubourg: Talk to
the owner of Ca’ Nascosta sunbathing.Look around and see some flowers that are covered by
bees.Gate: Exit the balcony and
then through the door at right to be outside.Helena Berg: Go down the
stairs and meet Helena abruptly.Pick up the letters; one of which is from her friend
from the US, Hildegard Killian.
Learn the assignment:
Parcel: Pick up the parcel
from the table. Take the ATM card from Banco dell’ Oro.There is an ATM machine at Piazza San Marco that
should be sued to activate the card.Read the newspaper. Learn about the latest item stolen
by The Phantom – the Chalice from Convent of St Gervase.Helena: Go back up and talk
to Helena at the table at left side of room. She’s a journalist and writes for
Eurowelt Magazine. Learn that Colin is a false name. His real name is Justin.Map: Exit through the gate
and see the map.See that there are 3 ways to go: Black lines are by
foot. The water boats (V) are on the red lines and the gondoliers are the blue
lines. The gondoliers charge money; try it to have the experience but remember
that you are on a budget. Hear the lovely song sang by the gondoliers and
sightsee at the waterways of Venice. If you do ride with the gondoliers often to
listen them sing; you might earn the Musical Muse Star at end of the game.Click on a place to travel one leg at a time. Click
again on the place with an eye icon to check some places of interest.Piazza San Marco: Go to
Piazza San Marco at bottom right of the map.Pigeon food: Click to enter the bank at left.
See a bird food dispenser on the left. Get some for 5 Euros.Banco dell’ Oro: Enter the
bank at left.Use the ATM card on the slot. Read the instructions
about the assignment. Antonio Fango is to be watched using the binoculars and an
alert will be given by the PDA whenever he is at his office in the Argon
building. The office can be seen at the balcony of Ca’ Nascosta.Press home button and then the Case Dossier. Take the
PDA and binoculars.Kiosk: Exit the bank. Look
close at the kiosk. See some things to buy.Buy the Sassy Detective magazine at second from
top shelf and the EuroWelt magazine from the third from top shelf for 5
Euros each.Open the EuroWelt magazine and see that it is in
German. Buy the German-English Dictionary from bottom shelf. There are
only 165 Euros left. Click the German-English dictionary on the open magazine
and read the story about Leo Machiano and his trial.Exit the piazza. Go back to the Ca’ Nascosta.
Ca’ Nascosta: The pager beeps.
Time to go to work.Balcony: Go up to the
balcony at top of the house. Stand behind Margherita and use the binoculars on the window of the
Argon building.See Fango take something from a pigeon that landed on
the window. Fango leaves the room.Bedroom: Nancy automatically reports to Sophia Leporace. Sophia
wants the pigeon be fed a tracking device. The device is to be picked up at a
costume shop in Campo Santa Maria Formosa.Nancy has to find out where the pigeon goes and to
discover what the message contains.Call Prudence Rutherford on the phone and see if you
can connect with her.Sausages: (May or may
not happen) See a basket on the table left of the door.The note with it says that the sausages came
from Colin. Eat some.Exit the room and Nancy collapses. Nancy got food
poisoning.After waking up at bedroom, check the handwriting on
Helena’s postcards and see if they match. No, they don’t.Talk to Colin about the sausages. He says he did not
send them. Uh Oh! (Thanks, Ana)Turn around and see a box of chocolates on the coffee
table by the sofa. Have some.Talk to Helena.
Feed and follow the pigeon:
Exit the house.
Get the tracking device: Go
to Campo Santa Maria Formosa.Open the PDA and review what the tracking device looks
like.Enter the Costumi di Vera.
Save here! Immediately click using the tip of
the cursor on the white pill right of the box on the left side of the shelf at
back wall. You get a second chance if the pill self destruct.Leave the store and the Campo.
Note: If you haven’t bought
bird seeds yet, buy some from the Piazza San Marco or from the Rialto market.Enter Fango’s office: Go to
Campo del Frari. Enter the building.See that Fango’s office is locked. Looks like I
have to pick this lock somehow...Read the Sassy Detective magazine and learn how to
pick a lock.Ca’ Nascosta: Go back to Ca’
Nascosta and then to the bedroom. The phone rings. Talk to Prudence Rutherford,
the former owner of Ca’ Nascosta. Try calling Mrs. Rutherford later and get a
funny caller ID dialogue.Take hairpins from Nancy’s makeup kit inside
the wardrobe.Go back to Fango’s office.
Pick the lock of office door:
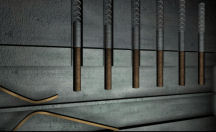
Use the hairpin on the lock.See 6 pins. The objective is to get the pins aligned
to have all white on top of the line and the brown below.This is a random puzzle and will be done several times
in the game. So practice.
Click on each pin to find out which pin moves most
other pins. Align that one first. Then do the next pin that moves more than the
others. Leave the pin that moves only itself last. Have fun!Search the room: Look around the
room. Turn right from the door and check the shelf at right. See a musical
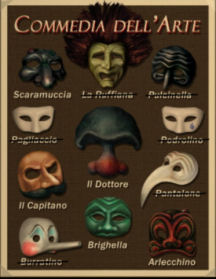
horse. Click on the knob to hear the whole music.Check the cabinet at the middle. See a Commedia
dell’Arte poster of mask. Some are crossed out, except for Scaramuccia, Il
Capitano, Brighella, Arlecchino and Il Dottore at the center.
There’s a fax machine right of the desk by the window.
Look at the trash can that has a Kris Kringle wrapper left of the desk.Check the diplomas at back wall. See that Fango
graduated at London School of Applied Technologies and the University of
Bologna.Check the travel brochure on the table left of the
coffee machine. Use the Italian dictionary to translate.Check the file cabinets on the left wall. Open the
third from top drawer of the middle cabinet. See some Scopa cards but some cards
are missing. Have fun opening the other drawers to see stuffed cat, fake
springing eyes and robot.Feed the pigeon: Look close
at the pigeon on the window shelf. It has yellow legs.Place the bird seed in front of the pigeon. Place the
tracking device on the seeds. Watch the bird eats it.If unsuccessful this time, check the PDA and track the
pigeon.Hide: Uh Oh! Fango is coming
back. Immediately, go to the left of the room and enter the cabinet with the
poster.Watch as Fango moves around the office. Exit the
cabinet. Put the loose poster back in place.Look around to know what he did back here. Look at the
front of the desk and see a box of chocolate and the identifier of the
chocolatesComputer: Go around the desk
and face the laptop.It asks for a password. See that the icon is the mask
of Il Capitano as seen in the poster.Type in Il Capitano. Click on the chess icon and see
that Gina’s Chessboard server is down.Check the trash. See that he cancelled plane
reservations to Tahiti and later to Aruba.Check all the chess logs. See that Fango plays chess
with Scaramuccia. There are locations noted at each end of the game.Follow the pigeon: Exit the
office.At the map, open the PDA. Click on ‘track’. See arrows
that would show where the bird has flown.The arrows point to south and west. Go to Campo Santa
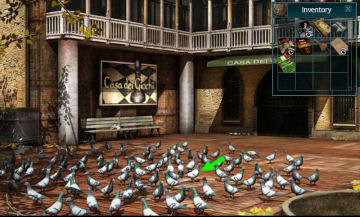
Margherita, SW of the office.See a lot of birds in front of the Casa dei Giochi
which translate as House of Games.Look for a pigeon with yellow legs and then click to
see if it is the one we fed.Take the message from the leg of the pigeon. See that
the message is hello!
Click on the message in close up and the birds fly away.
Automatically, Sophia calls on the PDA. She wants the message checked for a
microdot.Garbage interest: Go to the
alley left of the piazza.See a propane tank container that has a 4 digit lock
on it.To the right is a garbage bin. Check what is inside
completely.After some interesting discarded items from previous
Nancy games, read and take a Scotland Report about Colin Baxter aka
Justin Mathias Beaumont.After more previous game garbage, see a
letter to Enrico Tazza from the Doppeler Institute about Samantha Quick. Use
the Italian dictionary to translate the letter. She will be coming after the
Carnival. She can be identified by what she will be wearing: red dress, white
gloves, black sunglasses and has blond hair.
Check the message for a microdot:
Go back to the Ca’ Nascosta.
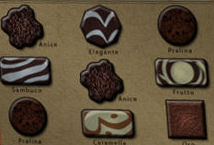
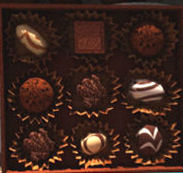
Chocolates: See a box of
chocolate on the table. It is for Il Dottore.Open and see what’s inside. What else – Chocolates. If
we remember (since we can’t take it) the chocolate identifier we saw from Fango’s office, the chocolates
are arranged:Caramella, Oro, Pralina
Pralina, Anice, Sambusco
Anice, Frutto, Elegante
COPPASAFE? What does that mean? Cup safe? The chalice
of St. Gervase is now in the safe place?This must be a way of communicating with Il Dottore.
Go up the steps and hear the 3 talking about Nancy. Enter the Great room.
Talk to Helena and learn about her immersion to and
her knowledge about the Machiano case.Talk to Colin about the microscope. Talk to him again
about the art theft. He admits his past to Nancy and learn about what Margherita
asked him to do.Microscope: Click the message
on the microscope.Read: Il Dottore requests you to change the safe
room lock combination to 43556.Margherita: Go up to the
balcony and talk to Margherita. She gives the impression that she doesn’t like
Nancy.Learn about her thoughts concerning Helena, how to
make money at Rialto market and about Colin.There’s a letter on the table. Try to read it.
Report: Go to bedroom or the
bedroom balcony
or to the front gate and call Sophia using the PDA.She wants the 3 members of the household to be bugged.
The tracking device can be taken from the ATM machine at Banco dell’ Oro.
Place the tracking device on the other occupants of
Ca’Nacostra.
Banco dell’ Oro: Go to Piazza
San Marco at bottom right of the map.Enter the bank, insert the ATM card in the machine,
select ‘Pick Up’ and take the 3 tracking devices.Kiosk: While we’re here, go
to the kiosk and buy the black sunglasses left of the books and the
Guide to Chess at third from top shelf. You have 150 Euros left.Ca’ Nascosta: Go back to the
house. Talk to give the tessera to Colin.Go to the bedroom and then the bathroom. Hear that
Helena is in the bathroom.Go back to the table where Helena usually writes. Take
the pink pen and remove the top end part (pen is inverted) and insert the white
tracking device. Check what she has written in her log book. Use the German
dictionary. Very Interesting.Go up to the balcony and talk to Margherita.
Automatically gift her with the sunglasses case.
Buy the new outfit:
If you have not bought the sunglasses yet go to the
kiosk at Piazza San Marco and get one. Get the Chess book too.Go to Campo Santa Maria Formosa and enter the costume
shop. Buy the red dress for 60 Euros, the white gloves at right
for 5 Euros and the blonde wig for 40 Euros. If you have enough
money (or earn some more) you can get the Clogio Star at end of the game by
buying several Italian shoes. There are 45 Euros left.
Rialto Market: Let’s take a
side trip. Go to the Rialto market as mentioned by Margherita at top of the map.Gelato: Look around. See the
Gelato cooler at right. Get one for 2 Euros.Open the cooler, take the scoop at right and select
your flavor. Scoop as much as you want and place the gelato on the cone at
right. If you can afford it and adventurous – try different flavors of gelato;
you might earn the Gelatina Star at the end of the game. 4 scoops per cone is
the max.Make a gelato of the colors of the Italian flag (red
at bottom, white and green on top) and hear a *chicken cackle* to get an Easter
Egg. (Thanks lily.bart!)Carbo Infusion: Have some
refreshing drink from the Carbo Infusion.Florist: Check the sign using
the Italian dictionary and see that ‘We buy flowers’. Hmm… A way to earn
money. Where did we see some flowers? Ah… Bees!Bug spray: There are seeds to buy
and a bug spray for 20 Euros. You might want to buy it to earn money. Use the
Italian dictionary to check the flowers. If you use the Italian dictionary often
enough, you might get the Webstressa Star at end of the game.Riciglaggio: Check the recycling stand.
Earn or get some money:
Check litter: At each place,
check the litter around – click on them. Some trash might be hiding money like
the Euros hidden on the litter in front of the Casa dei Giochi at Campo Santa Margherita
or at Campo Santa Maria Formosa.
You might even get the Euro Trash Star at the end of the game.Sell flowers: (This is an
optional way to get money. If you can find enough coins through other means and
not want to earn it this way, no problem.) Go back to Ca’ Nascosta and up to the balcony.Turn around and look at the flower with the bees. Use
the bug sprayer on the flowers.Automatically ask Margherita about the flowers. They
are from Hilihili Research Facility in Hawaii. Sounds familiar?If you played The Crystal Skull, you know what to do.
Click the bug sprayer on the bees until they all fall on the floor. Be sure to
hit the vicious red ones first.Take the flowers and bring them to the florist
at Rialto Market.Place the flowers on the empty flower vase above the
sign. Get 30 Euros for them.
Meet Enrico Tazza:
(This can happen at any time before now.) Go back to Ca’ Nascosta. The alert sounded on the PDA. Go to the balcony
and use the binoculars on Fango. See that he sent another message.Go back to the bedroom. Report to Sophia. She said to ignore this one.
Change outfit by opening the dresser and
use the red dress, white gloves, dark sunglasses and blond wig. Be sure to wear black
shoes.Go to Casa dei Giochi at Campo Santa Margherita. Knock
on the door.Talk to Enrico Tazza. He wants Samantha to beat him in
Scopa.Scopa: There are 4 suits: coins, cups, swords and clubs.
There are 10 cards in each suit with the 7 as the valuable card.The face cards are the Valet, Knight and King. The
value of each card is seen on the card.The most valuable are the 7s, then 6s, aces, 5 4 3 2
and then the face cards.3 cards are dealt to the players and 4 are face card
at the center.Each player play only 1 card from his own.
A match of one of your card is the sum of any card on
the face cards at the center.If you take the last card in the play area – you do
Scopa. 11 or more points win the game.Play the game and win to talk to Tazza. Have fun.
Tazza wants Samantha Quick to steal the Sadal Melik
sapphire from Palazzo Zattere. It is protected by a very sophisticated system.
Gina can help with the security system.
Steal the Sadal Melick sapphire:
Ca’ Nascosta: Go back to the
bedroom and change out of this outfit. Helena and Colin do not notice this
going in-out with different outfits?Report to Sophia via the PDA. Sophia likes the idea of
stealing the sapphire in order to get in good graces of Tazza. Oh No. No police help. Sophia will make sure that the real
Samantha will be delayed.
Contact Gina (Gina who?): Go back to Fango’s office at Campo del Frari. By
this time, you are already an expert lock picker.Go to the computer. Oh No, the alarm of the PDA goes off, Fango is here.
Immediately hide at the cabinet with the poster.After he leaves, go back out and look at the middle file cabinet. Check the Scopa cards, another
one is missing – the Valet of clubs.Go back to the laptop and
use Il Capitano as password.
Check the chess game. See that Gina is the chessboard server. Scaramuccia wants
a game.Exit back to the main menu and check the trash again. Read the chess log Dec29.
Play coded chess:
Learn that Scaramuccia likes to use the algebraic style of chess notation.The main question to be presented to Scaramuccia is Palazzo Zattere.
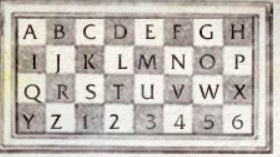
Review the Chess book bought at the kiosk. Study the graph of columns and rows
of letters-numbers that can be used as codes. Zattere is coded this way; Z =
KB1, A = KA4, T = KD2, T = KD2, E = KE4, R = KB2, E = KE4.Click on the chess piece icon and play with Scaramuccia.
Using the chess notation codes, type in using your keyboard as answers to
Scaramuccia postings: KB1, KA4, KD2, KD2, KE4, KB2, KE4. Press enter after
each answer.Scaramuccia posts to go to the recycling bin at the Rialto Market tomorrow
morning. Ciao!
Note: Since you have to wait for tomorrow to continue and if you have
enough money left, picked up or earned; go shopping or eat gelato or ride the
gondola.Ca’ Nascosta: Go back to the
bedroom and go to sleep.Il Fantasma-The Phantom:
Nancy is woken up by the Phantom. He took Ned’s gift, the locket from her neck.
Helena comes out of the bathroom and screams. The Phantom escapes through the
balcony. The newspaper reports the theft of the Etruscan bronze on Colin’s work
table and the necklace.Mrs. Rutherford calls and gave her one – no, half a
cent in.Try to go to the Grand room and is stopped by an
argument between Helena and Colin; each blaming each other for leaving the door
open.Margherita and Fango? The PDA alert sounded. Go to the balcony and use the
binoculars on Fango’s office. See Margherita arguing with Fango and waving a
piece of paper. She leaves in a huff. What is she doing there?While she’s gone, read the letter on the table. Use
the Italian dictionary.Chinese puzzle box: Talk to
Colin about the puzzle box.Collect items left by Scaramuccia:
Go to Rialto market. Use the Italian dictionary on the
label of the blue stand.Take the bottle inside the recycler. Open the base of
the bottle.Take the card with the word Hi and the
keycard with electronic gadget. The bottle goes in the recycler.Read the Hi card: Go back to the
Ca’.Look close at the microscope. Click the Hi card on the
microscope. As soon as you look through the scope, the bulb burns out.Colin got a bit hasty there. While he’s looking for
another bulb, he asks that you do some mosaic work.Mosaic tiles: Click to look
close at a photograph.Add tiles taken from top to the empty areas of the
mosaic. Use the picture as reference.I usually do the least number of tile colors first. Be
careful of the slight change in shadings.If you do this without any mistake, a Star at the end
of the game might be waiting.Click the cover to see the finished mosaic. Colin
comes back and has installed the new microscope bulb.Look close at the microscope. Click the Hi card on the
microscope.Read the microdot: Vlad is in
Gstaad fro the next month so he won’t show up. The Sapphire is housed in the
warehouse below the Palazzo – the entrance is the barred doors in the alleyway.
You’ll need an anti-thermal suit for this job. If you’ve lost yours, Fausto at
Club Micio in Campo San Polo is the only one who has any left. Be forewarned,
he’s gone straight and isn’t dealing in this business any longer so you’ll need
to date one of the dancers since Fausto uses the old fabric for his dancers’
costumes. But I doubt that’ll be any problem for you. Use the attached lock
override to break the combinations for the entry to the warehouse and the
sapphire container. The lock override will show you the order in which to push
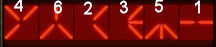
them in the following sequence: (see picture). The warehouse is monitored by
robotic sentries. There are four power circuits you’ll need to find and overload
to temporarily shut the power off that feeds the alarm system protecting the
sapphire. The sapphire is in the center warehouse.
One Easter egg: Pick the lock of the locked room left
of Colin. *Chicken cackle*. Get an Easter egg.Get an anti-thermal costume:
Go to Club Micio in Campo San Polo. Enter the Club.Dance Audition: Hear that
there is a dance audition today. If you finish this puzzle, you can earn money
later by dancing for tips if you want.Read the dance instructions. Take note that each dance
has a sound and a color cue.For the sound, press the sound icon to hear a sample
of the cue.Click on the cat suit hanging on the wall and be on
stage to audition.There are circles on top of the screen that are
colored coded and have the sound icon like (l-r):Yellow = bell, teal – claps, orange = ocarina, blue =
whistle, green = buzzer and red = siren.At the top of the circle is a bar. This shows the
progress of the audition. The audition is successfully done when the bar reaches
the right.The color cues are seen in various areas of the stage:
the light bulbs and fluorescent bars on the sides of the stage and the lights on
the base of the stage. Good luck and happy dancing!
Congratulations, Punchy LaRue!If you want to dance for tips, click on the gold
curtain at right. If you do dance for tips several times, you might win a
Dancing Super Star at the end of the game.Someone is out to get Nancy:
Go back to the Ca’. Outside the Ca’ see some leaves falling from above. Look up
and see a vase about to hit you – back up immediately.Go to the balcony and check to see who is up there.
Take the Scopa card – Valet of clubs from the edge of the balcony. Uh Oh! This
is the one missing from Fango’s cabinet.Change into the anti-thermal suit. Open the wardrobe
and change into: black gloves, black mask, cat’s ears, black top, black pants
and black boots.(This can happen earlier in this day). Try to leave the room. The phone rings. Answer the
phone and talk to Samantha Quick. She knows all about Nancy. Who is she?Try to leave the room again. Get another phone call.
It is Margherita. She will be gone and won’t be back til tomorrow.Palazzo Zaterre: Go to
Palazzo Zaterre.Gate to the warehouse: Go to the
grilled gate at right.Look close at the lock. Insert the keycard with
electronic gadget.Using the code from the microdot press the correct
sequence in the keypad. The door opens.

Warehouse: Enter and see the
topmost warehouse room. I used the keypad arrows here instead of the mouse.Be careful and avoid the robots. Hide in corners or
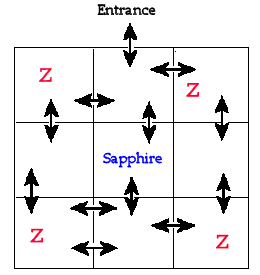
just move away. Plan your path ahead of time.There are 9 rooms in the warehouse; 3 rooms in 3 rows.
The corner rooms have the power circuit panels. Go to each corner room and overload the power marked
by red electric symbols inside a circle.This will deactivate the 4 lasers guarding the
sapphire that is located at the center room.Power circuit at the 4 corner rooms: See 8 rods with a lever at the bottom under each rod.
The aim is to lower the shutters to cover the rods. This will overload the
circuit.Find the first rod that can be shut down. Then find the second by pressing the
first rod lever followed by another unknown rod. Then redo the sequence again to find
the third and then the fourth and so on… until all 8 are covered and the power
is overloaded.Do this to all 4 corner power circuits.
After overloading the 4 power circuits, go to the
center room and take the sapphire. Exit the warehouse.
Go back to the Ca’. Change outfit to the Samantha
Quick costume: blonde wig, black sunglasses, white gloves, red dress and black
shoes.
Enrico Tazza: Go to Casa dei Giochi at Campo Santa Margherita. Knock
on the door.Talk to Enrico Tazza. Hear about Nico, the Chinese
Puzzle box and shaking the box. He wants Samantha to beat him in Scopa before
she gets paid.Play Scopa.
He will send the payment to a Swiss bank account.
Chinese Box Puzzle: Go back
to the Ca’.
Enter the bedroom and change outfit to daily wear.
Check the note on the pillow of Nancy’s bed. It’s a
parting letter from Colin-Justin. Look at the handwriting of this letter and
the note that came with the spoiled sausages. Aha! Why?Exit the room and look at the Chinese Puzzle box on Colin’s work table.
Nancy shakes the box as overheard from the phone call of Tazza.
It opens and Chinese characters are seen.
If you haven’t yet, go buy the book "An Introduction to Chinese Symbols" from
the kiosk at Piazza San Marco.Go back to the Chinese Box at the Ca’.
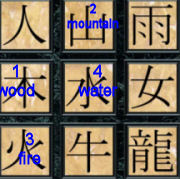
Translate the Chinese characters. Let’s try the 4 elements: Press wood,
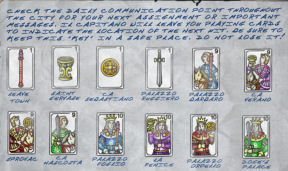
mountain, fire and water. Aha.Take the Scopa card code for the Communication points.
Check Fango’s office again:
Time to sleep. Go to the bedroom and lay me down to sleep.
Wake up and the alert on the PDA goes off. Go to the balcony and use the
binoculars. Too late.
Margherita’s business with Fango: Talk to Margherita.
She found a flyer in a trash here in the Ca’ about wireless network. See numbers
at the back of the flyer = 111#046.Talk to Helena about Colin.
Fango’s office: Go to Fango’s office at Campo del Frari.
Pick the lock of the door and then enter.
Music box: Check and note down the notes of the music played
by the horse music box.Fax machine: Enter the number see at the back of the wireless
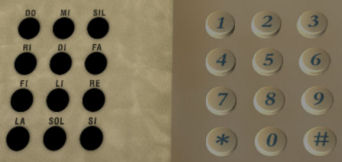
flyer = 111#046.It printed out a set of dots with notes. Ah, they look like the phone number
pad.Click the number pad code on the Fax dial.
Using the printed number pad code as reference, enter the notes of the music
box: mi, re, do, si, la, re, re, do, la, fi, sol, do, mi, do, do, sol, sol,
mi, fa, re, re, re, la, si, re, do on the number pad.Press: 2 9 1 # * 9 9 1 * 7 0 1 2 1 1 0 0 2 6 9 9 9 * # 9 1.
Check all the references in the automated directory and find out:
1. Personnel:
Signore Dottore is president, Capitano – communications, Arlecchino – shipping
and receiving, Scaramuccia-security, Brighella – Acquisition.2. Store Locations:
1. HQ – Argon building.
2. Safe-Secure store – fountain at Campo Santa Formosa.
3. Acquisition partners – Aces, Knights and Kings.
4. Presidential Suites are in Ca’ Nascosta.
5. Propane storage is in Campo Santa Margherita.
6. All others – check the calendar.
3. Communications
1. Presidential communications – sent by box of chocolates to Il Dottore
2. Acquisitions is at temporary meeting spaces; check the card delivered.
3. Security done by chess and follow up checked by Scaramuccia.
4. Shipping and receiving is at the propane storage facility.
Scopa cards: Check the middle file cabinet again and see
that the King of coins (Re di Danari) is now gone. Based on the code of places,
it is the Palazzo Orpello.
Report: Call Sophia using the PDA. Report where it will
strike next.The GdiF will stakeout the Palazzo; Nancy should be at the stakeout also.
Brush up on Italian words to understand the other operatives.
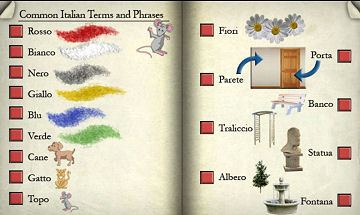
Common Italian words: Go back to the Ca’. Go to the
bedroom and review the Common Italian terms.Be sure to remember all the words in the page shown below.
Press the button to hear the pronunciation.Call Sophia. I am ready.
Stakeout: Get instruction. Click on the place where
Nico is located, not where the agents are staked out.Click on Nico three times correctly and he will be
apprehended.
Sophia reports: Nico is arrested but does not admit
anything. Sophia looks at the propane gas receipt Nico carried. It has 3447
written on the back.
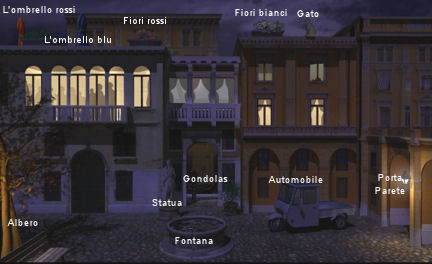
Find the secure and safe place:
Propane gas container: Go to Campo Santa Margherita
and then to the alley at left.Look close at the lock. Enter 3447 and open the
propane storage container.Take the key and the water well map (not
found in senior mode).Safe place: Go to Campo Santa
Maria Formosa. Look close at the right side of the wall fountain.If you do not see the fountain or door with the lock
right of the fountain, it is because you have not checked all the extensions in
the fax machine at Fango’s office.Use the key from the propane storage bin on the
padlock.
Explore the water well maze:
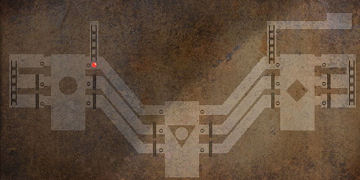
Enter and turn right. Study the map seen on the wall.
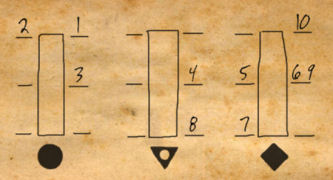
Compare that to the water well map taken from the propane bin.So we are in #1 circle right now. Ultimately we want
to go to 10 and across that to the other ladder.To do so, we need water to get a bridge up at top of
diamond well. We do this by draining the other 2 wells.
1. From the map pull back and turn right around the
corner.Turn around and see the circle water well. We want to
go across based on the map.Go forward and see that the water is down. Turn left
and fill this circle well by turning the wheel counterclockwise.Now cross the bridge.
2. Now we’re in #2 in the map. Turn to the right just
after crossing the floating bridge.We want to go to point 3. Drain the circle well by
turning the wheel clockwise.Turn left and go down the ladder one level down.
Turn around and cross the bridge.
3. We are now in point 3. Time to empty this
circle well.Turn to the right and turn the wheel clockwise to
drain circle well.4. Turn left and go down the ramp to see triangle
well. Cross the bridge.We are now point 4 at the map. Immediately turn to the
right.Turn the wheel to drain the triangle well in
preparation for #8.5. Go up the ramp to see a drained diamond well.
Turn left and fill the triangle well so we can go
across.6. Cross the bridge and be at point 6.
Turn right and drain the triangle well.
Go to the ladder and go down to the next level.
7. Cross the bridge. We are now at point 7 of the
diamond well.Turn right and drain the diamond well.
8. Go down the ramp to point 8 and see the floating
bridge. Do not cross.Turn left and drain triangle well.
9. Go back up the ramp to diamond well.
See that there is a floating bridge here caused by
draining the other well.Cross the bridge and go up the ladder to point 9.
Turn around and forward.
Turn left and let us fill diamond well.
Go back to the ladder and climb up.
10. We are now in point 10.
Turn around and forward to the wheel.
Turn left and fill diamond well so we can get to the
ultimate ladder.Ladder: Cross the
bridge and see the passage on the left.Go forward, left and climb the ladder.
Safe place (at last in more ways than one):
Light: Turn around from the ladder. We need light.
Look close at that faint yellow thing at left. Take the flashlight.
Take the flashlight from the stand. Pull back. Take the flashlight from
inventory and click it forward until the metal door.
The loot: See a keypad. Use the numbers taken from the
microdot of the pigeon message Hello!Press 4 3 5 5 6.
Enter through the metal door. See a crate. Check the crate and see that it is
mailed to one seen at the postcard and mailed dropped after a smashing encounter
your first day here.Check what is inside and see Carnevale mask. Open one and see the loot.
This is where the adventure began: the door is closed, water starts flowing.
Save yourself: Go to the left and look close at the gauges.
You need to place the gauge all at the center line. Be sure that when you adjust
the gauges that you do not have any reach the top or the game ends.After studying what gauge affects others: (left to right):
Do this fast:
Click 2 down clockwise twice.
Click 1 up counterclockwise 5 times.
Click 3 down clockwise 3 times.
Click 5 up counterclockwise 4 times only.
Click 4 down clockwise twice only.
Click 5 up counterclockwise once.
Click 4 down clockwise twice. Whew!
Exit, climb rope ladder and report.
Track the villain: Nancy needs to track the villain.
Check the mode of transportation and the last location she is seen.
A piedi is on foot – black lines, Vaporetto is by water boat – red lines and
gondola is the blue lines.The flashing circle is where the villain was last seen.
Listen to the explanation after catching the villain.
FINE!
See you at Haunting of Castle Malloy
This document may
not be distributed without express written permission of the author
and the content may not be altered in any way.For
Questions or Comments on this Walkthrough,
Please write to:
MaGtRoCopyright
© 7/2008
MaGtRo
View this guide raw, exactly as the archive holds it