Myst V: End of Ages
All images in this walkthrough are property of Ubi Soft
Entertainment™
Walkthrough by Bert Jamin
© September 2005 Bert Jamin (www.gamesover.com)
This walkthrough may not be sold and may not be used for any commercial
purposes. Neither is it permitted to publish this walkthrough in any way without
the written permission of the author Bert Jamin () and his E-mail address are mentioned unchanged. For the most up to date walkthroughs always visit www.gamesover.com.
If you have any suggestions
to improve this walkthrough, let me know by sending me an email: .
Click on one of the images
to go to that chapter,
 |
 |
 |
 |
 |
| K’Veer | Taghira | Todelmer | Noloben | Laki’ahn |
or click on the image at
the bottom of this page to go to the next chapter.
Taghira
Cross the first wooden bridge on the
right and also cross the next wooden bridge on the right. Enter the linking bubble
that has the icy landscape
projected on the inner side. Take the stone tablet from the pedestal, called the
Slate. Notice that the upper corner of the Slate appears at the bottom of
your screen while you are carrying it.
About the Slate: sometimes it happens
that a Bahro doesn’t recognize a drawing you made although it looks perfect. In
that case a Bahro picks up the Slate, looks at it and nothing happens. In that
case just pick up the Slate and give it another try. If you want to change a
drawing you made or if you want to delete a drawing on the Slate, click on the
upper left sign on the Slate with the two strokes. By clicking on that sign a
drawing on the Slate will be erased.
Press the blue-lit sign at the left side
of the pedestal to get linked to Taghira. Turn around to see Esher waiting for
you. Exit the bubble to hear what he has to tell you. Remember Esher tells you
that you can use the Slate to interact with the inhabitants of the ages, called
Bahro.
Go forward one step. Notice the drawing
on the ground. Go forward two times and notice that some ice blocks your path. Turn
around and go one step forward. Turn to the right and go one step forward.
Listen to how the ice is now cracking beneath your feet. Drop the Slate at that spot.
Notice that a crack appears in the ground. When a Bahro picks up the Slate the
crack grows even bigger. Turn around and enter the linking bubble.
Take the Slate from the pedestal that the Bahro has returned.
Head back to the crack in the ground.
Turn to the left and go forward one step. Because of the weight of yourself and the Slate the
ground will collapse. Turn to the right and exit the cave. Go forward and try to
climb up the ladder. The Slate is far too heavy to climb up the ladder. So…
simply drop the Slate on the ground. Climb up the ladder.
Go forward and a Bahro will take the Slate
back to the linking bubble once more. Return to the ladder. Turn to the
left to see two
important things. Notice the blue-lit symbol on the icy wall. Make a drawing of
this symbol because you are going to need it later. It is the Bahro symbol for
heat. Also notice the stone pedestal. Go forward and turn to the left to study
the pedestal.
Notice the image on top of the pedestal.
It looks a little like an anchor. Remember this sign!. Beneath it there is some
kind of triangle sign. Press this triangle shaped sign to return to the linking
bubble. Take the Slate and walk back to the ladder. Before dropping the Slate on
the ground use it to draw the sign of the anchor on it. Than drop the Slate on the
ground.
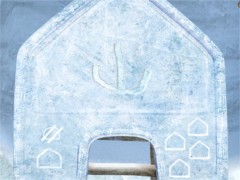
The anchor sign
Climb up the ladder and go one step
forward. Turn around and see how a Bahro places the Slate on the appropriate
pedestal. Walk to the pedestal. Take the Slate from the pedestal. Now cross the icy bridge. Keep on
going straight forward until you reach the brown stairs leading up to some sort
of hut. Notice the stone pedestal at the right side of the stone stairs.
Place the Slate on the pedestal. Climb up
the stairs to have another meeting with Esher. Enter the hut and find a diagram on the wall. Later on you’ll find out that this is a schedule about
steaming pipes. Exit the hut. Go down the stairs two steps. Turn to the left and
see a valve. Move it to the right position. Turn around. Go down the stairs and
look around to notice that six buildings that are tower shaped surround the hut.
Each and every tower has the same valve. Go and move the valve of each and every
tower to the right position. Near one of the buildings you’ll have another
meeting with Esher.
Return to the hut. Take the Slate from the pedestal. Turn to the right
once and walk straight forward. Keep going until you reach the frozen lake with tubes in
it just like you saw on the
diagram back in the hut. Make sure to stand in the middle in front of the frozen
lake. Use the Slate to make a drawing of the heat symbol.
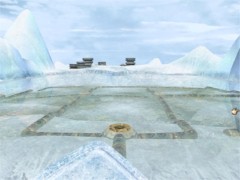
The correct place in front of the frozen lake
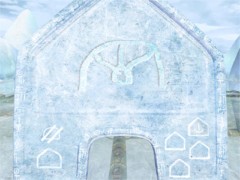
The heat symbol
Drop the Slate on the ground. Turn around
and go two steps forward. A Bahro will pick up the Slate and will heat the place
but only for a while. So be quick now! Turn around and go forward two steps.
Turn to the left and hurry to the base of the huge heating pipe. You’ll see
three levers with blue dots. Move the left lever to the right, the center lever
to the left and the right lever to the left.
Note: be aware that it
can be a little bit difficult to move the levers. The best way is moving your
cursor to the round base of the levers and than move them to the correct
direction.
Turn around and hurry to the base of the
pipe at the opposite site. Notice the same kind of levers with orange dots. Move
the left lever to the left, the center lever to the right and the right lever to
the left. You must accomplish this before the heating time is over!!!
Return to the frozen lake and wait until heating time is finished.
Return to the pedestal in front of the
hut. Remember the sign on top of the pedestal. Press the triangle shaped symbol
on the pedestal to return to the linking bubble. Take the Slate from the pedestal. Press the
sign next to the anchor sign, the one that corresponds with the sign you just saw
on top of the pedestal in front of the hut. Turn to the right and walk straight
forward to the frozen lake.
Use the Slate and click on the image of
heat at the left side on the Slate. Drop the Slate on the ground once more. Turn
around and go two steps forwards. Use the path on the frozen lake to walk to
the opposite side. Go forward to have another meeting with Esher. Walk to the
linking bubble called The Keep. When you approach it, it will back off as Esher
told you. Make a note of the symbol on the pedestal inside The Keep. Turn around and walk to the pedestal at
your right side. Press the triangle shaped sign to return to the linking bubble
where you started. Use the Slate to draw the Keep’s symbol.
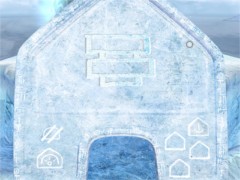
The Keep’s symbol on the Slate
Drop it on the ground. Exit the bubble and go forward. Turn around to see a Bahro picking up the
Slate. Enter the bubble and press the
Keep’s symbol on the right side of the pedestal.
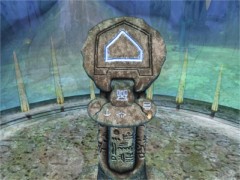
The Keep’s symbol at the right side on the pedestal
You’ll have another meeting with Esher.
Enter The Keep and press the blue-lit Slate to release one of the arms that is holding
the Tablet. Press the triangle shaped sign to return to Taghira. Press the
symbol on the center part of the pedestal to return to Direbo.
Todelmer
View this guide raw, exactly as the archive holds it
Parts of this guide
One guide by Bert Jamin, in 7 parts. They read in order, and the part you are on is marked.