Myst V: End of Ages

All images in this walkthrough are property of Ubi Soft
Entertainment™
Walkthrough by Bert Jamin
© September 2005 Bert Jamin (www.gamesover.com)
This walkthrough may not be sold and may not be used for any commercial
purposes. Neither is it permitted to publish this walkthrough in any way without
the written permission of the author Bert Jamin () and his E-mail address are mentioned unchanged. For the most up to date walkthroughs always visit www.gamesover.com.
If you have any suggestions
to improve this walkthrough, let me know by sending me an email: .
Click on one of the images
to go to that chapter,
 |
 |
 |
 |
 |
| K’Veer | Taghira | Todelmer | Noloben | Laki’ahn |
or click on the image at
the bottom of this page to go to the next chapter.
Noloben
Turn around and
exit the linking bubble. Cross the wooden bridge in front of you. Also cross the
next wooden bridge. Enter the linking bubble. Take the Slate from the pedestal
and press the sign on the left side on the pedestal to get linked to Noloben.
Turn around and exit the linking bubble.
Turn to the left and notice Esher sitting on the
beach in the distance. Walk towards Esher and listen to his story one more time.
Walk further, go around the corner and walk to the end of the beach. Turn to the left and go forward one step.
Enter the cave.
Keep on
walking straight ahead until you end up at the other side of the island. If you
like you can explore this part of the island. Notice something that looks like a
closed door on one of the little islands in the water. Walk forward four times.
Turn to the right and cross the water to
walk to that door which turns out to be a huge rock blocking your way.
For the
moment there is no way to get rid of this rock. Turn around to see
some kind of building in the distance with a huge lens on the roof. I bet this lens has something to do with this
rock! Remember this little island with this rock!!! You have to return here
later… Return to the cave. You can find it by crossing the
water and walking all the
way to the left.
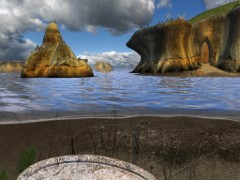
The mysterious closed door…
Enter the
cave and walk all the way to the end until you’re standing on the other beach
again. Turn to the right and go forward twice. Turn to the right to face a tent with a
plate on the ground and some empty bowls on a table. Study the stone
plate that is lying on the ground. Look at the signs on that plate. Use the Slate
to draw the same sign you just saw on the plate on the ground. Remember that you are facing the sign on
the ground upside down!
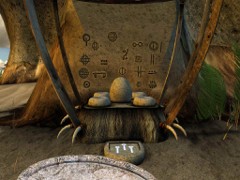
The plate on the ground
Now make a drawing of these
signs on the Slate. Because you see the signs upside down it should look like
this:
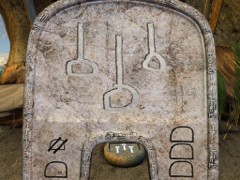
Now is that another fine piece art or what?
Drop the Slate on the
ground. Turn to the right and go forward twice. Turn around to see what is
happening! If you made a good drawing a Bahro will pick up the Slate to make it rain.
If nothing happens, your drawing wasn’t correct.
In that case pick up the stone Slate and try again…
Return to the tent and
notice a big stone surrounded by four bowls. See how these bowls are being filled with water. Wait until the rain stops with a big flash. Then have
a look at the filled bowls. Notice that a sign from the
tapestry is reflected in each and every bowl. I guess you’ll see that these four
symbols look a little like D’Ni signs you learned before in other Myst games.
However they sure are little different! Some of the signs on the tapestry don’t
look familiar at all. These must be Bahro signs… This means you not only have
to learn these new D’Ni signs you also have to learn the corresponding Bahro
signs!
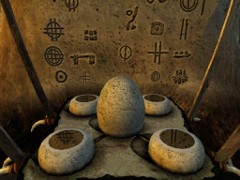
Four reflected D’Ni signs
It’s very important to make
a note of the four D’Ni like signs in the bowls. It’s also very important to
make a note in which order these four signs in the bowls are surrounding the big
stone. So after you have done that you can go on with the game!
If you like you can wait
until the water is drained from the bowls. Turn to the left and head back into
the linking bubble. Place the Slate on the linking pedestal. Why? Because
in a short time you will have to climb up a ladder and the Slate is far too heavy to
take it up with you! It is also possible that the Bahro placed the Slate on the
pedestal for you. In that case leave it where it is. Exit the portal.
Turn to the right and walk
to the shipwreck. Turn to the right and walk toward the steep cliffs. At the
right side of the cliffs you’ll see a cave. Enter the cave and soon a closed
door will block your way. Believe me… there are four of these closed
door in that cave. So to get to the end of the cave you have to open these four
doors! Turn around and exit the cave. While standing on the beach again, go one
step forward. Turn to the right twice and walk to the steep cliffs. Notice a hard to see lever that is
hanging down. Pull down that lever.
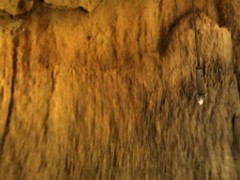
The hard to find lever…
Climb up the ladder. If you
like you can examine this part of the island. While walking around you’ll notice
that four stone pedestals are surrounding a huge stone building. Now remember
the tent with the four bowls surrounding the big stone you just saw on the
beach. It’s good you did make a note of the images and the correct order of them
after all!
When you examine the four
pedestals you’ll notice that you can turn the top. You’ll also notice that on
these tops there are these strange Bahro signs. Now the question of course is:
how to discover the meaning of these Bahro signs.
To do so the huge building
in the center of the pedestal will come in very handy! It takes quite some time to
find out which D’Ni symbol represents which Bahro symbol. Notice that all
windows of the huge building can be closed and opened. First of all make sure
that all of the 15 windows are closed. Then open the window that we all
know is the D’Ni sign for the roman 1 (I):
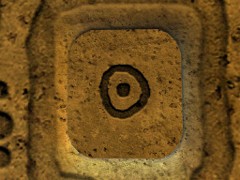
The first window to open…
Then walk to the opposite
site of the building and open the opposite window. One handy tip: there are 15
windows so to go to the opposite window you have to walk past seven closed
windows. When you open that window you’ll see the corresponding Bahro sigh above
the window you opened first. For a complete view of all the Roman numbers, D’Ni
signs and the corresponding Bahro signs have a look at
this page.
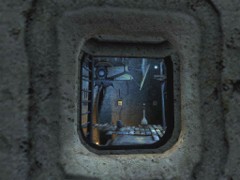
The Bahro sign above the opened window
You only have
to figure out which Bahro signs correspond with the four D’Ni signs you have
seen earlier on the filled bowls representing the Roman numbers II, XII, IV and
IX. When finished be sure to stand in front of the ladder you just climbed up
and face the huge stone building.
Go forward one step. Turn to
the right and notice the stone pedestal a little further away. Walk toward that
pedestal and turn to the left. Turn the top of the pedestal three times to the
left until it shows this
image:
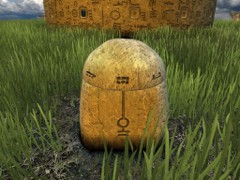
The first pedestal correctly adjusted…
Turn to the right and walk
toward the next pedestal. Turn the top of the pedestal one time to the right until it shows this
image:
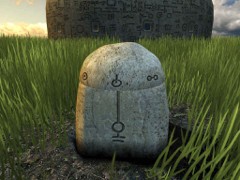
The second pedestal correctly adjusted…
Turn to the right and walk
toward the next pedestal. Turn the top of the pedestal three times to the left until it shows this
image:
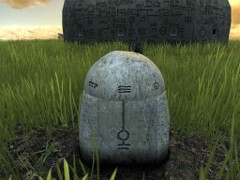
The third pedestal correctly adjusted…
Turn to the right and walk
toward the next pedestal. Turn the top of the pedestal four times to the right until it shows this
image:
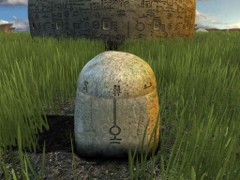
The fourth pedestal correctly adjusted…
Now head back to the ladder
leading down. Climb down the ladder. Head back into the linking bubble. Take the
Slate and exit the linking bubble. Turn to
the right and walk towards the shipwreck. Turn to the right twice and walk
toward the cave. Enter the cave and walk all the way to the
end. All doors in the cave should now be opened. If not, you didn’t turn the
tops of the pedestals at the top of the sleep cliffs correctly. In that case, go up the
steep cliffs once more and try again. Once done correctly, you’ll end up in another
room with a linking pedestal. Walk to the pedestal. Make a note of the Bahro
symbol on top of the pedestal. Place the Slate on the pedestal.
Turn to the right and climb
up the sandy stairs. Have another meeting with Esher. You learn that you have entered
his lab, which turns out to be the building you just saw on top of the cliffs.
You also learn that the Bahro won’t enter this place because they are afraid of
snakes. Also learn that you have to seal this place to be able to climb up. Go
the stairs all the way up. Step on the wooden platform.
Walk all the way to the end of the platform to find some sketches of Esher. One
of them is very important because it contains the sign of a snake. Make sure to
make a note of that one.
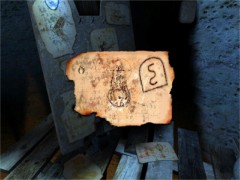
The snake sign
Turn around, go forward and climb up the
wooden ladder. Go forward and climb up the next wooden ladder too. Look up to see another
wooden ladder high above the ceiling. No way to climb that one right now. This
must be what Esher meant when he told you that you have to seal the place before
you can climb up… Turn around. Go all the way down until you’re standing in the room you
first entered. Take the Slate from the pedestal. Exit the cave and enter the
linking bubble. Use the Slate and draw the sign you just saw on the pedestal.
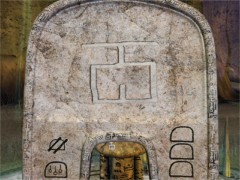
The sign for the cave
Drop the Slate on the
ground. Exit the linking bubble and go to the right twice. Re-enter the linking
bubble and notice that a Bahro added a new sign to the pedestal. Don’t press the
sign yet! Remember that you have to seal the lab to be able to climb up. Now the
question of course is… how to seal the lab!? Remember how you opened it in the
first place…
Place the Slate on the
pedestal. Exit the linking bubble and
go to the right. Climb up the ladder at the steep cliffs. Rotate the tops of the
four pedestals surrounding the lab to close the four doors in the cave. Head
back to the ladder and climb down. Re-enter the linking bubble. Take the Slate
form the pedestal and now press the right sign on the pedestal to get linked
back into the now sealed lab. Place the Slate on the pedestal and climb all the
way up. Finally you can climb up the ladder that is leading to the top of the
lab. Now you are facing another pedestal with a Bahro sign. Make a note of this
sign.
Turn to the left and go
forward one step. Walk to the huge lens. Look through the lens to have a look
at… the huge rock that is blocking the way on the distant island! I knew it, I
knew it… this lens really has to be used to get past that rock! Look through
the lens once more to see what happens to that rock. Turn to the left and go one
step forward. Turn around and look at the floor beneath the huge lens. Go all
the way down and take the Slate from the pedestal. Press the bottom sign on the
pedestal to get linked back into the linking bubble. Use the Slate to draw the
newly discovered Bahro sign.
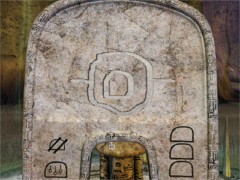
The sign for the top of the lab
Exit the linking bubble and
walk away to let the Bahro do his job once more. Re-enter the linking bubble and
press the newly appeared sign on the pedestal to get linked back on top of the
lab. Take the Slate from the pedestal. Walk towards the huge lens. Make sure to
stand in front of the huge lens. Save your
game here!!! Use the Slate to draw the snake symbol. Drop the Slate on the
floor.
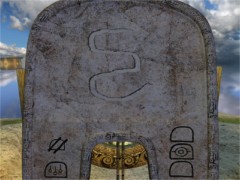
The snake sign
Go all the way down into the
room with the pedestal. Press
the bottom sign on the pedestal to get linked into the linking bubble. Exit the
linking bubble and go to the left. Walk all the way to the end of the beach.
Turn to the left and enter the cave to the other side of the island. Walk all
the way to the end. Turn to the left and walk forward until you are standing on
the shore in front of the distant island. Cross the water and stand in front of
the rock that is blocking your path. Wait until the rock collapses and than quickly step
into
the room. Keep in mind that this only happens once. If you are too late and the
rock re-appears before you enter the room, you have to restore the game you
just saved and try again.
Enter this new linking
bubble and make a note of the Bahro sign on top of the pedestal. Press the
bottom sign on the pedestal to get linked back into the first linking bubble.
Take the Slate from the pedestal and make a drawing of the newly discovered
Bahro sign.
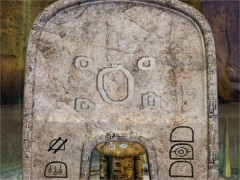
The Keep sign
Drop the Slate on the ground
and exit the linking bubble. Turn to the right once more and re-enter the
linking bubble. Press the newly appeared sign on the right side of the pedestal
to get linked to The Keep once more. You have another meeting with Esher. He
seems a little angry and confused this time. Remember his last wise words that there is
another option at the end, referring to the Myst Book in K’Veer. Turn to the
left. Enter the
linking bubble and press the Slate to release it. Press the bottom sign to get
linked back into the first linking bubble. Press the sign on the center part of
the pedestal to get linked back to Direbo.
Laki’ahn
View this guide raw, exactly as the archive holds it
Parts of this guide
One guide by Bert Jamin, in 7 parts. They read in order, and the part you are on is marked.