Jack Keane
Jack
Keane
by
10tacle Studios
Walkthrough by
MaGtRo November 2007
Gameplay:
This is a third person point and click game. The main
menu has New game, Load, Settings, Credits, Bonus Material and Quit game. Later
after playing, Continue game and Save game will appear.
The settings menu has brightness, resolution, shadows,
full screen effects, degree of details, music volume, sound volume, speech
volume, subtitles and fadeable inventory.
The cursor over an object shows an action stated at
the bottom of the screen that can be done. Left click of the mouse moves Jack.
Right click of the mouse is for doing the action shown at the bottom of the
screen. Select an item from inventory at top of screen and right click to
perform the action stated.
A ‘My to do list’ is accessed by pressing tab keys.
Another press of the tab key will close the list. The X key shows the active
spots in a screen. ESC key accesses the menu. There are unlimited saves and they
can be overwritten or deleted in the save page.
Pressing the space bar skips the intro and cutscenes. Double click
makes Jack run and double click on exit changes the screen scene faster.
Optional bonus: There are actions that can be done in the game to
collect bonuses. A certain number of bonuses found can unlock a bonus feature. The bonus features are wax works of the characters in
the game. You can make them talk using a loud speaker found at the central
pedestal. The bonuses are not necessary to finish the game.
Somewhere on the Indian Ocean… Dr. T talks with Miss
Gristle. The Queen is sending a secret agent spy here to find out if Dr. T is
going to deal a blow to the empire. They must not know of Dr. T’s sinister plan.
They will send an invitation to a woman from the United States for a job as a
henchman. Let the game begin.
Chapter 1: In a bind
London:
Meanwhile in London, 2 thugs are beating Jack Keane.
Mr. Lee wants his money back.
Free yourself from the ropes:
Talk to anyone of the 2 thugs. Every time Jack is
hit, the chair moves back.Insult them and Jack’s knife flies out of his
pocket.With another insult, the chair is close enough to
the knife. Take the knife and watch the fight.Jack’s knife flies out the door.
Set the platform in
motion:
Go left to the platform. Look at the safety line on
the roller at left.Use (untie) the knot of the restraining rope right
of the platform.Uh oh! The thugs’ weight counterbalance the
platform. Take broom and use it on the barrel. Up you go!
Get the knife back:
Take rag that
was under the barrel earlier.Go right and
try to enter the open attic door. Jack closes the door by mistake.Go to corner and
see his knife in a raven’s nest. Climb down and see bird droppings.Go back up and go
right. Use the rag on the bucket with water to get wet rag.Go back down to the
bird dropping. Use the wet rag on bird droppings.Go down again. Try to
take knife. That knife has been with Jack since his childhood and has a hidden
key. The bird does not allow it.Go left and see
a sandbag on the railing. Take sandbag. Use sandbag on one of the 2
thugs standing on the hands of Big Ben.One thug goes through
the clock, Big Ben chimes one o’clock and the bird flies off.Take the knife
from the bird’s nest.
Escape from the top of the tower:
Go up to the top and then go to the platform.
Use the knife on the safety line that holds the
platform. Whooaaahhh!
Watch Jack talk to his 2 deckhands: Lawrence and Eric.
Listen to Joe Little of the Royal Secret Service. A
lucrative mission to bring a top secret agent to Tooth Island with a payment of
10000 pounds is offered. The spy is to be picked up in South Africa.
Lawrence drops a paper that showed the 2 thugs that
Jack is going to Cape Town.
Chapter II: The Voyage
Lawrence and Eric insist on a shore leave and
something to wet their whistle (a bottle of rum).
Find rum for the shore leave:
Go left to the Adventure Shop, passing a Mexican and
a man asking for donation.Enter the shop. Look around. Pull the curtain (dressing area) and see a woman. An
adventurer arrives.Talk to the adventurer completely. Select dialogues: Prove you were
successful; visited the Canaries and prove that you’re wealthy. Hah! Take the
bottle of rum.Go back to the 2 deckhands and use the bottle of
rum on one of them.
Take the agent aboard part 1:
Click on the white area-plank of the Charming Princess,
Jack’s ship.Use Jack’s secret cash stash to get the rotten plank
and 30 shillings.Go left and talk to the bizarre Mexican. He is
Montgomery, the best agent that the Empire can muster.Learn all about the mission and what has happened to
cause the tea crisis. The only tea plantation not affected by the plant eating
tea problem is Dr. T’s plantation.He wants Jack to mail his secret parcel.
Get hold of a stamp:
Go to the right and look at the leaky boat on the
water.Go left and talk to Amanda, the blonde from the
dressing curtain in the store.Learn that she is from America and going to Tooth
Island. She shows the invitation that she got.Look at Amanda’s letter that has a stamp.
Talk to Captain Cookster, the former ship captain
asking for donations left of the shop. He gives wise advice. Talk to him
completely.Use the rotten plank to start Captain Cookster on
acquiring a new ship. Take the pipe given as a gift.
Go to the crates at right and in front of the shop.
Climb the crates twice to get to the ledge. Walk to
the left and down inside the wall of the shop.Go down to the top crate and see a blue bowl. Swarm
of wasps is guarding a bowl of cereal. Use the pipe on the wasp. Take
cereal bowl.Bonus material (optional): Climb
down to the ground. Take the 3 tea canisters that can be picked up.See on the screen ‘found bonus material’.
Use all 3 canisters over the 3 cans on the ground
to form a pyramid.
Bonus feature unlocked!Go back to the ship, Charming Princess.
Go to the leaky rowboat right of the dock. Use the
cereal bowl with rowboat to get cereal bow (full of water).In inventory, combine cereal bow (full of water) and
Amanda’s letter to get stamp.Use stamp with secret parcel to get secret parcel
with stamp.
Mail the parcel:
Go back to the Adventure Store.
You can mail the stamped secret parcel by placing it
in the mailbox right of the counter or give it to the shop owner.
Take the agent aboard part 2:
Exit the store. Go to far right of the store to the 2 deckhands. Talk to them.
They do not want to set sail because of pay or
poorly equipped ship. Talk about the promised payment.Go back to the adventure shop and talk to the shop
owner.Jack can
only buy 3 items that cost 10 shillings apiece.As an adventurer, be creative if you need the 4th
item that you can not afford.Buy any 3 items you think you like then.
Go back to the 2 deckhands and talk to them again. Tell them about each of the items bought from the
shop and his razor sharp mind.Talk to Montgomery to
get him aboard the Charming Princess. Go to Charming
Princess and cast off.
See the ship travel to
Tooth Island.
Chapter 3:
Shipwrecked
The Charming Princess
is shipwrecked in Tooth Island. Amanda and the crew row to the
island.
Montgomery destroys the
Temple at top of the mountain.
Make your way around
the cliff:
Bluff:
Look around and see a wooden plank in the water left of the bluff.Take the starfish
(found bonus object) and the elephant piggy-bank beside MontgomeryTalk to Montgomery. He
gives twine (sewing kit) and short fuse.Cave:
Enter the cave.Look at long-lost
contraband and take the old musket. Take a closer look at the old musket
by left and then right clicking it to get gunpowder. Take the starfish
(found bonus object) on the other side of the contraband.Go left to the
dense vegetation covered exit. Use the knife or scissors if you have it on the
dense vegetation.Bluff:
Exit and see the destroyed Charming Princess.Take the 2 starfishes
(found bonus object) on this side of the bluff.Climb the stairs and
up to the end of the stairs.Precipice:
At top of stairs, try to jump across the precipice.Look at loose
boulder and crevice behind the boulder.In inventory, combine
elephant piggy-bank with gunpowder from the musket.Use elephant piggy-bank
with gunpowder with the short fuse.Use elephant piggy-bank with fuse with crevice.
If you do not have the
lighter, use the knife on old compass to get lens. Use either the lighter
or lens on elephant piggy-bank with gunpowder in the crevice.Jump across the
precipice. Montgomery follows.Up the next level:
Look at the fallen column.Wooden plank:
Cross the wood walkway at bottom screen. Look at the rigging of the ship propped
up on the ledge.Use the knife on the
rigging. Oh No! Go back down via the precipice to look close at the Charming
Princess.Go to the right side of
the water’s edge. Walk the post to the ship.Take the fancy
fishing rod, Jack’s duffle bag (found bonus object) and the giant
woodworm from the plank.Enter the cave and go to
the end of the bluff. In inventory, use fancy fishing rod with twine to get
complete fishing rod.Use complete fishing rod
with woodworm to get fishing rod with worm.Use fishing rod with
worm on wooden plank floating in the water to get wooden plank.Climb back up to
Montgomery and the column.Seesaw:
Use the wooden plank with column.Climb up the boulder on
the right. Use the wooden plank. Talk to Montgomery to do the jumping.Jack gets up to the top
ledge.
Transport Montgomery
upward:
Take the wedge
and the prayer wheel. The head rolls down.Look and right click the
old chest in the destroyed temple.Go up the stairs on the
left. Take the BollyGlo Hair Wax for Men by the top stairs.Take 2 pieces of
stone head: one right of the temple door and the other at left side.Go to the winch on the
left. Take the starfish (there are 5 starfishes as bonus objects) and the
hook.Use the winch and find
it rusty. To lubricate the winch, use the lubricating oil or open the hair wax
with scissors to get wax.Use lubricated winch.
Use the rope to climb down. Take a piece of stone head. See oysters under
the tilted ship.Go back to the old chest
above Montgomery. Talk to Montgomery to make himself lighter by taking his
clothes off.Place the 3 pieces of
stone heads collected inside the old chest.A bride comes asking God for someone.
Watch Montgomery jump up
to next ledge.Talk to Shari. She will
help if Jack brings her tiara to her.
Give the brooch back
to the bride:
Go up the stairs. Use the hook to open the temple
entrance.Enter and take hot
Indian spice from the edge of the ledge.Go left and take
the brooch without gemstones. Look at the brooch in inventory.Look at the flagpole on
the cliff wall. Exit through the temple entrance.You can give the brooch
to the bride but she will refuse to accept it in that condition.Go to the wooden
platform left of the temple entrance. Use the rope to go down to the ship.Use hot Indian spice
on the oyster under the ship. Take the pearl.Use the pearl with brooch without gemstones to get brooch with gemstones.
Use brooch with
gemstones with Shari.
Make your way around
the cliff:
Pick up the thrown vine
beside Jack. Talk to Montgomery.Climb the stairs and
through the temple entrance.Go left and use
the vine with flagpole.Montgomery gets pulled
in the jungle by a tiger.
Chapter IV:
Payment and the voyage home?
Get my reward:
Village:
Go forward and enter the jungle to reach the village. Look at village. There are
2 layers to the village: upper and lower.Go down, enter path and
climb the shrine on the right. Take the burnt down
stick of incense.Go down and left to get
to the check point.Checkpoint: Talk to the 2
British soldiers.Learn about an airfield that belongs to Dr. T. They
need a British identification to let Jack pass through.Go to left road that
is being tarred. Enter the hotel on the left.Punjab Inn:
Look around.See the cleaning agent
on upper shelf and the turpentine at lower shelf of the pushcart in the lobby.Check the shiny star on the base of reception counter.
It is glued on.See that there’s a lit fireplace right of the
reception desk.Use bell on the
reception counter. Talk to the manager completely.
Gain access to
Montgomery’s room:
Learn that Montgomery
has a room here. Learn about how proud the manager is of his one star.Ask for and get the
glass of water. Use the glass of water
with fireplace.Go to the pushcart. Take
the cleaning agent on upper shelf and the turpentine at lower shelf of the
pushcart in the lobby. Place the cleaning agent on lower shelf and the
turpentine at upper shelf.Use the burnt down stick
of incense with shiny star. Watch as it gets polished again.Take the shiny fallen
bronze star.Talk to the manager
again. The manager gives the key for room #7.
Prove that I’m an
Englishman:
Climb the stairs and
use the key for room 7 on the first door.Enter (bonus feature unlocked) and Jack redecorates
the room using items in his duffle bag.Go right and
take secret parcel. Look at secret parcel in inventory and see that it
is the one Jack mailed.His reward is invested
in real estate. Montgomery agent ID and deed is in inventory.Take the red sock
from the floor by the bed.Exit the hotel and go
to the guards. Use Montgomery agent ID on any of the 2 guards.Jack has to answer
questions to be sure that he is British and from London.For the first question
answer crows. For the second, choose miraculous thing as "train"… Actually
any answer
will do; just keep talking to them and eventually they will let you through,
Mr. Keane.
Get my reward:
Go around the barrier.
Go forward and pass the elephant. Look at the plant
that is in a cage beside the guardhouse.Go forward before the
marketplace and take the right path. See Mr. Gopesh, Shari’s father. Talk to
him. You can not enter the supermarket but can enter the shop with wedding
arch.Go back to the left
and enter the marketplace. Take a leaflet
from the stand in front of the stairs to the upper village. It is about a poetry meeting.Talk to Rupiah, real
estate agent at the first table on the left completely. Use the deed on Rupiah.Get a key to green
swamp house no. 3. Talk to Rupiah again and find out it is at the Swamp.Go left and down the
stairs. Go forward and left to enter the path to the swamp.The swamp door is
locked. Take candle from the grave in front of the door.Go back and enter the village
again.Walk the plank to the
first house #3. Try the key on old rotten hatch. Climb up and use key on
the green house’s keyhole. The door falls off.Go back to Rupiah and talk to her about the house in ruins. Rupiah buys it back for 10 pounds
and 1 schilling.
Clear the elephant
handler:
Watch the gorilla and
Dr. T talk about the road blockage to his home and airfield. Learn about Dr.
T’s plan with his chimps, airship and tea plants.
Go back to the
checkpoint. Talk to Pandu, the taxi driver and learn about his problem. He
was supposed to have crashed his elephant on the guard house, destroyed the
guard house and broke his
back light. He will take Jack to airfield.Talk to the guards
about the elephant.Drunkenness:
Give 10 pounds to the guard.Backlight:
Go back to the market place and talk to Louise at the fruit stand. Learn
all about the elephant handler, granddaughter and aborted wedding.Talk to her
about the granddaughter, the favorite jam and no party at all. Ask for the jam and
get Granny’s Best jam.Talk to Shari and the
little old man beside her. Use
the jam on Shari. She gives back an empty jam jar.In inventory, use the
candle from the grave on the empty jar to get jam jar with candle.Use jam jar with
candle with red sock to get improvised rear light.Go back to the
elephant and use improvised rear light on the broken rear light of the
elephant frame.Guardhouse damage and Friday night alibi:
Talk to Louise about the elephant handler and about the guards.Louise talks to the
British soldiers that Pandu was busy seducing her granddaughter Friday night
and was not the one that did the damage to the guardhouse. Bonus feature unlocked!Talk to the guards
about the elephant handler. Then talk to Pandu about the airfield now that all
his problems are solved.
Back at Cape Town; see
the 2 thugs talk to
Captain Cookster.
Reach Dr. T’s
airfield:
See the blockage on
the road caused by the gorilla.Go up the upper path and check the road block:
rope and tree trunk.Go back down to Pandu. See that he is having a
picnic and has unloaded the elephant.Go to the elephant and see a tool chest by his side. Take the tools to get
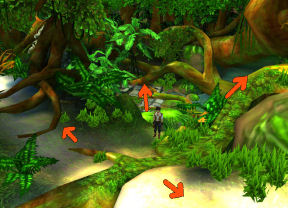
spade blade, spade shaft and prod.Go back up the path. See a
path going to the water (center arrow in picture below) and a higher path
that is a giant tree root above this road
(diagonal upper right on picture below).
Anaconda:
Go down to the water at center of screen and cross the log over the water. An
anaconda pops up out of the tree roots prevents the crossing.Go back up and climb
the huge tree root-path left of the main road (upper path).Climb up twice to be
at statue’s foot. Climb the steps and see a ledge that has a huge nut. Take the huge
nut.Look down at gorge
and see the anaconda from here.Electric fence:
Climb up and enter the stone arm and exit out the side of the head (?foot). Go right
and walk over the stone arm to the main road.Go down the road. Take the flat piece of wood before the piled up tree trunk blocking
the road.Climb back up and end
up at the electrified fence of the airfield.Check all the warning
signs. Pick up the old screwdriver beside a dead rat.Powered by a monkey:
Go back down the road. Walk the stone arm again to the head.Walk in front of the
head and see an open mouth. Place the huge nut inside the stone mouth.Go left to the other
side of the head. Place the flat piece of wood on the small hole of the huge
branch.Climb up twice and
walk left to the treetop until a hut is reached.See a monkey
vigorously pedaling to power up the electrified fence.Go forward and use old
screwdriver on grating at side of the veranda. Take grating.Use prod with bell or
bell pull
beside the door. See the monkey stop pedaling and checks outside.Go back down to the
head and enter the side of the head (foot).Go down the stone
stairs and go to the end of the ledge where you got the huge nut.Look down and use the
grating with the gorge. The anaconda is trapped.Go down to the bottom
and the water at center of the screen.Cross the log now that
the anaconda is contained.Ruins: See tiles on the
ground.Go left and see a crumbling structure at the center
of the tiled walkway.Use the knife to get
the single vine hanging from the tree limb over the ruins.Elephant shrine: Go left
again and see an elephant shrine.Enter shrine and look at elephant head.
Use the distinctive trunk-lever of the small
elephant. The nut is cracked.Go left and see dense
vegetation blocking a path on the other side. Use the knife on dense vegetation.Man eating plant: Enter
path.Go forward until you see a man eating plant. See
bones of monkeys around it. Use the vine on the
man eating plant.In inventory combine
the spade shaft and spade blade to get spade. Use spade on man eating
plant to get unearthed man eating plant.Monkey:
Go back to the monkey in the hut by going down the path, pass the ruins and up
the path left of the main road.Climb up until the
front of the head. Take the bottom half of huge nut that was the result
of the closing of the mouth.Climb up twice and
forward to the monkey’s hut at the treetop.In inventory combine
the unearthed man eating plant and the bottom half of huge nut to get a
potted meat eating plant.Use the potted meat
eating plant with the veranda. Use the knife to release the potted meat eating
plant from the vine.Use the prod on the
bell-pull. There goes monkey.Go down to the head
and go to the road. Go up the path to now ordinary fence. Use fence to climb to
the airfield.Jack talks to Miss
Gristle.
Watch Dr. T talk to
Amanda about her introductory exam. Dr. T wants Amanda to find out if Jack is
here on a mission to get a fateful legacy. A piece of paper with a certain year
will be the bait to a treasure.
Chapter V:
Put to the test
Playing as Amanda.
Find out if Jack is
on a mission:
Lookout platform:
While Jack is being entertained by Miss Gristle, take the opportunity to do
some checking.Go right until the
lookout platform. Look at the map and the telescope. Use the spyglass-telescope
and see the veranda of the hotel.Go left and see the
roadblock. Use rifle to shoot the rope. That cleared the roadblock.Go to crossroad, down
and talk to Pandu, the taxi driver having his tea.Tell him that the
customer is waiting at the other end. See the earlier missing tool chest. He can not leave because his prod is gone.Find out where Jack
is staying: Enter the village.Look up to the
clothesline in front of the Punjab Inn. Use rifle on clothesline above the road.
Take umbrella and garter belt.Enter the Inn. Look at
turpentine on top of the pushcart.Talk to the manager.
Find out that Jack is staying hereTry to take the letter
with a Queen’s seal on the right counter. Hmm.Try to climb up the
stairs.Exit the Inn. Talk to
the guards. They do not want to let you pass.Cross the plank at right
and go to the shrine on the cliff side. Take an unused stick of incense.Get the Inn manager
out of the way:Go back to Pandu at the
jungle. Give him the umbrella. Pandu gives the ankh prod bottle opener.Modify the rifle: Go back to the lookout
platform.Use the ankh shaped
bottle opener with base to get spyglass.Inventory, use the rifle
with the garter belt to get modified rifle.Use the modified rifle
with the spyglass to get rifle with telescopic sight.Use rifle with
telescopic sight on base.Look through the
telescope and see a view of Punjab Inn veranda.After trying to get the letter, get turpentine and go
up the stairs at the Inn; you can now try to get the manager out of the way and
he will come out to the veranda.Aim and shoot at a
barrel or vase at the foreground or until the manager comes out and places a
wedge to keep the door open.Immediately shoot the
hanging vase in front of the open door. This gets the manager away from the
door.Shoot the wedge off the
door’s base and this closes the door leaving the manager locked out of the Inn.Automatically take the
rifle.
Leave Jack a message:
Go back to village and
enter the Inn.Take the turpentine
from the pushcart and the letter with Queen’s seal from the counter.Use
the unused stick of incense on fireplace to get smoldering stick of incense.Go up the stairs and
enter room 7.Use the letter with
Queen’s seal and get royal letter. Look at letter with nothing on it but smells
like lemon.Use the turpentine and
then the smoldering incense on the lamp by the window.Use the lemony smelling royal letter on the lamp.
Amanda reads the letter confirming that whoever the person that the letter was
sent to has a mission for the Queen.Use the bait for Jack on
the table. What happened on November 6th, 1871?Exit the room. See that
the lit lamp burns Jack’s room.Chapter VI:
Jack’s past
Playing as Jack.
Reconsider the
situation: Maybe take a little nap?
Crossroad:
Go right to lookout platform and down to the crossroad.Hear a cry for help. Go
to the tree root path beside the main one to go up the statue.Go to the ledge and see
a man hanging by the strap of the luggage he’s carrying on his back.Talk to Murphy. Use
knife with Murphy.Go down to the water by
the anaconda and talk to Murphy.Punjab Inn:
Go to the village and pick up the tar on the road in front of the Inn.Go up to room 7. See the
burned room.Take the partially burned piece of paper from the table.
Look at the paper in inventory.Go right and take 3
nails from the wall. Exit the Inn.
I won’t leave the
island until I have worked out the message:
Checkpoint:
Talk to the British soldiers about what happened in November 1871.They give a
village chronicle from 1871. Look at the chronicle in
inventory and realize there are missing pages from November.Talk to the British
soldiers about the missing pages. They said that Signore Gopesh, Granny Louise
and Lady Rupiah have borrowed the chronicles.
Find the lost pages
of the chronicles:
Go to the supermarket
via forward and then right before entering the marketplace.Enter Pop’s supermarket.
Go left and talk to Mr. Gopesh. He says that he returned the chronicle in mint condition.Exit and go to Rupiah at
the marketplace. Talk to Rupiah. She returned the chronicle in perfect condition.See and talk to the 2
former deckhands.Go left and talk to
Louise. Select dialogue: are the pages already torn out and you do not believe her.She admits taking the missing pages. She gives the lost pages back.
Read-look at the lost
pages in inventory and learn that during that date, Botany Station 1 was destroyed by terrible
fire. The Keane family is also mentioned. Who?
Find out the story
behind Botany Station 1:
Talk to Murphy standing
in front of the cage where the plant is held. He will guide Jack to Botany
Station 1 if he
gets a boat.
Dr. T talks to his
chimpanzee workers.
Find a boat: Go to the swamp beyond
Shari and the little man. See Jack’s dinghy sprang a leak.Get tools: Go to Pops Supermarket
pass the butcher and the wedding presents’ room. Enter the supermarket next door.Look at the shelf by the
door. You can take the hammer or the paintbrush.Talk to Mr. Gopesh. He
will want you to do the family a favor him. The hammer involves Luigi and the
paintbrush involves Loretta who has been kidnapped.You will be given a
chance to get the other item later. To have both items and have repaired the boat in
different ways will open a bonus feature.
Get Luigi something to eat:
Select the hammer: Mr. Gopesh wants food for
Luigi, the plant in the cage. Luigi gets upset with rotten food.Go to the butcher and
talk to him Tell him that you need food for Luigi, the plant. He gives a
chain of party sausages that are a bit off.Go right of the
checkpoint. Go down the stone steps and see fishes surrounding the pier.Use the sausages on
fishing spot and get fish.Go back to Murphy by the
cage. Take the wooden plank left of the cage with Luigi.Go to back to Mr. Gopesh
and give him the fish. Take the hammer.Repair the dinghy:
Go to the green house that was formerly Jack’s. See the leaky boat.Use the hammer on the
boat. Automatically the plank and the 3 nails are used on the boat.
Return Loretta:
Select the paintbrush: The errand that Mr. Gopesh
wants done is to get Loretta that was kidnapped by the money lender.Go to Rupiah and ask
emphatically about Loretta. Eventually, she will give the key to the
hatch by Jack’s old house.Go to house #3 and use
the key on the hatch. Take Loretta, a golden hen statue.Go back to Mr. Gopesh
and give him Loretta. Take the paintbrush from the shelf.Repair the dinghy:
If you have not done so yet, go in front of Punjab Inn and take the tar
on the road.Go to the ledge right of
the Luigi’s cage and beside the tree by the cliff. Climb the ledge and up to the
roof of the guardhouse.Climb the chimney and
drop the tar in the chimney.Watch as smoke fills the guardhouse. The guard
takes the pot with tar out of the building.Take pot with tar and go to
the boat. Use the paintbrush on the boat and it will be automatically fixed.After fixing the boat two ways, Bonus feature is unlocked.
Cast off. Murphy
arrives.
See the 2 thugs arrive
at Tooth Island.
Botany Station 1:
Talk to Murphy completely. He gives salad oil.Use knife on ferns beside waters edge to get fern fronds.
Pumpkin patch:
Climb the familiar path and see a pumpkin patch on the right side of the path.Enter and take fresh
soil (by fence), cart wheel and car jack.Use the knife on all 7
pumpkins. Bonus feature unlocked.Ruined house:
Continue to go up the path.Enter the yard in front of the ruined house on the left.
Look at the sign and see
it was the house of The K…Take the green funnel
in front of the sign.
Get the giant vine
out of the way:
Greenhouse: Go up the path
and look at the gate. It is blocked by vines.Use salad oil on rusty
car jack. Use the car jack repaired on the jammed door. Enter the
greenhouse.Go forward and take
fertilizer from the pile at right corner.Go right and see a chest
covered by massive vines. The knife can not cut the vines.Laboratory: Go back left and
forward at the corner by the fertilizers.See vines blocking the path. Use knife on dense vines.
Enter the main lab.
Power:
Use the power switch of the ultraviolet lamp. There is no power.Use the faucet on the
right and see that there’s no water.Exit the building. Go
left of the building.Take the gardening
book and flower box close to the wall of the greenhouse.Get power: See that the windmill is
broken.In inventory combine the cartwheel and the fronds to make improvised
wind wheel. Use improvised wind wheel on the pole and get power.Read the gardening book
and find out about the experiments.Water:
Go to the right of the greenhouse. Walk the ledge to the back by cliff side.See the rusty pipes from
the right leading to the laboratory.Loading area: Go right, cross
the bridge and enter the elevator.Look around and realize this is where the deliveries
of plants are done.Go to the right of the
entrance and use valve to let water through the pipes. It broke the rusty pipe.
Take the plumber’s tools right of the wheel.Go to the bottom screen.
See the manual board hanging above and information board on the right. A lever is below
the information board that pulls out the ledge.Go to the shaft by the door. Go down and out through a
chute.Get water: Go back to the
broken pipes.Climb the boulder and
use the plumber’s tools on the right broken pipe. Water now shoots out. Turn the
bent pipe that got inserted into the broken right pipe to make it shoot higher.Use the funnel on the
left pipe to catch the water flow.Go back inside and to
the main laboratory.
Emerald 13:
Grow a mutant plant: Use sack of meat-eating
Tooth Island Plant seeds and then take a sack of meat-eating Tooth Island
Plant seeds (gold).Use sack of purple Tooth
Island creeper seeds and then take a sack of purple Tooth Island Plant seeds.Place the flower box on
the table. Place fresh soil in the flower box.Use the 2 (gold and red) seeds on the flower box.
Place the fertilizer on the mixing machine behind the
flower box.Use the faucet to bring water in.
Watch the mobile mutant
plant eating plant (clone of the 2 seeds) grow. Take mobile mutant plant
eating plant.Open the chest:
Go out of the main lab and right to the vine covered
chest at the end.Use the mobile mutant plant eating plant on the
massive vine covering the chest.Use knife that has the
key with the chest.Jack reads the Keane’s diary. Learn about Emerald 13
and what happened to Jack’s parents.Jack needs to bring
Emerald 13 to Dr. Umbati in Calcutta. The Keane family ring is in
inventory.Exit the laboratory and
talk to Murphy. Learn that Murphy was his babysitter.Go right to the elevator and up the airship loading dock.
See an airship arrive
and lowers to the loading dock.See a container that is
bound for Calcutta. Enter the cargo container.
Chapter VII:
Hunting for Jack
Dr. T wants Jack Keane
caught by Amanda.
Playing as Amanda:
Capture Jack:
Jack has escaped the
cargo container. He is trying to escape through the stuck elevator door.
Leave the hangar, but
not using the elevator:
Check the elevator door.
Check the ladder-shaft
going down under the cargo container and see that it is blocked.We need to raise that.
Look inside the cargo container and see that it has a crate of nitroglycerine.Go left to the open area
of the loading dock on the left.See unconscious chimps.
Take the 2 pompoms.Take the punch card
from the hand of one chimp and the other punch card from the chimp on top of
the crates.Take a duct tape
from the chimp on top of the crates.Take the box of
balloons from the stack of crate.Go right and study the
information board: unload, switch off light, send signal.Unload:
Pull the lever below the
information board to pull out the ledge.Place the crate of
balloon on the shaft of the ledge.Pull the lever again and
that crack opens the balloon box. Take balloon.Go to the wall at far end behind
the cargo container. Look at the rusty valve of the helium pipe.Use the rifle on the
rusty valve. Helium is released. Use balloon on the helium leak.Use the door of the
cargo container and the crate of nitroglycerine rolls out held by chains.Look at the narrow slots
holding the 2 chains of the crate. The crate is unloaded.Insert the 2 punch cards
on thin slots at both ends of the chains holding the crate of the nitroglycerine.The chains are off the crate of nitroglycerine.
The crate slides off the container and is protected by the balloon.Switch off light:
Use rifle on all 5 lamps around the loading dock.
Send Signal:
In inventory, combine
the 2 pompoms. Stand on the X on a square at end of the loading dock.Use pompoms. Amanda
signals with the pompoms for the airship to lift off.Catch Jack:
Go down the shaft. Watch as Jack tries to flee. Jack’s fear of heights rears up. Nice try, Cowboy.
Chapter VIII:
Jack’s decision
Jack is tied up above a kerosene container with a wick
on top of a lighthouse.
The chimpanzees fly off to drop the beast killer
plants on Royal Navy.
When the sun ray hits
the glass of the windows, Jack will be burned to a crisp. Amanda tries to buy him
some time.
Escape from the death
trap:
Out of the glass
enclosure:Use the purple Tooth
Island Plant seed with handsome hero (Jack). Jack expands enough to burst out of the
ropes.Take the wick
that is on top of the kerosene at the center.Look through the glass
windows and see that they are dirty. Use the wick on the dirty window at top
right and see the stairs to the balcony around the glass enclosure.Out of top balcony:
Use window. Jack pushes out and
exits out to the balcony.Go a little bit to the right of the balcony and see
the little man you saw in the village up across
the chasm on a cliff side.Ask him for help. He
throws a belt.Go to left side of the balcony. Use the belt on the
flagstaff that is in front of the trap door.Then use the belt for Jack to slide to a level below.
Out of the next
level: Go right and pick up a purple trophy.
(Found bonus object.)Go left and see a
pelican on the railing. Pick up the silver trophy. (Found bonus object.)Go inside lighthouse. It is full of fishing trophies. There is a locked trapdoor at center
of the floor.Go to the stairs and
take the blue trophy by the burning stairs. (Found bonus object.)Place in any order the 3 trophies on
the pedestals by the door. Bonus feature unlocked.Take the big
match-rod by the chair.Go right and look at the
container on top shelf. Look at the Gordian knot holding the ladder on
caster in place.Look at the showcase
with a dip net inside. Use the Keane family ring on the display case. Take the
dip net.Go outside to the
pelican. Use dip net on pelican. It spat out a can. Take the rusty old can.Go back inside and use
the can on the Gordian knot. Use the ladder on caster.The container falls off.
Take the container. Use container to get fishing equipment-dynamite.Use the fishing
equipment-dynamite on the locked trapdoor at center of the floor.Use the huge match on
the flames by the stairs. Use the lit rod on dynamite.Go down through the
blasted trap door.Outside the lighthouse: At
the bottom of the lighthouse, go to the left corner of the wall.Talk to the little man.
You have a task to
fulfill. You have to decide. Take up the challenge and accept it.Enter road to the
unknown.Chapter IX:
Jack’s training
Pass the ordeals in
order to take on the doctor:
The little man talks about the
Sacred Temple of Mr. Daniel’s where he will undergo training.Go right and cross the
bridge to enter the temple. See a large wooden shed below the bridge.Ordeal of space:
Talk to the priest at
the desk. He wants Jack to climb the pedestal and find space and time.Go to left screen and
climb the pedestal on the left.
You can do one of the
solutions below:To find space, press the
space bar of your computer.To find time, wait a few
seconds.Climb down and talk to
priest again.Go to the statue left of
the reception desk. Climb up and take parasol, flute and
cricket bat. Climb down.Go through the passage
left of the statue to the distillery.Pass the Ordeal of
the Machine:Talk to the other
priest. He gives a new task. The steam doesn’t go through the contraption
because of the bent valve. Repair this contraption.Go left and take the
filthy pipe hanging from the pipe at foreground.Take the dented pipe
from the right side railing of platform with the bent valve.Take the rusty pipe
from the right end of the distiller or in front of the strange contraption.Go right and use
the filthy pipe on the green part of the machine (lower connection of pneumatic
delivery system).Go right. Use the
parasol-sunshade on the conveyor belt hole at right of the setup. See it turn.Go left and use the
flute between the 2 wheel valves on the wall.Use the rusty pipe on
the worn valve left of the bent valve on the pedestal.Use the dented pipe to
the right of the valve on the platform (upper connection of the pneumatic
delivery system).
Now, you can turn the
machine on by doing one of the solutions below:Physical solution: Use
the cricket bat on the dented wheel valve on the pedestal.Mental solution:
Use the rust eaten valve left of the flute, the scratched valve right of the
flute, the worn valve on the platform and the worn out valve right of bent valve
on the platform.
Find the tiger: Cross the bridge to the
other side of the chasm. Go right and enter the Cave of the Sacred Tiger.Take torch from
the wall. Hear an echo inside the cave.Move spider out of the way: Go right and see 2
spider cobwebs-web towers. There are heaps of empty liquor bottles beside the
web tower.The spider is on the right cobweb and Jack will not
pass through.Take an empty liquor
bottle and place it on the left cobweb tower. The spider goes to the left
cobweb.Go to the right and
climb the ledge to look at the hanging shopping cart.Chasm: Now go right until the
chasm. Look up a see an ominously hanging stalactite. Jack’s echo makes
the stalactite vibrate. Keep on clicking on the stalactite until it falls
down. Jump to the other side.Go forward and pick up
the anti vampire set against vampire bats and liquor barrel.
Make the Sacred Tiger
show himself and roar:
Continue to the right
and see the dead impaled Sacred Tiger.See and talk to Montgomery. Montgomery’s foot is
stuck between 2 rocks. Take the liquor
barrel.Take the shopping
cart:Go back to the hanging
shopping cart by the cobwebs. Climb up to the ledge.Place a liquor barrel
on the right cobweb and then use a liquor barrel on the left cobweb.See the spider place
both barrels on the shopping cart. Use the schilling on the shopping cart’s
coin slot on the handle.Go down the ledge and
down one more ledge. Take the barrel bottoms. Take shopping cart.Arrange the tiger: Go back to the dead
Sacred Tiger.In inventory, use anti
vampire set tools on the barrel bottom to get discs.Use shopping
cart on dead Sacred Tiger. Use discs on tiger on shopping cart.Choose your roar.
The 2 thugs are close
by.
High Priest: The priest gives the
key to throne room door. Jack is to talk to the High Priest.Take the major bug
under the bridge at bottom of screen. (Found bonus object.)
Throne room:
Go to the right. Enter
gate and go forward to cross the bridge to the temple.Go inside the temple
and go to left screen.Use key to enter the mysterious door on the left of
the pedestal and passage.Go forward to the throne and talk to the little man.
Guess who!
Humanity Test:
The High Priest of the
temple explains the result of the test.He explains the last
test – Humanity Test: Unite the lovers and arrange the wedding.The High Priest
ordinates Jack in Kshatriya caste and gives a certificate to prove it.
Reunite the wedding
couple:
Go left and exit through
the back door. Go through the right exit that is pointed at by the blue sign to
get to the village.Go forward and use old
bar to enter the swamp. Enter village.Soldiers:
Go to the British soldiers at the checkpoint.Use the major bug on
British soldiers. Bonus feature unlocked.Rupiah:
Go to marketplace and talk to Rupiah.Learn about Gopesh tea
service that she has held as collateral.Use the certificate with
Rupiah.Jack is now allowed at
the upper village.Upper village:
Look around and talk to everybody.Take note that there are
2 staircases by the main veranda. The one on the left goes up to Vincent and Rupiah.The staircase to the
right goes to the pharmacist.The tower entry has the
stairs that goes down to lower village and a door to the plateau leads to Shari’s veranda.Mr. Gopesh:
Try to take the cup beside Mr. Gopesh.Talk to Mr. Gopesh
completely and learn about the cup that is one remaining from the tea service
collateral.Mr. Gopesh shows how the
family tries to get one to remember things.Vincent:
Go up the stairs and talk to Vincent, Rupiah’s son.Take the bandage
on the lounger.
Get hold of a poem
called Kela Tara:
Louise:
Go down to the veranda and talk to Louise. Concentrate on the wedding dialogue
until she ‘out with it’.Learn about the missing
pages and what she did to the mayor with Indian love poem Kela Tara.There is another copy of
the poem.Go to the bridge to the
tower and enter the stairs to the Lower Village.Butcher:
Talk to the butcher. Talk about poem and secrets.Use leaflet on butcher.
Then select dialogues that will keep his secret. Now, he owes you a favor.Talk to Butcher again
and ask about the Kela Tara.He gives butcher’s authorization to get it from the monks.
Priest at temple:
Go back to the swamp.Enter swamp and then
temple. Enter the door on the left.Cut across the throne
room and go to the reception desk.Talk to priest about
poem. Use butcher authorization on priest.The intended target must be the only one to hear it;
not even the one reciting it.Take the butcher’s
poem.Upper village:
Go back to the lower village and later to upper village via the stairs right of
Rupiah’s stand.Go to bridge and out to
the upper village.Montgomery and
deckhands: Go left and talk with MontgomeryMurphy:
Talk to Murphy.
Make ear protection:
Coconut:
Climb the stairs behind Murphy.Go left to the coconut tree
at the corner. Take coconut and then coconut halves.Shari:
Go to the bridge by Mr. Gopesh. Go inside the tower.Enter plateau; the door
behind the stairs.Talk to Shari. Use the
butcher’s poem with Shari.In inventory, combine
the bandage from Vincent’s lounge and the coconut halves to get ear protection.Use ear protection on
Shari. Ooops. One of the protections fell off.Shari went wild. Mr. Gopesh stands guard to the
tower.
Make sure that
Vincent regains his memory:
Take the place of Shari:
Take wedding dress
beside the left stairs.Take valuable
ornamental cup from table where Mr. Gopesh was sitting before.Climb the stairs behind
Murphy.Pharmacy:
Enter the first door on the right.Hear Miss Gristle asking
for gasoline.Talk to the pharmacist.
Learn about potion that can restore memory and make one fall in love with the
person in front of him.Read the poster left of
the door about rare plants purchased. Hmm…Exit the pharmacy. Go
left and enter the tower door. Then enter veranda.Rupiah:
Go right to the veranda. Talk to Rupiah and remember about the tea service.Use valuable ornamental
cup on Rupiah. She leaves the veranda.Take the rare plant at
hanging at left corner of the railing. It falls off below.Exit to the left. Go
left to Vincent. Take rare plant beside the lounge.Pharmacy:
Go right and enter the door to Plaza. Go right and enter the pharmacy.Use the rare plant with pharmacist. Ask for the love potion. She wants it for the taxi
driver.Be Shari:
Use the wedding dress inside the pharmacy.Jack with the help of the pharmacist is wearing the
wedding dress.Vincent:
Exit the pharmacy, go left and enter tower.Go left and use the love
potion on Vincent.Pharmacist:
Enter the pharmacy and use wedding dress again.This changes Jack to his
old self. Exit the pharmacy.
Make Shari come to
her senses:
Go down the stairs. Talk
to Murphy about ideas. Take frying pan from his back.While the 2 parents are
arguing, go to the plateau.Use the frying on
Shari.
Reunite the wedding
couple: Watch the reunion.
Confront the past:
Enter the temple and
talk to the High Priest. Jack has to confront his past and discover the root of
his fears.Jack is given the
mysterious memory-restoring potion.Go left and exit through
the back door.Enter the old lab right
of the village door.Jack is back in front of
the The Keane’s house below Botany Station 1.Jack as a child is with
Murphy, his babysitter. A sinister man sent by the doctor asks about Jack.Jack hears Murphy say:
Disappear, escape route, snappy and fly the coop.
Get out of the room!
But not through the door:
Find a place to
escape: A pacifier is in inventory.Try to climb the step
stool by the window.Use the wardrobe door at right and take the building
block.Take building block at lower shelf beside the wardrobe.
Take
the Jack in the box in front of the shelf.Take the building block close to stacked blocks
at right of room.Go back to the step stool by window. Use the 3
building blocks with up (step stool).Use the Jack in the Box with up-step stool.
Climb up twice to the
window.The window is locked:
Go back down to the
floor.Go to the bed and take
2 playpen rods.Take the lasso
from bottom shelf and the locked casket from middle shelf.Go to the right side of
room and take book of fairy tales from the floor in front of the table.Climb up on the chair.
Climb up on the table. Take toy gun.Look at the missing coat
hanger on the blue hooks above the table. Use playpen rod with missing coat
hanger. Do this to the other missing coat hanger. Use book of fairy tales with
climbing aid (2 playpen rods).Climb up to the top
shelf. Walk to and take pirate ship on top of the wardrobe.In inventory, use
pacifier with lasso. Use lasso on pacifier with toy gun. Use pacifier
with lasso with pirate ship. Use toy gun with pacifier, lasso and ship with
candlestick-candelabra hanging at center of ceiling.Use pirate ship. Tah dah!
Go down from top of the
wardrobe to the floor.Go to the rocking horse
by the door. Use locked casket on rocking horse or runner of the rocking horse.
Use rocking horse. Take smashed casket (pocket knife).Climb up to the window.
Use pocket knife on rope. Enter window.Baby Jack is chased by the guards to cliff. AARGH!
Chapter X:
Searching for clues
Find out if the
doctor is hiding any secrets from me:
Amanda wonders if Jack is
correct. She needs to investigate the wardrobe in her room.Veranda:
See a clay pigeon on a pedestal beside Amanda.Go left and take
fresh soil on the bench. Behind the bench is a faucet.Go inside the mansion.
Portrait gallery:
See a portrait gallery in the hallway. See Miss Gristle’s, Amanda’s and 2 monkeys’
portraits on the wall.
Find out the secret
behind the locked wardrobe door:
Amanda’s bedroom:
Go right, pass Dr. T’s locked office and go to the door at end of hallway.Enter and go to the
wardrobe at right. Use the wardrobe door twice. Find out that the left door of
the wardrobe is locked.Exit the bedroom.
Open left side of wardrobe:
Go down to the end of the hall. See a locked small room’s door with a
grandfather clock beside it.Look at the hands of the
clock face. Use Jack’s knife on the clock’s hands. Jack’s knife fell
inside the grandfather clock.Go back to Amanda’s
bedroom and the wardrobe. Use the clock’s hands on the left door of the
wardrobe.See a skeleton in the
wardrobe. Message of Treachery and conspiracies… is seen. The door was locked
from the inside.Try to exit the room.
Dr. T arrives. Hear Miss Gristle get upset about the dirty footprints and
Gorilla.
Distract the
housekeeper.
Distraction 1: Exit the bedroom. Talk
to Miss Gristle cleaning by Dr. T’s office.Learn that Gorilla is
childhood friend of Dr. T. Ask about chilled beverages and ask for lemonade.Try to enter Dr. T’s
office but Miss Gristle appears suddenly with the lemonade. Amanda will
not enter the office because of Miss Gristle.Go down the stairs and
see Gorilla sleeping in a divan.Talk to Gorilla. See it
wakes up and walks around before going back to sleep.In inventory, use soil
on lemonade to get mud. Use mud on Gorilla’s feet.Talk to Gorilla again
and watch him make muddy footprints. Miss Gristle starts cleaning the filth.Dr. T’s Office: Go up and enter Dr. T’s
office.Look around. Check the
wide awake meat eating plant, the records and safe behind it. Check the globe
behind Dr. T and see ouzo inside. Check the 4 headless statuettes on the desk and
the gramophone. Take Gorilla picture.Talk to Dr. T
completely. Exit the office.Distraction 2: Go to the
portrait gallery.Use Gorilla picture with Miss Gristle’s picture.
Go down and talk to Miss
Gristle.Miss Gristle gets very
upset and throws the bucket over the railing.Distraction 3: While Miss Gristle is
busy again, take the empty bucket from the floor.Go to the veranda. Use
the bucket with the faucet to get bucket with water.Go back to the library.
While Miss Gristle is cleaning, use the bucket with water with red hot coals.
Take cold charcoal.Go back to the portrait
gallery. Use charcoal with Miss Gristle’s portrait.Go back down and tell
Miss Gristle. See Miss Gristle go berserk. Gorilla runs to Amanda’s bedroom.Dr. T exits his office
to check the noise.
Search the doctor’s
office for documents:
Doctor’s office:
Exit the bedroom. Now is your chance to check the doctor’s office.Open the globe and take
the ouzo.Go to right side of
the man-eating plant. Take the classical LP.Use the Wagner classical
record on gramophone at foreground. Use the crank of the gramophone.Immediately, turn around and double click the ouzo on
the meat eating plant or on the pot.The man eating plant
falls asleep.You can do the next step
2 ways. Save here if you want try both ways.1. Take the med kit from the right book shelf
of the library at lower level.Go up and outside to the
veranda. Use rifle on the clay pigeon on the pedestal.Place the med kit on the
pedestal. Use rifle on the med kit. Take stethoscope from the opened
doctor’s bag.Go back to Dr. T’s office and the safe.
Use the stethoscope on the safe behind the plant.
2. Go down to the lower
floor and the shelves left of the main door.Climb up twice on the
right side and take handkerchief.Go to Amanda’s bedroom and talk to Gorilla.
Give Gorilla the
handkerchief. Talk to Gorilla and ask for the truth.He stands and scratches
his armpit right, left, left and then right.Go back to Dr. T’s office and the safe.
Use the signal given by
Gorilla: right, left, left and right on the safe.Read employees files.
Find out that he’s going to fire Amanda.Dr. T arrives and says
the British Fleet has arrived. He finished the calculations.Amanda looks for and
finds a drunken Jack.The next morning, Miss
Gristle knocks on the bedroom door. She says she needs to enter Amanda’s bedroom
to clean it and the doctor is waiting to have breakfast.A naked Jack runs
outside to the ledge.Chapter XI:
In the lion’s den
Get my clothes back:
Veranda: Go right until the
veranda. See Dr. T having breakfast with Amanda. Hear him say that he needs to
ring his chimps for them to start the bombing.See the hose end under
Dr. T’s chair. Use the faucet. Dr. T turns off the faucet and changes chair.See a gardener’s saw on the logs
behind the bench close to the faucet and a watering can by the bench close to
the door.Tiptoe bug-eyed to the
door and exit to the gallery.Miss Gristle: Go and check Dr. T’s
locked door and see Miss Gristle at right hallway.Go down and use the bell
pull left of the fireplace. Automatically, Jack hides when Miss Gristle comes down.Climb up the left stairs, go to right hallway and
see-hear that Miss Gristle comes back up.Automatically hide behind the clock. Look at clock and
see the knife.Enter the last small door with monkey sign on door.
Gorilla room: See the gorilla reading
a newspaper.Use the Venetian blind to close
it and darken the room. Gorilla needs the light
and removes the blind.Exit through the windowsill. Go inside Amanda’s room.
Try to get his clothes
but Jack wants privacy. Open the left wardrobe door and use the drawer to hold it in place.
Take Jack’s clothes.
Prevent the doctor from sending off his monkeys:
Gorilla: Exit through the windowsill
or through the bedroom door to go back to the Gorilla room.Take the gorilla statue
and the headache tablets on the hutch by the door. Exit through the door.Veranda: Go to the veranda.
Take the watering can from right bench.
Go to the faucet and use watering
can on faucet to get filled watering can. Take gardener’s saw by faucet.Go to the ledge and take
old
umbrella by Amanda’s window.Go back and stand behind
Dr. T. Use umbrella to get doctor’s bunch of keys hooked on chair beside
him.Get Jack’s knife:
There are 2 ways to get
the knife. Save game here to try both.Look in the grandfather
clock and see Jack’s knife.1. Go downstairs and get
the mop thread on the floor by left staircase.Go to the bulletin board right of the main door
and take the to do message and the magnet.In inventory, use the
magnet with thread to get magnetic fishing rod.Use magnet with thread
on the grandfather clock and get Jack’s knife.2. Go back to the foyer by
main door.Climb the left side of
the book shelf. Climb to top shelf.Use gardener’s saw on loose floorboard above the shelf and just below the clock.
Take Jack’s knife. Climb down.
Doctor’s Office: Go to
doctor’s office and use
the bunch of keys to open Dr. T’s office.Enter and look around. Go to the desk.
Letter of notice: Pick up
the office paraphernalia-fountain pen off the floor by the left drawers.In inventory, use the
fountain pen on the pre-phrased letter of notice.Miss Gristle’s name and today’s date is added to the
notice automatically.
Unlock the secret desk mechanism:
Statuettes and heads: Use the keys to open
desk drawers.Take contents of drawers: great grandfather’s head, grandfather’s head
and father’s head.The bottom left drawer
can guard many a secret. Use knife on contents of bottom drawer. Get letter
#1, letter #2 and letter #3.Letter #1 is a love letter of a young boy to someone
named Vicky. Letter #2 is a disappointed letter because Vicky has not replied
and Letter#3 swears revenge on Victoria (?the Queen). Bonus feature
unlocked!Use the appropriate
heads on the matching headless dolls on the table: Great-grandfather’s head on
his statuette, grandfather’s head on his statuette and father’s head on his
statuette. Dr. T’s head is missing.Meat-eating plant: Go to the meat eater
plant with a hangover.In inventory, combine the headache tablets and filled watering can.
Use the watering can
with dissolved headache tablets on the meat-eater pot.Use the gorilla statuette on
the now wide awake meat-eater plant. Automatically, have a gorilla (monkey) head.Use gorilla head on
headless Dr. T doll.Use all the doll heads
once to get all of them to face forward (sideways).
Find the doctor’s telephone, then disable it:
Telephone booth: The bookcase turns into
the command center.Read the secret plan for the destruction of British
fleet.At the phone booth, use knife on power cable to get
telephone and telephone cable.Fire Miss Gristle: Hear
someone coming.Jack automatically sits bent wise on the chair to make
himself Dr. T short.Give Miss Gristle her
letter of notice. She leaves.Exit the office and Jack
tells Dr. T what he did.Dr. T states that he can
do it manually from his secret base and leaves before he can be stopped.Gorilla blocks the way.
Amanda talks to Gorilla. He steps aside.
Get rid of ballasts:
After, the talk about the airplane, Amanda flies the
airplane.
Amanda and Jack try to catch Dr. T’s balloon. Amanda
says to lighten the load by dropping ballasts.Check the 2 large boxes
attached to the top wing. Climb up to be standing above the top wing.Use knife to cut off the
rope-tank mounts holding those 2 large boxes.
Refill the tank:
The plane is faster but the fuel tank is going
down. Those were the gasoline tanks.One of the gasoline tanks opened the bottom hatch
when it fell off.Jump down and open one of the hatch-cargo spaces and
take what is inside: if left hatch, get jerry can with gasoline and
ouzo provision; if right hatch, get jerry can with gasoline and
hand written manual.Use hood of the engine behind Amanda. Look at the tube
beside it. Need another tube.Climb up again to be on top of the plane. Take
monkey flight tube at center. In inventory use knife on monkey flight tube to
get hose. Climb down.Use hose with engine. Use jerry can with gasoline on
engine.
Chase off the monkey:
Dr. T sends in Jerry with his screwdriver to
stop the plane. The right wing is starting to break off.Take the broken strut
right of the engine compartment. Use strut with Jerry.Jerry jumps on Amanda
and tries to cover her eyes.Use the white knob of
the rip cord on Jerry’s back.
Stabilize the rudder:

The plane is on fire and the elevator is torn. Jerry hits the rudder in
the back.Go to the back part of the plane and take the red screwdriver
stuck there.Go to the center part of
the body of the plane and use the screwdriver to take the landing gear rod underneath
the body of the plane.Go back to the rudder of
the plane. Use the telephone cable on the pitch elevator. Then use the landing
gear rod on
the pitch elevator.The plane crashes into
Sacred Island.Chapter XII: The decision
Jack wakes up and goes to the plane wreck. He sees
Amanda’s boots under the plane wreckage.
There are still no wind turbines seen. Amanda works on
the plane wreckage.
Track down the doctor:
Go left and look at the
stone road sign base. Cross the bridge on the left and get stopped by 3 killer
plant guards.There are monkey
skeletons around. Take skeleton. Go back to the left.Go to top of screen. Go right to arch (small altar) and
see Vincent standing by the ornate bridge.Talk to Vincent. The
wedding party is still down below because the plane wreckage changed the flow of
the river and blocked the path. He asked that Jack help them.Deserter monkey: Continue to cross the
bridge. Go forward and see a familiar deserter monkey holding a coconut up a tree.Talk to the monkey and
recognize him as the bicyclist giving power to the airfield fence. He throws the coconut.
He emphatically does not want to be friends. Take
coconut.Continue forward and see
the wreckage of the balloon.Look at the wobbly rocks on the cliff side. Take the
bamboo rod holding the wobbly rocks. The rocks slide down.
Bring agent a cold
beer:
Montgomery follows the rockslide. Talk to Montgomery.
He wants a cold beer before he will help.Take beer crate to get beer bottle (warm).
Continue to the left at the balloon wreckage. See the 2 thugs are in the balloon
gondola.Continue to the left and see a
raised bridge and dense vegetation right of it. Something is hidden there. Use
knife of dense vegetation and see a sign post. Take sign post stone.Go back one screen to
the right and see another signpost. This one has 2 on top of each other and
showing entrance to consecrated bridge. Enter consecrated bridge then.See that you are back by the front part of the plane’s
wreckage. Use
the sign post from inventory on the stone road sign before the bridge. Bonus feature
unlocked.
Optional
Bonus Wax Works completed
Continue forward passing
the way to Vincent and the bridge. See the wreckage of the rear part of the
plane that is blocking the plane flow.Go down to the former path of the river’s flow. Cross
the bridge and look down the stairs. See the rest of the party down there.
Go back up to the other
side by the giant ferns. Use the bamboo rod on the metal at center of the red
part. It will then control the rudder blocking the present river flow.Use bamboo rod and see that the river flows to the
other side of the tree and steps.Use the skeleton on the
now dried-up riverbed. Use beer bottle (warm) with skeleton.Use the bamboo rod again and see
the river chills the beer. Take beer bottle (chilled) from the altered
river flow.Go across the bridge and
go forward to Montgomery. Use chilled beer on Montgomery.Get mad at Montgomery. He gives
comb (miniature saw) and elastic belt.
Let the wedding party into the crater:
Go back to the blocked
river flow. Use comb with the tree beside the steps.Watch as the river flow is
diverted to allow the wedding party to pass.High Priest starts talking about the Sacred place. The
wind turbines rise and the raised bridge drops down.Take hollow branch beside the small bridge.
Expose the doctor:
Go to the bridge where
Vincent is located. Talk to the High Priest.He will help you if you
show the villagers that Dr. T is responsible for the desecration of their Sacred
Island.Cross the bridge and go
forward pass the balloon crash site. See the raised bridge is now down.Enter statues. Climb up to the boardwalk.
See the doctor up inside the glass covered room. Go other
side of the left wind turbine.See that the first crown chevron has the central stone
fall down. Use the belt on the crown chevron to get a catapult-slingshot.Go to the other side of
the back wind turbine. Use the hollow branch with rocks.Go back to the belt. Use
coconut on the makeshift slingshot. It breaks the window of surrounding Dr. T’s
control center.
Infiltrate the
doctor’s headquarters:
Go back down to the maintenance ramp. Enter the
consecrated bridge right of the lowered ramp.Take crank from the foreground beside the plane
debris.Killer plants: Go back and
talk to the High Priest by the bridge.He gives the ancient artifact – Shape of Bone;
ritual bone shaped
mold.Go to the rubber tree left of the High Priest. Use
knife on tree trunk and see rubber ooze.Use ritual bone mold with rubber and get 3 ritual
rubber bones.Go left and forward.
Cross the bridge to sacred island. Use ritual bone on each of the 3 killer plant
guards.Headquarters’ entrance: Go
forward.See 2 keyholes and locked hatched. Use crank on the
right padlock and Jack will say he does not have
technical savvy on this one.Go back to Amanda at the plane wreckage. Talk to her
about needing her expertise.While Amanda thinks why the mechanism is still not
opened, climb on the ledge at left. Enter the small hatch.
Disarm the bomb:
Dr. T throws a bomb. Look around and see loose wires
at the control panel at right (center of screen).Take the teapot by the chair. Use teapot on
loose wires to short circuit it.
Stop the doctor before his transmitter is reloaded:
Platforms: Take cane
hanging right of locked door. Use cane on the hatch of the locked door.Follow Dr. T outside to the bridge and enter upper
platform through the next building on the left.At the platform, take door handle left of door. See a
closed hatch. Use knife on hatch. Take blown fuse.Enter the door at right to platform close to barracks.
Talk to Amanda. Take the brake pad right of platform.Go back down to the upper platform using the door on
the left. Use the brake pad on the fuse socket.Go back through right door. Go to the ramp at right to
enter the barracks.Barracks: Take the spindle
with twine at bottom bunk left of Jerry, the sleeping chimp.Check the lockers at back wall. Take the clothes
peg-coat hanger from the last locker at right.
Open the door in the
monkey’s dormitory:
The exit hatch to the hangar is closed and needs a
code. The chimp should know it.Go back to left side of room and see the alarm console
that alerts the chimp pilots.Use the large green button and this wakes up the
chimp. He opens the hatch and takes off in his round plane.Amanda follows the chimp. Amanda tries to fix the
metal door.In inventory, use the clothes hanger with spindle with
twine to get improvised coil.Use improvised coil on fuse box or Amanda.
Use broken rifle.
Amanda and Jack confront Dr. T.
Montgomery arrives to a sort of rescue and gets
thrown off the gondola of the fixed balloon.Dr. T escapes in the balloon.
Chapter XIII: The last stand
Change the course of
the balloons:
Dr. T needs to be higher to signal his army.
Grappling hook: Go left and enter
the cabin-furnace room.See and take horseshoe on wooden board on the
wall. Use the horseshoe on oven.Take corkscrew by oven. Use corkscrew on
minibar. Open minibar. Take bucket of ice.Go outside and left. Take emergency paddle and
hawser. Go back to the cabin-oven.Use paddle with oven to get red hot horseshoe.
Use horseshoe on paddle with bucket of ice. Use horseshoe with hawser to get
grappling hook.Go outside and right by Amanda. Use grappling hook on
ship’s helm-steering wheel in front of Dr. T.This turns the ship sideways.
Stop the doctor
before his transmitter is reloaded:
Amanda is hanging below.
Climb up to be on the first sofa. Turn the steering
wheel to get Amanda a foothold on the rudder to climb up.Use knife on blue box left of steering wheel. Take
signal flares.Give signal flares to Amanda. She uses it to distract
Dr. T.
Prevent the doctor
from grabbing the transmitter:


Jump to right ledge of the gondola. Jump again to be left of the chimp figurehead.
Stand on the red door. Climb to the figurehead and
then use
the chimp’s left arm to get to Dr. T. The left arm breaks off. Take wooden
arm.Go down to the red door. Go back to the left. Jump
back to the ledge and back to the sofa.Go left of sofa and see a swing gate on the railing
that does not hold open. Use wooden arm on wrecked swing door.Jump back to the right until the chimp figurehead.
Now, go right instead of up (chimp figurehead) to the right small platform.Then go up to stand on swing door propped up by the
arm. Use knife on frayed rope.Watch.
But we did it!
Watch the credits for some outtakes.
This document may not be
distributed without express written permission of the author and the content
may not be altered in any way.
For Questions or Comments
on this Walkthrough,
Please write to:
MaGtRo
Copyright © 11/2007MaGtRo


