Frankenstein: Through the Eyes of the Monster – Resurrection Laboratory 1
Mausoleum
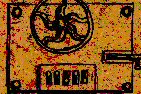 Proceed
through the now open gate IV to the mausoleum and click on the open drawer in
the bank on the right for a closeup. Click on the skull to open the jaw. Run the
cursor over the books and a spider will emerge, scurry about, hesitate, and run
into the skull. Click on the skull again to close the jaw. With the spider
trapped you can withdraw eighteen note pages from between the books, most of
which go into the valise. One of these shows a sketch of the handwheel and lock
on the
door in the castle chemical storage room with the unlocking
slider positions indicated. As you read all the notes the plot thickens. Return
to the planetary control unit and open gate I.
Gate I
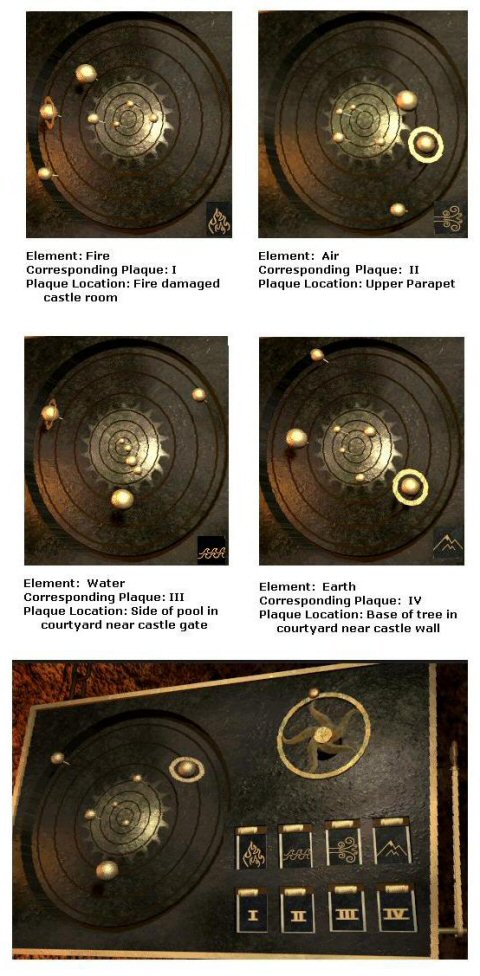
Slide back the appropriate control panel covers and
set the planetarium configuration to that of plaque I, and click on the lever to
hear gate IV close and gate I open. After you enter this gate you may wish to do
some exploring. To the left just after entering is a tunnel at the end of which
you will find a stone framed opening with red and black pushbuttons on the left,
and looking closely inside the plates of a conveyor belt may be seen. The
buttons have no effect at the moment, but you will have to come back here soon.
Back off and turn left to see a wall other than dirt; a cool breeze is detected.
Go back toward the entrance and continue on into the tunnel where you will soon
come upon a chamber showing three openings. Here on the shadowy floor is
something that you might at first take for a sea creature, but in fact appears
to be a disembodied hand that can move and speak, but cannot be understood. It
slowly crawls away through the right opening of the three.
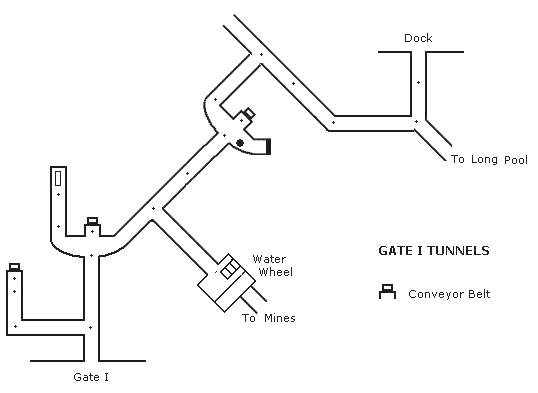
The left opening leads to another
locked door, and through the center opening is a conveyor belt identical to the
first. Follow the hand through the right opening and note that immediately after
you do you can hear running water. Move forward twice more and you will be in
another three-doored chamber identical to the first except that there is a rock
in this one. Here is the hand again; click on it and it crawls away through the
left opening. Once more there is a conveyor belt behind the center opening; the
right opening brings you to a blank wall.
Water Wheel
Turn around and go back through
the tunnel to the spot where you heard the running water. Turn left here and
follow the tunnel to a slowly turning water wheel, you should have one of the
doctor’s notes in the valise about this being the source of power of his mining
operations. Behind the wheel is a large door chained shut. In the foreground is
a horizontal pipe in which is a handwheel controlled valve. Click on the
handwheel to turn off the flow of water and the wheel stops turning. You can now
go across the wheel to the door. Look down to the chain on the floor; click on
it and an end rises and hangs in the air, then you are holding a few links.
Carry the links to the water wheel where the chain becomes attached, then cross
the wheel to the pipe and click on the handwheel to restart the water flow. The
turning wheel noisily pulls away the door providing access to a tunnel behind
it, and after a bit the waterwheel continues turning as before. Cross over on
the fallen door to the large switch on the wall next to the now open tunnel and
pull the switch handle down. You will hear an industrial noise as power is
applied to the tunnel complex.
With power now available, return
to the three conveyor belts that you saw in the tunnels and use the black
buttons on each to start them up, whereupon you will see rocks moving by—–the
same rocks in all three, passing again and again. Go back to the waterwheel,
proceed across the fallen door, and through the tunnel behind it to the end,
then turn left and follow the rails to a metal gate. Raise the gate using the
lever on the right, and you will see a ladder and a cart on the rails below a
hopper. Go up the ladder and move ahead to the pulverizer, which is the end of
Frankenstein’s pitchblende mining operation that he described in one of his
notes. Pitchblende is an ore containing a large percentage of uranium oxide.
Pulverizer
Go a step farther, and to the
right of the tripod at the rear of the cavern you can see one more conveyor belt
just like the previous three; energize it with the black button and again the
same rocks flow past. Step back from this noisy unit, turn right, and move to
the white box on a post, which turns out to be the pulverizer master switch.
Press the black button and heavy duty motors may be heard to start up. When that
noise dies away the pointing cursor will indicate a unit to the right; click on
it and you will be at the pulverizer controls.
In the valise notes you should
find a nasty letter from Frankenstein to Mario, the pulverizer operator, with
some instructions on its operation, unfortunately not detailed ones. Pull the
knife switch toward you and the pulverizer conveyor is set in motion
transporting large chunks of ore under the two hammers, the left one operated by
the red button and the right one by the black button. Every ore chunk must be
struck by both hammers in order to pulverize it enough; should you somehow miss
and a piece too large gets past, the machine shuts down and you must clear it by
going to and pulling the lever that is located off to the right—–mentioned by
Frankenstein to Mario—–then begin again by going to the master switch, resetting
it by pushing the red button, then restart by pushing the black one. Go to the
control and continue crushing, and when you succeed in getting enough crushed
ore for a full cart load, the conveyor stops and you will hear the ore slide
into the cart. Go down the ladder and check the cart; if it is filled you can
see ore above the cart end.
Go back along the tracks a couple
clicks to the tunnel entrance from the waterwheel on the right. Travel through
this tunnel, past the waterwheel and the rest of the tunnels to the planetary
control panel, where you must open gate III on order to get into the refinery.
GateIII
At the planetary control panel,
to open gate III use a similar procedure that you used to open gates I and IV,
sliding back the control panel covers to show the Roman numeral III and the icon
for water, and setting the planetarium to the pattern of plaque III. With the
gate open move to stand in the entrance. You now have to navigate the relatively
simple maze of the wine cellar: go FFFFFRFLFRFLFRFL and pass through the square
opening in the masonry wall.
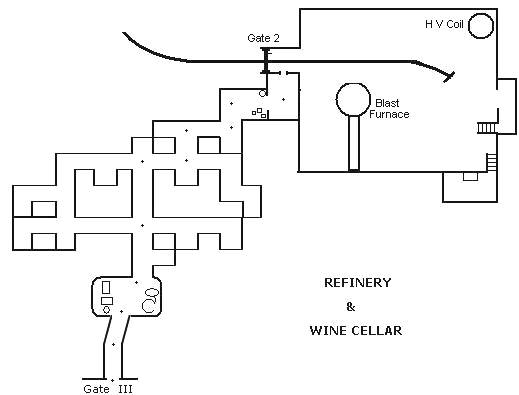
You are now in Frankenstein’s ore
refinery, and to your left is a closed metal door blocking the ore cart entry.
Click on the lever on the right to open the gate and move through to face a
tunnel wall. Turn left and proceed along the tracks unit you get to a track
switch lever on the left just before the end of the track. Pull the lever to
shift the track so that it leads into the barely discernable tunnel on the left.
Should you travel down this tunnel you will find a ladder going up to a firmly
closed trapdoor from which a chain is hanging. Pulling on the chain does not
budge the trapdoor.
Return back up the track and you
will shortly see on the right side of the track a desk-like stand with another
track switch lever next to it. Click on this stand and you will be placed behind
it; it is a control for moving the ore cart. The cart is self-propelled and
somehow gets its movement signals from the two knife switches on the stand. Pull
the left knife switch down, whereupon the ore cart comes from the right where
you have filled it with crushed ore in the pulverizer, and disappears into the
distance down the track. Follow it and you will find resting below the trapdoor.
Click on the hanging chain to fasten it to the cart. Go back to the cart control
stand and set the switches (both down) to bring the cart rolling back and
disappearing to the right. Now pull on the lever at the stand’s left and see the
tracks turn to lead left into the refinery, then pull the left knife switch
down, whereupon the ore cart comes from the right and disappears into the
refinery. Follow it in.
Refinery
You may wish to briefly look
around. In one corner there is a high voltage coil on the base of which is a
knife switch that must be placed in the up position before you leave, but not
right now. (Down is for the refinery, up is for the Crystallizer.) The most
prominent item is a large barrel shaped unit that in the letter to its supplier
Frankenstein calls a blast furnace. Unseen above is a mechanical arm called a
claw. From a position behind the cart you will see two stairs. Go up the one on
the right and in the room at the top turn to the table, where from the right
hand drawer you can get several important notes that include diagrams
delineating the controls for the refining process and for the soon to be used
Crystallizer. It would be a good idea to have copies of these notes and diagrams
so that you will not have to keep retrieving them from the trunk.
Leave this room and go up the
other set of steps, then turn and get a closeup of the refinery control panel.
The refining process on the refinery floor is viewed through a protective screen
to the right of the panel, and is straightforward: place the pitchblende ore in
the temperature controlled furnace, apply a short period of electricity, and
remove the refined ore. You may wish to consult the above suggested control
panel copy as you go through the following steps.
Note: There are
couple discrepancies between the sketch and the panel itself, but these are of
little consequence.
- Apply power to the system by pulling down knife switch
(#1 on the copy) on the upper left. - Pull down the larger bronze knob on the left side of the
panel (#6), the vertical claw control. The ore transport arm moves to the
cart. - Move the knob back up. The claw grasps the ore and
raises it. - Move the smaller bronze knob (#7), the horizontal claw
control, from left to right. The arm moves the ore over the furnace. - Pull the vertical claw control knob down. The arm puts
the ore in the furnace. - Move the vertical claw control knob up. The claw
withdraws empty from the furnace. - Set the temperature of the furnace by moving the
semicircular pointer next to the temperature gauge (#3) until the gauge needle
is next to, but not into, the red area. - In a scribbled note found in the library, under the
heading High Voltage there is a series of numbers, the last three of which—80,
85, 90—are encircled. Use the large tan knob at lower left (#4) to set the
voltmeter (#5) to 80, 85, or 90. - Pull down the electrode switch (#2), the knife switch at
top center. There follows a brief harsh sound.
10.
Pull the vertical claw control knob down. The claw enters the furnace.
11.
Move the vertical claw control knob up. The claw retrieves the glowing
refined pitchblende from the furnace.
12.
Move the horizontal claw control knob from right to left. The arm moves
the pitchblende over the cart.
13.
Pull the vertical claw control knob down. The pitchblende is placed in
the cart.
14.
Move the vertical claw control up. The arm moves up out of the way.
Leave the control room and exit
the refinery to the cart control stand, being sure that before you do you have
thrown the switch on the high voltage coil to the up position. At the cart
control set the switches to bring the cart rolling out of the refinery and to
the right toward the pulverizer. Click on the track switch lever to change the
track direction away from the refinery. Now set the switches to send the cart
down the track past the refinery; follow it down to find the trapdoor on the
ground and the cart parked below the trapdoor opening. Climb the ladder into the
Crystallizer lab.
Crystallizer
The equipment in this laboratory
can be confusing until you sort it out. Some of it has been mentioned in
Frankenstein’s notes, and you have the control diagram that you found along with
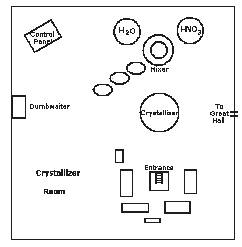
the refinery control diagram. Around you as you emerge from the trapdoor are
racks of equipment that have no function other than to locate this entrance. In
front of you is the Crystallizer unit, and behind it is the mixer over which are
spherical tanks of water and nitric acid (HNO3).
In the left rear can be seen the equipment control unit with cables running to
it on the floor, and on the right a door that opens to the Great Hall. Another
mechanical arm and claw is attached to the ceiling, and out of sight in the wall
to the left is the Resurrection Laboratory dumbwaiter. Your task is to use the
refined pitchblende to make a lifestone crystal, though what is wrong with the
one that you already used is not stated. Perhaps they may only be used once.
Move from the trapdoor entrance
to the control panel.
1.
A knob at upper right (#2 in the sketch), the claw control, has T-shaped
movement slots. Move it to the right and the refined pitchblende is retrieved
from the cart below the trapdoor by the mechanical arm.
2.
Move the knob to the left and the arm places the pitchblende in the
mixer, then returns to its rest position.
3.
Maneuver your way around the equipment so that you are looking directly
at the mixer with the two labeled spherical tanks at either side. The best way
to do this to return from the control panel to trapdoor (look for the equipment
racks), then go past the right side of the Crystallizer.
4.
There is a valve at the base of the water tank where the hose joins it.
Click on this valve and a measured amount of water flows into the mixing vat.
5.
Do the same with the HNO3
acid tank to add acid.
6.
Lift the knife switch on the vat support leg directly in front of you.
The mixer blades descend, stir the mixture, then rise out of it.
7.
Click on the drain valve at the bottom of the mixing vat. Mixture flows
into the adjacent tall container.
8.
Return to the control panel (via the trapdoor).
9.
One of Frankenstein’s notes says to use 80 volts to crystallize lifestone.
The digital voltmeter (#6) registers 45 volts. Use the voltage control knob (#7)
below it to raise it to 80.
10.
Move the claw control knob to the left. The arm and claw picks up the
mixture filled container and returns to its rest position.
11.
Pull down the larger black knob (#4). The arm puts the container upright
in the Crystallizer and pulls away.
12.
Throw the knife switch (#1) in the upper left corner from left to right.
The arm swings so the claw is above the Crystallizer. Brief loud buzzing ensues.
13.
To the right of the control panel is a lever that resembles those used to
switch the cart track. Move this lever (#5) forward. The Crystallizer rotates
and electrical discharges move from the claw to the Crystallizer. Several items
turn green.
14.
When the rotation stops, return knife switch to the left. The claw
retreats.
15.
Move the claw control knob in the T-slot downward. The arm and claw pick
up the finished lifestone crystal and carries it off to the dumbwaiter.
Go to the dumbwaiter where you
will find the glowing crystal inside. Click on the red button to send the
dumbwaiter up, then leave the lab by the door to the Great Hall.
There are still areas of the
castle that you have not yet explored. Recall that in the mausoleum you found
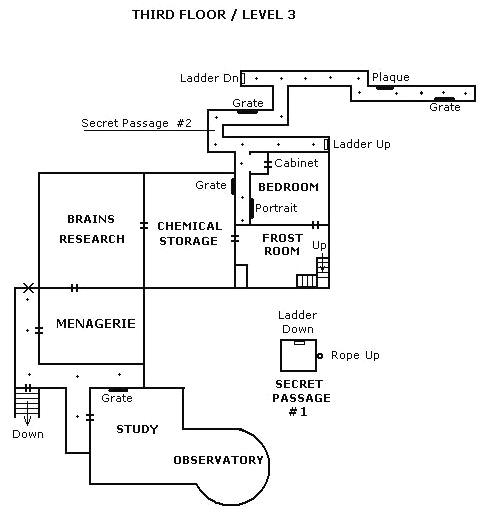
the combination for the locked door in the chemical storage room, so go there.
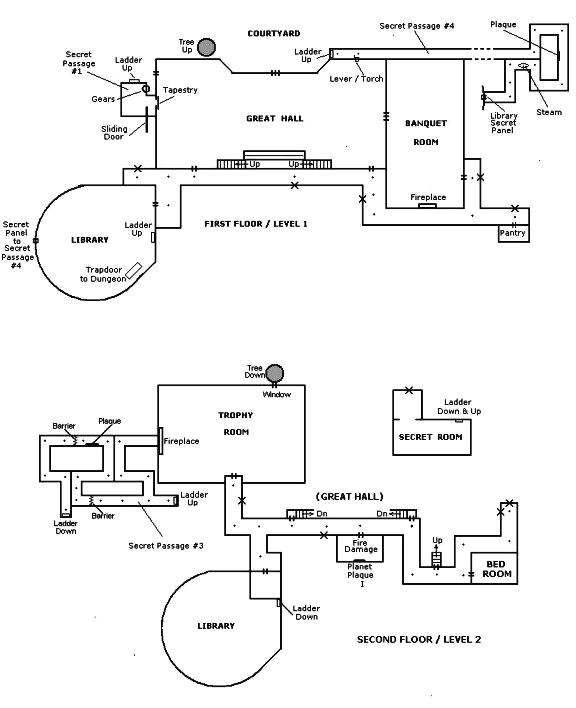
Click on the tapestry covering the access to secret passage #1, go up the ladder
and then the rope to the lower parapet, through the Tesla coil room to the frost
room below, and into the chemical storage room. The sliders below the handwheel
are difficult to see, but upon close scrutiny they can be set to the positions
shown in the mausoleum note. Success will be demonstrated when the handwheel
turns as you click on it, and the door opens for you to enter. You have seen
this room before through one of the secret passage grates.
There is a somewhat gruesome
optional exercise at this point if you wish to undertake it, otherwise skip this
paragraph. Go to the table on the right to read more of Frankenstein’s notes,
then return to the shelves to the right of the entry door. On one of the shelves
are four pink objects in jars; these are human brains. Pick up one, carry it to
the apparatus on the right, and place it in the pan above the knife switch.
Click on the bird-like probe, which will move to a spot on the brain, then close
the knife switch to hear a few last words. The probe withdraws; click on it
again for more words. Keep clicking on the probe until the words are repeated.
Put the brain back in its jar. You may do this for the other three brains as
well.
Menagerie
Toward the end of the room
opposite the entrance there is another door in the wall on the left. Open this
door to find Frankenstein facing you from behind some cages. Animal noises are
heard. Approach him for an interchange of invective, after which he goes behind
some boxes. Find a desk on which there is another set of notes about a
modification of the Resurrection Laboratory equipment. Keep moving around,
possibly seeing animals in cages, until Frankenstein appears, calls you an
incompetent drunk, and raised his gun to shoot you. Quickly turn right to a
door, which after a self-demeaning soliloquy on your part, will open to the 3rd
floor hallway. You have been in this hall before when you examined
Frankenstein’s study and you know there is no way out but the door to the left,
which leads to the 2nd floor hallway, where the closest exit is to
the top of one of the Great Hall stairs. Where to hide?
Well, there are numerous places
to go. One of them is into the tunnels at the end of the long pool. Go out into
the courtyard and head for the tower. Past the tower is a strangely dressed man
with a pronounced accent and a handgun who clearly intends to kill you; quickly
turn toward the pool where you find another man, this one with a rifle but with
the same dire intention on your life. Rapidly turn right again and hurry back to
the castle and the Great Hall. Just before the Great Hall door is the second man
who has beat you there carrying his rifle and grim intentions with him, but
again if you act quickly you can get into the Hall, where you are temporarily
safe.
Sara
Go up the right stairs. When you
get through the door, turn left, move forward to the end of the hallway, turn
right, forward, and left again, and head for the door at the end of the hall.
This door has been locked up to now, but fortunately is no longer so, though it
locks again after you go through it. You have time to look around and see that
this is a bedroom, even while one of the men is pounding on the door and
shouting threats. You must find and click on a full length mirror, behind which
are shadowy movements. The mirror breaks, and in the opening is a young woman
who urgently tells you to follow her.
As you do so, going after her as
quickly as the cursor allows, you pass through tunnels that should be familiar
to you from your experiences behind planetary gate I. She tells you her name is
Sara Strauss. Eventually you enter some new tunnels, ending up at the mouth of a
cave looking out at a sunset. Turn to Sara on the right next to some barrels, on
one of which is a cup and a tree branch. Click on the barrels; She says that she
knows who you are, offers you the cup for a drink, and moves off. Strangely, in
this cave there are shelves with some bottles on the top one. If you are indeed
thirsty, click on the cup for a drink, then put it back. You can use the tree
limb to knock down a bottle, which will break upon falling unless you first
click on the adjacent barrel to push it behind the shelves so the bottle lands
safely in it.
At this point the order of things
tend to become slightly confusing. Keep switching right or left when the action
becomes static. Sara speaks several times, as do you, the monster. The
disembodied hand shows up in the foliage, frightening Sara. You have the option
of throwing a rock at it or not, in either case it withdraws, though you may
have to wait a bit for it to do so. Whether or not you use the convenient rock
determines whether Sara survives or is shot. Sara wants to get Frankenstein’s
help, but you want to take her to the mausoleum to show her that he is evil.
After this intention is stated, leave this place and travel through the tunnels
FFFFRFFRFR to the planetary control unit. Sara questions you a couple times as
you go, indicating she is with you. Just before you get to the tunnel entrance
you hear gate I conveniently open. Use the control unit to open gate IV and take
Sara into the mausoleum. When you get there pull out the three remaining
documents from the open drawer; however, your intention of demonstrating evil
seems to have backfired, as Sara expresses admiration for Frankenstein, then
leaves, stating that she must find him.
Earthquake
As you start to follow her out an
earthquake hits. Rocks fall, but the tunnel is not blocked, though the ones
behind gates I and III are, and the control unit has fallen, blocking the exit
tunnel. However, Gate II has been shaken open and when you go to it you find
that the rocks formerly blocking it have shifted enough so that you can get by.
That is where Sara has gone, so go FFRFF to her, then immediately go up the
ladder as she indicates and keep moving up as fast as the cursor will let you.
Three times you will have a choice of ladders: the first time take the left one,
the second time the right one, and the third time the left one. At the top click
on Sara when she reaches for you, and you will end up in the topiary garden.
Sara leaves, to look for Frankenstein she says.
Dock 2
Move forward and leave the garden
through the spiderweb gate. Outside, turn left and place the cursor over the
pool so that when you go forward you see the gargoyle and sphere statuary. Click
on the latter to move it downward, then go forward to the castle end of the pool
to have the gate slide down. Again follow the tunnel to the dock of your
previous underwater excursion. Without going to the edge of the dock, look
around and discover a bomb and under a bottle on a crate an incriminating note
from Judge Rothenbush to Vladimir. Take the note. Somehow Sara is here and it is
decided not to touch the bomb and to find Frankenstein.
Study and Observatory 2
Frankenstein could be in many
places in his large castle, but as it happens he is in his observatory. Leave
the dock across the six logs to the exit, take the left tunnel, and use the
lever on the right wall to open the door to the long pool. Go to the Great Hall,
up the stairs to the second floor hallway, up the stairs behind the door near
the bedroom to the third floor, right and around the corner into the alcove in
which is the door to the study. In the study turn right, and Sara, who must have
been with you all the way, goes into the observatory. Follow her in to see
Frankenstein gazing out a window. There follows a long emotional conversation
between the two of them, in which Frankenstein states he knows of the collusion
between the judge and Vladimir and that he put the bomb there to get rid of
them. He denies that there are any children involved despite the note thrown at
his feet, which he ignores. You hear his footsteps leaving. Go into the study,
where he is standing in the doorway. He speaks placatingly that he is going to
defuse the bomb, then closes the door and locks it, shouting from the outside
that the bomb will go off as planned, and the two of you must stay in these
rooms.
Return to the observatory and
Sara, who is now disillusioned. She is looking out a window and sees children
being taken into the dock. Look through the telescope and see this, and
recognize Gabrielle, whom you are supposed to have killed and for which deed you
have been convicted by Judge Rothenbush and hung. You must get out and try to do
something. Back in the study there is a grate high in a wall; you have used
grates before to make an escape. This one is too high to reach, but if you move
the table on the left (click on it) underneath you can reach it.
The grate is locked. Look in the
drawer of the table next to the one you just moved to get the key, but when you
try to use it you drop it. Move the table again to discover the key in a floor
grate, where it is just beyond your reach. On a table in the observatory next to
Sara is a magnet that you can use to retrieve the key, and this time you are
able to unlock the grate, but the opening is too small for you to crawl through.
However, Sara can, and when she gets into the hall she unlocks and opens the
door.
There is a gunshot. Frankenstein
has rigged a deadfall so that opening the door sets it off. Back in the cave
when the disembodied hand appeared in the foliage and frightened Sara, you has
the opportunity to chase it off by throwing a rock at it; had you done so, the
deadfall will kill Sara, but if you had waited for the hand to withdraw on its
own, then the hand would have taken the shot and Sara is spared.
You must get to the dock. As you
open the door to go down the stairs to the second floor an explosion is heard;
Frankenstein has set off the bomb. By now you know the way; when you click on
the gargoyle and open the door at the end of the long pool, smoke escapes. Hurry
to the dock, but you are too late, Gabrielle is dead. But you have made a
lifestone crystal, you can bring her back to life!
Endgame
Pick up Gabrielle and carry her
to the Great Hall, up the ladder in secret passage #1, up the rope to the lower
parapet, and up to the Resurrection Laboratory. When you enter the Laboratory
you will be facing the skeleton and a thunderstorm has come up.
1.
Turn right and Gabrielle will be on the table on which you yourself came
back to life.
2.
Now you must get the crystal from the dumbwaiter where it was placed
after you made it. Turn left, forward to the right twice, and left. Click on the
dumbwaiter grating to move it aside, then on the dumbwaiter to see the glowing
crystal. Pick it up and move back.
3.
Turn right twice and place the crystal vertically in the holder at the
end of the green arm above Gabrielle.
4.
Turn left, go forward to the right, then right and you will be at the
control panel. Click on the three switches on left side of the panel and they
all flip to the right. Click on the two switches on the right side of the panel
and they both flip up. Click on the cart track type lever on the left of the
panel and the platform carrying Gabrielle rises out of sight.
The electricity in the storm must
be used to energize the Tesla coil, and that in turn applied to the lifestone
crystal. Values and timing are critical. Details are given in the notes that you
have been collecting.
5.
Turn left from the control panel and move to the periodic table chart,
then go down through trapdoor to room below where the Tesla coil is located.
6.
Move forward and left to the knife switch, which you must throw to the up
position.
7.
Go back up to the Resurrection Laboratory and continue up the ladder to
the upper parapet.
8.
Click on the anemometer to bring up the wind speed gauge. When the
indicator is between 15 and 23 (or close), back off and click on the reel of
kite cord to release the kite, which will sail out into the lightning.
9.
Go down the ladder and through the trapdoor to the Tesla coil switch.
Pull the switch down and watch the meter (be patient); when the needle
approaches the red area push the switch back up.
10.
Return up to the Resurrection Laboratory.
11.
Move forward to the right three times, then right, and you will be at the
control panel. Click on the three switches on the board left to set them back to
the left to complete the life giving process.
Watch the concluding video. An epilog follows concerning
the principle characters.
Commentary
Thinking back on the game after
finishing it, a few thoughts and opinions came to me as I wonder if I have
missed anything:
·
After the monster acquires the inventory valise, it accompanies
him wherever he goes, even during the precarious ascent of the tower. This
inventory always accompanying a protagonist everywhere is an Adventure game
phenomenon that one learns to accept.
·
The only part of the monster one gets to see are brief glimpses of
his arms. I for one would like to observe what Frankenstein put together.
Apparently it did not faze his daughter.
·
Why are those three mysterious line plaques found in the secret
passages included?
·
I would like to know what it was that the disembodied hand says.
·
After the first visit to the dock, one may well wonder about its
purpose. The gold bars are never touched, the list of children is gratuitous, as
is the appearance of the octopus—though you will get killed if you do not pick
up the speargun before entering the water.
·
You don’t have to put out the fire in the Trophy Room—–at least as
far as the appended walkthrough goes. A different one might enter the secret
passage that way.
·
Somewhat along the same line, you may realize that other than for
initial exploration the walkthrough does not take you back to several of the
secret passages, and if you do, you could get to your destinations by another
route. However, game replay with this in mind resulted in sequences not
appearing when required for game progress.
·
Frankenstein makes quite a point of wanting his notes back, but he
does not take them when he has Phillip shackled in the dungeon.
·
The only access to the Resurrection Laboratory at the top of the
castle that is shown in the game is via secret passage #1 and the rope to the
lower parapet. It is inconceivable that Dr. Frankenstein used this route, yet no
other is ever indicated. One would hardly expect him to ride the dumbwaiter.
·
Having the alternative of setting the game to have Sara live or
die seems rather pointless.
·
The monster must have been recreated with extraordinary strength
and agility in order to carry Gabrielle from the dock to the Resurrection
Laboratory, including up the rope to the parapet.
·
A unit such as the Tesla coil will not store energy more than a
few milliseconds at most. A capacitor will.
·
It is my opinion that this game has an unsatisfactory ending,
something that I find is characteristic of many Adventure games. It is too
abrupt, without a complete conclusion despite the epilog, as though the
designers just ran out of inspiration, ambition, or money.
View this guide raw, exactly as the archive holds it