Frankenstein: Through the Eyes of the Monster – Resurrection Laboratory 1
FRANKENSTEIN
Through the Eyes of the Monster
Personal Observations & Walkthrough
by Soren Andersen
Frankenstein is not a
particularly linear game. There is very, very much traveling through a multitude
of possible paths in Dr. Frankenstein’s castle and grounds, with its many rooms,
hallways, secret passages and tunnels, mazes, and doors that will open at times
and will not at other times, and this path complexity increases the farther you
get into the game. There is no doubt a most efficient pattern to accomplish the
many tasks that must be done to rescue the monster and his daughter from the
clutches of Frankenstein, but the available path variations are so numerous that
this is difficult to determine. As in any Adventure game, there are of course
many items that you must find and tasks that you must perform before you can do
others, but they do not necessarily follow closely upon each other.
There is a very complete game
playing instruction book on the disk; however, I think a few extra words about
the cursors might be in order. The right and left pointing hands normally turn
you 90º in the direction of the pointing finger, but on occasion the turn is
180°, and it is up to you to determine if that is the case; in addition, these
cursors are used to withdraw from a closeup, in which case there is no turn at
all. The forward movement cursors are also pointing hands, either slightly left
or right, not straight ahead; furthermore, the angle away from straight ahead is
not always the same and may take you to a different location. You have to move
the cursor slowly across the screen to detect this when it occurs. A case in
point is the long pool in the castle courtyard.
Despite the game’s age I played
it on Windows XP with only one problem: at one point large chunks of ore are to
be run through a pair of crushers until you get a full load of crushed ore in a
cart–—something that you need to continue the game-—and I was unable to get any
rocks to show up on the crusher conveyor belt to be pulverized by the two
manually operated sequential hammers. I bring this up because I have been in
contact with several other gamers who experienced this same anomaly, and at
least one was using Windows 98. In some frustration while the empty belt was
running in front of me, I began idly and alternately operating the hammers and
suddenly three rocks appeared—–shaken loose, as it were, moving along and ready
to be crushed. Repeating this, and occasionally turning the conveyor belt off
and on, eventually—-and that is the operative word—-got me the cartload of
crushed ore. It is to be hoped that you will not encounter this difficulty, or
if you do that this unorthodox solution will work.
The inventory is not very
extensive, many items are used almost immediately, in which case they accompany
your cursor until applied. Not too long into the game you acquire a valise to
carry the few items that need to be transported. Most of these consist of
various notes that turn up in a great variety of places; those that may be
collected are stored in the valise in a single sheaf, and you must leaf through
it if you wish to review them. Be sure and read these notes as you find them,
because while many of them are of little import, others contain information that
has much relevance to the conduct of the game.
There are several instances in
which the need for haste is expressed or implied, but the only one where I found
this to be actually the case is at the series of ladders found beyond gate II,
or if someone is gunning for you…Setting of gauges does not have to be all
that precise…There seems to be a particular piece of music for each of the
various locations—-a leitmotif, as it were-—and fortunately none of these is so
loud as to interfere with any speech…Throughout the game there are comments by
Frankenstein, but mostly by you, the monster; some of these are indications of
what must be done, some are explanatory, and some gratuitous, frequently
maudlin.
Saving games can be something of
a problem. At the time that the game was developed Windows file names were
limited to eight characters (no spaces), and since the filename listing in the
folder where the games are stored is alphamerical I chose to fill the first two
places with a number in order to keep the list in time/action sequence, leaving
only a restrictive six for some sort of abbreviation. My solution was to use the
six as inventively as I could and to keep a separate cross reference text list
in which I could describe the game storage situation without any limitation. One
can, in fact, use the six character descriptor more than once since it will have
a different sequence number. Games are stored in C:INTRPLAYFRANKIE with an .STA
extension, and using Windows Explorer to access them you can manipulate them as
any file, such as delete or rename. There are several places where you may be
killed, so as in any Adventure game you should save often.
As indicated above, there are a
multitude of different paths through the castle and its environs, and the
following walkthrough is but one of these. It is easy to loose track of where
you are in the passages and hallways inasmuch as the views are frequently
identical, so I have made several diagrams to assist in keeping track of your
progress. Reference to these drawings will greatly facilitate your progress
through the walkthrough, and you may well wish to employ them even though you
are not using the walkthrough, although some annotations may be regarded as
spoilers. You will note that the hallways and passages contain unevenly spaced
dots; these are endpoints of the forward steps as you pass along these
corridors.
There is a lot of gaming on just
one disk. And it is pretty good.
Soren Andersen, May 2003
Walkthrough
The game begins, as do most
Adventure games, with an introductory video to establish some story background.
The time is the latter part of the nineteenth century, and with lightning
flashing over Frankenstein’s castle a narrator states that you, Phillip Werren,
have been accused of murdering your daughter Gabrielle; protesting your
innocence, you have been found guilty and hanged, with your body torn apart by
an outraged mob. You then come back to consciousness looking up at a ceiling,
with Dr. Frankenstein leaning over you and congratulating himself on creating
life. He gives you a shot of something that “will make you feel better,”
then gives himself one. The cursor appears; click and one of your arms comes
into view, click again and the other arm shows—to your horror Frankenstein has
given you a woman’s arm. One more click and the doctor is at a control panel
urging you to stand, which you do, finding yourself in a laboratory in
Frankenstein’s castle. This room where you have returned to life is the
Resurrection Laboratory. As indicated in the subtitle, you are playing this game
in the persona of the just brought back to life “monster”.
Resurrection Laboratory 1
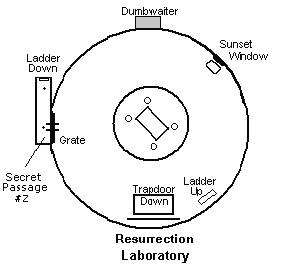 There is
much equipment around: shelves with vials and flasks, a greenboard with
notations, a large chart of the periodic table, a skeleton, many books. You are
free to explore and examine, and Dr. Frankenstein will have comments as you do.
You can read a newspaper
page containing an article about your sentencing judge,
find a bookcase that can be moved to reveal an opening blocked by a locked
grate, and if you look hard, a dumbwaiter. You can also find on a shelf a
glowing green lifestone crystal, below which are some of the doctor’s working
notes. You will have to leave these items for now—–but remember where they are.
Attached to the wall to the right of the greenboard is a ladder that you may
climb to the castle’s upper parapet where you will see a strange looking kite.
On the parapet wall is a plaque bearing the Roman numeral II and showing an
orbital planetary arrangement that you must carefully note. Nothing to do up
here at this time, so return down the ladder.
When you have finished looking
around the Resurrection Laboratory, find a trapdoor in the floor below the
periodic table chart. Click on this door to go to the room below, which is
mostly occupied by a very large Tesla coil, named after its Serbian inventor,
the early electrical engineer Nikola Tesla. This device is an electrical
transformer that can change both the frequency and magnitude of an alternating
electrical voltage; it is here [erroneously] used to store electrical energy
from lightning. You can find a knife switch for this device, which is in the
down position. Leave it that way.
Lower Parapet
Near the foot of the stairs is a
door leading out to the castle lower parapet, where there is a v-shaped break in
the parapet wall. Looking down from this break you can see a barred window in
which the remnants of the bars have been have been blown outward. Turn around
and observe the tower, then go to the wall between the two hanging white ropes,
where you will find three canon balls. Place one of them on the hoist platform
on the left, then pull on the rope at the right and watch as the hoist lifts the
canon ball and tilts it onto a shelf, where it rolls until it goes off the other
end. Noises of falling objects are heard.
With the hoist back down, looking
to the left there is now on the deck what appears to be moose antlers, or
perhaps a statue of an eagle in flight, in which a rope is entangled. It is not
tangled all that much, because you can take an end of the rope off to the right
and cast it through the notch in the wall. T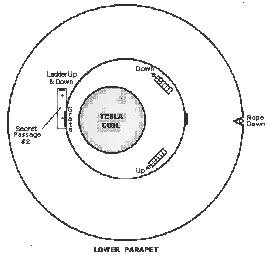 he
he
rope must have become wedged in the notch because it will support you as you
climb down and go into the room behind the blown out grate. Once inside turn
right and you can make out a ladder. Call this secret passage #1. Go down the
ladder until it changes aspect and color. Turn left and you will see a room in
which is a table with a red mess on it (it is the remains of a cadaver); don’t
bother going in as the door that you can see behind the mess is locked. Turn
left again to observe two tables and a candle; the monster (you) says that here
is a place that he can do some experimenting about which the doctor will be
unaware.
Return to the ladder and go the
bottom. Turn right to be confronted with a crank above which is a set of five
different sized gears; study the gears so you will know their relative
positions. Turn the crank and a panel in the wall on the right begins to move,
whereupon the top three gears fall. They don’t fall far; you can pick them up
and put them back, easy if you have studied them as suggested. Anyway, there are
only three gears to remount, how hard can it be? With the gears back in place,
continue turning the crank to complete the panel movement and enlarge the
opening, then go through it to emerge from behind a tapestry into a large room.
You are in the Great Hall of the castle.
Banquet Room
Go through the double doors at
the far end of the Hall and into the banquet room. Turn right and go to the
fireplace to pick up the valise. This is an important item because it is where
you will carry your inventory. Open the valise to read three pages of Dr.
Frankenstein’s research notes.
Turn left and you will hear a
door open, footsteps, and the door closing. Turn left again to see Frankenstein
at the far side of the room. Go toward him and he makes some remarks about dead
tissue, then turns away. Approach him again and he leaves. Turn to face the
table, then move forward once on its right side, face it again, and go forward
to pick up the turkey leg to use in an experiment. Put the leg in the valise,
turn around, and go through the doors back into the Great Hall. Move to the
tapestry at the far end, lift it, and go into secret passage #1 by the gears.
Proceed up the ladder and the rope and stairs all the way to the Resurrection
Laboratory.
Resurrection Laboratory 2
Go to the shelves where you saw
the lifestone crystal, which you need for the experiment that you are planning,
but of course Frankenstein will not let you have it, so you must devise a way to
get it out without him knowing it. He can be seen working at a desk and glancing
at you occasionally. At the times when he is concentrating on his work, pick up
two sets of his notes from the shelf below the crystal and put them in the
valise, then grasp the crystal and very quickly turn right to the window
displaying a red sunset. If Frankenstein apprehends you in any of this activity
he will admonish you, more severely each time that he catches you, and the
fourth time he will shoot you, thus ending the game unfavorably. However, it is
not difficult to gather these items unobserved and to put the crystal on the
table on front of the sunset window. Then you must acquire the cloth from the
bottom shelf at the right and place it on the table next to the crystal. Take
four pieces of string from the bundle on the wall and click them on the cloth
and you will have formed a parachute for the crystal. Click this on the window,
and very improbably an updraft carries it to the tower that may be seen in the
distance (not over the wall as the monster says). You will retrieve the crystal
later. If in your hurry you have not yet read the research notes that you just
acquired, now is a good time to do so.
Leave the Resurrection Lab
through the trapdoor below the periodic table chart. The cursor will indicate
that you can continue down, but if you look downward you will see that the steps
are broken. Leaning on the steps from the lab above is a dimly perceived board
that you may place on the broken part of the steps. Before you take the board,
look in the wooden box to the right of it for some more research notes. Read
these at this time because for some reason you cannot put them in the valise;
perhaps they are unimportant. Grasp the leaning board and place it on the broken
steps, then go down to the room on the next level. This is another laboratory
called the Frost Room.
Frost room
Here you are facing a locked
door, a fact that you may determine by clicking on it. Turn left and move
forward to find the frost that gives this lab its name, though the reason for
its existence is not apparent. Click on the frost; it is sealing the door behind
it shut. The view as you turn left is of equipment on a laboratory bench; go to
this bench to examine it. The first thing to do is to lift the rightmost of the
four knife switches. Loud noises are heard; what you have done-—though you have
no way of knowing it-—is to turn off the machinery that maintains the frost, and
you must now wait for it to melt. While waiting you can investigate the other
items on the bench. Or you can just wait.
Pick up the loose wire on the
bench and attach it to the open terminal on the bottom of one of the other three
switches. (The wire appears to still be loose on the bench, but you can see a
wire on the terminal.) Pull down the switch handle to observe what happens. Take
the wire from the switch and repeat on another, then again on the third. While
the foregoing is optional, you must take the battery from atop the glowing green
one at the end of the bench and also the coils of wire hanging on the wall. Put
both of these items in the valise.
Turn back to the frost, which may
or may not have melted, and continue turning to see Dr. F in front of the locked
door that you encountered when you came down the stairs into this room. (If he
is not there, look around while waiting some more and he will show up.) He tells
you that the door is to your bedroom and that the key is in the drawer of the
table. Go right to find the table and get the key; in the drawer is a note to
read, another that won’t go into the valise. Carry the key to the bedroom door
and click it on the door to unlock it and enter. Look around this small room. In
a corner is a wooden cabinet; open the cabinet door and discover there is no
back to the cabinet. Clearly this is something to investigate, but not now. Turn
to go back to the Frost Room, and Dr. F appears in the doorway for some more
remarks, after which he leaves. Follow him out.
Chemical Storage Room
By now the frost has melted and
you may open the door that it had blocked. In this room, a chemical storage
room, you can find a prybar to put in your valise, and two sets of notes as
well. There also is another door, this one has a handwheel on it, but it is
locked. Get a closeup of the lock below the handwheel; it appears to be a matter
of setting five sliders either up or down in the correct combination (120
different possibilities).
You have by this time collected
everything that you need for your intended experiment except the all-important
lifestone crystal, and you must therefore find a way out of the castle proper
and into the courtyard to the tower where you saw the parachute deposit it. The
exit door is in the Great Hall. You of course know the most direct route to get
to that room: back up to the lower parapet, down the rope and the secret passage
ladder, and out past the gears and the tapestry. However, there may be an
alternative: the backless cabinet in the bedroom. You have much to learn about
this castle in your effort to get away, so unless you are in a hurry it is
probably a good idea to pursue this latter venue. Going through the cabinet puts
you in secret passage #2.
Secret Passage #2
If you turn left upon entering
this passage you will be able to look through the back of a picture to see into
the bedroom that you just left, and through a grate to look at the chemical
storage room, but they are both empty and you have been in each, so there does
not seem much point to it. Turning right instead of left takes you immediately
to a tee in the passage; going right from there you come to an upward leading
ladder. Click the upward pointing cursor twice and turn away from the ladder,
whereupon you will see another grate. Looking through this grate shows the Tesla
coil and little else, so return to the ladder.
Again click the upward pointing
cursor twice and turn away from the ladder. Following the revealed passage takes
you to a different kind of grate, one that you can open. Click on the latch to
do this and you see the back of a bookcase; click on that and it slides to the
right. You are looking into the Resurrection Laboratory from the grated opening
that you discovered earlier behind the bookcase that could be moved aside. Move
forward once for a better view. You can see many of the items that you looked at
after you became conscious on the central table with Dr. Frankenstein leaning
over you, but more importantly you get a new perspective on the table itself: it
is situated in a depressed circular section of the floor on a platform suspended
by chains from four pillars, and it appears as though the this platform may be
raised and lowered. You just may have noticed these pillars and chains when you
first became conscious staring up at the ceiling of this laboratory.
You could move into the
Laboratory, but you have already examined it and are not likely to find anything
new, so return to the ladder; however, if you do go into it you will find the
grate no longer locked and you may return to the secret passage. Whatever, go to
the ladder, then go all the way down to the area where you first entered this
secret passage. Leaving the ladder, follow the passage straight through the tee,
and after a couple turns you will come upon another grate from which you can see
a room that is unfamiliar but is full of laboratory equipment. Follow the
passage to another tee, and after turning right here you will eventually come to
a plaque affixed to the left wall. (There are two more of these plaques, but as
it turns out they have no bearing on the progress or solution of the game. Their
purpose will remain a mystery.) After the plaque you will find one more grate,
again looking at an unfamiliar room, this one containing a telescope. Not
surprisingly, Dr. Frankenstein appears to have an observatory. Passing the grate
you encounter a dead end, so go back to the tee and through it to find a ladder
going down. Climb down this ladder to secret passage #3.
Secret Passage #3
Turn away from the ladder and
move forward once—you are at a tee in this new passage. Turning right and
following this branch for a bit you find yourself at the rear of a fireplace in
which a fire is burning brightly. Clearly you cannot proceed further, so go back
to the tee and move to the right. You will encounter a scaffolding barrier
blocking the passage, but very fortunately you are carrying a tool to take care
of that. Get the prybar from the valise and click it on five of the barrier
nails and the boards will fall away. Put the prybar back in the valise and move
onward, and after several turns you will come upon another of the mystery
plaques displaying a line diagram. Immediately following there is second
scaffolding barrier for you to treat as you did the first one. After three more
turns the passage takes you to yet another ladder to go down to secret passage
#4.
Secret Passage #4
 Following this passage
away from the ladder, after many turns—six, in fact—your way is blocked by a jet
of steam from a pipe each time you try to pass it. Looks as though there will be
a long trip back. During this return you will find a third line diagram plaque.
However, just before you get to the ladder going back up to secret passage #3,
there is on the left wall a lever, which when pulled down moves back some bricks
in the wall, and when you crawl through you find yourself in the Great Hall,
which is where you want to be so you can go for the lifestone crystal. Turning
around and moving the wall torch also opens the bricks.
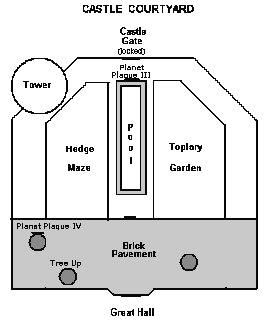
Go through the double doors
opposite the Great Hall stairs and you will be in the courtyard, where on the
far side is the castle gate and the tower where the lifestone crystal landed.
Move to the edge of the brick paved area and look outward. On the left is a
hedge maze and on the right is a topiary garden, with a long narrow pool
separating them.
Tower
Turn left and move along to the
tower. On the way you will see a rope lying on the bricks under a tree, but you
can’t make use of it now. Later, undoubtedly. At the tower look upward to see
the crystal glowing up there. Click the upward cursor on the tower to produce an
upward view of the tower showing a couple stones protruding from the wall. Climb
the tower by clicking on the stones that produce the upward cursor; when you get
to the screen showing two of these, keep to the left. When you can reach the
crystal (without the parachute), put it in the valise which you have kept with
you during this somewhat precarious ascent. Climb back down by clicking on the
stones showing a downward cursor.
You have what you need for your
experiment, but before you return to the hidden room in secret passage #1, go to
the castle gate and turn right to look at the long pool between the two foliage
sections. In the end wall of the pool is to be found another of the planetary
position plaques, No. III. Now note the slight difference in forward cursors for
going along either side of the pool, and there is yet another: move forward once
on the left side, then move the cursor slowly to the right so that it is above
the pool—-this is not the previous right poolside cursor. Click it and a statue
of a goblin on a sphere is shown in the pool; click on the sphere and the statue
lowers in the water. Move forward and a door to a tunnel opens in the wall
ahead. Go through the door.
Dock 1
Move ahead through the tunnel,
soon coming to a dock that is just inside the mouth of a cave looking out at a
large body of water. Advance to the edge of the dock and turn left, avoiding the
down cursor. On the dock is a battery with a loose wire, and on a table directly
in front of you is a brown spherical object that is a diving helmet. Click on
the helmet to don it, and be sure to take the spear gun that is yet on the
table. Connect the wire to the battery to start the noisy air compressor, then
turn right and use the down cursor on the ladder at the left to enter the water.
Turn right to see a piece of
paper on which are twelve names, right again to be attacked by an octopus that
is automatically dispatched by the spear gun. Right once more to find a box
filled with gold bars that may be seen but not taken. Turn left and go up the
ladder to the dock, where you will be facing the exit tunnel. Click on the
tunnel to remove the helmet and approach six logs forming a bridge that you may
cross to enter the tunnel. Move forward, taking the tunnel on the left back out
to the long pool, opening the gate with the lever on the right wall of the
tunnel.
You still have your experiment to
do, so go the length of the pool, turn left, and go past the tower back to the
castle. On the way back examine the rope under the tree; clicking on it causes
one end to rise like a cobra, then fall back. Curious. In the dirt at the base
of the tree is another planetary plaque, No. IV.
Turkey Leg Experiment
When you get to the secret room
in secret passage #1, the paraphernalia collected for the experiment of infusing
life into the turkey leg appears spontaneously on the table with the candle;
this must include the illustrative sheet of Frankenstein’s notes that you
acquired at the time you took the crystal. Connect the wires from the battery to
the ends of the lifestone crystal, which shortly begins to glow, then goes dark.
Very despondent soliloquy from the monster, who believes the experiment failed,
the turkey leg disappears as he takes it to satisfy his hunger, and the screen
goes dark. Sounds of vomiting, and when the screen lights up again, bits of
regurgitated food are on the table. Pieces of chewed turkey leg move away,
indicating that the experiment worked after all. What this peculiar incident is
probably supposed to illustrate is how to use a lifestone crystal to irradiate
dead tissue so that it is again alive.
From a new perspective after the
vomiting, there appears at the foot of a table a previously unseen grappling
hook for you put it in the valise. From previous remarks made by the monster, a
good bet is that it could be used with the rope under the courtyard tree, so
return to that location. However, it would seem that Frankenstein has discovered
that some of his research notes are missing, and when you leave the Great Hall
for the courtyard, he appears in the doorway, threatening and demanding the
return of his notes. Curiously, he makes no mention of the lifestone crystal. He
goes into the castle and you follow him in for more threats, after which he
leaves.
Trophy Room
Go back out to the courtyard and
to the rope lying beneath the tree. Click the grappling hook on the rope, whence
it becomes affixed to the rope end, then click on the hook and it rises to
attach itself to the tree limb outside the open castle window. Climb the rope
and go through the window. You are in the castle Trophy Room, as attested by the
several mounted game animal heads. Ahead is a door; if you try to use it to exit
the room the suits of armor on each side of it become animated and bar your way
with their axes.
Even though Frankenstein is
elsewhere in the castle, you can hear him continually demanding his notes and
making dire threats. Turn left and you can see another note on a table against
the wall under some trophies. This one is a rather incriminating one written by
your sentencing judge, but does not go into the valise. Turn left twice to see
the fire that you came upon when exploring secret passage #3. Since it bars the
way to a secret passage, perhaps you should out it out. To the right is a glass
tank of water on wheels; use your cursor to locate and remove the piece of
firewood blocking one of the wheels, then click on the tank to move it under the
chandelier. Move close to the fireplace and click on the reel of rope supporting
the chandelier. The rope will unwind, dropping the chandelier and breaking the
glass tank. The resulting flood of water will extinguish the fire.
You can now go through the
fireplace, but you have already explored that secret passage. Go back to the
door and place the black table against it. Now when you try to go through the
axes become embedded in the table, and you can exit to the second floor hallway.
Move forward and go around the corner to the left. The hall extends quite a way
ahead; move that way four times and you will find an unlocked door on the right.
The room inside this door has suffered damage, mostly from fire. The only thing
of note here is another planetary plaque, No. I. Leave the room and continue on
down the hall. When you come to the end, go right, forward, left, and forward.
You need not proceed further, as all the doors ahead are locked.
Study and Observatory 1
The door on your left, however,
is not locked. Go through this door and up the stairs to the third floor
hallway. All the doors in this short hall are locked except the one you just
came through and the one in the alcove around the corner to the right. When you
enter this room, immediately in front of you on a table are two more notes.
Looking around this room with its globe, astrolabe, and books you can conclude
that it is Frankenstein’s study. Turn to the right, go to the bookshelf, turn
left and you can see his telescope, so the observatory is attached to the study.
Looking through the telescope shows nothing that you can recognize, nor is
anything to be found in the many books, so return down the stairs to the second
floor hallway and back toward the Trophy Room.
Library
Just before you get to the end of
the hall (before you turn to the Trophy Room) you will find an alcove on the
left with an unlocked door at the end, when you go through this door and glance
around you will realize that you have entered the castle library. Click on the
double eagle heraldic shield on the left to get the axe from behind it, then use
the axe to draw the rolling library ladder to you. Go down the ladder to the
library floor. The first thing you see are two sets of notes for you to read and
put in the valise. Look around the room for two more sets. In the course of this
search you will doubtless find a trapdoor, but it is locked. One other thing
that you must find-—and it is not all that easy—-is a set of small green scales,
or balances, on the end of a lower shelf. On one pan is a skull shaped weight,
move it to the other pan and you will open the hidden door to the other end of
secret passage #4. Following this passage you will arrive at the steam pipe that
puts out a jet of steam as you attempt to pass it, but here you can reach the
valve that shuts off the steam. Do that, and continue past the steam valve until
you get to the lever that will open the hole in the wall and let you into the
Great Hall.
Dungeon
Frankenstein is here waiting for
you, frustrated and very angry indeed. He tells you that he has waited long
enough for the return of his notes, and he is going to kill you permanently if
you do not do exactly as he orders. (He has a gun and will use it if you don’t
do as he says; try it and see if you wish.) He then begins a series of
step-by-step peremptory orders that take you back to the library and down
through the now somehow open trapdoor to the dungeon, where you are shackled to
a wall. A shadow shows you being whipped, after which Frankenstein leaves.
Curiously, in the valise you still have the notes he wants.
Look at your woman’s left arm in
its shackle. This arm is small enough so that it can slip the shackle when you
click on it. Click on the right shackle; that hand is too big to slip out. Turn
back to the left shackle; a key is mysteriously lowered on a string. Take the
key, and with an unshackled left hand you can use it to unlock the right
shackle. You are free!
The trapdoor dungeon entrance
from the library at the head of the stairs to the right of the skeleton is
locked. However, to the right there is a grate in the wall that may be opened,
behind which is a tunnel leading to a chamber that has two tunnels as exits. Of
these, the right tunnel takes you to secret passage #4 in the castle adjacent to
the ladder going up and the lever that opens the wall passage to the Great Hall;
however, when in the secret passage there is no evidence of this tunnel and you
cannot get back into it.
From the chamber the other tunnel
going straight ahead takes you to yet a different chamber, again with two tunnel
exits. The right one takes you to a gray ladder and up to the topiary garden,
and the left one to a brown ladder and up to the hedge maze. As it happens, you
have to get to the maze, so that is the way to go; if you take either of the
other two tunnels you would still have to find your way to the maze.
Hedge Maze
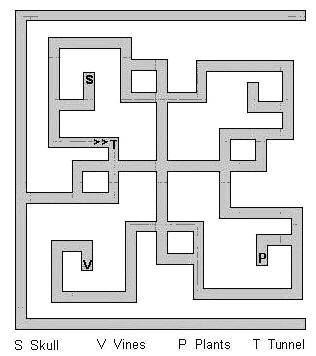 In
In
guiding you about the maze, the following simple shorthand will be used;
F=forward one click; L=turn left, R=turn right; D=down. When you climb the
ladder up to the maze, for some reason you are one click back from the hole
where you emerged. From this position move LFRFLF to a skull. When the scurrying
beetle stops momentarily, capture it, put it in the valise, and back away. Go
LFRFRFRFFLFRFFFLFRFLFLFLFLF to a
pair of plants. Put the beetle in the smaller plant so that
you may retrieve the shears from the larger one. Back away and go LFRFRFRFFLFF
LFRFRFRFRD to vine covered wooden doors. Use the shears to cut the vines,
whereupon the doors spring open to reveal a passage downward. Go
down.
You end up at the bottom of a
ladder, to the right of which is a lever arrangement similar to the one in
secret passage #4 that opens the wall access to the Great Hall. Well, pull it,
that’s what levers are for. Rumblings are heard. You may well wonder what has
happened, and you can check it out: go back up the ladder, move forward toward
the dimly seen castle, and climb the ladder to the paved area of the courtyard.
Turn around and move to the edge of the paved area; you will see that a corner
of the maze has been rearranged so you will not have traverse the entire maze
again should you have to go through it. Retrace your steps back down the ladder
and to the just pulled maze configuration control lever.
Planetary Control Tunnels
Go through the tunnel next to the
lever and up the ladder. Still underground, you are in the planetary control
chamber with the control unit affixed to the wall. Take a moment to look around,
and you will see four heavily barred gates identified by Roman numerals. Get a
closeup of the control unit, noting the lever on the right. Clicking on the
handwheel causes it to rotate, as do the planets at different orbital speeds in
the planetarium on the left. Click on the handwheel again to stop the rotation.
Below the handwheel are eight covers that may be slid back two at a time: one in
the top row that displays symbols, and one in the bottom row that displays Roman
numerals.
It may be observed at this point
that for centuries the ancient alchemists believed that there were but four
elements: fire, water, air, and earth. Behind the upper row of covers on the
control unit the stylized symbols are icons of flames, waves, wind, and
mountains; the four element equivalencies are apparent, mountains being of
earth. Now consider the four planetary plaques and where you found them: plaque
I in the fire damaged room, corresponding element fire; plaque II on the upper
parapet with the kites and the wind blowing, corresponding element air; plaque
III on the end of the long pool, corresponding element water; plaque IV in the
dirt at the base of a courtyard tree, corresponding element earth.
What you must do is regard each
plaque in turn and bring the three control unit settings in agreement: open the
lower cover to the Roman numeral on the plaque, the upper cover to the
corresponding symbol as indicated above, and using the handwheel set the
positions of the planets as shown on the plaque. Pull the lever on the side of
the control unit, and if you have set all correctly you will hear the sound of
the matching gate opening. It would be convenient to go ahead and open all the
gates, but only one gate at a time may be open.
You need not open the gates in
numerical order; in fact, you should open gate IV to the mausoleum at this
point, because there you will find many notes containing information and
directions that will be needed elsewhere. Of the eight covers on the planetary
control panel, open the one on the bottom right to show the Roman numeral IV,
and the one above it to display the corresponding icon for earth, then
manipulate the handwheel until the planets are in the arrangement that you
carefully noted when you found the plaque in the dirt at the base of the tree in
the courtyard. When you think you have duplicated the arrangement, pull the
lever on the right of the control unit; if you are indeed correct you will hear
sounds of movement, that of gate IV rolling back.
View this guide raw, exactly as the archive holds it