Frankenstein: Through the Eyes of the Monster – Walkthrough Version 1.4
Walkthrough Version 1.4
June 6, 1996
by Jacques Dupont and Erik Gos
with help of Mike Scott
HTML by Erik Gos
TABLE OF CONTENTS
- General notes
- Additions to versions 1.1, 1.2 and 1.3
- Laboratory
- Exploring the tower’s floors
- Secret passage no. 1
- Castle exploration
- First experiment with lifestone
- Secret passage no. 2
- New rooms to explore
- Library
- Escape from the dungeon
- Planetarium room
- The mines
- Ore processing plant
- Melting chamber
- Mixing room (second experiment with lifestone)
- Meeting with Dr. Frankenstein
- Meeting the thugs and run for your life
- The observatory
- Endgame
- List of maps
- Comments and feedback
- Credits
LIST OF MAPS
GENERAL NOTES
The Frankenstein adventure game is a mixed bag. It has great graphics
and sounds that remind of Myst with the exception that the first has a much
darker story. It is not as violent as many other games on the market.
However, the themes covered in Frankenstein are quite morbid.
One of the game worst sides is its slowness. It takes a lot of time to
get from one place to the next (even with a Pentium 90). What makes
the matter worst is the huge area to explore in this game. This implies
that going from the tower upper floors to some of the mine chambers takes
forever. Despite this shortcoming, which induces a lot of frustration, you
always come back for more. The game is not so tough to solve (when you
know the answers). Most puzzles are logic or have solutions written on
loose notes scattered around the castle. The real difficulty lies in not
knowing where to go and what to do next. You can wander around the castle
for hours before some new actions take place. Passing through a given room
or finding a new note often triggers new events.
Writing this walkthrough was not easy because a lot of the difficulties
rest in mapping the secret passages, that are not easy to describe in
text mode. We will at least try to give you a description of what you need
to do in order to win the game. It would be better to rely on this
walkthrough only if you are stucked in the game. Knowing in advance every
move spoils the fun. Also, this game takes a long time to solve. So
don’t think you will be through in one evening (even with this solve).
Very few items can be taken in this game. There are only 5 or 6 you can
carry at all. However, you will find a lot of notes scattered around the
castle. Some you can carry, some you cannot. It is however very important
to read them all, and for the multipage notes, reading all pages. At a
certain point in the game the opening of a particular door will depend
on this.
Finally, this walkthrough was written to the best of our knowledge (and
memory). It is in no way an official walkthrough. We may have missed some
key features or may have mixed up some actions. It was written to help
those who where not able to finish the game. We hope you will be indulgent.
You will also probably find the writing a bit off the track, because
English is not the native language of both authors. Again we apologize
for those who will find it difficult to follow us.
ADDITIONS TO VERSIONS 1.1, 1.2 AND 1.3
Version 1.3 differs from the first two versions by providing added details
concerning the endgame. It also describes the actions needed to produce
the four possible endgames, which are :
- both Sara and Gabrielle live
- both Sara and Gabrielle die
- Sara lives and Gabrielle dies
- Sara dies and Gabrielle lives
Several omissions and errors were also corrected in this version. They deal
with the following issues :
- initial position of note explaining lifestone experiment
- hanging wire in the tower’s first floor
- escaping from the thugs through the great hall
- conveyors in the mines
- lock mechanism of the door leading to the biology lab
- switch on the large Tesla coil
- switch on the small Tesla coil in the melting room
- operation of the horizontal claw control in the melting chamber
As a result of the huge amount of E-mail I receive on this game I decided to
create a version 1.4, that should clear out most of the remaining questions.
They deal with the following issues :
- the notes in the mausoleum
- operation of the controls in the mixing room
- some layout modifications
- addition of some maps
LABORATORY
After viewing or at least listening to what happened to you (you were
falsely found guilty and hung high for the murder of your daughter), you
wake up looking at Dr. Frankenstein who gives you a shot of morphine (he
also takes one to celebrate your rebirth). You find out that you still
live but you now have a ladies’ left arm.
You get up and look around the lab. There are several things to see
around this floor. For instance, you can look at the blackboard, activate
some electrical machines, look at a periodic table (chemical elements),
you can climb to the tower’s roof (you do not need to activate anything yet),
you can open a dumb-waiter and look inside the shaft, you can push aside a
cabinet to find a closed grate, you can read a newspaper telling about your
verdict and hanging, you can look at a lifestone and some notes.
Take the lifestone and turn right (Dr. Frankenstein will not let you out of
the laboratory with this crystal). Put it on the table. Take the cloth and put
it beside the lifestone. Take four strands of rope and put them on both the
cloth and crystal. Now you have a parachute that you can throw through
the window. Notice that it will go over the wall. You will need to retrieve it
later.
If you climb the ladder leading to the roof, take note of the plaque and the
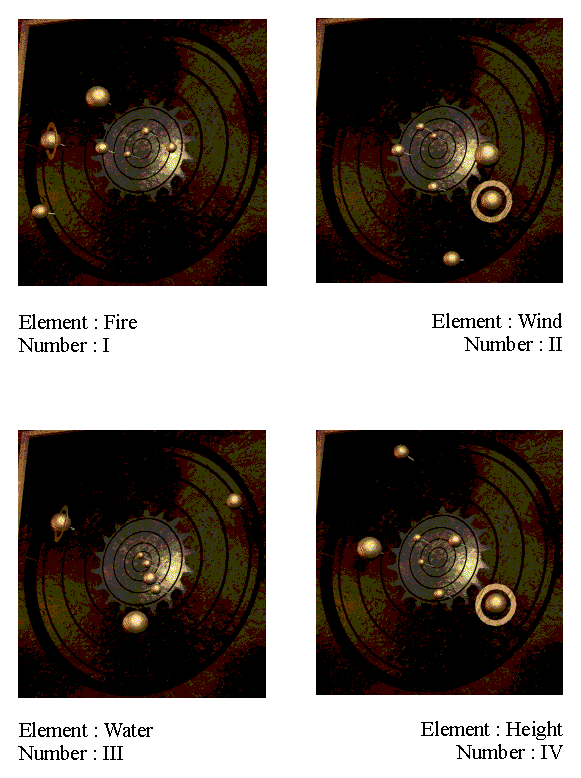
pattern of planets. This is plaque no. 2 and it is associated with winds.
Take careful note of this pattern because you will need it later on.
EXPLORING THE TOWER’S FLOORS
You may have noticed a trap door in the floor. Go down the lower level. Go
in the back and look at the large Tesla coil. It is supposed to store
energy. Notice the lever just below this coil. It is already in the ON
position. You will need to pull it down later on at the endgame. You
will eventually find a note telling about this information. Another note
will explain the ON and OFF position. Open the door beside the stairs.
You will find yourself on a large balcony. Go towards the cannon balls.
Take one and put it in the steel basket. Pull on the rope. The cannon ball
should fall on the left upper gangway and roll out to the left knocking
the moose head trophy.
SECRET PASSAGE NO. 1
Now pick the rope and turn right. Place it in the wall opening. Now go
through this opening and go down. You will see a broken grate. Go through
it, turn right, go down once and turn left twice.
You will find yourself in a small room with a corpse and a desk. This desk
will serve for a forthcoming experiment later on, so keep in mind its
location.
Now turn left twice and go down and turn right. Activate the pulley.
The wheels will break loose, so put them back in place and try
again to open the hidden door to the castle great hall. The order of
the gears is right-to-left, top-to-bottom. There is a lot to
explore after that. However, few doors open to let you in.
CASTLE EXPLORATION
Go directly in front of you towards the double doors. These lead to the
dining room. Dr. Frankenstein will speak for a moment and will leave. Go
towards the fireplace and take the bag. Click on the bag to see its
contents. Read the notes. Go back towards the table and take the turkey
leg. Put it in the bag. You may explore all three floors but only three
doors will let you in.
Exiting to left of the fireplace, go right and then left and enter the door
to the right. You will be in some kind of kitchen. Read the note found there.
Again Dr. Frankenstein will come to speak with you (if he doesn’t show up,
no problem). This time he will be less friendly.
No other door opens on this floor except for the ones leading outside
(we will come back later for these). Climb up one of the two stairways in
the main hall. Only one door opens towards a burnt room. Look at the plaque
on the fireplace. This is plaque no. 1 and it is associated with fire.
Be careful to write down the exact position of all seven planets on this
plaque. You will need this pattern later on.
You will find stairs going up to the third floor. Turn right, forward,
right and left and enter. This is the observatory room. You will find new
notes. Read them. Nothing can be done yet in this room. Go back down to
the great hall and open the door to outside.
Go outside and turn left, go forward and right. The rope lying on the floor
will come handy later. Look on the plaque at the bottom of the tree. This is
plaque no. 4 and it is associated with height. Take note of the pattern of
planets.
Go left towards the tower near the courtyard doors. You will be able to climb
the wall. You will retrieve the lifestone if you always choose the left path.
Climb down and go towards the courtyard doors. Turn around towards the
castle and look at the plaque. This is number 3 and it is associated with
water.
Go back inside the castle and into the secret passage behind the tapestry.
Drop the turkey leg and lifestone on the desk. Climb up again, exit the
grate, climb up towards the balcony and get inside the tower. Now take the
wooden plank beside the stairway leading up. Turn right and go down. Place
the plank on the missing stairs and go down.
Look around and go towards the corner desk. Take the battery (above the
glowing green box) and the rope-wire hanging on the wall. Connect all three
wires in turn and pull the levers. One will make the cat head groan. One
will make the human head say some word. A third will contract the arm and
the last will turn off the freezer. This will help you go through the door
beside this table.
Turn around and look at the desk in the middle of the room. Open the drawer
and take the key. Use the key on either doors. The right one leads to your
bedroom. There is a secret passage in the cabinet. Dr. Frankenstein will come
visit again. The left one leads to an anteroom where you will find more notes
and a crowbar. Take them all. There is a locked door in this room. You will
eventually find a note in the mausoleum that will explain how to unlock it.
FIRST EXPERIMENT WITH LIFESTONE
Go to the laboratory and get the note that was lying under the lifestone.
Go through the first secret passage to reach the hidden small room (the
one with the corpse). Place the battery on the desk. Attach both wires of
the battery to the lifestone. This will recharge the crystal. The turkey
leg needs to be also on the desk. It will seem that the experiment failed,
so you will eat the turkey leg. You will then black out to wake up looking
at live vomit (the experiment did work…). Take the grappling hook.
Get back to your bedroom and explore the hidden passageway. Map it
carefully, because it is difficult to find your way when in a hurry.
SECRET PASSAGE NO. 2
When you enter the secret passage in your bedroom, you will face a grate
at your left side. Looking through it you will be able to see the anteroom.
If you continue to the left of the secret door you will find a place to
look in your bedroom (that’s why you thought someone was looking at you in
there).
Now, if you go right of the secret door, you will come to a fork. Going
right leads to a ladder. This ladder goes up to the Tesla coil level (you
can only peek at this room) or further up to the room where you have
awaken. You will be able to open the grate and move the cabinet in order
to free the passage. Now you have a way to get from or to this floor
level.
If you take left at the fork, you will encounter another fork. Going right
leads to a grate where you can look at the lab after the anteroom and further
on at the observatory. Going left leads to a ladder. Go down the ladder.
You will encounter another fork. The right passage leads to a fireplace (you
will be able to go there later on). The front passage leads to another ladder
going down. To reach it, you need the crowbar to remove the planks blocking your
way (you will have to do this twice). Take the next ladder. Turn right and pull
the lever. You now have another passage leading to the great hall. If you decide
to go further on in the secret passage, you will be blocked by hot steam coming
out from a defective pipe (you will correct that later on).
NEW ROOMS TO EXPLORE
Go outside the castle and head towards the tree where the loose rope lies on
the ground. Use the grappling hook with the rope lying on the floor. Take
the hooked rope. Go up the tree. Use the grappling hook on the window. Enter
the window.
Look around and read the notes lying on the table. Push the small table standing
beside the entrance and put it in front of the exit door. Go forward and both axes
will fall down on the table. Now look at the aquarium. Remove the piece of wood.
The aquarium will move under the chandelier. Look at the fireplace and unwind the
rope wheel. The chandelier will come down on the aquarium and smash it. This will
extinguish the fire. The way to the secret passage no. 2 is now open. Go
to the exit door. Go forward, turn left then right and go through the
door in front of you.
LIBRARY
Take the staff on the armorial bearings. Use it on the sliding ladder. Go
down and look around. Read and take all the notes you find. Go in the
back of the library and look at the scale.
Take the weight and place it in the right tray. A hidden door will open. Go
through it and you will come near the defective plumbing. Turn off the wheel.
This opens the way to secret passage no. 2. Go back to the library and exit
the door in front of you (the one in the back of the reading room). This door
leads to the first floor of the castle.
Now go to the great hall and Dr. Frankenstein will catch you. If he doesn’t
show up, keep on walking around, entering doors and returning back to the great
hall. While you are doing this you will hear him requesting his notes from time
to time. Eventually, he will show up in the great hall. He will bring you back
to the library and push you down in the dungeon where he will cuff you and scourge
you.
ESCAPE FROM THE DUNGEON
After he is gone, someone will drop a key from the grate. Remove your
left hand from the cuff (remember that you have a lady’s left arm, which
is smaller than your right arm). Use the key on the right cuff. Head back
towards the stairs and turn right towards the grate. Remove the grate and
go through secret passage no. 3.
You will come to a room with two exits. The right one connects to the first
floor in secret passage no. 2 (no way back however). The front hole leads to
yet another room. The right hole brings you to a ladder heading towards the
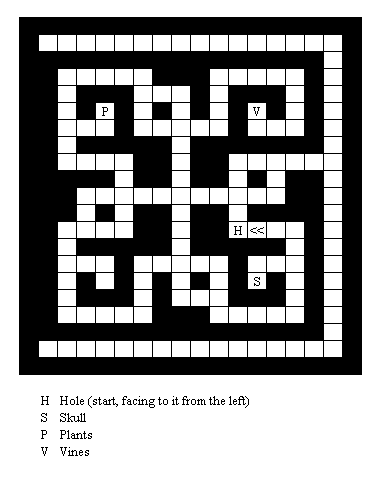
garden. The left one leads towards the hedge maze. (hint : you could
already know the layout of this maze just by looking at it from the entrance
doors to the castle; we were able to map it before entering it).
We will not give you the indication to navigate this maze. However, you
will need to gather some objects in this maze. Look for a skull and
take the black beetle. Find the carnivorous plants and place the beetle
in the right one. After the right plant took the beetle, the left one
will open its mouth. Take the corroded scissors. Finally, you will need
to find the entrance way to yet another secret passage (no. 4). Use the
scissors on the vines to get access to the hatch.
PLANETARIUM ROOM
Go down and pull the leftside lever. You will hear a opening sound. Go
forward and climb the ladder. You will be now in the planetarium room with
four doors numbered 1 to 4 (remember the plaques). Go towards the orbital
machine.
Dependently of the door you want to open, you will need to open one of the
four lower little doors. Opening them will show a number (the plaque number).
The upper door reveal four patterns. If you want to open door no. 1, you will
need to open the leftmost upper little door and the leftmost lower little
door. After that, turn the wheel until the pattern of planets fits with the
pattern on the plaque. When this is done, pull the lever. If you hear a sound,
you have succeeded. If not, you will have to try again.
Door one leads towards the mine. Door two leads to a collapsed tunnel (for
now). Door three leads to the melting chamber and door four leads to the
mausoleum.
For now, you may look at the mausoleum to gather notes and read them. Make
sure you read them all an carry the ones you can take. This action is very
important for the progress of the game. You must discover some background
information on the relationship between yourself, your wife and Dr.
Frankenstein here.
You should also open door 3. This door leads to the wine cellar maze. From the
entrance of this maze, follow these directions :
- forward
- forward
- forward
- right
- forward
- left
- forward
- right
- forward
- left
- forward
- right
You will eventually come to a small room leading to the melting chamber.
Look around. Pull the lever to open the steel doors leading to the mine.
Go in the back and go towards the coil. Leave the switch in its current
position, you’ll have to change its position later on. Go towards
the right stairway and search the room (more notes to read). For now
head back to the planetarium room. Reverse the directions above to navigate
through the wine cellar.
The next step will be the mines. You should however first open door 1 when
you leave the planetarium room. This will save you a lot of walking around
when going through the mines. Also, if you head back to the hedge maze, you
will find a newly created passage leading out directly towards the entrance
doors of the castle.
THE MINES
There are two entrances to the mines (at this stage). The first one is
through the planetarium room. The other one is in the garden. Start near the
exit doors to the courtyard near plaque no. 3 and go towards the left side
of the water basin (between the garden and the hedge maze). Push the
gargoyle and a pedestal will emerge from the water. Step on it and the
entrance to secret passage no. 5 will open (it also leads to the mines).
Go ahead until you find the secret dock. Take the diving suit and speargun,
and activate the air pumping machine. Turn right and go down in water.
Look around and read the note (notice that your daughter’s name is mentioned
in it) and look at the treasure chest (you cannot take any of them with you).
Turn around and kill the squid with the speargun. Climb the ladder. Shut off
the pump and go back in the tunnel.
Take the right tunnel. It leads to the mines. It is important to turn
around in all directions in the mines to find all passages. Go forward
until you encounter a left passage. Go in and turn around.
You will find three passages. You entered from the left. The middle one
leads to a conveyor. Remember its location. You will have to come back to
activate it later on. Two more of these are to be found in the mines and
another one is in the ore processing room (this one needs to be activated
first).
Turn around and go forward. You will encounter a left passage leading to
a waterwheel and chained doors. We will come back later for this one. If
you continue to the end of this corridor, you will eventually face a
closed door, unless you left it open when you were in the planetarium room
(it is door no. 1 from the planetarium room).
Turn right and follow the side corridor to the end (you will find another
conveyor). Step back to the planetarium room door no. 1. Head back towards
the side corridor leading to the waterwheel. Before getting there, you will
encounter a three door fork. The center one leads to a conveyor (come back
later on to activate it). The left one leads to a trap door you cannot yet
enter. It will however be open, leading to the castle 1st floor, after you
escaped from the thugs. The right one is the main corridor.
Now at the waterwheel location, turn the wheel to stop the flow of water.
Take the chain and attach it to the waterwheel. Turn on the water and the
doors will be torned away. Before entering the tunnel ahead, pull the switch
to the right.
You may also encounter a monster hand creeping on the floor. Do not throw a
rock at it because it is friendly, it even gives you directions to which
passage way you should follow. This monster hand will also help save Sara
further on in this game. You can follow it outside the mines towards the
secret dock. It will be back later on in this game.
ORE PROCESSING PLANT
You will come to a corridor with rails leading to the left and to the
right. For now, take the left tunnel until you come to a steel door. Pull
the lever. If it does not work, the entrance switch is probably off. When
the steel door is open, climb the ladder and step in the ore processing
plant.
Look around. Activate the conveyor in the back of this cavern. Go back and
activate all three conveyors found in the mines. These conveyors can only
be activated after you forced the door with the waterwheel and after the
switch near this waterwheel has been turned on. When all four conveyors have
been turned on, rocks will begin to be carried towards the ore processing
plant. Return to the ore processing room and take a look again at the
conveyer. You should see rocks being transported to the machine.
Save your game here. If the machine jams it will be easier to restart the
process. However, as explained further on the machine can be reset. Turn
right and push the black button on the machine. Head towards the control
panel and pull the left switch to activate the crushing machine. Use the
black and red buttons to crush the ore with the left or right crusher.
You need to crush each boulder two times. If the processing plant shuts
off, pull the lever at the far right and restart the machine from the
beginning. After enough ore has been produced, you will hear a signal.
Get down the ladder and follow the rail until you find a control panel on
your left. Continue down the tunnel and you will encounter two forks. At
the first one, the left rail leads to the melting chamber (the steel doors
should be open if you went through door no. 3 in the planetarium room). At
the next fork, pull the lever to direct the rails towards the left passage.
Go back to the first of these forks and look at the control panel.
Pull the left switch and a wagon full of ore will come from the right. Head
towards the second fork and go in the left tunnel. You will come into a room
with closed doors in the ceiling. Attach the chain to the wagon and head back
to the control panel. Flip both switch up and down again and the wagon
will retreat to the right tearing off the ceiling door.
Pull the lever at the side of the control panel. Flip the left switch back up.
The wagon will go into the melting chamber. Go to the melting chamber.
MELTING CHAMBER
Go towards the left stairway and you will come facing another control
panel. This panel has different controls and switches.
At the upper right side are two switches The left one controls the claw
power while the right one is the electric switch. On the left side, is the
vertical claw control. In the upper middle lies the horizontal claw
control. Just below it, you will see the temperature gauge (left side)
and temperature control lever (right side). At the bottom of the
control panel, you will find the voltage control (left) and the
voltage meter (right). You should also have a note explaining this (this
note can be found if you enter the right-hand stair in the melting room).
It took several tries but the following actions worked out :
- switch claw power on
- pull horizontal claw control to the right and to the left again
- pull vertical claw control down (the claw will gather the ore) and up
again (ore will be lifted)
- pull the horizontal claw control to the right and pull down the vertical
claw control (the ore will be put in the melting machine)
- pull it back up
- increase temperature to the maximum with the temperature control
lever
- use voltage control to increase voltage to 80
- pull the electric switch on (the angle of the claw will be raised)
- pull down the vertical control claw, and up again (now you see a glowing
white mass in the claw)
- pull the horizontal claw control to the left (the claw will put
the white crystal in the wagon)
- turn of the machine (switching both upper right side switches off)
Go to the small Tesla coil and switch its lever to its opposite position.
Head back to the control panel in the mine. Pull both switches down to let the
wagon go to the right. Pull the left lever to redirect the rail towards the
second fork. Pull both switches up and then pull the left switch down. The wagon
will head towards the room with the ceiling doors.
MIXING ROOM (SECOND EXPERIMENT WITH LIFESTONE)
Go to the room with the ceiling doors. Note that there are now open. Climb
up the ladder. Go towards the control panel in the far corner of the mixing
room. There are several controls on this panel. If nothing works, go to
the melting chamber and pull the switch at the base of the coil.
The electric switch is on the upper left corner. The claw control is in the
upper right corner. The claw to the crystal maker is on the lower right
side. The voltage meter is in the middle. The voltage control is in the
lower center of the panel. The spin control clutch is to the right side
of the control panel. You should again also have a note explaining this
(this note is to be found at the same place as the note explaining the
previous control panel).
The following actions should work out fine :
- pull the claw control to the rightmost position (the claw will get
the white crystal from the wagon)
- pull this lever to the leftmost position (the claw will put the
crystal in the mixing tub)
- go to this mixing apparatus
- turn the left wheel to pour H20 (water) in the mixing tub
- turn the right wheel to pour HNO3 (nitric acid) in the tub
- pull the switch to start the mixing process
- pull the bottom switch to fill the container
- head back to the control panel
- pull the claw control to the left
- pull down the crystal maker claw
- activate the electric switch
- set voltage to 80 volts
- activate the spin control clutch
You have now created a large lifestone. Use the claw control (you can pull
it down now) to direct the claw to take the crystal and place it in the
dumb-waiter. Switch off the machine and go to the dumb-waiter.Send the
dumb-waiter up by pushing one of the buttons on the left side.
MEETING WITH DR. FRANKENSTEIN
Now is time to talk with Dr. Frankenstein. If you turned of the electrode
before attempting to move the crystal to the dumbwaiter, you can find
Dr. Frankenstein by using the exit from the mixing room (leading to the
great hall) and taking the secret passage behind the tapistry. Otherwise
you have to go to the tower’s first floor (passing through the mines, the
hedge maze, …).
Then, go through the anteroom. You should now have found the note explaining
the combination lock (remember, it was in the planetarium room). If you do not
have it, then put the first, second and fourth switches (starting from the
left) in the up position. Switches no. 3 and 5 should be in down position.
This will unlock the door.
This will lead to another laboratory room (it looks like a biology lab). Turn
left twice. Take each brain in turn and place them in the machine to the right.
Pull the lever and they will speak the last word they heard before being killed.
Explore the room further to find more notes. Save your game because you can die
in the meeting to come. Open the door to the left (it should now be unlocked, if
not return to the mausoleum, and start reading notes again; before you return
to the lab remember to re-open door no. 1, leading to the mines).
Enter the room and look around. There is a door to your right but do not
open it yet. Go straight to Dr. Frankenstein and a discussion will follow.
When it is finished, look at the cages to see some disturbing sequences.
Turn left and go to the desk. Take the notes in the drawer. Read them.
Turn left and Dr. Frankenstein will talk again.
Save your game and head for the other door (not the one you entered). You
will be forced to face Dr. Frankenstein who will point a gun at you. Turn
around and go through the door as fast as possible. You will be OK outside.
MEETING THE THUGS AND RUN FOR YOUR LIFE
Go outside near the exit doors to the courtyard. Save your game again.
Turn towards the castle. A thug will greet you with a rifle. Another thug
will be to your left, so head right towards the castle doors. You will
know where to go because a thug will always block your way if its not the
correct direction. Climb up the right stairs. Now follow these
directions :
- turn left
- go forward till the end of the hallway
- turn right
- go forward
- turn left
- go straight forward to the open door
It will close behind you. Turn right to face the mirror. Do it quickly because
the thugs will soon break the door of this room. A girl will appear in the mirror
and she will shatter it. From now on, one of the dead ends in the mines will be open,
thus providing a shortcut from the mines into the castle. Follow the girl to the
secret cave (it is not far from the planetarium room door no. 1). You will be safe
there. Sara will talk to you several times. Take the cup of water and drink it.
She will ask for the bottle on the upper shelf, so push one of the barrels and use
the wooden fork to retrieve a bottle. There will be some more talks and then the
monster hand will appear. Sara’s life depends on what you do next.
If you send a rock at it, Sara will eventually be killed. If you wait until the hand
goes away, Sara will be safe and it will be the hand that will be killed later on.
Sara will now want to see Dr. Frankenstein.
Go to the mausoleum (door no. 4 of the planetarium room). If you left open
door no. 1 when you where in the planetarium room before, you can get there very
easily through the mines (leave the cave, turn right, go to the end and turn right
again). Otherwise you will have to reach the planetarium room from the garden as
you initially did. So you have to leave the mines where you entered them from the
garden (at the fountain with the gargoyle) and then go to the planetarium room by
using the secret passages in the garden (taking the ladder down).
Look into the drawer and look at the notes. More talks will follow. There will be
an earthquake that will block all the doors except door no. 2 (the tunnel was
collapsed before). Follow Sara in this tunnel. This will bring you to a vast cave
with a ladder going up. You may save your game here because this is the ladder maze
and a monster will try to catch you. The exact route is as follows :
- up
- up
- take left ladder
- up
- take left ladder
- up
- take right ladder
- up
- take left ladder
- up
- up
- up
- up
- up
- up
- up
Take Sara’s hand to get her free of the monster. You will be back in the garden.
THE OBSERVATORY
Go to the secret dock through secret passage no. 5. Look around and you
will find a note. Take it and read it. Turn around and you will see a
bomb (you cannot deactivate it).
Go to the observatory on the third floor of the castle. Go straight to Dr.
Frankenstein. There will be talks between Sara and him. Move around a bit to
start new conversations. He will then leave and lock you inside the observatory
with Sara. Go back to talk with her. Look into the spyglass to see the thugs
forcing your child Gabrielle to follow them to the secret dock.
Go back near the door and push the desk under the wall grate. Open the drawer
and take the key. Use it on the locking mechanism of the grate (the one on the
wall). The key will fall in the floor’s grate. Push back the desk and go retrieve
the horseshoe shaped magnet near the spyglass. Use it on the floor’s
grate to retrieve the key. Push the desk again and use the key to unlock
the wall’s grate.
Try to climb through the opening. You appear to be to big to fit. Turn left to
Sara and she will climb through the opening and unlock the door to the
observatory. What comes next will depend on whether or not you threw a rock at
the monster hand. If you did throw a rock at it, Sara will be murdered on the
spot. If you did not throw the rock, it is the hand that will be shooted at.
Go directly to the secret dock. You will find Gabrielle lying dead on the floor,
killed by the bomb. Take her with you and head to the laboratory on the third floor
of the tower.
ENDGAME
This is the toughest part of the game. Many gamers, including us, had a hard
time finding the exact sequence of actions to finish the game without
killing for good Gabrielle.
So, place Gabrielle on the table. Go to the dumb-waiter and retrieve the
lifestone. Put it in the holding apparatus above the table. Go to the main
control panel. Pull the three left switches to the right position and then
the two right switches to the up position. Pull the lever at your left (to
raise Gabrielle to the roof top).
Make sure the switch of the Tesla coil is in its off position (it must be up).
You should have a note explaining this in the room with the animal cages.
Climb the ladder and look at the speed gauge. Wait until the speed reaches
between 10 and 20 and unroll the rope to let the kite float free. Go down
to the Tesla coil chamber (2nd floor of the tower). Pull the switch down
to charge the coil and pull it back up when the needle in the display is
still in the light red area (but close to the dark red area).
Head back to the control panel on the third floor. Turn the three left
switches to the left and see what happens. This set of actions is needed to
save your daughter. You then leave the castle and live long and happy.
There is also another ending to this story. If you pull up the switch
in the Tesla coil chamber on the 2nd floor when the needle is in the dark
red area, and then pull the three left switches to the left, your daughter
will come to life but dies eventually again. You will then be emprisoned
again by Dr. Frankenstein and won’t have a long and happy life.
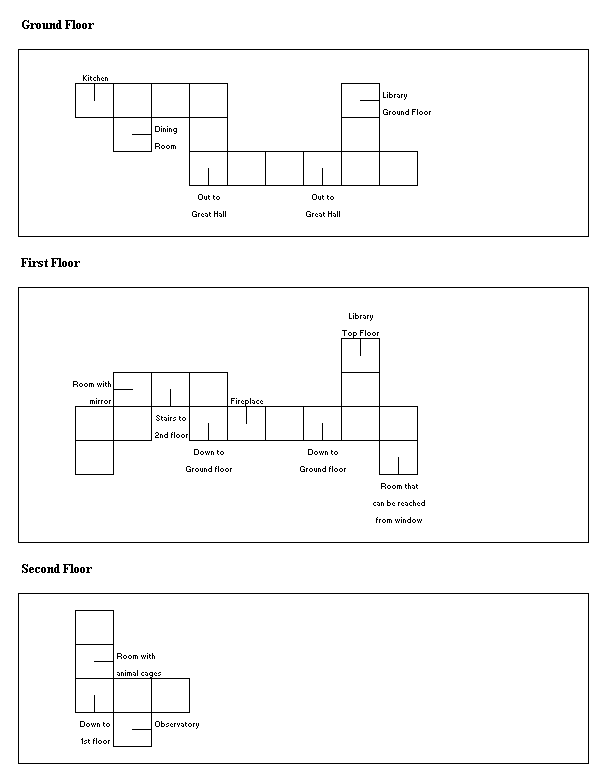
CASTLE HALLWAYS

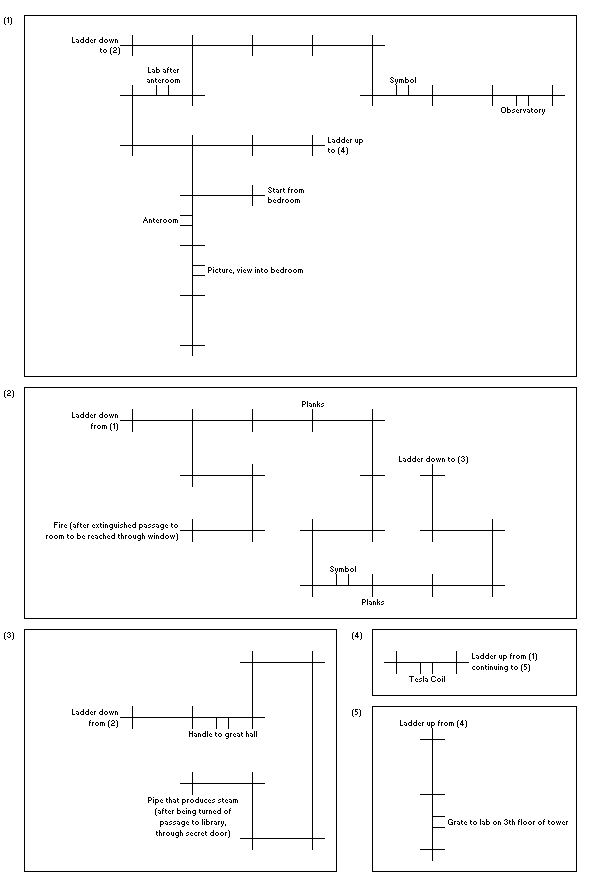
SECRET PASSAGES IN THE CASTLE

HEDGE MAZE

THE MINES
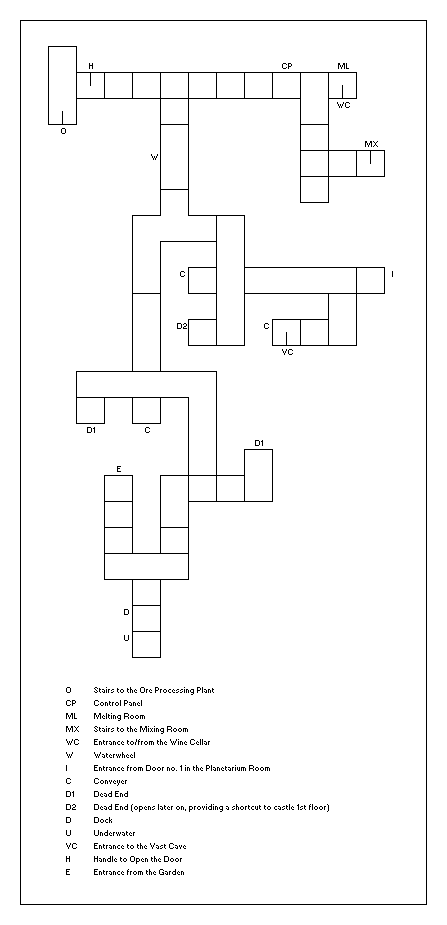

Note : The sizes of the blocks do not reflect real distances,
they only result from the difficulty involved in mapping this area. Giving
each block the same size would result in serious overlappings. The somewhat
odd form of some of the blocks is the result of an effort to represent shifts
in your position when you make a move as accurately as possible. Keep however
in mind that you don’t really need this map if you follow the walkthrough
in a very strict sense.
PLANET POSITIONS

COMMENTS AND FEEDBACK
Send E-Mail to or ,
if you want to give feedback or have comments on or corrections to this
walkthrough.
Click here to return to the table of contents.
CREDITS
This walkthrough is copyrighted © 1996, Jacques Dupont and Erik Gos
"Frankenstein : Through the Eyes of the Monster" is copyrighted
© 1995, Interplay Productions Ltd. and Amazing Media Inc.
View this guide raw, exactly as the archive holds it