Dracula: Origin
Pick up any items that are active even though they are not in the list given
by the assistant director.
Far Right shelf: Go to the right and be at the far
end shelving. Press the spacebar to see where the active items are located.Take the papyrus from 1852 from middle shelf. Take the flail of
Nekhnekh and the miniature pyramid at end shelf. Take the key
under the pyramid.
Inner right shelf: Go left from the far right shelf. Press
the spacebar to see where the active items are located.Take the pyramid and the knife with a mother of pearl handle
from the end shelf.Center shelf: Go right via the bottom exit and then forward
to the center aisle. Press the spacebar to see where the active items are
located.Take the Spanish helmet from left end shelf. Take the pyramid
and Heka – crook on top of the chest below the helmet. Take the
pharaoh with broken head from the table at the center.Go to the bottom screen and see another view of the center aisle. Press the
spacebar to see where the active items are located.Take the small pyramid from center table. Take the small granite
scarab from left shelf.Inner left shelf: Go to right
of the door. Press the
spacebar to see where the active items are located.Take the pyramid and head with solar disk. Use the key taken
from the far shelf under the pyramid on the locked chest above the head with
solar disk. Take the pyramid inside the opened chest.
Far wall: Go right to the end of the museum. Press
the spacebar to see where the active items are located. Look at the
sarcophagus.Use the crook-Heka and the flail of Nekhnekh on the hands of the sarcophagus
next to the mummy. There, perfect. Open. Take the large pyramid.Go back to the assistant director and talk to him. Now you have finished the
items in the list.Learn about the Demonomicon and the black sphinx. It might be at the Blood
Rocks.Exit the museum.
Market place: Go back to Mustapha by the camels.
Mustapha: Talk to Mustapha. Learn that the camels
have
all fallen ill.
He mentions the Monk that might help.
Coptic monk: Go to the left and talk to the monk. Go
back to the market place.
Mustapha: Take the casserole dish behind
Mustapha. Take fork leaning on the cart in front of the sick camels.Use the fork to take the fresh herbs-curious plants on the trough in
front of the camels.
Coptic monk: Go to the left and give to-click the curious
plants on the monk.Learn about the poison found only in the desert. He gives a remedy-medicine
for the camels. He warns about the night birds that flew to the desert 2
nights ago.
Mustapha: Go back and give the remedy to Mustapha.
Blood Rocks: Mustapha shows Van Helsing to the Blood
Rocks.
Enter the temple. The exit is blocked by Dracula’s henchman.
First room: Look around. Check the recent
skeleton.Take the pick head and turban from the ground at right.
Take plank from the ground at left.Go to bottom screen and then go right
Abyss: See a hole on the floor and the stakes in the
hole at middle of the hallway.Use the plank on the far end of the hole in the ground.
Cross the plank. Take the lantern. See an opening at the side of the hole in
the ground.Continue to top screen and see ways to the right and left.
Cross door: Go left.
Check the body of the woman on the floor.
Take the belt beside her body. She is wearing a black sari.See a metal door with a cross and sun on it. Examine it closer.
Click on the indentations of the door. The door has indentation for a solar
disk at the center. The top has small fissure. The left one needs something
inserted. The right smells of garlic and the bottom has a receptacle for
liquid.Exit this hallway.
Go right to the other hallway.
Mummification room: Look around.
Look at the painting on the back wall and the medicine table.Take the linen strips from the medicine table and the oil flask
on the table by right wall.Exit the room and go back to bottom screen.
Abyss: In inventory combine (click-hold-drop) the
linen strip with the belt and then with the turban to get rope.Use the rope on the plank that is laid across the hole on the floor.
Combine oil flask and lantern to get lantern with oil Use match on
lantern with oil to get lit lantern.Highlight the lit lantern and then click on the rope to descend.
Underground hallway: Take the spike on the
floor.Go to the hallway at top screen. See a recent skeleton crushed by boulders.
Take the poison-curious plant from the bag of the skeleton.
See an opening at top right of the boulders.
In inventory, combine pick head and spike to get a pick.
Use pick on opening. The pick breaks but the spike is still intact.
Now to find a way to Cairo.Exit through the opening.
Herodotus: See the monk
with the camel. Talk to the monk. He is Herodotus of Judah.Learn about the guardian and the sealed tomb. The
subsequent opening of the tomb. The seal (cross) has been penetrated and he
has not been able to reproduce the seal. The objects on the ends of the cross’ arms
and the sun disk need to be recovered. Return the artifacts taken by the
looters and subsequently by the authorities. The authorities kept the
artifacts in the museum.Herodotus gives a list of the artifacts.
Market place: Automatically be back with Mustapha by
the camels.
Learn from Mustapha that his wife’s niece is missing. The girl wears black
sari. Ah – the girl is the one in front of the seal.Van Helsing says to collect things. Let’s look for things to pick up.
Enter the central market by clicking on one of the side stairs and be in front
of the stall.Take the flask and scale at right table and the strand of
garlic on the left post.Exit the marketplace and go to the museum at bottom right.
Cairo Museum: Talk to the Smail Quahab, the assistant
director.
See Dracula’s henchman try to kill Van Helsing.
Take the thrown knife on the bookcase. Take the mirror from the
table.Click Herodotus’ list on Smail Quahab and talk to him then.
He gives a receptacle with the capacity of a hinu and a necklace.
The necklace has a diamond of great value.Smail advises to recover stolen
Museum artifacts and the authorities will forget about the Coptic artifacts.
Then he will give the Coptic artifacts after the recovery of the Museum
artifacts.Exit the museum.
Market place: Show the knife to Mustapha by the
camels.
The knife is an Ottoman blade owned by a Turk who is the head of smugglers
and thieves.He is gone this morning. The Turk’s house is after the bazaar.
Turk’s house: Go right from Mustapha and then take
the path to go left past the marketplace.
Look at the gate of the house with ivied walls.
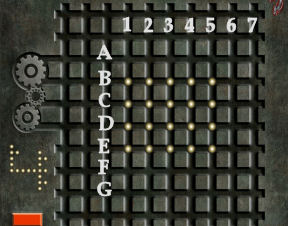
Turk’s gate puzzle: See balls and lines. At left is an
arrangement of balls.The object of the puzzle is to arrange the balls at the center to look like
the ball arrangement seen on the left.The red bar at bottom left is the reset button.
To move the balls, hover the cursor over a ball and see red arrow(s).
These arrows are
the directions the balls can be moved.As a hint: Move the balls on the arms first into the correct
column position.Remember the number of balls on the center horizontal line between the 2 arms.
1.
Push column 2 (from bottom) up once. Push top ball of column 2 to the left
once.2.
Push column 3 down 3 times.3.
Push top ball of column 2 left once. Push column 2 down twice.Push
row B (left side) to the right once.———
4.
Push row B, column 4 to the right twice. Push row C, column 4 to the
right once. Push row D, column 4 to the right twice.You
now have column 6 and 7.5.
Push column 7 (from top) down twice.6.
Push last ball at right side of row E to the left once.7.
Push row F to the right twice.8.
Push bottom of column 3 up once.9.
Push row G to the right twice.10.
Push row F to the right twice.11.
Push row G to the right once.12.
Push bottom ball of column 7 down once.13.
Push row F to the right once.12.
Push bottom 2 balls of column 7 that are at the bottom down once.13.
Push last ball of column 7 to the left once.14.
Push top ball of column 7 down once.15.
Push row C right side to the right once.
There. Perfect!
Turk’s room: Enter and look around the room. Press the spacebar
to see all the items that can be picked up.Take the black sphinx on the chest at bottom left. See
hieroglyphs
of the black sphinx.Take the pyramid on the chest and the axe in front of the chest.
Look at the table on the right and see a bag of jewels and a smoking
brazier.Take the torn parchment from the table.
Torn parchment: Put together the torn pieces.
Right click to turn the piece of parchment.
Do the corner first, edges next and then fill up the center.
The hieroglyphs on a parchment found at the Turk’s is now in documents.
Cobra: Go to bottom screen. Check the door. The urn on the right vase breaks and a
cobra falls out.Add the curious plant on the smoking brazier on the table. Watch the poisoned
smoke affect the cobra.Look at the broken vase and take key. Use the key on the door.
Turk’s locked room: Enter the room and look around. See that
the loot are in here.Take the sachet of gold powder from the shelf left of the window. Take
the solar disk on the floor at back wall.Take scrolls and letter in the vase on the table at bottom right. Read the
letter found at the Turk’s and piece of a letter found at the Turk’s.Exit the Turk’s house and go back to the museum.
Cairo Museum:
The assistant director informs Van Helsing that the Turk is named Suleiman and
that the authorities have gathered the loot but the Turk has not been caught.Talk to Smail about the Coptic artifacts. He gives a bag of Coptic treasure.
Show the Turk’s letter to Smail.
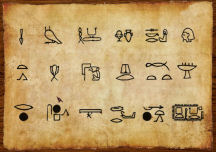
Decipher the hieroglyphs on the Turk’s letter:Take the book on the table. See the hieroglyph puzzle
in close up.There are words on the left that corresponds to the hieroglyphs on the right.
Click on a word and place it under the hieroglyph.
First line: Weapon – With – Magical Powers – Within – Seker – Head.
Second line: Cursed – Blood – Hidden – Under – North – Altar.
Third line: Before – Enter – Darkness – Destroy – Guard – Curse be on you
forever. If correct the words turn red.See the translation of hieroglyphs on a parchment found at the Turks in
documents.Show the black sphinx to Smail. It has the phrase ‘Ny ar lut hotep’.
Exit the museum.
Marketplace: Talk to Mustapha.
Herodotus, Coptic monk: Go left from Mustapha’s place
and talk to the monk.The monk gives a host and states that he doesn’t know about the 2 items
feared by demons.He needs clean water that hasn’t touched the earth to make
holy water.Show the black sphinx and he recommends to smash it. The hieroglyph on the
sphinx that was translated by Smail is the name of the messenger of the
ancient gods.
Mustapha’s place: Go back by the camels.
Prepare water that hasn’t touched the earth:Use the casserole dish taken from the shelf of Mustapha’s house and use it on
the water trough in front of the camels to get casserole dish full of water.Use the knife on the necklace in inventory to get a diamond.
Use the diamond on the mirror to get a square mirror.
Place the casserole dish full of water on the barbecue grill at the corner to
get a steaming casserole dish full of water.In inventory, use the square mirror on the casserole dish full of water to get
a mirror with condensation.In inventory, use the flask on the mirror with condensation to get flask
with condensation.
Herodotus, Coptic monk: Go back to the monk and give him
the flask with condensation. The monk gives holy water.
Blood
Rocks: Automatically be at the Blood Rocks.
Enter
through the opening at the side. Go forward and climb the rope. Go forward and
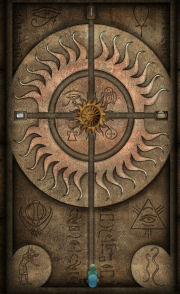
then to the cross seal at left passage.Seal:
Look close at the seal.Place the
solar disk at the center indentation.Place the
Host at the top slot.Place the
garlic at right slot.Place the
cut square mirror at left slot.Place holy
water at bottom slot. There, perfect.See Van
Helsing recite the words given by Herodotus.The door
rises. Enter.
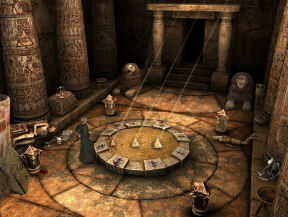
Large
chamber: Look at the whirlpool in a large basin at the
center of the chamber.Based on
the translated hieroglyph on a parchment found in the Turk’s:
First line: Weapon – With – Magical Powers – Within – Seker – Head.Look at the fallen statue at right of the chamber. It is Seker.
Use axe on the head. Take the silver spearhead-tip from the cut head.
Second line: Cursed – Blood – Hidden – Under – North – Altar.Go to the short pillar at bottom left of screen, one of 4 at corners of the
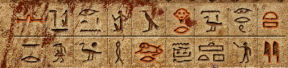
outer circle seen on the floor.See hieroglyph on the stone pillar. It has the hieroglyphs in the black
sphinx.Remember that Smail said that it is the phrase ‘Ny ar lut hotep’ and the monk
said that it means the messenger of the ancient gods.Click in order the hieroglyphs seen on the black sphinx on the stone pillar.
There, perfect!The stone pillar moves and blood is seen on the floor cavity.
Use the hinu receptacle on the blood as mentioned by Herodotus and get a hinu
of cursed blood.
Remember what Herodotus said: To open it (secret passage just after the
cross), you must put a gold deben and a hinu of cursed blood into the basin).Gold deben:
Go to the chest at left and between the 2 pillars
left of chamber. Place the scale on top of the chest.Take the bowl from the floor and left of the chest.
Go to the pot at right side of the chamber and
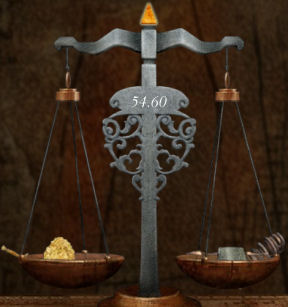
beside the broken statue of Seker and take a copper deben.Weigh gold deben: Click the bowl on the
scale and see the close up of the scale.The reset button is the bar with hieroglyphs at
bottom of scale.See the copper deben from museum, copper deben from
the pot and a stiletto.Weigh each of the items using scoops of gold dust
from bottom left.Find out that each copper deben weighs 27.3 grams
and the stiletto weighs 41.0 grams.We need 13.6 grams as stated by the black sphinx
hieroglyphs.Place the 2 copper debens in one pan to make 54.6
grams counterweight.Place the 41.0 grams stiletto on the other pan.
Add scoops of gold (3 scoops) to the pan with the
stiletto until it balances to show 54.6 grams.Automatically get the bowl at bottom right.
Scoop the gold off the pan to the bowl to get 13.6
grams of gold – a gold deben. There, perfect!
Basin: Place the hinu of blood and the gold deben in
the whirlpool.The basin changes into sand.
Another counsel from Herodotus: Directly afterwards, the
sun must hit the summit of the Pharaoh’s tombs.
Select the pharaoh’s tombs:
Read-click the middle pillar at left of chamber. Use the lit lantern on the
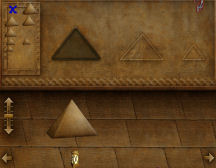
pillar.The selection of pyramid puzzle screen is seen.
The object of the puzzle is to select the correct pyramid by the way the light
is reflected on it.Place pyramids that corresponds to the size of the etched pyramids above the
lantern.To start, place a large pyramid above the lantern placed at left.
See the shadow of the pyramid overlay the etched pyramid above.
Click the bar of lined arrow on the left to the middle line to get an exact
fit of the shadow on the etched pyramid above. If the shadow doesn’t fit the
etched pyramid, try another large pyramid.
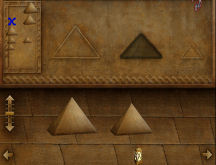
Do the middle sized one. Place the lantern at the middle so that it casts a
shadow on the middle pyramid. Find the middle sized pyramid that has a shadow
that correctly fit the etched middle sized pyramid above while the bar is at
the middle of the arrow on the left.
Move the lantern to the right and find the correct small pyramid. There
perfect!When all 3 correct pyramids are found the rest of the pyramids in inventory
are gone.Place the correct pyramids on the sand of the basin:
the large pyramid on the right, middle sized one at center and small one on
the left. They are the pyramids at Giza.Hear and see the secret door opens.
Third line: Before – Enter – Darkness – Destroy – Guard – Curse be on you
forever.Go through the secret door. See a crocodile on the barge at the skeleton ridden platform.
Make a path to the platform:
Go back upstairs.Look at the funerary barge between the 2 statues by
the wall.Take the metal bar held by the left Egyptian
snake-faced statue.Take the broken piece of column from the
floor right of the monkey-faced statue.Look at-click the right support of the boat. Van
Helsing says to break the support. Use axe on
the right support of the boat.Use the piece of column under the right side of the
now unsupported boat.Use the metal bar on the piece of column. Use the
metal bar again to push the unsupported boat down the stairs to the pool
inside the secret room.Go down to the secret room and walk over the
funerary barge that is now on top of the water.Look at the metal structure on the platform and
learn
that inside is creature that is in ‘non-death’. This is explained at the reports.Go forward to the darkness at left or end of the
platform (see third line above). A mist, supernatural force stops forward progress.Destroy the guard. In inventory, use the axe on the black sphinx.
Use the broken black sphinx on the mist blocking the way.
Enter the room ahead.
Look around the room and take the papyri written in a strange language
from the altar. An earthquake occurs. Exit the room.

Marketplace: Automatically be at the marketplace.
Herodotus, Coptic monk: Go left from Mustapha’s place
and talk to the monk.Learn that the papyri can be read by a Brother
Alberto that knows the language. He can be found at St. Carousel Abbey in
Vienna where he works as an illuminator.Mustapha: Go back and talk
to Mustapha. He gives a letter forwarded through the museum director. A tall tale about the niece is said by Van Helsing. He gives the
gold dust for Mustapha and the diamond necklace for the niece’s family.Vienna
Learn that Mina is getting worse and wants to go
East to join her lover. Seward with Mina will join Van Helsing in Vienna at the
manor of Duchess Orlowski.
Orlowski Manor: Talk to
Seward and the Duchess.
Learn about the Abbey, the order and the inability
to see Brother Alberto.Learn from Seward that the abbey and the university
is one large building. There is one door that connects the university
to the abbey and it is in the library.Look around. Go to the bottom screen.
Check the locked door and find out that the door
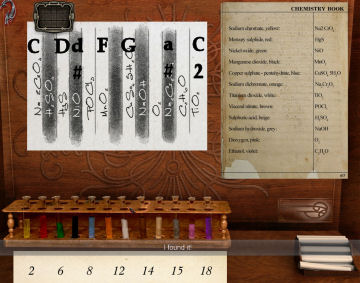
leads to the library.Check the painting of piano keys with chemical
formulae left of the locked door and get Professor Orlowski’s painting
in documents.Check the closed panel on the left part of the
bookcase and see a small laboratory setup.Check and get Chemistry book from the lowest
shelf of the middle part of the bookcase.Talk to the Duchess and hear her hum a melody. Ask
about a key kept by Duke Orlowski, the test for his students with the
key as the prize. Learn that the melody is one that Duke Orlowski played
in the piano during his later days.Check Duchess Orlowski’s Song in documents and see
that it is C, G, D#, F, D, A#, C2.Chemistry Laboratory litmus test:
Go back to the chemistry laboratory at the bookcase and see it explained atreports.
The small lab has test tubes with chemicals. Dip
litmus paper on specific chemicals in a certain order in order to produce a
result.Using the clues of the melody hummed by the duchess
and the painting of the duke, deduce the sequence-order of dipping the litmus
paper on the test tubes.1. Find the sequence of the keys. The documents has
the sequence of the duchess’ melody-humming.2. Find the sequence of the chemicals. Identify the
duchess’ melody on the painting of the piano
keys-scales. Find out then the chemicals that corresponds to
those piano keys-scales.3. Find out the color of those chemicals. Learn the color of those chemicals
using the paper on the right.4. Take a litmus paper on the right and dip it on a
test tube with chemicals on the left following the sequence of the deduced
colors.Using the painting and the piano scale clues, dip
the litmus paper on the test tube in the order from left to right: 1, 5, 3, 4,
2, 6, 7 or yellow, blue, green, black, red, orange, white. I found it!See numbers below the test tubes: 2, 6, 8, 12, 14,
15, 18. Perfect, on to the next step.
Safe: Go to the left corner
of the room; left of the piano.Duke’s safe: Open the
marble structure and see a safe.Use the numbers taken from the litmus test of the
chemicals as the code.Use the arrows on the top to turn the dial’s arrow
to point at a number.Be sure to click the handle on the right after each
number is pointed by the dial’s arrow.The bar at the bottom of the dial is the reset
button.Turn to 2, click on handle, 6, handle, 8, handle,
12, handle, 14, handle, 15, handle, 18 and handle. Perfect, on to the next
step! Open!Take the key, angel and Duke
Orlowski’s letter from the opened safe.Read the Duke’s letter and learn about missing
students at the university. Baker, a chemistry student talks about angels and
demons and was searching for an explanation to the missing students.
University library: Use the
key on the locked door right of the bookcase.
Look around. Go to the desk at bottom of the room.
Check the curtain with the insignia of the
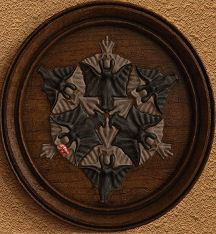
university.Look at the circle and see black demons and white
angels. Van Helsing says that some characters are missing.Search for angels and demons:
Go to center of library and climb the stairs to top
level.Top floor: Look close at the map of Europe. See and click on
Transylvania. Take the angel hidden behind the map of the country.Go right to the row of bookcases. Move one
step forward on the aisle. Take the angel on the cover of the book at
end of middle shelf. Read about Robert "Bob" Herzog’s Work, a study on
crossbow.Go down the stairs and then left of the stairs.
Dissecting area: Look at the items on the dissecting table. Take
paper cutter-scalpel and tweezers from the table. Look at the
dissected frog. It seems someone
left in haste.Look at butterfly display on the wall, one
is uncommon. Use the paper cutter on the door of the butterfly display case.
Take the angel.Radio: Go to the radio
right of the butterfly display. See a close up of the radio with a head
wearing a hat on top of the radio. Take the angel.Chandelier: Go right towards the fireplace. See a winch on the
side of the stairs. Use the crank-winch and see that it lowers the chandelier.
Take the poker at left propped on the wall.Go to center of room and look-click on the chandelier.
Something is on the chandelier.Click on the rolling staircase on the left.
Now that you saw ‘something’ on the chandelier, it can be taken. Place the
rolling staircase on the floor below the chandelier by clicking it on the
chandelier itself. Click on chandelier again and take the angel.Anatomy display: Go right of the staircase. Look at the skeleton
display. One of them has a hat and pants held by suspenders-braces.
Take the braces.Biology display: Go to bottom of the room. Look at the specimen jars
on display case at left of desk.The jar at middle left is sealed by a stopper. In inventory,
combine the poker and braces to get an obedience collar. Use obedience
collar on the stoppered specimen jar. Open.Use the tweezers on the
specimen jar to get a demon.Angels and demons: Look
close at the circle on the wall and see demons and angel on the side.Place the angels and demons in their proper place.
Click hold and drop the figures in their proper
place. If they are correctly placed, they cannot be moved anymore.The angle of the figures is the clue where they can
be placed.
Perfect, on to the next step. The connecting
door to the abbey opens.
St. Carousel Abbey: The
connecting door closes.
Wine cellar:
Check the desk and see the dragon head on the front of the
desk that protects the drawers.