Destination Treasure Island
DIVE TO THE WRECK
Move
forward, turn left towards the pirates’ flag in the sea, and click on
"dive to the wreck."A
cutscene follows.Use your Knife
to free the yellow sponge from the rock in front of you.Pick up the Damp Sponge.Try to pick up the Surgeon’s Case
inside the clam.Place the Handspike
in the front edge of the clam to keep it from "clamming up."Pick up the Surgeon’s Case, and place
it on the spanner in your inventory to retrieve the Forceps and the Amputation
Saw.Retrieve the Handspike.Turn left to the larger part of the shipwreck
and pick up your Cannonball from the seabed further left of the larger shipwreck.Click on the Eye icon appearing on the Roman
Numerals carved on a wooden board jutting out of the shipwreck.Go up out of the water and take two steps to
your right to arrive by your dinghy.
REPAIRING THE DINGHY
Click
on the Eye icon on the hole in the dinghy, and the hero will tell you the
details of what needs to be done to repair the hole.Click on the piece of log with two small
planks nailed to it, on your left.Use
your Forceps to remove the nails from the planks.Use the Amputation Saw on the planks,
and the cutscene will do the rest.Apply
the Oakum to the area under repair, and the cutscene will do the
rest.The final touch is to varnish the
repairs.So take a step to the left
along the beach.Turn around to the
fireplace by the statue.If you haven’t
built a fire yet, do so now by placing the Fuel in the fireplace and
using your Lighter to light it.Place the Cold Resin in the fire, return to the dinghy and apply
the Hot Resin to the repaired hole.The hero will declare that the hull is repaired and we can now row
upriver.
[Note: You must apply the resin
quickly after heating it, or it will cool down and you will have to go back to
the fireplace and heat it again!]
THE PIRATE AT HOLLOW HEAD
We
need to take care of this last pirate before leaving this part of the island,
because he has something that we will need later in the game.So go to your right, turn left, and click on
the lines to bring the trolley back to your side.Cross the gorge.Step forward to the resin tree, turn around
and go to the Skeleton cave.Enter the
cave, step forward, and look at the torn net on your left.Repair it with the Nettling Needle.A cutscene follows.
Step
forward to the saber-ruled door, go up the stairs, and the hero will point out the
pirate to the right of the stone bench.So
go left, up the stairs on your right and look down in the mouth of the Hollow
Head.The hero will comment.If you just click on the gear icon, the hero
will tell you that shouting will not do the trick.Use the Megaphone instead.A cutscene follows.Pick up the Key hanging down from the
pirate’s belt, and return to your dinghy.We are ready to "Go to the Waterfall."So click in that direction, and a cutscene
will follow.
THE BLOOD
RIVER FALLS
Close
the Enigma box.Look down on your right,
pick up the rope in the dinghy and tie it to the large ring above in the rocks,
by using the following knot:
Bottom, Bottom, Top, Center, Center.
Step
on the landing behind the boat.Click on
the Eye icon on the skeleton down on your right.Click on the bell on the tripod, or try to go
through the passage in front of you, or talk to the parrot perched up on your
left.The same dialog will follow in
each case.Talk to the parrot.Pick up the Twin Daggers.Go back in your boat and apply the daggers to
the strange symbol in the rocks, to start "the enigma with daggers."
THE TWIN-DAGGERS PUZZLE
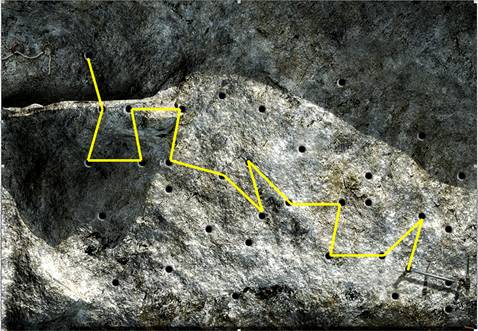
It
is really easy to solve this puzzle but much harder to explain the
solution.I hope that the following
picture will help.Imagine that the tube
between the two daggers left an imprint
on the rocks.Thus, each one-inch
segment of the yellow line shown below represents such an imaginary imprint;
and together, they mark the route that you must take as you proceed from the lower-right to the upper-left portion of the screen.
LONG JOHN SILVER
A
cutscene takes you from the upper landing to the cave where Long John Silver awaits
the hero.We will call this the Snake Cave.Talk to Long John, exhausting all the topics
in the dialog box.Turn right and click
on the passage with the set of stairs going up.Long John will tell you that it is a secret passage.Click on the passage again to go upstairs.
THE PIRATES AT THE FALLS
A
cutscene will bring you to the cave where the pirates are holding Pepita.Note that the three pirates are spread out in
the cave.If you try to shoot one of
them, the other two will get you before you can reload.So go back down to your boat, step on the
landing behind the boat, and click on the bell to talk to the pirates.Exhaust all topics in the dialog box.
As
the pirates lower the "box" (actually a basket), put the Cannonball
in it.A dialog will follow.Open your inventory, seal the bottle of rum with
the cork and place the bottle on the box.Another dialog and a cutscene follow.Go back up to the cave where the pirates are holding Pepita.Try to shoot the last pirate, who is standing
beside Pepita, with your Loaded Pistol.A cutscene and dialog follow.
THE LAST PIRATE
Try
to talk to Morgan the pirate, but he won’t tell you anything useful until you
attend to his injuries.[Of course, you
don’t really need any help or information from him, but that might not be so "Christian-like."So let’s take care of his wound, and this
would be the best time to do so.]Click
on Morgan’s injured leg, and the hero will tell us that we need the forceps to
extract the bullet.But if you try to use
the forceps, the hero will indicate that we need to give Morgan something to
help him bear the pain.In other words,
we must get him drunk first.
So
pick up the Bottle of Rum from the ground on your left.Pick up the Slate and Crayon and the Mirror
from the table further left.Open the Bottle
of Rum by placing it on the spanner in your inventory, and give it to
Morgan.He will tell you to fix him
now.Apply the Forceps to his
leg, and a cutscene will do the rest.Talk to Morgan now and exhaust all the topics in the dialog box.Then, use the Key (retrieved earlier
from the pirate in the net) on the lock hanging down from Pepita’s hand, to
free her of the chains binding her wrists.Another dialog follows, taking us back down to the Snake Cave.
THE MAYAN ENIGMA – SET UP
Close
the Enigma box.[You can click on the glyph above the secret passage, or just press Enter,
to open that box again.]Turn to the
stone mechanism on your right.Bring out
the large and small disks from your inventory and put them in their respective
slots at the top of the mechanism.Pepita
gives you some information.Turn back to
the mechanism.Note the white button
under the two disks, but don’t press it yet.Click on the Eye icon on the black glyph under the white button, to hear
Long John explain what it means.
Click on the
green "basin" under the black glyph.Fill the basin with the water from your helmet.Click on the grimy inscription around the
green basin.Use the Damp Sponge to
wipe off the grime.Click on the
inscription now, and Long John will tell you what it means.Feel free to talk to Long John and Pepita to have
them give you some more information and/or repeat part of what they told you
earlier.
Go
back to our original Point of Arrival on this island.The quickest way to do so is to open the Map
and click on "Cape
Fear."Disassemble your Sailmakers’ Kit.Place the Needle on the magnetic rock
down on your left, to get a Magnetic Needle.Combine this magnetic needle with the Cork, to make a Compass.Return to the Snake Cave
and put the Compass in the green basin.We are now ready to solve the Mayan Enigma.
PART 1:THE
CALENDAR DAYS
Question 1: From south to white north, how many days?
We
determine the directions from the compass needle, of course.So put your cursor on the Eye icon on the image
that the needle is pointing at, to determine the North.The box in the upper-right corner of the
screen tells us that this image represents "1 Flint."In other words, the "white north" in
the Enigma is "1 Flint."Now put your cursor on the Eye icon on the yellow
image to the right of the needle, to learn that the "south" in the
Enigma is "1 Rain."Hence, we must find the number of days from 1 Rain to 1 Flint.
Place
your cursor on the white button, and the box in the upper-right corner of the
screen will give you three critical pieces of information:
START
DATE
DAYS
COUNTED
DESTINATION
POINT
We
do not need to touch the small disk because it is already set on 1 (i.e., a
single dot appears in the 9-0’clock position of the small disk).So just click on the large disk and, with
your thumb still pressed against the left-mouse button, rotate the disk until
the image representing Rain (the
yellow image right of the compass needle) is in the 3-0’clock position of the
large disk.Check to see if you have selected
the correct image by placing your cursor on the white button.If you
don’t have the correct image, keep rotating the large disk and checking on the
white button until the box in the upper-right corner of the screen says, "Start Date: 1 Rain."
Once
you have set the correct Start Date, click on the white button repeatedly until
the box in the upper-right corner of the screen shows "Destination Point: 1 Flint."The
box will also show "Days Counted: 39."
Turn
around to Long John and Pepita standing by the round stone table behind
you.Place your cursor on the yellow
crocodile-head (in front of Pepita) to make sure that it is "set" on
the First Question.We must now get our three players (the hero,
Long John, and Pepita) to press numbers that will add up to 39, the answer to that
first question. Here is one possible
solution.[Feel free to try another
yourself.]Click on the following
buttons (or dice):
3 bars and 4
dots (=19) on Long John’s right;
2 bars and 1
dot (=11) in front of Pepita; and then,
1 bar and 4
dots (=9) in front of the hero.
The dice in the
center will roll, and Long John and Pepita will release their buttons.Place your cursor on the yellow crocodile-head
to confirm that the answer to the first question has been recorded as 39.Click once on the
crocodile-head, and place your cursor on it to confirm that it has now moved on
to the Enigma’s Second Question:
Question 2: From south to west, how many to count?
Turn
back to the disks.Since the question
still asks us to count "from south," our start date is still 1 Rain. But the large disk has "Flint" in its 3-o’clock position.So move the disk counterclockwise once
to put "Rain" in the 3-o’clock position.Place your cursor on the white button to confirm
that the box in the upper-right corner reads "Start Date: 1
Rain."
Now place the
cursor on the Eye icon on the image under the compass needle, to find that
"the west" in the Enigma is represented by "7 Monkey."So click on the white button repeatedly until
the box in the upper-right corner of the screen reads "Destination
Point: 7 Monkey."The
box will also show "Days Counted: 32."Hence, we must now press three numbers that
add up to 32.A
possible solution is as follows.[Again,
feel free to try another yourself.]Click on the following buttons (or dice):
3 bars and 4
dots (=19) on Long John’s right;
2 bars and 1
dot (=11) in front of Pepita; and then,
2 dots (=2) on the hero’s left.
The dice in the
center will roll, and Long John and Pepita will release their buttons again.Place your cursor on the yellow crocodile-head
to confirm that the answer to the second question has been recorded as 32.Click once on the
crocodile-head, and put your cursor on it to confirm that it has now moved on to
the Enigma’s Third Question:
Question 3:And
from west to north, add what amount?
Turn
back to the disks.We already know that
the west is represented by "7 Monkey."In fact, the image of the monkey appears in
the 3-o’clock position in the large disk.But it is there as the "destination point" from the last
question.So just turn the large disk up
or down a little and re-set the image of the monkey in the 3-o’clock
position.Place your cursor on the white
button and it should now show "Start Date: 7 Monkey."
Recall
that the North is represented by "1 Flint."So click on the white button repeatedly until
the box in the upper-right corner of the screen reads "Destination
Point: 1 Flint."The box
will also show "Days Counted: 7."Hence, we must now come up with three numbers
that will add up to 7.A possible solution is as follows.[Once again, feel free to try another
yourself.]Click on the following
buttons (or dice):
3 dots (=3) on Long John’s left;
2 dots (=2) on Pepita’s left; and then,
2 dots (=2) on the hero’s left.
A cutscene will
follow, bringing up the second part of the Enigma.
PART 2:THE
LUNAR POSITIONS
Close
the Enigma box.Click on the Eye icon on
the three blue circles on the wall, and Long John will tell you that it is the
glyph representing the moon.In fact,
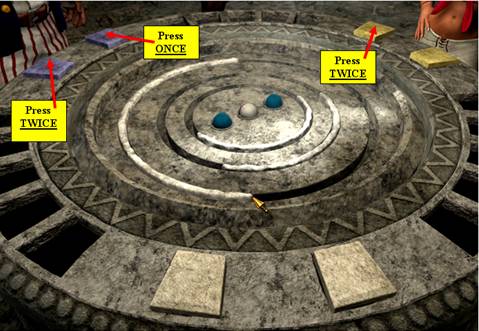
this "Lunar Symbol" depicts the solution to this part of the
Enigma:the three balls (in the center
of the structure in front of us) must be all BLUE; and the three white lines around the balls must appear
in the same position around those balls as they do in the glyph.Here is how to accomplish that.
A
cutscene follows.Try to talk to Long
John, and the hero will note how Long John is wiggling his fingers.Combine the Slate and Crayons and the Damp
Sponge, and place A Blank Slate and Crayon in Long John’s hand.A cutscene follows.You can pick up the Slate with a Drawing
in your inventory, and read the box at the bottom of the inventory screen to
learn what Long John has drawn on the slate.Then, place the Mirror either on the snake’s face or on the
circular stone on the ground in front of you.And then,
Sit back and enjoy the ending…
View this guide raw, exactly as the archive holds it