Destination Treasure Island
Destination:
Treasure Island
(A Walkthrough by
Zurreen Zubairie)
Copyright © 2007.All rights reserved.
(Please,
note that this walkthrough is copyrighted.Hence, any attempt to
reproduce anything from this
walkthrough will be severely punished
to the maximum extent of the law.)
The Walkthrough
GENERALLY:
This is actually a very easy game and I would encourage you
to try to solve as many puzzles as you can on your own.For this reason, I have tried to write the
following walkthrough so that you can find the answer to a question without
"accidentally discovering" the answer to another that you might have
preferred to find yourself.
As for the game itself, the format is similar to that of
"The Return to Mysterious
Island" and
"Voyage – A Journey Beyond Reality," that is, in the way you combine
things, disassemble them, etc.There is
no "Intelligence Score" in this game, however, something that I had
really enjoyed in the above two games.But this game has a lot of qualities that more than make up for that
shortcoming.The storyline is more
sophisticated, the puzzles are fun, and the game overall is quite creative and
presents a wonderful adventure.
COMBINE:Just
pick up an item in the inventory, place it on another item, and click.If you need only two items for the
combination, they will be combined.But
if you need more items, a box will open at the bottom of the screen showing the
two items and a question mark for each of the missing items.Feel free to try any or every item in your
inventory to see if it fits!
DISASSEMBLE/EMPTY:If an
item can be disassembled or emptied, a black-and-white spanner symbol will
appear in its lower-right corner.Just
place the item on the spanner (in the lower-left portion of the screen), and
the item will be disassembled or emptied, as the case may be.But note: do not worry about losing a
vessel’s contents.There are really only
two liquids in this game: rum and water.Of these, water is the only thing that is ever lost when you empty the
vessel (the helmet).But that is okay
because you can always get more water throughout the game.In the case of rum, however, you do not
really "empty" the bottle and therefore never lose the rum.Putting the bottle on the spanner only opens
it by removing the cork (which then appears as a separate item in your
inventory).
THE MAP:You can use this
map to get from one place to another during the game, if you have already
visited the second place at least once.In order to do this, open the map and click on the spot where you would
like to go.You will see the hero jump
from one point in the map to the other, and you will then find yourself at that
other location.
Note:I have
often given the "physical" directions to various places, even after
we have visited them already, just in case you might want to "go by
foot" again.I have also used
different labels for some places from those indicated in the map.For example, I call the place where you first
arrive as "The Point of Arrival."I thought that it might be better to call it that than "Cape
Fear" (as it is called in the map) because my descriptive label might be
easier to remember than the map’s non-descriptive name, especially after we are
introduced to the "Flowery Coast" and have to then differentiate
"Cape Fear" from the "Flowery Coast," both of which happen
to be on the same side of the island.
THE ALTERNATIVE STORY:It might
be best to mention the following right here in the introduction.At the beginning of the game, there is not
only a Sextant but also a Marine Chronometer (found up on the
ceiling) in Jim Hawkins’ cabin.The game
will allow you to take either, both, or even neither of these instruments when
you leave for Emerald
Island.The storyline, and thus the game play, will
be (at least slightly) affected by your particular choice.I have written the following walkthrough
assuming that you take only the Sextant.Unlike some walkthrough-writers, however, I decided not to use boxes,
etc. to try to show what would happen if we had made another choice because
doing so seems to make the walkthrough unnecessarily complicated.I chose the Sextant-only choice because that
was how I first played the game (and also because I loved having to repair that
dinghy which would not have required any repair if I had taken both the
instruments).
Feel free to try any or all of the other three
possibilities, one by one, to see how it affects the game.Whatever choice you make, rest assured that
the game will provide you with whatever you might need to finish it.Enjoy the "exploration" of the
other possibilities!
Well, that is all I can think of in terms of a general
guide to the game.Following is a more
detailed step-by-step walkthrough.Please, feel free to address any comments or questions about this
walkthrough to .
* * * * * * * * * * * * * * * * * * * * * * * * * * * * * *
* * * * * * * * * *
Jim
Hawkins’ cabin
After
the beginning cutscene, you hear a rapping.Turn to the middle of the three large windows on your left.Open the window.Click on the parrot.Retrieve the Message from its left
claw (the one on your right).A cutscene follows.Click on the "X" in the lower-right
corner of the screen to close the Map.
Note:You can click on the "MAP," the
horizontal tab on the left side of the inventory, to refer to both the map and
the Enigma again.You can also refer to
the Enigma-only by either (1) clicking on "ENIGMA," the horizontal
tab on the left side of the inventory, or (2) just pressing the Enter key on
your keyboard (pressing the Enter key again will close the Enigma box).
After
the parrot finishes talking, moving RIGHT, pick up the following objects:
SEXTANT — from the top-left of the desk under the small window;
BLACK
SPOT — from the top-center of the pole left of the
door; after the cutscene,
THICK
ROPE — from the same spot as the Black Spot;
LIGHTER — from the floor on the right of the bed; and
ROPE — from the same spot as the Lighter.
Turn
and click on the door to find it locked from the outside.A dialog/cutscene will follow.You can click on the door again, but to no
avail.Turn to the parrot in the window
and see it fly away.Click to step out
of the window yourself but the hero will point out that we need to use a
rope.The camera will pan down to the left
at the arm-rest, to show you where the rope must be tied.Either of the two ropes you have is too short
for the job.So combine the Rope
and the Thick Rope, and tie the knot by clicking on the pictures on your right in the following order:
Bottom, Top, Bottom, Center (the only picture on your right).
Note: Since
there is no scoring on your performance, you will not be penalized for making a
mistake in tying the knot.If the red
‘X’ appears, indicating a mistake, just start over by clicking on the picture
(or one of the two pictures) on your right again.
Note also:The "Do-It-Yourself" and
"Knot" horizontal tabs, on the left side of the inventory, have lit
up (i.e., they are no longer "grayed" out).You can click on them now any time during the
game to see the combinations and knots you have made up to that point.By clicking on the hand image under a given
knot, in this section, you can also try to tie that knot again, without
affecting your progress in the game.
Attach
the Knotted Ropes to the arm-rest, tying the knot as follows:
Center, Bottom, Bottom, Center, Center.
Now
step out of the window and the cutscene will take us to a new destination.
Emerald Island
THE POINT OF ARRIVAL
Close
the Enigma box.Click on the Block on
your right, but you need a good knife.Pick up the Rusty Knife from the rock on your left.The hero notes that it felt as if the knife
were lying on a magnet.Hmmm…
The
Rusty Knife is useless, so disassemble it.A cutscene will follow; and then, you will
retrieve the Knife Hilt.
THE SKULL
CAVE
Turn around now
and note the carving of a huge skull in the rocks on your left.Step forward.You will find that you can go either left or right.Go left, towards what we will call "the Skull Cave."Before entering the cave, however, look down
on the ground to your left and click on the Eye icon on the claw marks.After the cutscene, enter the cave.
Pick
up the Fuel from your left and place it on the fireplace in the
center.We cannot light it up, however,
because our lighter has no wick.Moving
from left to right in the cave, pick up the following objects:
KNIFE
BLADE
EMPTY
HELMET
STRING
BROKEN
STATUETTE
Note:Leave the FIGURINE in its place because, as you will see later, that
is where it belongs.
BACK TO THE POINT OF ARRIVAL
Step
out of the cave and take three steps forward to return to the point of the
coast where you had arrived.Open your
inventory and combine the Knife Hilt and the Knife Blade.Supply the String in the space for the
missing item.Tie the knot as follows:
Center, Top, Bottom, Center, Center.
Use
the resulting Knife to cut the Block free on your right.Pick up the Block.
THE RESIN TREE
Turn around, step forward, and then
step to your right this time.Look to
your left and note the white scratched surface in the center of the tree.Use your Knife on that surface to see
the resin ooze out.Pick up the Terracotta
Jar (lying on the ground right of the tree), and place it against the tree
to get Cold Resin.A cutscene
will follow.
Note:If you don’t like the
"belching sounds" that will follow this cutscene, feel free to
retrieve the resin at a later point when you will actually need it.
THE SKELETON
CAVE
If
you look around, you will find that you can go in four different directions.Take the first right from the tree, in the
direction of another cave that you see in the distance.The cave is presently closed off, however, by
a barred gate.Click on the ring in the
small wooden window on your left, and the hero will tell you that you need some
tool to "hook it."But if you
try a tool (for example, the knife), he will tell you that we should get back
to it later.Look up to the right of the
cave and note the skeleton hanging down.So we will call this "the Skeleton Cave."
THE GORGE
Turn
around and step back to the resin tree.Turn around again and go to the right of the path to the Skeleton Cave this time, to arrive at a
gorge.Click on the lines tied to the
shaved-off tree on your right, to bring over the trolley handle.Retrieve the Trolley Handle.Open your inventory and
Disassemble BLOCK = AXLE, WHEEL, and BLOCK CHEEK PLATE.
Combine AXLE + WHEEL + TROLLEY HANDLE = REPAIRED TROLLEY.
Attach
the Repaired Trolley now to the lines and click on it, to let a cutscene
take you across the gorge.
THE HAMMOCK
Look
down on your left and pick up the Orange Flower.Look around to see that you can go in three
directions: forward, right, and back across the gorge.Step forward.Pick up the Bananas from the tree in front of you.Turn left and click on the Eye icon on the
hammock for a cutscene.Pick up the Bottle
of Rum from the ground under the hammock.Finally, pick up the Right Horn of a Ram from the large grey rock
on your right.Another cutscene follows,
and a part of the Enigma is crossed off.
THE FIREPLACE BY THE BEACH
Go
to the right of the grey rock.Turn
around to find a fireplace.Pick up the Package
Wrapped in Oilcloth from the "mouth" of the statue of a creature.
Disassemble the PACKAGE = MALLET, CAULKING IRON, and OAKUM.
Combine LIGHTER WITH NO WICK + OAKUM = LIGHTER.
Feel
free to place the Fuel in the fireplace and use your Lighter to
light it up, but you do not need to do so just yet.
THE STONE IDOL BY THE BEACH
Turn
right and take a step along the beach.A
cutscene follows.Talk to the parrot.
Note: you
might want to SAVE your game here because you can have the parrot sing the
entire song of "Fifteen Men on the Dead Man’s Chest" by clicking on
the second line of the dialog and, as you will shortly see, you will need to
know the lines of this song later.
Use
your Knife on the Bananas to get Banana Slices.Open the Bottle of Rum by placing it
on the spanner in the lower-left corner of the screen.Combine
OPEN
BOTTLE OF RUM
+
BANANA SLICES
+
EMPTY HELMET
=
HELMET FILLED WITH BANANAS IN RUM.
Click
on the parrot and then on the dialog choice offering the parrot with this
concoction.The parrot responds by
giving you a Red Feather that falls down by the stone idol’s feet.You do not have to pick up this feather just
yet.Instead, step over to your right,
turn around and pick up the following items lying by the edge of the
water:Blue Feather, Yellow
Feather, and the Red Seashell.Fill your helmet with "salted water" from the waterhole in
front of you.You may step further down
the beach (now on your left) but there is nothing of interest there (at least
at the moment).Return to the stone idol
by the beach, where the parrot is sitting.
DECORATING THE STONE IDOL
Place
the Blue and Yellow Feathers, the Orange Flower, and the Red Seashell at the
feet of the stone idol.Tie the
green-and-white tassel hanging right of the fish image on the stone idol as
follows:
Center, Top, Center, Top, Center, Center, Center.
Decorate
the stone idol by applying the Red and Yellow Feathers, The Orange Flower, and
the Red Seashell (as shown below).
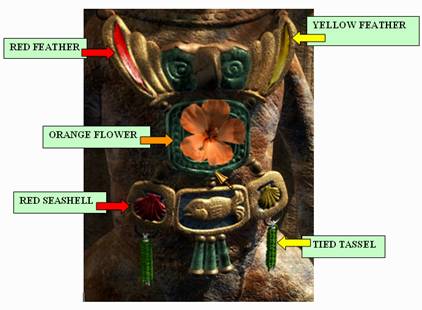
A
cutscene follows and another part of the enigma is crossed off.Close the enigma box and take two steps to
the left, to find your dinghy.As the
hero finishes speaking, click on the Eye icon on the side of the boat to let
the hero tell you that we will repair it later.
Go
to your right.Turn left and cross the
gorge.Then, take two steps forward to
arrive in front of the Skull cave.Enter
the cave.
THE SKULL CAVE PUZZLE
Use
your Lighter on the Fuel in the fireplace to light up a
fire.Close the Enigma Box.Place the Cold Resin on the fireplace
to get Hot Resin.
Combine HOT RESIN + BROKEN STATUETTE = FIGURINE (with the hook).
Place
this Figurine opposite the one (with the pegged leg) that we had not
removed earlier.Note how the shadows of
these figurines are cast against the grid on the wall on your right.Refer to the enigma which talks about using
the mallet to strike at the "Hook, pegleg, dagger and pistol."So take out your Mallet and strike at
the grid boxes as follows.
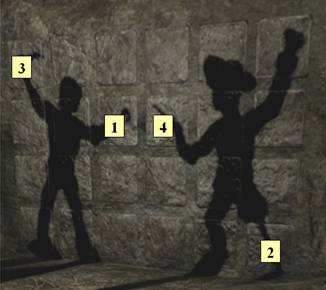
A
compartment will open in the wall above the two figurines.Pick up the Left Horn of a Ram, and a
cutscene will follow.Close the Enigma
box, and another cutscene will follow –showing the skeleton dropping in front
of the Skeleton Cave’s barred gate.Close the Enigma box again.Place your Helmet Full of Salted Water
on the fireplace to get Helmet Full of Salt.Pick up both Figurines, and step out of the Skull Cave.
THE SKELETON
CAVE PUZZLE 1 (THE
SONG)
Take
two steps to your left, to arrive in front of the Skeleton Cave.Look down on your right and pick up the
following items from or lying around the fallen skeleton:
JUNK
WATCH
GLASS
EYE
HOOK
SCRAP
OF CLOTH (on the skeleton itself).
Click
on the parrot and he will start the song, urging you to finish it.Feel free to try to complete the song using
the SAVE suggested earlier in which the parrot sings the whole song for you.Or click on the lines that start with the
following words.
1)"Drink
and the devil had done for the rest …"
2)"The
mate was fixed by the bosun’s pike …"
3)"And
cookey’s throat was marked belike …"
4)"And
there they lay, all good dead men …"
With
each correct answer, the parrot will slide a bit to the right.At the end of the song, it will peck down on
its perch to release the purse tied there.Pick up the Purse.
THE SKELETON
CAVE PUZZLE 2 (THE
SCALE)
Turn left and
use the Hook on the ring at the base of the window.Put the Purse inside the opened
compartment.Place your cursor on the
Eye icon appearing on the note in the top-center of the window, to learn that
you must place 7 coins to open the gate on your
right.Refer to the Enigma to learn
further that you need 109 shillings.In other words, you need 7 coins that add up
to 109 shillings to open the gate.So
place the following coins (from the upper-left portion of the screen) into the
scale inside the compartment:
2 – LOUIS D’OR
2 – GUINEAS
1 – PIASTER
2 – PISTAREENS
The
gate opens.Close the Enigma box and
pick up the Blackened Bone from the holder on your left, just inside the
cave.Combine the bone to the Cold
Resin in your inventory, to get a Macabre Torch.Put this torch back in the left holder, and
light it with your Lighter.Close
the Enigma box again and enter the cave which turns out to be a tunnel.A cutscene will take you to the other side.
THE SECOND PART OF THE ENIGMA
Click
on the feeder on your right, to learn that there was salt in it.Take two steps forward, and the hero will
point out a trap but indicate that it is safe to cross it.So step forward, to face another closed gate.This is what the Enigma will later call the
"Saber-Ruled Door." Click on
the Eye icon appearing on the case with the four sabers in it, on the left of
the door, but the hero will tell us to take care of it later.
Click on the ram
standing on your left.Return to the
feeder and fill it with the salt from your helmet.Go back to the ram and click on it.A cutscene will follow.Pick up the Shears (resting on the
wooden crate down on your right), and use it on the ram.Then click on the Eye icon appearing on the
ram, to discover the northern part of the map and the second part of the
Enigma.Close the Enigma box, and a
cutscene will follow – showing the opening of the saber case.Take a step in that direction, but stop to
look at the net hanging down the tree on your left.Click on it to hear the hero tell us that we
will need a "netting needle" to repair it but that we will take care
of that later.
THE SABER-RULED DOOR
Approach the
Saber-Ruled door.Close up on the saber
case.Refer to the Enigma, which quotes
a "holy verse" and indicates a number in it.The Enigma also refers to the "black
spot."So click on the Black
Spot in your inventory, and read its contents in the box at the bottom of
the screen.Find the verse quoted in the
Enigma and note the number preceding it – 22: 15. Drag to slide the sabers up so that the
numbers exposed on them would read as follows:
2 – 2 – 1 – 5
The
saber case will close, but the door will open.Go up the stairs.
THE TWO-DISK PUZZLE
Go
to the right of the stone bench in front of you.A cutscene will follow.Go back to the stone bench, and pick up the two
disks now on it.Go left of the bench, and
place the two disks in the wall in front of you.Refer to the enigma to see that it talks
about 1 Rabbit, 5 Monkeys, and 13 Snakes.Note that the Large Disk has animal pictures
on it, while the Small Disk has marks representing Mayan numbers.Align the two disks so that each animal mentioned
in the Enigma will appear in the 3-o’clock
position in the large disk, while its corresponding number will appear in
the 9-o’clock position in the small
disk, in the following order.
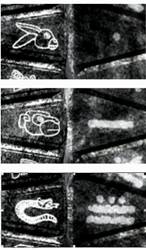
With
each correct alignment, a stone door will rise partially on your right.As the door is fully open, retrieve the two
disks from the wall and go upstairs through that opening.
THE HOLLOW-HEAD PUZZLE
The
parrot will welcome you to "Hollow Head."Look down, to learn that "It’s the mouth
of Hollow Head!"If you click here,
the hero will call out.Hmmm…
Pick
up the Package wrapped in oilcloth from the table on your left.
Open PACKAGE
= SAILMAKERS’ KIT; MASTS; HULL
OF A MINIATURE BOAT.
Combine SAILMAKERS’ KIT + SCRAP OF CLOTH = SAILS.
Combine HULL OF A MINIATURE BOAT + SAILS + MASTS =
MODEL (of a boat).
Close
up on the map laid out on the table on your further left.Feel free to refer to the Enigma for setting
the objects on this map.You need to place the three figurines in
the three holes at the bottom of the map.Pick up the Figurine (holding a saber)
and place it on the left hole (right of the Cactus plants).Bring out the Figurine (with the hook) from
your inventory and place it in the middle hole (between the two lakes).Finally, bring out the Figurine (with the
pegged leg) and place it on the right hole.
Place
the Model (of a boat) in the middle bronze tray, and the parrot will
tell you to haul in the sails.Click on
the Model‘s sails, and the parrot will tell you to trim your canvas.Click a few times on the sails again, to move
them around until the parrot cries, "Full speed ahead!"A cutscene will follow.Close the Enigma box.Pick up the Ram Skull with its Horns
Removed and combine it with the Left + Right Horns of a Ram in your
inventory, to get the complete Skull of a Ram.
If
you try to go downstairs, the parrot will tell you not to forget your
three-master.So pick up your Model
(of a boat) from the map table and step out of the Hollow Head.
THE SWAMP
Return
to the Saber-Ruled door, turn around and go right of the stone bench.Take two steps (slightly to your right each
time) to reach the edge of water.Turn
around left and pick up the Dried Clay from the cracked ground.Turn back to the water and keep going forward
in spite of the hero’s expressed concerns.A cutscene/dialog follows.
Pick
up the Hangman’s Rope.Untie it
by placing it on the spanner in your inventory.Then attach the resulting Long Rope to the Hook by tying
the following knot:
Bottom + Top + Center + Center + Top + Center.
Throw
the resulting Grapnel at the tree in front of you.A cutscene follows.
X MARKS THE SPOT
Pick up the Branches
from the ground on your right, turn around, and place them in the water to provide
a safe path back across the swamp.Turn
around and go to the right of the tree.Note
the two hooks coming out of the tree, just above the mark of the spade.Place your Skull of a Ram on these
hooks.Close the Enigma Box, and try to place
the Glass Eye on the skull.The
eye rolls down.Try to go after it, but
the hero will point out that you must tie a rope to the tree’s roots to provide
a safe climb down.So disassemble the Grapnel
and attach the resulting Long Rope to the tree’s roots, tying the knot
as follows:
Center, Top, Center, Top, Center, Bottom, Center, Top,
Center.
Go
down.A cutscene follows; and then, the
hero indicates that he has caught the swamp fever.Pick up the Glass Eye and close the
Enigma box, to find that the "X" on the ground marks the spot where
Long John must have buried his treasure.But we need a tool to dig.So
step to your right, turn right and take two steps forward to arrive in what we
will call the Mining area.A cutscene
follows.
THE RESCUE
Retrieve
the Block from the top of the tripod above the hole in which Pepita has
fallen.Turn right and pick up the Pick.Pick up the Axle, Wheel and the
Short Rope from the small box on further right.Turn right yet further and open the rusty box
on the ground (outside what we will call the Workshop).Close up inside the box and read the old Log
Book written in Spanish, flipping through the pages by clicking on the
directional arrows ("<" ">") in the middle of the
screen. Step out of the close up and
look further right, for a cutscene.Pick
up the Megaphone sitting on the big box.Open that box then and retrieve the Long Rope.
Combine BLOCK CHEEK PLATE + AXLE + WHEEL = BLOCK.
Combine LONG ROPE + BLOCK + BLOCK = TACKLE.
Attach the Tackle to the hook at the
top of the tripod above the hole.Tie
the following knot (thus attaching one end of the tackle’s rope to the stand
left of the hole):
Center, Bottom, Center.
Attach the Short Rope to the lower
end of the Tackle above the hole, tying the following knot:
Center, Top, Bottom, Bottom, Center, Center.
Disassemble PICK = HANDSPIKE & PICK HEAD.[Hero comments about the Handspike.]
Attach
the Handspike to the stand (left of the tripod), where one end of the
tackle’s rope is tied.Click to push on
the Handspike, and a cutscene will follow.
CURING THE SWAMP FEVER
Retrieve the Handspike
and the Tackle (the Short Rope will automatically be deposited in
your inventory).Turn around and step
towards the fence, to hear the hero’s comment.Close up on the note on the fence.As the hero finishes speaking, move your cursor on the Eye icon at the
bottom of the page to read it.Go up the
rope ladder.
Fill
your Helmet with water from the boxlike structure on the ground in front of you.Turn right to the tree and move your cursor up
over the heart ("P+J") carved in the bark.Cut the bark with your Knife and pick
up the Piece of Bark shaped like a Heart.Go back down the rope ladder and to the hole
in which Pepita had fallen.Enter the
Workshop on your left.
Turn
right towards the kiln and pick up the Fuel down from the right end of
that wall.Place this Fuel in the
kiln.Use your Lighter to light
up a fire.Place your Helmet Full of Fresh Water
directly upon the burning fuel (not in the crucible!) to getHelmet Full of Boiling Water.Combine the boiling water with the Piece
of Bark shaped like a Heart.[Note:
You must combine the two quickly before the water cools down.Otherwise, you will have to boil the water again!]A cutscene follows.
THE TREASURE CHEST
Go
to the spot marked "X" by the beach.Combine the Handspike and the Pick Head, and use the
resulting Pick on the "X" in the ground.A cutscene follows.Close up on the chest.Pick up the Damaged Carriage from the
right groove in the mechanism.
Disassemble SEXTANT = VERNIER, SMALL MIRROR, LENS.
Combine DAMAGED CARRIAGE + SMALL MIRROR = REPAIRED CARRIAGE.
Put the Repaired Carriage in the right
groove.(Don’t worry if you can’t
remember the exact spot in the groove where you had found the Damaged Carriage,
because any necessary adjustments can be made later.)
Put the Lens in the tiny arc-like
protrusion (above an X-shaped base), in the left portion of the mechanism.
Disassemble JUNK WATCH = GEARS, WATCH CASE.
Place the Gears at the bottom-center
of the mechanism (below the central lever, and between the left and right grooves
for the two carriages).
Place the Glass Eye in the empty eye-socket
of the Skull in the chest.
We must now
adjust the mechanism.The "central lever" is pointing
towards the right groove.So feel free
to adjust the Carriage in that groove first.Click on the right "directional
arrow" (">"),
in the lower-right portion of the mechanism, as many times as necessary, to
move the Carriage all the way to the right end of that groove.Click on the "central lever" so that it will point towards the left
groove now.Click on the left "directional arrow" ("<") twice, to move the carriage three places left from the right end of that groove.Finally, adjust the mirrors on both carriages
so that the mirror on the left carriage will reflect the light on to the mirror
on the right carriage, which will in turn reflect it on to the Glass Eye, which
will reflect it on to the silver square (in the lower-left portion of the
mechanism) turning it red.
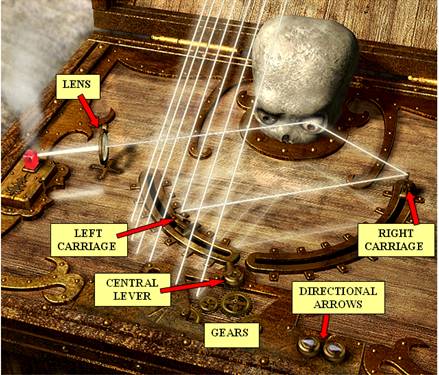
As
the mechanism lifts, pick up the Bar.Close the Enigma box and pick up the Treasure.Close the Enigma box again.Pick up the little pile of Sand on
your left.
THE LAST PART OF THE ENIGMA
Go
to the hole (in which Pepita had fallen) in the Mining area.Turn right and attach the Bar to the triangular
slot above the nozzle in the barrel. Click
on the Bar to fill the "sluice" with water.Close the Enigma box.Put the Model (the "three-master")
in the water, and it will float away.Step right and turn to find the Model stopped by a log.Pick up the Parchment from the top of
its sails.It is the last piece of the
map and the end of the Enigma!Close the
Enigma box, and a dialog/ cutscene will follow.Click on Pepita and exhaust all the topics suggested in the dialog
box.Another dialog/cutscene follows.Fill your Helmet with water from the
sluice.Go to the fence and then, to
your right.Go up the rope ladder
hanging down the rocks. The hero notes a
black flag.Go forward to see the
pirates.
THE PIRATES ON THE BEACH
Turn
around and go up the makeshift flag pole.Look down at the pirates on your left, and a cutscene will follow.Go back down the flag pole and enter the log
cabin (the "fort").Turn right
and pick up the following items:
TUBES – from the left middle-shelf
FISH-HOOK – from the right middle-shelf
PERFORATED
WATERSKIN – from the bottom-shelf
POLE – standing just right of the shelves
Disassemble SAILMAKERS’ KIT = THREAD, NEEDLE.
Combine POLE + THREAD + FISH-HOOK = FISHING POLE but only after the knot:
Center, Bottom, Center, Top, Center, Bottom, Center,
Center, Center.
Go back up on
the cabin’s roof and use the Fishing Pole to pick up the Tobacco
Pouch from the table between the two pirates.Disassemble the combination to free the
fishing pole of the tobacco pouch.Use
the Fishing Pole again to then pick up the Powder Horn from the
table.Disassemble the resulting combination
to free the fishing pole of the powder horn as well.[Note: Feel free to try to use the Fishing
Pole to pick up the Bullets, but the hero will tell you that it is
too heavy for your fishing line.]
Return
to the cabin.Click on the keg on your
left to remove its cover; and then, fill your Tobacco Pouch with the
powder in the keg to make a Booby-Trapped Tobacco Pouch.Combine this pouch with your fishing pole,
and go back up on the cabin’s roof.Lower the snagged pouch down on the table between the pirates.A cutscene follows.
Use
your Short Rope to tie up the two pirates using the following knot:
Center, Bottom, Center, Bottom, Center.
Turn
right.Pick up the Bullets from
the table (an overturned crate) and the Netting Needle from the
ground.Look on your right and pick up
the Unloaded Pistol lying in front of the other crate on the ground.Load the pistol by combining it with the Full
Powder Horn and Bullets.Turn
right and go down the rope ladder to the beach.
THE PIRATES ON THE SHIP
Click
on the Eye icon appearing on the ship on your left, to hear the hero’s comment.Try to go forward but you will have to
withdraw because of the shooting from the ship.Go back up on the rope ladder.Feel free to go all the way across the swamp, in order to try to reach
the beach from that side.But you won’t
make it even to Hollow Head because you will find another pirate shooting at
you there as well.So go to the Mining
area and into the Workshop.
THE CANNONBALL
Turn to the
molding area on your left.Combine the
water in your helmet with Sand and Dried Clay, and put the
mixture in the container down on your left.Pick up the Empty Molding Box (from the upper-left side of the table)
and place it on the three spools sticking out in front of you on the table.Place the Hemispherical Model inside
the molding box.Note: Do not put the
"Conical Model" on top of the Hemispherical Model in preparing this box
because that will put a hole at the bottom of the box; and since this box is
the bottom-half of the mold, the molten liquid would ooze out of that hole!(Feel free to try it out, if you would like,
but you will just have to repeat the process.)Pick up the mixture from the container and
pour it in the molding box.Pick up the Full
Molding Box and place it on either one of the two white-brick "slots"
on your right.This is your molding box without
the hole.
Pick up the other Empty
Molding Box and place it on the three spools on the table.The Hemispherical Model is already in
place.Put the Conical Model on top of the Hemispherical
Model in this box. Fill the
box with the rest of the mixture from the container.Remove the Conical Model and put it on
your right.Pick up this Full Molding
Box (with the hole) and place it on
top of the other Full Molding Box (without the hole) on your
right.
Turn
right towards the bellows.Pull the
handle (hanging above the two white-brick slots) to find that there is a "hole"
in the left side of the bellows.Disassemble
the Fishing Pole, combine the Thread with the Needle, and
use the resulting Sailmakers’ Kit to repair the hole in the
bellows.Pick up the Extension Tube
set against the wall, just below the tongs, on the right side of the kiln.Attach this tube to the nozzle at the front
of the bellows.
Turn
right towards the forge and place your Treasure in the crucible.[Ahhhhhh!I know.But sometimes "a man’s gotta do what a man’s gotta do" — even
if the girl is not really all that pretty …]Pull the handle above the white-brick slots to raise the heat in the
kiln and melt the contents of the crucible.Use the Tongs (on the right of the kiln) to pick up the crucible
and pour its contents down the hole in the top molding box on your left.Put the crucible back in the kiln.Remove the top molding box and set it aside in
the white-brick slot you did not use.Pick up the Cannonball from the bottom-half of the mold.
Remove
the Extension Tube, and put it back under the tongs.Combine the Perforated Waterskin with
the Tubes, and attach the resulting Strange Device to the
bellows’ nozzle.Pull the handle to
inflate the device, and pick up the resulting Diving Apparatus.Step out of the Workshop, fill your helmet
with water from the sluice, and go to the "fort."
THE CANNON
Note
the three tools hanging on the wall in front of you as you enter the Fort.Use the Swab to clean the top of the
cannon (actually the mouth of the cannon, presently pointing upward) on your
left.Pick up the Empty Gunpowder
Shovel, fill it with gunpowder from the keg, and pour this gunpowder down
the now-cleaned mouth of the cannon.Use
the Rammer to tamp the powder in the cannon.Load the cannon by putting the Cannonball
in it.
Attach the Tackle
to the hook that you will find at the end of the wall, to the right of the
window, in front of the cannon.Disassemble
your Pick, and attach its Handspike to the square hole in the left
"arm" of the cannon.Click on
the Handspike to lower the cannon, and the hero will automatically recover
the handspike.Pull the rope knot tied before
the hook in the ground behind the cannon, to move the cannon closer to the
window.
Use
the Oakum to provide the linstock with a wick.Light up the linstock with your Lighter,
and apply the Linstock to the hole at the top-back of the cannon.A cutscene follows.Fill your Empty Powderhorn with gunpowder
from the keg.Step outside the fort,
turn right, and go down the rope ladder to the beach.
View this guide raw, exactly as the archive holds it