Secrets of the Ark: A Broken Sword Game – Broken Sword 4, The Angel of Death
Broken Sword 4, The Angel of
Death
© September 2006 Bert Jamin (www.gamesover.com)
This walkthrough may not be sold and may not be used for any commercial
purposes. Neither is it permitted to publish this walkthrough in any way without
the written permission of the author Bert Jamin ().
Feel free to place this walkthrough on your web site or on your home page, on
condition that no part of this walkthrough is changed and that the name of the
author (Bert Jamin), the URL of the owner of this site (www.gamesover.com)
and his E-mail address
are mentioned unchanged. For the most up to date walkthroughs always visit www.gamesover.com.
If you have any suggestions to improve this walkthrough, let me know by sending
me an email: .
The Great Escape
Take the golf club at the right
side of the door. Walk to the left and try to switch on the stereo that is
standing on the floor. Walk further to the left and examine the safe. Walk to
the desk and try to use the telephone to call the cops. Try to open the door at
the left side of the room. Pry the door open with the golf club.
Push over the file cabinet at the left side op the door. Climb up the file cabinet. Go through the opening in
the ceiling. Place the golf club under the elevator door. Walk to the right side
of the room. Try to pull of the grate of the vent. Ask Anna Maria to give you a
hand. You do this by clicking on her portrait in your inventory and than click
on the vent. Now the two of you will pull of the grate.
Pull out the vent. Pull it
backwards four steps. Then right click to let it go. Now walk to the left side
of the vent. Grab it once more and pull it seven steps to end up in front of the
elevator. Let it go. Step to the front side of the vent. Grab it once more and
push it forwards to place the vent halfway into the elevator. Don’t forget to
take the golf club!
Walk to the right side of the room
and enter the vent hole. While standing outside in the pouring rain stand with
your back against the wall. Walk all the way to the right to end up on the fire
stairs. Climb up the ladder. Step on the roof. Walk to the right and climb up
the green ladder. Walk all the way to the end. Pick up the chain that is laying
at the end of the platform. Try to grab the hanging chain. Damn… you can’t
reach it!
Use your golf club to get the
chain. Note the two handles behind the steel beam. Turn the right handle to set
the way free for Anna Maria. Enter the building on the right side. Walk to the
left wall of the room. Grab the wooden beam against the wall. Go all the way to
the right. Jump on the floor. Walk all the way to the left. Jump over the gab in
the floor.
Go further to the left. While
standing with your back against the wall go all the way to the left. Go through
the broken brick wall. Go through the opened door. Get the rope from the door.
Close the door. Lock the door with the sliding bolt at the left side of the
door. Right click on the door and choose the gears to uhhh… open the locked
door.
Go down the two stairs. Go through
the opened door at the right side. Walk all the way to the left side of the
room. Examine the grey rusty pipe on the floor. Examine the breaker switch
against the wall. Leave it alone for now but remember you can find it here!
Walk all the way to the right side
of the room. Walk further to the right and go down the sunken floor. Jump down
and walk further to the right. Cross the two wooden planks. Examine the two
sparkling cables. Head back to the breaker switch you saw earlier. Ask Anna
Maria to hold down the breaker switch. I guess you know by now how to do this.
Yep… click Anna Maria’s portrait on the breaker switch.
Go back to the two cables which
aren’t sparkling anymore. Cross the two wooden planks to the very end. Walk to
the right side of the room. Move the cabinet aside that is blocking the door.
Ask Anna Maria to turn the handle at the right side of the security shutters.
While the shutters are a little bit up grab and hold them to exit the building
and off you go to Anna Maria’s hotel.
Hotel Alfonso
Try to open the center window of
the counter. Talk to the man behind the left window, Alfonso. Ask him about
everything you can. Walk to the right side of the lobby. Talk to the man who’s
sitting in the chair. Ask him about everything you can. When the conversation is
over, look at the book he’s reading. Talk to the man once more and ask him about
everything you can once more. Be sure he tells you his name!
When the conversation is over,
walk to the vending machine at the right side of the room. Try to operate both
of them. Open the door next to the vending machines. Enter the bathroom. Read
the New York Hotel Flyer in your inventory. Use your PDA, choose Phone and
Alfonso’s Hotel. When connected with Alfonso, ask for Thelwell Minster. Quickly
exit the bathroom and take the Hotel Key Card from Thelwell’s book which he left
behind on the table. Talk to Thelwell once more. Walk back into the lobby.
Try to operate the vending machine
at the left side of the lobby. Open the double doors by putting your Hotel Key
Card into the electronic card reader next to the doors. Climb up the three
stairs. Enter the corridor to the left. Notice the banging behind the door of
the first door on the left side of the corridor. Leave it alone for now but
remember this door!
Walk further through the corridor.
Examine the plant on the little table halfway the corridor. Walk a little
further through the corridor. Notice the guard who is standing in front of Anna
Maria’s room. Wait a little and notice the funny dance he makes from time to
time. Talk to the guard twice. Walk back towards the stairs.
Examine the large fumigation warn
sign that blocks another stairs up. Pick up one of the dead bugs. Look at one of
the other dead bugs that are laying there. Go down the three stairs. Open the
door with the Hotel Key Card. Enter the lobby. Try to open the big standing
clock. Talk to Alfonso. Ask him about the Fumigation, the Death Watch Beetle and
finally about the Grandfather Clock.
Walk back to the clock. Place the
Death Watch Beetle on the clock. In the next part you have to be very quick!
While Alfonso goes to inspect the clock, you have to open the center window of
the counter and quickly grab the lighter that is laying behind the window. So
talk to Alfonso once more. Tell him about the clock. Quickly open the center
window of the counter and grab the lighter. If Alfonso returns before you are
able to grab the lighter, just talk to Alfonso again about the clock and repeat
this until you have the lighter. When you’ve got it, it would be wise to save
your game!
Go back upstairs to the guard in
front of Anna Maria’s room. In the next part you have to be very quick too. Talk
to the guard once more. Now stand halfway between the guard and the window at
the end of the corridor. As soon as he starts his funny dance and turns his back
to the window, quickly open the window. When the guard walks towards the window
to close it, quickly walk to the little table with the dry flowers. Set the
flowers on fire with your lighter. If you aren’t quick enough the guard will
stop you before you can set the flowers on fire. In that case just repeat this
until you manage to set the flowers on fire! When you made it, it would be wise
to save your game once more!
Open the door of Anna Maria’s
room. Enter the room. Examine the safe in the corner of the room. Try to open
the windows. Walk to the
bed and pick up the pen that is laying on the floor at the left side of the bed.
Walk around the bed and enter the bathroom. Switch off the big vent at the wall
besides the bath by pressing the circular button. Put the string into the fan blade. Switch on the vent.
Hhhmmm… what a string can do! Exit the room and enter the corridor. Go to
the left and walk towards the door where you’ve heard the banging. It is the
last door at the right side of the corridor.
Slide the New York Flyer under the
door. Do the same with your pen. Pick up the returned flyer and pen. Examine the
flyer in your inventory. Use the keypad at the right side of the door to punch
in the correct code. The door opens and you’ll set free the girl that was held
imprisoned in the room. Hhhmmm… Elvis just left the building!
Back at Bail Bonds
Walk through the door at the end
of the room. Walk around the desk and take the box of Italian Cigarettes. Return
to the other room. Open the blue front door and go to Hotel Alfonso.
Back at Hotel Alfonso
Talk to the girl you’ve set free
earlier. Ask her about everything you can. Talk to the policeman and ask him
about everything you can too. Don’t forget to ask him about the tattoo! When the
conversation is over, show him the package of Italian Cigarettes. Talk to the
policeman once more to ask him about the docks. Talk to Alfonso behind the
counter and ask him about everything you can. Walk to the right and go down the
stairs. Exit the hotel and go to Bail Bonds.
Back at Bail Bonds
Talk to Anna Maria about Martino’s
Meat Package Company. Then tell her about the Mafia Gang. Talk to Virgil who is sitting on the floor in front of the sofa. Walk to the right. Exit the room
through the front door. Go to Martino’s Meat Packing.
Martino’s Meat Package Company
Enter the shop. Look at the
display case. Look at the blood stained butcher’s apron that is hanging on the
wall behind the display case. Talk to the man behind the display case. Ask him
about everything you can. When the conversation is over, give him the box of
Italian cigarettes. When he asks you what you wanna have for the cigarettes you
wisely choose… salami! Exit the shop. Walk towards the wooden pallets next to
the window of the shop. Wait a little while. As soon as the shopkeeper goes
outside to smoke a cigarette, quickly enter the shop and snatch the butcher’s
apron from the wall behind the display case.
Try to open the garbage cans next
to the shop. Try to open the little green door. Cross the square and walk past
the white truck. Walk up the loading platform. Walk to the right and talk to the
man in front of the entrance to the meat factory. Ask him about everything you
can. Show him your salami. Enter the meat factory.
Go through the door opening at
your right side. Walk to the right side of this room. Just before another door
opening take the fire proof blanket from the wall at your right side. Walk
through the next door opening. Walk straight ahead and examine the machine that
is standing there. Take the keys from the machine. Walk further to the yellow
lit part.
You’ll here music coming from one
of the upper rooms. Walk to the green container at your right side. Push it
forwards three times so it ends up on the forklift truck. Examine the container.
Examine the forklift truck. Put the machine safety keys into the forklift. Use
the controls to lift the container. Climb up the orange part of the forklift.
Climb onto the grey platform and finally climb on the container. Peek
through the little window.
Climb down the forklift. Re-enter
the meat factory. Walk to the left side of the hall and climb up the little
stairs. Walk past the hanging pigs. Walk further on the loading platform and
enter the opened door with the green light on top. Go down the wooden stairs.
Try to open the left door. Ouch! Open the door while using the fire proof
blanket. Enter the smoking room. Look at the meat hanging above the fire.
Pick up a smoking log from the
floor while using the fire proof blanket. Walk all the way back to the forklift
truck. Climb up the forklift and place the fire blanket holding smoldering wood
in the little window. Walk back all the way to the entrance of the factory. Now
you have to hurry. Because you have to take some ice out of the truck and place
it in the little window before it is all melted down!
So enter the white truck and take
a piece of the ice. Run back to the forklift, climb it up and place the ice in
the window. When the bad guys have left, enter the factory. Enter the first door
at your right side which is opened now. Examine the chair that is standing in
the upper part of the room. Exit the room through the door at the left side.
Walk a little further to the right
and climb up the wooden stairs. Walk further to the left and exit the room. Walk
to the right and walk towards the hanging pigs. Press the blue lit control
against the wall. Poor Tony! Examine his body. Walk back to the left. Go through
the opened door. Climb down the stairs and go through the opened door at the
opposite wall. Walk to the right and go through the opened door.
Go through the door opening at
your left. Enter the room with the opened blue door. Examine the first aid kit
against the wall. Use the meat packing company key card on the first aid kit.
Enter the secret passage. Climb up the three wooden stairs. Go through the
opened green door on top of the stairs. Walk further to the right.
Open the large center drawer of
the desk to get something wrapped in a silk hankie. Open it in your inventory.
Examine the cabinet against the back wall of the room. Look through the opened
window at the left side of the cabinet. Walk back to the left side of the
office. Exit through the opened green door.
Climb down the three wooden
stairs. Exit through the opened door at your right side. Walk towards the
forklift truck. Take the keys from the forklift. Head back all the way to the
smoking room. Use the silk hankie with the meat above the fire. Head back to the
cabinet in the secret office. Use the grease soaked silk hankie on the cabinet.
Right click on the cabinet and select the pushing hand symbol. Push the cabinet
through the opened window. It will end up on top of the bone cruncher machine.
Exit the office and climb down the
three wooden stairs once more. Go through the opened door at your right and go
through the next opened door. Walk to the left. Put the machine safety keys into
the bone cruncher. Switch on the bone cruncher. Take the keys from the machine.
Pick up the MP3 player and Anna Maria’s manuscript from the ground.
Study everything you can on the
manuscript. You’ll read the Latin header, Latin part 1, 2, 3 and 4. After that
look at the Fleur de Lys, the Coat of arms, the Fortified City, the Idol, The
Holy man, the Knight, the Angel, the Hell, the Castle, the Holy man on top of
the castle and the King next to him. Finally read the Anno and the Black symbols
at the bottom of the manuscript. After that zoom out.
Walk to the left and talk to
Virgil. Give him the MP3 player. Talk to him once more. Ask him about the PDA,
the Mafia and Anna Maria. Use your PDA and click on Connect. Log on to
Lobineau’s Private Server. Click on OK. Click on Yes. Virgil will give you an
explanation about how to hack a computer. After his demonstration you have to
hack Lobineau’s computer. Here are two images of how you have to set the
controls:
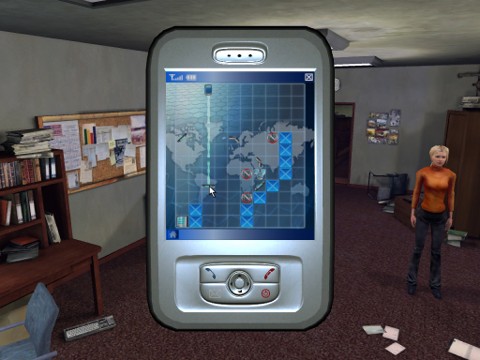
All the routers and refractors set correct. Now you only have to click this one…
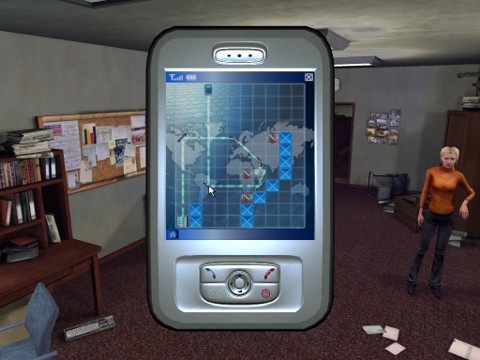
…three times
The image above shows the hacking
of Lobineau’s computer! After the hacking is done, click on OK. Scroll down the
text and click on the link Latin on manuscript translated. Read the text and
return to the main menu by clicking on the circular icon at the bottom of the
display. Scroll down the text once more and click on the link historical
database. First read the welcome note. Scroll down the text to read it all.
Return to the main menu and click on the Baphomet link. Be sure to read all the many texts and even be more sure to use each
and every link in each and every text!!! The once you must read are the links
the great secret, Philippe IV, Clement V, Jaques de Molay and Knight
Hospitaller!
When finished close down the PDA.
Study the manuscript once
more and click on the fortified city at the right side of the manuscript…Zoom
out, open the front door and off you go to Istanbul!
Istanbul
Walk to the right and talk to the
receptionist. Ask her about everything you can. Look at the photo next to the
monitor. Look at the monitor. Study the green map on the wall. You can walk
around and examine the plants if you like. Walk to the right. Go down the little
stairs to enter the dining room. Talk to the waiter who’s walking around. Ask
him about everything you can.
Walk back to the foyer. Study the
green map on the wall once more. Study the building called the Lover’s Vestibule
on the map. It is almost the top right building on the map. Zoom out. Head back
to the waiter in the dining room. Talk to him and ask him about the Lover’s Vestibule
twice. Walk back to the foyer. Exit the hotel through the front door
and go to the Topkapi Palace.
Talk to the guard. Turn around and
walk onto the square. Go back to the Pasha Palace Hotel. Walk towards the
receptionist. Look at the bunch of letters on the far side of the counter. Try
to pick them up. Of course the receptionist won’t let you!
Talk to the receptionist and ask
her about Eamon O’Mara. Ask her about golf. Talk to Anna Maria. Tell her about
Eamon O’Mara. Show the golf club to the receptionist. When the show is over,
enter the dining room once more. Take the knife from the second table to the
right. Talk to Anna Maria and ask her about Eamon O’Mara. In inventory open the
map and ID card of Eamon O’Mara.
Use the knife on the Bail Bonds ID
card. Place your own photo on Eamon O’Mara’s ID card. Exit the hotel and go to
the Topkapi Palace. Show the ID for Topkapi to the guard. Walk past the guard
and try to open the next door. Try to walk down the path to the left. Talk to
Anna Maria about the guard. When Anna Maria is successfully distracting the
guard, walk down the path to the left.
Walk a little further. Walk
towards the most right scaffolding against the wall. Climb up the scaffolding on
the right side. Walk to the left side and climb further up. Wait until the guard
walk away from you. Take the guard’s cell phone that is laying on the wall just
above the burning lantern. Examine the guard’s phone to find out his cell phone
number. Put the phone back on the wall.
Climb down and jump onto the left
scaffolding. Walk all the way to the left. Climb up further. Use your PDA. Click
on Phone and call the guard. Wait until the other guard walks away. Quickly
climb up the wall and quickly hide behind the buttress. Wait until the guard
returns. As soon as he turns around quickly sneak behind his back and hide
behind the next buttress. Wait until the guard returns once more. When he turns
around wait until he passes you then walk behind him and quickly climb up the
niche in the wall.
Walk straight forward. Notice some
blue plaster laying in the window sill. Use you knife on the plaster. Quickly
turn to the left and run straight ahead. In the next corridor, where the guard
has been standing with his dog, take the cup of tea from the window sill to
drink it. Quickly run back to where you came from. You’ll see how the guard will
return and takes off with his dog to get another cup of tea.
Go forward a few steps. Just
before the dark corridor go to the right and step on the little balcony. Note
that there is a cloth line hanging down from the balcony. Use your knife on the
salami. Take the cloth line. Attach the salami slice to the cloth line. Exit the
balcony and walk through the corridor where the guard has been with his dog. Go
down the stairs. Enter the left passage.
Walk further to the left and go
down the stairs. Switch on the computer. Shit… password protected! Use your
PDA and click on Connect. Connect to the Topkapi Security Management. I guess
this screen look familiar to you. Yep… it’s time for another hacking. On the
next image you can see the correct settings.
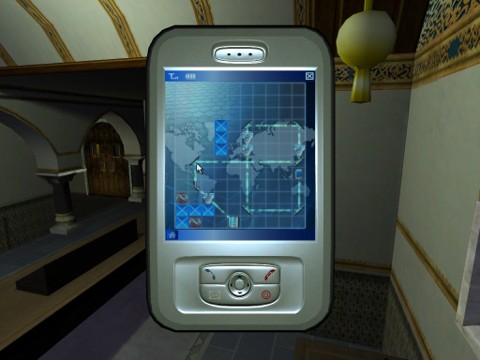
All the routers and refractors set correct once more
After the connection has been
made, click on OK. Click on Service system. Click on Yes. Walk to the right side
of the room. Open the grilled door. Carefully walk a few steps into the room.
Turn around and open the vent at the right side of the door. Put the Hotel Flyer
into the vent. Set the flyer on fire with your lighter. Walk carefully to the
first set of laser beams. By the smoke you can see if the lasers are switched on
or switched off. No need to say that you can walk further when the laser beams
are off. Do the same with the other laser beams and walk all the way to the end
of the room.
Walk towards the big levers at the
left side of the door. Flip down the first, the second and the fourth lever.
Turn around and walk towards the opposite door. Operate one of the devices next
to the door. Talk to Anna Maria about the door.
Walk to the wall at your right
side. Walk further along the wall. Look at the little power switch at the end of
the wall. Use your paperclip on the power switch. Wait until the guards have
walked away from the fountain. Try to push the fountain aside. Ask Anna Maria to
give you a hand with this. You do this by clicking Anna’s icon on the fountain.
Climb down the hole.
Walk to the left. Notice some
pipes, levers and valves attached to the wall. Turn the first lever down. Walk
further to the left. Turn the upper lever down and leave the bottom lever alone.
Walk further to the left. Close the valve. Walk to the end of the pipes and open
this valve.
Climb through the opening in the
wall. Walk to the left all the way to the end. Climb down the wall. Jump onto
the floor. Step on the image of the knight at the center of the floor of the
room. Ask Anna Maria to press the button next to the door. As soon as she asks
if you are ready, quickly step back on the image of the knight.
Go through the opened door. Walk
through the corridor and enter the Hall of Knights. Walk to the left and examine
the statue of the knight in the niche. You have to solve three of this kind of
Knight-puzzles. You can find some vital clues for solving this puzzles on the
manuscript and in the notes in your PDA. The most important of the notes in your
PDA is the file called ‘Latin on manuscript translated’! Notice that there are four turning stones
at the base of the statue. Move the first 2x. Move the second 1x. Leave the
third alone. Move the fourth 2x.
Walk to the right and examine the
next statue of the knight. Leave the first alone. Move the second 2x. Move the
third 3x. Move the fourth 2x.
Cross the room and examine the
third statue of the knight. Move the first 1x. Move the second 4x. Move the
third 2x. Move the fourth 3x. Walk to the right and activate the alcove. Talk to
Anna Maria and tell her about the alcove.
Walk towards the golden statue of
the cherub. Great… now the doors of the room get sealed! When you examine the
floor of this room it turns out to be some kind of huge map with the names of
different places on it. Also consult the file called ‘Latin on manuscript
translated’ in your PDA notes for some vital clues to solve this puzzle. The only way to get the precious statue and to escape is
to click on the places in the order Jaques de Molay visited them. The correct
order is: Acre, London, Paris and Cyprus. So… right click in that order on
those places. Here is an image of the correct order how to right click on the
different places.
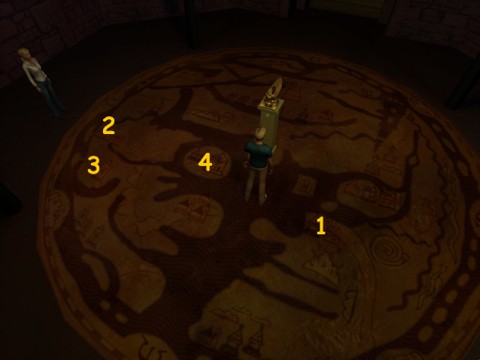
The correct places and the correct order
When you’ve done this correctly
you can take the golden cherub. Now you only have to get the doors unsealed! You
can do this by using the plinth of the cherub. Turn the plinth 1x to the right
and press it down. Turn the plinth 1x to the left and press it down. Turn the
plinth 1x to the left and press it down. When you have done this correctly, off
you go and you’ll enjoy a happy meal and a happy night with Anna Maria. Alas
things won’t go as smooth as you hoped for…
Right… you are in prison now! Of
course your main goal is to get out. Try to catch the rat. Oooeeepppsss… off
it goes into it’s comfortable home. Take the rat out of the hole. Ouch… that
hurts! Examine the rat hole once more.
Walk to the left and examine the
piece of cheese on the table. Try to pick it up. Try to open the door of the
cell. Examine the huge part of stone that is sticking out of the right wall. Use
the bracket on the wall besides the piece of stone. Pull the stone out of the
wall. When the visitors have gone, examine the mechanical mouse. Examine the bag
of marbles.
Put the marbles into the drain in
the floor. Climb through the opening in the wall. Try to open this cell door
too… Climb back through the opening in the wall. Walk towards the bars of the
cell. Examine the guard. Open the cell door with the cell key. Tie the guard
with the marble string. To keep him quiet put the piece of cloth in his mouth.
Walk up the stairs at the end of
the corridor. Enter the room with the dog. Throw the squeaky toy to the dog to
keep him occupied. Take the can of beef from the table. Open the can of beef
with the mouse key. Put the beef into the dog bowl.
Walk to the right side of the
room. Walk up the stairs. Open the door. Walk into the computer room. Walk
towards the grilled door. Use the mechanical mouse on the door. Walk back
towards the computer. Re-enter the corridor and go up the stairs. On top of the
stairs walk to the right side of the corridor to have a view on the garden and
even better, to have a view on the outside wall. Climb up the vines.
Walk to the left on the roof.
Notice the loose stone in the buttress. Put the squeaky toy into the loose
stone. When the guard approaches, quickly cross the roof at the opposite side.
Keep walking forward. On the flat roof walk to the left. Jump over the gap and
walk towards the nun who is standing a little further away. Talk to her…
surprise!
Walk towards the receptionist.
Talk to her and ask her about everything you can. In possession of Eamon
O’Mara’s key, enter the elevator at the left side of the foyer. When you wonder
if you should go upstairs, choose for Yes! You can examine the room if you like
but believe me there is noting of interest.
Walk to the left side of the room.
Open the most right window. Climb out the window. Walk to the right. In front of
the first window with the curtains closed hang down the ledge. Right click to
drop down on the balcony below. Walk to the right and jump onto the baluster.
Step on the little platform. Hang down from the ledge and jump down. Hang down
from the ledge and go all the way to the left. The very last window is the
window of Anna Maria’s apartment.
Climb up the ledge. Open the
window and enter the room. Enter the room to the left. Examine the waste
basket. Re-enter the bedroom. Pick up the rosary from the floor. Examine the
credit card receipt. Use your PDA. Click on Connect. Click on Credit R Us. Now
it’s time for another hacking. Here is the image with all the routers and
refractors set correct.
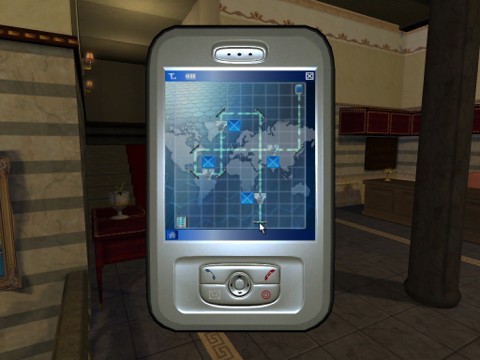
Hacked into Credit R Us
When the hacking is completed,
click on OK twice. Off you go to…
Rome
Look at the yellow car parked on
the pavement. Talk to the man that is wiping the street. It turns out to be a
priest called Mark. Ask him about everything you can. Walk towards the man
sitting on the stairs a little further down the street. Talk to this beggar
called Archie. Ask him about everything you can too. Walk to the apartment with
the two plants. Try to open the door of the apartment. Talk to Mark once more.
Ask him about the key. Also ask him about Archie.
Talk to the beggar once more. Ask
him about the key too. Ask him about Nico. Try to pick up the bread at Archie’s
back. Walk towards the door of the apartment with the plants. Try to move the
left plant. Talk to Mark and ask him about Archie. Talk to the beggar and ask
him about the mouldy bread. Talk to Nico and ask her about Mark twice!!! When
the beggar is distracted by Nico’s charms, take the bread!
Walk towards Mark’s car. Scatter
the mouldy bread on the car. Cross the street and move the left plant in front
of the door aside. Enter the building. Walk up the stairs. Walk to the left a
little and enter the small corridor. Try to open the door of Anna Maria’s
apartment. Damned… it’s locked!
Open the double doors at the end
of the corridor. Step onto the balcony. Step on the plants at the right side of
the balcony. Jump to the ledge against the wall. Go to the balcony on the right
side. Jump to the pole and cross the street all the way to the right to the end
of the pole. Jump onto the balcony.
Walk to the right side and try to
open the double doors. As soon as the nun on the next balcony takes off, quickly
jump over the baluster and go all the way to the right to the last balcony. Step
onto the balcony. Jump to the ledge against the back wall. Go all the way to the
right. Jump onto the balcony. Try to open the double doors.
Peek through the opened window
next to the door. Notice the bolt on top of the double doors. Use your golf club
on the bolt to unlock the doors. Open the double doors. Take the photo of Anna
Maria from the mantelpiece. Examine the books in the bookcase. Look at the
opened book on the table. Enter the kitchen.
Take the air line stub from the
table. Walk back to the living room. Enter the bedroom. Take the Italian metro
ticket from the bed. Examine the slippers. Look at the Holy Bible on the
nightstand. Enter the bathroom to find… nothing else than Anna Maria’s scale.
If you want you can switch on the water of the shower. Exit the bathroom. Enter
the living room and examine the laptop. Exit the apartment. Walk to the right
and go down the stairs. Walk to the right and go down the street to…
The Vatican
Walk to the left. Try to open the
double doors at your right side. Talk to both of the guards standing in front of
another double doors. Talk twice to both of them! Read the plaque next to the
doors. Try to open the doors behind the guards. Look at the small office behind
the window. Peek through the window. Talk to the nun, sister Angelica. Ask her
about everything you can. Try to pick up the list from the right side of her
desk.
Walk to the right and ring the
bell next to the door. Ask sister Serena about everything you can. Boy… ain’t
she sweet!? Walk all the way to the right to go back to Anna Maria’s apartment.
It’s time for another hacking. So use your PDA. Click on Connect. Click on
Vatican Server. Here is another image to assist you once more.
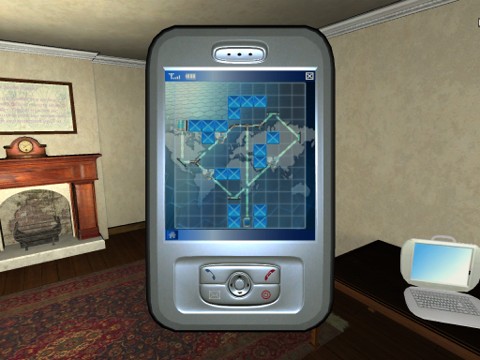
Hacked into the Vatican Server
When you’re finished hacking,
click on OK. Exit the building and go back to the Vatican. Walk all the way to
the left and towards the window with sister Angelica. Peek through the window.
Use your PDA. Click on Phone and call the wafer factory :o) Now back off
and stand between the window and the door so that sister Angelica can’t see you.
Use your PDA, click on Phone and make that call to the wafer factory. When
connected with sweet sister Serena, ask for sister Angelica.
As soon as sister Angelica leaves
her post to answer the phone, quickly peek through the window and take the list
from the right side of her desk. As soon as sister Angelica returns, talk to her
and ask her about everything you can.
When the free tour is over, talk
to sweet sister Serena. Ask her about everything you can with your great German
accent. Turn around and walk to the little storage room filled with boxes.
Examine the box on the table. Turn around and move the upper white box.
Oooeeepppsss! While sister Serena restores the mess you made, quickly take a
communion wafer from the box on the table.
Do the same trick with the white
box once more. While sister Serena is busy again, quickly put the mouldy bread
into the box on the table. Walk towards the boxes on the left side of the room.
Use your knife to open the upper big brown box. Take a bottle of wine from the
opened box. Walk to the center of the factory. Climb up the stairs.
Walk all the way to the end. Open
the lid of the dough mixer. Throw the bottle of wine into the machine. Pour
sisters! Walk towards the storage room. Walk through the corridor between the
storage room and the little office of sister Angelica. Open the door at the end
of the corridor. Walk to the back wall and climb up the wooden crates. Jump to
the ledge beneath the baluster. Go to the left and climb up at the broken part
of the baluster.
Now you have a view over the
beautiful garden. Your goal is to enter the door of the opposite building
without being seen by the monks working in the garden. Take your time to see
what is happening. Notice that the monk near the entrance of the opposite
building is walking all the way to the right from time to time to nurse one of the plants.
Also notice that there are four plants inside the garden. The
other monks don’t walk around at all. Well… that comes in handy!
First put the mouldy bread on the
right upper plant (1). Quickly walk the path to the left all
the way to the end past the hedge (2). Carefully walk to the corner of the edge near
the building (3). Wait until the monk heads for the right most plant. Quickly follow
him and sneak into the building (4). Here is an image of what to do!
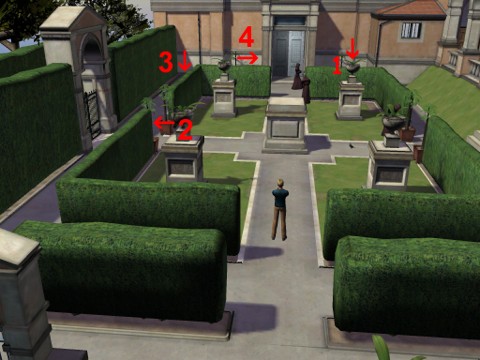
The easiest way to enter the opposite building
Once you are inside the building,
walk to the left. Climb up the stairs. Walk down the corridor all the way to the
end. Open the door at your left side. Walk around the room and examine the book
case. Examine the painting between the two book cases. Move your cursor over the
painting and notice another description click for most of the details on the
painting. Click the descriptions in this order: Men carrying Corpse, Men
debating, Woman with Baby and Temple Block. Examine the angel at the left side
of the bottom of the painting’s frame. Do the same with the right angel. Zoom
out. Examine the desk to get Anna Maria’s file.
Back in Rome
Exit the apartment. Walk down the
corridor and knock on Mark’s door. Show him Gregor’s Business card. Show him the
pen from the hotel room. Walk back to Anna Maria’s apartment. Enter the
apartment and place the DVD into the laptop. Go back to Mark’s apartment. Show
him the pen once more. Talk to Mark and ask him about the Black Cat Club twice.
Go down the stairs to exit the
building. Walk down the street and go to the Black Cat Club. You can use the
intercoms if you want next to most of the doors. Walk towards the door-man in
front of the Black Cat Club. Ask him about everything you can. Go back to Anna
Maria’s apartment. Knock on Mark’s door. Tell him about the Black Cat Club. Show
him the photo of Lucy Chu. Walk back towards Anna Maria’s apartment.
When Mark closes his door, use
your pen on the photo of Lucy Chu to write a very personal note on it. Knock on
Mark’s door once more. Give Mark the Forged signed photo of Lucy Chu. Head back
to the Black Cat Club. Show the Black Cat card to the door-man. Go down the
stairs. Open the door to enter the club.
Walk to the right and try to walk
dressed through the opened door. Walk to the right. Enter the shower room. Walk
around the shower that is in use. Try to steal the towel. Exit the shower room.
Walk all the way to the left in the locker room. Move the plant in the left
corner of the room. Open the warm water valve.
Head back to the shower that is in
use. Steal the towel. Enter the lobby. Walk to the right and talk to the
receptionist behind the window. Ask him about everything you can. Walk through
the door opening at the right side. Walk through the corridor. Go around the
corner and enter the opened door at the right side.
Turn to the left and walk around
the corner. Walk to the left and talk to the man standing near the circular
water basin. It is good old Duane! Ask him about everything you can. When the
conversation is over, head back towards the corridor.
Use the power switch at the wall.
Look at the big metal box. Talk to the man inside the box. Move the harness
hanging at the chain twice. Tip over the bottle of baby oil on the table. Kick
the power switch at the wall one more time.
Move the curtain aside. Press the
button at the left side of the window. Go through the secret passage. Walk to
the circular water basin and go down the stairs. Talk to Duane down the drain.
Ask him about everything you can. Exit the steam room. Walk through the
corridor. Enter the room at the right side.
Walk to the locker room. Your
locker is the upper one second from the left next to the door. Open the locker
to get dressed. Head back to Duane down the drain. Combine your paperclip with
the rosary. Put the rosary with clip into the drain. Exit the steam room.
Walk through the corridor. Go
through the opened door at the left side. Go around the corner. Examine the
rosary with the key in your inventory. Use the key to open the first door to the
right. Enter the laundry. Look at the washing machine. Go up the stairs. Open
the door on top of the stairs and walk outside. Walk to Anna Maria’s apartment.
Here waits an unpleasant surprise!
Someone has placed a bomb in Anna Maria’s apartment. You’ve got about five
minutes to defuse the bomb. By the way, remember that you just said that there
is no gas in Anna Maria’s apartment. Look at the wall behind your back. Ain’t
that a common device to heat water with uhhh… gas!?!? It seems to be a good
idea to save your game at this point!!!
It’s time to do another hacking.
Use your PDA. Click on Connect. Click on US Military Field Notes. Here is
another image of all the routers and refractors set correctly. Notice that there
are two of them which are a little smaller and they are a little brighter than
the other ones. You have to place them where my red arrow are pointing to!
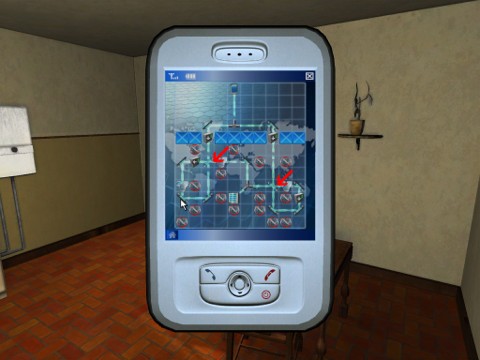
Hacked into the US Military Field Notes
When the hacking is done, click on
OK. Quickly read your notes and click on Self Protection. After that click on
Defusing, Part 2 and Part 3! Don’t keep on reading too long! Remember that
you’ve only about 10 minutes to get the job done! Close your PDA. Talk to Mark
and ask him for his gloves! Use your paperclip on the bottom blue wire. Select
Live Trigger Wire. Use your knife on the upper blue wire. If you’ve done this
correct AND fast enough, you just defused the bomb.
View this guide raw, exactly as the archive holds it